Getting Started
Welcome to the Advanced Product Feeds Documentation. Whether you are new to Advanced Product Feeds or an advanced user, you can find useful information here.
First of all we recommend to check the following links:
- How to Install Extension
- Configuration Settings
- How To Create a New Data Feed
- How to create a dynamic attribute
- How to create a category mapping
- List of the pre-installed templates
How to Install Extension
- Login to Magento backend.
-
Go to System > Tools > Compilations.
If Compiler Status is Enabled, disable the compilation by clicking the button Disable in the upper right corner.
- Backup your store database and web directory.
- Download extension from your Personal Account.
- Unzip the extension locally.
- Copy contents of the folder step1 to the root directory of Magento store.
- Copy contents of the folder step2 to the root directory of Magento store.
-
Completely clear the site cache.
Go to System > Cache Management. Click button Flush Magento Cache. If you want to clear the cache manually, you need to remove a folder
/var/cacheat the server. - Logout from Magento backend and login again.
- Setup a cron job for Magento if you want to generate feeds automatically. See How to Setup Cron for Magento.
- Go to System > Configuration > Mirasvit Extensions > System, at form Installed Extensions press the button Run validation tests for all extensions for check extension installation and configuration.
- If compilation was enabled before installation, you need to run recompilation process to enable compilation. Go to System > Tools > Compilation and click on Run Compilation Process.
If you did not disable compilation and store is down after installation, follow the link and make next steps to recover the store.
Next steps:
- Configuration Settings
- How To Create a New Data Feed
- How to Create a Dynamic Attribute
- How to Create a Category Mapping
Extension Disabling
To temporary disable extension please follow the next steps:
- Disable Compilation Mode (if enabled).
-
Remove following files:
app/etc/modules/Mirasvit_FeedExport.xml
-
If you have only one extension from Mirasvit installed, remove following file:
app/etc/modules/Mirasvit_MstCore.xml
- Login in to Magento back-end and refresh site cache (if enabled).
Extension Removing
To uninstall extension please follow the next steps:
- Disable Compilation Mode (if enabled).
-
Remove following files:
app/etc/modules/Mirasvit_FeedExport.xml
-
If you have only one extension from Mirasvit installed, remove following file:
app/etc/modules/Mirasvit_MstCore.xml
- Login in to Magento back-end and refresh site cache (if enabled).
-
Remove following folders:
app/code/local/Mirasvit/FeedExport
-
Remove templates and layouts files of extension from your theme folder. List of such files can be collected from files in the extension package.
- Run the following SQL Query (before running it, replace [db_table_prefix] to your database table prefix. It can be found in the file /app/etc/local.xml).
DROP TABLE [db_table_prefix]m_feedexport_custom_attribute;
DROP TABLE [db_table_prefix]m_feedexport_feed;
DROP TABLE [db_table_prefix]m_feedexport_feed_history;
DROP TABLE [db_table_prefix]m_feedexport_feed_product;
DROP TABLE [db_table_prefix]m_feedexport_mapping_category;
DROP TABLE [db_table_prefix]m_feedexport_performance_aggregated;
DROP TABLE [db_table_prefix]m_feedexport_performance_click;
DROP TABLE [db_table_prefix]m_feedexport_performance_order;
DROP TABLE [db_table_prefix]m_feedexport_rule;
DROP TABLE [db_table_prefix]m_feedexport_rule_feed;
DROP TABLE [db_table_prefix]m_feedexport_rule_product;
DROP TABLE [db_table_prefix]m_feedexport_template;

DELETE FROM [db_table_prefix]core_resource WHERE code='feedexport_setup';- If you have only one extension from Mirasvit installed, run:
DROP TABLE [db_table_prefix]m_mstcore_attachment;
DROP TABLE [db_table_prefix]m_mstcore_logger;
DROP TABLE [db_table_prefix]m_mstcore_urlrewrite;

DELETE FROM [db_table_prefix]core_resource WHERE code='mstcore_setup';
How to upgrade extension
To upgrade extension follow next steps:
- Login to Magento backend.
-
Go to System > Tools > Compilations.
If Compiler Status is Enabled, disable the compilation by clicking the button Disable in the upper right corner.
-
Backup your store database and web directory.
If you have customizations, please, create a separate backup of app/code/local/Mirasvit before upgrading to the new version. - Download new extension package from your Personal Account.
- Unzip the extension locally.
- Temporary disable extension. Check Temporary Disabling.
- Copy contents of the folder step1 to the root directory of Magento store.
- Copy contents of the folder step2 to the root directory of Magento store.
- Completely clear the site cache. Go to System > Cache Management. Click button Flush Magento Cache. If you want to clear the cache manually, you need to remove a folder /var/cache at the server.
- Logout from Magento backend and login again.
- If necessary adjust css styles to fit your store's frontend theme.
- If compilation was enabled before upgrade, you need to run recompilation process to enable compilation. Go to System > Tools > Compilation and click on Run Compilation Process.
If you did not disable compilation and store is down after installation, follow the link and make next steps to recover the store.
How to Setup Cron for Magento
Manage templates
To manage templates go to Catalog > Manage Feeds > Manage Templates.
Extension includes more then 45 ready to use templates for all popular price comparison engines (Google Shopping, Amazon, eBay, Shopzilla, etc.).
You can create template for any comparison shopping engine.
To create a new template click the button Add Template. Fill in the following fields:
- Name - Name of the new template.
- File Type - Sets feed output format. There are 3 file types are available for data feed:
- CSV - a comma-separated values, each item placed on a new line. File extension is .csv.
- TXT - same as CSV file, but with .txt extension.
- XML - uses tags to define blocks of content. Information about your items is enclosed within these tags, which are indicated by angle brackets. File extension is .xml.
Select Content Settngs tab.
If you select CSV or TXT file type, see How to configure CSV, TXT to configure template for CSV or TXT feed.
If you select XML file type, see How to configure XML Feed to configure template for XML feed.
To export a new template file to the Magento feed templates folder, click Export Template at Action drop down list. This action allows you to select the new template when you create a new feed.
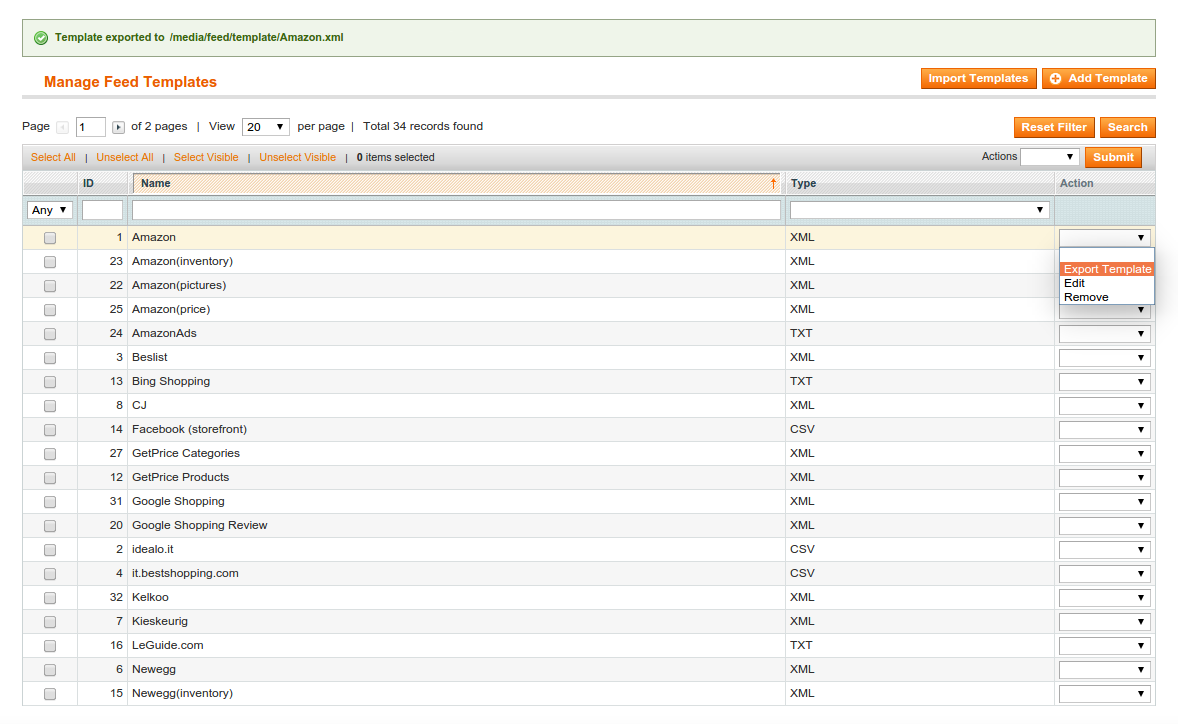
To import templates click the button Import Templates. Select the templates you want to add. Click the button Import Templates.
[Magento_root]/media/feed/template/
FTP settings
Extension can automatically deliver data feed file via FTP to Shopping Engine Service.
To configure FTP delivery, follow these steps:
- Go to Catalog > Manage Feeds. Open your feed.
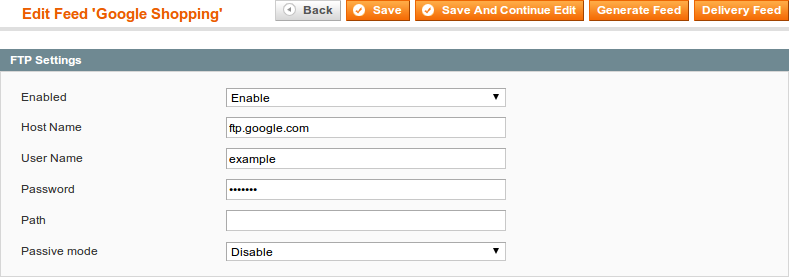
- Open tab FTP Settings.
- At tab you need to enable FTP delivery and fill these fields:
- Protocol - you can select FTP or SFTP connection.
- Host Name - this is a FTP server where you would like to send your feed.
- User Name - the username to FTP server.
- Password - the password to FTP server.
- Path - optional field, enter path to your merchant folder provided by Shopping Engine Service.
- Passive mode - most FTP servers work in Passive mode, even when you use a firewall.
- Press button Save And Continue Edit.
After enabling FTP delivery, you can run delivery of feed manually by pressing button Delivery Feed at the right top corner.
Additionaly extension can deliver feed by schedule, after each feed generation.
Schedule Task Settings
You can configure your feed to automatically generate data feed file by schedule.
If FTP settings are enabled, feed will be automatically delivered to the marketplace after generation by schedule.
To configure schedule follow these steps:
- Go to Catalog > Manage Feeds. Open your feed.
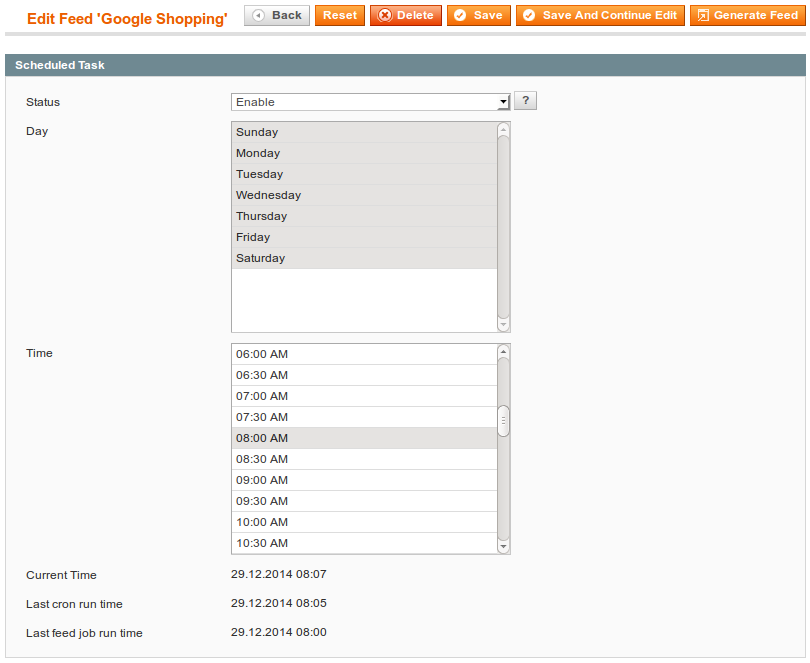
- Open tab Scheduled Task
- Set Status - Enabled to enable feed generating by schedule
- Set up the following fields:
- Day - days of the feed generation.
- Time - time of the feed generation.
- Press button Save And Continue Edit.
For example, if selected days are Monday, Wednesday and time 03:00AM, 05:00AM, then feed will be generated 4 times during a week.
~! If you have a few feeds with scheduled tasks, to prevent cron job errors you need to set different scheduler time for each feed.
Additional Settings
Extension allows to set up additional settings for feed export.
Go to Catalog > Manage Feeds and open your feed. Open tab Additional.
Export Configuration
- Export Only Enabled Products - if option is enabled, products with status Disabled will be excluded from the feed export.
- Export Only New And Changed Products - if option is enabled, only new and changed products will be exported since the last time feed generation.
You can reset already exported products, by pressing on link Reset Exported Products.
- Enable archiving - if option is enabled (.zip), after feed generation extension also generate zip archiv of the same feed.
Reports Configuration
For each feed, you can enable/disable tracking clicks and orders by changing setting Enable Reports.
If feature enabled, extension append to product url two special arguments (fee=, fep=) to track clicks and orders (http://example.com/product.html?fee=1&fep=3), where fee - ID of the feed, and fep - ID of the product).
Content Filter
This option alllows to remove symbols from the feed content.
To make option enabled, fill in the following fields:
- Allowed Characters - Sets allowed characters for the product feed content. Leave empty to allow all characters. Begin and end with the "/" to use as a regular expression (ex.
/[A-Za-z]*/).
Begin from any other character to accept only particular characters (ex.ABCDEFGH). - Ignored Characters - Sets ignored characters for the product feed content.
Leave empty to accept all characters. Begin and end with the "/" to use as a regular expression (ex.
/[A-Za-z]*/).
Begin from any other character to ignore only particular characters (ex.ABCDEFGH).
Email Notifications
Go to Catalog > Manage Feeds. Open your feed Additional tab.
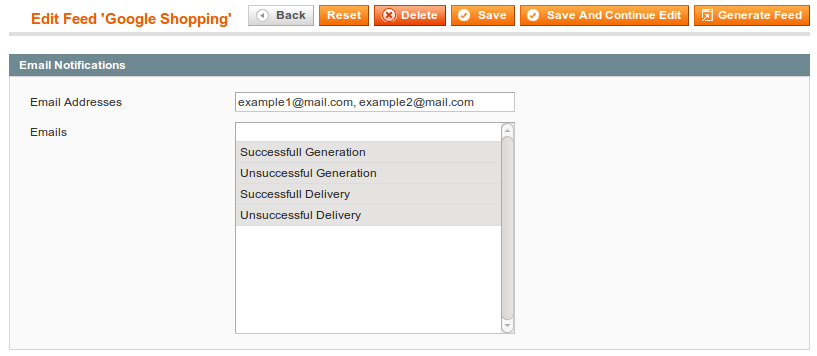
Extension can automatically send email notifications for next events:
- Successfull Generation
- Unsuccessful Generation
- Successfull Delivery
- Unsuccessful Delivery
Fill in the following lines:
- Email Addresses - email addreses for email notifications (use comma separator to set more then one email address)
- Emails - sets events for further email notification
Press the button Save And Continue Edit.
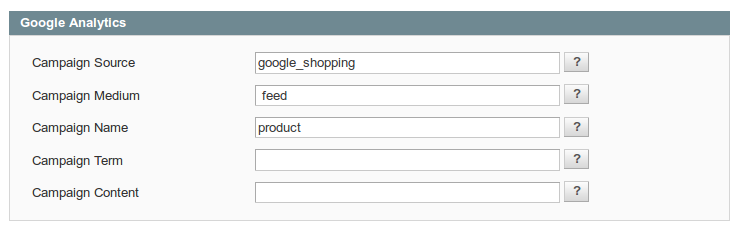
Google Analytics Campaign
Extension can automatically append google analytics campaign parameters to your product URLs.
To configure Google Analytics Campaign, follow these steps:
- Go to Catalog > Manage Feeds > Manage Feeds. Open your feed.
- Open tab Google Analytics.
-
Fill in 3 required fields:
- Campaign Source - Identifies a search engine, newsletter name, or other source.(i.e. google, citysearch, newsletter)
- Campaign Medium - Identifies a medium such as email or cost-per-click. (i.e. cpc, banner, email)
- Campaign Name - Identifies a specific product promotion or strategic campaign. (i.e product, promo code, or slogan)
Also, you can optionally fill in other fields: - Campaign Term - Identifies paid keywords.
- Campaign Content - Differentiates ads or links that point to the same URL.
- Press button Save And Continue Edit.
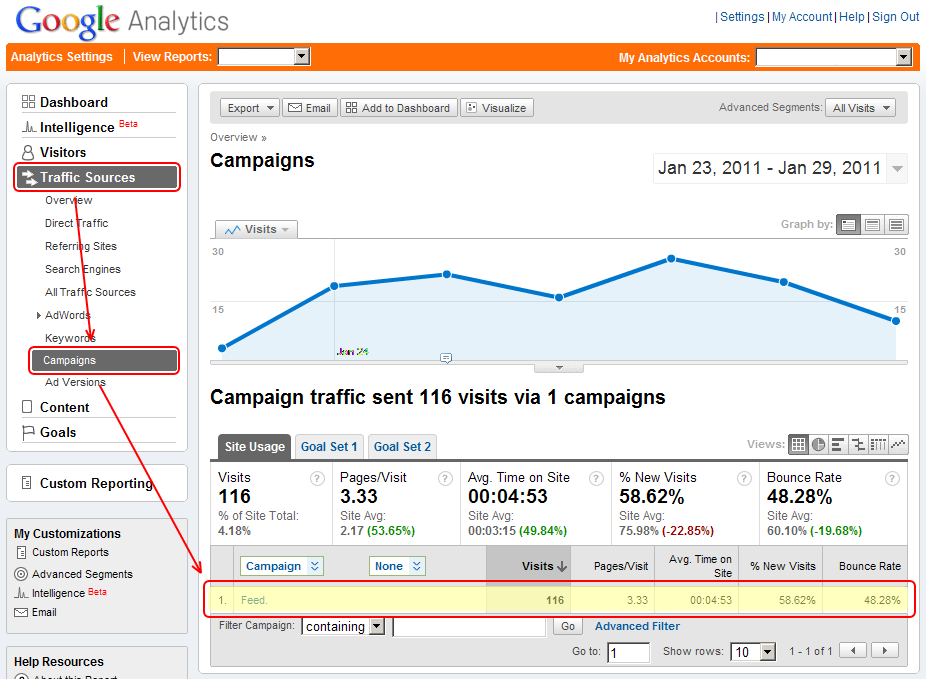
After adding google analytics parameters, you need to generate your feed. In feed file all product URLs will be http://example.com/product.html?fep=…&fee=…&utm_source=…&utm_medium=…&utm_name=…
After feed generating, you don't need to do additional configuration adjustments.
Additionaly, in campaign fields, you can use any patterns.
To track Google Analytics Campaign log in into your account and go to Traffic Sources > Campaigns. Select campaign source from the list.
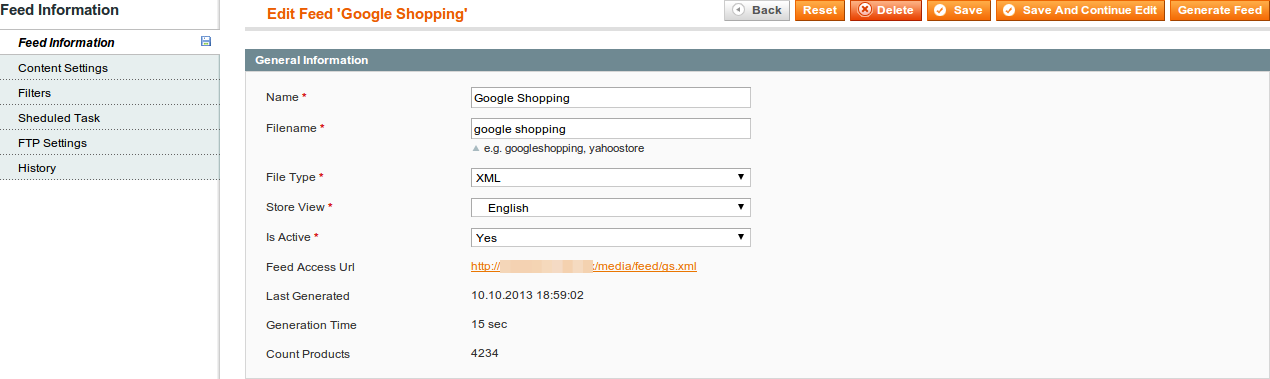
How to create a new data feed
To create a new data feed, follow these steps:
- Go to Catalog > Manage Feeds. Press button Add Feed.
- Select one of the existing template to create a feed. To create an empty feed, select Empty Template.
- Press button Continue.
-
Fill few requirement fields:
- Name - name of the data feed.
- Filename - name of the data feed file. File will be located at
[magento_path]/media/feed/filename. - Store View - store view, for which will be generated data feed.
- Is Active
Additionaly, if you selected Empty Template, you need fill these fields:
- File Type - there are three file types available for data feed.
- CSV - a comma-separated values, each item placed on a new line. File extension is .csv.
- TXT - same as CSV file, but with .txt extension.
- XML - uses tags to define blocks of content. Information about your items is enclosed within these tags, which are indicated by angle brackets. File extension is .xml.
- Press button Save and Continue Edit.
- To generate data feed, press button Generate Feed at the top right corner.
How to configure CSV, TXT Feed
If you select CSV or TXT file type at tab Content Settings, you can create/edit attribute schema for your feed.
Content Settings
Before creating attribute scheme, you need to fill in required file settings:
- Fields Delimiter - delimiter, which allows you to split text into columns in your feed file. Supported delimiters are:
- Comma ","
- Tab "\t"
- Colon ":"
- Space " "
- Vertical pipe "|"
- Semi-colon ";"
- Fields enclosure - allows enclose data in your feed file.
- Include Header - set "Yes" to include a header row (attribute names) in the first line of your feed file.
- Add Second Field - allows to add additional field for each header. If you change option value, click the button Save before setting up template.
- Extra header - set "Yes" to include an additional header row in the first line of your feed file. It will always be above the first attributes row or the columns header.

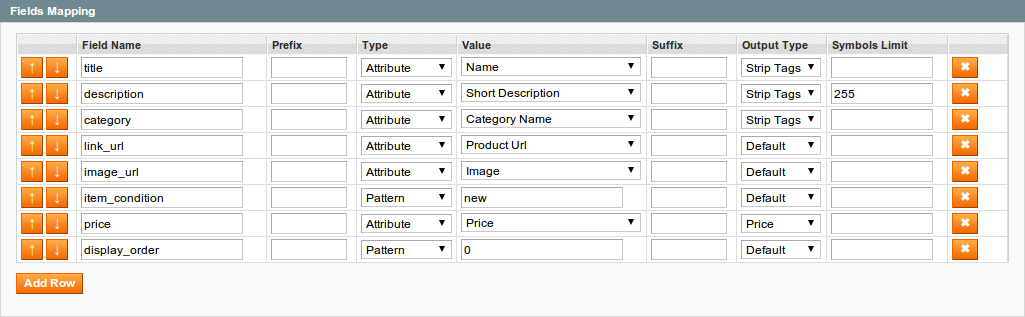
Field Mapping
In field mapping table you can add/remove rows, change rows ordering, set output type, symbols limit. Each row in mapping table is a column in data feed file.
For adding new column to your CSV feed, you need to create a new row and fill it with few params:
- Field Name - the header column name.
- Prefix - allows you place prefix before each value in column.
The prefix Special for attribute Name, will return values Special Product Name 1, Special Product Name 2.
- Type - following types available:
- Attribute - allows to select any store attribute from the drop down list.
- Parent Attribute - allows to export configurable products. In this case, simple associated products will have attribute values of the parent attribute.
If you have configurable products, we suggest to use this Type with fields: "Product URL", "Grouped id" - Pattern - this option allows you to enter static value or use patterns
- Value - you need to select the attributesribute or put pattern
- Suffix - allows you place suffix after each value in a column.
- Output Type - following types available:
- Default - value not will be changed
- Integer - value will be converted to ceil number
- Price - value will be converted to price format (#.##)
- Strip Tags - extension will clear text from html tags
- Symbols Limit - limit on number of symbols in value
How to configure XML Feed
If you select XML file type at tab Content Settings you can create/edit xml schema for your feed. By default we provide templates for XML feeds, so you can easily copy it and change for your requirements.
Usually Comparison Shopping Engines provide a template of the xml file. Based on this template, you can create own xml schema.
Typical xml schema:
<?xml version="1.0" encoding="utf-8" ?>
<rss version="2.0" xmlns:g="http://base.google.com/ns/1.0">
    {each type="product"}
      <item>
        <attribute_1><![CDATA[{attribute_1}]]></attribute_1>
        <attribute_2><![CDATA[{attribute_2}]]></attribute_2>
        .....
      </item>
    {/each}
</rss>
Product cycle block:
{each type="product"}
    ...
{/each}
Inside this block, you can use any product attribute.
Category cycle block:
{each type="category"}
    ...
{/each}
Inside this block, you can use any category attribute.
Review cycle block:
{each type="review"}
    ...
{/each}
Inside this block, you can use any review attribute.
Attribute (pattern) block:
<attribute_1><![CDATA[{attribute_1}]]></attribute_1>The attribute code must be enclosed in curly brackets: {attribute_code}. You can use all attribute codes available at Catalog > Manage Attributes and all static attributes (ex. entity_id, created_at etc).
Additionaly in curly brackets you can place any avalilable pattern. Full pattern list of patterns
< and & are illegal in XML elements.
<will generate an error because the parser interprets it as the start of a new element.&will generate an error because the parser interprets it as the start of an character entity.
We suggest enclosed all patterns in CDATA block <attribute><![CDATA[{pattern}]]></attribute>. In this case, xml data feed will be valid.
Google Shopping Feed Example
Lets check example of the Google Shopping template.
We created the XML template using Google Shopping guide: https://support.google.com/merchants/answer/160589?hl=en&ref_topic=2473799
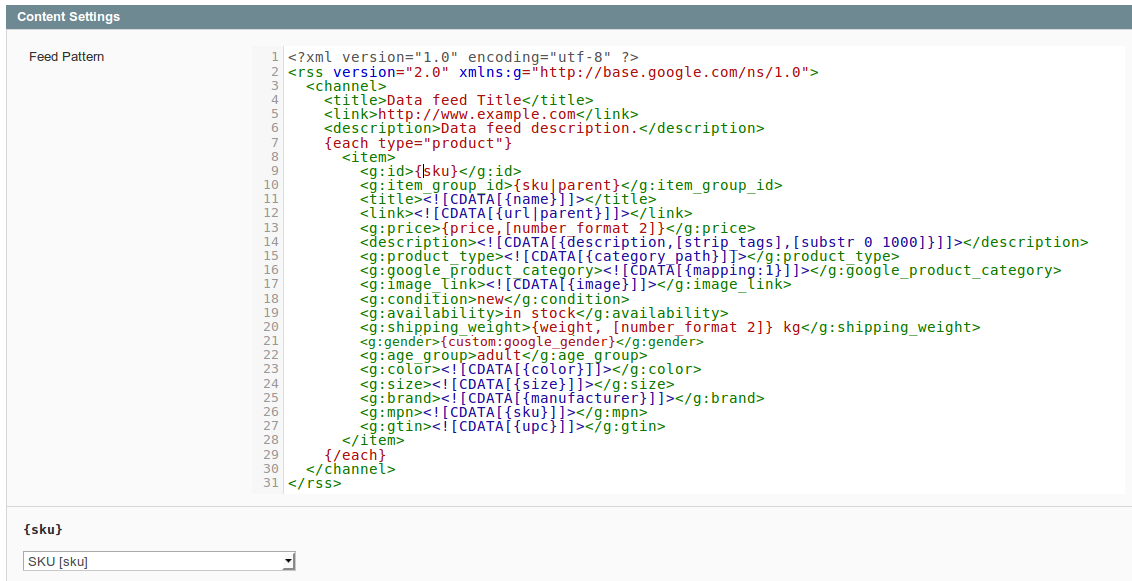
Lets check next tag lines.
At these lines sets xml encoding format: utf-8, sets RSS 2.0 format of the feed template and Google namespace declaration (xmlns:g=).

Here you can set three pre-defined elements which describe feed general information - title, link, and description.

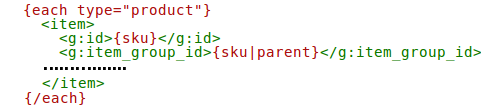
Between tags <item> ... </item> must be used attributes which response for product values. To make extension export all products from the store, we covered tags <item> ... </item> with Product cycle block:
{each type="product"}
...
{/each}
Lets check how we can use store attributes at the feed template.
At this page you can see attributes that you can use the template and accepted values https://support.google.com/merchants/answer/188494?hl=en
All attributes and patterns must be covered by curly brackets {}, otherwise extension will not export attribute values: {sku},{image},etc.
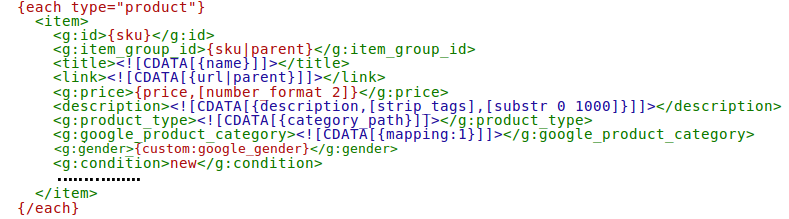
Tags <g:item_group_id> Google uses to declare product variations( configurable/grouped/bundled products). It means that here must be set value of the parent product. Extension allows to export product variation. You can use suffix |parent to return value of parent product. For example: {desciption|parent}, {image|parent}, etc. As rule, uses SKU do declare parent products, thats why we used this attribute: {sku|parent}. Also we set |parent suffix for URL attribute to combine all child products in to the one product link.
You can use a lot of patterns with attributes:
<description><![CDATA[{description,[strip_tags],[substr 0 1000]}]]></description> - at this line used strip_tags to delete all html tags from the feed and substr set max string lenght 1000 chars.
<g:price>{price,[number_format 2]}</g:price> - sets max 2 numbers for a price after comma
At the tags <g:google_product_category>...</g:google_product_category> Google recommend to set their own category names for the products, which mostly differ from the merchant stores. Extension allows easily replace in the feed store categories to the Google categories by creating Category mapping attribute. At this template it is declared as {mapping:1}, where 1 is a category mapping attribute id. For more information how to create and use it, check Category Mapping
Extension allows to use Dynamic Attributes when basic attributes require some improvements. For example, Google accept only one of these three values for gender: male, female, unisex. Merchant store may have another values for gender, so dynamic attributes can solve this and other tasks. Prefix custom: must be set before dynamic attribute name: {custom:google_gender}. For more information, see Dynamic attributes
Attribute Types
Following types of attributes are available:
- Default Attributes - all attributes available for products, like SKU, Name, Product Url, etc.
- Special Attributes - additional set of attributes, like Category Path, Attribute Set Name, etc.
- Dynamic Attributes - the attributes created by store administor, which allows to return value depending on some conditions.
- Category Mapping Attribute - the special attribute, which allows you to relate store categories with Comparison Shopping Engines taxonomy.
How to create a dynamic attribute
Dynamic attribute - it's attribute, that can return values depends on conditions or value of another attributes.
To create a new dynamic attribute, follow these steps:
- Go to Catalog > Manage Feeds > Manage Dynamic Attributes. Press button Add Attribute.

-
Fill in the following fields:
- Attribute Name - name of the dynamic attribute
- Attribute Code - code of the dynamic attribute. You will see this code when you select this dynamic attribute in the templates.
-
At Conditions tab, set conditions.
- Press Add New Value
- Select attribute at left corner
- Select condition
- Select or input condition value
- Select Output Type:
- Attribute Value - allows to return attribute values for the specified conditions.
- Pattern - patterns allow to use for output values attributes with php functions.
- Select attribute or input pattern at Output Value - when condition is true, dynamic attribute will return this value.
- Set Default value - sets output value for the attribute, which is not described in the conditions of the dynamic attribute.
- Press button Save.
If Condition is TRUE, then this attribute will have next Output Value. If none of the conditions are TRUE, the attribute will have Default Value.
~! In the feed templates, dynamic attributes must contain the phrase "custom:" in the beginning: {custom:attribute_code}
- If output type "Attribute", select attribute from the group Dynamic Attributes. Phrase "custom:" adds automatically.
- If output type "Pattern", don't forget to add manually phrase "custom:" in the beginning of the dynamic attribute.

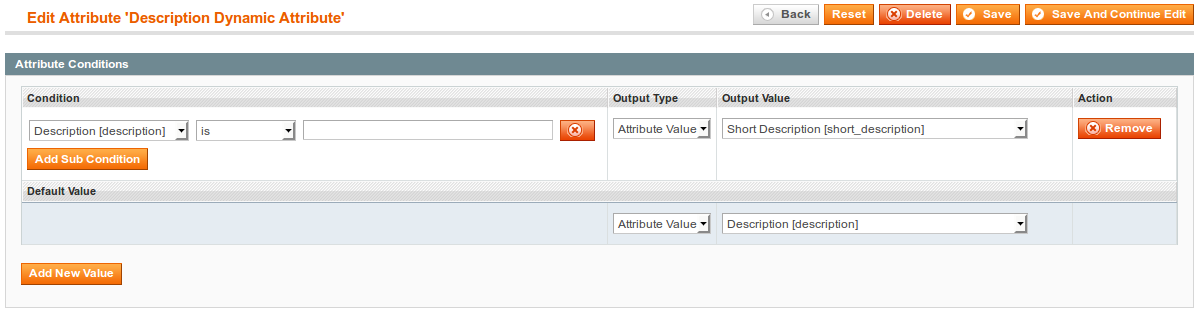
Dynamic Attribute Examples
-
How to set output Google Shopping acceptable values for gender: male, female, unisex
Google accept only one of three values for
gender: male, female, unisex. Your merchant store may have another values for gender.
For example, gender values: Mens and Womens. To replace these values, we create two conditions and set appropriate output values for genders. If product don't have gender "Mens" or "Womens" attribute values, it will have Default Value - unisex.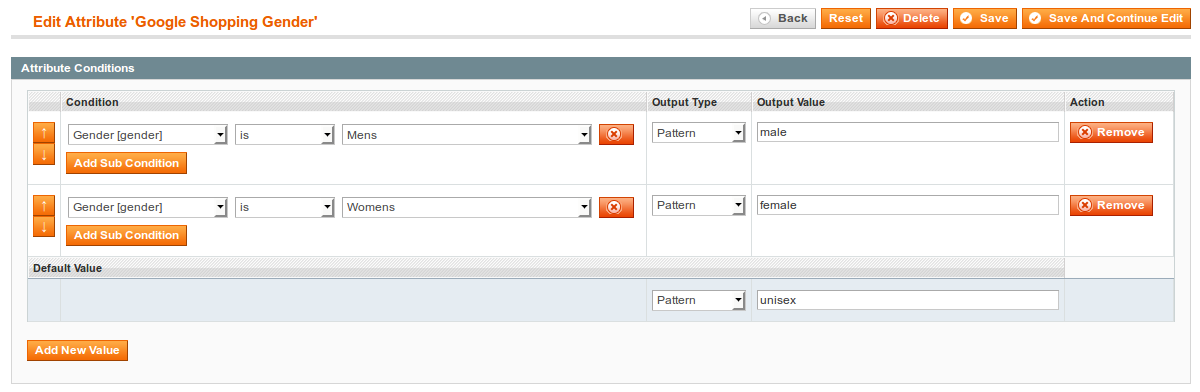
-
An example of why position of the conditions must be set correctly.
In this dynamic attribute for the Silver color we need to set ouput value Matte Silver. For all other colors, we need to set ouput value Multi.
If you set conditions with the same order posiotions as at this image, then this dynamic attribute will not work correctly!
First Condition:Color is not emptywill replace all existent Colors to value Multi(including color Silver). So when second Condition search for Silver color, it will not find any values.
To make it work correctly, you need to change position of the conditions.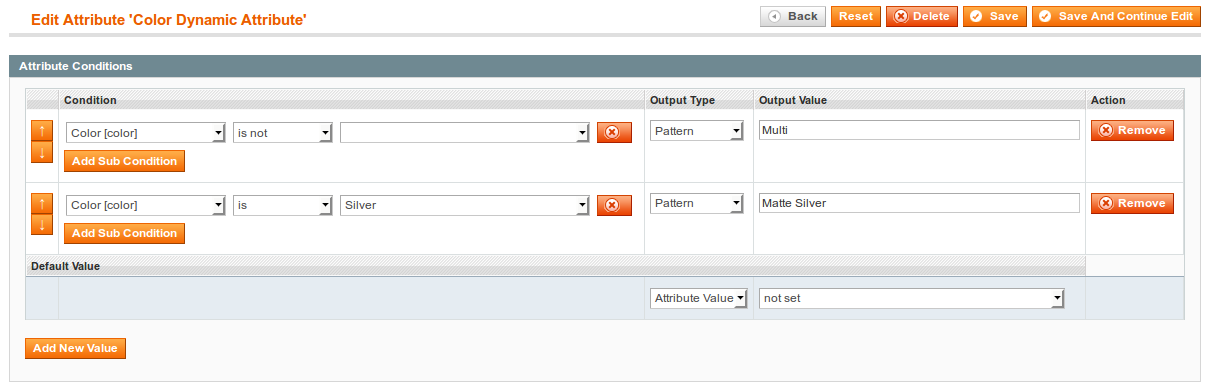
Dynamic attribute examples with Subconditions
~! If you use subconditions, all selected conditions will be applied at the same moment
-
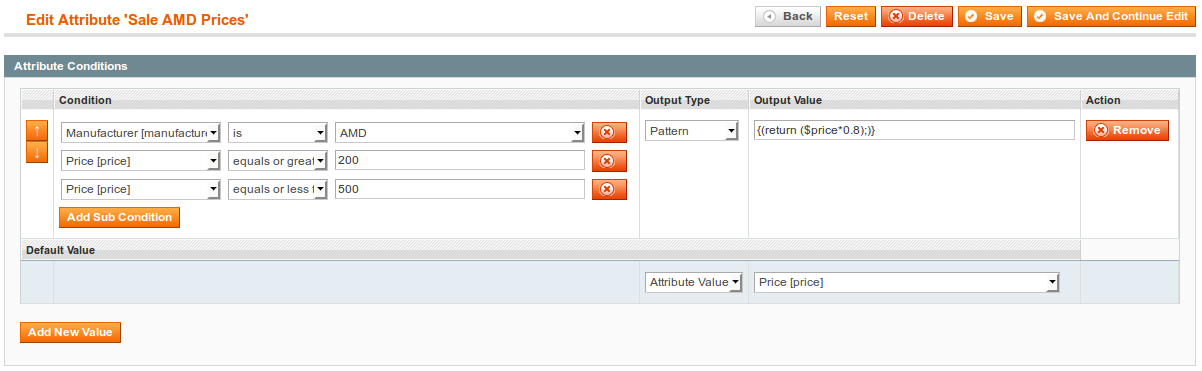
For the AMD brand products, which have price between 200 and 500, we need to set ouput price with 20% discount.
To cover all requirements, we need to use Subconditions.
Select AMD manufacturer and add two subconditions: Price equals or greater than 200 and Price equals or lower than 500.
To get 20% price discount at the Output value, we used one of the php patterns{(return ($price*0.8);)}. For more examples and information about patterns, see List of PatternsYou can add in this dynamic attribute discount for another price limits. To do this, you need to add a new Condition with subconditions. (See next example)
-
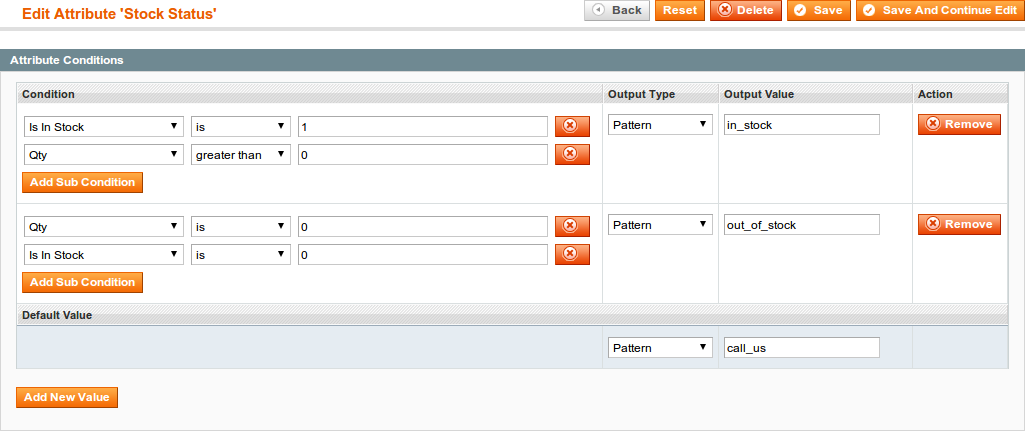
How to set proper output values for product stock statuses with quantity subconditions.
In the dynamic attribute for the attribute Is In Stock you can use next possible values:
- 0 - Out of Stock
- 1 - In Stock
How to create a category mapping
Category names you are using in your Magento store aren't always the same that ones used by Comparison Shopping Engines to reference your products. This means you have to find out which Shopping Engine categories have the best matching with yours.
To create new category mapping, follow these steps:
- Go to Catalog > Manage Feeds > Manage Category Mapping. Press button Add New Mapping.
- Fill mapping Name
-
Fill new names related with store categories If child category not has own related name, it will be use related name of parent category.
The list of categories for Google Shopping you can find by links https://support.google.com/merchants/answer/160081?hl=en and http://www.google.com/basepages/producttype/taxonomy.en-US.txt - Press button Save
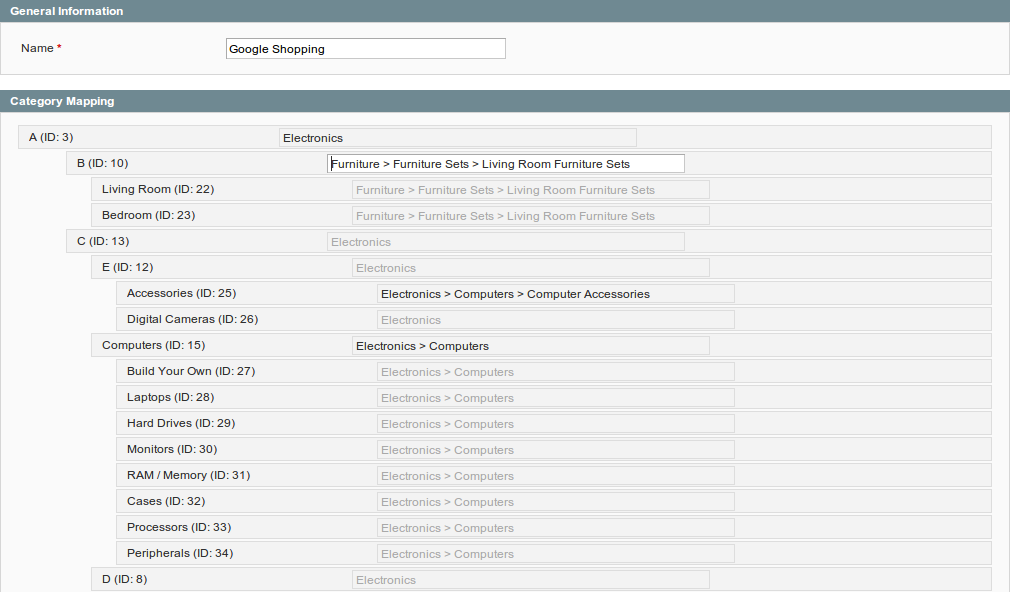
Now you can use new category mapping in your feeds. You can select created Category Mapping attributes from the drop down list of the store attributes
- For CSV feeds, at attribute selector you need select attribute Category Mapping: name
- For XML feeds, you should use pattern {mapping:mapping_id}

Product Filters
Filtering is one of most important parts of the feed creation process. Using filters you will not export products which have zero price or out of stock, products without images, disabled products etc.
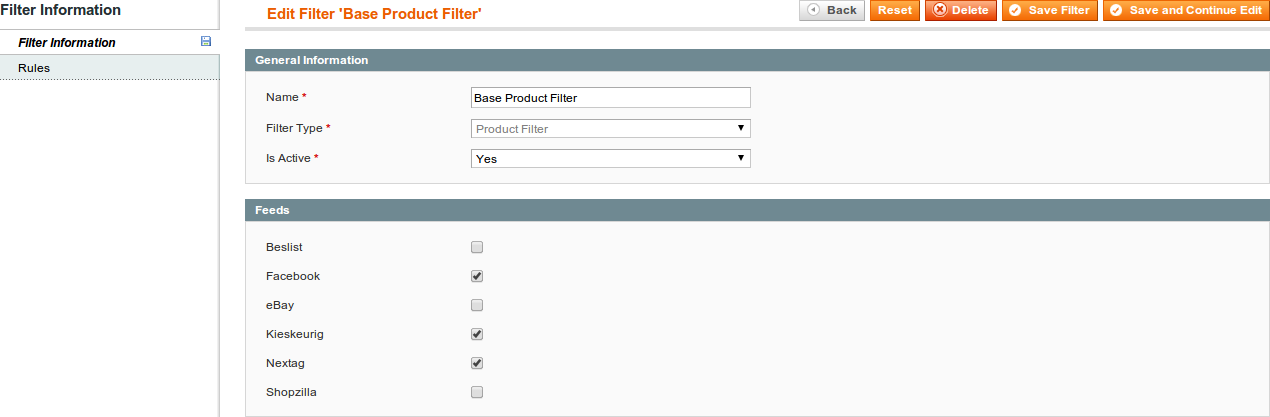
To create a new product filter follow these steps:
- Go to Catalog > Manage Feeds > Manage Filters. Press button Add Filter.
- Set filter name and filter type. For product filter, you need to select Product Filter.
- Select feeds for which the filter will be applied. Also you can select applied filters on the feed edit page.
- At Rules tab you can specify all required filters.
- Select any attribute from the list and use filter conditions. Extension allows to set conditions combination, using if ALL and if ANY, TRUE or FALSE rules.
Product Filter Examples
-
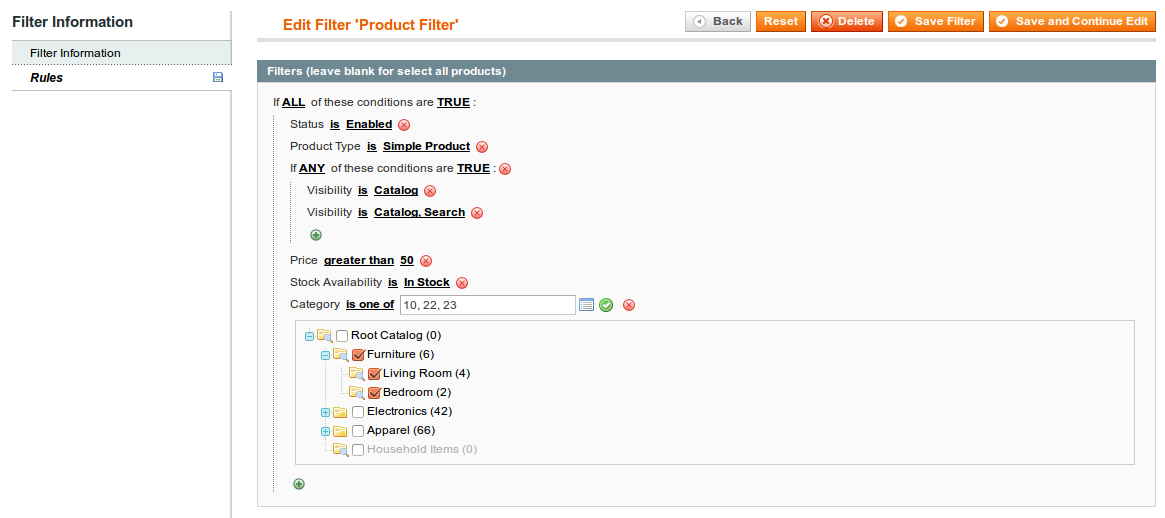
Filter example for Simple products
For example, you want to export only Simple products from Furniture category, which product Price greater than 50 and products are available in the Stock:
- Set Status is Enabled (not necessarily)
- Set Product Type is Simple Product
- Add a new Condintions Combination. Set if ANY rule. Add 2 conditions for attribute Visibility:
- Visibility is Catalog
- Visibility is Catalog, Search
This condition allows to include products, which have Visibility status: Catalog or Catalog, Search.
If you don't set this condition combination, feed will be generated also with products, which have status: Not Visible Individually. Thus, Configurable Associated Products will not be included into the feed.Continue setting up main conditions:
- Set Price greater than 50
- Set Stock availability is In Stock
- Select Category attribute and set condition is one of. Click the Chooser icon and you will see the store category tree. To include products from certain categories, tick the Furniture category and their subcategories from the list. Category ID's will be added automatically to the text line.
-
Filter example for Simple and Configurable products
For example, you want to export Simple and Configurable products which not from Cell Phones and Cameras categories. Product Name contains word ecco and product quantity equals or greater than 10:
- Set Status is Enabled (not necessarily)
- Set Name contains ecco
- Set Stock availability is In Stock
- Set Quantity equals or greater than 10
- Select Category attribute and set condition is not one of. Click the Chooser icon and you will see the store category tree. To exclude products from certain categories, tick the Cell Phones and Cameras categories and subcategories from the list. Category ID's will be added to the text line automatically.

-
How to exclude products without Base images
Add next condition to your filter:
Base Image is not no_selection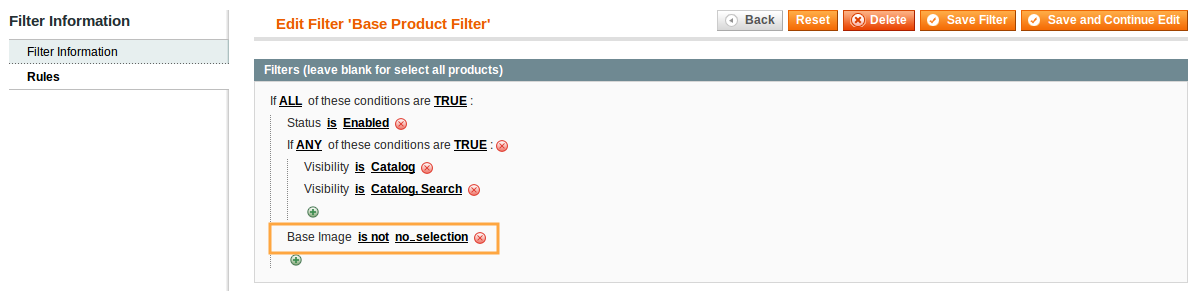
Filter by Parent Products
Extension allows to filter products according to the conditions of the parent attributes.
To use this option, select in the filter next condition: Parent Product Attributes. All filter subconditions, which can be set inside this option, will be directed to check only attribute values of the parent products.
If the Parent Product Attributes condition is true, then all child products will be exported into the feed. If the Parent Product Attributes condition is false, all child products will be excluded from the feed export.
This filter will not be applied to the simple products, which are not related to parent products. Parent products will be excluded from the feed export.
-
Examples of the filter condition Parent Product Attributes:
For example, we have a store, where exist simple and configurable products. Lets check two examples:
1) Some parent configurable products were deleted or disabled, so their child simple products are become inactive. Thus, all this child products must be excluded from the feed.
To do this, you need to select Parent Product Attributes option with subcondition: Status is Enabled: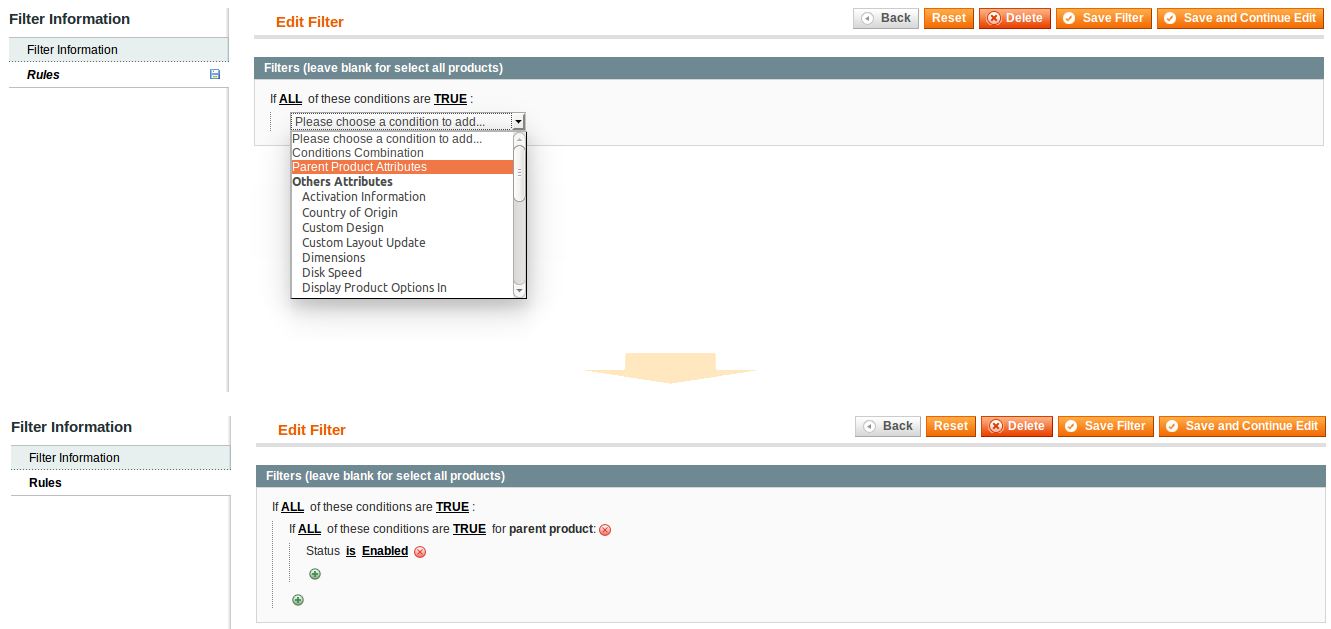
2) All images are stored only on the parent product pages, but some parent products dont have images also. We need to exclude from the feed the parent and its child products without images.
To do this, you need to select Parent Product Attributes condition by adding it to existing filter: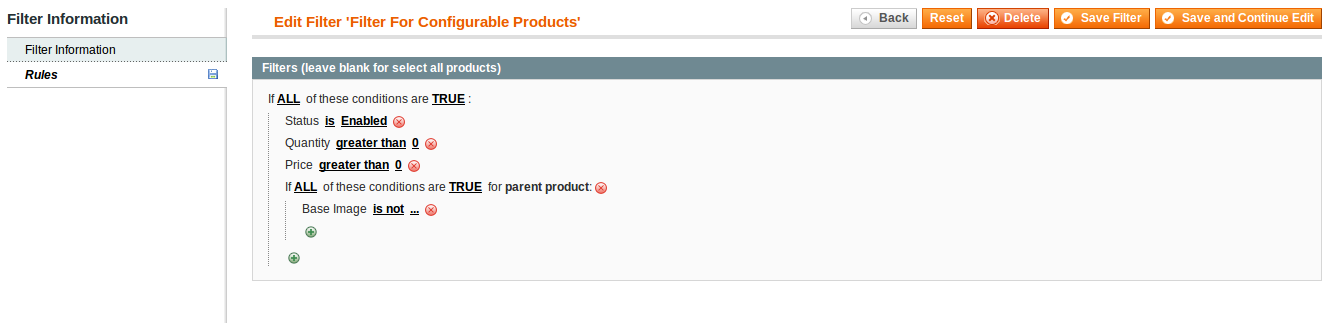
Additional Conditions
-
PHP Condition - the special php condition
This condition allows you to create any rule using product attributes, calculations, comparissions etc. PHP condition must return
TRUEorFALSEWe would like to export only products with price greater than cost than 10%In this case, result string for condition will be:
($price > $cost * 1.1)
Performance Filters
Extension allows to set additional filter for products export: by number of clicks, number of orders, revenue, conversion rate (%).
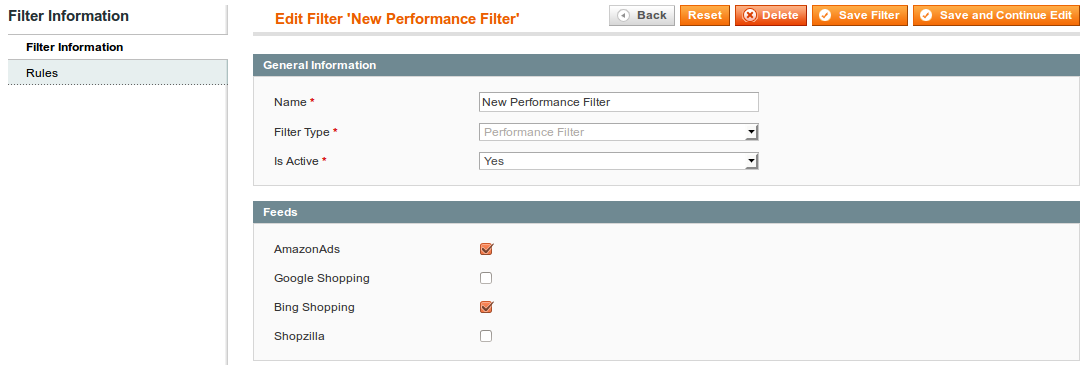
To create a new performance filter follow these steps:
- Go to Catalog > Manage Feeds > Manage Filters. Press button Add Filter.
- Set filter name and select Performance filter type.
- Select feeds for which the filter will be applied. Also you can select applied filters on the feed edit page.
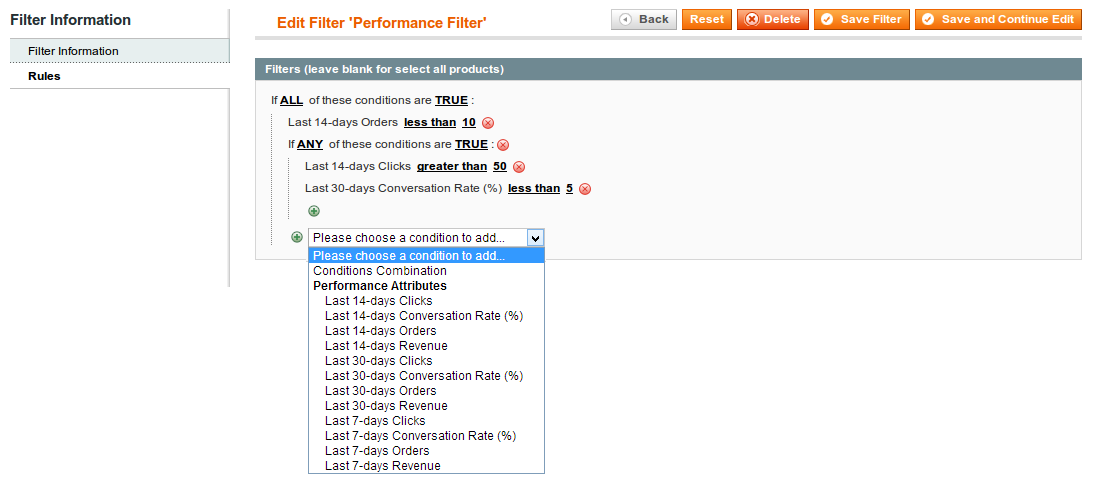
- At Rules tab you can specify all required filters.
- Select filter conditions. Extension allows to set conditions combination, using if ALL and if ANY, TRUE or FALSE rules.
Performance Filter Example
For example, you want to export only products which were ordered less than 10 times for the last 14 days. Also, if one of these conditions are true:
- Product page was visited more than 50 times for the last 14 days;
- Conversion rate less than 5%
List of Patterns
All patterns must be enclosed in curly brackets. In patterns you can use codes of attributes, formatters, links to parent products, base php functions and calculations.
The base pattern shema {attribute_code, [ formatter 1 ], [ formatter 2 ], ... }
Attribute Patterns
-
Product ID {entity_id} - ID of the product
-
SKU {sku} - an identifier of the product
-
Name {name} - a name of the product
-
Description {description} - a description of the product
-
Short Description {short_description} - a short description of the product
-
Status {status} - a status of the product
Possible values:
- Enabled
- Disabled
-
Visibility {visibility} - a visibility of the product
Possible values:
- Not Visible Individually
- Catalog
- Search
- Catalog, Search
-
URL Key {url_key} - a url key of the product
-
URL {url} - a direct url to the product
-
Price {price} - price of product (without discounts, catalog rules etc)
-
Final Price {final_price} - a final price (sellable) of the product
The price of product after applying special price and catalog price rules.
-
Base Price {base_price} - a base price of the product
The price of product before applying special price or catalog price rules.
-
Group Price for customer group {group_priceX} - a group price for X group, where X - customer group ID
Examples: {group_price1}, {group_price4}
-
Manufacturer's Suggested Retail Price {msrp} - manufacturer's suggested retail price
-
Special Price {special_price} - a special price of the product
The special price of the product.
Special price ignore values of Special Price From Date and Special Price To Date
-
Store Price {store_price} - price converted into the currency of the feed selected store.
-
Minimal Child Price of Grouped or Bundle Product {min_price} - if product is Grouped or Bundle, will be exported the lowest child product price.
For the other product types, will be exported Final Price.
-
Category {category} - a name of the assigned category to the product
If product is assigned to a few categories, extension selects Category using next logic:
There always is selected the most nested category. For example, if a product is assigned to a few categories at different level, the attribute{category}returns the name of the category that is the most nested in the category tree.
If product is assigned to a few categories at the same level, the extension selects a category with the lowest position of the product. Change position of the product you can at Catalog > Manage Categories, tab Category Products
-
Category Id {category_id} - a ID of the assigned category to the product
If product is assigned to a few categories, extension selects Category Id using next logic:
There always is selected the most nested category id. For example, if a product is assigned to a few categories at different level, the attribute{category_id}returns the id of the category that is the most nested in the category tree.
If product is assigned to a few categories at the same level, the extension selects a category id with the lowest position of the product. Change position of the product you can at Catalog > Manage Categories, tab Category Products
-
Category Ids {category_id} - a ID of the assigned category to the product
-
Category Path {category_path} - a path of the category names
E.g. Computers > Notebooks > Samsung
If product is assigned to a few categories, extension selects Category Path using next logic:
There always is selected the most nested category path. For example, if a product is assigned to a few categories at different level, the attribute{category_path}returns the path that is the most nested in the category tree.
If product is assigned to a few categories at the same level, the extension selects a category with the lowest position of the product. Change position of the product you can at Catalog > Manage Categories, tab Category Products
-
Category Paths {category_paths} - all product category paths
-
Category Url {category_url} - a direct url of the assigned category to the product
The direct url to parent category.
If product is assigned to a few categories, extension selects Category Url using next logic:
There always is selected the most nested category url. For example, if a product is assigned to a few categories at different level, the attribute{category_url}returns the url of the category that is the most nested in the category tree.
If product is assigned to a few categories at the same level, the extension selects a category id with the lowest position of the product. Change position of the product you can at Catalog > Manage Categories, tab Category Products
-
Attribute Set {attribute_set} - a name of the assigned attribute set to the product
-
Quantity {qty} - a quantity of the product
-
Parent Qty {parent_qty} - sum of in stock child products quantity. Export values only for configurable products.
-
Is In Stock {is_in_stock} - a stock status of the product
Possible values:
- 0 - Out of Stock
- 1 - In Stock
-
Image {image} - a direct url to base image of the product
For resize image, you can use pattern {image:WxH} ({image:110x150})
-
Thumbnail {thumbnail} - a direct url to thumbnail image of the product
For resize image, you can use pattern {thumbnail:WxH} ({thumbnail:200x100})
-
Small Image {small_image} - a direct url to small image of the product
For resize image, you can use pattern {small_image:WxH} ({small_image:100x150})
-
Image 2 {image2}, Image 3 {image3}, Image 4 {image4}, Image 5 {image2} - a direct url to gallery images of the product
-
Rating Summary {rating_summary} - average product rating (from 0 to 5)
- Number of Reviews {reviews_count} - number of approved reviews
Parent product values
You can use suffix |parent ({name|parent}, {price|parent}, {image|parent}, {custom:dynamic_attribute|parent} etc), if you need return value of parent product.
{url|parent}, will return URL to parent product.
If extension can't find parent product, it uses current product.
Note: Parent suffix is very useful when you export simple products with visibility Not Visible Individually. In this case, product can't have a direct link, so you must use a link to the parent product.
Only Parent product values
You can use suffix |only_parent ({name|only_parent}, {image|only_parent}, {custom:dynamic_attribute|only_parent} etc), if you need to return only value of the parent product.
If extension can't find value of the parent product attribute, all its child products will also have no values, even if the childs have values of this attribute.
Parent value, if child value is empty
You can use suffix |parent_if_empty ({image|parent_if_empty}, {custom:dynamic_attribute|parent_if_empty} etc), for return parent value, if child product value is empty.
Grouped product values
You can use suffix |grouped ({color|grouped}, etc), if you need contact all child product values to one string (this feature will work for bundled and grouped products).
{color|salable_grouped}).
Category attributes mapping
If product is assigned to a few categories, extension selects Category using next logic:
There always is selected the most nested category. For example, if a product is assigned to a few categories at different level, the attribute {category} returns the name of the category that is the most nested in the category tree.
If product is assigned to a few categories at the same level, the extension selects a category with the lowest position of the product. Change position of the product you can at Catalog > Manage Categories, tab Category Products
Formatters
| Formatter | Description | Schema | Example |
|---|---|---|---|
| strip_tags | Remove all html tags | {attribute_code, [strip_tags]} | {description, [strip_tags]} |
| html2plain | Remove all html tags, slashes and multiple spaces | {attribute_code, [html2plain]} | {description, [html2plain]} |
| htmlentities | Convert all applicable characters to HTML entities | {attribute_code, [htmlentities]} | {description, [htmlentities]} |
| clear | Remove all non-utf-8 characters from string | {attribute_code, [strip_tags]} | {description, [clear]} |
| substr | Truncate the string | {attribute_code, [substr from to]} | {name, [substr 0 80], [...]} |
| strtoupper | Transform the string to upper case | {attribute_code, [strtoupper]} | {name, [strtoupper]} |
| strtolower | Transform the string to lower case | {attribute_code, [strtolower]} | {name, [strtolower]} |
| convert | Change price currency | {attribute_code, [convert CODE]} | {price, [convert AUD]} or {special_price, [convert CHF]} |
| number_format | Format a number with grouped thousands | {attribute_code, [number_format decimals]} | {price, [number_format 2]} or Price comma format: {price, [number_format 2 , ]} |
| urlToUnsecure | Convert all Urls to http format | {attribute_code, [urlToUnsecure]} | {image, [urlToUnsecure]} |
| urlToSecure | Convert all Urls to https format | {attribute_code, [urlToSecure]} | {image, [urlToSecure]} |
| if_not_empty | Delete the row if attribute value is empty | {attribute_code, [if_not_empty]} | {color, [if_not_empty]} |
| [php function] | Any other php function | {attribute_code, [function arg1 arg2 ]} | {brand, [trim], [strtoupper], [substr 0 80]} |
Additional Patterns
Calculations:
- {(return $price * 1.15;)}
- {(return $qty + 1;)}
- {(return $group_price2 / 10 * 4 - 2.5;)}
- {(return str_replace("0", "*", $sku);)}
- {(return substr($sku, 3);)}
- {(return str_replace("a", "b", substr($sku, 0, 5));)}
- {(return date('d.m.Y H:i:s');)}
- {(return date('d.m.Y H:i:s', strtotime('+25 days'));)}
- {(return date("d/m/Y", strtotime($special_from_date));)}
PHP Ternary Operator:
- {(return ($price > 1000) ? 'free shipping' : '15';)}
- {(return ($manage_stock == 1) ? $qty : 999;)}
- {(return (strlen($manufacturer) > 1) ? $manufacturer : 'NoBrand';)}
- {(return ($color!=='orange') ? $color : '';)}
PHP functions:
- {php, [date("d.m.Y H:i:s")]}
Settings
To check additional feed generation settings, go to Catalog > Manage Feeds > Settings.
File Generation Settings
-
Number of Products per Iteration - allows to set number of products per each iteration due feed export.
In case of low feed generation, you can set for example 100 and enhance value until speed is increased.
In case of big load on server, you can set for example value 25 and check the new speed generation.
This option allows to optimize file creation. - Enable Profiler - if option is enabled, you can check the profiler logs during product feed generation (for developers).
After option is enabled, you can see the feed generation memory usage and duration details if you click on Inspect Element button > Console tab.
Command Line Interface
How to generate a data feed via command line
To generate a data feed via command line (shell, SSH) you can use php script located at <magento_root>/shell/feedexport.php
Usage:  php feedexport.php [options]

  --generate all      Generate all active feeds
--generate <id> Generate Feed with ID <id>php feedexport.php --generate all php feedexport.php --generate 2
How to export a data feed via command line
To export a data feed via command line (shell, SSH) you can use php script located at <magento_root>/shell/feedexport.php
~! To enable export a data feed via command line you must set up FTP settings. See FTP settings
Usage:  php feedexport.php [options]

  --deliver all      Deliver all active feeds
--deliver <id> Deliver Feed with ID <id>php feedexport.php --deliver all php feedexport.php --deliver 3
Shopping Channels
Comparison Shopping Sites
-
Google Shopping
-
Amazon Product Ads
http://www.amazonservices.com/content/product-ads-on-amazon.htm
-
NexTag
http://merchants.nextag.com/serv/main/seller/registration/landing/ProductShopping_a.jsp
-
PriceGrabber
-
Bing Shopping
http://advertising.microsoft.com/search-advertising/bing-shopping
-
Pronto
-
Shopzilla
-
Shopping.com
https://merchant.shopping.com/enroll/app?service=page/PartnerWelcome
-
TheFind.com
-
Become.com
-
Oodle
-
ShopMania
-
Smarter.com
-
FindGift
-
Gifts.com
http://www.gifts.com/merchant/public/welcome?redirect=%2Fmerchant
-
Price.com
-
Oneway Shopping
-
SortPrice
-
PriceRunner
-
Shopbot
-
LeGuide
-
Kelkoo
http://www.kelkoo.co.uk/co_4292-online-merchants-and-stores-partner-with-kelkoo.html
-
Buy.at
-
PriceCanada.com
-
ShopPrice
Marketplaces
-
Amazon
http://www.amazonservices.com/content/sell-on-amazon.htm?id=hm4&ld=AZSOAHelpLM
-
Buy.com
-
eBay
https://scgi.ebay.com/ws/eBayISAPI.dll?RegisterEnterInfo&ru=http%3A%2F%2Fwww.ebay.com%2F
-
NewEgg
http://promotions.newegg.com/marketplace/merchants/apply.html
-
Sears
https://seller.marketplace.sears.com/SellerPortal/d/index.jsp
-
Pricefalls
-
Shop.com
How to work with data feed at shopping channels
Google Shopping
Google Shopping allows shoppers to quickly and easily find sellers product listings on Google. Check Beginner's Guide.
How to manage attributes
Some attributes are required for all items, some are required for certain types of items (such as apparel), and others are recommended. Failure to provide a required attribute may prevent that particular item from showing up in Google Shopping results, whereas failure to provide recommended attributes may result in items showing up less frequently. Check product attribute requirements for your country: Summary of attribute requirements.
There are 3 attribute statuses:
- Required attribute - Not including a required attribute and correct values for each item may result in the suspension of your products.
- Recommended attribute - It is not mandatory to include this attribute in your feed, but including it where applicable will help improve your data quality.
- Not applicable - Attribute not applicable to this product category.
For more information about attributes see Products Feed Specification.
As example, there are three ways to specify attributes tax and shipping costs:
-
Settings in the Merchant Center - The account-level settings allow merchants to make global shipping models at the account-level. Can be based on product attributes like price, shipping weight, or shipping label.
-
Separately for each product - allows to configure through the extension settings. See How to configure XML Feed.
- Combination of the two - You can specify default tax and shipping information in Merchant Center, and then override those defaults for certain products by specifying the attributes below. Feed-level information always overrides account-level settings.
For more information about tax and shipping, see Tax & Shipping.
How to upload a data feed
When you uploading data feed to Google Merchant Center, you have three upload options:
-
Direct upload (Files under 20 MB in size). Sign in to http://www.google.com/merchants, go to Data feeds link and click the Manual upload button. It can take up to 24 hours for your file details to be updated in your account.
-
Automatically Upload (Scheduled Fetch) (Files under 1 GB in size) - The automatic upload option allows you to create an uploading schedule for your data feed hosted on your website. For more information about scheduling and server or website options, go to Submit data feeds via Automatic Upload.
- FTP Upload - FTP (File Transfer Protocol) allows to upload feeds through Advanced Product Feeds extension. To enable this option, you need to set up FTP settings at Google Merchant Center: Submit data feeds via FTP and set up extension FTP settings. To enable feed upload via FTP make sure that Automatically Upload (Scheduled Fetch) is disabled.
If you first time upload Google feed via Direct upload, you need to Select Feed type method - Products.
After first upload of the full Google feed, you can use Google Shopping Update feed template to update main information of the selling products by selecting upload Feed type method - Online Product Inventory Update.
For more information how to upload feeds, see Upload a data feed.
Sears
To upload products on Sears, you need to create two feeds using our pre-installed templates: Sears.com item and Sears.com Inventory.
Sears.com item feed uploads products and Sears.com Inventory updates quantity information.
Sears marketplace does not allow to use FTP/FTPS for feed upload. Therefore, to upload feeds you need to use one of the browsers plugin which allows to make API calls.
As example, you can install plugin "HttpRequester" for your browser. Open it (two arrows image in the right top browser corner) and follow steps to upload feeds:
You need to copy and paste these lines for these feeds, where your@mail.com and yourpassword - your Sears account login email and password:
For feed Sears.com item load set URL:
https://seller.marketplace.sears.com/SellerPortal/api/catalog/fbm/v18?email=your@mail.com&password=yourpassword
Browse Sears.com item generated feed, select content type - application/xml and click to the button PUT.
For feed Sears.com Inventory load set URL:
https://seller.marketplace.sears.com/SellerPortal/api/inventory/fbm-lmp/v7?email=your@mail.com&password=yourpassword
Browse Sears.com item generated feed, select content type - application/xml and click to the button PUT.
You will see response: 200 OK if feed delivery was successful.
After all templates were successfully uploaded, you can check the uploaded data at your Sears account.
Go to Products->Product Mgmt -> Browse and edit. Select all categories and click Load catalog.
To check inventory details, go to Inventory->Product Mgmt -> Browse and edit. Select all and click Browse Inventory button.
List of the pre-installed templates
| Template name | Format |
|---|---|
| Achetezfacile | XML |
| Affili.net | CSV |
| AmazonAds | TXT |
| Become Europe | CSV |
| Beslist | XML |
| Billiger.de | CSV |
| Bing Shopping | TXT |
| Bol | TXT |
| Bonanza | CSV |
| CJ | XML |
| Daisycon | XML |
| eBay(Commerce Network) | CSV |
| eBay.com (Store) | CSV |
| Facebook (storefront) | CSV |
| Facebook Dynamic Ads | XML |
| Facebook Dynamic Ads CSV | CSV |
| Fishpond | CSV |
| Fruugo | CSV |
| Geizhals | CSV |
| GetPrice Categories | XML |
| GetPrice Products | XML |
| Gifts.com | CSV |
| Google Dynamic Display Ads (custom) | CSV |
| Google Shopping | XML |
| Google Shopping (configurable products) | XML |
| Google Shopping CSV | CSV |
| Google Shopping Review | XML |
| Google Shopping Update | XML |
| Hepsiburada | XML |
| Heureka | XML |
| Houzz | CSV |
| idealo.it | CSV |
| iOffer | CSV |
| it.bestshopping.com | CSV |
| JadoPado | CSV |
| Kelkoo | XML |
| Kieskeurig | XML |
| LadenZeile | CSV |
| LeGuide.com | TXT |
| Marktplaats | XML |
| Newegg | XML |
| Newegg(inventory) | XML |
| Nextag | TXT |
| OpenSky | CSV |
| pagineprezzi | TXT |
| Partner-Ads | XML |
| Polyvore | TXT |
| PreisRoboter | CSV |
| Pricefalls | TXT |
| PriceGrabber | TXT |
| PriceMe | XML |
| PriceRunner | XML |
| PriceSpy | TXT |
| Prisjakt | TXT |
| Pronto | TXT |
| Rakuten Inventory | TXT |
| Rakuten New SKU | TXT |
| Sears.com Inventory | XML |
| Sears.com Item | XML |
| Sears.com Price | XML |
| ShareASale | CSV |
| Shibby | CSV |
| ShopAlike | CSV |
| Shopcost | TXT |
| ShopMania | XML |
| Shopping.com | XML |
| Shopping24 | CSV |
| ShopPrice | XML |
| Shopzilla | TXT |
| SingleFeed | CSV |
| Stileo.it | XML |
| TradeDoubler | CSV |
| TradeTracker | CSV |
| Trovaprezzi | CSV |
| Twenga | CSV |
| Uvinum | CSV |
| Webgains | CSV |
| Wish | CSV |
| Yandex Market | XML |
| Yatego | CSV |
| Yopi | CSV |
| Zanox | CSV |
Troubleshooting
Error message: "You don't have permission to access /index.php/feedexport/adminhtml_feed/save/id/2/key/fab85a07526579609c8e239df07b3dd6/back/edit/ on this server"
Error could appear if you try to save feed, filter or make some other actions with extension.
This problem is related to restriction on server to save requests with some php code, html tags or other forbidden symbols.
Solution:
Please ask system administrator to provide required permissions.
Error message when click Feed Generation button: "Can't remove folder /magento_root/media/feed/tmp/2"
This problem is related to wrong permissions on folder /magento_root/media/feed/, therefore extension can't delete/save file at feed media folder.
Solution:
You need to to set recursive permission to the folder /magento_root/media/feed/ on your server.
Change Log
1.1.25
(2019-10-28)
Fixed
- fixed issue when inactivated filters was applied to the feed
1.1.24
(2019-03-29)
Fixed
- fixed an issue with the incorrect output of the pattern 'parent_if_empty'
1.1.23
(2018-07-09)
Fixed
- fixed and issue with incorrect store view data export via schedule generation
- fixed an issue with incorrect text encoding
1.1.22
(2018-03-09)
Fixed
- Feed export process is not started, memory limit error
1.1.21
(2018-03-07)
Improvements
- added ability to filter feeds by active status at the main feeds grid (#30)
Fixed
- fixed an issue with the category mapping export values (#29)
- fixed an issue with the reviews export in the feed (#28)
1.1.20
(2017-12-13)
Fixed
- Compatibility with Magento 1.9.3.7 (#22)
1.1.19
(2017-12-12)
Fixed
- Fixed an issue with the loading "Abort" button on the feed edit page (#21)
- Fixed an issue with the products duplicating in the feed export (#20)
1.1.18
(2017-06-29)
Features
- Filter conditions to check whether a product attribute value is assigned or not
1.1.17
(2017-05-10)
Improvements
- Solve conflict with Aitoc Aitquantitymanager
1.1.16
(2017-02-08)
Improvements
- Added Facebook Dynamic Ads templates, updates templates list
Fixed
- Fixed an issue with incorrect displaying buttons at feed field mappings and dynamic attributes
1.1.15
(2016-12-28)
Improvements
- Added ability to export disabled products when Flat Catalog is Enabled
1.1.14
(2016-12-26)
Fixed
- Solve the 'new year' problem associated with the generation of the product feeds by cron
1.1.13
(2016-10-20)
Features
- Ability to export and import dynamic attributes
1.1.12
(2016-10-11)
Improvements
- Added new filter conditions: Product Id, Final Price, Weight, Minimum and Maximum Qty Allowed in Shopping Cart
1.1.11
(2016-06-15)
Improvements
- Fixed deprecated method of setting translations
1.1.10
(2016-06-03)
Improvements
- New templates: google dynamic display ads, google shopping csv template
1.1.8
(2016-05-30)
Fixed
- Fixed second header error while creating new templates
Improvements
- Updated templates list table, patterns list, info about second field
- Added new templates
1.1.7
(2016-04-27)
Features
- Ability to add second header at csv and txt format feeds
Improvements
- Convert 'emalloc' value to readable form
1.1.6
(2016-04-21)
Features
- Profiler for generating the product feeds
- Ability to set number of products per iteration
1.1.5
(2016-04-01)
Improvements
- Pattern min_price for grouped products
- Disable ability to change feed and template type after creation
1.1.4
(2016-02-26)
Fixed
- Fixed an issue with printing ids array at the mappings pattern
- Fixed an issue of the filter incorrect product collection
- Fixed an issue with feed generation url (if backend domain not equal store view domain)
1.1.3
(2016-02-15)
Improvements
- Improved generation process performance
Fixed
- Minor bug fixes
1.1.2
(2016-02-11)
Improvements
- Suffix '|salable_grouped' for exporting values of active products which are in stock
- Ability to filter products by total sales
- Admin routing patch. Compatibility with SUPEE-6788.
- Fallback pattern
- Generate test product feed for particular product
- Ability to filter products by parent product attributes
- Disable feed logs
- Ability to retrieve the average rating for the particular product review
Fixed
- Allow test generation by IDs for product reviews
- Fixed an issue with wrong json encode at csv mapping
- Issue with double quotes in the Csv and Txt format templates
- Typo bug in Performance filter