RMA Basics
Consider a RMA workflow chart and its detailed explanation, that fully describes typical everyday returning process. You can see there, that there's three possible types of RMA:
- Regular RMA - it is the most part of all returns, they are properly based on original orders and have full document cycle.
- Offline RMA - this type of RMA can be placed, when there's no original order. There can be many cases: order, placed by a phone, an order from point-of-sale device, even other site, but still applied to your store.
- Mixed RMA - this type of RMA contains both Regular and Offline part (as different orders). It became available, only when Allow RMA for multiple orders from RMA Policy settings is set to Yes.
- Allow RMA for offline orders - located at General Settings section of Configuration Settings. If set to Yes, placing Offline Orders is allowed (except of Guest Offline RMA).
- Allow Guest Offline RMA - located at General Settings section of Configuration Settings. If set to Yes, placing Offline Orders is allowed.
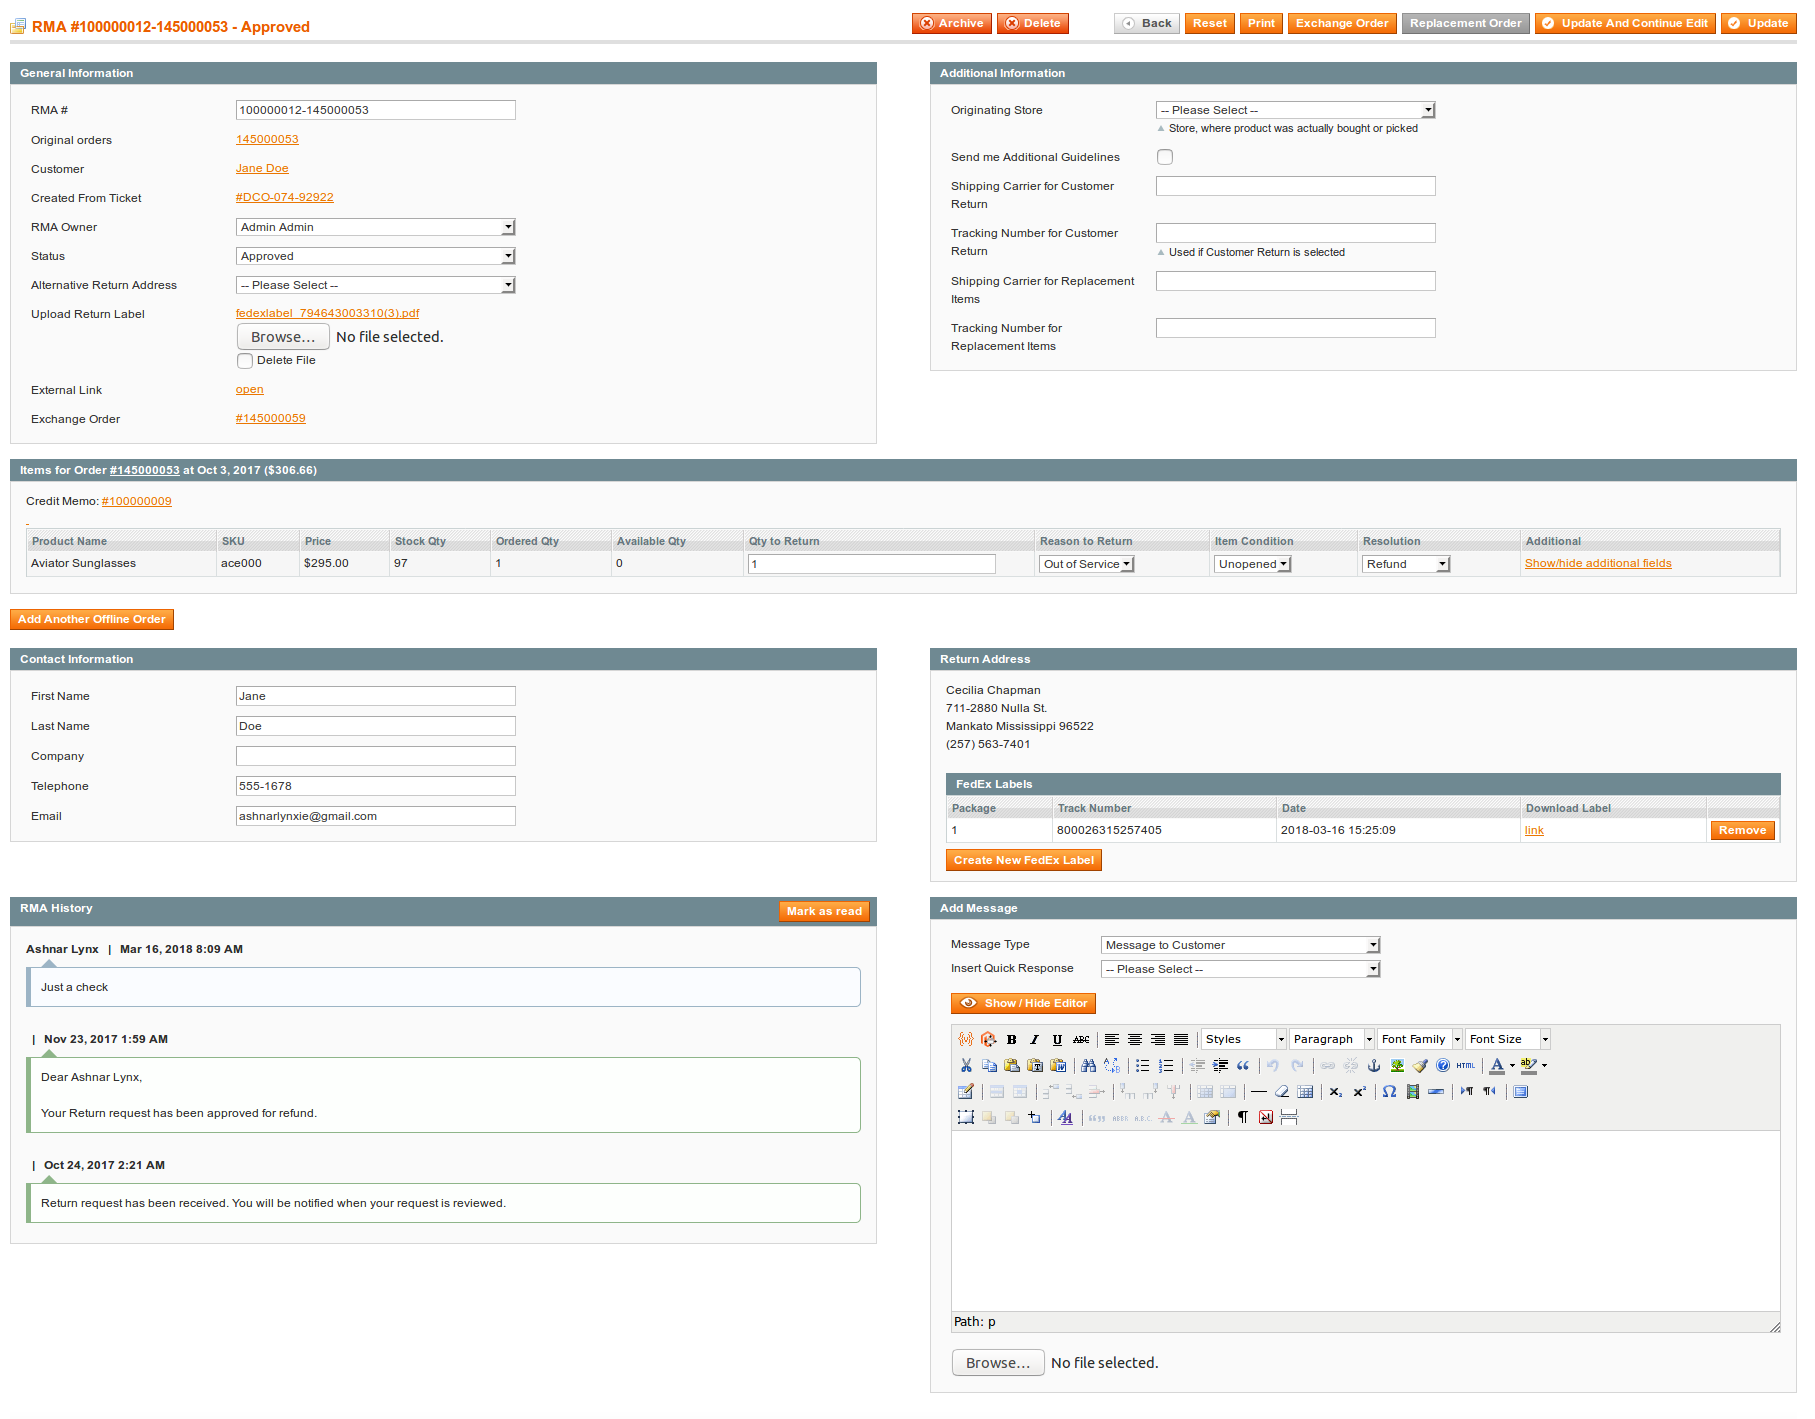
All RMA types has common interface, except of a few differences. Typical RMA looks like screenshot below, divided into seven blocks, each containing important part of return information: General Information, Additional Information, Items for Order, Contact Information, Return Address, RMA History and Add Message.
- General Information.
Contains most basic information about RMA Request, such as:
- RMA # - number of current RMA. Numbering of RMA can be changed at RMA Number section of Configuration Settings.
- Order# - number of original order (or, if it's Multiple Orders RMA, comma-separated original orders). Each number also is a shortcut, which leads to corresponding Order Edit Page.
- Customer - name of customer, which requested return. It is a shortcut to his record as well.
- RMA Owner - an agent of the store, who works with the RMA.
- Status - current status of the RMA.
- Alternative Return Address - a drop-down menu, which allows you to specify specific return address, instead of store address. Read more about Return Addresses.
- Upload Return Label - a control widger for uploading a return label (image or PDF). If RMA has return label, customer will be able to print it via Print RMA Shipping Label button from RMA view page.
You can specify only one Return Label here.
If there was an uploaded label before, it will be either replaced with new one (just select it with a widget), or removed (a Delete checkbox will appear below existing label - check it and save RMA). - Alternative Return Address - a drop-down menu, which allows you to specify specific return address, instead of store address. Read more about Return Addresses.
- External Link - link to the frontend view of current RMA, as it seen from customer side. Mainly, used for checking, whether uploaded label can be correctly printed, or to plugging third-parties to conversation.
- Exchange Order - if for current one or more Exchange Order was issued, here will be placed a shortcut to it.
- Additional Information
In this section Custom Fields are displayed.
Definitions of fields, shown on screenshot above, can be seen in Examples of Custom Fields subsection.
- Items for Order
This section can contain one or more blocks, which contain return items from corresponding orders. It can slightly differ depending on type of RMA.
Consider Regular RMA item list:

Header of this section contains:
- Original Order Number - a shortcut to original order.
- Original Order Date - a date, where order was placed.
- Original Order Total - a total paid amount.
Each row of this block contains:
- Product Name - a name of actually bought product. If customer had bought a Configurable product, here will be displayed simple product, which corresponds to the options he selected.
- SKU - SKU of product. Like above, it resembles actually bought simple product.
- Price - actual price, that was used in original order for total calculations.
- Stock Qty - product quantity, available your store' stocks. Refer to Inventory tab of a Product Edit Page (at Catalog -> Manage Products).
- Ordered Qty - how many items of current product was ordered.
- Available Qty - used in case, when customer ordered several items. In this case this field will display, how many items still have customer (excluding returned or pending to return).
- Qty to Return - how many items of current products should be returned by current RMA.
- Reason to Return - reason, why customer would like to return the item. Read more at Reasons section.
- Item Condition - condition of current item. Read more at Conditions section.
- Resolution - desired resolution for current item. Read more at Resolutions section.
- Additional - this column is shown only when at least one Product Custom Field is defined. They are displayed here, under collapsible pane Show/hide additional fields
If RMA is partial - e. q. not all items in original order are requested to return, additional link will appear at the bottom of the block - Show all order items. You need just to change Qty to Return field in desired row to add that item to current RMA.
Bundle products typically are returned as they were bought - as single item.
If you wish to grant customer to return separately bundle items, you need to set option Allow bundled items return one by one to Yes at RMA Policy section of Configuration Settings.
In this case Bundle item will be still shown as separate position (like Configurable) - and likewise, in this case it shall not be selected.
If at least one item in block has resolution, set in option Allow to create Credit Memo, when item has resolution at RMA Policy section of Configuration Settings (Refund by default), block will feature a Credit Memo button, which is a shortcut to creation of refund document. After Credit Memo is complete, additional link will be shown on the block - Credit Memo, with a shortcut to that document.
If Mirasvit Store Credit is installed, you can also transfer money for returned items, to the customer's Store Credit Balance. For that you need to set Resolution of items, that shall be refunded this way, to Store Credit - then additional Refund to Store Credit button will appear.
Read more about this in Working with Refunds subsection below.
Offline Orders
Offline Order Item List has more simpler layout, shown on screenshot below:

As you see, its header does not contain information of original order (except of its number), since it does not exists in fact.
Rows do not contain any product information, except of Qty to Return, since offline products also do not exist.
Conditionals (e. q. Reasons, Conditions and Resolutions) and Product Custom Fields also applied to Offline Orders, and shown in respective columns.
Mixed Orders
Mixed Orders contain item lists of both types, as shown on screenshot:

We recommend you to create separate RMA for Regular and Offline orders.
Read more, how to create different kinds of RMA at Creating RMA section.
- Contact Information
The section contains information regarding RMA's customer:
- First Name - first name of customer.
- Last Name - last name of customer.
- Company - company, that customer belongs to (if applicable).
- Telephone - phone number.
- Email - email, to which should go all email notifications.
If you really need to change customer - you need to re-create RMA, or change ID manually at database-level.
- Return Address
This section displays current return address, that will be used in Packing Slip, or in FedEx Shipping Label.
Typically in contains address, defined at RMA -> Settings -> General Settings -> Return Address. If you wish to change it to other destination, you need to define Return Address, and select it in corresponding drop-down menu at General Information section of RMA.
This section also holds a subsection of Fedex Labels. It displayed only if Enable FedEx label option is set to Yes at Federal Express Shipment section of Configuration Settings.
FedEx Labels subsection contains a button Create New FedEx Label, which allows generation of FedEx labels using their dedicated service. Read, how to create such labels at Federal Express Integration Settings section.
If label is generated correctly, it is added to the subtable, which contains the following information:
- Package - is the package number. Each label generated is recognized as separate package, so if for some reason you need to send returned product by several package, each can have its own label.
- Track Number - is the track number of the package, assigned by FedEx service. Using this number, you can track your package delivery.
- Date - is the date of label generation.
- Download Link - link to download label as a PDF file.
- Remove button allows to remove current FedEx label.
In default workflow, agent should generate at least one FedEx label, then download it and attach to RMA using Upload Return Label field from General Settings.
Add code below to email notification template, and customers will receive links to all labels, generated by the moment of that notification:
{{depend rma.getFedExLabels()}}
    {{var rma.getFedExLabels()}}
{{/depend}}
- RMA History
The section contains a list of all RMA messages (status changes, replies of customer or agent).
Each message has a author (except of automated messages, added by appropriate Status), and a sensical background color depending on message type:
- Green - for customer's messages;
- Cyan - for staff messages;
- Red - for internals.
- Add Message
The section allows store agent send message to the customer or add internal note to the RMA. This section consists of the following fields:
- Message Type - is the type of message, that you plan to send. Two types available:
- Message to Customer - a regular message to the customer;
- Internal Note - internal message, which will be visible only to staff members in backend.
- Insert Quick Response - this drop-down appears only at least one Quick Response is defined for the store, where was placed original order. To add a quick response text, you need just to select desired title - and corresponding Quick Response will be added to the message text.
- Message Area - is the main text area, where you can enter your message to customer.
- Message Area can be Rich HTML and created with a visual editor. For that you need to set Use WYSIWYG editor in backend option to Yes at General Settings section of RMA Settings.
- In plain-text mode (e. q. when option above is No, or you had pressed a button Show/Hide Editor of the WYSIWYG editor) you can add to the message transitional variable, just as in Email Template.
Proceed to Creating RMA from backend
Your feedback about this content is important.
Let us know what you think.