Getting Started
Welcome to the RMA Documentation.
RMA (Return Merchandise Authorization) - is a powerful tool for managing the return and exchange of items purchased by customers in your store.
It has an intuitive, step-by-step user interface which allows your online store clients to create return/exchange requests quickly and easily, even when original order is not available. Extension allows you to create backend requests through the administration interface as well.
RMA Workflow Diagram
The best way to understand, how returns work, is to follow the this workflow diagram, which depicts the most general use cases. Detailed description of each step you will find below:
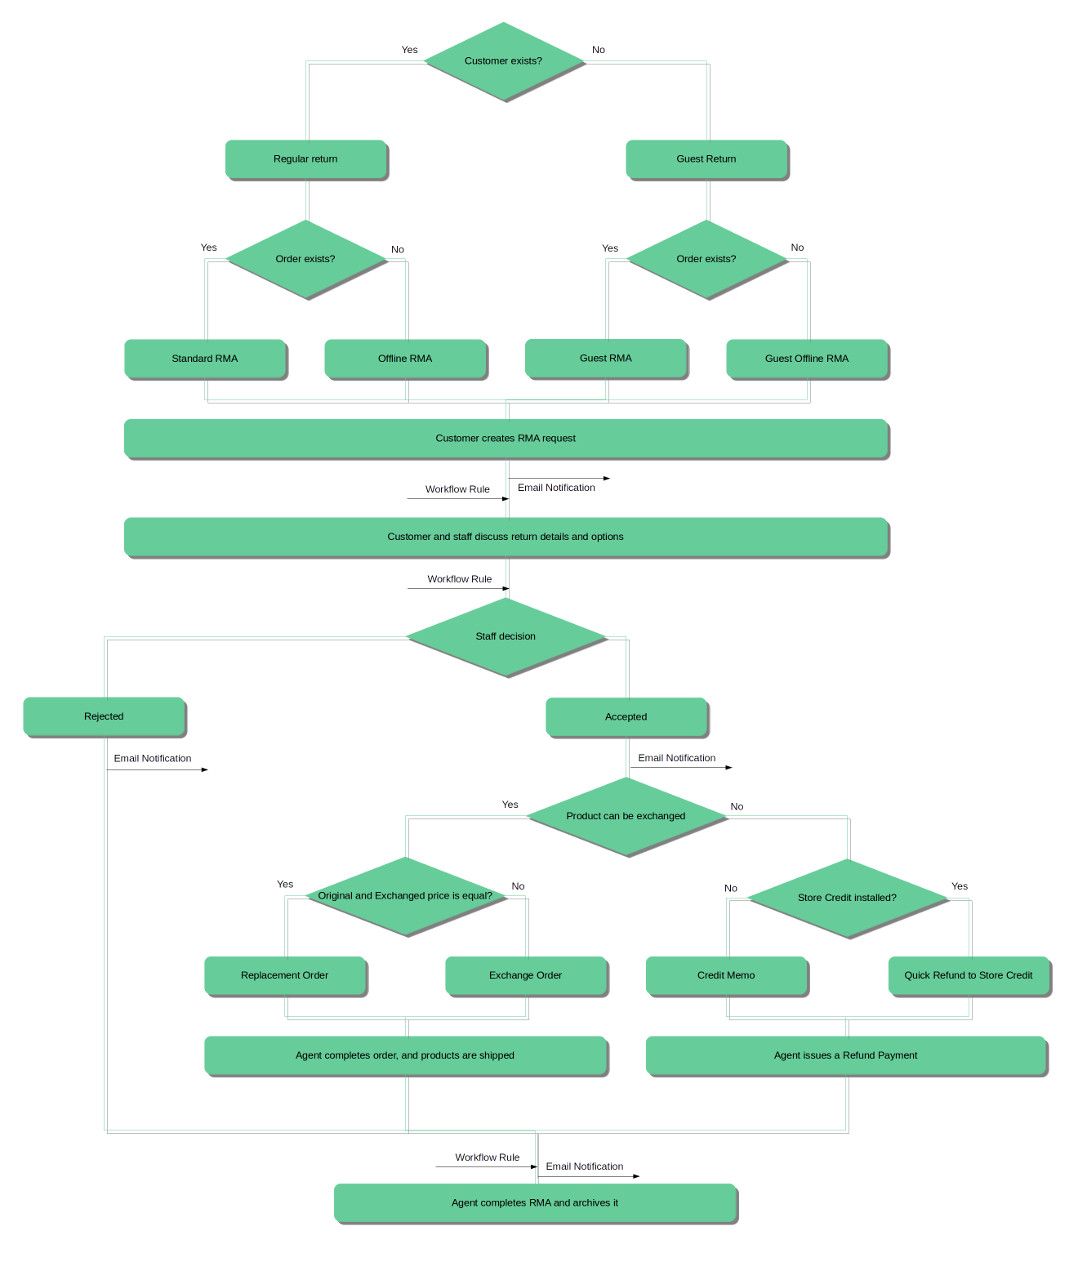
RMA Workflow Explained
- If customer would like to make a refund or exchange of the ordered item(s) he can follow two possible paths:
- If he is registered customer, then he have dedicated My Returns section in his Customer Account.
- If he is a Guest, Guest RMA Form is available for him (by default accessible from the footer of frontend pages).
- Original order should be completed (e. q. invoiced, shipped and received Complete state) and was placed during time period, set in Allow to request RMA after order completion, days option at RMA Policy settings section, only then customer can issue a return. You can change order status, required for return, as well, using Allow to request RMA if order has status option from the same settings section.
- If order exists, RMA can be placed in Regular mode, e. q. can be either selected in drop-down menu (for registered customers), or entered in Guest Form.
- If order does not exist, RMA can be placed in Offline mode. Customer will be asked to enter order number and products to return manually.
Normally Guest customers are not allowed to place Offline RMA. However, you can grant them such a possibility using option Allow Guest Offline RMA from RMA Policy section of Settings.
- By default customer also should provide for each returned product its Condition, Reason for returning and desired Resolution.
You can select, which product conditionals shall be provided, at Require customers to select option at General Settings section of Settings.
- After products are selected and their conditionals provided, RMA Request can be placed. By default, each new RMA immediately receives status Pending Approval, and assigned to default staff user. Customer will receive Email Notification about this.
You can change, which status will be automatically received by RMA using Default status for new RMA, and default staff user using Default owner for new RMA option. Both of them are located at General Settings section of Settings.
Also, email notification, sent on default status assigment, is changed at corresponding Status edit page, at Email Notification for customer field. -
RMA Request, just placed by customer, can be automatically processed by Workflow Rule.
In fact, during placing RMA request, two subsequent events are fired:- New RMA has been created - on this stage basic properties are set, such as RMA Number, initial Status assigment, and saving of customer and custom fields data.
- RMA has been changed - on this stage returned items are added, and original orders are binded to RMA.
If you wish to process with rules Status or other basic property of RMA (or custom fields), use first event. If you wish to process items and their conditionals, use second one.
- After Request is placed, and initial status is assigned, staff agent and customer can communicate with each other, to have additional details and return arrangement. Communication can be through emails (since each message will trigger notification), or through frontend. Both answers of staff and customer can be additionally processed using Workflow Rules.
-
There can be two possible ways for agent to complete RMA:
- If the item can not be returned or refunded, agent would set the RMA status to Rejected, and archive it.
- If decision is positive, agent sets status Approved (or similar status), and return procedure begins.
In both cases customer will receive automatic Email Notification (defined inside corresponding Status).
- On RMA approval, customer obtains possibility to print RMA Packing Slip and Confirm Shipping (corresponding buttons will appear in frontend).
Display of these buttons can be turned on/off at corresponding Status (Approved by default) edit page, using option Show buttons 'Print RMA Packing Slip' and 'Confirm Shipping' in the customer account.
- Customer prints an RMA Packing Slip (or staff generates a FedEx label for him), and sends a package to your store.
- After sending it, Customer shall confirm shipping from his account (using button mentioned above). RMA then automatically receives status Package sent.
- When package is arrived on store and desired resolution is Exchange, agent have the following options:
- If product can be exchanged to a identical one (useful for exchanging broken to a working items), he can create a Replacement Order. This option creates automatic order of zero-total, with the same product as requested.
- If product can be exchanged with a cheaper/expensive one, he need to create Exchange Order. It will open a standard order dialog, where agent can pick product for exchange. If price is larger, use Custom Price option, and enter difference between old and new product.
Magento allows very little flexibility for Order Creation dialog, so you can not automate the following properties:
- Order number. Magento will number Exchange Order as any other. However, link to this order will be attached to corresponding RMA (see Exchange Order field at RMA backend edit page).
- Automatic address pickup. If Exchange Order is created for registered customer, his Default Shipping address will be used. If original order, however, was placed in Guest Mode - regardless, whether customer is registered, will be used shipping address from original order.
- Automatic exchange product pickup. You always need to add products for exchange manually.
- Special surcharge. If you really need to have a fee for the exchange, you also need either to add it manually, or create a special virtual product as a workaround.
- When package is arrived on store and desired resolution is Refund, agent have the following options:
- Issue a Credit Memo, and return money to customer.
- If Mirasvit Store Credit is installed, you can use Quick Refund option to transfer money to customer's balance. This way refunded money can be used instantly in another order as discount, or even full payment.
- If customer received exchange or refunded money, agent would set RMA status to Closed (or similar status), e. q. completes RMA, and archives it.
Return back to diagram. You may also proceed to Agent's Guide', where you can dive in even deeper.
Next steps:
How to install extension
- Login to Magento backend.
-
Go to System > Tools > Compilations.
If Compiler Status is Enabled, disable the compilation by clicking the button Disable in the upper right corner.
- Backup your store database and web directory.
- Download extension from your Personal Account.
- Unzip the extension locally.
- Copy contents of the folder step1 to the root directory of Magento store.
- Copy contents of the folder step2 to the root directory of Magento store.
-
Completely clear the site cache.
Go to System > Cache Management. Click button Flush Magento Cache. If you want to clear the cache manually, you need to remove a folder
/var/cacheat the server. - Logout from Magento backend and login again.
- Go to System > Configuration > Mirasvit Extensions > System, at form Installed Extensions press the button Run validation tests for all extensions for check extension installation and configuration.
- If compilation was enabled before installation, you need to run recompilation process to enable compilation. Go to System > Tools > Compilation and click on Run Compilation Process.
If you did not disable compilation and store is down after installation, follow the link and make next steps to recover the store.
Next steps:
How to upgrade extension
To upgrade extension follow next steps:
- Login to Magento backend.
-
Go to System > Tools > Compilations.
If Compiler Status is Enabled, disable the compilation by clicking the button Disable in the upper right corner.
-
Backup your store database and web directory.
If you have customizations, please, create a separate backup of app/code/local/Mirasvit before upgrading to the new version. - Download new extension package from your Personal Account.
- Unzip the extension locally.
- Temporary disable extension. Check Temporary Disabling.
- Copy contents of the folder step1 to the root directory of Magento store.
- Copy contents of the folder step2 to the root directory of Magento store.
- Completely clear the site cache. Go to System > Cache Management. Click button Flush Magento Cache. If you want to clear the cache manually, you need to remove a folder /var/cache at the server.
- Logout from Magento backend and login again.
- If compilation was enabled before upgrade, you need to run recompilation process to enable compilation. Go to System > Tools > Compilation and click on Run Compilation Process.
If you did not disable compilation and store is down after upgrade, follow the link and make next steps to recover the store.
How to temporary disable extension
To temporary disable the extension follow the next steps:
- Login in to Magento backend, go to
System > Tools > Compilation. Disable Compilation Mode (if enabled). -
Rename the following file:
app/etc/modules/Mirasvit_Rma.xmltoapp/etc/modules/Mirasvit_Rma.xml.bak
-
If you have only one extension from Mirasvit installed, remove the following file:
app/etc/modules/Mirasvit_MstCore.xmltoapp/etc/modules/Mirasvit_MstCore.xml.bak
- Go to
System > Cache Management. Press the buttonFlush Magento Cache.
Note: To enable the extension you need to rename the files back and flush the cache.
Extension Removing
To uninstall an extension please follow the next steps:
- Disable Compilation Mode (if enabled).
-
Remove following files:
app/etc/modules/Mirasvit_Rma.xml
-
If you have only one extension from Mirasvit installed, remove following file:
app/etc/modules/Mirasvit_MstCore.xml
- Login in to Magento backend and refresh site cache (if enabled).
-
Remove following folders:
app/code/local/Mirasvit/Rma
- Remove templates and layouts files of the extension from your theme folder. The list of such files can be collected from files in the extension package. Run the following SQL Query (before running it, replace [db_table_prefix] to your database table prefix. It can be found in the file /app/etc/local.xml).
DROP TABLE [db_table_prefix]m_rma_comment;
DROP TABLE [db_table_prefix]m_rma_condition;
DROP TABLE [db_table_prefix]m_rma_field;
DROP TABLE [db_table_prefix]m_rma_item;
DROP TABLE [db_table_prefix]m_rma_reason;
DROP TABLE [db_table_prefix]m_rma_resolution;
DROP TABLE [db_table_prefix]m_rma_rma;
DROP TABLE [db_table_prefix]m_rma_rma_store;
DROP TABLE [db_table_prefix]m_rma_status;

DELETE FROM [db_table_prefix]core_resource WHERE code='rma_setup';

DELETE FROM [db_table_prefix]eav_attribute where attribute_code='rma_status';- If you have only one extension from Mirasvit installed, run:
DROP TABLE [db_table_prefix]m_mstcore_attachment;
DROP TABLE [db_table_prefix]m_mstcore_logger;
DROP TABLE [db_table_prefix]m_mstcore_urlrewrite;

DROP TABLE [db_table_prefix]core_resource WHERE code='mstcore_setup'
Statuses
Statuses are one of basic blocks of RMA Workflow. Each stage of RMA processing should be represented as Status, which provide not only anchors for Workflow Rules but also automated email notifications.
By default RMA has following statuses:
- Pending approval - RMA request isn`t reviewed yet. This status is assigned to RMA on creation stage.
- Approved - RMA request is approved. Customer can print RMA Packing Slip and Confirm Shipment (if required).
- Package Sent - customer has confirmed sending of RMA items to the store.
- Rejected - RMA request is rejected.
- Сlosed - RMA request is closed.
If your workflow require more processing stages, you can create any set of additional statuses. You can also create special conditional auto-replies, which will be sent depending on returned items conditionals.

How to create a new Status
All statuses are located at RMA > Dictionaries > Statuses. Press the button Add New to add a new one, and you will be brought to Status Creation page, divided into two sections:
-
General information - contains basic properties of the status.
- Title - title of the new status.
Unlike other strings, Status titles can not be translated using locale CSV.
Instead of this, use Store Chooser above Status Edit form, to switch to the proper storeview, and enter to Title field proper translation. - Code - unique internal code for statuses.
- Sort Order - sort order, the lesser - the higher.
- Is Active - whether status is active and available for RMA assignment.
- Title - title of the new status.
- Notifications - here is defined automatic messages, which are sent to customer (and/or) added to RMA History on status assignment. If you do not need them, just leave empty appropriate field.
- Email Notification for customer - defines a sub-template with a message, which will sent to the customer by email. This sub-template will be enclosed in Template of Notification Email for Customer at Settings.
- Message for RMA history - defines a message, which will be added to RMA History.
- Email Notification for administrator - defines a sub-template with a message, which will be sent to administration staff (typical owner of RMA). This field is extremely useful, if current status is automatically assigned by a Workflow Rule.
Automatic messages in Statuses fully support our additional Transactional Email Variables, so you can also use them to enhance your email flow.
Conditional automatic messages in Statuses
- Dependable sections
In some cases you may need to create different auto-reply for different RMA items conditionals, such as namely Reasons, Conditions and Resolutions.
For example, when customer selects Exchange as desired resolution, he should receive a warehouse address, where product should be delivered. Or, if item has Damaged condition, customer should receive recommendations, how to use repair service.
This task can be achieved using special statuses with conditional automatic messages.
Our extension provides three special variables, that allows you to check RMA items conditionals. Corresponding variables are:
rma.getHasItemsWithReason(reason_id)- checks, whether at least one of RMA items has Reason with specified ID.rma.getHasItemsWithCondition(condition_id)- checks, whether at least one of RMA items has Condition with specified ID.rma.getHasItemsWithResolution(resolution_id)- checks, whether at least one of RMA items has desired Resolution with specified ID.
Since these variables return boolean value, they can be used in transaction email conditional operators such as {{depend}} and {{if}}.
The best way to add to your message dependable content is to insert it as {{depend}} section, as shown on example.
{{depend rma.getHasItemsWithResolution(2)}}
    You choose to receive your money back, so refund procedure will require some additional request, sent to this address:
    7292 Dictum Av.
    San Antonio MI 47096
    (492) 709-6392
{{/depend}}
This block will be added to message only if customer have chosen Refund (ID = 2) resolution for at least for one of returned item. Otherwise, content of this block won't be sent.
This allows to have in the same status several dependable blocks, which will be added to the actual notification only on matching items presence.
- Dependable item lists
Typically customers select the same desired resolutions for all items, but they rarely select the same reason or conditions. In this case you will need to show items, which match your dependable section.
Our extension provide for that special block rma/rma_view_items, which can be displayed with {{block}} keyword inside email template.
Basic format for displaying our special item list block is {{block type="rma/rma_view_items" rma=$rma}}. It will display all items in current RMA. You can add up to three additional parameters-filters of conditionals:
reason_id- ID of reason, that can be used as filter.condition_id- ID of condition, that can be used as filter.resolution_id- ID of resolution, that can be used as filter.
{{depend rma.getHasItemsWithCondition(3)}}
    You had chosen the following items for Repair Service:
    {{block type="rma/rma_view_items" rma=$rma condition_id=3}}<br><br>
    Send them to our repairing facility at:
    928-3313 Vel Av.
    Idaho Falls Rhode Island 37232
{{/depend}}
These additional parameters also can be used simultaneously, allowing you to create almost any item list.
Combining dependable block with our dependable item list block can result in flexible template like on example below:
Dear {{var customer.name}},<br><br>

Your Return request has been approved.
<br>

{{depend rma.getHasItemsWithResolution(1)}}
You choose to receive your money back, so we will refund the following items:<br><br>
{{block type="rma/rma_view_items" rma=$rma resolution_id=1}}<br><br>
{{/depend}}

{{depend rma.getHasItemsWithResolution(2)}}
You choose to exchange your product, we will contact you about the following items:<br><br>
{{block type="rma/rma_view_items" rma=$rma resolution_id=2}}<br><br>
{{/depend}}

Please, print <a href='{{var rma.guest_print_url}}'>RMA Packing Slip</a>.
- Enhancing with Workflow Rules
However, when store uses wide system of item conditionals, such templates tend to be very large and complex. This complexity can be resolved by adding new supporting Statuses and using Workflow Rules.
Let the store has three large traits for returns: Repair Service, Exchange Service and Refund Service. Create three different statuses for each of them:
- Repair Approved - status for repair services, contains conditional template depending on item conditions.
- Exchange Approved - status for exchanging service, contains conditional template depending on return reasons.
- Refund Approved - status for refund services, deals with all other cases.
Remove all notifications from standard Approved - it will act as a trigger for a Workflow Rules, which will direct RMA to one of statuses above. Now let's create three rules, for each of supporing statuses:
-
Rule for Repair Service
- Event:
RMA has been changed - Conditions:
Status is ApprovedStatus (before change) is Pending ApprovalItems have reason is Out of Service
- Actions:
- Set Status:
Repair Approved
- Set Status:
Note: two status checks in Conditions section required for detecting only transition between Pending and Approval statuses, otherwise subsequent communication will also trigger this rule.
- Event:
-
Rule for Exchange Service
- Event:
RMA has been changed - Conditions:
Status is ApprovedStatus (before change) is Pending ApprovalIf ANY of these conditions are TRUEItems have reason is Wrong colorItems have reason is Wrong size
- Actions:
- Set Status:
Exchange Approved
- Set Status:
- Event:
-
Rule for Refund Service
- Event:
RMA has been changed - Conditions:
Status is ApprovedStatus (before change) is Pending ApprovalItems have reason is Other
- Actions:
- Set Status:
Refund Approved
- Set Status:
- Event:
Activate all three rules. From that moment whenever staff approves RMA, customers will be automatically provided with appropriate notifications, and RMA will be directed to the proper service.
Of course, it is merely a simple example. There can be far more complex solutions, allowing you to enhance nearly any return policy.
Reasons
Reasons are possible situations, under which ordered item can be returned. Our extension provides five default Reasons, which are displayed on screenshot below:

All of them are located in their dedicated Grid at RMA -> Dictionaries -> Reasons. There you can also Change status (i. e. activate/deactivate) or Delete reasons, if you need to.
You can also create a set of new Reasons, that will suit your return policy.
How to create a new Reason
Visit RMA -> Dictionaries -> Reasons and press Add New button. You will be brought to Reason creation page:
- Title - title of the Reason.
Unlike other strings, Reason titles can not be translated using locale CSV.
Instead of this, use Store Chooser above Reason Edit form, to switch to the proper storeview, and enter to Title field proper translation. - Sort Order - sort order, the lesser - the higher.
- Is Active - whether Reason is active and available for RMA item assignment.
Conditions
Conditions are states, which can have each item, requested for return. Our extension provides three basic Conditions, which are displayed on screenshot below:

All of them are located in their dedicated Grid at RMA -> Dictionaries -> Conditions. There you can also Change status (i. e. activate/deactivate) or Delete conditions, if you need to.
You can also create a set of new Conditions, that will suit your return policy.
How to create a new Condition
Visit RMA -> Dictionaries -> Conditions and press Add New button. You will be brought to Condition creation page:
- Title - title of the Condition.
Unlike other strings, Reason titles can not be translated using locale CSV.
Instead of this, use Store Chooser above Reason Edit form, to switch to the proper storeview, and enter to Title field proper translation. - Sort Order - sort order, the lesser - the higher.
- Is Active - whether Condition is active and available for RMA item assignment.
Resolutions
Resolutions are desired actions (or return types), that customer wishes for selected items. Our extension provides three most used return types, which are listed on screenshot below:

All of them are located in their dedicated Grid at RMA -> Dictionaries -> Resolutions. There you can also Change status (i. e. activate/deactivate) or Delete resolutions, if you need to.
If you do not need them, deactivate them either using Change status mass function, or with Is Active field at edit page.
You can also create a set of new Conditions, that will suit your return policy.
How to create a new Resolution
Visit RMA -> Dictionaries -> Conditions and press Add New button. You will be brought to Condition creation page:
- Title - title of the Resolution.
- Code - unique internal code of Resolution.
- Sort Order - sort order, the lesser - the higher.
- Is Active - whether Condition is active and available for RMA item assignment.
Custom Fields
Sometimes information, collected on RMA Request, is not enough. For this case, our extension allows you to create Custom Fields, that will be displayed on both frontend and backend. You can use them to collect and store additional information.
Custom Fields can be of two major types:
- RMA-based - these fields are applied to RMA as a whole, and will be displayed at Additional Information section. They also will be available as email transaction variables, and can be used in Workflow Rules.
- Product-based - these fields are applied to particular return items, and will be displayed in corresponding collapsible panel. They are not available as email variables, and can not be used in Workflow Rules.
There's still a possibility to use these custom fields in transactional emails, via custom modifications. Read more at Emails Notification section.
Select major type, depending on the exact task. For example, you need to have customer enter shipping tracking number - it can be done via RMA-based custom field. But if you need to have customer to enter serial ID for each of returned items - you need a product-based custom field.
All Custom Fields are located in their dedicated Grid RMA -> Dictionaries -> Custom Fields. There's special Product column, which indicates, whether custom field applies to particular return item, or no.

You can also Change Status (e. q. activate/deactivate custom field), and Delete them, if need, via mass actions.
[YOUR_PREFIX]m_rma_rma (for RMA-based), [YOUR_PREFIX]m_rma_item (for items of Regular Return) and [YOUR_PREFIX]m_rma_offline_item (for items of Offline Order).Warning: If you will delete custom field, or change its major type, all data will be lost. If you wish to keep data - just deactivate Custom Field. It won't be displayed or available for edit, but data still will be stored in corresponding database tables.
Please, have a look to the some examples of Custom Fields, prior to creation of your own.
How to create a new Custom Field
Visit RMA -> Dictionaries -> Custom Fields, and press the button Add New. You will be brought to the Custom Field creation page.
Select major type first, as shown on screenshot below. If you need to create a custom field for a particular product, you should set it to Yes. For RMA-based custom fields just leave it in default state (e. q. No).
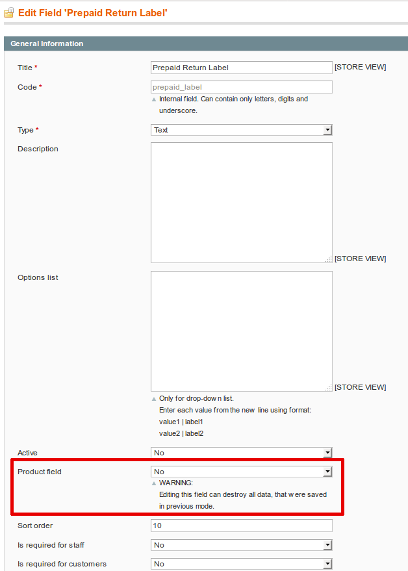
The following properties are identical for both major types of Custom Fields:
- Title - Title of the field.
-
Code - A unique internal code of the field.
This field can be used for accessing custom field content at transactional emails (applies only to RMA-based major type):- If Code is declared in lower case, special variables
{{var rma.get[VARIABLE_CODE]()}}can be used. E. q. if code is "stage", then variable would be{{var rma.getStage()}}; - If Code is declared in mixed case (e. q. contains both capital and small letters), then use generic variable
{{var rma.getData([VARIABLE_CODE])}}. E. q. if code is "Return_Tracking", then variable would be{{var rma.getData("Return_Tracking")}}.
Read more at Emails Notification section.
- If Code is declared in lower case, special variables
- Type - type of widget, associated with this field, and used for editing.
- Text - Simple one-line text field.
- Multi-line text - Multiple lines text field (textarea).
- Date - Date with calendar pickup widget.
- Checkbox - Checkbox.
- Drop-down list - Combo-Box with drop-down menu.
- Description - Description of the field. Will be displayed as hint under editing widget.
- Options list - Options definition for custom fields only of Drop-down list type, should be empty for all other types.
Each option should have format[ACTUAL] | [DISPLAYED]. First value in this pair - ACTUAL - is the actual value, that will be stored at the RMA table. It also will be displayed at the Grid, and as a result of email variables. DISPLAYED value is displayed only at RMA editing stage (both frontend and backend):actual_value1 | displayed_label1 actual_value2 | displayed_label2Read more at Examples section below.
- Active - whether this field is active and available for editing.
If Custom Field is deactivated, associated field in database is not removed, just not used - e. q. for all RMA, placed during inactivity, it will have NULL value.- Sort Order - sorting order of custom field. Fields will be displayed according to this value - from lesser to greater.
- Is required for staff - whether agent is required to fill this field.
- Is required for customers - whether customer is required to fill this field.
- Visible for customers in statuses - allows to show current field to customer only on specified statuses of RMA. In backend, however, Custom Fields will be shown regardless of this property.
This field lists all active statuses, defined at Statuses grid.
It also adds a special status - RMA Creation - it is a special built-in status, which commands to display current custom field at frontend RMA Creation Page.- Is editable for customers - If this option is enabled, customer can edit value of this field at frontend.
Examples of Custom Fields
- RMA-based Custom Fields
-
Custom Field for Guarantee Number (for Repair Service)
This custom field will appear as simple text field, where customers are required to enter their guarantee number.
- Title:
Guarantee Number - Code:
guarantee - Type:
Text - Description:
Guarantee Ticket Number, provided to you at the store - Active:
Yes - Product Field:
No - Is Required for Staff:
No - Is Required for Customers:
No - Visible for Customers In Statuses:
RMA Creation, Pending Approval, Approved - Is Show In Confirm Shipping Dialog:
No - Is Editable for Customers:
Yes
- Title:
-
Custom Field for Originating Store (for manually picked products, for example)
This field will appear as drop-down list, where customers can select, where they get their product.
- Title:
Originating Store - Code:
store_origin - Type:
Drop-down list - Description:
Store, where product was actually bought or picked - Options List (should be entered as multi-line text):
magellan | Trade-Center "Magellan"city_ok | Trade-Center "City OK"walmart | Walmartebay | E-Bay
- Active:
Yes - Product Field:
No - Is Required for Staff:
No - Is Required for Customers:
No - Visible for Customers In Statuses:
all statuses - Is Show In Confirm Shipping Dialog:
No - Is Editable for Customers:
Yes
- Title:
-
Custom Field for Shipping Carrier (for confirming shipment)
This field will be shown only when customer is required to confirm shipment.
- Title:
Shipping Carrier - Code:
carrier - Type:
Drop-down list - Description:
Service, which you had used for returning product - Options List (should be entered as multi-line text):
fedex | Federal Expressdhl | DHLusps | United States Postal Serviceother | Other
- Active:
Yes - Product Field:
No - Is Required for Staff:
No - Is Required for Customers:
No - Visible for Customers In Statuses:
Approved(or other status, where option Show buttons 'Print RMA Packing Slip' and 'Confirm Shipping' in the customer account is set) - Is Show In Confirm Shipping Dialog:
Yes - Is Editable for Customers:
Yes
In this case, make sure, that option Ask customer to confirm shipping is set to Yes at General Settings. - Title:
-
Custom Field for Requesting Additional Guidelines
This field allows you to mark, whether customer wants to receive additional guidelines for returning products.
- Title:
Send me Additional Guideline - Code:
send_guideline - Type:
Checkbox - Description:
If this checkbox set, send customer additional guideline. - Active:
Yes - Product Field:
No - Is Required for Staff:
No - Is Required for Customers:
No - Visible for Customers In Statuses:
RMA Creation, Pending Approval - Is Show In Confirm Shipping Dialog:
Yes - Is Editable for Customers:
Yes
Such checkbox-based custom fields are best used with supporting Workflow Rules (see Enhancing with Workflow Rules section below). - Title:
- Product Custom Fields
-
Custom Field for IMEI
Selling mobile phones also requires from customer to send authentical IMEI on requesting repairs. This field will help you to collect it.
- Title:
Mobile IMEI Number - Code:
imei - Type:
Text - Description:
IMEI number, shipped with mobile phone - Active:
Yes - Product Field:
Yes - Is Required for Staff:
No - Is Required for Customers:
No - Visible for Customers In Statuses:
RMA Creation, Pending Approval, Approved - Is Show In Confirm Shipping Dialog:
No - Is Editable for Customers:
Yes
- Title:
-
Custom Field for Repair Services
When you have an extensible number of different services, provided by repairing facility, you can create that many desired Resolutions. But this will make RMA request too complex. It's much more effective to create supporting Product Field, so customer can request also specific type of service.
- Title:
Repairing service - Code:
repair_service - Type:
Drop-down list - Description:
Which repair type is needed - Options List (should be entered as multi-line text):
firmware | Update or Re-Program Firmwarecase | Repair or Change Casescreen | Replace Screenreanimate | Reanimate Burnt Deviceother | Other Service
- Active:
Yes - Product Field:
Yes - Is Required for Staff:
No - Is Required for Customers:
No - Visible for Customers In Statuses:
all statuses - Is Show In Confirm Shipping Dialog:
No - Is Editable for Customers:
Yes
- Title:
-
Custom Field for Damage Description
Sometimes, products comes to return damaged. To serve customer the best, you need to know exactly, what was happened. This field will allow customer to describe, how product was damaged.
- Title:
Damage Details - Code:
damage_details - Type:
Multi-line text - Description:
How product was damaged - Active:
Yes - Product Field:
Yes - Is Required for Staff:
No - Is Required for Customers:
No - Visible for Customers In Statuses:
all statuses - Is Show In Confirm Shipping Dialog:
No - Is Editable for Customers:
Yes
- Title:
-
Custom Field for Preferred Exchange Type
There can be many options for exchange.
- Title:
Preferred Exchange Type - Code:
preferred_exchange - Type:
Drop-down list - Description:
Preferred Exchange Option. - Options List (should be entered as multi-line text):
same | Replace with the same productsimilar | Exchange with similar productcheaper | Give me a more cheaper alternativeexpense | Exchange to a more costly product with additional paymentother | Other Service
- Active:
Yes - Product Field:
Yes - Is Required for Staff:
No - Is Required for Customers:
No - Visible for Customers In Statuses:
all statuses - Is Show In Confirm Shipping Dialog:
No - Is Editable for Customers:
Yes
- Title:
- Enhancing with Workflow Rules
Custom Fields also can be used in Workflow Rules, allowing you not only to collect additional information, but also automate your return policy using that collected data.
Enhancing with Workflow Rules applies only to RMA-based Custom Fields.-
Automatically send to customer additional guidelines for returning product
This Workflow Rule enhances custom field Requesting Additional Guidelines, described above. It will be triggered on transition from Pending Approval status to Approved, automatically sending to customer all required documents.
- Event:
RMA has been changed - Conditions:
Status is ApprovedStatus (before change) is Pending ApprovalSend me Additional Guidelines is 1(Custom Fields of Checkbox type return1when selected, and0when deselected)
- Actions:
- Resolved:
Mark as unresolved
- Resolved:
- Notifications:
- Send email to customer:
Yes - Email subject:
Guidelines for returning product - Email body:
[Message about guidelines] - Attach files which were attached to the last message:
Yes(if applicable, it is attachments (documents, etc) provided by customer before)
- Send email to customer:
- Event:
-
Automatically reject all requests with non-specified IMEI
This Workflow Rule enhances rule Mobile IMEI Number, which is described above. It can be used, when customer should to provide IMEI for Repair Service, but does not need this for Refund. Thus, we need to notify customer about his error and ask him to place another RMA, with correct data.
- Event:
RMA has been changed - Conditions:
Status is Pending ApprovalItems have resolution is RepairMobile IMEI Number is ...(e. q. value is not entered)
- Actions:
- Resolved:
Mark as resolved - Set Status:
Rejected
- Resolved:
- Notifications:
- Send email to customer:
Yes - Email subject:
You had placed incorrect request - Email body:
[Message about correct RMA placement]
- Send email to customer:
- Event:
Examples, described above, are merely simple and mostly requested cases. The real possibilities behing Custom Field, especially with Workflow Rules enhancements - are nearly limitless.Quick Responses
Quick Responses or Templates are used for communication with customer, providing message templates on common topics, such as return procedures, answers to frequently asked questions and so on.
By default RMA does not contain any predefined Quick Response, but they can be created at RMA -> Dictionaries -> Quick Responses.
Once Quick Responses are properly created, they are shown at RMA Edit page, in Add Message section, in Insert Quick Response drop-down menu. If you wish to answer with Quick Response snippet, just select it by title in that menu, and it will be added to current message body. Then just press Update and Send Message button to send it.
If you need to create automated messages, you can use for that Statuses or Workflow Rules. Some non-trivial cases also described in How To section.
How to create a new Quick Response
Press Add New button at the dedicated grid (see path above). Each Quick Response contains the following fields, as shown on screenshot below:
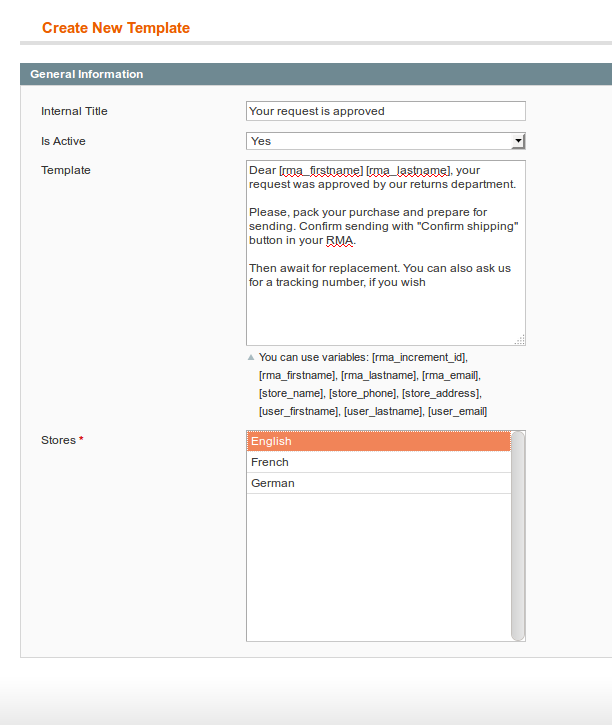
- Internal Title. It is the short title, that will be displayed at RMA Edit page, in Add Message section.
- Is Active. Allows to hide Quick Response, if it is no longer needed, and activate it again.
- Template. Contains body of Quick Response.
- Stores. Allows to control, for which storeviews particular Quick Response is applicable.
This field should match stores, from which original orders are placed. If any Quick Response does not appear in the RMA Edit page, please, check its Stores field - it should contain the same Store, as original order.
Body of quick response can contain variables, but only from the list below:
- [rma_increment_id] - current RMA number
- [rma_firstname] - First Name of RMA customer
- [rma_lastname] - Last Name of RMA customer
- [rma_email] - Email of RMA customer
- [store_name] - Current Storeview's Name, taken from System -> Configuration -> General -> Store Information
- [store_phone] - Store's phone, taken from System -> Configuration -> General -> Store Information
- [store_address] - Store's address, taken from System -> Configuration -> General -> Store Information
- [store_return_address] - RMA return address
- [user_firstname] - First Name of current RMA Owner
- [user_lastname] - Last Name of current RMA Owner
- [user_email] - Email of current RMA Owner
Quick Responses also can be Rich HTML and created with a visual editor. For that you need to set Use WYSIWYG editor in backend option at General Settings section of RMA Settings.Return Addresses
By default for any return the same address used, specified at RMA -> Settings -> General Settings -> Return Address. But there are cases, when products should be returned not to the main store's address, but to some other location - warehouse, for example, or repair facility. Return Addresses are used just for this.
By default RMA does not contain any predefined Return Address, they should be created at RMA -> Dictionaries -> Return Addresses.
To use newly-created Return Address, you need to open appropriate RMA and in section General Information select proper address by its short title in Alternative Return Address drop-down list. Then save RMA, and only after that selected Return Address will be shown on RMA Edit Page, and on RMA Packing Slip.
How to create a new Return Address
Visit Return Address dedicated Grid (path is given above), and press Add New button. Each Return Address contains the following fields, as shown on screenshot below:
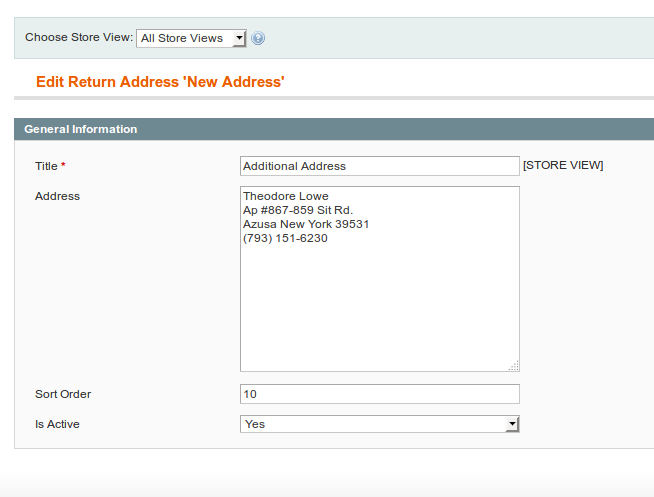
- Title - short title, under which this Return Address will be shown at RMA Edit Page.
- Address - address itself, as a multi-line string.
- Sort order - allows to set Return Addresses in some order - for example - by locations, associating a number with proximity. The lesser number - the higher position.
- Is Active - allows to hide Return Address, if it is no longer needed, and activate it again.
Federal Express Integration Settings
RMA extension allows integrating FedEx label generation service for return shipping.
FedEx credentials
Having subscribed to FedEx service, you obtain the following credentials for sandbox or production:
- Account ID - Account ID used in FedEx profile.
- Password - Unique password.
- Authentification Key - First unique key for service authentification
- Meter Number - Second unique key for service authentification
These credentials must be entered at Configuration > Sales > Shipping Methods > FedEx. They are critical for all FedEx services and label generating as well.
FedEx Service confirmation procedure
FedEx authority does not provide live credentials at first request, only test ones, for sandbox mode. You need to pass special procedure of labels validation. It can be done only with your FedEx account:
- Pick up appropriate service in test mode. Return labels can be service-specific, so you need also to specify service - Smart Post, for example;
- Enable FedEx support in RMA -> Settings -> Federal Express Shipment, with appropriate options, having entered FedEx test credentials at System -> Configuration -> Shipping Methods -> FedEx;
- Create a test order and test RMA. If you had properly enabled FedEx Support in RMA, you will see additional button Create New Fedex Label at RMA editing page;
- Create a number of labels with different parameters, download them and send to FedEx authority.
Then you will receive confirmation, with live-store credentials, that you can use for RMA.
Other FedEx settings
They are located at Configuration > RMA > Federal Express Shipment:
- Enable FedEx Label - Enables or disables FedEx label generating for RMA.
- Default FedEx Method - FedEx Shipping Method, used by default
- FedEx Reference Text - Unique reference line, added to label
- Store Contact Person - Person, who is responsible for receiving FedEx return packages
- Store Address (Line 1)
- Store Address (Line 2)
- Postal Code
- City
- State or Province Code
- Country
- Weight by Default - Default product weight. FedEx requires weight for all products, so this parameter is critical, if you have products without precise weight.
- FedEx Shipment Charges Pays - Determines, who shall pay shipment charges. By default it's recipient.
- FedEx SmartPost Indicia - SmartPost indicia is a special constant, which means weight category. Usually weight under 1 lbs marked as "Presorted Standard", while from 1 - 70 lbs - as "Parcel Select".
- FedEx SmartPost HubID - Hub ID, which is used for SmartPost shipment handling. This ID issued, when SmartPost is enabled at FedEx Service side and must be one of these: http://www.fedex.com/us/smart-post/network.html
Also, you should have properly set all parameters at Configuration > General > Store Information
How to generate FedEx label for RMA
Having enabled FedEx label generation, you will see at RMA Edit page additional table FedEx Labels and "Create New FedEx Label" button.
Press this button to enter FedEx Shipping Label Settings dialog (see screenshot below) and configure package. You will see the following parameters:
- Type - Packaging type, allowed in current FedEx Method.
- Total Weight - Total weight of package. Be sure, that it is equal to sum of weights of package items and corresponds with packaging type.
- Length
- Width
- Height
- Units - dimension units, used in three parameters above.
- Signature Confirmation - special sign on label, for example, "Adult Content".
- Package Items - content of package. Add them by entering greater that 0 value in Returned column.
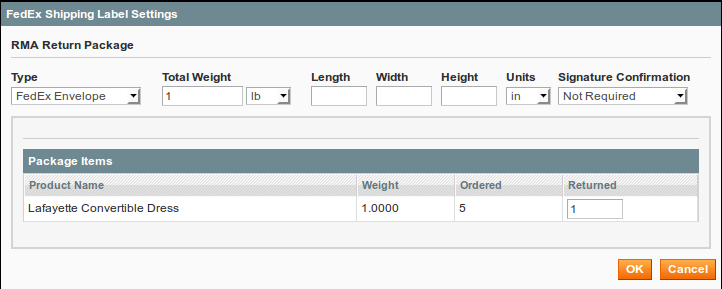
Then, if package is configured properly, press "OK" and you will see new record at FedEx Labels, with tracking number and download link to PDF file, containing ready-to-print label.
NoteFedEx services provide two types of production credentials. One for simple services, other for advanced. Label generation is advanced service, so it need additional certification. If you subscribed to simple service, you will obtain Authentification Error. If so, contact your FedEx account support rep for advances subscription.
How to insert link to generated FedEx labels to a history message, or to email template
To include label to a notification or email message, pick a status at RMA > Dictionaries > Statuses (for example, Approved). There will be Notifications area with three large text fields:
- Email Notification for customer - email template, which is sent to customer when this status is assigned to RMA.
- Email Notification for administrator - email template, which is sent to staff when this status is assigned to RMA
- Message for RMA history - automated message, which is added to RMA history.
Pick a template, which you want to contain links to FedEx labels, and add there the following code:
{{depend rma.getFedExLabels()}}
{{var rma.getFedExLabels()}}
{{/depend}}
Then, if that status is assigned to RMA, links to labels will be added to messages. If there are more than one label, they will be arranged as list.
NoteFedEx Labels must be generated before status assigning. If any label was generated after it, either status must be reassigned, or label must be sent manually.
Errata
If error displayed while generating FedEx, here is the list of possible codes of FedEx issues: https://www.fedex.com/us/developer/WebHelp/ws/2014/dvg/WS_DVG_WebHelp/Ship_Service_and_Open_Shipping_Error_Messages.htm
Workflow Rules
The Workflow Rules are powerful tool for automating RMA processing. Each event, each stage, which RMA passes, can be hooked using these rules.
Each Rule contains a set of conditions and automated actions. Whenever RMA is changed, our extension checks all Rules, and if conditions are met - corresponding action is triggered.
For example, when new RMA arrives, all the department members can be alerted. If support team member answers to the RMA Request, its status can be automatically changed to Approved or Rejected. If customer makes no reply for 3 days, a reminder to him can be sent.
Workflow Rules also can enhance auto-replies in Statuses, usage of Custom Fields, and even enhance your email communication. The possibilities are wide enough to support RMA policy of any complexity.
All rules are located in their dedicated Grid at RMA -> Workflow Rules. There you can Change Status (e. q. activate or deactivate them) and Delete them using mass-actions. New Rules also are created there.
Please, check examples of Workflow Rules before creating your own one.
How to create a Workflow Rule
Visit RMA -> Workflow Rules and press the button Add New to create a new Workflow Rule. You will be brought to the Creation page with the following tabs:
General Information
This tab contains the most basic properties of the rule.
- Rule Name - sensical name of the rule. Carefully selected name will help you to determine, for what task rule is created.
- Is Active - whether rule is active and is processed, when event is triggered.
- Priority - order which will be used for rules sorting before applying. The lesser - the earlier.
- Stop Further Rules Processing - If option enabled, other rules, binded to the same event, will not be processed. This option is extremely useful when building complex automation.
Conditions tab
This is the most important tab of the rule - it breaks into Event and Conditions sections, and define - when this rule shall be triggered.
- Event subsection
This section binds the rule to one of events, that are fired on changing RMA Request properties or adding a new message to communication. There's five possible events:
- New RMA has been created - fired, when RMA created, and its basic properties (including Custom Fields, but excluding return items) are saved.
- RMA has been changed - fired, whenever any RMA property is changed. Also fired, when RMA is created, and return items are added.
- New reply from customer - fired, when to RMA history a new message from customer is added.
- New reply from staff - fired, when to RMA history a new message from staff is added.
- Check every hour - fired every hour, on crontask execution. If you wish to use this event, make sure, that crontask
mirasvit_rmais running. You can do it, for example, via third-party extension AoE Scheduler.
On creation stage RMA two events consequently appear:- New RMA has been created - on this stage RMA is issued, and basic properties are filled - such as store and customer, and initial status is set.
- RMA has been changed - on this stage items are added to the RMA, and filled rest of properties.
Therefore, if you need to control properties of items, you need to use RMA has been changed event, along with additional condition of Status. Read more at Conditional automatic messages in Statuses.
- Conditions subsection
This section contains conditions, which define, when current rule shall be executed. There are four possible global modes of applying conditions, shown in special header
If [APPLY MODE] of these conditions are [VALIDATION MODE]:Applying modes define, when rule shall be triggered:
- ALL - implies, that rule will be executed only when strictly all conditions were met;
- ANY - implies, that rule will be executed only when one or more (but not all) of conditions were met;
Validation modes define, which result can produce each condition to be counted as "met":
- TRUE - implies. that conditions should be valid.
- FALSE - implies, that conditions should be invalid.
Blocks can be nested. To insert a block with global mode, you need to select Conditions Combination option as a condition. This allows to create flexible condition sets to satisfy policy of any complexity.
Each block can contain one or more conditions. Here is their list:
- Last message body - Content of the last public message, left in particular RMA
- Created at - Date of RMA creation
- Updated at - Date of RMA last update (e. q. new message appeared, or properties changed)
- Store - Store, from where RMA was submitted (note: this condition can not detect backend-created RMAs, as they can be binded to any store)
- Status (before change) - Status, which particular RMA has prior to event firing (used only for RMA has been changed event)
- Status - Current RMA status
- Owner (before change) - Owner, which held particular RMA prior to event firing (used only for RMA has been changed event)
- Owner - Current RMA owner
- Is Archived (before change) - whether particular RMA was in archive prior to event firing (used only for RMA was changed event)
- Is Archived - whether RMA is archived
- Last Reply By - Last replier in this RMA: Customer or Staff agent
- Hours since Created - Tme period from creation of particular RMA (note: this condition is not precise, use equal or greater or equal or less than comparators here)
- Hours since Updated - Time period from last update of particular RMA (note: this condition is not precise, use equal or greater or equal or less than comparators here)
- Hours since Last Reply - Time period from last message appearance in particular RMA (note: this condition is not precise, use equal or greater or equal or less than comparators here)
There's three special conditions, that allows you to analyze conditionals of returned items. They can be applied on any event, except of New RMA has been created.
- Items have Reason - checks, whether at least one of returned item has certain Reason.
- Items have Condition - checks, whether at least one of returned item has certain Condition.
- Items have Resolution - checks, whether at least one of returned item has certain Resolution.
You can also use as conditions RMA-based Custom Fields. There's, however, some differences in their usage.
Each Custom Field comes as two different condition. So, if the field is Repairing service, then it will result in two conditions:
- Repairing service (before change) - checks value of the field before event was fired.
- Repairing service - check current value of the field.
It allows you to detect changing values of that fields, and thus - flexibly react to additional information, supplied in your RMA. Read more at Examples of Workflow Rules section below.
Actions tab
This tab defines actions, which should be performed if conditions, defined in Conditions tab are met.
- Set Status - sets a new Status for the RMA
- Set Owner - sets a new Owner for the RMA
- Resolved - allows to mark the RMA as solved or unresolved
- Archive - allows to mark the RMA as archived or unarchived
Actually, you need to set Action even if Rule is intended just to send custom notification. We recommend using in this case Resolved action.Notifications tab
If conditions are met, and action is executed, Rule can send notification with details.
- Send email to RMA owner - If option enabled, current email will be sent to RMA owner
- Send email to customer - If option enabled, current email will be sent to customer
- Send email to other email addresses - Allows to send emails to additional addresses (if you need to send more to one address, use comma to separate them).
- Email subject - Email subject
- Email body - Message, which should be sent. You need to supply here a sub-template, which will be enclosed in template, defined at Template of Rule Notification option at Settings.
Since it is a subtemplate, you can use transactional email variables here. Read more at Email Notifications section.
- Attach files which were attached to the last message - If option enabled, attached to the last message files will be attached to the Rule notification as well.
Examples of Workflow Rules
-
Automatically approve all new RMA requests, which are placed by Staff from backend
Sometimes staff members place RMA from backend, based by phone call, or other external communication channel. In this case is useful automatically to approve such requests.
- Event:
RMA has been changed - Conditions:
Status is Pending ApprovalLast Reply By is StaffHours since Created equals or less than 1
- Actions:
- Set Status:
Approved
- Set Status:
Note: Additional check for a hours from creation allows you to select only New RMA, otherwise this rule will be triggered, whenever RMA is answered by Staff.
- Event:
-
Automatically reject all RMA with Opened condition
This workflow rule can be used for rejecting all requests for returning already opened merchandize.
- Event:
RMA has been changed - Conditions:
Status is Pending ApprovalItems have condition is Opened
- Actions:
- Set Status:
Rejected - Resolved:
Mark as resolved
- Set Status:
- Event:
-
On approval of RMA Request, assign it to different staff depending of desired Resolution
If you have more than one staff, managing returns, you may want to automate their assignment. For that you will need a separate Rule for each Resolution type.
Assume, that you have John Doe staff, responsible for Exchanges, and Jane Doe, responsible for Refund. In this case you will need two different rules:
Rule for Exchange Staff:
- Event:
RMA has been changed - Conditions:
Status is ApprovedStatus (before change) is not ApprovedItems have resolution is Exchange
- Actions:
- Set Owner:
John Doe
- Set Owner:
Rule for Refund Staff:
- Event:
RMA has been changed - Conditions:
Status is ApprovedStatus (before change) is not ApprovedItems have resolution is Refund
- Actions:
- Set Owner:
Jane Doe
- Set Owner:
Note: This rule uses so-called transition detection, e. q. using the same property check of value before event, and current value. It ensures, that Rule will be triggered only once, when Status was changed from one status to another.
- Event:
-
Analyze customer's answer and discard all RMA, when customer uses hate speech or posts spam
Sometimes, there can be customers, that do not want actually be satisfied. You can detect it, and automatically discard it, with a notification to him.
- Event:
New reply from customer - Conditions:
If ANY of these conditions are TRUE :Last message body contains bastardLast message body contains freakLast message body contains retarded[ANY OTHER KEYWORD]
- Actions:
- Resolved:
Mark as resolved - Set Status:
Closed - Archive:
Move to Archive
- Resolved:
- Notifications:
- Send email to customer:
Yes - Email subject:
Your request had been dropped - Email body:
[Message about inappropriate lexic]
- Send email to customer:
- Event:
-
Send a reminder to a customer, who did not answered to Staff message for 3 days
Sometimes RMA Requests are forgotten by customers, or staff answers accidentally went to Spam folder. You can send the customers a reminder.
- Event:
Check every hour - Conditions:
Last Reply By is StaffHours since Last reply equals or greater than 72(24 x 3 = 72 hours)
- Actions:
- Resolved:
Mark as unresolved
- Resolved:
- Notifications:
- Send email to customer:
Yes - Email subject:
We've just contacted you to remind, that you had placed a return request' - Email body:
[Message with details]
- Send email to customer:
Note: Just the same way you can close dead (e. q. unanswered) RMA - by increasing
Hours since Last replyvalue and using Set Status action. - Event:
Examples, described above, are merely simple and mostly requested cases. The real possibilities behing Workflow Rules enhancements - are nearly limitless.Settings
All configuration settings are located at RMA > Settings, and consist of the following sections:
- General Settings - defines the most basic settings for tuning-up your Return policy.
- Federal Express Shipment - allows you to generated FedEx shipping labels directly from RMA. This section is described in dedicated Fedex section of this manual.
- Customer Account - allows you to turn on/off dedicated RMA section in customer's account.
- RMA Policy - allows you to define specific details of your RMA policy, such as status of orders to return, exchange and refund resolutions and so on.
- RMA Number - deals with RMA numbers generation.
- Email Notification Settings - allows you to set (or disable) your custom templates for email notifications. Read more here;
General Settings
Option Description Return Address Return address of the store. Will be shown in the RMA Packing Slip. Default status for new RMA When customer creates a new RMA, this option sets RMA default status. Default owner for new RMA Sets default owner for a new RMA. Move RMA to Archive if it has one of following statuses Option allows to archive RMA automatically. E.g. you can automatically move to the archive RMA with the status Closed. Ask customer to confirm shipping If option is enabled, customer will be asked to confirm shipping of returned items. Shipping confirmation text Text of shipping confirmation dialog. Enable option "This was a gift" Option is useful, when your customers buys gifts for their friends. Friend can create an RMA request for gift. And initial customer will not be notified about such RMA. Enable integration with Help Desk This option allows to convert Help Desk tickests to RMA requests. Works only if you have installed Mirasvit Help Desk MX extension. Code of "Brand" attribute This field is used to create RMA reports by "Brand". To find correct code of your "brand" attribute go to the Catalog > Attributes. Allow upload only attachments with extensions Customers will be allowed to upload only those types of files. Limit of attachments size Customers will not be able to upload files with size more than this limit. Store attachments in Allows to store attachments either in Database, or in File System. If you had selected the latter, make sure, that /media/rma/attachmentsdirectory is writable.Show Columns in RMA Grid You can configure what columns you would like to show in the main RMA list in the backend. Allow RMA for offline orders If option is enabled, RMA requests will be available for offline orders. CMS block for additional step Allows to select the store page, where customer will be redirected after clicking the button Next Step from the Request New Return page. CMS block for RMA success page Allows to select the store page, which will be shown for customer when RMA request is created. Require customers to select Sets the required for customer fields to fulfil at the RMA request form. Use WYSIWYG editor in backend Allows to use WYSIWYG editor in backend. Customer Account
Option Description Show RMA section in Customer Account If option is enabled, RMA section is displayed in a customer account. RMA Policy
Option Description Allow to request RMA after order completion, days Number of days after order completion, when customer can create an RMA request. Allow to request RMA if order has status Sets product's order status(es) which allows customer to create RMA request. Allow to create Replacement Order, when item has resolution Shows Replacement Order button on RMA, where at least one item has selected Resolutions. Allow to create Credit Memo, when item has resolution Shows Credit Memo button on RMA, where at least one item has selected Resolutions. Allow return to Store Credit Allows Quick Refund to Store Credie (works only when Mirasvit Store Credit is installed). Allow bundled items return one by one Allows Bundled Items returns as independent items (set Yes), or as a single item (set No). Allow Guest Offline RMA Allows Offline RMA to be placed by guests Allow RMA for multiple orders Allows one RMA to contain items from several orders Ask to agree with RMA policy text If option is enabled, RMA policy is shown when customer creates a new RMA. Customer must accept the policy to proceed with RMA. CMS block with RMA policy text Sets CMS static block with text of RMA policy. To create and manage this block go to the: CMS > Static Blocks RMA Number
Option Description Number Format You can specify a custom format for RMA numbers. You can use variables [store], [counter]. E.g. you have a format 'RM-[store][counter]' and you'll receive RMAs with numbers RM-1000001, RM-1000002, RM-1000003, etc. Start Counter From Initial number of the counter. Counter Increment Step Counter's increment step. Counter Length Number of digits in the counter. Email Notification Settings
Option Description Email Sender Sets email, from which letters will be sent to a customer. Template of Notification Email for Customer Template of email notifications for customers. Also see how to customise email templates. Template of Notification Email for RMA Owner Template of email notifications for RMA agents. Also see how to customise email templates. Template of Rule Notification Template of email rule notifications. Send blind carbon copy (BCC) of all emails to Allows to send blind carbon copy (BCC) of all outgoing emails to this list of emails. You can enter a comma-separated list of emails. Email Notifications
Email Notifications are powerful communication tool, which can accompany almost any stage of RMA processing. By default notifications are sent on these events:
- RMA receives new Status - if field Email Notification for customer or Email Notification for administrator in newly assigned Status are not empty, their contents is sent to customer or staff respectively.
- New message from customer arrived - if option Template of Notification Email for RMA Owner contains actual template, notification will be sent to RMA Owner on each customer's message arrived.
- New message from staff member - if option Template of Notification Email for Customer contains actual template, notification will be sent to RMA requester on each staff message.
Notifications also can be sent using Workflow Rules. They are flexible enough to implement any email flow scheme - read more at section Building Custom Email Flow below.
Templates of RMA Email Notifications also can be fully customized to fit your communication policy: they can be redesigned, enhanced with variables, and even custom blocks.
Email Notifications can be translated into other locales. For that you need to follow these steps:
- Create a custom template with a desired Locale and translated content (see How to Customize Email Notifications section below).
- Visit Email Notification Settings section in Configuration and switch to the proper storeview using Store Switcher.
- Uncheck Use Website checkbox near template, translation for which you need, and set your newly created custom template with translation. Save configuration.
- You may also need to translate Email Notification for customer and Email Notification for administrator. It can be done in corresponding Statuses also via Store Switcher.
How to Manage/Disable Email Notifications
Our extension divides all notifications into three types, governed by corresponding options at Email Notification Settings section of Configuration Settings. All of these options are store-dependent, so you can have different templates for different storeviews.
- Notification for customer - governed by Template of Notification Email for Customer option.
- Notification for staff member - governed by Template of Notification Email for RMA Owner option.
- Notification, sent by Workflow Rule - regardless of its recipient, all rule-based notifications governed by Template of Rule Notification option.
Each of the option above contains transactional template, which is used for sending notification. If any of them is set to Disable these emails, then entire type of notifications will be suppressed.
You can easily observe email flow by setting option Send blind carbon copy (BCC) of all emails to at the same Email Notification Settings section.
Then a copy of each notification will be sent to one or more (comma-separated) emails.
How to Customize Email Notifications
Our extension comes with default templates of notifications Depending of type of notifications, different approaches required for their customizations.
- Customizing Email Notifications Templates
Each notification, as noted above, belongs to one of three main types, which also have corresponding templates. To customize them, you need to follow these steps:
- Go to the System -> Transactional Emails, and press Add New Template.
- In section Load Default Template in Template drop-down list select one of pre-defined RMA templates (it is not mandatory, but makes customization easier):
- RMA - Notification Email for Customer
- RMA - Notification Email for RMA Owner
- RMA - Template of Rule Notifications
- In the same section select Locale, for which newly created template shall be applied. By default it is English (United States).
- Then press Load Template button, and template will be loaded to the Template Subject and Template Body fields.
- Modify Template Subject and Template Content as you need.
- Give a sensical Template Name to your new template, and save it.
- Go the to RMA -> Settings -> Email Notification Settings. Select a storeview, if need, at Store Switcher. Then pick up option, corresponding to notification type (say, Template of Notification Email for Customer), which you need to change, and replace its value with your newly created template.
- Save Configuration.
From that moment notifications will flow using your custom template.
- Customizing Automatic Replies
Automatic Replies are sent to customer, when RMA receives a particular status. It breaks into two parts: message from Notification Email for Customer in particular Status, which is enclosed inside Notification Email for Customer template, defined in Settings. To customize such a messages, you need to do the following:
- Customize template RMA - Notification Email for Customer, as described in previous section.
- Go to RMA -> Dictionaries -> Statuses, pick a Status, and add to Email Notification for customer field message, that should be enclosed in template above.
In some cases you may also need a special conditional automatic reply. Read more about this here.
- Customizing Rule Notifications
Rule Notifications can be sent to customer, staff member, or to specific emails, when Workflow Rule is triggered and some action executed.
They also break into two parts: message, defined at Notifications tab of Workflow Rule, which is enclosed inside Template of Rule Notifications template, defined in Settings. To customize such a messages, you need to do the following:
- Customize template RMA - Template of Rule Notifications, as described in previous sections.
- Go to RMA -> Workflow Rules, pick a Rule, and add to Email Subject and Email Body message, that should be enclosed in template above.
- Using Variables in Email Notifications
Any notifications of mentioned above, can be personalized, using Variables. Some of them can be added at Transitional Email Template edit page (see above, in Customizing Email Notifications Templates).
Our extension provides a rich set of additional variables, through which current RMA properties can be included to the notification:
-
Global variables and shortcuts
{{var customer}}- object variable, which allows access to customer properties;{{var rma}}- object variable, which allows access to RMA properties, including custom fields (see below).{{var comment}}- contains message, sent to customer or staff in RMA discussion.{{var email_body}}- used in Rule templates,{{var store_name}}- name of current store{{var store_phone}}- phone of current store{{var store_address}}- address of current store{{var user_firstname}}- First Name of current agent{{var user_lastname}}- Last Name of current agent{{var user_email}}- Email of current agent
If Helpdesk also integrated with RMA, it is possible to use two another variables:
{{var hidden_separator}}- allows to separate answer from communication history{{var hidden_code}}- allows to hide ticket code in email template, which is used to bind email with ticket
-
Customer Properties
{{var customer.getName()}}- Full Name of current customers{{var customer.getEmail()}}- Email of current customer
-
RMA Properties
{{var rma.getIncrementId()}}- current RMA number{{var rma.getFirstname()}}- first Name of current customer{{var rma.getLastname()}}- last Name of current customer{{var rma.getName()}}- full name of current customer{{var rma.getCode()}}- number of current RMA{{var rma.getStatusName()}}- current status of RMA{{var rma.getUrl()}}- URL of current RMA{{var rma.getBackendUrl()}}- backend URL to RMA page{{var rma.getPrintUrl()}}- URL of printable version of current RMA{{var rma.getUserName()}}- full name of current agent{{var rma.getGuestPrintLabelUrl()}}- URL of Package Slip Label{{var rma.getReturnAddressHtml()}}- address, where package is returned{{var rma.getLastComment()}}- last comment, left in RMA History{{var rma.getStatus().getCustomerMessage()}}- automated message to the customer, sent on assigning current Status.{{var rma.getStatus().getAdminMessage()}}- automated message to the staff member, sent on assigning current Status.
Through
{{var rma}}variable you can also access properties of original orders.Order object itself can be obtained using
{{var rma.getOrder()}}, and its properties will be accessible via the following expressions:-
Order Properties
{{var rma.getOrder().getIncrementId()}}- number of original order.{{var rma.getOrder().getState()}}- state of original order. It is major state , defined in System -> Order Statuses, in State Code column.{{var rma.getOrder().getStatus()}}- status of original order. It is a minor state, defined in System -> Order Statuses, in Status Code column.{{var rma.getOrder().getCouponCode()}}- coupon code. Returns non-empty value only if Coupon was used. This is in fact boolean value, and can be used in{{depend}}block.{{var rma.getOrder().getShippingDescription()}}- name of Shipping Method, used in original order.{{var rma.getOrder().getDiscountAmount()}}- amount of discount, provided in original order. This is in fact boolean value, and can be used in{{depend}}block.{{var rma.getOrder().getGrandTotal()}}- grand total of original order.{{var rma.getOrder().getTotalOfflineRefunded()}}- refunded amount in Offline mode (e. q. with Credit Memo).{{var rma.getOrder().getTotalOnlineRefunded()}}- refunded amount in Online mode (e. q. using external payment systems).{{var rma.getOrder().getGlobalCurrencyCode()}}- global currency code, used on current store.{{var rma.getOrder().getOrderCurrencyCode()}}- currency, in which order was placed.{{var rma.getOrder().getCustomerIsGuest()}}- whether customer is a Guest. This is in fact boolean value, and can be used in{{depend}}block.{{var rma.getOrder().getCustomerEmail()}}- email, from which original order was placed.{{var rma.getOrder().getCustomerFirstname()}}- first name of customer, which had placed original order (useful for Guest-mode orders and RMA).{{var rma.getOrder().getCustomerLastname()}}- last name of customer, which had placed original order (useful for Guest-mode orders and RMA).{{var rma.getOrder().getRemoteIp()}}- IP-address, from which original order was placed.
The same expressions, as above, are applicable, if RMA is placed for multiple orders (it is possible, when option Allow RMA for multiple orders from RMA Policy settings is set to Yes).
In this case accesser expression
{{var rma.getOrder()}}will always return first original order. To obtain access to subsequent, you need to replace it to{{var rma.getOrder([INDEX])}}, where[INDEX]is zero-based number or orders.If you need to have a number of second original order in current RMA, then expression would be:{{var rma.getOrder(1).getIncrementId()}}
Since it's not necessary to have second original order in RMA, see also next example.When using multiple orders, you may need to divide email into blocks for each order separately (since it's not mandatory to use 2 or 3 orders - there still can be only one original order), you can use{{depend}}sections, as shown below:{{depend rma.getOrder(1)}} [custom display of second order, used in current RMA]. {{/depend}}The approach is the same, as in Conditional automatic messages in Statuses.
You can access only properties of Magento orders, Offline order properties can not be accessed this way - since in fact they do not exist.If need, it is possible to use in RMA templates standard custom variables as well. They are created with System -> Custom Variables and can be inserted with {{customvar code="var_name"}}. For example, if custom variable have code "test", then variable will be
{{customvar code="test"}}. Read more about these variables here.
Custom Blocks in Notifications
You can also create custom blocks, which can be used in notification.
Generic syntax for such blocks is:
{{block type="[BLOCK TYPE]" rma=$rma}}, where[BLOCK TYPE]is type of your custom block, defined in layout.Parameter
rmaallows direct access to RMA properties, since this block will be enclosed in RMA Template, and that template contains$rmavariable.Custom block dependable item list, described in Conditional automatic messages in Statuses also can be used in notifications, and can serve as good example.- Usage:
{{block type="rma/rma_view_items" rma=$rma}} - PHP Module:
app/code/local/Mirasvit/Rma/Block/Rma/View/Items.php - Corresponding Template:
app/design/frontend/base/default/template/mst_rma/rma/email/items.phtml
You can also include to the notifications CMS blocks, defined in CMS -> Static Blocks. For that you will need more complex syntax:
{{block type="cms/block" block_id="[BLOCK_ID]" template="[PATH_TO_TEMPLATE] rma=$rma"}}.In this case you also need to register your CMS block at System -> Permission -> Blocks.
Building Custom Email Flow
Sometimes you need to build your own email flow, independent from that comes with our extension out-of-box. Here is some useful advices, how it should be constructed:
- Plan your Statuses transitions and RMA lifecycle. Whenever status is assigned, it can be accompanied by Email Notification.
- Use Workflow Rules for creation additional Email Notifications or replace existing ones. Here is a few good examples:
-
New Staff Message Notification - sends notification to customer, when staff member adds a message to communication.
- Event:
New reply from staff - Actions:
- Resolved:
Mark as unresolved(we need it in order to trigger Rule)
- Resolved:
- Notifications:
- Send email to customer:
Yes - Email subject:
You have new message - Email body:
{{var rma.getLastComment()}}
- Send email to customer:
- Event:
-
New Customer Message Notification - sends notification to RMA owner, when customer adds a message to communication.
- Event:
New reply from customer - Actions:
- Resolved:
Mark as unresolved(we need it in order to trigger Rule)
- Resolved:
- Notifications:
- Send email to RMA owner:
Yes - Email subject:
You have new message - Email body:
{{var rma.getLastComment()}}
- Send email to RMA owner:
- Event:
-
Transitional Notification - sends notification to customer, whenever particular status is assigned, with its dedicated message.
- Event:
RMA has been changed - Conditions:
Status is Approved(or other status)Status (before change) is not Approved
- Actions:
- Resolved:
Mark as unresolved(we need it in order to trigger Rule)
- Resolved:
- Notifications:
- Send email to customer:
Yes - Email subject:
Your Request was approved - Email body:
{{var rma.getStatus().getCustomerMessage()}}
- Send email to customer:
Note: In this case Status auto-reply template shall not contain variables. All personalized content (e. q. name of customer, etc.) shall be entered in Email Body field of the rule.
- Event:
- If you wish to suppress all standard notifications, provided by our extension, and replace with your own, based on Rules - you shall not disable Template of Rule Notification option, otherwise your custom notifications won't be sent.
Suppressing Template of Notification Email for Customer means suppressing not only notifications about messages, but also auto-replies from statuses. You can, however, duplicate them using Transitional Notification example, described in previous advice.
- Make sure, that conditions does not overlay each other, and each rule is triggered properly.
- Use Sort Order and Stop Further Rules Processing options in Workflow Rule to control execution of rules, binded to the same event.
Managing RMA
Guide section contains a everyday guide for all agents, that are responsible of returns. For convenience, it is divided into following sections:
- RMA Management Hub - describes dedicated RMA Grid.
- RMA Basics - describes RMA Edit Page and differences between Regular and Offline Orders.
- Creating RMA from backend - describes, how RMA can be created from backend, and some useful tricks.
- Working with Exchanges - describes, how Exchange shall be performed properly.
- Working with Refunds - describes, how Refunds shall be made.
- Reports - describes reporting feature of RMA extension.
RMA Management Hub
The central place of all RMA is their dedicated grid, where all active (e. q. non-archived) RMA are listed. It is located at RMA -> RMA (archived ones are located at RMA -> Archive).
By default RMA grid has the following columns:
- RMA# - RMA Number. Numbering of RMA can be changed at [RMA Number](/Configuration_Settings/Settings#number) section of Configuration Settings.
- Order# - original order number (or numbers, if Allow RMA for multiple orders from RMA Policy settings is set to Yes).
- Customer Name - name of customer, that had requested RMA.
- Owner - an agent of the store, responsible of the RMA.
- Last Replier - name of person who added the very last message to the RMA.
- Status - current status of the RMA request. Read more in Statuses section.
- Created Date - Date of RMA request creation.
- Last Activity - Time, passed from RMA last activity.
- Items - synthetic field (e. q. gathered on-the-fly), that display short info about returned items and their conditionals.
 You can customize columns, displayed on the RMA Grid, by selecting them in option Show Columns in RMA Grid at General Settings section of Configuration Settings.
Warning: If you use third-party extension for grid customization (BL_CustomGrid, for example) do not opt (or unselect, if already opted) for display Items - otherwise there can be unchecked conflict and even extension crush.From this hub you can process RMA:
- Add New - button on the Grid, that allows backend creation of RMA.
- Edit RMA - each row in the grid is in fact link to corresponding RMA editing page. If for some reason it is not applicable (for example, due to third-party grid enhancing extension), add to the Grid View Link column.
- Change Status - allows to change status of one or more RMA in bulk. Activated from mass-actions menu.
- Archive - allows to move to Archive one or more RMA. Activated from mass-actions menu.
- Delete - allows to delete one or more RMA. Activated from mass-actions menu.
- Export - allows you to export contents of the Grid either to CSV or XML format.
Grid also allows you to perform Global Search and column filtering.
RMA Basics
Consider a RMA workflow chart and its detailed explanation, that fully describes typical everyday returning process. You can see there, that there's three possible types of RMA:
- Regular RMA - it is the most part of all returns, they are properly based on original orders and have full document cycle.
- Offline RMA - this type of RMA can be placed, when there's no original order. There can be many cases: order, placed by a phone, an order from point-of-sale device, even other site, but still applied to your store.
- Mixed RMA - this type of RMA contains both Regular and Offline part (as different orders). It became available, only when Allow RMA for multiple orders from RMA Policy settings is set to Yes.
There's two different options, that can allow/forbid placing of Offline Orders:- Allow RMA for offline orders - located at General Settings section of Configuration Settings. If set to Yes, placing Offline Orders is allowed (except of Guest Offline RMA).
- Allow Guest Offline RMA - located at General Settings section of Configuration Settings. If set to Yes, placing Offline Orders is allowed.
All RMA types has common interface, except of a few differences. Typical RMA looks like screenshot below, divided into seven blocks, each containing important part of return information: General Information, Additional Information, Items for Order, Contact Information, Return Address, RMA History and Add Message.
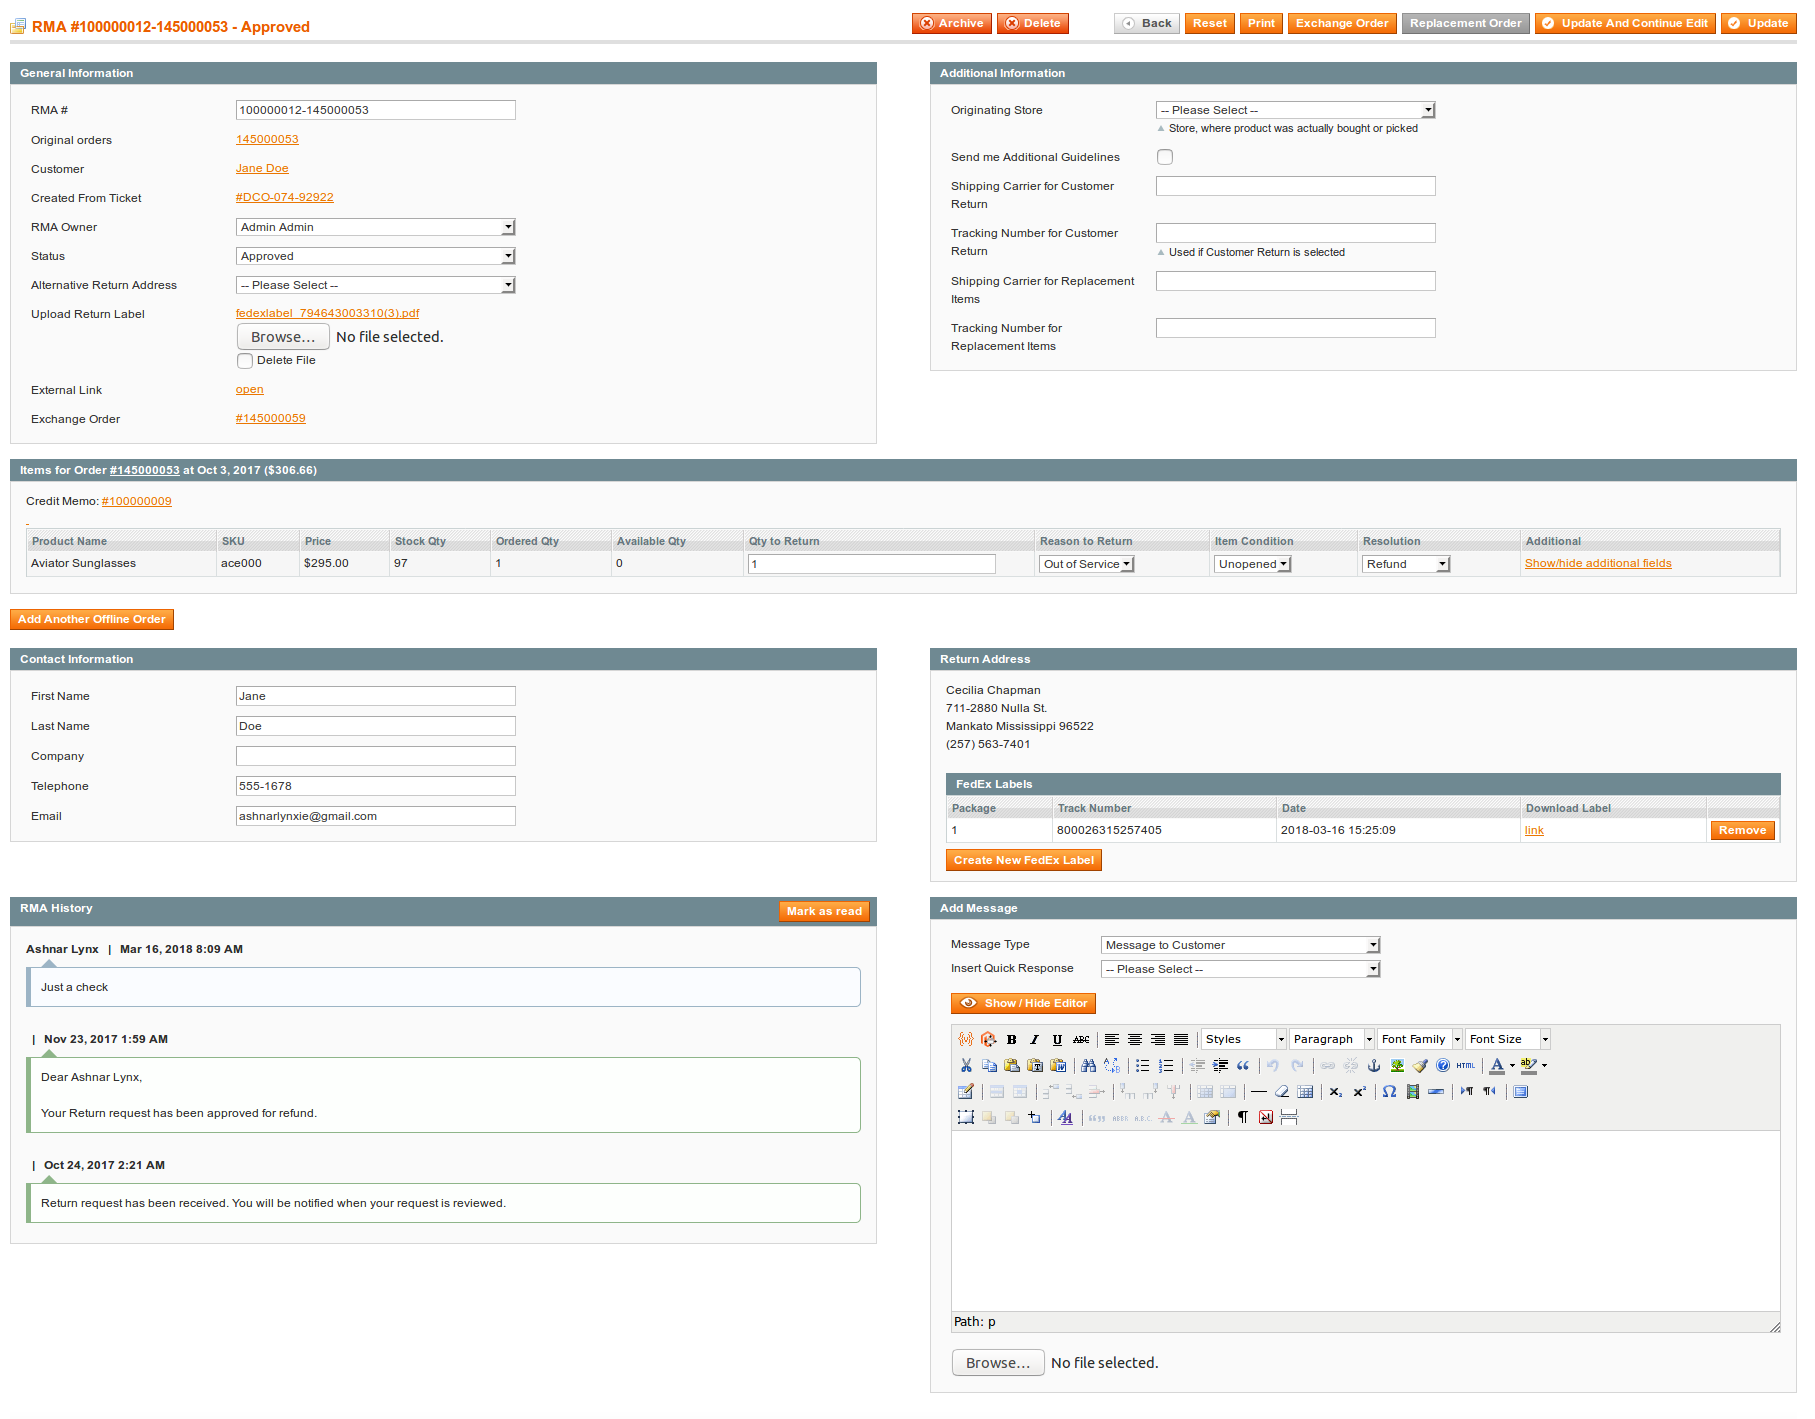
- General Information.
Contains most basic information about RMA Request, such as:
- RMA # - number of current RMA. Numbering of RMA can be changed at RMA Number section of Configuration Settings.
- Order# - number of original order (or, if it's Multiple Orders RMA, comma-separated original orders). Each number also is a shortcut, which leads to corresponding Order Edit Page.
- Customer - name of customer, which requested return. It is a shortcut to his record as well.
- RMA Owner - an agent of the store, who works with the RMA.
- Status - current status of the RMA.
- Alternative Return Address - a drop-down menu, which allows you to specify specific return address, instead of store address. Read more about Return Addresses.
- Upload Return Label - a control widger for uploading a return label (image or PDF). If RMA has return label, customer will be able to print it via Print RMA Shipping Label button from RMA view page.
You can specify only one Return Label here.
If there was an uploaded label before, it will be either replaced with new one (just select it with a widget), or removed (a Delete checkbox will appear below existing label - check it and save RMA). - Alternative Return Address - a drop-down menu, which allows you to specify specific return address, instead of store address. Read more about Return Addresses.
- External Link - link to the frontend view of current RMA, as it seen from customer side. Mainly, used for checking, whether uploaded label can be correctly printed, or to plugging third-parties to conversation.
- Exchange Order - if for current one or more Exchange Order was issued, here will be placed a shortcut to it.
Note for Workflow Rule: This section is filled on New RMA has been created event.- Additional Information
In this section Custom Fields are displayed.
Definitions of fields, shown on screenshot above, can be seen in Examples of Custom Fields subsection.
Note for Workflow Rule: This section is filled on New RMA has been created event.- Items for Order
This section can contain one or more blocks, which contain return items from corresponding orders. It can slightly differ depending on type of RMA.
Consider Regular RMA item list:

Header of this section contains:
- Original Order Number - a shortcut to original order.
- Original Order Date - a date, where order was placed.
- Original Order Total - a total paid amount.
Each row of this block contains:
- Product Name - a name of actually bought product. If customer had bought a Configurable product, here will be displayed simple product, which corresponds to the options he selected.
- SKU - SKU of product. Like above, it resembles actually bought simple product.
- Price - actual price, that was used in original order for total calculations.
- Stock Qty - product quantity, available your store' stocks. Refer to Inventory tab of a Product Edit Page (at Catalog -> Manage Products).
- Ordered Qty - how many items of current product was ordered.
- Available Qty - used in case, when customer ordered several items. In this case this field will display, how many items still have customer (excluding returned or pending to return).
- Qty to Return - how many items of current products should be returned by current RMA.
- Reason to Return - reason, why customer would like to return the item. Read more at Reasons section.
- Item Condition - condition of current item. Read more at Conditions section.
- Resolution - desired resolution for current item. Read more at Resolutions section.
- Additional - this column is shown only when at least one Product Custom Field is defined. They are displayed here, under collapsible pane Show/hide additional fields
If RMA is partial - e. q. not all items in original order are requested to return, additional link will appear at the bottom of the block - Show all order items. You need just to change Qty to Return field in desired row to add that item to current RMA.
Warning: If customer had bought a Configurable product, it also will be displayed as separate position. Do not add it to the RMA, since it will conflict with corresponding simple product.
Bundle products typically are returned as they were bought - as single item.
If you wish to grant customer to return separately bundle items, you need to set option Allow bundled items return one by one to Yes at RMA Policy section of Configuration Settings.
In this case Bundle item will be still shown as separate position (like Configurable) - and likewise, in this case it shall not be selected.If at least one item in block has resolution, set in option Allow to create Credit Memo, when item has resolution at RMA Policy section of Configuration Settings (Refund by default), block will feature a Credit Memo button, which is a shortcut to creation of refund document. After Credit Memo is complete, additional link will be shown on the block - Credit Memo, with a shortcut to that document.
If Mirasvit Store Credit is installed, you can also transfer money for returned items, to the customer's Store Credit Balance. For that you need to set Resolution of items, that shall be refunded this way, to Store Credit - then additional Refund to Store Credit button will appear.
Warning: You can not refund Offline or Mixed RMA neither with Credit Memo, nor with Store Credit.Read more about this in Working with Refunds subsection below.
Offline Orders
Offline Order Item List has more simpler layout, shown on screenshot below:

As you see, its header does not contain information of original order (except of its number), since it does not exists in fact.
Rows do not contain any product information, except of Qty to Return, since offline products also do not exist.
Conditionals (e. q. Reasons, Conditions and Resolutions) and Product Custom Fields also applied to Offline Orders, and shown in respective columns.
Mixed Orders
Mixed Orders contain item lists of both types, as shown on screenshot:
 Although mixed orders contains the same information as a Regular Order, at least one Offline Item List technically makes them treated as Offline. Create such RMA if you really need them.
We recommend you to create separate RMA for Regular and Offline orders.Read more, how to create different kinds of RMA at Creating RMA section.
- Contact Information
The section contains information regarding RMA's customer:
- First Name - first name of customer.
- Last Name - last name of customer.
- Company - company, that customer belongs to (if applicable).
- Telephone - phone number.
- Email - email, to which should go all email notifications.
You can change First Name, Last Name and Email - corresponding changes will be made to Customer field of General Information section. But actual customer, which was responsible for opening RMA, will remain the same, as in original order.
If you really need to change customer - you need to re-create RMA, or change ID manually at database-level.- Return Address
This section displays current return address, that will be used in Packing Slip, or in FedEx Shipping Label.
Typically in contains address, defined at RMA -> Settings -> General Settings -> Return Address. If you wish to change it to other destination, you need to define Return Address, and select it in corresponding drop-down menu at General Information section of RMA.
This section also holds a subsection of Fedex Labels. It displayed only if Enable FedEx label option is set to Yes at Federal Express Shipment section of Configuration Settings.
FedEx Labels subsection contains a button Create New FedEx Label, which allows generation of FedEx labels using their dedicated service. Read, how to create such labels at Federal Express Integration Settings section.
If label is generated correctly, it is added to the subtable, which contains the following information:
- Package - is the package number. Each label generated is recognized as separate package, so if for some reason you need to send returned product by several package, each can have its own label.
- Track Number - is the track number of the package, assigned by FedEx service. Using this number, you can track your package delivery.
- Date - is the date of label generation.
- Download Link - link to download label as a PDF file.
- Remove button allows to remove current FedEx label.
In default workflow, agent should generate at least one FedEx label, then download it and attach to RMA using Upload Return Label field from General Settings.
Alternatively, you can grant customers to download FedEx labels from email notification, especially when there should be multiple packages.Add code below to email notification template, and customers will receive links to all labels, generated by the moment of that notification:
{{depend rma.getFedExLabels()}}
    {{var rma.getFedExLabels()}}
{{/depend}}
- RMA History
The section contains a list of all RMA messages (status changes, replies of customer or agent).
Each message has a author (except of automated messages, added by appropriate Status), and a sensical background color depending on message type:
- Green - for customer's messages;
- Cyan - for staff messages;
- Red - for internals.
- Add Message
The section allows store agent send message to the customer or add internal note to the RMA. This section consists of the following fields:
- Message Type - is the type of message, that you plan to send. Two types available:
- Message to Customer - a regular message to the customer;
- Internal Note - internal message, which will be visible only to staff members in backend.
- Insert Quick Response - this drop-down appears only at least one Quick Response is defined for the store, where was placed original order. To add a quick response text, you need just to select desired title - and corresponding Quick Response will be added to the message text.
- Message Area - is the main text area, where you can enter your message to customer.
- Message Area can be Rich HTML and created with a visual editor. For that you need to set Use WYSIWYG editor in backend option to Yes at General Settings section of RMA Settings.
- In plain-text mode (e. q. when option above is No, or you had pressed a button Show/Hide Editor of the WYSIWYG editor) you can add to the message transitional variable, just as in Email Template.
Proceed to Creating RMA from backend
Creating RMA from Backend
RMA can be created from backend in three ways:
Creating RMA from the Grid
The most common way is to create RMA from its dedicated Grid:
- Visit RMA -> RMA Grid and press Add New RMA button.
- You will be prompted for Customer selection. Pick one to open Order selection stage.
- Select Order, for which you need to create RMA.
If Allow RMA for multiple orders option at RMA Policy is set to Yes, you can check multiple orders.
In this case you need to select Create action in Actions menu (see screenshot below), and press Submit button.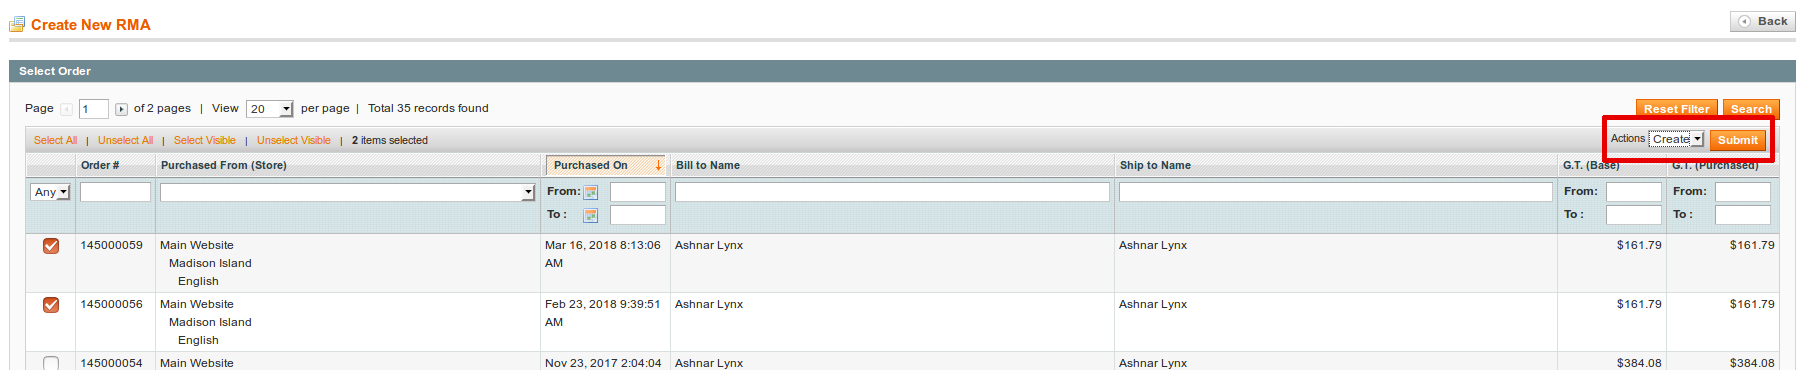
- Fields of Customer and Status will be filled automatically. Fill other fields of the General Information section.
- Fill Qty to Return for each item, that should be returned. If Available Qty is greater than 0, item can be returned.
We do not recommend it, but in some cases (for example, when RMA implements Repair policy) you can create more than one RMA for the same item. For that you need to set previous RMA to Rejected status (it should be our pre-defined Status, you can rename it, however, just do not change Code), and move it to Archive. This will make desired item again available for return.
- If you need to make Offline or Mixed RMA, you can use button Add Another Offline Order to add offline part. You need only to enter Order or Receipt number (which acts as order or invoice number) and Returned Item name. Add Another Item button will allow you to enter more than one offline item.
 If you need just Offline Order, you still need to select at least one order. Just leave 0 for the items of that order, and fill only offline part.
 - Make sure, that Email field is entered. This email is crucial for sending email notifications.
- Save RMA and begin processing it.
Creating RMA from Order Edit Page
It is much simpler to create RMA from Order Edit Page. Our extension adds a dedicated tab there, as shown on screenshot below:

This tab, as you see, displays quantity of already placed RMA on his title. Dedicated Grid at the tab displays all RMA, registered for this order, and provides a shortcut for their Edit Pages.
Create RMA for this order button allows you to quickly create RMA, with already filled Customer and Order data. You need just to set Qty to Return for each item, and other fields - as described above.
Creating RMA from Customer Edit page.
It is also simpler to create RMA from customer. Similar dedicated tab also displays quantity of already placed RMA on his title. Dedicated Grid at the tab displays all RMA, registered for this order, and provides a shortcut for their Edit Pages.

This way, however, will bypass only Customer selection stage. You will need to select order, and then proceed as described in the Creating RMA from the Grid section above.
Proceed to Working with Exchanges
Working with Exchanges
Our extension allows two types of Exchanges:
- If product can be exchanged to a identical one.
- If product can be exchanged with a cheaper/expensive one.
Creating a Replacement Order
Replacement Order should be created only when product should be exchanged to the another item of the same product. It is generated automatically by Replacement Order button, available from top button ribbon.
Once you had pressed the button, the following will be performed:
- Original order will be copied as is - with its billing and shipping properties.
- Original items, that have Exchange Resolution (or others, defined in settings - see note below), will be also copied, but with zero price.
- Stocks will be correctly updated.
- Order will be automatically completed, and added to the RMA as one of Exchange Orders.
You can allow Replacement for any Resolution you need, with Allow to create Replacement Order, when item has resolution at RMA Policy.
Select there Resolutions, when Replacement Order button should be active.In rare cases exchange should be made for other product, but with the same price. In this case you need to create full-scale Exchange Order, as described in next section.
Creating an Exchange Order
Such an order can be created with Exchange Order button on the buttons ribbon. Basically, it is a shortcut to a standard Magento Order Creation Page.
Here you can pick up an items and complete order, like any other regular backend order. There is, however, some differences.
There's two possible cases of Exchange Orders:
- Item has the same or lesser cost, then original. In this case, if Replacement Order is inapplicable, you need to set price of the item to zero.
- Item has greater cost, then original. In this case you need to enter as the price difference between costs of previous and current item.
In both cases you need to use Custom Price feature, as shown below.
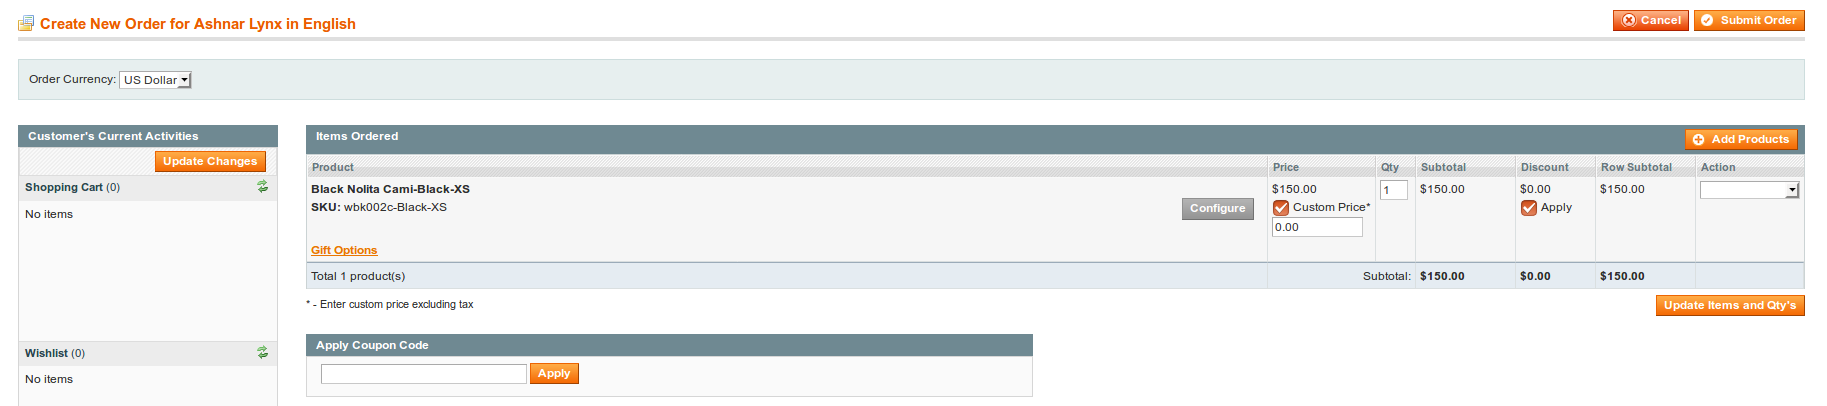
Here is what should be done:
- Add products to the section Items Ordered.
- Check Custom Price checkbox in Price column and enter there custom price (either zero, or cost difference).
- Repeat it for any product you added.
- Press Update Items and Qtys to regenerate totals.
- Complete Order as usual.
This order, on completion, will be added to Exchange Order field on RMA Edit Page.
Magento allows very little flexibility for Order Creation dialog, so you can not automate the following properties:- Order number. Magento will number Exchange Order as any other. However, link to this order will be attached to corresponding RMA (see Exchange Order field at RMA backend edit page).
- Automatic address pickup. If Exchange Order is created for registered customer, his Default Shipping address will be used. If original order, however, was placed in Guest Mode - regardless, whether customer is registered, will be used shipping address from original order.
- Automatic exchange product pickup. You always need to add products for exchange manually.
- Special surcharge. If you really need to have a fee for the exchange, you also need either to add it manually, or create a special virtual product as a workaround.
Proceed to Working with Refunds
Working with Refunds
Refunds can be made, when at least one item of RMA has Resolutions Refund or Store Credit (when integration with Mirasvit Store Credit is enabled).
In this case on Items section two buttons will be displayed:
- Credit Memo - is a shortcut to standard Magento Credit Memo.
- Refund to Store Credit - allows to make quick refund to Store Credit.
 You can allow Credit Memo for any Resolution you need, with Allow to create Credit Memo, when item has resolution at RMA Policy.
Select there Resolutions, when Credit Memo button should be available.
Refunding with Credit Memo
Refund process is simple, you need to press Credit Memo button, and you will be brought to a fully filled Credit Memo. You need just to complete it.
However, when you wish to make a partial Refund, you need to manually set zero to the Qty to Refund and then regenerate totals with Update Qty's' button, as shown below.
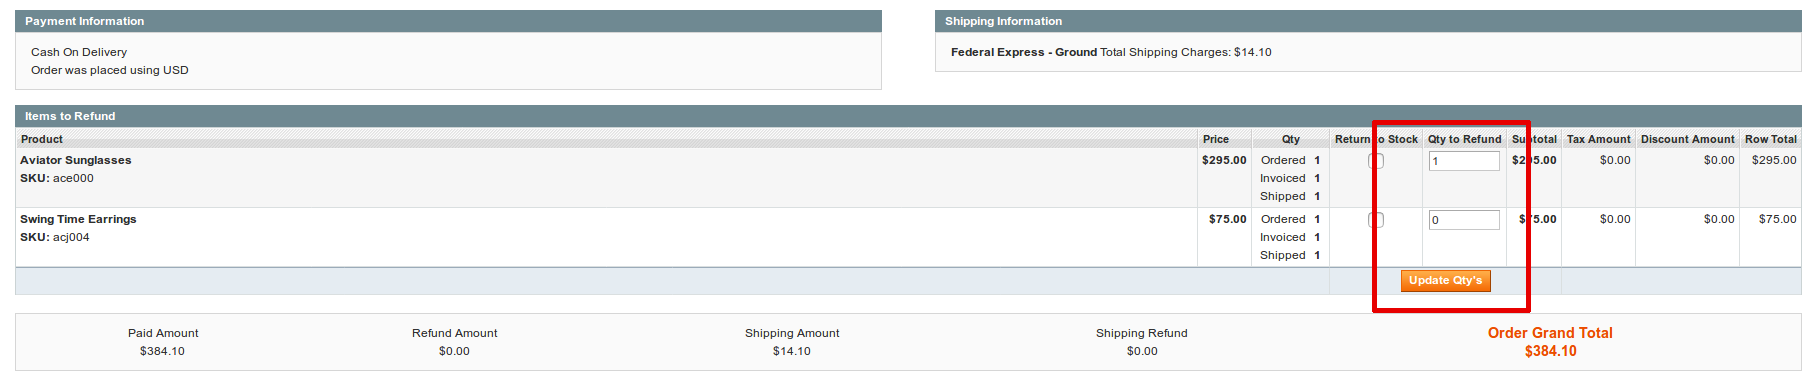
Refunding with Store Credit
Refunding with Store Credit is even simpler. You need just to press button Refund to Store Credit, and our extension will automatically create transaction only with price of items, that have Store Credit resolution.
You can even check it at Sales -> Store Credit -> Transactions:

To the transaction description will be added shortcuts for original order and RMA.
Reports
You can find RMA reports in the RMA > Reports.
To generate any report, you need to fill in report params and click the button Show Report.
General Report
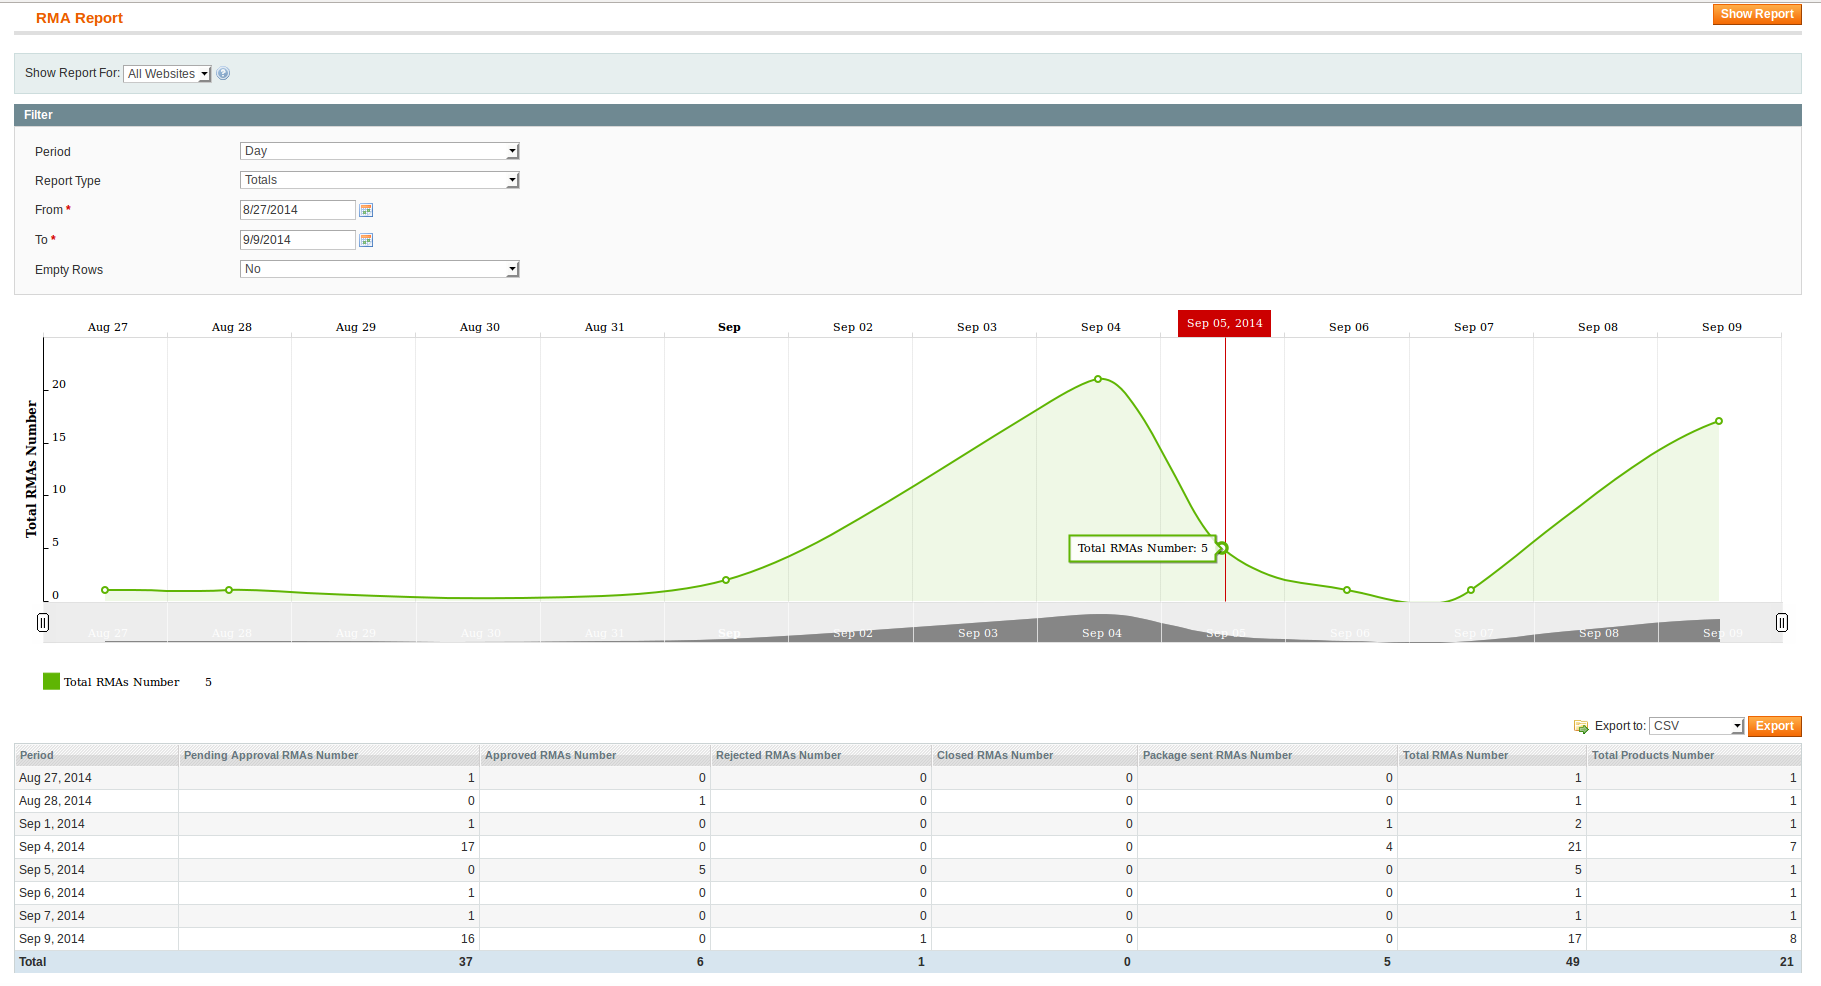
The report has the following information:
- Period
- Pending Approval RMAs Number - Number of RMAs with the status Pending Approval.
- Approved RMAs Number - Number of approved RMAs requests.
- Rejected RMAs Number - Number of rejected RMAs requests.
- Closed RMAs Number - Number of closed RMAs requests.
- Package Sent RMAs Number - Amount of RMAs with the status Package Sent.
- Total RMAs Number- Total amount of all RMAs.
- Total Products Number - Total number of returned items.
RMAs by Product
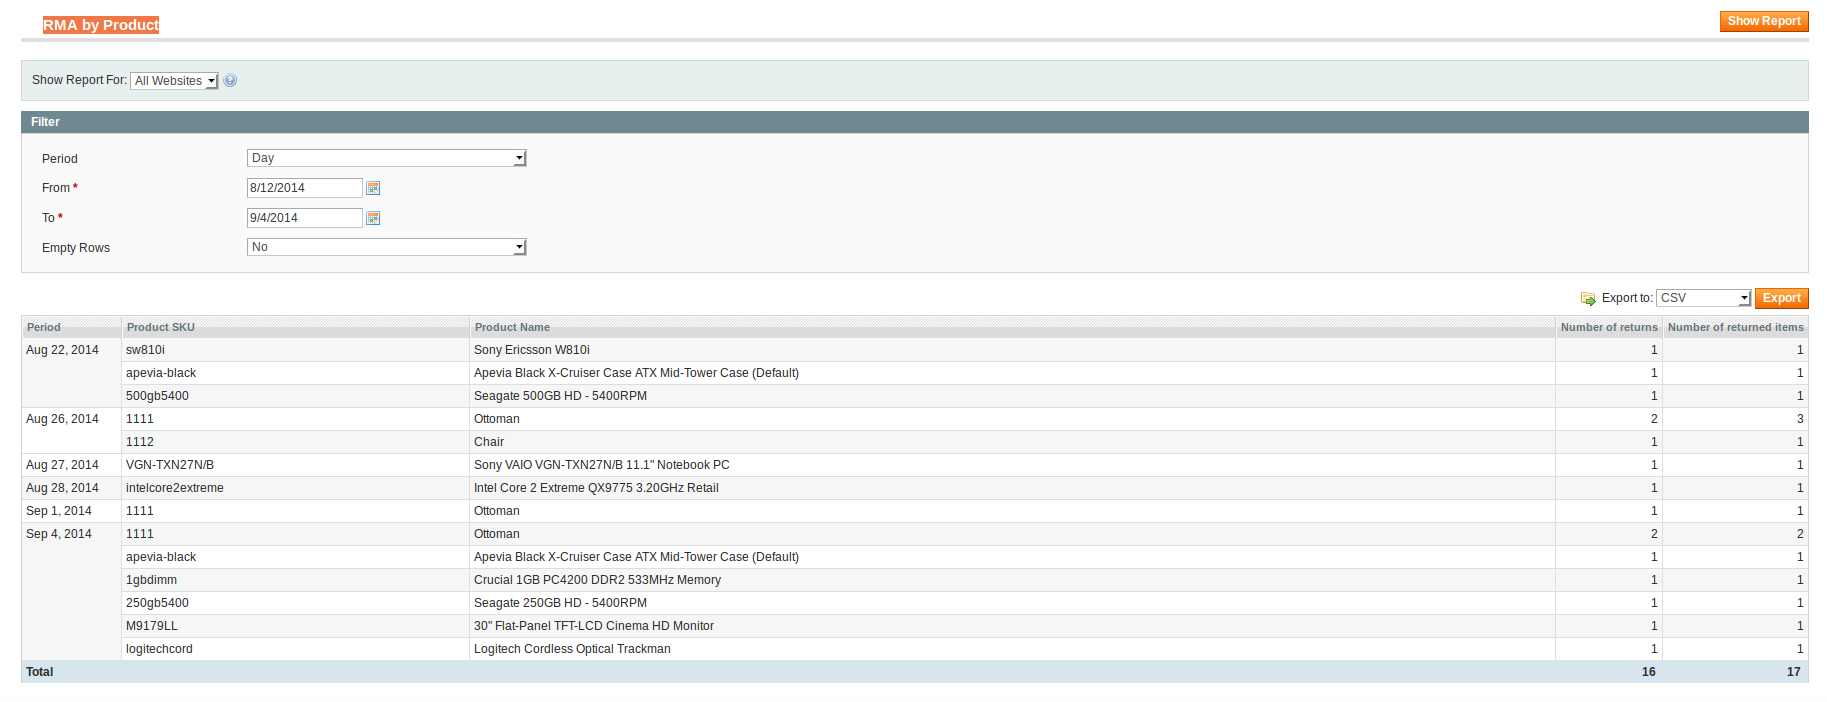
The report has the following information:
- Period
- Product SKU
- Product Name
- Number of returns - The number of RMAs with this item.
- Number of returned items - The total number of items.
RMAs by Brand
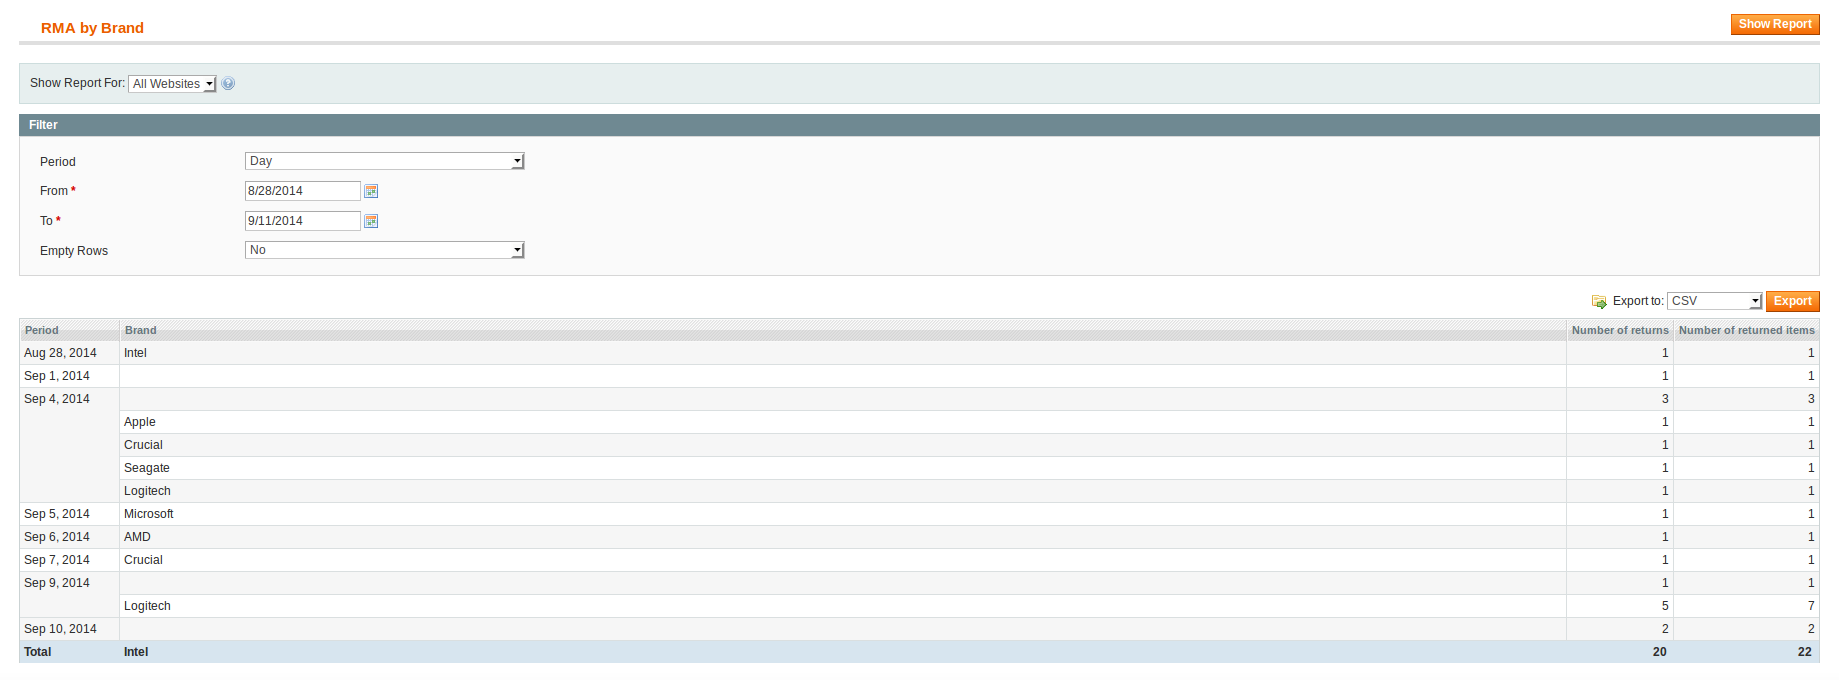
The report has the following information:
- Number of returns - The number of RMAs with this item.
- Number of returned items - The total number of items.
Known issues
This section describes the most common issues, and how to repair them:
- I can not attach to comments files above some size (1 Mb for example)
- Opening of RMA became inaccessible or too slow (Help Desk is integrated)
- Opening of RMA became inaccessible or too slow (only RMA installed)
- When I create customized access to RMA for the staff via System -> Permissions -> Roles it ends with 'Access Denied' for all functions
- While submitting RMA from frontend, steps are displayed incorrectly.
- I had created custom notifications via Workflow Rule, and template in email is doubled (or nested)
- I had created notifications via Workflow Rules for specific conditions, but customer receives both standard notificator and my custom one.
- I need to use order number in my custom notification via variable, but it does not displayed for New RMA Notification. For new messages notifications it is shown correctly.
- I had created a Workflow Rule, that should send notification to customer, but "Send email to customer" is always "No".
- I had created an "drop-down list" custom variable for RMA, but when I access it via email variables, it return "value1", "value2" and so on.
- I had created custom field for RMA, but when I used them as email variables, they rendered empty.
- I had customized email template, but when email is actually sent, styles are broken.
I can not attach to comments files above some size (1 Mb for example)
This issue appears, when store's PHP engine has too small uploading limit.
Solution:
Increase post request limits. You can do it in two places - globally, in php.ini. Here is how post parameters should be there:
post_max_size=20M
upload_max_filesize=20M
Or you can do it in .htaccess file, then corresponding expressions should be:
php_value post_max_size 20M
php_value upload_max_filesize 20M
I have RMA and Help Desk installed, and integrated, and suddenly opening of RMA became inaccessible or too slow
This issue appears, when there's infinite cycle of comments. It can occur, when our notifications, send by RMA extension, are fetched by Help Desk. Normally, we prevent it using special header tag "Auto-submitted", but when notification is duplicated as Blind Carbon Copy (BCC), all non-basic headers will be stripped, and message fetched. Then it will trigger "RMA changed" event, and next notification will be sent - duplicated - fetched - and so on, to infinity.
Solution:
- Make sure, that RMA -> Settings -> Email Notification Settings -> Send blind carbon copy (BCC) of all emails to does not contain the same mailbox, as one of your Help Desk Gateways (Help Desk -> Dictionaries -> Gateways);
- Clean [YOUR_PREFIX]m_rma_comment table from auto-responds manually;
Also, check next known issue, as it can be the secondary cause.
I have only RMA installed, and suddenly opening of RMA became inaccessible or too slow
This issue appears, when too many attachments are stored in database.
Solution:
Make sure, that you have latest version of RMA. If not, upgrade to the RMA 2.4.5.
- Go to RMA -> Settings -> General Settings -> and set option Store attachments in to Filesystem;
- Make sure, that subdirectory
/media/rma/attachmentsexists and Magento has the rights to write there; - Either clean tables [YOUR_PREFIX]m_rma_attachment and [YOUR_PREFIX]m_mstcore_attachment, or contact Mirasvit Support team for a special script to move attachments from database to filesystem.
When I create customized access to RMA for the staff via System -> Permissions -> Roles it ends with 'Access Denied' for all functions
This issue appears, when you're using very old version of our extension, and installed Magento security patch SUPEE-6788.
Solution:
Some of older versions (but not all) can be easily fixed with our patch script here: https://mirasvit.com/doc/common/patch_supee6788
If this patch did not help, just upgrade to the RMA 2.4.5.
While submitting RMA from frontend, steps are displayed incorrectly.
This issue appears, while Amasty Full Page Cache (AMFPC) is used on the store to cache all frontend pages, including RMA. Display inconsistencies, caused by this, include:
- RMA allow to create RMA for the same order again ad again
- When "Create new RMA" issued, an order number requested, but it is not found
- Customer logs in, and on requesting a return sees as eligible order of other customer
- When submitting new RMA at a Guest RMA form, totally different order is found
- When RMA is already created, it does not displayed at Customer's Account My Returns section
- When RMA is removed, it still displayed at Customer's Account My Returns section
- When submitting offline RMA, requested items does not displayed properly (images missed, items table at success stage is empty, etc)
Working of AMFPC can be detected at System -> Cache Management, where "Amasty FPC" item appeared under cache types.
Solution:
Add to the System->Configuration->Amasty Extensions->Full Page Cache->Ignore List new exception line - "/returns/" (without quotes). Then purge all cache.
I had created custom notifications via Workflow Rule, and template in email is doubled (or nested)
This issue can appear, if you copied template entirely to the field Body at Conditions tab of Workflow Rule.
Solution:
Workflow Rule uses two-step template generation. Base template, set in RMA -> Settings -> Email Notifications Settings -> Template of Rule Notification, contains a special variable {{var email_body}}, that includes to that template contents of Body field.
To customize Workflow Rule template properly, follow these steps:
- Customize base template - it can be done at System -> Transactional Emails. Create a new template, then in field Template select "RMA - Template of Rule Notification" and press Load Template button. This will load our default template.
- Make sure, that variable {{var email_body}} is used in your template, give the new template name and save it. Then select newly created template at RMA -> Settings -> Email Notifications Settings -> Template of Rule Notification and save configuration.
- Place to the Body field of your Workflow Rule only message, that particular customer or staff member shall receive.
I had created notifications via Workflow Rules for specific conditions, but customer receives both standard notificator and my custom one.
Default notifications of RMA are not cancelled by creating Workflow Rule. So notifications doubling is normal behaviour of our extension.
Solution:
You can use the following workaround to suppress default notifications, if you use custom notifications extensively.
- Make RMA - Template of Rule Notification template look similar to RMA - Notification Email for Customer template. It can be done at System -> Transactional Emails
- Create a workflow rule, binded to the New reply for staff event;
- Set field Send email to customer to Yes in Notifications tab.
The same approach can be used for other email flow - for example, for staff. You need just to use New reply from customer event instead of New reply from staff.
I need to use order number in my custom notification via variable, but it does not displayed for New RMA Notification. For new messages notifications it is shown correctly.
This is because RMA creation is divided into two stages. The first - creation of RMA, increment ID generation and assigning to the customer. And the second one - when orders and items are added to RMA. That's why on New RMA creation stage order ID and other properties can not be displayed.
Solution:
If you really need to display order ID in notification on New RMA creation, follow these steps:
- Set RMA -> Settings -> Email Notification Settings -> Template of Notification Email for Customer to Disable these emails. It will effectively disable all notifications to customer;
- Create two Workflow Rules at RMA -> Workflow Rules:
- First, binded to the RMA has been changed event (it will be fired immediately after items are added), with additional Condition Status is Pending Approval. In this rule, in Notifications section set option Send email to customer to Yes, and in Subject and Body enter message you need. This will mimic notification on New Ticket Creation stage;
- Second, binded to New reply from staff. Make similar settings for this rule - it will mimic notification about new staff message arrival.
Please, note, that in Body field you need to enter only message. If you need to have custom template for that emails, you need to override our template RMA - Template of Rule Notification (see above).
I had created a Workflow Rule, that should send notification to customer, but "Send email to customer" is always "No".
This issue can appear due to incorrect upgrade from older versions, or (rarely) due to incorrect installation - during which a "is_send_customer" field was not created.
Solution:
Execute the following SQL expression using Adminer or other database querying tool:
ALTER TABLE `[MY_PREFIX]m_rma_rule` ADD COLUMN `is_send_customer` TINYINT(1) NOT NULL DEFAULT 0;Make sure, that you had replaced [MY_PREFIX] placeholder with your actual database prefix.
I had created an "drop-down list" custom variable for RMA, but when I access it via email variables, it return "value1", "value2" and so on.
This issue can appear, if you used for drop-down options setup given example, but modified only one pair of each value.
Solution:
All options for drop-down list custom fields have format "[ACTUAL] | [DISPLAYED]". First value in this pair - ACTUAL - is the actual value, that will be recorded at the RMA table. It also will be displayed at the Grid, and as a result of email variables. DISPLAYED value is displayed only at RMA editing stage (both frontend and backend). Therefore, to have at the Grid and emails more readable value, you need to use more readable values for options.
I had created custom field for RMA, but when I used them as email variables, they rendered empty.
This issue can appear, when you had used improper custom field call.
Solution:
Custom fields for RMA can be called in two ways:
- If Code of variable, found at RMA -> Dictionaries -> Custom Fields -> (Your Custom Field Edit page), is declared in lower case, special variables {{var rma.get[VARIABLE_CODE]}} can be used. E. q. if code is "stage", then variable would be {{var rma.getStage()}};
- If Code is declared in mixed case (e. q. contains both capital and small letters), then use generic variable {{var rma.getData([VARIABLE_CODE])}}. E. q. if code is "Return_Tracking", then variable would be {{var rma.getData("Return_Tracking")}}.
I had customized email template, but when email is actually sent, styles are broken.
This issue can appear, when third-party extension is used for customizing email templates at System -> Transactional Emails, or {{inlinecss file="email-inline.css"}} variable was used in template.
Solution:
Variable {{inlinecss}} is translated not by our sending procedure, but by default Magento's template engine. It also used by different third-party extensions for WYSIWYG-styling of templates. Each theme has its own CSS space, but styling picks rather theme's CSS, than base style. Therefore, to resolve just make stylesheets the same in these locations manually:
- skin/frontend/base/default/css/email-inline.css
- skin/frontend/YOUR_THEME_PACKAGE/YOUR_THEME/css/email-inline.css
How To
- How can I write my own observer of your RMA events?
- How can I prevent product from being returned?
- How can I limit RMA for only one order
- How can I use Exchange order and Replacement Order, and what's the difference between them
- How do I control, which refund should be made to Store Credit, and which - should be made as regular Credit Memo?
- How do I create staff members for RMA
- How do I change the path for the RMA page at customer's account'?
- How do I enable WYSIWYG mode for RMA messaging?
- How do I change packing slip template?
- How can I change or adjust logo at the Packing Slip template?
- How can I add RMA link to the Magento's top menu?
- How do I create Workflow Rule, which triggers on X status, and when items has condition (reason, resolution) Y.
- How do I create custom email notifications?
- How do I create notification, which will be sent only once, when specific status is set?
- How do I stop default email from sending when my Workflow Rules are applied?
How can I prevent product from being returned?
Sometimes you need to write your own observer for our events, to connect our extension with third-party extension, or just for custom notifications to some external software (ERP, for example).
Our extension fires special event for that -
mst_rma_changed. It has one parameter - current RMA, which you can analyze, and even perform actions on it.Warning: If you need to make changes in RMA in your custom observer, please note, that it also will triggermst_rma_changedevent, and this can cause infinite loop.
To avoid it, surround your actions with proper condition branch, so action will be performed only once.You can take as an example our own observer of that event, located in module
app/code/local/Mirasvit/Rma/Model/Observer/RmaChange.php.
How can I prevent product from being returned?
- Go to Catalog -> Manage Products, and edit appropriate product.
- On General tab set option Allow RMA to No.
Note: for Bundled, Grouped and Configurable products, you need not only disable return for 'parent' product, but for associated simple products as well.
How can I limit RMA for only one order
Make sure, that RMA -> Settings -> RMA Policy -> Allow RMA for multiple orders is set to No.
How can I use Exchange order and Replacement Order, and what's the difference between them
Both of these functions work, when items in RMA have Exchange resolution, or custom one, set at RMA -> Settings -> RMA Policy -> Allow to create Replacement Order, when item has resolution.
Their uses are dictated by one of the following scenarios:
- If product, requested for return, should be replaced with the same one (usually, due to malfunctioning, or defect), then staff should use Replacement Order. By pressing corresponding button, shown above, new order will be automatically created and set to a Penging state. It will have zero total, therefore, staff just need to send replacement products to the customer, and then complete the order and RMA;
- If product, requested for return, should be replaced by other product, staff should use Exchange Order. There can be the following subscenarios:
- Product have the same price, as original:
- Press Exchange Order button, and proceed to new Order creation;
- Using Add Product add to the order that product, that should be sent to customer as a exchange. This should be only simple products;
- Check Custom Price checkbox at the order items grid, and enter to text field price of 0.00. Then press Update Items and Qty's button. This will recalculate totals and you can submit the order;
- Complete order
- Product, requested for return, should be replaced by other product, which have larger price, as original. Repeat actions above, but change step (3) as noted below:
- Check Custom Price checkbox and enter to text field price a difference between prices. E. q. original product was worth $100, and the replacement product was worth $20, then in this field should be $80. Then press Update Items and Qty's button;
- Product, requested for return, should be replaced by other product, which have the lesser price, as original. Repeat actions from first subscenario, except of step (4):
- Calculate difference between total of newly created Exchange Order and original Order (unfortunately, you need to do it manually), and refund that difference with manual Credit Memo, that can be submitted from order's Edit page. Note that manual credit memo can be created only after you will invoice it.
- Product have the same price, as original:
How do I control, which refund should be made to Store Credit, and which - should be made as regular Credit Memo?
You need to have different resolutions for both actions, and for each action have separate RMA.
- if you need to refund to the bank via Credit Memo, create an RMA with Refund resolution for each item to refund. If you need to use custom resolution for this scenario, create it at RMA -> Dictionaries -> Resolutions, and set in RMA -> Settings -> RMA Policy -> Allow to create Credit Memo, when item has resolution;
- if you need to quick refund to the Store Credit, create an RMA with Store Credit resolution for each item to refund. Make sure, that Mirasvit Store Credit is installed and RMA -> Settings -> RMA Policy -> Allow return to Store Credit is set to Yes.
How do I create staff members for RMA
- Go to System -> Permissions -> Users and create backend users. If need, create for them custom access rights in System -> Permissions -> Roles.
- Make sure, that assigned roles have rights to RMA section (in ACL tree).
How do I change the path for the RMA page at customer's account'?
Go to Catalog -> URL Rewrite Management, and create a new Rewrite of Custom type, where Target Path will be RMA default URL, and Request Path - is your desired URL. Redirect field should be equal to Permanent (301).
Note that URL Rewrites are store-dependent, so if you have more than one storeview, you need to create such rewrite for each storeview separately.
How do I enable WYSIWYG mode for RMA messaging?
To enable WYSIWYG, you need to set to Yes option RMA -> Settings -> General Settings -> Use WYSIWYG editor in backend. Then WYSIWYG editor will replace standard comment widget.
How do I change packing slip template?
You need to modify this template:
app/design/frontend/base/default/template/mst_rma/rma/print.phtml
How can I change or adjust logo at the Packing Slip template?
We do not display logo at the Packing Slip page, instead of this we use for that standard print header of current theme.
Typically it is located here (for custom themes this location can differ):
app/design/frontend/base/default/template/page/print.phtmlThere you will find
<div class="print-head">section, which contains code of logo displaying. It is regular IMG tag, and it can be adjusted using regular style or attributes.
How can I add RMA link to the Magento's top menu
You need to customize customer layout, and add there to the "top.links" section link to our extension. Default customer layout file is located here:
app/design/frontend/base/default/layout/customer.xmlIf you use custom theme, location can differ and depends only from theme implementation.
How do I create Workflow Rule, which triggers on X status, and when items has condition (reason, resolution) Y.
- Create a new Workflow Rule at RMA -> Workflow Rules, and add to the Conditions tab the following conditions:
- Status (before change) is not X;
- Status is X;
- Items have condition is Y;
If you need to trigger only when all items have the same condition, include a set of conditions Items have condition is not Z, where Z - is all other possible conditions;
The same way Reasons and Resolutions can be checked.
This option is available in RMA version above 2.3.7.
How do I create custom email notifications
They can be created in two ways. First way is to customize our default notifications:
- Go to System -> Transaction Emails. Press Add New Template button. There you will have an option to load our base templates - they are selected in Template fields, and begin from RMA prefix. There's three of them:
- Notification Email for Customer (this template is used for all messages, sent to customers)
- Notification Email for RMA Owner (this template is used, when message is sent to staff)
- Notification Email for Template of Rule Notification (this template is used for Workflow Rule-based notifications);
- Press then Load Template button, and edit desired template. Then save it under name, for example, "My Notification";
- Go to RMA -> Settings -> Email Notifications Settings, and set your newly created template in appropriate field.
The second requires Workflow Rule:
- Create a Workflow Rule at RMA -> Workflow Rules and pick up appropriate event and condition at Conditions tab (if required).
- Jump to Notifications tab. Set there either Send email to customer or Send email to RMA owner option to Yes, and then put appropriate content to Subject and Body fields. You can use email variables there.
- Note 1: Body shall contain only message text and layout. Rules use as container default template RMA -> Template of Rule Notifications, set in RMA -> Settings -> Email Notification Settings.
- Note 2: On RMA creation stage events fired in this order:
- New RMA has been created, fired on RMA creation. Notification on this event shall use only base email variables, original order or items properties are inaccessible on this stage. If you need them, refer to Known issues for an workaround.
- RMA has been changed, fired on items attaching to the RMA. Only on this stage all email variables should be used.
- New reply from customer or New reply from staff, depending on which message is attached to RMA on creation stage.
How do I create notification, which will be sent only once, when specific status is set.
It can be done in two ways:
- Go to RMA -> Dictionaries -> Statuses, pick up appropriate status, and set desired notification content in Email Notification for customer field. It will be sent to customer, only when RMA receives that Status.
- Create a new Workflow Rule at RMA -> Workflow Rules, and add to the Conditions tab two additional conditions to make rule trigger only on status change (let's get Approved status as an example'):
- Status (before change) is not Approved;
- Status is Approved.
In both cases notification will be sent only when desired status is assigned to RMA.
How do I stop default email from sending when my Workflow Rules are applied?
- Disable all notifications at RMA -> Settings -> Email Notification Settings -> Template of Notification Email for Customer;
- Create a Workflow Rule, that will send notification to customer on event "New reply from staff", and give it lowest priority (say, 100). This will be your new notification for customer, instead of default one;
- Give all other rules higher priority, and have option Stop Further Rules Processing (located at General Information tab of the rule Edit page) set to Yes.
This will create a workflow, where your special rules will be checked first, and if one of them applies (and its notification sent) - rules with lower priority will be skipped. So, your custom default notification will be sent only when no other rule was triggered.
Change Log
2.4.17
(2018-12-04)
Fixed
- Issue: there was an error for the imported orders that contain only order items, but not products
- Wrong data saved in contact information
- Empty custom fields of "date" type automatically fill with current date
2.4.16
(2018-08-20)
Fixed
- Error "Exchange order produces error for deleted product"
- Compatibility with Magento 1.9.37
- Issue when files are not uploading to RMA
- Credit Memo button displays for not completed orders
2.4.15
(2018-06-07)
Fixed
- Issue when customer is able to create two custom field with the same code
- Custom fields for product do not work
- Issue when RMA change event fired twice during Workflow Rule execution
- Fixed option "Allow bundled items return one by one" = No
Improvements
- Added quick response variable store_return_address
2.4.14
(2018-04-03)
Fixed
- Displaying of multiple date fields in RMA form
- Displaying of attachment limit on frontend
2.4.13
(2018-02-20)
Fixed
- Fixed issue when reserverd Statuses and Resolutions was able to delete
2.4.12
(2018-02-07)
Fixed
- Fixed issue with display of html tags as plain text in rma comments created via helpdesk
- Fixed issue with display of last replier if rma comments were created via helpdesk
- Fixed issues with display of incorrect total number of items in rma grid
- Workflow rule events were triggered before full RMA creation
- If status/resolution was saved in configuration and then removed, the error "Fatal error: Call to a member function getId() on null" occured
2.4.10
(2017-11-26)
Fixed
- Customer credentials saving for Pure Guests
- Guest RMA creation
- An issue where openning a RMA in backend caused fatal error.
- Displaying of RMA item price when tax was included in price
2.4.8
(2017-11-21)
Improvements
- Added RMA ids to RMA report
Fixed
- Added disable option for Replacement Order and Credit Memo
2.4.7
(2017-09-20)
Fixed
- Bugs
2.4.6
(2017-09-13)
Fixed
- Orders IDs saving between creation and update stages
- Issue with saving of both non-product and product custom fields
Improvements
- Improve styles
- Allowed WYSIWYG for Quick Responses
2.4.5
(2017-05-24)
Fixed
- Issue with Quick Responses Grid display
Features
- Improved documentation (Known Issues and How-To sections added) (#118)
2.4.4
(2017-05-11)
Fixed
- Issue when item's price uses wrong currency
2.4.3
(2017-05-05)
Features
- Allowed multiple Return Addresses for RMA (#113)
- Allowed using WYSIWYG editor in backend (#111)
- Added variables for order properties to emails and comments (#107)
Fixed
- RMA-108 - Stocks are updated on Quick Refund to Store Credit (#109)
- RMA-108 - Custom Fields for Products style fix (#109)
- RMA-108 - Wrong store pickup on email notification fix (#109)
- RMA-104 - Fixed RMA Readme.MD (changelog) (#105)
2.4.2
(2017-04-07)
Features
- RMA-99 - Allowed Quick Refund to Store Credit (RMA-SCR Integration) (#100)
- RMA-90 - Allowed custom fields for RMA Items (#96)
Fixed
- RMA-97 - Fixed order list display for guest-submitted RMA (#98)
- RMA-91 - Fixed incorrect address assigning if eBay predefined guest used (#92)
2.4.1
(2017-01-25)
Features
- RMA-58 - Added Change Status mass action to RMA Grid (#59)
- RMA-63 - Allowed customers to map to Description FedEx field product properties (#64)
- RMA-71 - Allowed staff to remove unnecessary FedEx labels (#72)
- RMA-73 - Allowed to create Replacement Orders for custom resolutions (#74)
- RMA-80 - Allow customers to enable/disable multiple-order RMA Policy (#81)
- RMA-82 - Allowed to create Credit Memo for custom resolutions (#83)
- RMA-88 - Replacement Order Generation made more compliant to ERP-export (#89)
Fixed
- RMA-61 - Fixed display of rule-generated notifiers on RMA History (#62)
- RMA-66 - Fixed issue, which blocks view of fully processed orders (#66)
- RMA-67 - Fixed missed controller function for downloading Fedex labels (#68)
- RMA-69 - Fixed RMA crush, if RMA was created for deleted customer's order (#70)
- RMA-70 - Fixed issues with Conditions, Reasons and Resolution comparison in rules (#76)
- RMA-77 - Fixed display of taxed product price (#78)
- RMA-84 - RMA change event now fired at cron rules as well (#85)
2.4.0
(2016-09-26)
Features
- RMA-54 - Allow storage of attachments in file system
- RMA-40 - Added pure Offline RMA support
Fixed
- RMA-51 - Fixed order link in elements list header, added order link to the General Section
- RMA-48 - Fixed 'order' variable translation
- RMA-46 - Added stock quantity update when placing Replacement Order
- RMA-44 - Fixed incorrect RMA item quantity available calculation
- RMA-42 - Fixed store variable translation on RMA number generation
- RMA-38 - Fixed translation of status on RMA View page
- RMA-36 - fixed incorrect store setting for Replacement Order
-
RMA-34 - Fixed incorrect stock quantity display for configurables
2.3.7
(2016-08-01)
Features
- RMA-24 - Allowed customers to use conditions, reasons and resolutions in rules and templates
Fixed
- RMA-32 - Fixed incorrect price displaying at RMA Stage 1 if Custom Price used
- RMA-28 - Fixed incorrect display of Multi-line Text fields in print form
- RMA-30 - Allowed customers to have infinite return period
- RMA-26 - Fixed display and filter of Offline RMA items in Grid
- RMA-22 - Fixed improper page redirection on 0 quantity for return
- RMA-20 - Fixed bugs in Workflow Rules logic
- RMA-15 - Made Is Archived condition select Yes/No element
- RMA-18 - Fixed saving procedure for Confirm Shipping in Guest Mode
2.3.6
(2016-07-05)
Features
- RMA-260 - Added support for SmartPost Parcel Return service
- RMA-254 - Allowed Credit Memo button for RMA from Store Credit-paid orders
Fixed
- RMA-13 - Fixed RMA creation fail due to use in rule Last Message condition
- RMA-11 - Fixed wrong RMA allowance time period due to wrong sort order in history request
- RMA-261 - Fixed long URIs breaking out message div
2.3.5
(2016-06-10)
Improvements
- RMA-258 - Added Email Notification after Replacement Order generation
- RMA-252 - Show full Order Label in RMA Packing Slip
Fixed
- RMA-257 - Fixed Store ID saving for RMA, based on guest orders
- RMA-256 - Fixed array instantiation for old PHP versions
- RMA-255 - Fixed secure URL rewrite for HTTPS connection
- RMA-253 - Fixed automatic email saving at RMA submission
2.3.4
(2016-06-01)
Features
- RMA-251 - Added new Event to the Workflow Rules - Check Every Hour
2.3.3
(2016-05-26)
Improvements
- Improved errors handling
2.3.2
(2016-05-16)
Features
- RMA-227 - Adjusted Replacement Order generation for RMA with multiple orders and for RMA with offline items
- RMA-229 - Added to the FedEx reference RMA properties as variables support
Fixed
- RMA-245 - Fixed incorrect message for fully processed orders in Guest RMA
- RMA-244 - Fixed CSS
2.2.1
(2016-05-05)
Features
- RMA-208 - Added ability to archive RMA
Fixed
- RMA-219 - Fixed Exchange Order creation for the same customer, if previous one was dropped
- RMA-216 - Fixed incorrect RMA count at RMA Grid (affects both frontend and backend)
- RMA-214 - Fixed validation error for FedEx labels in pure offline RMA
- Fixed minor bugs and returned [order] variable to the RMA numbering
- RMA-213 - Fixed order number display at RMA Packing Slip Label
- RMA-212 - Fixed improper redirect at dictionaries edit pages
2.2.0
(2016-04-21)
Features
- RMA-202 - Ability to create offline RMA via backend
Fixed
- RMA-210 - Changed option Require customer to select to more informative, and hint added
- RMA-209 - Fixed FedEx helper and template to fit offline RMA layout
2.1.4
(2016-04-18)
Fixed
- Issues with RMA creation and updating from the backend
- Integration with Help Desk small bug
2.1.3
(2016-04-12)
Features
- RMA-204 - Allowed items subpanel in RMA Request Step 1 unfold by click on checkbox.
- RMA-180 - Added Swedish translation example with email templates
Fixed
- Fixed bug with items not allowed to return and order status label.
2.1.2
(2016-04-05)
Fixed
- RMA-198 - Fixed issue with creating RMA from backend
2.1.1
(2016-04-04)
Fixed
- Small CSS fixes
2.1.0
(2016-03-31)
Features
- Customer can create just one RMA for products even from different orders. It's not necessary to create multiple RMA for products from each order.
- Customer can create RMA for any products purchased in offline store.
Fixed
- RMA-195 - Added check for address validity in customer account for FedEx
- RMA-193 - Fixed incorrect customer name check in RMA form
- Add postcode into customer return address
- RMA-172: - Fixed return issue with two or more items of the same type in bundle
- RMA-185 - Fixed incorrect SKU in Replacement Order for configurables
- Possible fedex issue with PHP 5.3
2.0.8
(2016-03-11)
Fixed
- Possible issue with Fedex and PHP 5.3
2.0.7
(2016-03-03)
Fixed
- RMA-184 - Incorrect numbers in report "RMA by product"
2.0.6
(2016-02-17)
Features
- RMA-154 - Added translation example for Nederlands locale (nl_NL)
- RMA-149 - Added FedEx SmartPost support
Fixed
- RMA-153 - Fixed address bug for label generating in Guest RMA and added SmartPost weight check
- RMA-150 - Compatibility patch for Webshopapps ShipUSA and other packaging extensions, which use order quote tracking
- RMA-147 - Fixed misformed link in FedEx dialog
- RMA-146 - Fixed possible issue RMA notifications fetched by Help Desk, if integration is enabled and agent shares mailbox with gateway
- RMA-139 - Fixed search in RMA Grid on Items column
- RMA-144 - Fixed issue in Reports with simple products treated as configurables
2.0.5
(2016-02-10)
Fixed
- RMA-143 - Blocked possibility to request return for an old orders from Guest RMA form.
2.0.4
(2016-02-03)
Features
- RMA-75 - Show price of RMA items in the frontend and backend
- RMA-122 - Backend. Add RMA tab inside the ticket page of Help Desk. Highlight RMA number on the Order and Customer pages.
Fixed
- RMA-90 - Prevent RMA from creating duplicates due to form resend in some rare cases
- RMA-96 - Is Send Customer field in Workflow rule does not exist in database
- RMA-124 - Magento 1.6 Fatal error: Call to undefined method Mage::getEdition()
- RMA-119 - Added FedEx setup check also for multistore setup
- RMA-119 - Fixed possible crush due to incorrect FedEx setup. Added warning message.
- RMA-117 - Added check for Fedex Label Table to validator and fixed test for known issues
Improvements
- RMA-116 - Added ability for workflow rules to send notifications to multiple recipients
- RMA-113 - Replaced in Email Notifications sections unsafe direct references to fields to function calls
2.0.3
(2016-01-20)
Features
- RMA-108 - Ability to show reasons/conditions/resolutions of returned products in reports
2.0.4
(2016-02-03)
Improvements
- Testing 2.0.4-alpha2
- Add RMA tab inside the ticket page of Help Desk
- Show price of RMA items in the frontend and backend
- Prevent RMA from creating duplicates due to form resend
- Is Send Customer field in Workflow rule does not exist in database
-
Magento 1.6 Fatal error: Call to undefined method Mage::getEdition()
2.0.3
(2016-02-01)
Improvements
- Fatal error related with wrong syntax PHP < 5.5
- Possible conflict between RMA Created and RMA Updated events
- When FedEx is not properly set up, it can cause crush of RMA dialog
- Validator does not check correct creation of table 'm_rma_fedex_label'
- Allow workflow rules to send notifications to multiple addresses
- Replace in variables documentation direct references to RMA fields to function calls
- If Workflow Rules have "Stop processing option", the last one by priority is executed instead of first
- Ability to show reason in reports
2.0.1
(2016-01-18)
Improvements
- Add to migration script from AW RMA to HDMX Guest RMA support
- MstCore (common for all extensions): Fpc Crawler
- MstCore (common for all extensions): Improve validator
- On multi-store configuration with different emails on every store, if RMA created from backend, comment notifications are not sent
- Allow use of variables in Workflow Rule's notifications
- Disable Credit Memo, Exchange Order and Replacement Order buttons, if window with them already opened
- Pure guest RMA customer address update fix
- When RMA is created from backend, address do not added to RMA fully
- When guest trying to create RMA, it fails, because of update address failure
- Filter by customer full name fails
- Allow Replace Order for RMA exchange
- When Workflow Rule set on RMA changed Event and sends notifications, RMA creation fails
- MstCore (common for all extensions): Admin ACL fix related to Magento security patch
- Admin routing patch. Compatibility with SUPEE-6788.
- When Mandrill API and blind carbon copies set, RMA notification fails
- Migration script for aheadWorks RMA
- When customer has no address in account, Exchange Order fails
- Allow bundled products return as a whole
- If brand attribute set only for simple products, and in RMA used configurable, RMA Brand report has blank Brand field
- If RMA based on order from deleted storeview, store_id do not set and notifier fails.
- Show red notifier if RMA, created via backend, is expired
- RMA uses two different return addresses
- Add to validator check for Enteprise RMA
- When using Custom RMA field of Date type, we do not normalize date
- Fix XSS
2.0.0
(2015-08-14)
Improvements
- Filter in main RMA grid affects grids in RMA tabs at customer
- Remove additional fields check from validator
- Allow validator to check also RMA table structure instead of just their existense
- Compatibility fixes for Magento EE
- Improve Docs
- Allow sending Blind Carbon Copy of all emails to third party address
- Allow exchange of different products with ability to pay/return extra. Remove ability to auto create Exchange order and Credit Memo (!).
- When generating Exchange Order, parameter weight from original order ignored
- When owner of RMA changes, empty message in notificator is triggered
- Allow sending Blind Carbon Copy of all emails to third party address
- When using Custom RMA field of Date type, we do not normalize date
- MstCore (common for all extensions): Add ability to view changelog in validator
- MstCore (common for all extensions): fix isModuleInstalled (if extension doesn't exist, but xml file is in modules folder)
- Block 'Create RMA' button in frontend to prevent multiple creation of RMA by customer
- When helpdesk fetches emails and adds messages to RMA, email sender is incorrectly specified
- CSS issue with popup dialog
- MstCore (common for all extensions): Merge with validator + default cron checker
- MstCore (common for all extensions): Additional checks for extension validator
- Can't upload files via frontend
- When RMA is created from the backend, check for exceeding original order contents is not performed
- Workflow rules
- When RMA is created from the backend, check for exceeding original order contents is not performed
- Show RMA details in grid
- If product is configurable and has custom fields with custom SKU, SKU is displayed improperly
- Add more variables to email texts
1.0.9
(2015-05-15)
Improvements
- Fix XSS
- When changing status of RMA automatic history message does not translated
- When changing status of RMA automatic history message does not translated
- Send notification to owner email, if internal comment isssued
- When last replier was not RMA owner, and after that was automated comment, Last Replied field of RMA persists
- When multi-website is established, RMA redirect works incorrect
- In Order tab RMA grid uses the same filter, as main RMA grid
- Allow fields Email and customer Surname to be displayed in RMA grid
- Allow sending event on checkout to ensure compatibility with other extension
- Translation of store-dependant values on RMA frontend is not working
- Allow sending event on checkout to ensure compatibility with other extension
- Backend: Allow users attach files to comments
- Backend: Allow to configure number of columns in the RMA grid
- Compability issue with magento 1.4.2.0 and lower
- When refund resolution code is deleted, RMA creation crashes
- Show correct SKU, Product name in RMA for configurable products
- Allow to print RMA Packing Slip from backend
- Error if order does not have a shipping address
- Incorrectly create RMA (affected versions 1.0.7.672, 1.0.8.684)
1.0.8
(2015-02-11)
Improvements
- Link 'Show all order items' is not working
- Customer account - Show RMA in the Order page.
- Allow guest customer to see the list of RMAs and check the status
1.0.7
(2015-02-09)
Improvements
- Link 'Show all order items' is not working
- Wildcard exceptions: support regular expressions
- Add ability to mark customer message as read/unread in RMA backend
- Add Quick Responses
1.0.6
(2015-01-13)
Improvements
- MstCore (common for all extensions): MstCore: Incorrectly identify Magento version (effects only Magento EE 1.14.1.0 with SEO extension)
- Allow to disallow RMA for some products
- Allow to limit size and type of attached files
1.0.5
(2014-11-17)
Improvements
- MstCore (common for all extensions): In some rare cases we have SQL error during installation (duplicate key name 'mstcore_urlrewrite_index1')
- MstCore (common for all extensions): Incorrect core CRC if magento patches were applied
- MstCore (common for all extensions): Encoding problem with russian chars
- MstCore (common for all extensions): Attachments are downloaded without extension in FF (affected RMA extension)
- Attachments are not shown in the backend
- Element with id "is_show_in_confirm_shipping" already exists
- MstCore (common for all extensions): When click "Run validation tests" for particular extension, core test not running
- RMA should allow to select order statuses to start calculations of return period
- MstCore (common for all extensions): Wrong extension code in the extension validator
- Customer should not be able to accidentally post the same RMA form few times
- MstCore (common for all extensions): Ability to validate existence and CRC sum for extension files (depending on version of extension)
- MstCore (common for all extensions): Problem with check of extension status
- RMA should allow to calculate return period from last order update date
- MstCore (common for all extensions): Add checks for possible PHP cache
- In backend show guest links as in Helpdesk (more userfriendly)
- Add fields to shipping confirmation dialog
- Add checks of permissions to validator
- Add ability to use order number in the number of RMA.
- Active - whether this field is active and available for editing.