Getting Started
Welcome to the SEO Auto Links documentation. Whether you are new or an advanced user, you can find useful information here.
Next steps:
How to install extension
- Login to Magento backend.
-
Go to System > Tools > Compilations.
If Compiler Status is Enabled, disable the compilation by clicking the button Disable in the upper right corner.
- Backup your store database and web directory.
- Download extension from your Personal Account.
- Unzip the extension locally.
- Copy contents of the folder step1 to the root directory of Magento store.
- Copy contents of the folder step2 to the root directory of Magento store.
-
Completely clear the site cache.
Go to System > Cache Management. Click button Flush Magento Cache. If you want to clear the cache manually, you need to remove a folder
/var/cacheat the server. - Logout from Magento backend and login again.
- Go to System > Configuration > Mirasvit Extensions > System, at form Installed Extensions press the button Run validation tests for all extensions for check extension installation and configuration.
- If compilation was enabled before installation, you need to run recompilation process to enable compilation. Go to System > Tools > Compilation and click on Run Compilation Process.
If you did not disable compilation and store is down after installation, follow the link and make next steps to recover the store.
Next steps:
How to upgrade extension
To upgrade extension follow next steps:
- Login to Magento backend.
-
Go to System > Tools > Compilations.
If Compiler Status is Enabled, disable the compilation by clicking the button Disable in the upper right corner.
-
Backup your store database and web directory.
If you have customizations, please, create a separate backup of app/code/local/Mirasvit before upgrading to the new version. - Download new extension package from your Personal Account.
- Unzip the extension locally.
- Temporary disable extension. Check Temporary Disabling.
- Copy contents of the folder step1 to the root directory of Magento store.
- Copy contents of the folder step2 to the root directory of Magento store.
- Completely clear the site cache. Go to System > Cache Management. Click button Flush Magento Cache. If you want to clear the cache manually, you need to remove a folder /var/cache at the server.
- Logout from Magento backend and login again.
- If compilation was enabled before upgrade, you need to run recompilation process to enable compilation. Go to System > Tools > Compilation and click on Run Compilation Process.
If you did not disable compilation and store is down after upgrade, follow the link and make next steps to recover the store.
Temporary Disabling
To temporary disable an extension please follow the next steps:
- Disable Compilation Mode (if enabled).
-
Remove following files:
- app/etc/modules/Mirasvit_SeoAutolink.xml
-
If you have only one extension from Mirasvit installed, remove following file:
- app/etc/modules/Mirasvit_MstCore.xml
- Login in to Magento back-end and refresh site cache (if enabled).
Extension Removing
To uninstall an extension please follow the next steps:
- Disable Compilation Mode (if enabled).
-
Remove following files:
- app/etc/modules/Mirasvit_SeoAutolink.xml
-
If you have only one extension from Mirasvit installed, remove following file:
- app/etc/modules/Mirasvit_MstCore.xml
- Login in to Magento back-end and refresh site cache (if enabled).
-
Remove following folders:
- app/code/local/Mirasvit/SeoAutolink
- Remove templates and layouts files of the extension from your theme folder. The list of such files can be collected from files in the extension package.
- Run following SQL Query (before running, replace [db_table_prefix] to your database table prefix. It can be found in the file /app/etc/local.xml).
  DROP TABLE [db_table_prefix]m_seoautolink_link_store;
  DROP TABLE [db_table_prefix]m_seoautolink_link;
  DELETE FROM [db_table_prefix]core_resource WHERE code='seoautolink_setup';
General Configuration
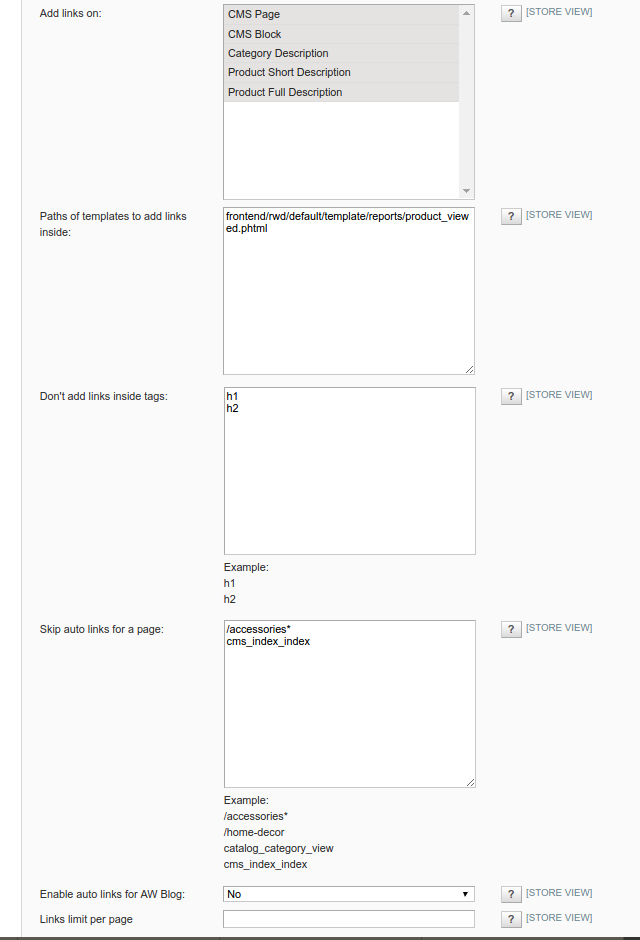
Go to the System > Configuration > Mirasvit Extensions > Auto Links.
- Add links on - Select content types where autolinks should be applied.
- Paths of templates to add links inside - you may use this option to add auto links to needed blocks. To find out needed template file's paths to put into the field of this configuration option - please enable "Template Hints" in System > Configuration > Advanced > Developer > Debug > Template Path Hints to see it on the frontend.
-
Don't add links inside tags - Ignore matching keywords enclosed in selected tags.
To flexibly skip autolinks for one part but add to another part of the same block or template you may define a custom tag like<skip_links>or<skip_seo>, wrap needed output in the template with a new tag like this:<p><skip_seo><?php echo $description_text; ?></skip_seo></p>and add this tag asskip_seoorskip_linksto Don't add links inside tags field. - Skip auto links for a page - Choose pages where auto links should not be placed.
- Enable auto links for AW Blog - If enabled, auto links will be added to pages generated by AheadWorks Blog extension if matching keywords are present on them.
- Links limit per page - global limit of links that should be added on a any given page. Leave field empty to disable limit.
- Skip links pointing to current page - Skip links with URL parameter identical to current page URL. For example link with URL "/home-decor/electronics.html" on Electronics category description with URL "http://example.com/home-decor/electronics.html" will be skipped.
Next steps:
Auto Links Management
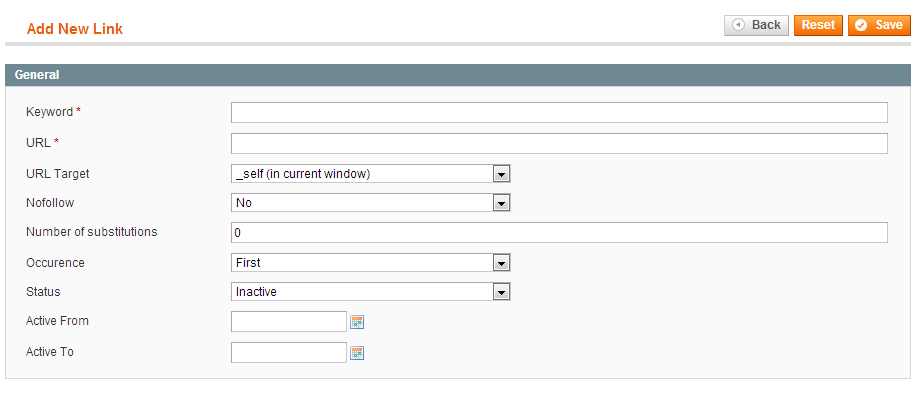
Add Links
Go to the SEO > Auto Links > Management and click the button Add New Link. In the opened window, enter settings:
- Keyword - word which will be replaced by the link.
- URL - target URL of the link
- URL Target - specifies where link should be open (in the current window or in the new one)
- Nofollow - If enabled, nofollow attribute will be added to the link
- Number of substitutions - specifies maximum number of keyword replacements in the content of the page. If this number is equal 0, then number of replacements is unlimited.
- Occurence - specifies direction of search for keywords replacement.
- Status - indicates either link is active or disabled.
- Visible in Store View - Choose store views where links will be added.
You may choose All Store Views OR individeal views like English,French. Please do not select both All Store Views along with individual views.
Next step:
Import Auto Links
Go to SEO > Auto Links > Import
Extension allows to import Auto Links via CSV file.

Click on the Example of CSV file to download an example of template.
If you open the example, you will see next columns on the first line: keyword, url, url_title, url_target, etc. All these headers are response for the fields, which you can see if you create a new auto link, or open the existing one.
Strarting with the second line, fill in the values according to the header.
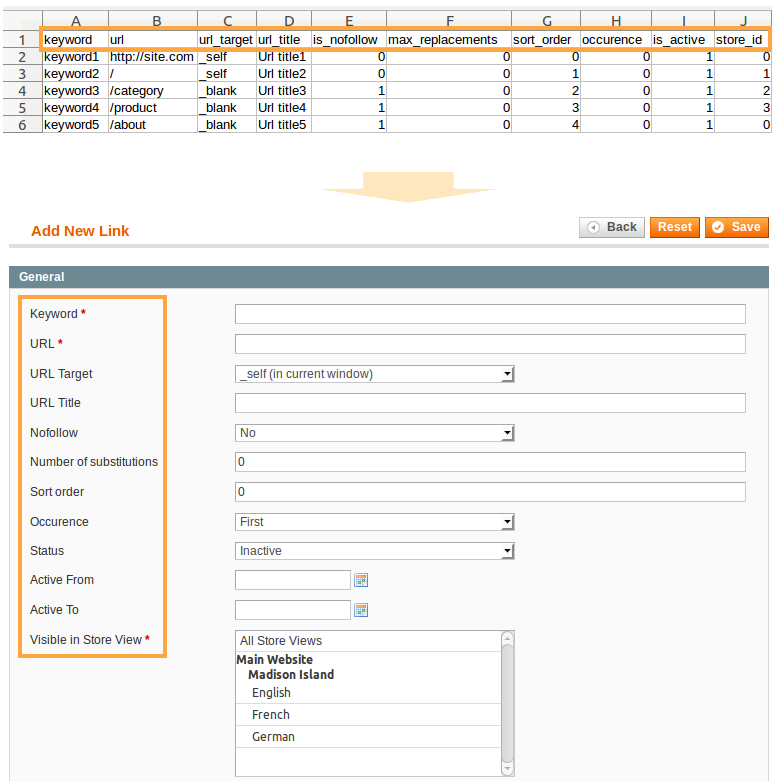
If you already have correctly created CSV file, click on the button Browse and select file. To apply auto links, click the Save button.
Change Log
1.0.17
(2018-05-25)
Improvements
- Debug improvement
- Ability add links by tags
1.0.16
(2017-12-28)
Fixed
Fixed an issue when autolinks with special characters, for example "(", is not changed
1.0.15
(2017-12-27)
Fixed
- Fixed an issue if autolink don't added to the page because of additional spaces in templates which added in "Paths of templates to add links inside"
1.0.14
(2017-02-16)
Improvements
- Compatibility adjustments introduced
1.0.13
(2017-01-24)
Fixed
- Stability adjustments introduced to avoid issues on Magento reindex(for some stores)
1.0.12
(2016-12-07)
Fixed
- Fixed an issue with templates to add links inside
1.0.11
(2016-11-10)
Fixed
- Fixed error if slash exist in autolink keyword
1.0.10
(2016-11-03)
Improvements
- Improved auto links import for multiple store views
1.0.9
(2016-09-01)
Improvements
- Compatibility with languages without space (Chinese, Thai etc.)
1.0.8
(2016-08-19)
Fixed
- Fixed "id already exists" error ( for some stores )
1.0.6
(2016-08-11)
Features
- Added option to skip links pointing to current page
Improvements
- Max links per page calculation optimized
Documentation
- Description for "Skip links pointing to current page" added and "Don't add links inside tags" description extended
1.0.5
(2016-08-05)
Improvements
- Performance improved
Fixed
- Compatibility adjustments for newer versions of AW Blog extension
1.0.4
(2016-07-08)
Improvements
- Improved handling of special characters in internal link keywords
1.0.3.1
(2016-03-31)
Documentation
- Added "Paths of templates to add links inside" option description
1.0.3
(2016-02-19)
Improvements
- Old manual files removed
1.0.2
(2016-02-17)
Features
- Possibility to add autolinks based on block or template information
Improvements
- Add frontend debugging mechanism for added autolinks
Fixed
- "Links limit per page" works incorrectly
- Incorrect work of "number of substitutions"