Getting Started
Welcome to the Follow Up Email Documentation. Whether you are new to Follow Up Email or an advanced user, you can find useful information here.
First of all we recommend to check the following links:
- How to install extension
- Setting Up an Email Trigger
- Setting Up an Email Template
- Setting Up an Design
How to install extension
- Login to Magento backend.
-
Go to System > Tools > Compilations.
If Compiler Status is Enabled, then disable the compilation by clicking the button Disable in the upper right corner. After installation of extension, you can enable compilation again.
- Backup your store database and web directory.
- Download extension from your Personal Account.
- Unzip the extension locally.
- Copy contents of the folder step1 to the root directory of Magento store.
- Copy contents of the folder step2 to the root directory of Magento store.
-
Completely clear the site cache. Go to System > Cache Management.
Click button Flush Magento Cache. If you want to clear the cache manually, you need to remove a folder /var/cache at the server.
- Logout from Magento backend and login again.
Next steps:
- How to set up the cron job for Magento
- Setting Up an Email Trigger
- Setting Up an Email Template
- Setting Up an Design
How to set up the cron job for Magento
Setting up the cronjob using shell access
- Before setting up a new cron job, check that it has not been set up yet. Use the following command to get a list of cron jobs:
crontab -l - To add a new cron task, open crontab for editing:
crontab -e - Add the following record to the end of the list of jobs:
* * * * * /[path_to_php]/php -f /[path_to_magento]/cron.php >> /[path_to_magento]/var/log/cron.log 2>&1
Setting up the cron job using a control panel (CPanel, Plesk, etc)
- Open settings of cron jobs in your control panel.
- Before setting up a new cron job, check that it has not been set up yet.
- Add a new cron job with the following parameters:
- Minute: *
- Hour: *
- Day: *
- Month: *
- Weekday: *
- Command: /[path_to_php]/php -f /[path_to_magento]/cron.php >> /[path_to_magento]/var/log/cron.log 2>&1
- Click the button Click Add New Cron Job.
Extension Disabling
Temporary Disabling
To temporary disable extension please follow the next steps:
- Disable Compilation Mode (if enabled).
-
Remove following files:
app/etc/modules/Mirasvit_Email.xmlapp/etc/modules/Mirasvit_EmailDesign.xmlapp/etc/modules/Mirasvit_EmailReport.xmlapp/etc/modules/Mirasvit_EmailSmtp.xml
-
If you have only one extension from Mirasvit installed, remove following file:
app/etc/modules/Mirasvit_MstCore.xml
- Login in to Magento back-end and refresh site cache (if enabled).
Extension Removing
To uninstall extension please follow the next steps:
- Disable Compilation Mode (if enabled).
-
Remove following files:
app/etc/modules/Mirasvit_Email.xmlapp/etc/modules/Mirasvit_EmailDesign.xmlapp/etc/modules/Mirasvit_EmailReport.xmlapp/etc/modules/Mirasvit_EmailSmtp.xml
-
If you have only one extension from Mirasvit installed, remove following file:
app/etc/modules/Mirasvit_MstCore.xml
- Login in to Magento back-end and refresh site cache (if enabled).
-
Remove following folders:
app/code/local/Mirasvit/Emailapp/code/local/Mirasvit/EmailDesignapp/code/local/Mirasvit/EmailReportapp/code/local/Mirasvit/EmailSmtp
- Remove templates and layouts files of extension from your theme folder. List of such files can be collected from files in the extension package.
How to upgrade extension
To upgrade extension follow next steps:
- Login to the Magento backend.
- Go to System > Tools > Compilations. If Compiler Status is Enabled, then disable the compilation by clicking the button Disable in the upper right corner. After installation of the extension, you can enable compilation again.
- Backup your store database and web directory.
If you have customizations, please, create a separate backup of app/code/local/Mirasvit before upgrading it to the new version.
- Download a new extension package from your Personal Account.
- Unzip the extension locally.
- Temporary disable extension. See Temporary Disabling.
- Copy content of the folder step1 to the root directory of the Magento store.
- Copy content of the folder step2 to the root directory of the Magento store.
- Clear completely the site cache. Go to System > Cache Management. Click the button Flush Magento Cache. If you would like to clear the cache manually, you have to remove a folder /var/cache on the server.
- Logout from the Magento backend and login again.
- If necessary adjust css styles to fit your store's frontend theme.
Setting Up an Email Trigger
Trigger - is the event or the sequence of events as a result of which is generate chain of emails.
Event - is the certain action of a visitor (e.g. log in, registration, placing an order) or action of a system (e.g. change order status, change of the price)
To create a new email trigger, follow these steps:
- Go to Follow Up Email > Manage Triggers. Press button Add Trigger
- Input all needed values there:
- General Information
- Name - the name of trigger.
- Description
- Is email redirection active - is a sandbox mode on a trigger level. If this option enabled it activates another field "Send only to email".
- Is Active
- Active From
- Active To
- Store View - the store view, for which will be send emails.
- Event - the event a result of which will activate the trigger.
- Cancelation Event - the event a result of which will cancel the trigger.
- Email Chain
- General Information
- Press Save.
- After saving the trigger, you can test new trigger.
List of Events
Customer Events
-
Customer Logged In
-
New customer signup
-
Customer Birthday
-
Customer Activity
The event is triggered, when authorized customer open some page (products, categories, shopping cart, account etc)
-
Change of a group
The event is triggered, if a customer group was changed
-
Newsletter subscription
-
Newsletter unsubscription
-
Newsletter subscription status change
The event is triggered each time when customer subscription status changed
-
Customer submits review
-
Customer review has been approved
- Customer Account Update
Order Events
-
Order obtained new status
The status "Order obtained new status" is triggered each time when an order obtains a new status (Pending, Processing, Complete, Canceled...), so when you select this status, it's exactly the same as when you select all the available order statuses. So if you want to capture the actually new orders, then you need to select the specific event, for example "Order obtained 'Pending' status".
-
Order obtained '###' status
-
Order obtained 'Pending' status
-
Order obtained 'Processing' status
-
Order obtained 'Completed' status
- ...
-
Wishlist Events
-
Product was added to wishlist
- Wishlist shared
Shopping Cart
-
Abandoned Shopping Cart
The event is triggered, 1 hour after a shopping cart is created.
To trigger the event "Abandoned Shopping Cart" you need to add product to cart, navigate to the checkout. If you are not logged in, then you need to specify your name, last name and email. Wait 1 hour to register this event and you will receive an email according to the time set in the settings of the email queue for this trigger.
By default our extension restricts a number of abandoned carts for the same customer within the same store. This restriction is set to 1 abandoned cart within 7 days.
- Product price was changed
Emails
-
Open link in email from trigger "trigger name"
The event is triggered, when client clicks the link from the trigger email "trigger name".
-
Payment Transaction Failed
The event is available only if the module Mirasvit EmailSmtp is used.
The event is triggered, when Magento sends the email Payment Transaction Failed.
RMA
-
RMA created
The event is available only if the module Mirasvit RMA is used.
The event is triggered, when client creates new RMA.
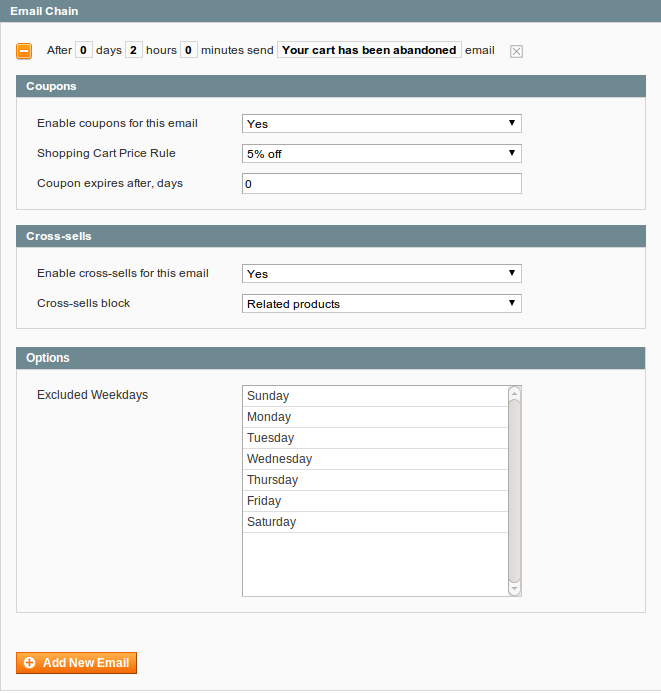
Manage Email Chain
You can create unlimited number of emails, that will be sended after a triggering event.
For add new email to mail chain, follow these steps:
- Go to Follow Up Email > Manage Triggers and open trigger.
-
Press Add Email
-
Select when the triggered message will be sent.
By default, it will send immediately after a triggering event (0 days 0 hours 0 minutes). You can choose set times from as short as one minute to as long as few years after the trigger’s criteria is met.
- Select Email Template, which will be sended
-
Press Plus for configure additional conditions
-
Coupons
If email template supports coupons, you can enable this feature
- Enable coupons for this email
- Shopping Cart Price Rule - select shopping cart price rule, depends on the amount of discount
- Coupon expires after, days - fill expiry time of coupon (leave blank for no limit)
Our extension generates the coupon codes based on the selected shopping cart price rule.To be able to generate the coupon codes you should check the option "Use Auto Generation" at the shopping cart price rule.
-
Cross-sells
If email template supports cross-sells product, you can enable this feature
- Enable cross-sells for this email
-
Cross-sells block - select cross-sells block, products which are added to the email
- Cross-sell product
- Related products
- Upsell products
- New Arrival Products (products with the attributes "New from Date" and "New to Date")
- AheadWorks Who bought this also bought
- AheadWorks Autorelated products 2. Only a block of the type "Shopping Cart" is used.
- TM Sold Together - Customers who bought this item also bought
- TM Sold Together - Frequently bought together
- Amasty most viewed
The products for the cross-sells block are selected based on the products associated with the customers orders or shopping cart.Before using one of the above types as the source make sure that an appropriate type of products is configured in your store.
- Options
- Excluded Weekdays - allows to exclude some particular days for sending emails. Emails scheduled on these days will be sent with delay (after excluded days).
-
-
Manage Trigger Rules
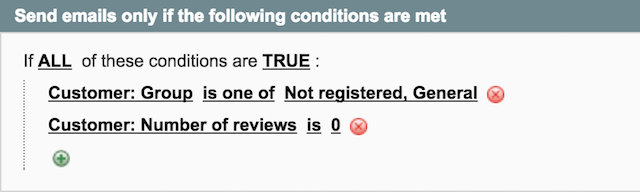
The use of rules, giving you additional options for managing the customers who will receive certain emails.
Before send each scheduled email, extension check Rules.
If Rules return TRUE - extension send email. In other cases, extension will cancel certain email.
Google Analytics
The use of this feature, giving you tool to analyze number of visits, conversion rate, time of visits etc for visitors, who arrives from email.
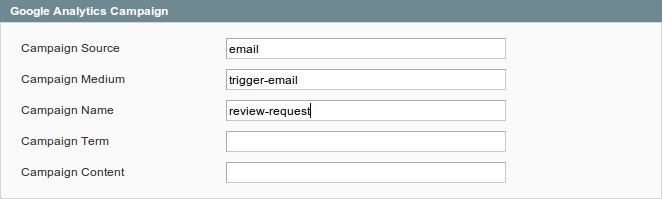
For configure Google Analytics Campaign, follow these steps:
- Go to Follow Up Email > Manage Triggers, open trigger and follow tab Google Analytics.
- Fill in 3 required fields:
- Campaign Source - Identifies a search engine, newsletter name, or other source.(i.e. email, follow-up-email, newsletter)
- Campaign Medium - Identifies a medium such as email or cost-per-click. (i.e. cpc, banner, email)
- Campaign Name - Identifies a specific product promotion or strategic campaign. (i.e product, promo code, or slogan)
Also, you can optionally fill in other fields: - Campaign Term - Identifies paid keywords.
- Campaign Content - Differentiates ads or links that point to the same URL.
- Save the trigger
After configuring Google Analytics Campaign, extension will automaticaly add special get params to all links in emails. Thus, you don't need to do additional configuration adjustments. (i.e. url http://example.com/about-us/ will be converted to http://example.com/about-us/?utm-source=email&utm-medium=trigger-email&utm-name=review-request).
To track Google Analytics Campaign log in into your account and go to Traffic Sources > Campaigns. Select campaign source from the list.
![]()
Testing the trigger

To test trigger follow these steps:
- Go to Follow Up Email > Manage Triggers and open trigger.
- At top right corner press Send Test Email
- Fill your email address and press Send
- Extension will send all email (chains) associated with the trigger for each selected store
Manual Email Generation
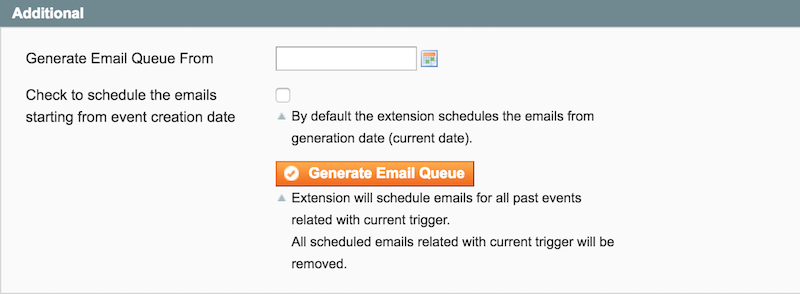
To manually generate email queue for the trigger follow these steps:
- Go to Follow Up Email > Manage Triggers and open trigger
- Navigate to the tab Additional
- Select a specific date in the past at the field Generate Email Queue From, starting from which you want to generate an email queue
- Press the button Generate Email Queue in order to start email generation
- In addition you can check the option Check to schedule the emails starting from event creation date, if the option is not checked the extension schedules the emails from generation date (current date)
After clicking the button Generate Email Queue the extension starts searching for the events from the selected date and registers the found events.
Within the same process the extension creates the emails only for the first 100 events. If the extension has registered more than 100 events all the rest events will be processed later by cron.
- Customer: Change group
- Wishlist: Wishlist shared
- All the newsletter events
- Emails: Payment Transaction Failed
Unsubscribed Customers
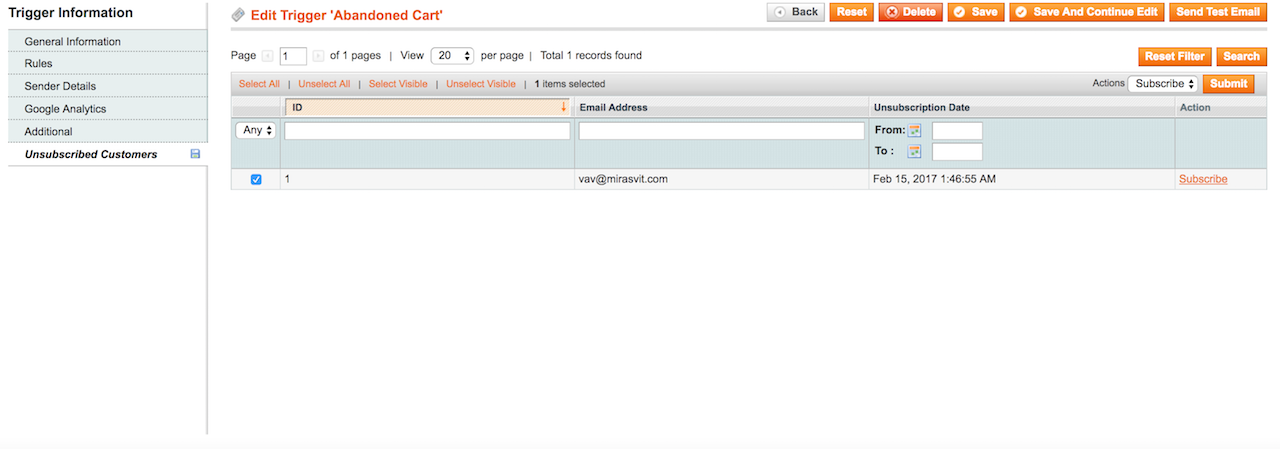
Here you can see the list of customers unsubscribed from receiving emails of this trigger.
In order to send the emails to these customers again, you can remove customers from this list. For this follow steps below:
- Choose required customers
- At the action toolbar of a grid choose the action Subscribe and press Submit
Examples of triggers configuration
In this section, we try explain possible configuration of typical triggers.
-
Birthday wishes
Customer has birthday today.
- Event:
Customer Birthday - Cancel Event: none
- Rules: none
- Mail Chain: After
0days0hours0minutes sendHappy Birthdayemail
- Event:
-
Abandoned cart
Visitor abandon their shopping cart.
- Event:
Abandoned Shopping Cart - Cancel Event:
Order obtained new status - Rules:
Cart: Total count of productsgreater than0- Additionaly you can filter by
Customer GroupandAmount In Cart
- Mail Chain:
- After
0days2hours0minutes sendAbandoned cartemail - After
5days0hours0minutes sendAbandoned cartemail - After
15days0hours0minutes sendAbandoned cartemailwith coupon code
- After
Our extension considers the shopping cart as abandoned only after 1 hour.To trigger the event "Abandoned Shopping Cart" you need to add product to cart, navigate to the checkout. If you are not logged in, then you need to specify your name, last name and email. Wait 1 hour to register this event and you will receive an email according to the time set in the settings of the email queue for this trigger.
There is also another nuance, by default our extension restricts a number of abandoned carts for the same customer within the same store. This restriction is set to 1 abandoned cart within 7 days.
- Event:
-
Review request
Request review after placing the order.
- Event:
Order obtained new status - Cancel Event: none
- Rules:
Number of reviewsis0 - Mail Chain:
- After
2days0hours0minutes sendReview requestemail - After
10days0hours0minutes sendReview requestemailwith coupon code
- After
- Event:
-
Nopurchase
Signs up but never purchases.
- Event:
Customer Logged In - Cancel Event:
Order obtained new status - Rules:
Sales Amountis0 - Mail Chain:
- After
10days0hours0minutes sendWe miss youemailwith coupon code - After
45days0hours0minutes sendWe miss youemailwith coupon code
- After
- Event:
-
No activity some time
During some time customer not visit store.
- Event:
Customer Logged In - Cancel Event:
Customer Logged In - Rules: none
- Mail Chain:
- After
30days0hours0minutes sendWe miss youemailwith coupon code - After
60days0hours0minutes sendWe miss youemailwith coupon code - After
90days0hours0minutes sendWe miss youemailwith coupon code
- After
- Event:
-
Re-order
for example, if you sell consumables
- Event:
Order obtained 'Complete' status - Cancel Event:
Order obtained 'Complete' status - Rules: filter by category or product skus
- Mail Chain:
- After
30days0hours0minutes sendRe-orderemail
- After
- Event:
Setting Up an Email Template
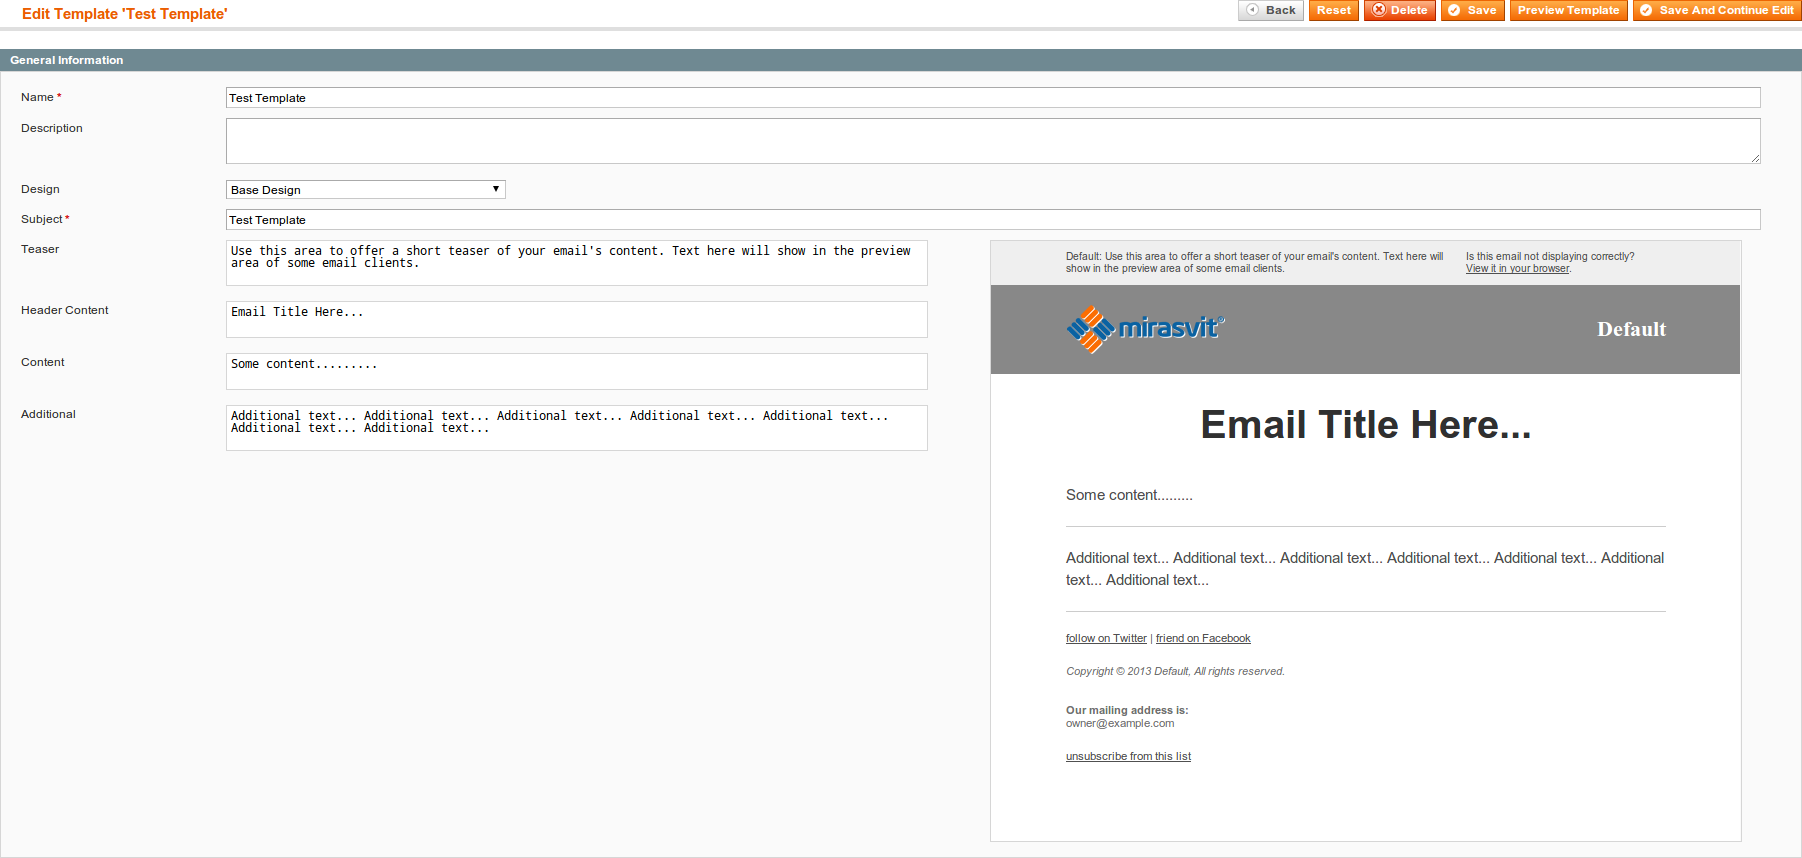
To create a new template, follow these steps:
- Go to Follow Up Email > Templates > Manage Templates. Press button Add Template
- Input all needed values there:
- Name - the name of template.
- Description
- Design - the one of defined designes.
- Subject - the subject of email. In subject you can use variables.
- Press Save.
- Open saved template.
- Depends on desing, you can fill content areas.
List of Methods
Global Methods
-
getUnsubscribeUrl - a direct link to unsubscribe from current trigger
Customer will be unsubscribed from all already scheduled emails (Follow Up Email > Mail Log (Queue)) for current trigger.
This link not unsubscribe customer from future emails (triggered by another events) or native magento subscription.
Usage:
<a href="<?php echo $this->getUnsubscribeUrl() ?>">Unsubscribe</a>Additional you can specify a target URL as the parameter to this method to which customer will be redirected after unsubscription:
<a href="<?php echo $this->getUnsubscribeUrl($this->helper('cms/page')->getPageUrl(10)) ?>">Unsubscribe</a>I.e. customer will be redirected to the CMS page with ID 10.
You can subscribe customer back, follow subscribe instruction for this.
-
getUnsubscribeAllUrl - a direct link to unsubscribe from all triggers
Customer will be unsubscribed from all already scheduled emails (Follow Up Email > Mail Log (Queue)) for all triggers.
This link not unsubscribe customer from native magento subscription.
Usage:
<a href="<?php echo $this->getUnsubscribeAllUrl() ?>">Unsubscribe</a>Additional you can specify a target URL as the parameter to this method to which customer will be redirected after unsubscription:
<a href="<?php echo $this->getUnsubscribeAllUrl($this->helper('cms/page')->getPageUrl(10)) ?>">Unsubscribe</a>I.e. customer will be redirected to the CMS page with ID 10.
You can subscribe customer back, follow subscribe instruction for this.
-
getUnsubscribeNewsletterUrl - a direct link to unsubscribe from all triggers and newsletter
Customer will be unsubscribed from all already scheduled emails (Follow Up Email > Mail Log (Queue)) for all triggers.
This link also unsubscribe customer from native magento subscription.
Usage:
<a href="<?php echo $this->getUnsubscribeNewsletterUrl() ?>">Unsubscribe</a>Additional you can specify a target URL as the parameter to this method to which customer will be redirected after unsubscription:
<a href="<?php echo $this->getUnsubscribeNewsletterUrl($this->helper('cms/page')->getPageUrl(10)) ?>">Unsubscribe</a>I.e. customer will be redirected to the CMS page with ID 10.
You can subscribe customer back, follow subscribe instruction for this.
-
getSubscribeUrl - a direct link to subscribe client back to the trigger's emails
Customer will be subscribed back to all the emails for current trigger.
Usage:
<a href="<?php echo $this->getSubscribeUrl() ?>">Subscribe</a>Additional you can specify a target URL as the parameter to this method to which customer will be redirected after subscription:
<a href="<?php echo $this->getSubscribeUrl($this->helper('cms/page')->getPageUrl(10)) ?>">Subscribe</a> -
getViewInBrowserUrl - a direct link to open email in browser
Usage:
<a href="<?php echo $this->getViewInBrowserUrl() ?>">View it in your browser.</a> -
getResumeUrl - a direct link to resume (restore, log in) customer session
Usage:
<a href="<?php echo $this->getResumeUrl() ?>">Open</a>I.e. customer will be automatically authorizated in store.
Additionally you can pass parameter to method for redirect customer to specific url after authorization.
    <?php foreach($this->getOrder()->getAllVisibleItems() as $item): ?>
      <tr>
        <td>
          <a href="<?php echo $this->getResumeUrl($item->getProduct()->getProductUrl()) ?>">Review <?php echo $item->getName() ?></a>
        </td>
      </tr>
    <?php endforeach ?>
I.e. customer will be automatically redirected to product page for leave review after automatically authorization.
-
getStoreUrl - a direct link to store home page
Usage:
<?php echo $this->getStoreUrl() ?> -
getStoreName - a curent store name
Usage:
<?php echo $this->getStoreName() ?> -
getStorePhone - a curent store phone
Usage:
<?php echo $this->getStorePhone() ?> -
getStoreAddress - a curent store address
Usage:
<?php echo $this->getStoreAddress() ?> -
getStoreEmail - a curent store general transactional email
Usage:
<?php echo $this->getStoreEmail() ?> -
getStoreHours - a curent store hours
Usage:
<?php echo $this->getStoreHours() ?> -
getLogoUrl - retruns URL to logo used at store header
Usage:
<?php echo $this->getLogoUrl() ?> -
getLogoAlt - retruns alt for logo used at store header
Usage:
<?php echo $this->getLogoAlt() ?> -
getEmailLogoUrl - retruns URL to logo used for emails
Usage:
<?php echo $this->getEmailLogoUrl() ?> -
getFacebookUrl - retruns facebook URL specified at the extension settings
Usage:
<?php echo $this->getFacebookUrl() ?> -
getTwitterUrl - retruns twitter URL specified at the extension settings
Usage:
<?php echo $this->getTwitterUrl() ?> -
getFormatedDate - returns the date formatted according to the given parameter
Usage:
<?php echo $this->getFormatedDate($this->getQuote()->getUpdatedAt(), 'full') ?>- Monday, November 23, 2015<?php echo $this->getFormatedDate($this->getOrder()->getCreatedAt(), 'long') ?>- November 23, 2015<?php echo $this->getFormatedDate($this->getOrder()->getUpdatedAt(), 'medium') ?>- Nov 23, 2015<?php echo $this->getFormatedDate($this->getQuote()->getCreatedAt(), 'short') ?>- 11/23/2015 -
getFaviconFile - returns path to favicon icon (since version 1.0.36)
Usage:
<link rel="icon" href="<?php echo $this->getFaviconFile(); ?>" type="image/x-icon" /><?php if ($this->getFaviconFile()): ?> <link rel="icon" href="<?php echo $this->getFaviconFile(); ?>" type="image/x-icon" /> <?php endif ?>
Customer Methods
-
getCustomerName - returns customer's full name
Usage:
Dear <?php echo $this->getCustomerName() ?>You can pass a parameter to the method getCustomerName() which will be used instead of the customer name, if customer's name is empty:
Dear <?php echo $this->getCustomerName('Customer') ?>, results in Dear Customer, if customer's name is empty (since version 1.0.34). -
getFirstname - returns customer's firstname (since version 1.0.36)
Usage:
Dear <?php echo $this->getFirstname() ?> -
getLastname - returns customer's lastname (since version 1.0.36)
Usage:
Dear <?php echo $this->getLastname() ?> -
getCustomer - retrurns customer's object (only for registered customers)
Usage:
Hi <?php echo $this->getCustomer()->getFirstname() ?><?php echo $this->getCustomer()->getEmail() ?> -
getPrimaryShippingAddress - returns customer shipping address object
Usage:
Your shipping address: <?php echo $this->getCustomer()->getPrimaryShippingAddress()->format('html') ?>Returns customer's shipping address in HTML format. Instead of html it's also possible to use the following formats: text, oneline, pdf and js_template.
<?php if($this->getCustomer()->getPrimaryShippingAddress()): ?> <p><?php echo $this->getCustomer()->getPrimaryShippingAddress()->format('oneline') ?></p> <?php endif ?> -
getPrimaryBillingAddress - returns customer billing address object
Usage:
Your billing address: <?php echo $this->getCustomer()->getPrimaryBillingAddress()->format('html') ?>Returns customer's billing address in HTML format. Instead of html it's also possible to use the following formats: text, oneline, pdf and js_template.
    <?php if($this->getCustomer()->getPrimaryBillingAddress()): ?>
      <p><?php echo $this->getCustomer()->getPrimaryBillingAddress()->format('oneline') ?></p>
    <?php endif ?>
Shopping Cart Methods
-
getRestoreCartUrl - a direct link to customer shopping cart
Usage:
<a href="<?php echo $this->getRestoreCartUrl() ?>">Finish Checkout!</a> -
getQuote()->getAllVisibleItems() - return collection of products in cart for feature output
Usage:
<?php foreach ($this->getQuote()->getAllVisibleItems() as $item): ?> <?php echo $item->getName() ?> <?php endforeach ?> -
getAddToCartUrl - a direct link to customer shopping cart with specified product
Usage:
<a href="<?php echo $this->getAddToCartUrl(388) ?>">Add to cart</a>Customer will be automatically authorizated in store and redirected to a shopping cart with the specified product.
Order Methods
-
getOrder()->getStatus() - the status of order
Usage:
order status is <?php echo $this->getOrder()->getStatus() ?> -
getOrder()->getIncrementId() - the order number
Usage:
Order #<?php echo $this->getOrder()->getIncrementId() ?> -
getOrder()->getStoreGroupName() - the store name of order
Usage:
You placed order in <?php echo $this->getOrder()->getStoreGroupName() ?> -
getOrder()->getAllVisibleItems() - return list of products in order for feature output
Usage:
<?php foreach ($this->getOrder()->getAllVisibleItems() as $item): ?> <?php echo $item->getName() ?> <?php endforeach ?> -
getOrder()->getShippingAddress() - return shipping address object which can be used to retrieve information from customer's shipping address
Usage:
    <?php echo $this->getOrder()->getShippingAddress()->getCountryId() ?>
    <?php echo $this->getOrder()->getShippingAddress()->getRegion() ?>
    <?php echo $this->getOrder()->getShippingAddress()->getPostcode() ?>
    <?php echo $this->getOrder()->getShippingAddress()->getCity() ?>
    <?php echo $this->getOrder()->getShippingAddress()->getStreet() ?>
    <?php echo $this->getOrder()->getShippingAddress()->getTelephone() ?>
    <?php echo $this->getOrder()->getShippingAddress()->getComplany() ?>
The same methods can be called from the billing address object, but instead of thegetShippingAddress()you need to call the methodgetBillingAddress():<?php echo $this->getOrder()->getShippingAddress()->getCity() ?> <?php echo $this->getOrder()->getShippingAddress()->getComplany() ?> -
getReorderUrl - a direct link to reorder customer order
Usage:
<a href="<?php echo $this->getResumeUrl($this->getReorderUrl($this->getOrder())) ?>">Reorder</a>I.e. customer will be automatically redirected to the checkout to reorder an order after automatically authorization in a store.
-
Retrieve order tracking number by carrier code
Usage:
<?php
$track = Mage::getModel('sales/order_shipment_track')->getCollection()
    ->addFieldToFilter('order_id', $this->getOrder()->getId())
    ->addFieldToFilter('carrier_code', 'your_carrier_code')
    ->getFirstItem();
?>
Where 'your_carrier_code' - is the carrier code of a track which is used for this shipment (or which you want to retrieve). Below specified some of the default carrier codes provided by Magento:
- "custom"
- "fedex"
- "dhl"
- "ups"
- "usps"
- "dhlint"
I.e. to retrieve information for carrier code "fedex" use:
->addFieldToFilter('carrier_code', 'fedex')To see which information stored in this tracking code you can use the code below:
    <?php
    echo '<pre>';
    print_r($track->getData());
    echo '</pre>';
    die();
    ?>
And use this code to retrieve any field you want, example of retrieving the value of tracking number:
<?php echo $track->getTrackNumber() ?>.Another example:
<a href="http://tracking.site.com/track.php?id=<?php echo $track->getTrackNumber() ?>">View tracking info</a> -
Retrieve all order tracking numbers
First you need to get shipment for the order:
<?php $shipment = Mage::getModel('sales/order_shipment')->load($this->getOrder()->getId(), 'order_id'); ?>Next you need to create a cycle to iterate through all the tracks for this shipment:
<?php foreach ($shipment->getAllTracks() as $track): ?>
    Track Number: <?php echo $track->getTrackNumber() ?>
    Carrier Code: <?php echo $track->getCarrierCode() ?>
<?php endforeach ?>
You can use this code in all order-related email templates.
-
Additional Methods
Usage:
    <?php echo $this->getOrder()->getBaseTaxAmount() ?>
    <?php echo $this->getOrder()->getBaseGrandTotal() ?>
    <?php echo $this->getOrder()->getBaseShippingAmount() ?>
    <?php echo $this->getOrder()->getShippingDescription() ?> - returns shipping method name
    <?php echo $this->getOrder()->getPayment()->getMethodInstance()->getTitle() ?> - returns order payment method title
Coupons
-
getCoupon()->getCode() - the autogenerated coupon code
Usage:
Your coupon code: <?php echo $this->getCoupon()->getCode() ?><?php if ($this->getCoupon()): ?> Let us offer you a discount to complete your purchase.<br> Your coupon code: <?php echo $this->getCoupon()->getCode() ?> <?php endif ?>I.e. we display this text block, only if coupon is available.
Our extension generates the coupon codes based on the selected shopping cart price rule.To be able to generate the coupon codes you should check the option "Use Auto Generation" at the shopping cart price rule.
-
getCouponExpiryDate() - the expired date for autogenerated coupon code (since version 1.1.4)
Usage:
Your coupon code valid until: <?php echo $this->getFormatedDate($this->getCouponExpiryDate(), 'short') ?>
Cross sell products
-
getCrossSellHtml - html block of cross sell products
Usage:
<?php echo getCrossSellHtml() ?><?php if ($this->getCrossSellHtml()): ?> <h1>See also:</h1> <?php echo $this->getCrossSellHtml() ?> <?php endif ?>I.e. we display this text block, only if products are available.
Products Methods
-
getProductUrl - a direct link to the product
Usage:
<?php echo $item->getProduct()->getProductUrl() ?> -
getPrice - a price of the product
Usage:
<?php echo $item->getProduct()->getPrice() ?><?php echo $this->getFormattedPrice($item->getProduct()->getPrice()) ?> -
getPriceInclTax - a price of the product with tax (saved in order/shopping cart)
Usage:
<?php echo $item->getPriceInclTax() ?><?php echo $this->getFormattedPrice($item->getPriceInclTax()) ?> -
getName - a name of the product
Usage:
<a href="<?php echo $item->getProduct()->getProductUrl() ?>"><?php echo $item->getName() ?></a> -
getAttribute - method allows you to print or return product attribute value according to a given mask:
Set last parameter to true in order to print the result:
Usage:
<?php $this->getAttribute($item->getProduct(), 'manufacturer', '<h1>Brand: %s</h1>', true) ?>Do not pass last parameter to return the result:
Usage:
<?php echo $this->getAttribute($item->getProduct(), 'manufacturer', '<h1>Brand: %s</h1>') ?> -
getReviewUrl - a direct link to product review page
Usage:
<a href="<?php echo $this->getReviewUrl($product) ?>">Leave Review</a>I.e. customer will be automatically authorizated in store.
    <?php foreach($this->getOrder()->getAllVisibleItems() as $item): ?>
      <tr>
        <td>
          <a href="<?php echo $this->getReviewUrl($item->getProduct()) ?>">Review <?php echo $item->getName() ?></a>
        </td>
      </tr>
    <?php endforeach ?>
I.e. customer will be automatically redirected to product page to leave a review after automatic authorization.
In order to redirect customer to the product review page use the following code:
<a href="<?php echo $this->getResumeUrl(Mage::getUrl('review/product/list', array('id' => $item->getProductId(), '_fragment' => 'review-form'))) ?>">Review <?php echo $item->getName() ?></a> -
Image Directive
Usage:
<img src="<?php echo $this->getImageUrl($item->getProduct(), 100) ?>"/><img src="<?php echo $this->getSmallImageUrl($item->getProduct(), 150) ?>"/><img src="<?php echo $this->getThumbnailUrl($item->getProduct()) ?>"/>
Wishlist Methods
-
getWishlist()->getItemCollection() - return collection of products in wishlist for feature output
Usage:
    <?php foreach ($this->getWishlist()->getItemCollection() as $item): ?>
        <img src="<?php echo $this->getImageUrl($item->getProduct(), 100) ?>"/>
        <a href="<?php echo $item->getProduct()->getProductUrl() ?>"><?php echo $item->getProduct()->getName() ?></a>
    <?php endforeach ?>
Alternative way of retrieving wishlist products:
<?php foreach ($this->getWishlistItemCollection() as $item): ?> <img src="<?php echo $this->getImageUrl($item->getProduct(), 100) ?>"/> <a href="<?php echo $item->getProduct()->getProductUrl() ?>"><?php echo $item->getProduct()->getName() ?></a> <?php endforeach ?> -
getWishlistProduct() - return last added product to wishlist for feature output
Usage:
<a href="<?php echo $this->getWishlistProduct()->getProductUrl() ?>"><?php echo $this->getWishlistProduct()->getName() ?></a>Price: <?php echo $this->getWishlistProduct()->getPrice() ?>
Gift Registry Methods
-
getRegistry() - return gift registry for feature output
Usage:
<p>Gift registry name: <?php echo $this->getRegistry()->getName() ?></p><p>Gift registry view link: <?php echo $this->getRegistry()->getViewUrl() ?></p> -
getRegistry()->getItemCollection() - returns collection of products in gift registry for feature output
Usage:
    <?php foreach ($this->getRegistry()->getItemCollection() as $item): ?>
        <img src="<?php echo $this->getImageUrl($item->getProduct(), 100) ?>"/>
        <a href="<?php echo $item->getProduct()->getProductUrl() ?>"><?php echo $item->getProduct()->getName() ?></a>
        <b><?php echo $this->getFormattedPrice($item->getProduct()->getPrice()) ?></b>
    <?php endforeach ?>
Alternative way of retrieving wishlist products:
    <?php foreach ($this->getRegistryItems() as $item): ?>
        <img src="<?php echo $this->getImageUrl($item->getProduct(), 100) ?>"/>
        <a href="<?php echo $item->getProduct()->getProductUrl() ?>"><?php echo $item->getProduct()->getName() ?></a>
        <b><?php echo $this->getFormattedPrice($item->getProduct()->getPrice()) ?></b>
    <?php endforeach ?>
Additional Methods
-
Print all properties for order object:
Usage:
<?php echo '<pre>'; print_r($this->getOrder()->getData()); echo ' </pre>'; die(); ?> -
Print all properties for order item object:
Usage:
<?php foreach ($this->getOrder()->getAllVisibleItems() as $item): ?> <?php echo '<pre>'; print_r($item->getData()); echo ' </pre>'; die(); ?> <?php endforeach ?> -
Print all properties for product object:
Usage:
<?php foreach ($this->getOrder()->getAllVisibleItems() as $item): ?> <?php echo '<pre>'; print_r($item->getProduct()->getData()); echo ' </pre>'; die(); ?> <?php endforeach ?> -
Print all properties for customer object:
Usage:
<?php echo '<pre>'; print_r($this->getCustomer()->getData()); echo ' </pre>'; die(); ?> -
Print all properties for wishlist object:
Usage:
    <?php
    echo '<pre>';
    print_r($this->getWishlist()->getData());
    echo ' </pre>';
    die();
    ?>
[property_code] => property value
[another_property_code] => property value
[one_more_property_code] => property value
Each property can be accessed separately as follows:
<?php echo $this->getOrder()->getPropertyCode() ?>
<?php echo $this->getOrder()->getAnotherPropertyCode() ?>
<?php echo $this->getOrder()->getShippingAddress()->getAnotherPropertyCode() ?>
<?php echo $this->getOrder()->getPayment()->getPropertyCode() ?>
<?php echo $this->getCustomer()->getPropertyCode() ?>
<?php echo $this->getWishlist()->getOneMorePropertyCode() ?>
<?php echo $item->getProduct()->getPropertyCode() ?>
Setting Up an Design
To create a new design, follow these steps:
- Go to Follow Up Email > Templates > Manage Designs. Press button Add Design
-
Input all needed values there:
- Name - the name of design.
- Description
- Type - the content type
- HTML
- Text
-
Template - the template of design. In this textarea you need create html markup.
You can use variables and methods inside design or template.
Editable Area
Additionaly you can use the directive
<?php echo $this->area('header_content') ?>to create an editable area in a template, whereheader_contentis the name of an area.
Place this directive in a section where you want to insert a content from a template.
- Press Save.
Now you can use new design in your templates.
Import MailChimp Designs
Our extension allows to import MailChimp designs. By default the extension already includes a set of MailChimp designs. In order to import them follow these steps:
- Go to Follow Up Email > Templates > Manage Designs. Press button Import Mailchimp Design
- Select all needed designs.
- Press Import Designs.
Now you can use new design in your templates.
General Settings
Go to System > Configuration > Follow Up Email.
Limit number of emails per address
This option allows you to limit the maximum number of emails sent per address within the specified period:
- Send maximum emails - sets maximum allowed emails for a specified Period
- Period (hours) - sets period for the maximum amount emails, which can be set at Send maximum emails
Send maximum emails  3
Period (hours)       24
If customer within 24 hours already received from you 3 emails, all other emails during the same 24 hours will be canceled
Information
- Facebook Url - allows to add Facebook url to the trigger emails
- Twitter Url - allows to add Twitter url to the trigger emails
Test Information
This option allows to test delivering of trigger emails
- Sandbox Mode - if option enabled, all emails will be sent only to Test Recipient
- Test Recipient - sets receiving email for trigger emails if Sandbox Mode is enabled
Event Settings
-
Enable AJAX Data Capturing - allows you to control guest users data capturing
When enabled, our module automatically captures guest customer's (not logged in) firstname, lastname and email when a client enters this information in your store's fields, for later use while sending emails.
Configure SMTP
Settings
By default, magento use server environment to send emails. But extension allows you to use custom SMTP host.
To configure custom SMTP, follow these steps:
- Go to System > Configuration > Email SMTP.
- Set up options you need:
- Enabled - enable/disable custom SMTP server.
- Host - host or ip address of your smtp server.
- Port - the default port is 25, but some smtp server use a custom port.
- Authorization type - most of smtp servers need an authentication (login/password). Check it if required.
- Use SSL/TLS - checked it only if the smtp server need a secured connection (ssl, tsl)
- Login
- Password
- Press Save Config
- Enabled: Yes
- Host: smtp.gmail.com
- Port: 587
- Authorization type: Login
- Use SSL/TLS: TLS
- Login: example@gmail.com
- Password: 123456
Logging
- Enabled Email Logging - all the sent emails are saved at the section Follow Up Email > System > Mail Log
- Enable Log Cleaning - enable automatic clearing of the Mail Log
- SMTP Mail Logs are stored for, days - store the emails at the section Mail Log for the specified number of days
Mail Log (Queue)
Extension allows to track triggered emails.
Go to Follow Up Email > Mail Log (Queue). You will see next fields:
- ID - id of the mail
- Scheduled At - time when email was added to the queue
- Sent At - time when email was delivered to the recipient
- Trigger - name of the email trigger
- Status - current status of the trigger email. You can track emails with next statuses:
- Ready to go - email is ready to be delivered
- Delivered - email has already been delivered
- Canceled - email delivery was cancelled, email can be cancelled by a cancellation event, trigger rules, global limitation settings or manually
- Error - error was occurred while sending an email, click on the email in order to see the error details
- Missed - email delivery wasn't occurred, if an email is not sent within 2 days after scheduled date
- Unsubscribed - customer unsubscribed from email newsletter
Click on the triggered email. You will see detailed information about triggered email at the next tabs: General information, History, Variables.
The extension automatically removes the 30 days old emails from this section.
Event Log
Extension registers all the events used at triggers.
Go to Follow Up Email > System > Event Log. You will see next fields:
- ID - id of the event
- Event Unique Key - event unique key, used to identify the event
- Event Code - code of the event, refers to the event selected at the trigger's settings (main or cancellation)
- Created At - indicates the time at which a given event took place
- Updated At - the date of updating an event
- Arguments - information related with an event. Every event may have its own set of arguments which can later be used at the email templates. Some of the arguments appear across all the events such as:
- store_id - ID of a store associated with the event
- epxire_after - number of seconds after which a new event with the same Unique Key and Event Code can be registered again. By default it's the 3600 seconds, which is equals to 1 hour. But for different events this interval may vary, e.g. for the event "cart_abandoned" this interval equals to 604 801 seconds - 7 days.
- customer_name - name of the client which caused an event
- customer_email - email of the client which caused an event
- time - timestamp of an event's creation date
- And other arguments vary across different event types, for example:
- order_id - this argument exists only in order-related events, and points to the order's ID
- quote_id - exists only in shopping cart related events, points to the shopping cart ID
- Triggers - list of triggers IDs that listen to this event, and status of event processing by specific trigger
- Action:
- Reset & Process - resets status of the triggers and processes the event by the triggers anew
- Remove - removes the event
At the toolbar you can also find the field Actions, here you can find some useful options:
- Remove - gives you an ability to remove events in bulk
- Validate - allows you to validate the events over the rules of a particular trigger. This option is very useful in case if you want to check why the emails were not created based on the specific events.
The extension automatically removes the 30 days old events from this section.
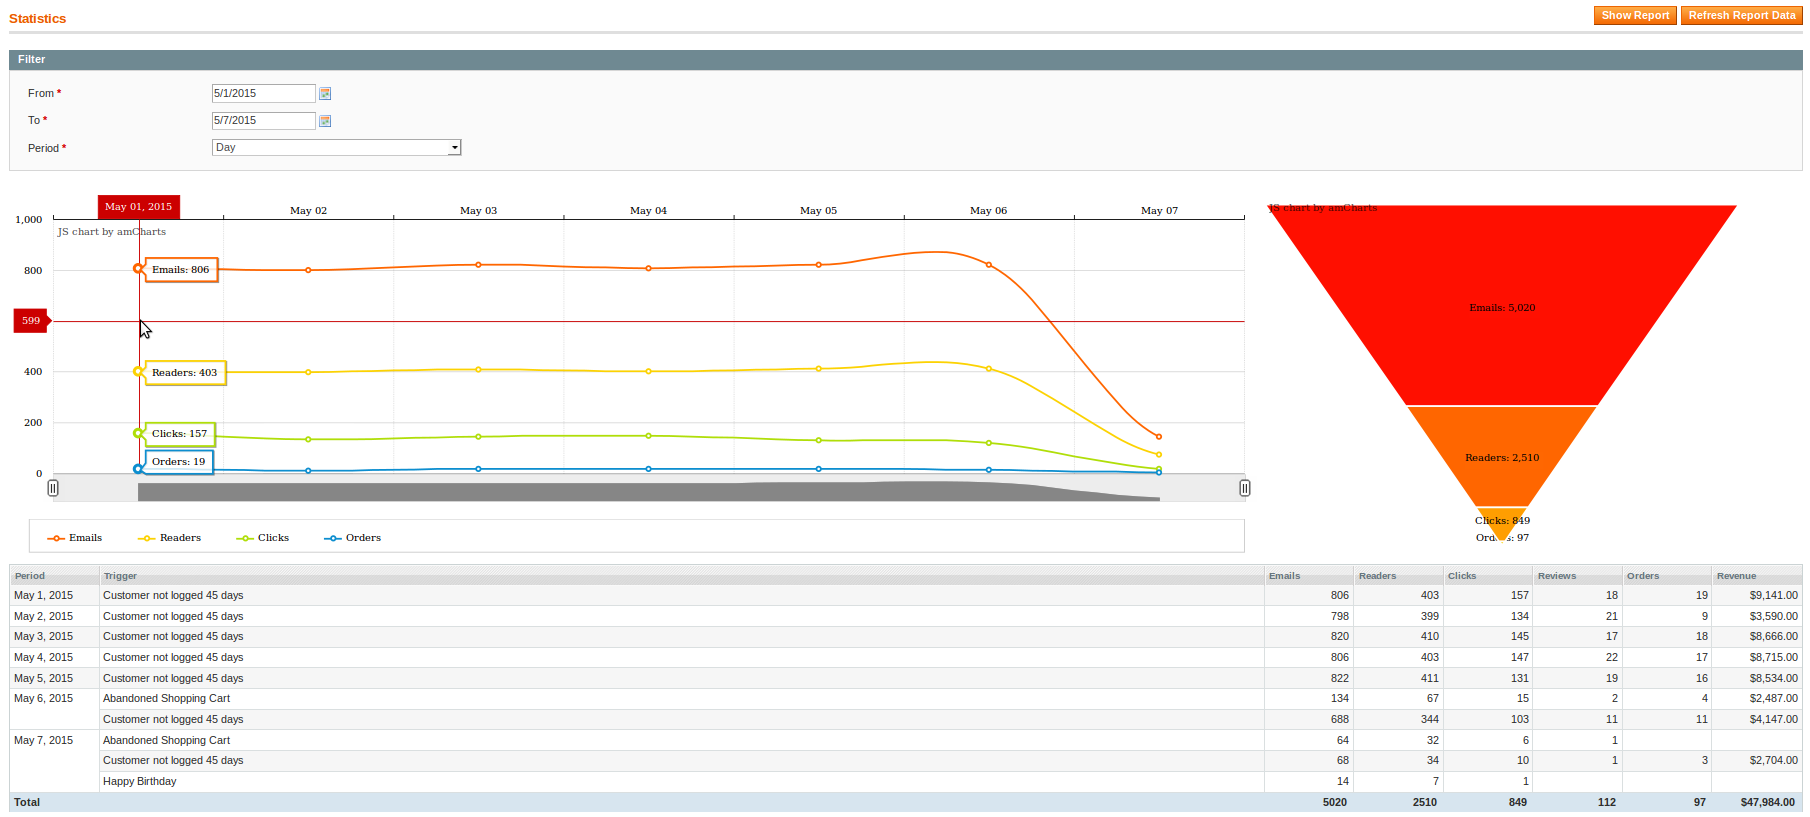
Statistics
Extension generates a data chart based on the trigger emails statistics: number of emails, readers, reviews, clicks, orders.
Go to Follow Up Email > Statistics
Set in the Filter appropriate period for the report and click on the Show Report button. After this action, you will see the following statisiticts in the table:
- Period - period of calculation
- Trigger - event which forced the chain of emails generation
- Emails - amount of sent emails by this trigger
- Readers - amount of the readed emails
- Clicks - number of clicks on the email link
- Reviews - number of written reviews
- Orders - number of customers orders after email link redirect
- Revenue - order amount from the customers which were redirected from the trigger email link
Troubleshooting
-
You don't have permission to access /index.php/emaildesign/adminhtml_design/save/id/11/key/66ea3cdbc88430d08d1c0ca9af546bce/ on this server
Error could appear if you try to save email template or you may find it on a network tab in browser developer toolbar when previewing the email template or design.
This problem is related to restriction on a server side to handle requests with php code, html tags or other forbidden symbols.Solution:
It's possible that your server uses the extension "ModSecurity" (or any other similar tool), it's a toolkit for real-time web application monitoring, logging, and access control.To render the email template/design our extension sends AJAX request to the server (http://example.com/admin/emaildesign_template/drop/id/7/?isAjax=true) which may contain PHP and HTML tags in its body. The extension ModSecurity can be configured in a way to forbid accept requests which may contain any tags (HTML, PHP).
If that is the case you may contact your server admin, and ask to check the URLs below:
- http://example.com/admin/emaildesign_template/drop/id/7/?isAjax=true
- http://example.com/admin/emaildesign_template/save/id/7/?isAjax=true
- http://example.com/admin/emaildesign_design/drop/id/7/?isAjax=true
- http://example.com/admin/emaildesign_design/save/id/7/?isAjax=true
We recommend you to ask your server admin to "whitelist" the above mentioned requests in order to accept them and be able to save and preview templates.
-
core/email_template must be Mirasvit_EmailSmtp_Model_Email_Template, current rewrite is 'Some Another Class Name'
This problem is related to conflict between modules that provide similar functionality and extend email-related functionality of Magento.
Solution:
Our extension Follow Up Email is supplied in package with the optional extension Mirasvit EmailSMTP, which provides additional features and allows you to send all the Magento emails through the configured SMTP server.
To make it possible our module EmailSMTP extends the core functionality of Magento. Since there are a lot of modules which provide similar functionality, there may be a conflict between other installed modules.
If you encounter this conflict in order to cope with it you may need to disable one of the extensions. Weigh all the pros and cons of disabling concrete module, then go to the folder app/etc/modules/ located at the root directory of your Magento store, open the module activation file, and change its directive active to false from true.
Since our extension Mirasvit Email SMTP is optional and it does not affect overall functionality of the Follow Up Email extension you can disable it without ceremony. -
How do I display ordered product options in the email template?
To display product options for configurable products, add the following code to the email template:
<?php if($item->getProduct()->isConfigurable()): ?>
    <?php if ($item instanceof Mage_Sales_Model_Order_Item): ?>
      <?php $_options = $item->getProductOptionByCode('attributes_info'); ?>
    <?php else: ?>
        <?php
          $helper = Mage::helper('catalog/product_configuration');
          $_options = $helper->getConfigurableOptions($item);
        ?>
    <?php endif;?>

    <?php if ($_options):?>
      <?php foreach ($_options as $_option) : ?>
      <?php $_formatedOptionValue = Mage::helper('catalog/product_configuration')->getFormattedOptionValue($_option) ?>
      <div>
          <b><i><?php echo $this->escapeHtml($_option['label']) ?></i></b>: <?php echo $_formatedOptionValue['value'] ?>
          <?php if (isset($_formatedOptionValue['full_view'])): ?>
          <p>
              <span><b><i><?php echo $this->escapeHtml($_option['label']) ?></i></b></span>
              <span><?php echo $_formatedOptionValue['full_view'] ?></span>
          </p>
          <?php endif; ?>
      </div>
      <?php endforeach; ?>
    <?php endif;?>
<?php endif; ?>
Change Log
1.1.48
(2018-09-17)
Documentation
- How to display configurable product options in email template
Improvements
- Improve product image select algorithm in email templates
1.1.47
(2018-08-15)
Fixed
- fixed an issue with the Abandoned Cart incorrect updating "Created At" date
1.1.46
(2018-08-08)
Fixed
- Compatibility with Magento 1.4.1.1
1.1.45
(2018-07-09)
Fixed
- Fixed an issue with abandoned cart event
1.1.44
(2018-06-25)
Fixed
- Product price change triggers the Abandoned Cart event of a cart which contains this product
1.1.43
(2018-05-04)
Features
- GDPR Compliance: Ability to reset email statistic, disable automatic data capturing, remove sent emails
Documentation
- update docs about editable areas
1.1.42
(2018-02-07)
Bugfixes
- fixed an issue with the incorrect images at the emails #49
1.1.41
(2018-01-10)
Bugfixes
- Fix issue where customer email address for abandoned cards is not saved #47
1.1.40
(2017-11-22)
Fixed
- Process variables defined in a subject of transactional email templates
1.1.39
(2017-10-24)
Improvements
- 'Order: created at' condition
1.1.38
(2017-10-10)
Improvements
- Update Pelago Emogrifier library
Fixed
- Properly encode URL parameters
- Fix error with redirect after pressing the button 'Show Report' in emails statistic
1.1.37
(2017-10-02)
Fixed
- Fixed an issue with the none Authorization type at the smtp settings
1.1.36
(2017-08-24)
Fixed
- Fix error with event 'email click' when email chain associated with event no longer exists
1.1.35
(2017-07-31)
Fixed
- Do not use short array syntax
- Correctly filter customer reviews
- Error loading 'log/visitor' model
Improvements
- Cancel emails whose email chain was removed from trigger
- Compatibility with default Magento queue system
1.1.34
(2017-06-29)
Fixed
- Check payment method existence before using it
- Solve error 'Call to a member function getFullActionName() on a non object' caused by 3rd party modules
Improvements
- Show more information about email queue cancellation event
- Edit/view actions for trigger/email queue grids
- Edit action for Email Template grid
- Information about new methods
1.1.33
(2017-06-12)
Fixed
- Problem with validation logic of 'different' condition
1.1.32
(2017-06-09)
Features
- New condition: Recipient has pending emails in email queue related with specific triggers
Improvements
- More info on the 403 error when previewing/saving email templates
- Ability to validated concrete number of matched products in 'different' condition
- Ability to compare attribute values for matched items only with compare condition
- Check if Mage Newsletter is active before using it
- Use only confirmed customers for test emails
- Throw exception if email chain does not exist anymore for email in queue
- Display correct product image type
1.1.31
(2017-05-22)
Fixed
- Remove short array syntax
1.1.30
(2017-05-11)
Fixed
- Properly display scheduled and sent at dates at queue view
Improvements
- Display links for email queue details
1.1.29
(2017-05-03)
Fixed
- Compatibility with the versions before introducing ability to send emails every X period (affects since 1.1.28)
1.1.28
(2017-04-27)
Features
- Ability to send emails every X days/weeks/months/years
- New event 'New shipment created'
1.1.27
(2017-04-21)
Features
- Method 'getSubscribeUrl' - used to subscribe customer back to trigger's emails
Improvements
- Unsubscribed customers documentation
1.1.26
(2017-04-15)
Features
- Condition to compare product attribute values for different products in cart/order
1.1.25
(2017-04-13)
Improvements
- Update documentation
- Troubleshoot: information about solving possible conflict between 3rd party extensions
- Ability to validate review rating
- Send emails by scheduled order
- New condition to validate Gift Registry existence
1.1.24
(2017-03-30)
Features
- Ability to validate concrete number of products in order/cart
Fixed
- Error while filter templates at the grid of Email Templates
1.1.23
(2017-03-24)
Fixed
- Compatibility with Magento versions less than 1.9.x (affects since 1.0.13)
Improvements
- Exclude the active shopping carts that already have associated orders
1.1.22
(2017-03-14)
Improvements
- New condition 'Shipping Amount' for rules of a trigger
1.1.21
(2017-03-10)
Fixed
- Fix issue for the event 'RMA created'
1.1.20
(2017-03-06)
Improvements
- Default value for method 'getCustomerName' - 'Customer'
1.1.19
(2017-02-20)
Improvements
- Ability to specify target URL to the method 'unsubscribe' as the parameter
1.1.18
(2017-01-17)
Improvements
- Update docs
1.1.17
(2017-02-08)
Improvements
- New rule condition 'Is order placed from admin panel'
1.1.16
(2017-02-06)
Fixed
- Fix error of displaying preview for email designs
1.1.15
(2017-02-01)
Improvements
- Show design title at the email template grid
1.1.14
(2017-01-24)
Fixed
- Compatibility with Magento email interface (affects from 1.1.12)
1.1.13
(2017-01-17)
Documentation
- Information about the event log
Improvements
- New email template method 'getReorderUrl()'
1.1.12
(2017-01-16)
Fixed
- Check availability of the payment method before adding 'payment_html' variable (affects since 1.0.13)
- Add email tracker only to email designs of type HTML (affects all)
Documentation
- Explain global methods associated with store
Improvements
- Sort trigger's email chains by delay
- Condition to validate product QTY in cart/order
1.1.11
(2017-01-03)
Improvements
- Round downward the condition 'Last order was ago, days'
1.1.10
(2016-12-29)
Fixed
- Fix error for test emails
- Incompatibility with Magento v. 1.8.x and below (affects since 1.0.13)
- Cannot deselect cancellation event
1.1.9
(2016-12-26)
Improvements
- New rule 'Customer: Has 'Ready to go' email in the mail queue for this trigger'
1.1.8
(2016-12-23)
Improvements
- Update to 'No activity some time' sample trigger
- Information about the event 'Order obtained new status'
- Set correct quote ID for test email
1.1.7
(2016-12-14)
Improvements
- How to import MailChimp Designs
- Additional info on the cross-sells products
- New event 'New Gift Registry created' integration with Mirasvit Gift Registry extension
- Support of transactional variables within template engine of our extension
- Ability to use AheadWorks Autorelated products as the source of cross-sells with 'order-related' events
1.1.6
(2016-11-28)
Fixed
- Correct validation of custom product attributes for rules (affects all)
- Properly generate email queue for the 'email-related' events (affects all)
- Fixed issue with image links at the emails when path used for the Base Url (affects from 1.0.37)
- Display date with the timezone offset at the mail log view (affects all)
Documentation
- Method to get product price including tax from order/shopping cart
- Use of method 'getReviewUrl' to redirect customer directly to the product review page
Improvements
- Default value for methods 'getFirstname()' and 'getLastname()'
1.1.5
(2016-11-21)
Improvements
- Update images
- Additional information about the events
- Information about manual email generation
- Method to retrieve all order tracking numbers
- Method to retrieve coupon expiry date
1.1.3
(2016-11-04)
Fixed
- Fix problem with the event 'Payment Transaction Failed' (affects from 1.0.37)
1.1.2
(2016-11-03)
Fixed
- Emulate store view for emails opened from admin panel
1.1.1
(2016-11-01)
Fixed
- Correctly display email queue page in admin panel, footer broken (affects all)
1.1.0
(2016-10-28)
Features
- Event validation
Fixed
- Save every click-through associated with the follow up email
- Support default transactional variables for earlier versions of Magento
1.0.38
(2016-10-18)
Fixed
- Use default store ID for customers created from admin panel
- Apply default Magento 'disable email communication' setting
Improvements
- Code refactoring
- Ability to choose email schedule strategy for manual email generation
1.0.37
(2016-10-10)
Fixed
- Correctly display page when viewing emails in system mail log
Improvements
- Hide not available events for used environment
- New event 'Failed Payment' triggered when payment fails
- Retrieve images using file path
1.0.36
(2016-10-07)
Fixed
- Properly show new arrival products
- Filter random arguments for test emails by store
Improvements
- Sort cross-sell products randomly
- Method to retrieve favicon icon
- Methods for retrieving customer's first/last name
1.0.35
(2016-09-26)
Fixed
- Display email template subject as the title for the email
- PHP7 error due to using deprecated modifier in the preg_replace function
Improvements
- Group of Billing address conditions for trigger rules
1.0.34
(2016-09-08)
Fixed
- Correctly select collection of active triggers (affects from 1.0.22)
- Validate order conditions properly (affects all)
Improvements
- Default value for method 'getCustomerName' if customer's name empty;
- Performance improving for generating order-related events;
- Ability to generate trigger email queue using shell script
- Adjust height and width of the email preview at the email queue
1.0.33
(2016-08-12)
Features
- New rule "Last order date was ago, days" with ability to use number of days
1.0.32
(2016-08-01)
Fixed
- Fix problem of double registration of order-related events triggered by order comment
Improvements
- Validate extension's CRC values
1.0.31
(2016-07-19)
Improvements
- New event 'Customer account update'
- Action for removing emails from queue
1.0.30
(2016-06-30)
Improvements
- Fix time range for event 'Customer Activity'
1.0.29
(2016-06-30)
Improvements
- Added additional email selector to capture script
1.0.28
(2016-06-23)
Fixed
- Generate unique coupon code per email queue
1.0.27
(2016-06-10)
Improvements
- New order condition: 'Invoice created'
1.0.26
(2016-06-10)
Improvements
- New order conditions: 'Shipment created', 'Shipment has tracking information'
1.0.25
(2016-05-25)
Improvements
- Improvement for the condition "contains"
- New condition for validating the recipient email
1.0.24
(2016-05-20)
Improvements
- New rule condition 'Product stock quantity'
1.0.23
(2016-05-17)
Improvements
- New events associated with review
1.0.22
(2016-05-16)
Fixed
- Use store view settings to configure SMTP
Improvements
- Cross-sell source 'New Arrival Products'
1.0.21
(2016-05-11)
Fixed
- Fixed an issue with trigger sandbox empty email
1.0.20
(2016-05-10)
Fixed
- Fix issues related with tracking events 'Customer: Change group', 'Wishlist shared', 'Newsletter'
Improvements
- Description for email redirection
1.0.19
(2016-04-20)
Improvements
- Cross-sell source 'IWD Auto Related Products'
1.0.18
(2016-04-18)
Fixed
- Fixed an issue with email observer
1.0.17
(2016-04-14)
Improvements
- Do not display Magento debug info in the email templates
- Process only events associated with trigger
- New rule condition 'Order: status'
1.0.16
(2016-04-06)
Improvements
- Description for customer methods 'getPrimaryShippingAddress'/'getPrimaryBilliningAddress'
1.0.15
(2016-04-04)
Features
- New method for adding product to cart 'getAddToCartUrl'
- Ability to convert extension's email templates to transactional emails
Improvements
- Support of extension's methods within transactional emails
1.0.14
(2016-04-01)
Fixed
- Typo in method name 'getFormattedPrice'
Improvements
- Performance improvements
1.0.13
(2016-03-29)
Features
- Manage customers subscription
Fixed
- Set variables for transactional email templates
1.0.12
(2016-03-21)
Improvements
- Ignore 'is missed' when sending email queue manually
1.0.11
(2016-03-14)
Fixed
- Fix using helper from ADVN (affects from 1.0.2)
1.0.10
(2016-03-07)
Fixed
- Use original recipient email for unsubscribing and validation
1.0.9
(2016-03-01)
Improvements
- Use Magento response for output
- Set higher priority for test email
1.0.8
(2016-03-01)
Fixed
- Issue with the tracking image in Gmail
1.0.7
(2016-03-01)
Fixed
- Public visibility for callback method
- Fix small incompatibilities with Magento ver. 1.6.1.0 (affects all)
1.0.6
(2016-02-24)
Fixed
- Fix short array syntax issue (affects from 1.0.5)
- Fix issue with the shipping rules for the trigger
1.0.5
(2016-02-19)
Features
- New customer event 'Subscription status change'
Improvements
- Updated user manual
1.0.4
(2016-02-17)
Improvements
- Added FAQ section
1.0.3
(2016-02-16)
Features
- Set email queue status to 'Error' if its content contains PHP erros
Fixed
- System config was renamed
- Use less than instead of greater than
- Cron job name should be unique
- Fixed problem of outputting images
Improvements
- Information about event Abandoned Shopping Cart
- Information about retrieving order tracking number in the email template
- Note for using shopping cart price rules
1.0.2
(2016-02-15)
Improvements
- Additional information on the email template methods
- Info about trigger testing and coupons
- Save all recipient emails to SMTP mail model
- Better performance for the event order_status and manual generation of the email queue
GDPR Compliance Tips
Since our module collects user data for sending emails, please check some tips to make the extension fully compliant with the GDPR:
- Send emails only to confirmed customers. You can use rules to filter the target auditory:
- Customer: Is subscriber of newsletter is Yes
- There is a cron job email_clean_history which removes a month old emails and events
- You can disable automatic guest user data capturing
- You can manually delete all the stored user data:
- To remove queued emails go to Follow Up Email > Mail Log (Queue), select required emails, choose Delete option in the Actions dropdown and press Submit.
- To remove sent emails go to Follow Up Email > System > Mail Log, select required emails, choose Delete option in the Actions dropdown and press Submit.
- To remove registered events go to Follow Up Email > System > Event Log, select required events, choose Delete option in the Actions dropdown and press Submit.
- To reset statistic go to Follow Up Email > Statistics, press the button Reset Statistic at the toolbar.
- Do not forget to include the unsubscription link to the emails using the method
getUnsubscribeNewsletterUrl()- in order to unsubscribe from all triggers and newsletter, for sample of usage refer to list of methods