Getting Started
Welcome to the AI Assistant documentation.
Whether you are a new or an advanced user, you can find some useful information here.
Go ahead, dive in!
Firstly, please, find our extension in My Downloadable Products section of our store. Learn how to install extension, and proceed with Quick Start, which will guide you to set up your AI Assistant service.
How to install the extension
How to install the extension using composer
- Backup your store's database and web directory.
- Login to the SSH console on your server and navigate to the root directory of the Magento 2 store.
- Copy the installation instructions from the page My Downloadable Products to the SSH console and press ENTER.
- Run command
php -f bin/magento module:enable Mirasvit_Core Mirasvit_Assistantto enable the extension. - Run command
php -f bin/magento setup:upgradeto install the extension. - Run command
php -f bin/magento cache:cleanto clean the cache. -
Deploy static view files
rm -rf pub/static/*; rm -rf var/view_preprocessed/*; php -f bin/magento setup:static-content:deploy
How to install the extension manually
- Backup your store's database and web directory.
- Download archive from My Downloadable Products.
- Unzip the extension locally.
- Copy unzipped folder to the root directory of the Magento store.
- Run command
php -f bin/magento module:enable Mirasvit_Core Mirasvit_Assistantto enable the extension. - Run command
php -f bin/magento setup:upgradeto install the extension. - Run command
php -f bin/magento cache:cleanto clean the cache. -
Deploy static view files
rm -rf pub/static/*; rm -rf var/view_preprocessed/*; php -f bin/magento setup:static-content:deploy
Note
If you install the module manually to the"app/code/" directory, you additionally need to install the required libraries through the composer:composer require "liquid/liquid":"~1.4"
Configuration
AI Assistant integrates your Magento store with GPT3/ChatGPT, allowing you to leverage the latest AI technology advances in your business.
The AI will help you with SEO, customer support, and your blog:
- save time and make your store more visible in search engines by generating meta title and meta description for your products with the artificial intelligence.
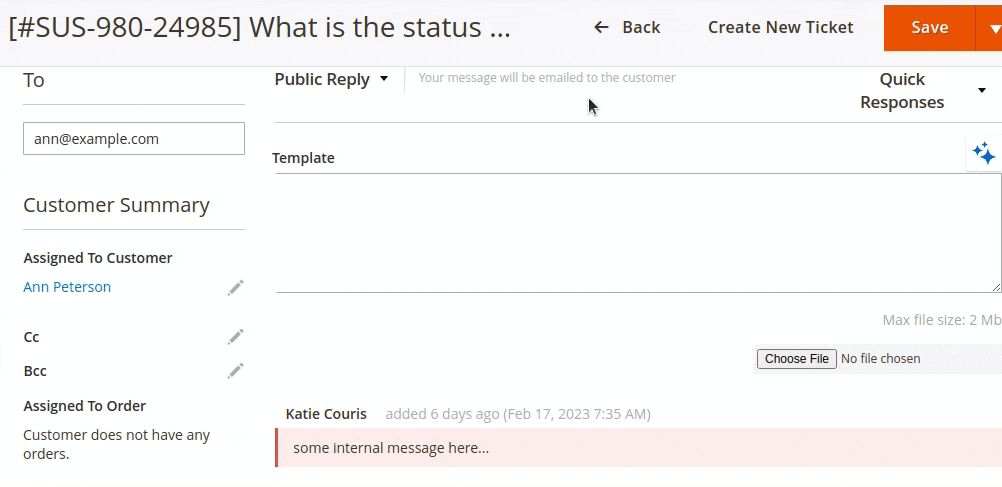
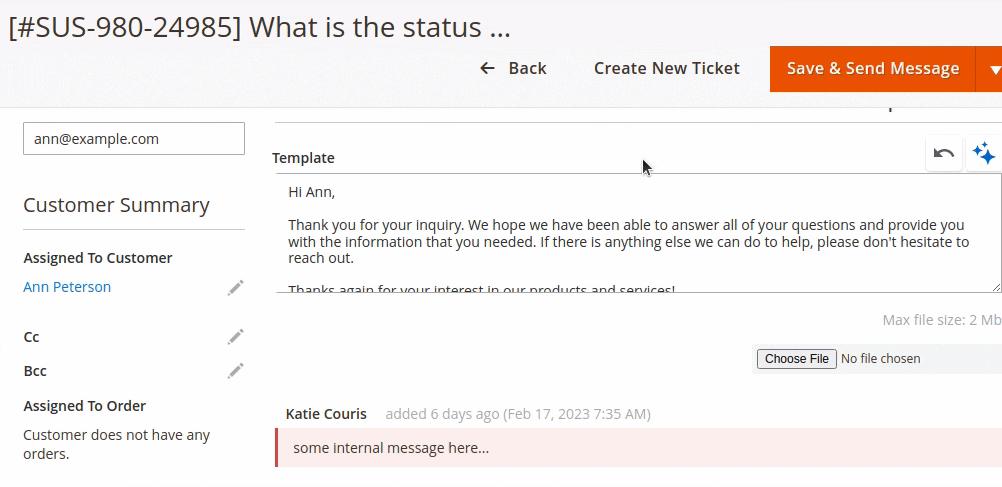
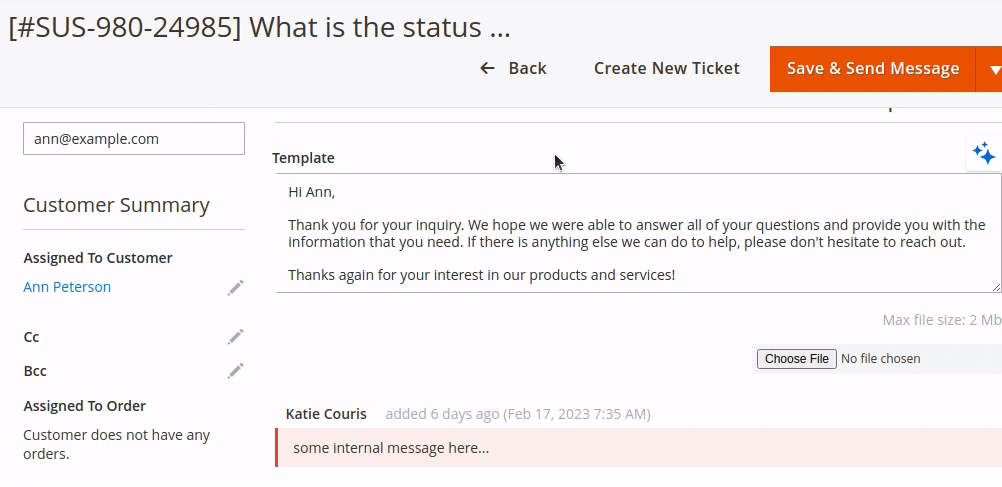
- generate clear and polite messages when responding to your customer support tickets. Additionally, AI can check the grammar of your responses, bringing your customer support to a higher quality level.
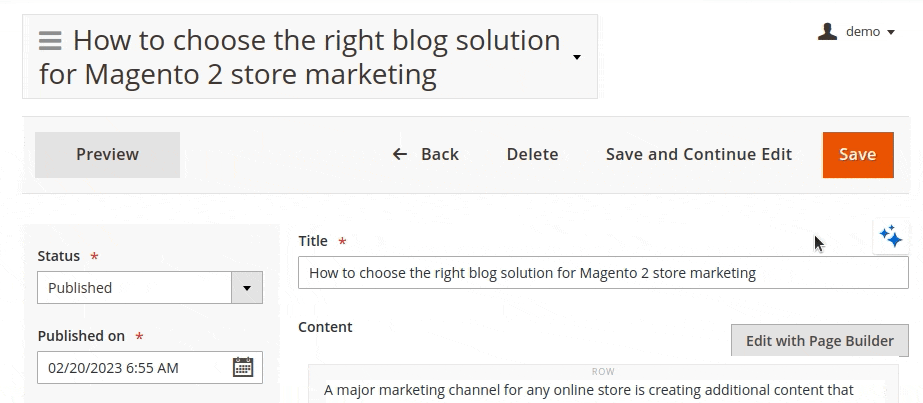
- enhance your blog articles with a catchy headlines generated by AI. Additionally, the AI Assistant module can help you in enhancing the SEO of your blog by creating meta title, meta description, and meta keywords. The extension will also generate you a catchy Tweet for your blog article to enhance your SMM.
General Settings
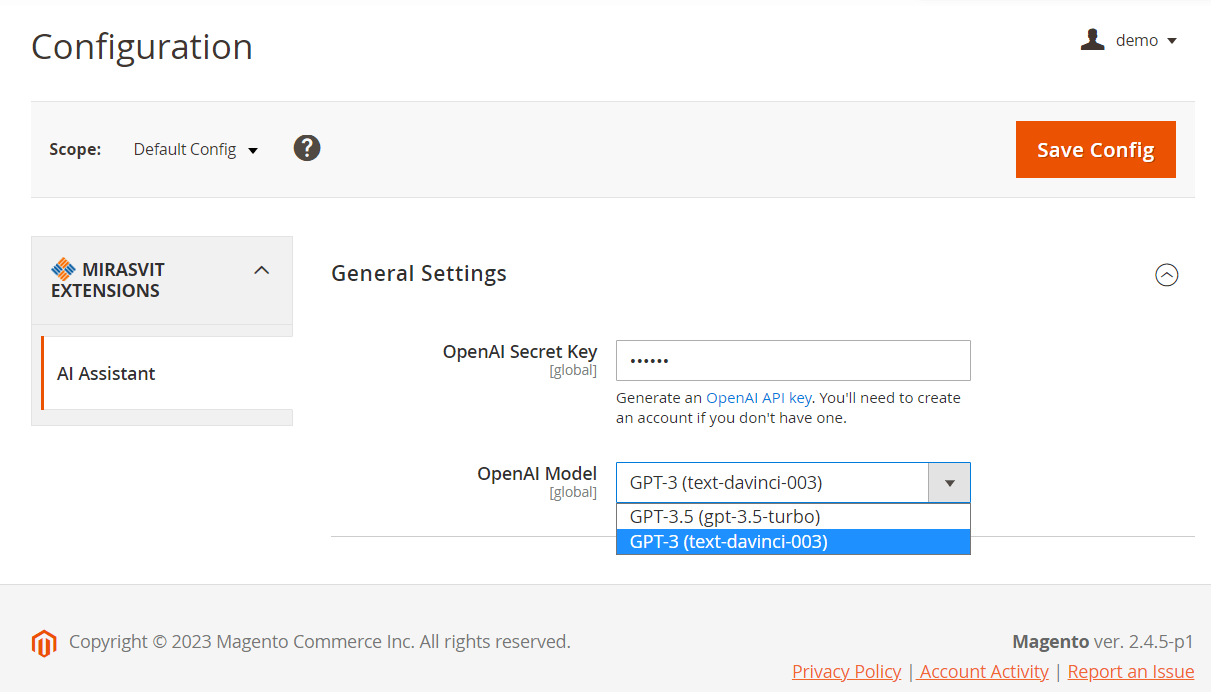
OpenAI Secret Key
Navigate to Stores > Settings > Configuration > Mirasvit extensions > AI Assistant > General. Paste the API key into the field OpenAI Secret Key in order to use the artificial intellect in your store.
Note
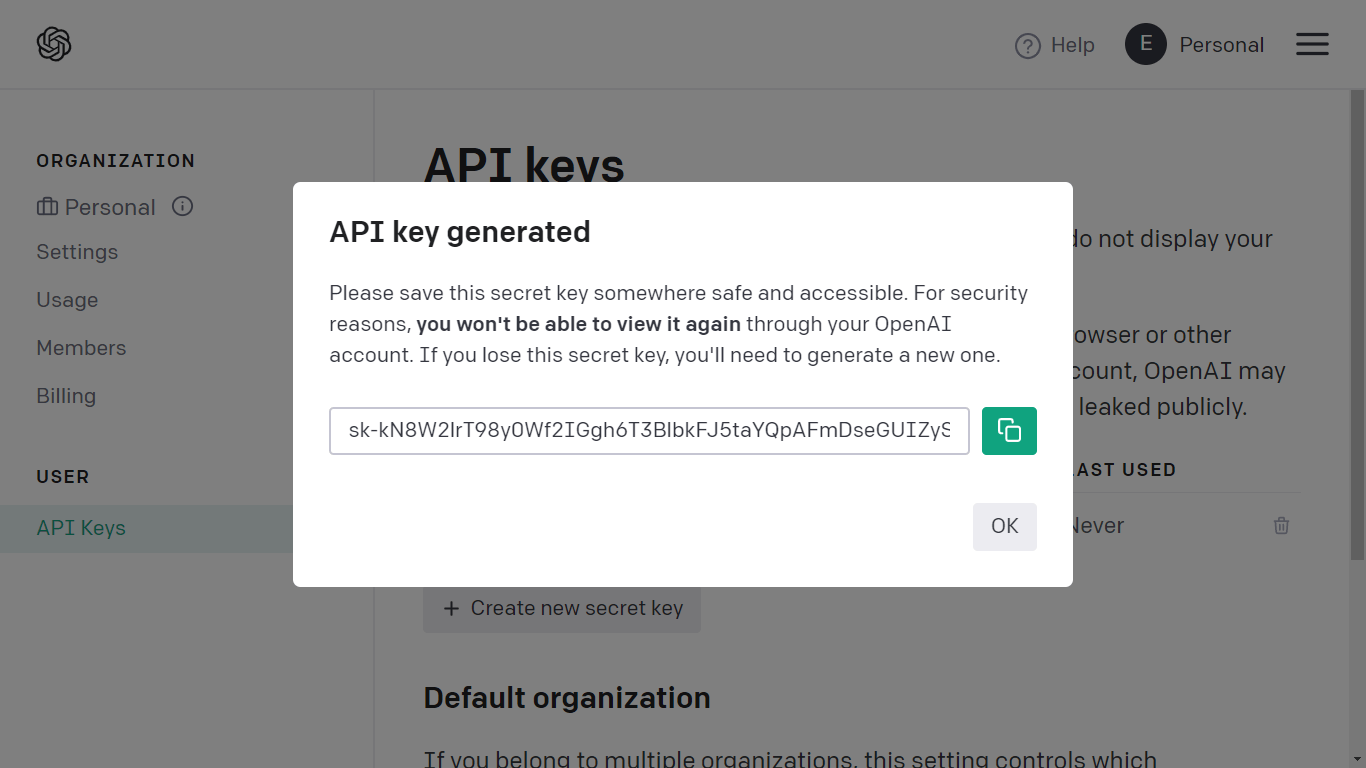
The AI Assistant extension accesses ChatGPT via an API. You need to sign up for a ChatGPT account in order to obtain the OpenAI secret key.
Generate the OpenAI secret API key on page platform.openai.com/account/api-keys. Click Create new secret key and copy the key.
Using ChatGPT API costs money, which are billed from your ChatGPT account. The total pricing depends on the number of tokens generated by this language model. Refer to openai.com/api/pricing/ for more info on prices.
OpenAI Model
Choose a most suitable language models for you to utilize. AI Assistant works via various language models.
- GPT-4o (gpt-4o) is improved GPT-4 Turbo model. It is 2 times faster and up to 50% cheaper than GPT-4 Turbo model. Also has improved capabilities in non-English languages and uses a new tokenizer which tokenizes non-English text more efficiently than GPT-4 Turbo. Maximal support input is 128 000 tokens. It was trained on data existing before Oct 2023.
- GPT-4 Turbo (gpt-4-turbo-preview) is improved GPT-4 model featuring improved instruction following, JSON mode and more. Maximal support input is 128 000 tokens. It was trained on data existing before Apr 2023.
- GPT-4 (gpt-4) is more capable for complex tasks and gives better results on large texts. Maximal support input is 8 192 tokens. It was trained on data existing before Sep 2021.
- GPT-3.5 (gpt-3.5-turbo) is optimized for chat. It is considered by OpenAI as a most capable GPT-3.5 model, and its price is 1/10th the cost of text-davinci-003. Maximal support input is 16 385 tokens. It was trained on data existing before Sep 2021.
- GPT-3 (text-davinci-003) is suited for any language task. It is configured for longer output of better quality and consistent instruction-following. Its input can be up to 4 097 tokens. Its trained on data before Jun 2021.
Prompt management
ChatGPT starts generating text in respond to a text prompt. Configure prompts for your store by navigating to System > AI Assistant > Prompts.
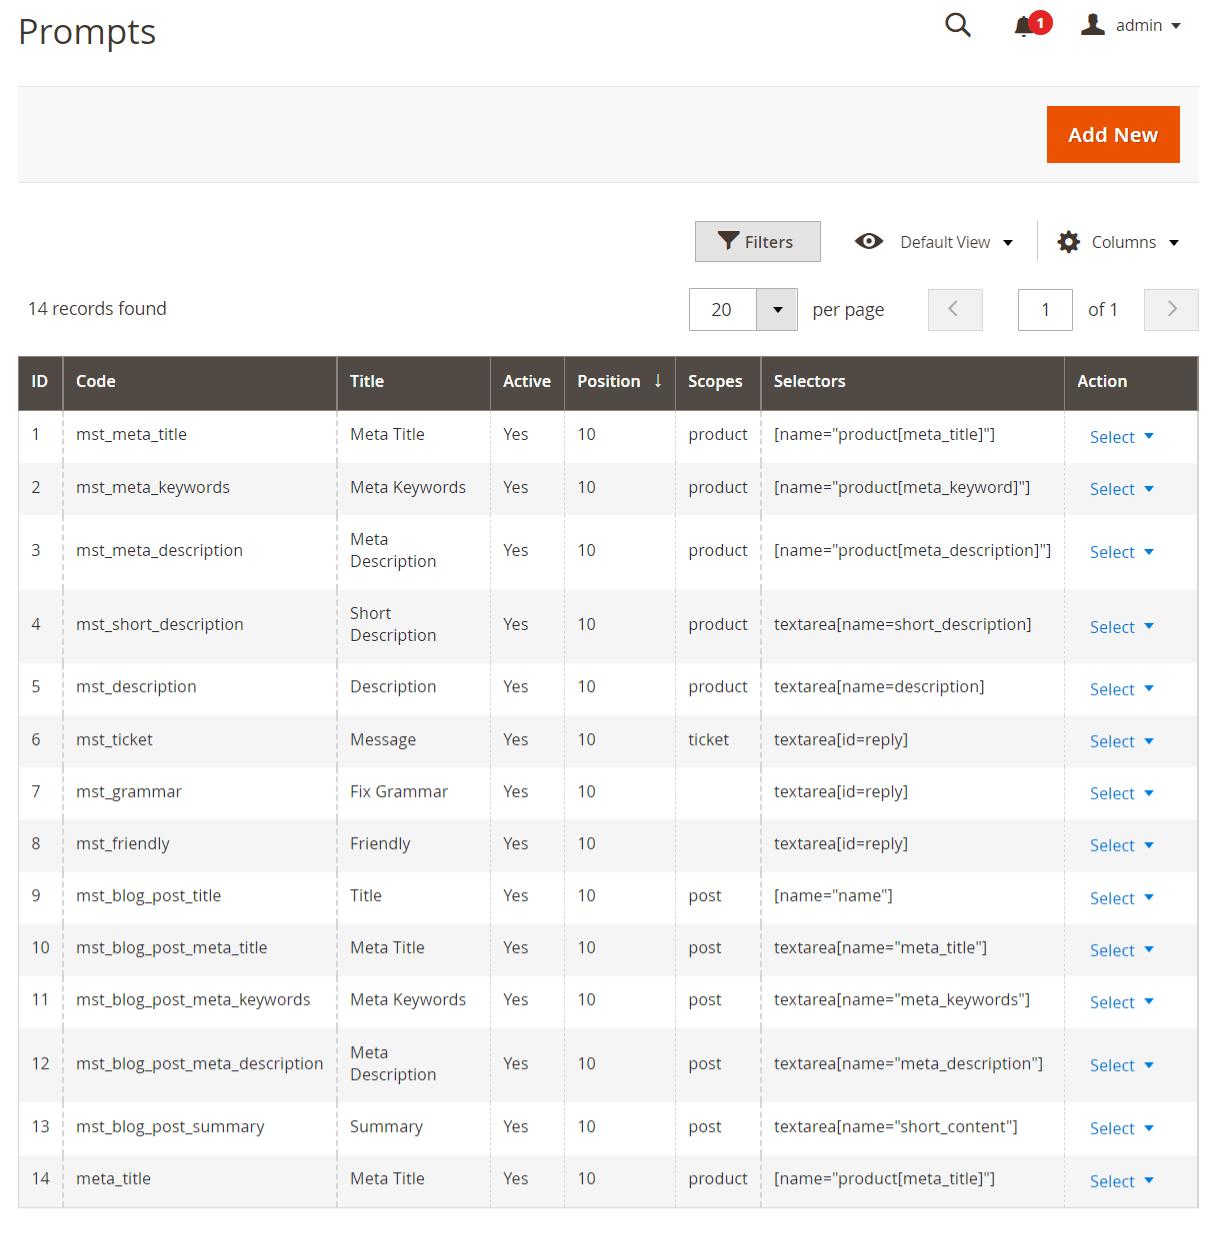
Add a new prompt or duplicate an existing one to use it as a template.
Configure the prompt
- Active - Activates the prompt to be accessible for usage.
- Code - Prompt identifier to be used by the extension.
- Title - Prompt name that is visible in the Magento admin to the user.

- Prompt - Contains a short prompt for ChatGPT. Use variables to adjust the ChatGPT response to the specific request.
- Scopes - Select where the prompt will be available: product, blog, ticket.
- Open AI Model - Select Open AI model for a particular prompt. The From config value for this option means the prompt will use the default Open AI model from the configurations of the extension.
- Stop Sequences - Used to stop generation when a value is encountered in output.
- Frequency penalty - Controls the tendency for repeating words in the output. It can be from 0 to 1.
- Field Selectors - Add a Magento selector field in which the extension will insert the ChatGPR output.
- Sort Order - Sets the prompt position in the list of all prompts.
- Open In Window - When activated a window appears so you can see the Help Text or alter the prompt. When disabled the ChatGPT output immediately appears in the text field.
- Help Text - Additional text for ChatGPT to use when generating content. For example, additional info on the product.
- Get Variables' Values From - Select the store from which the assistant should grab values for variables. "Current store" means the assistant will autodetect the store. For automation rules "Current store" will be the store for which the prompt applies at the moment. This setting most useful for translations. Applicable for Products, Categories, and Blog posts (Mirasvit Blog MX).
- Remove HTML Tags from Input - If disabled, the extension will not remove HTML tags from variable values. The prompt size might increase which can lead to OpenAI maximum content length error (depends on the model). Enabled by default. Disabling this option most useful for translating content from WYSIWYG editor and the Page Builder.
- Convert output to HTML - Places the ChatGPT output within the HTML tags. Only available when the Remove HTML Tags from Input option is enabled.
Available variables
Use the variables in the prompt so the ChatGPT could generate a response that includes specific details on your store, blog content, customer.
| Variable | Description |
|---|---|
| {{ global.input }} | Identifier of the input field. |
| {{ store.name }} | Store name. |
Helpdesk
| Variable | Description |
|---|---|
| {{ ticket.lastMessage }} | Includes the content of the last |
| {{ ticket.customer }} | Customer full name |
| {{ user.first_name }} | Agent first name |
| {{ user.name }} | Agent name |
| {{ user.last_name }} | Agent last name |
Product edit page
| Variable | Description |
|---|---|
| {{ product.name }} | Name of the product |
| {{ product.some_attribute }} | One product attribute |
| {{ product.attributes }} | List of useful attributes |
Category edit page
| Variable | Description |
|---|---|
| {{ category.some_attribute }} | One product attribute |
| {{ category.attributes }} | List of useful attributes |
Blog edit page
| Variable | Description |
|---|---|
| {{ post.title }} | Title of the blog post |
| {{ post.content }} | Main content of the blog post |
| {{ post.short_content }} | Short content of the blog post |
| {{ post.meta_title }} | Meta Title of the blog post |
| {{ post.meta_description }} | Meta Description of the blog post |
| {{ post.meta_keywords }} | Meta Keywords of the blog post |
| {{ post.data }} | Combined data of the blog post |
Available field selectors
| Field selector | Description |
|---|---|
| [name="product[meta_title]"] | Meta title on product page |
| [name="product[meta_keyword]"] | Meta keyword on product page |
| [name="product[meta_description]"] | Meta description on product page |
| textarea[name=short_description] | Product short description |
| textarea[name=description] | Product description |
| textarea[id=reply] | Ticket reply |
| [name="name"] | Blog post title |
| textarea[name="meta_title"] | Blog post meta title |
| textarea[name="meta_keywords"] | Blog post keywords |
| textarea[name="meta_description"] | Blog post meta description |
| textarea[name="short_content"] | Blog post summary |
Translate to different Languages
OpenAI language model can be used for translating text to another language. You need to create a corresponding propmpt in AI Assistant to use ChatGPT for translating purposes.
There are several approaches to create a prompt for ChatGPT to be used as a translator:
- When creating a Prompt, specify in which language you want to receive the response;
- Create a separate Prompt in which you ask to translate an existing text to another language (similar to how Fix Grammar prompt);
- Write the question in the language you want to receive the answer. For example, if you want to translate from English to German - write the prompt in German.
Note
When using Automation rules functionality, the language of the ChatGPT output is affected by the selected Store view. The Store View language will signal to ChatGPT to switch the language for its output.
Examples of prompts
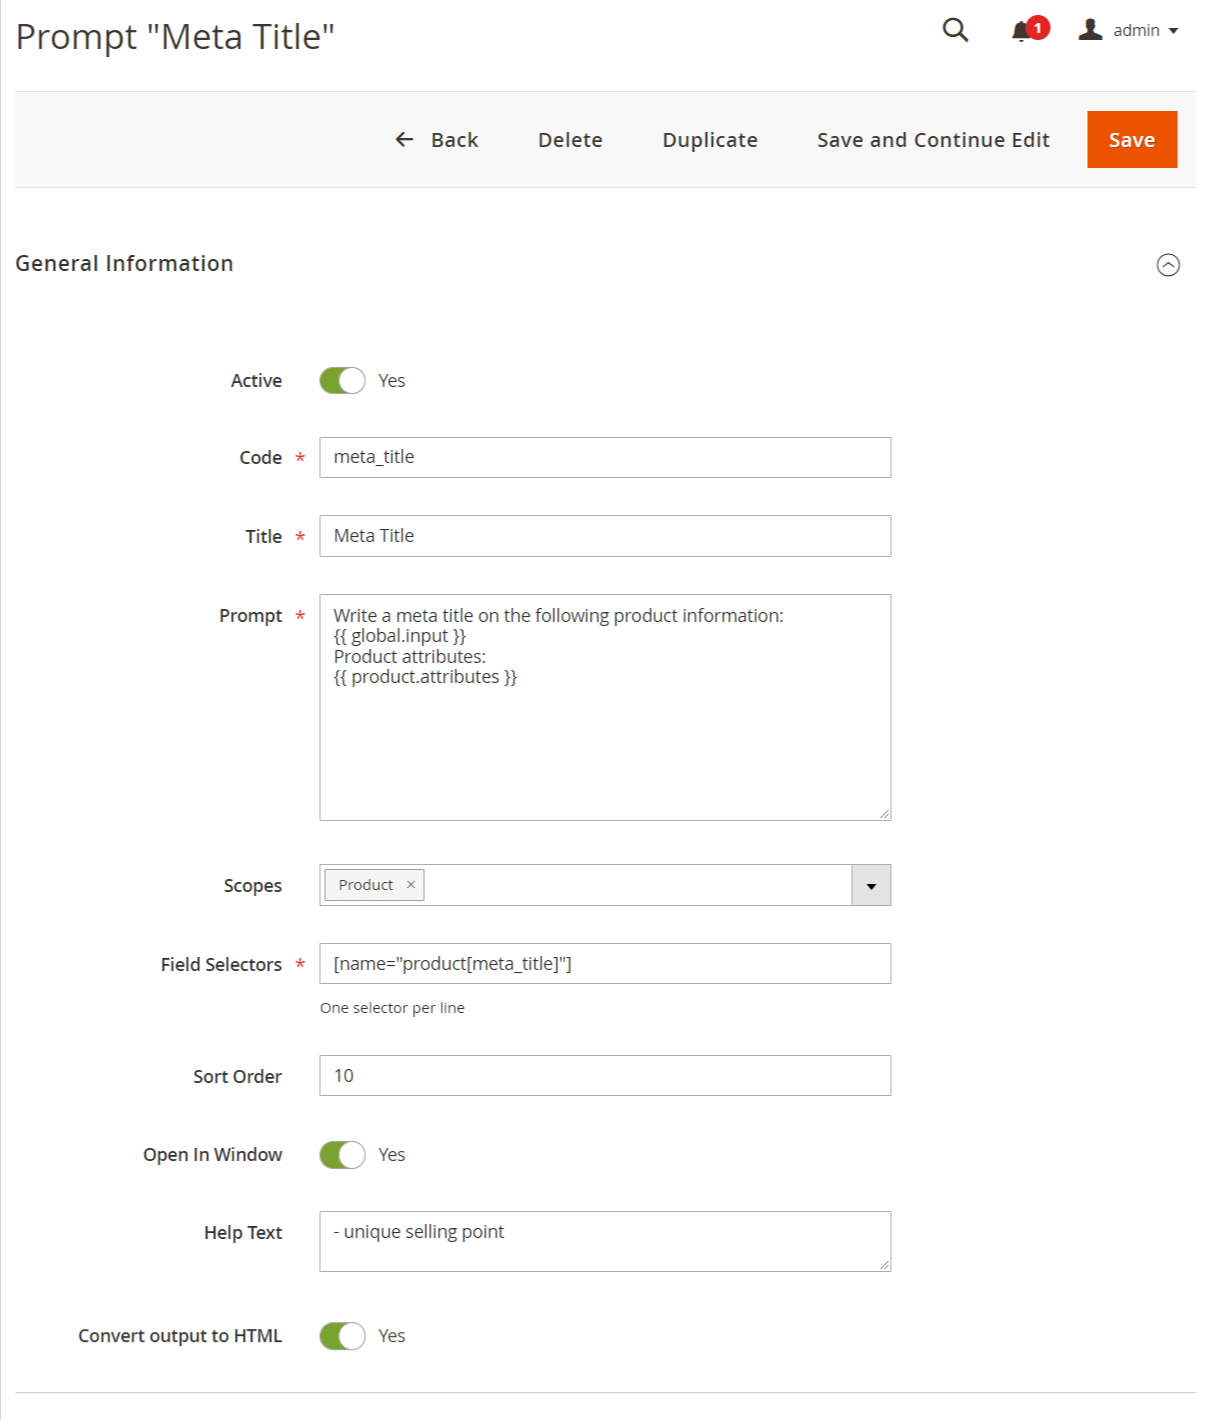
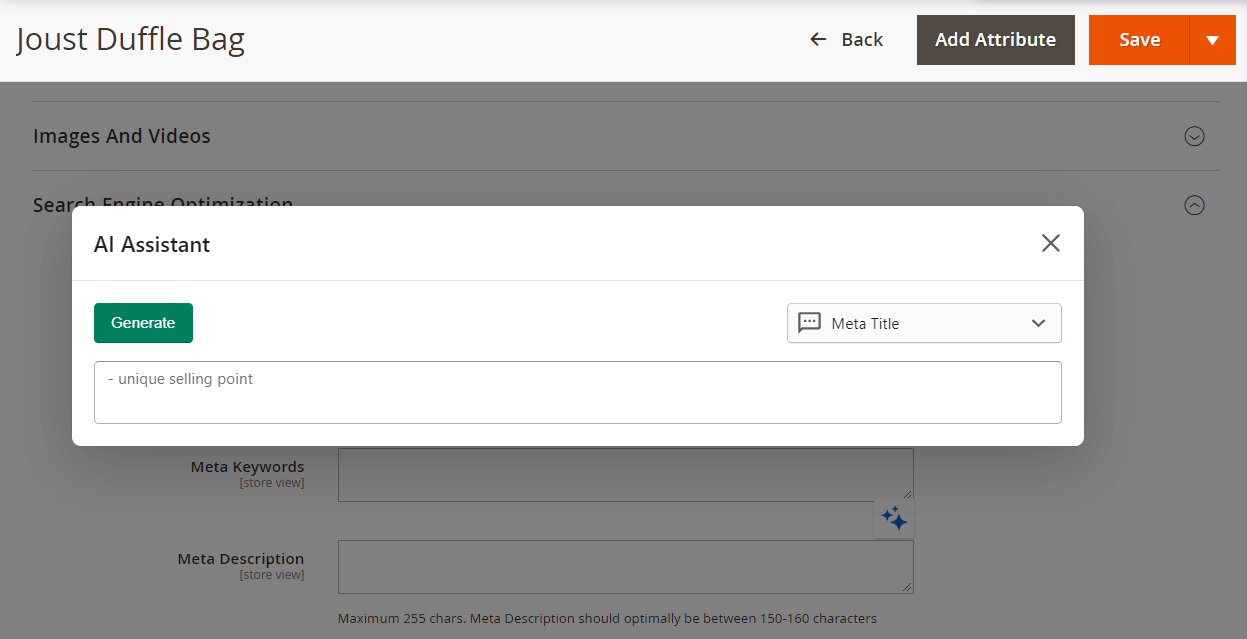
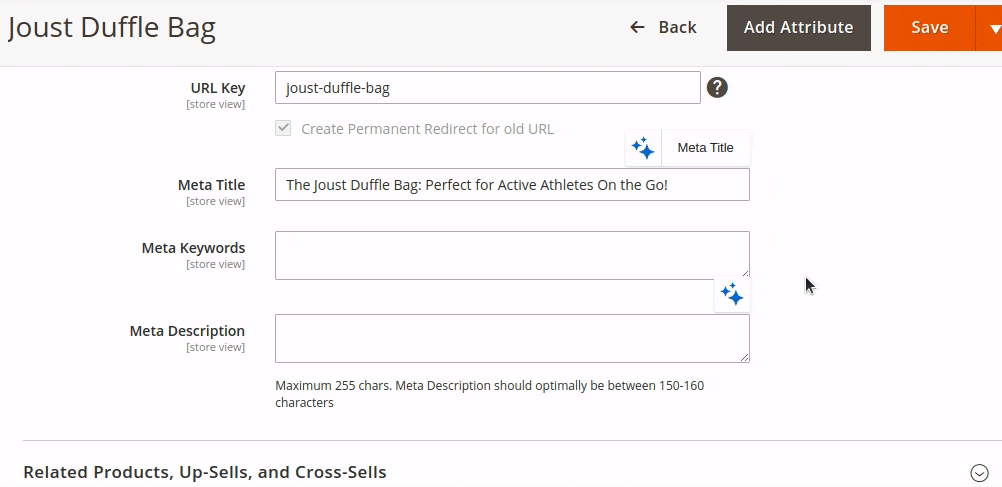
Prompt for Meta Title

| Code | meta_title |
| Title | Meta Title |
| Prompt |
Write a meta title on the following product information: {{ global.input }} Product attributes: {{ product.attributes }} |
| Scopes | Product |
| Field Selectors | [name="product[meta_title]"] |
| Help Text | unique selling point |
| Convert output to HTML | No |
Prompt for Meta Keywords
| Code | meta_keywords |
| Title | Meta Keywords |
| Prompt |
Write a meta keywords on the following product information: {{ global.input }} Product attributes: {{ product.attributes }} |
| Scopes | Product |
| Field Selectors | [name="product[meta_keyword]"] |
| Help Text | unique selling point |
| Convert output to HTML | No |
Prompt for Meta Description
| Code | meta_description |
| Title | Meta Description |
| Prompt |
Write a meta description on the following product information: {{ global.input }} Product attributes: {{ product.attributes }} |
| Scopes | Product |
| Field Selectors | [name="product[meta_description]"] |
| Help Text | - unique selling point 1 - unique selling point 2 - unique selling point 3 |
| Convert output to HTML | No |
Prompt for Product Description
| Code | description |
| Title | Description |
| Prompt |
Write a long marketing product description by the plan: - Introduction (don't print this as a header) - Benefits - Key features - Feature - Feature - Feature - Feature - Feature - Summary Use the following product information: {{ global.input }} Product attributes: {{ product.attributes }} |
| Scopes | Product |
| Field Selectors | textarea[name=description] |
| Help Text | - unique selling point 1 - unique selling point 2 - unique selling point 3 |
| Convert output to HTML | Yes |
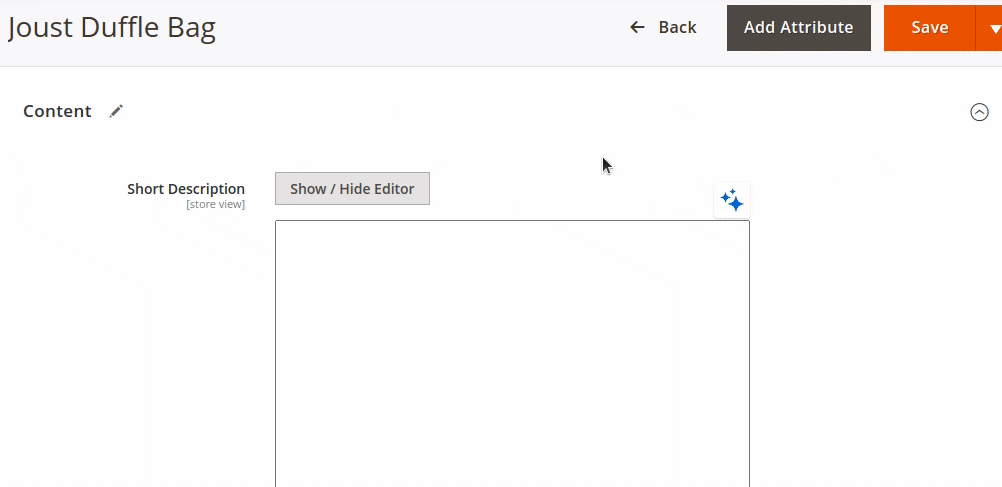
Prompt for Product Short Description
Short description is a block of text with all the major info on a product. This block is displayed when the product is displayed beyond its product page.
| Code | short_description |
| Title | Short Description |
| Prompt |
Write a short marketing product description using the following product information: {{ global.input }} Product attributes: {{ product.attributes }} |
| Scopes | Product |
| Field Selectors | textarea[name=short_description] |
| Help Text | - unique selling point 1 - unique selling point 2 - unique selling point 3 |
| Convert output to HTML | No |
Prompt for Ticket response message
| Code | ticket |
| Title | Message |
| Prompt |
Customer Name: {{ ticket.customer }} There is a last message from customer: ``` {{ticket.lastMessage}} ``` Write a personal message that explain next things: ``` {{ global.input }} ``` Message: |
| Scopes | Ticket |
| Field Selectors | textarea[id=reply] |
| Help Text | - key point 1 - key point 2 - key point 3 |
| Convert output to HTML | No |
Prompt for more friendly reply message
| Code | friendly |
| Title | Friendly |
| Prompt |
Make the following message more sociable and friendly: ``` {{ global.input }} ``` Message: |
| Scopes | Ticket |
| Field Selectors | textarea[id=reply] |
| Help Text | N/A |
| Convert output to HTML | No |
Prompt for grammar fix
| Code | grammar |
| Title | Fix Grammar |
| Prompt |
Fix grammar in the following message. Keep all original line breaks. ``` {{ global.input }} ``` Message: |
| Scopes | Ticket |
| Field Selectors | textarea[id=reply] |
| Help Text | N/A |
| Convert output to HTML | No |
Prompt for blog title
| Code | blog_post_title |
| Title | Title |
| Prompt |
There is a blog post: ``` {{ post.content }} ``` Write a title: |
| Scopes | Blog post |
| Field Selectors | [name="name"] |
| Help Text | N/A |
| Convert output to HTML | No |
Prompt for blog meta title
| Code | blog_post_meta_title |
| Title | Meta Title |
| Prompt |
There is a blog post: ``` {{ post.title }} {{ post.content }} ``` Write a meta title: |
| Scopes | Blog post |
| Field Selectors | textarea[name="meta_title"] |
| Help Text | N/A |
| Convert output to HTML | No |
Prompt for blog meta keywords
| Code | blog_post_meta_keywords |
| Title | Meta Keywords |
| Prompt |
There is a blog post: ``` {{ post.title }} {{ post.content }} ``` Write meta keywords: |
| Scopes | Blog post |
| Field Selectors | textarea[name="meta_keywords"] |
| Help Text | N/A |
| Convert output to HTML | No |
Prompt for blog meta description
| Code | blog_post_meta_description |
| Title | Meta Description |
| Prompt |
There is a blog post: ``` {{ post.title }} {{ post.content }} ``` Write a meta description: |
| Scopes | Blog post |
| Field Selectors | textarea[name="meta_description"] |
| Help Text | N/A |
| Convert output to HTML | No |
Prompt for blog post summary
| Code | blog_post_summary |
| Title | Summary |
| Prompt |
There is a blog post: ``` {{ post.title }} {{ post.content }} ``` Write a summary: |
| Scopes | Blog post |
| Field Selectors | textarea[name="short_content"] |
| Help Text | N/A |
| Convert output to HTML | No |
Prompt for tranlating a text
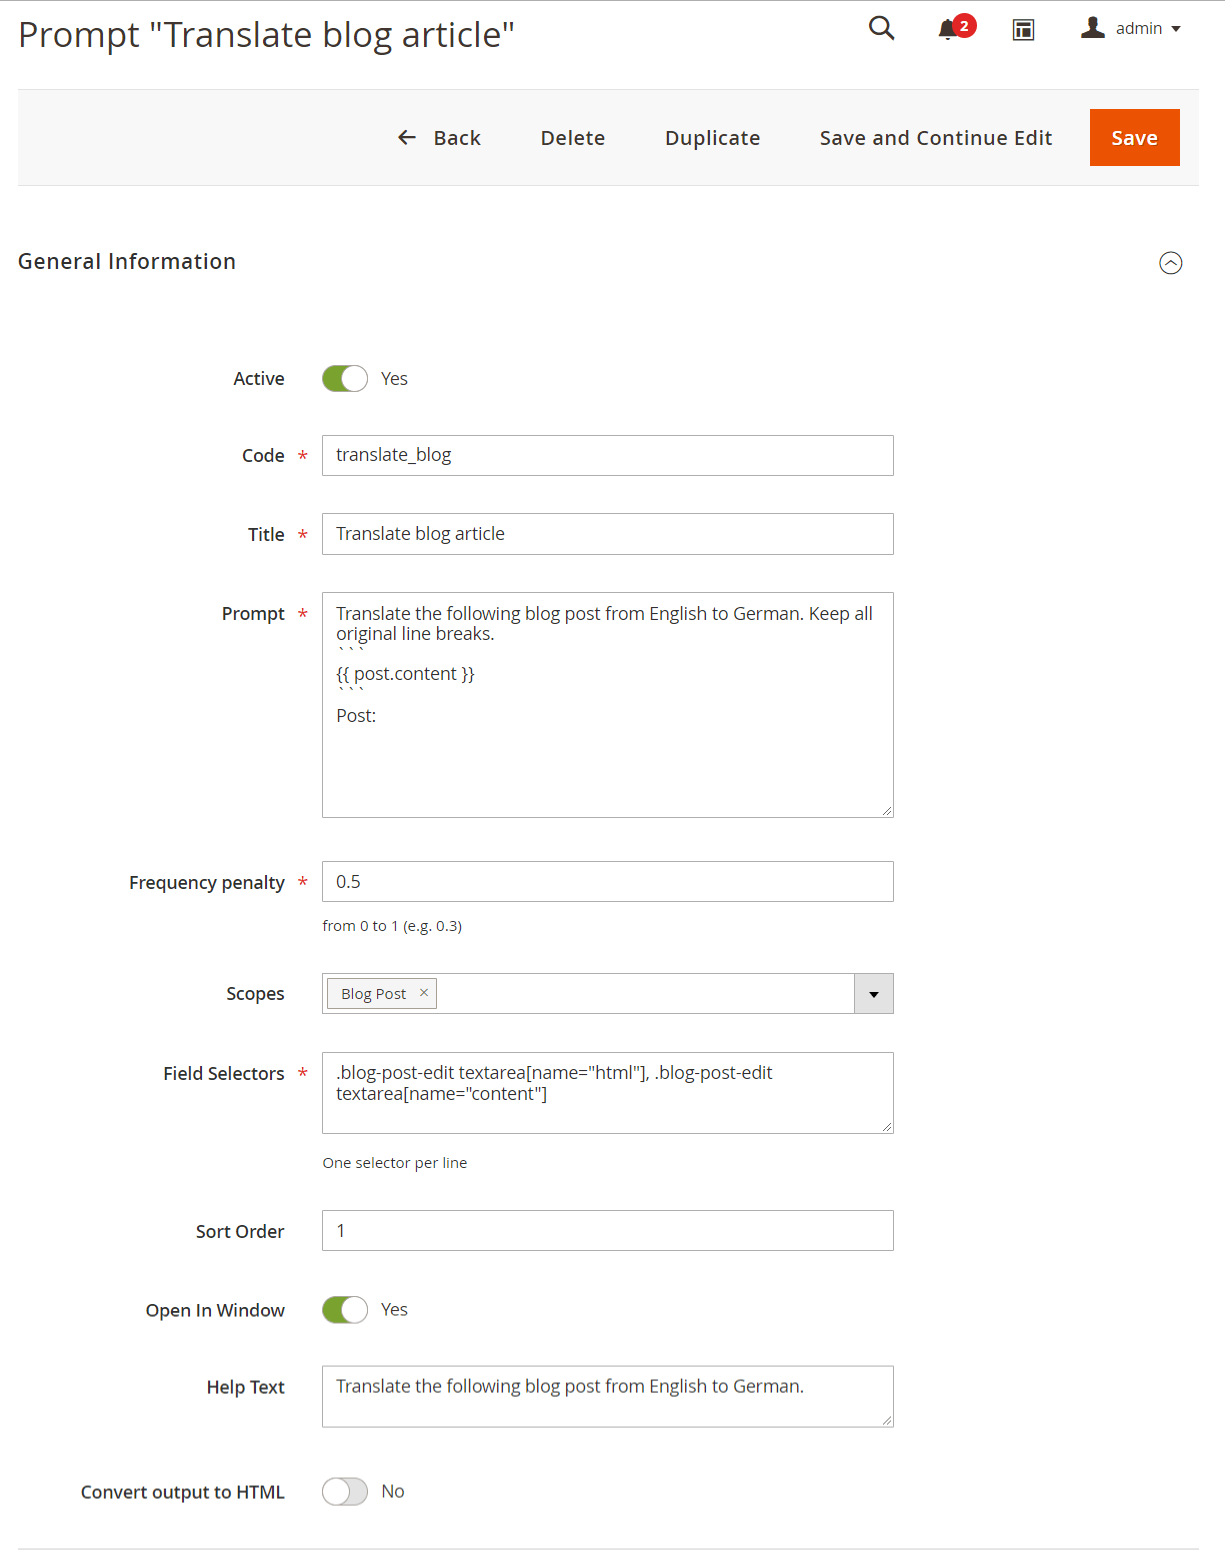
| Code | translate_blog |
| Title | Translate blog article |
| Prompt |
Translate the following blog post from English to German. Keep all original line breaks. ``` {{ post.content }} ``` Post: |
| Scopes | Blog |
| Field Selectors | .blog-post-edit textarea[name="html"], .blog-post-edit textarea[name="content"] |
| Help Text | Translate the following blog post from English to German. |
| Convert output to HTML | Yes |
Automation rules
Automation rules functionality allows to run the selected prompts by Cron.
Navigate to System > AI Assistant > Automation rules and add a new rule.
Automation rule configurations are split in 2 stages.
On the first stage you'll need to set the following information for the rule (General Information section):
- Title - The name of the rule that is visible in the grid of automation rules.
- Entity Type - type of an entity to configure the rule for. Currently the extension allows to create rules for Products and Categories.
- Active - set to Yes if the rule should be executed.
- Apply Only Once - set to Yes if the rule should be executed only one time.
- Overwrite Not Empty Field - set to Yes if the rule should overwrite any existing text in the selected text field.
- Store Views - select the applicable scope of the rule.
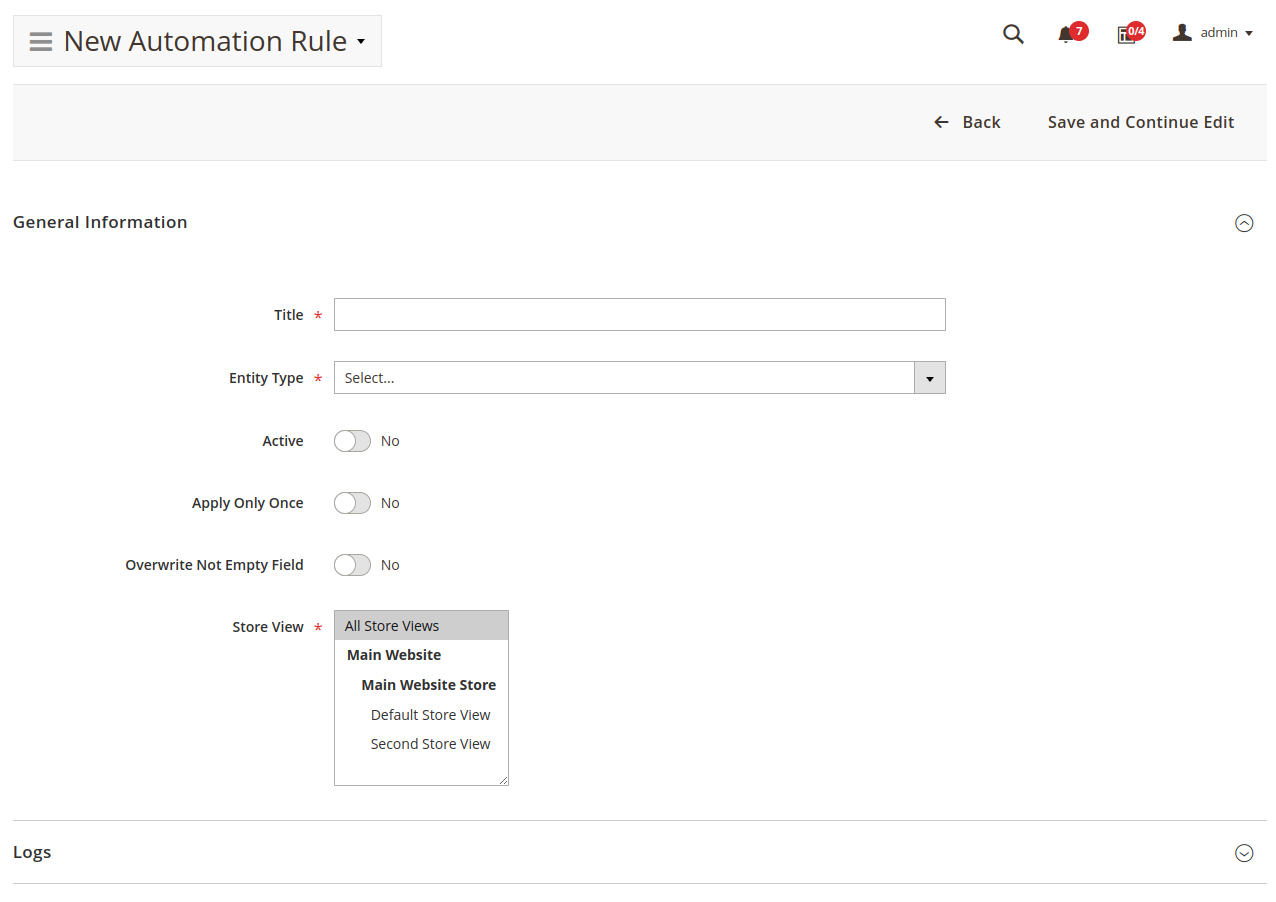
After specifying all data press the Save and Continue button to proceed to the second stage.
Note
You won't be able to change the entity type after you saved the rule.
On the second stage you'll need to set additional information:
- Prompt - select the existing prompt that should be used with this automation rule. For example, a prompt for generating meta title.
- Field - select one field that will be used for inserting the prompt output. For example, a Product Meta Title field.
- Conditions - select conditions to adjust entities for which the rule should be applied. Leave blank if the rule should be applied for all entities of the type selected at the stage 1.
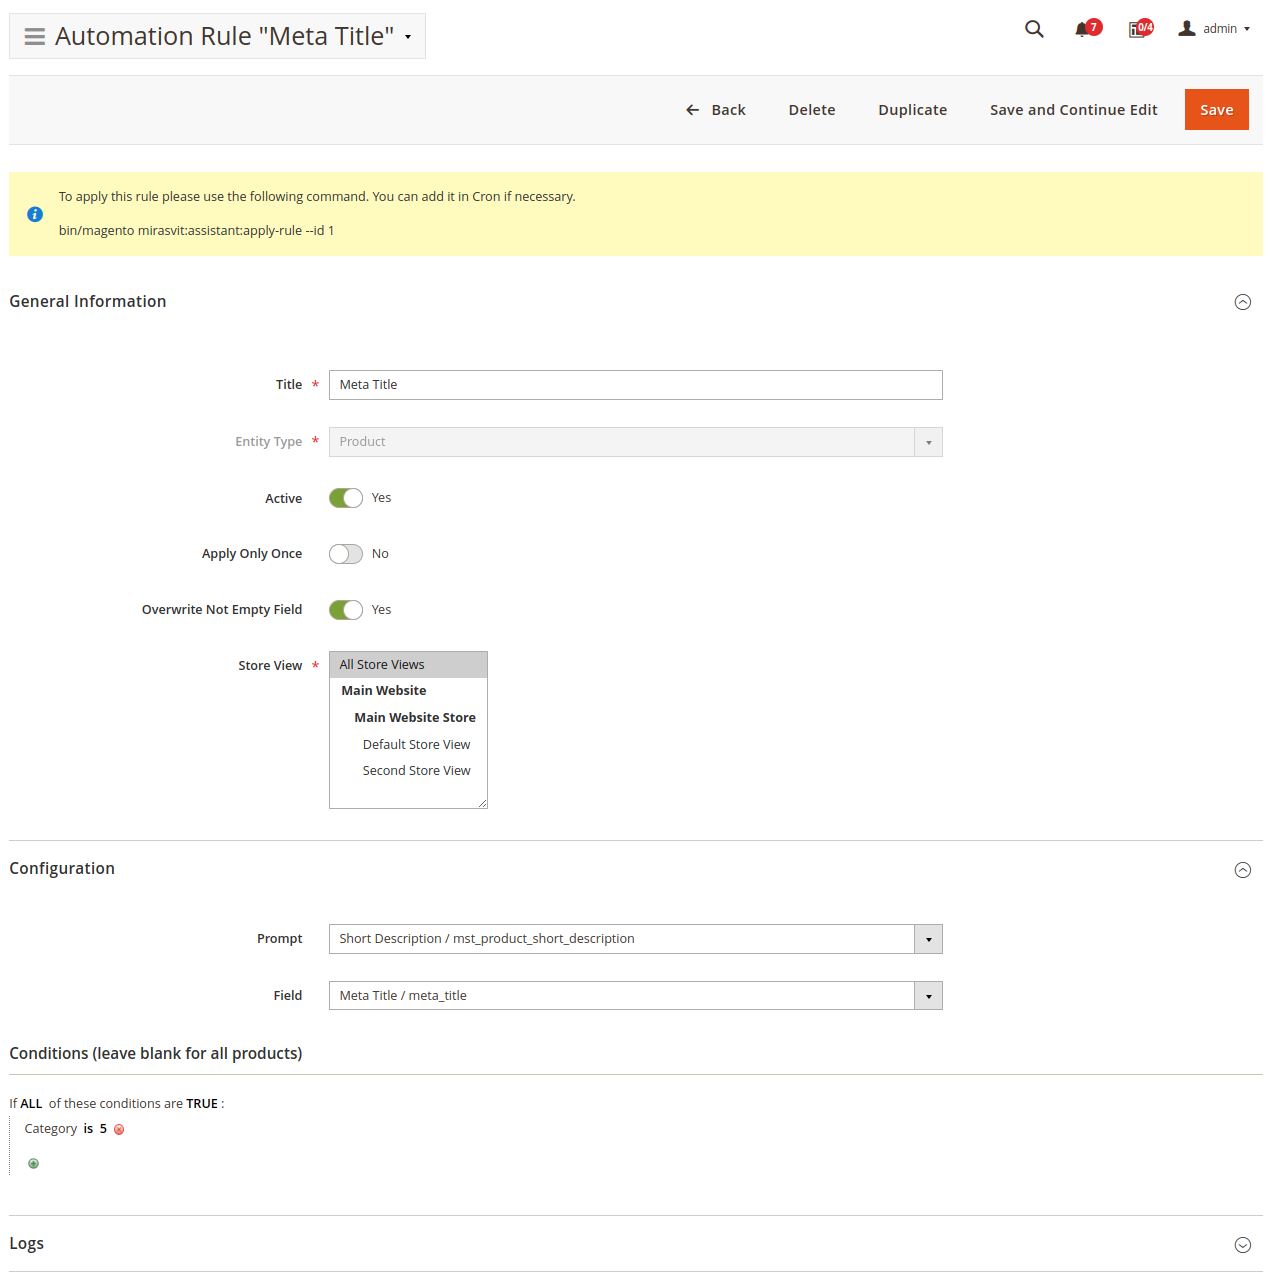
After specifying all data save the rule.
Write down its ID as it will be used for configuring Cron job.
You will need to specify the rule ID in Cron command bin/magento mirasvit:assistant:apply-rule --id XXX, where XXX is the rule ID number.
For more details regarding this command check the Command Line Interface section of this manual.
Note
The GPT/ChatGPT will generate answers on the language depending on the selected Store View.
Command Line Interface
Usage: php -f bin/magento [options]
-
mirasvit:assistant:apply-rule- Apply automation rule for products that match rule's conditions. This command has the following params:--id- id of applied rule. This parametr is required.--entity-id- allows you to specify only one entity id (e.g. product_id) that will be changed by the rule. This parameter is optional.--reset- reset already applied rule so it can be re-applied again later. Will affect only rules with "Apply Only Once" => "Yes". This parameter can be combined with the parameter--entity-id. Not applicable along with the--dry-runparameter.--dry-run- this is a flag which indicates that you would like to run the command without changing anything in database.--force- forcibly apply rule (will terminate previous process for current rule if running).
Note
Examples:mirasvit:assistant:apply-rule --id 1- applies the rule with ID 1 to all products that match conditions in the rulemirasvit:assistant:apply-rule --id 1 --entity_id 10- applies the rule with ID 1 to the entity (e.g. product) with ID 10 ONLY if that product matches conditions of the rulemirasvit:assistant:apply-rule --id 1 --reset- resets the rule with ID 1 ONLY if the rule's option "Apply Only Once" is set to "Yes"
mirasvit:assistant:reindex - Reindexes the "automation rule - product" relations. This command has only one optional parameter --reset which can be used to remove all data from the "automation rule - product" relations tableHow to upgrade extension
To upgrade the extension, follow these steps:
- Backup your store's database and web directory.
- Login to the SSH console of your server and navigate to the root directory of the Magento 2 store.
- Run command
composer require mirasvit/module-assistant:* --update-with-dependenciesto update current extension with all dependencies.Note
In some cases, the command above is not applicable, or it's not possible to update just the current module, or you need to upgrade all Mirasvit modules in a bundle. In this case, the command above will have no effect.
Run insteadcomposer update mirasvit/*command. It will update all Mirasvit modules installed in your store.
- Run command
php -f bin/magento setup:upgradeto install updates. - Run command
php -f bin/magento cache:cleanto clean the cache. -
Deploy static view files
rm -rf pub/static/*; rm -rf var/view_preprocessed/*; php -f bin/magento setup:static-content:deploy
Disabling the Extension
Temporarily Disable
To temporarily disable the extension please follow these steps:
- Login to the SSH console on your server and navigate to the root directory of the Magento 2 store.
- Run the command
php -f bin/magento module:disable Mirasvit_Assistantto disable the extension. - Log in to the Magento backend and refresh the store cache (if enabled).
Extension Removal
To uninstall the extension, please follow these steps:
- Login to the SSH console on your server and navigate to the root directory of the Magento 2 store.
- Run command
php -f bin/magento module:disable Mirasvit_Assistantto disable the extension. - Run command
composer remove mirasvit/module-assistantto remove the extension. - Log in to the Magento backend and refresh the store cache (if enabled).
Change Log
1.7.0
(2026-05-28)
Features
- REST API — manage prompts, automation rules, and system messages from external systems and scripts; read-only access to logs and history. A render endpoint resolves a prompt's Liquid template against a chosen entity and returns the result, useful for previews and programmatic use. All endpoints are gated by matching admin ACL resources.
1.6.14
(2026-05-26)
Security
ConditionRule::getConditions()no longer falls back to native PHPunserialize()for legacyconditions_serializedrows. The fallback was a PHP object-injection sink. Legacy PHP-serialized rows now log a warning and load empty conditions — re-save the rule in admin to convert the row to JSON.
1.6.13
(2026-05-13)
Improvements
- Automation rules now have an "Include target field value into prompt" toggle. When enabled, the current value of the field being updated is passed to the prompt as the
{{ global.input }}variable, so the AI can see the existing text it needs to work with. Most useful for translation rules. The value respects the prompt's "Get variables' values from" and "Remove HTML tags from input" settings.
1.6.12
(2026-04-29)
Improvements
- Refined the built-in prompts so AI responses contain only the requested content. Preambles, explanations, code fences, surrounding quotes, and field labels are no longer included, so generated text can be applied directly to fields without manual cleanup.
1.6.11
(2026-04-28)
Features
- Grok (xAI) AI provider support — added a new "Grok settings" section in the extension configuration where you can set an xAI API key and pick a default Grok model. Grok can also be selected on a per-prompt basis.
Improvements
- Added a
--limitoption to themirasvit:assistant:apply-ruleconsole command. It stops the run after the specified number of successful AI calls, which is useful for batching large rules across days to control token spend. Subsequent runs automatically skip records that were already processed. - Apply-rule run summary now reports the number of AI calls made during the run.
1.6.10
(2026-04-17)
Fixed
- Fixed the issue with unable to select options from AI provider, Model, Prompt dropdowns in AI Assistant popup in Firefox
1.6.9
(2026-03-27)
Improvements
- File uploader in the Assistant window now displays help text with supported formats (JPEG, PNG, GIF, WebP, PDF, CSV, TXT), maximum number of files, and size limits
1.6.8
(2026-03-25)
Features
- Added the ability to use Web Search in prompts (configured per prompt, AI decides if and how to use it)
- Added the ability to upload files and include them in prompts when "Open in window" option is enabled
- Image variables for products, categories, and blog posts (Mirasvit Blog MX)
- Integration with Mirasvit Product Attachments extension — ability to include attachments in AI requests using corresponding variables
1.6.7
(2026-03-10)
Improvements
- Translations files added
Fixed
- Issue with CSS conflict from Polaris
- Compatibility with Adobe Commerce (Magento EE)
1.6.6
(2025-12-11)
Fixed
- The issue with automation rule uses AI settings from extension's configurations even when they overridden on a prompt level.
- The issue with custom prompts for blog entities not available in automation rules with the same scopes.
1.6.5
(2025-10-14)
Improvements
- Added parent category data and 10 products data to the category context (variables)
1.6.4
(2025-10-08)
Fixed
- Prompt - System Message relation fixed
1.6.3
(2025-10-07)
Improvements
- AI Providers' info block improved
1.6.2
(2025-10-02)
Fixed
- Regex validation fixed (coding standard)
1.6.1
(2025-10-02)
Fixed
- Issue with overriding core AI settings
1.6.0
(2025-09-30)
Features
- Support for AI providers Anthropic Claude and Google Gemini
- System messages for prompts
- Ability to define regex in automation rule so the rule override the field value only if it matches specified regex
Improvements
- Assistant UI improved
- Database data types optimized
- Ability to use store context in automation rules. Store context always points to the target store
- Automation rules for blog posts and categories (Mirasvit Blog MX)
- Compatibility with blog categories (Mirasvit Blog MX)
- AI communication improved
Fixed
- Fixed the issue with the module retrieves product data with fallback to the default value (from default store) when prompt is configured to retrieve context data from a particular store (automation rules)
1.5.2
(2025-08-21)
Fixed
- Compatibility with Adobe Commerce (Magento EE)
1.5.1
(2025-08-08)
Improvements
- Added support for GPT-4.1 and GPT-5 model groups
1.5.0
(2025-06-19)
Improvements
- WCAG 2.2 AA compliance
- Translations support
1.4.17
(2025-05-13)
Improvements
- Improved performance of the page builder when a lot of prompts are added to inline-editable elements
1.4.16
(2025-04-10)
Fixed
- Compatibility with PHP 8.4
1.4.15
(2025-03-26)
Improvements
- Skipping prompts with incorrect field selectors so prompts with correct selectors can be used
1.4.14
(2025-03-12)
Improvements
- Compatibility with multistore blog posts (Mirasvit Blog MX)
Fixed
- Fixed the issue with entity data not picked from the right store in admin area prompts
1.4.13
(2025-02-12)
Improvements
- Context for Magento newsletter templates improved
1.4.12
(2025-01-31)
Improvements
- Ability to use Assistant in CMS blocks
1.4.11
(2025-01-23)
Improvements
- Ability to use Assistant for writing order comments
1.4.10
(2024-10-30)
Improvements
- PageBuilder compatibility improved
Fixed
- Fixed the issue with unable to write anything in newly added fields (PageBuilder)
1.4.9
(2024-08-09)
Fixed
- Fixed the issue with the rule applied to all stores instead of the default store when the rule is configured to apply for All Store Views
1.4.8
(2024-07-30)
Fixed
- Fixed the issue with incorrectly applied generated content in PageBuilder (partial text selection)
1.4.7
(2024-07-25)
Fixed
- Fixed the conflict with Mageworx Advanced Product Options Suite
- Fixed the issue with error when 'Remove HTML tags' is disabled (Magefan Blog)
1.4.6
(2024-07-24)
Improvements
- Added support for OpenAI model GPT-4o-mini
1.4.5
(2024-07-22)
Fixed
- Fixed the issue with Magefan Blog Posts compatibility
1.4.4
(2024-07-04)
Fixed
- Fixed the issue with assistant not appeared on CMS pages (since 1.4.0)
1.4.3
(2024-06-26)
Fixed
- Fixed the issue with applying incomplete responses from OpenAI API
1.4.2
(2024-05-24)
Fixed
- Fixed the issue with the error "Request failed with status code 500"
1.4.1
(2024-05-14)
Improvements
- Added support for GPT-4o model
1.4.0
(2024-05-07)
Improvements
- Ability to select if HTML tags should be removed from the text in the prompt or not
- Ability to choose the store from which the extension will retrieve variables' values for prompts
1.3.13
(2024-04-30)
Fixed
- Fixed the issue with cleaning content created in the page builder
- Fixed the issue with error during applying rules related to the attribute 'custom_layout_update_file'
1.3.12
(2024-03-11)
Features
- Compatibility with Mirasvit_Brand (prompts)
1.3.11
(2024-02-27)
Improvements
- Added support for the GPT-4 Turbo model
1.3.10
(2023-12-29)
Improvements
- Page Builder support for pre-installed prompts for category description and product description
1.3.9
(2023-10-30)
Fixed
- Fixed the issue with saving alt for product images per store (automation rules)
1.3.8
(2023-10-27)
Fixed
- Fixed the issue with the generated product image alt attribute not being saved (prompt)
1.3.7
(2023-10-18)
Improvements
- Ability to generate Products images' ALT attributes automatically (automation rules)
1.3.6
(2023-10-05)
Improvements
- Added context for Mirasvit Knowledge Base Categories and Articles
1.3.5
(2023-09-28)
Fixed
- Fixed the conflict with Mirasvit_Kb (Categories)
1.3.4
(2023-09-25)
Fixed
- Fixed the issue with WYSIWYG in Magento 2.3.*
1.3.3
(2023-09-08)
Fixed
- Fixed the issue with attribute values from the default (admin) store passed to prompts in automation rules
1.3.2
(2023-08-28)
Fixed
- Fixed the issue with the rule execution terminated when error happened during saving entity's attribute
1.3.1
(2023-08-25)
Fixed
- Fixed the issue with prompt inserted instead of answer on Apply button click
1.3.0
(2023-08-25)
Improvements
- GPT-4 model added
- Ability to set different OpenAI models for different prompts
- Ability to choose the OpenAI model in the assistant popup
1.2.3
(2023-07-26)
Improvements
- Updated UI library
1.2.2
(2023-07-04)
Fixed
- Fixed the issue with foreign key error on setup:upgrade (since 1.2.1)
1.2.1
(2023-07-03)
Improvements
- Automation rules for categories
1.2.0
(2023-06-08)
Fixed
- Backend issue (conflict with Mirasvit_CatalogLabel)
1.1.11
(2023-06-05)
Fixed
- Fixed the issue with saving product when automation rule is present with deleted attribute in conditions
- Fixed the issue with error on CMS Page edit page
1.1.10
(2023-05-31)
Improvements
- Support for Magefan Blog
1.1.9
(2023-05-16)
Fixed
- Fixed the issue with incorrect Assistant API URL (Magento < 2.4.4)
1.1.8
(2023-04-27)
Features
- Logging for automation rules
Fixed
- Issue with creating new CMS page
- Cron issue
1.1.7
(2023-04-25)
Improvements
- Prevent executing multiple apply-rule commands for the same rule at the same time
Fixed
- Properly retrieve product data per storeview (multistore)
1.1.6
(2023-04-21)
Fixed
- Fixed the issue with analyzing partial select inside WYSIWYG editor
1.1.5
(2023-04-20)
Improvements
- Data preparation for request to API improved
- Compatibility with pagebuilder
1.1.4
(2023-04-18)
Improvements
- Compatibility with pagebuilder
Fixed
- Issue with the 'Undo' button when only part of the text analized by Assistant
1.1.3
(2023-04-17)
Improvements
- Compatibility with WYSIWYG
- AI answer characters count for meta fields
1.1.2
(2023-04-13)
Fixed
- Pevent results like 'No correction needed' on Fix Grammar
- The issue with errors on product edit pages (attributes added by 3rd-party extensions)
- The issue with not able to type 'space' in prompts
- The issue with assistant bar in helpdesk
- The issue with automation rules in multistore
1.1.1
(2023-04-11)
Fixed
- Issue with indexing products per store (all stores)
- Issue with deleting products
1.1.0
(2023-04-05)
Improvements
- Added rule-product index table and the command to reindex rule-product relations
- Performance of the applying rule process
- Added "reset" param to the "apply-rule" command
- Navigation through extension's pages in the backend
Fixed
- Categories show empty pages in the backend when they have Custom Layout Update
- Stock status condition issue
- Convert to HTML not working in CLI
- Issue with the "Apply Only Once" option of automation rules
1.0.17
(2023-03-28)
Fixed
- Unable to save field selector
- PHP 8.2 - strpos(): Argument #1 ($haystack) must be of type string, null given
1.0.15
(2023-03-22)
Features
- Add prompts for categories
Improvements
- Add entity-id param to console
- Add dry-run and stop_sequences
1.0.12
(2023-03-21)
Improvements
- Add support of storeviews for automation rules
1.0.11
(2023-03-20)
Features
- Added more fields to Automation Rules
Fixed
- PHP 7.2
1.0.10
(2023-03-17)
Features
- Add support of GPT3.5
- Added Automation Rules
1.0.8
(2023-03-15)
Improvements
- Rename prompt codes
Fixed
- Make field selectors field multiline
1.0.7
(2023-03-06)
Improvements
- Added more precise selectors for prompts
1.0.5
(2023-02-22)
- Initial release