Getting Started
Welcome to the Extra Payment for Magento 2 documentation.
In this documentation, you will find everything you need to use Extra Payment functionality and create a flexible system for receiving fees on accompanying services your store can provide on orders.
Our extension allows Magento 2 store to provide a convenient way for customers to pay extra fees that may occur in respect to their orders. These can be fees for product replacement, extra insurance, individual shipping, special packaging, etc.
Go ahead, dive in!
Firstly, please, find our extension in My Downloadable Products section of our store. Learn how to install extension, and proceed with Quick Start, which will guide you with the basics of the Extra Payment for Magento 2 module.
How to install the extension
How to install the extension using composer
- Back up your store's database and web directory.
- Log in to the SSH console on your server and navigate to the root directory of the Magento 2 store.
- Copy the installation instructions from the page My Downloadable Products to the SSH console and press ENTER.
- Run command
php -f bin/magento module:enable Mirasvit_Core Mirasvit_ExtraPaymentto enable the extension. - Run command
php -f bin/magento setup:upgradeto install the extension. - Run command
php -f bin/magento cache:cleanto clean the cache. -
Deploy static view files
rm -rf pub/static/*; rm -rf var/view_preprocessed/*; php -f bin/magento setup:static-content:deploy
How to install the extension manually
- Back up your store's database and web directory.
- Download the archive from My Downloadable Products.
- Unzip the extension locally.
- Copy the unzipped folder to the root directory of the Magento store.
- Run command
php -f bin/magento module:enable Mirasvit_Core Mirasvit_ExtraPaymentto enable the extension. - Run command
php -f bin/magento setup:upgradeto install the extension. - Run command
php -f bin/magento cache:cleanto clean the cache. -
Deploy static view files
rm -rf pub/static/*; rm -rf var/view_preprocessed/*; php -f bin/magento setup:static-content:deploy
Quick Start
Extra payments for Magento 2 is a supportive tool that provides a convenient way for making accompanying financial transactions on existing orders. Such fees may occur for many reasons, for example, when a purchased item needs to be returned for a replacement.
Go to Sales > Extra Payments to view all issued extra payments in your store. The extra payments grid provides the following paramaters:
- Customer name
- Order number the extra payment was issued for
- Order number of the issued extra payment itself
- Extra payment status (paid, pending, draft)
- Items for which the extra payment was issued for
- Direct link to the checkout cart with a particular extra payment
-
Extra payment edit button

On this page, you can use filters to sort out irrelevant issued extra payments and edit existing records.
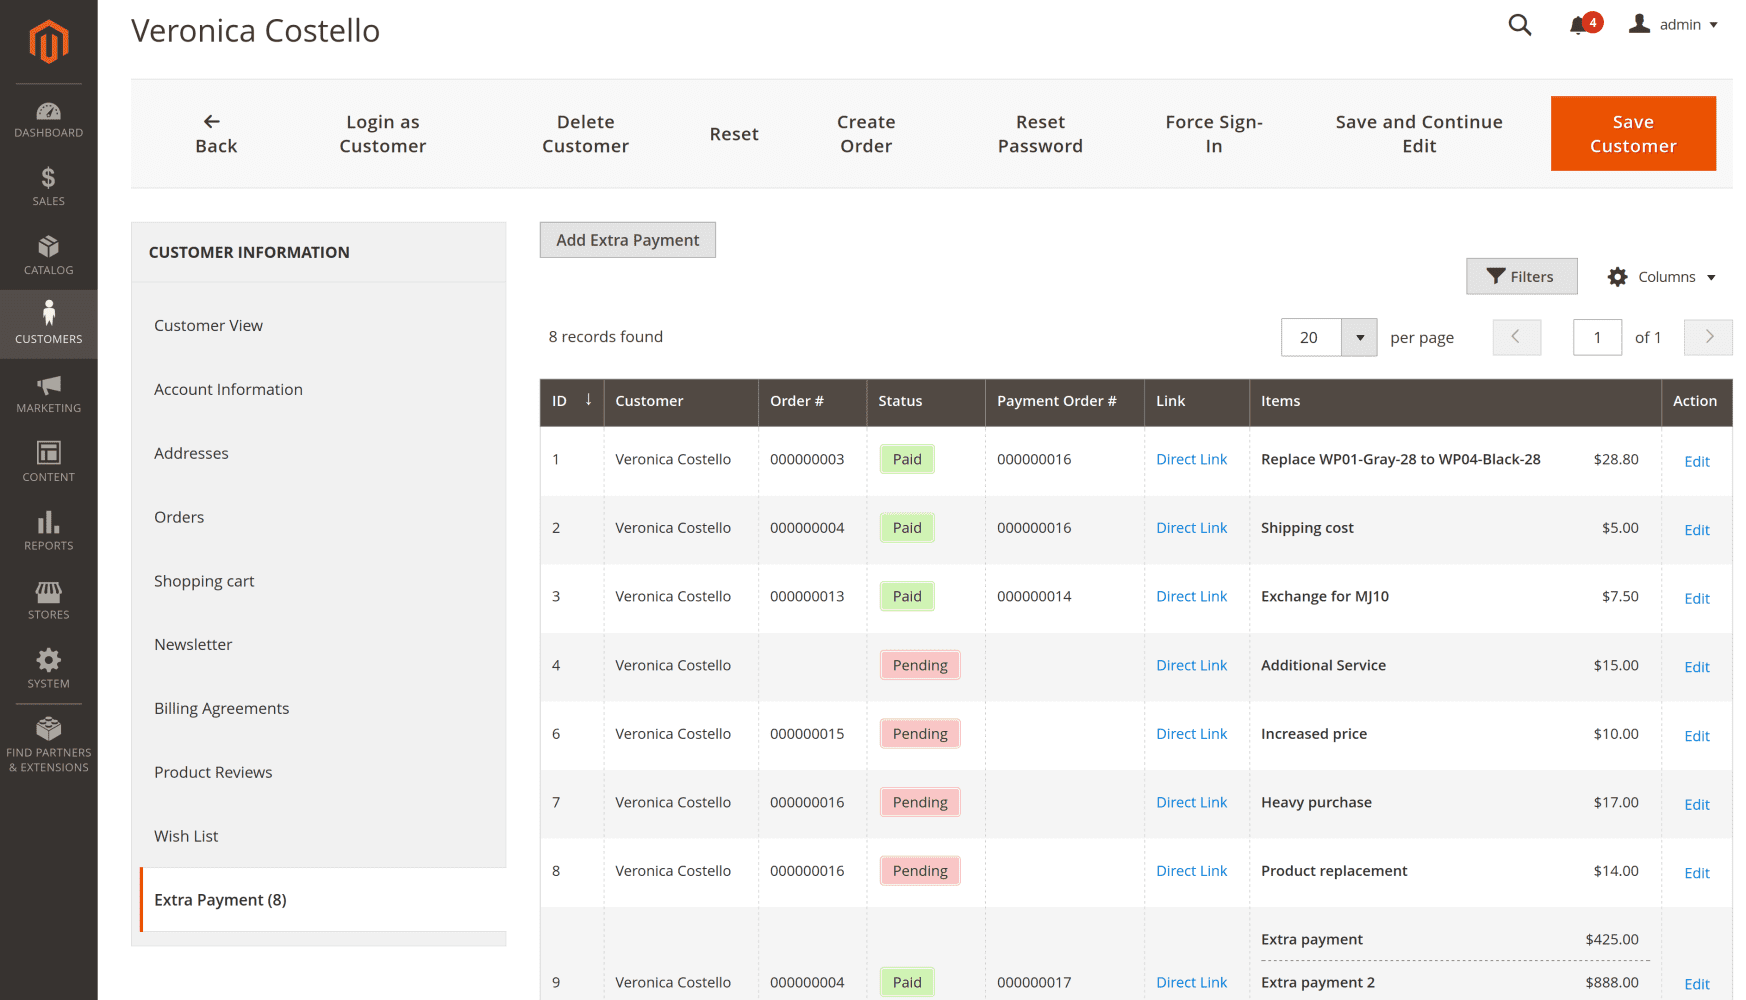
Alternatively, you can get all extra payments issued on a particular customer on the Customer Information page. Go to Customers > All customers, choose a particular customer and click Edit on their account. Next, navigate to Customer Information > Extra Payment.
Configuration Settings
The module Extra Payments for Magento 2 does not require any prior configuration. It is ready to use right after installation.
Our module adds a virtual product with the name Extra Payment Product and SKU E_PMNT to the store product catalog. The E_PMNT product is not visible for customers in product search or any other places of the Magento 2 store since its visibility is configured as Not Visible Individually.
Each extra payment can contain one or several items, which for store admins and customers are the description of the reason the extra payment order was issued for. From a Magento 2 standpoint, the extra payment is an ordinary purchase of a virtual product. Each item in the extra payment corresponds to the purchase of one virtual product.
Each purchased extra payment gets its own order number, and can be accessed in the general order list of the store.
Backend of the Extra Payments module
Extra Payments List
The Extra Payments list is a main view panel of the module which allows tracking, and editing of issued orders on extra payments. Go to Sales > Extra Payments in order to access this page.
The Extra Payments list provides a configurable grid that can display the following information:
- Customer name
- Order number the extra payment was issued for
- Order number of the issued extra payment itself
- Extra payment status (paid, pending, draft)
- Items for which the extra payment was issued
- Direct link to the checkout cart with a particular extra payment
- Internal note on extra payment
- Note on extra payment that can be viewed by customers
Additionally, the Extra Payments list provides an edit button for modifying issued extra payment orders.
You can use filters to display the issued extra payment with the parameters you need.
View extra payments of a specific customer
On the Extra Payments list, you have the option to filter the list by the name of the customer. For example, you may need to view all issued extra payment for a particular customer. Simply filter the list by his name.
Alternatively, issued extra payments for a particular customer can be accessed on the Customer Information page that is available from the All customers list. Go to Customers > All customers, choose a particular customer and click Edit on their account. Then navigate to Customer Information > Extra Payment.
How to issue an extra payment
A new extra payment is bonded to an existing order, therefore it is created on the page of a particular order. Navigate to Sales > Orders and find the order for which you need to create the extra payment. On the Action column, click the View button for this order and on the Order View page, navigate to Extra Payments tab.
Start creating a new extra payment with the button Add Extra Payment. You will be presented with a page that contains three sections: general information, items, and additional.
General Information
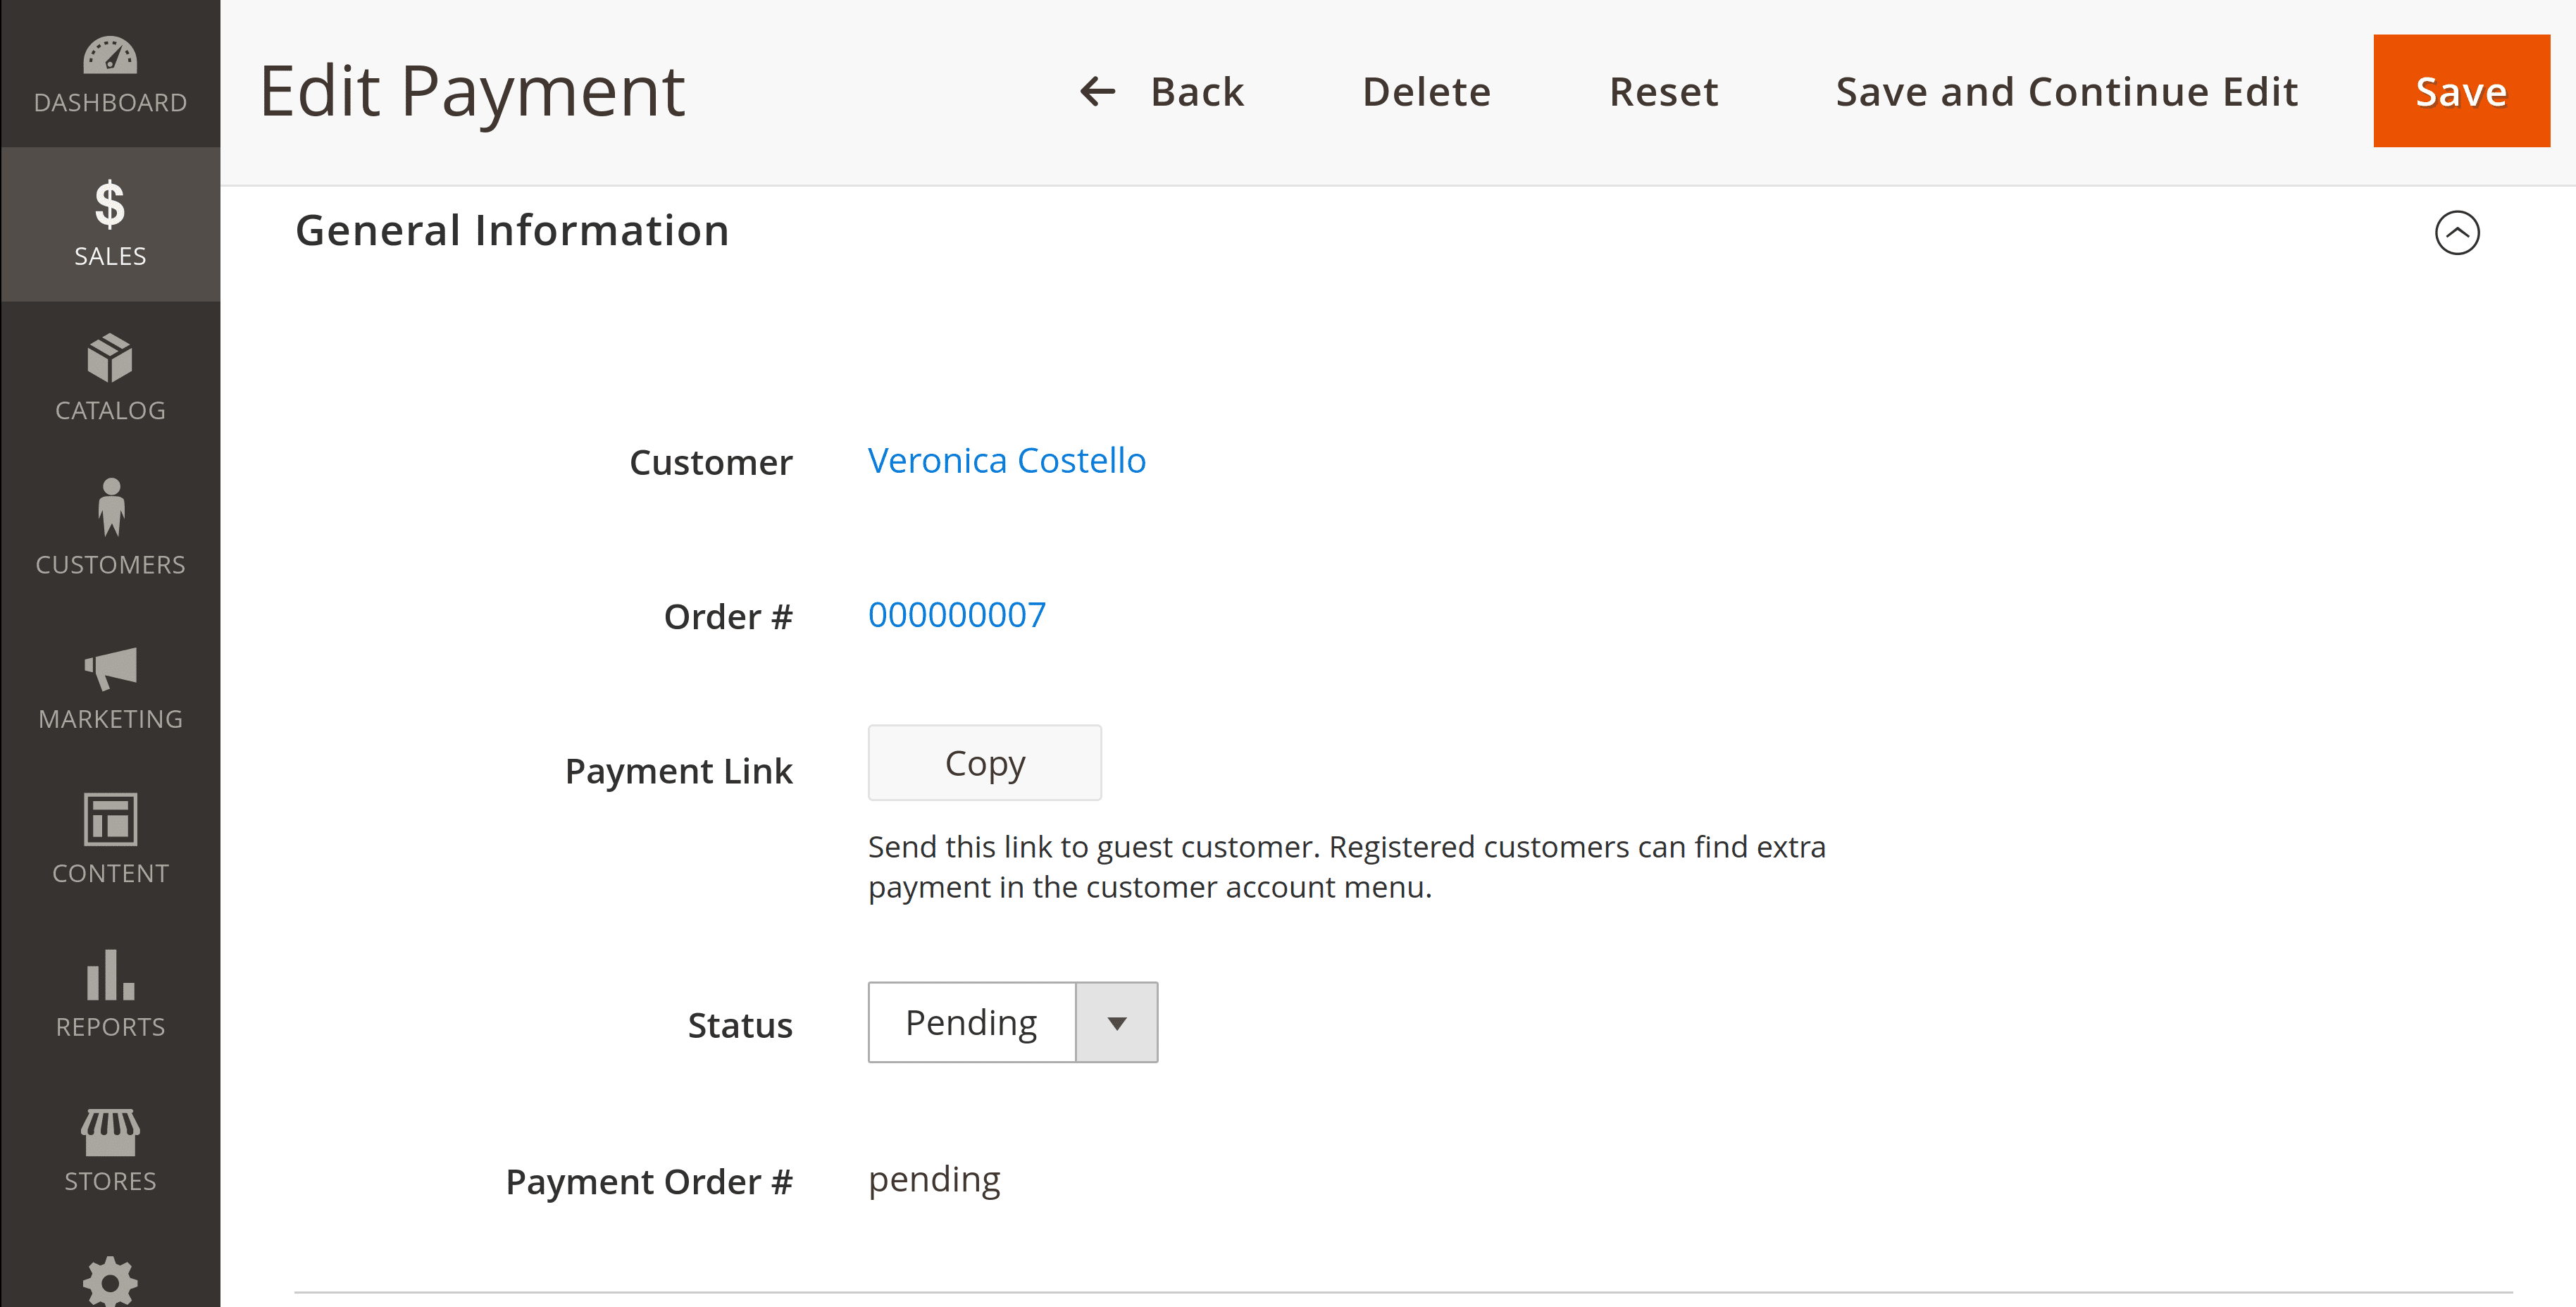
Fill in the general information on a new extra payment when you create one.
Customer. From a drop-down menu, select the customer name the extra payment was issued for. Leave the name blank for guest customers who don't have an account in your store.
Order #. Refers to the number of the order the issued extra payment is bonded to. It is not available for modification by store admin.
Payment Link. This is the direct link to the checkout cart for the issued extra payment. Use this link to provide extra payments for guest customers without an account in your store. Press the Save button on the issued extra payment for this link to be created.
Status. Shows the current status of the issued extra payment. The default value is pending. The status changes automatically and manually. In manual mode it is possible to set statuses: draft, pending, paid. For draft and paid statuses the Payment link becomes unavailable.
Payment Order #. This field depicts the order number of the issued extra payment after a customer successfully closes the transaction on it. For awaiting extra payment, this field will display pending status.
Items
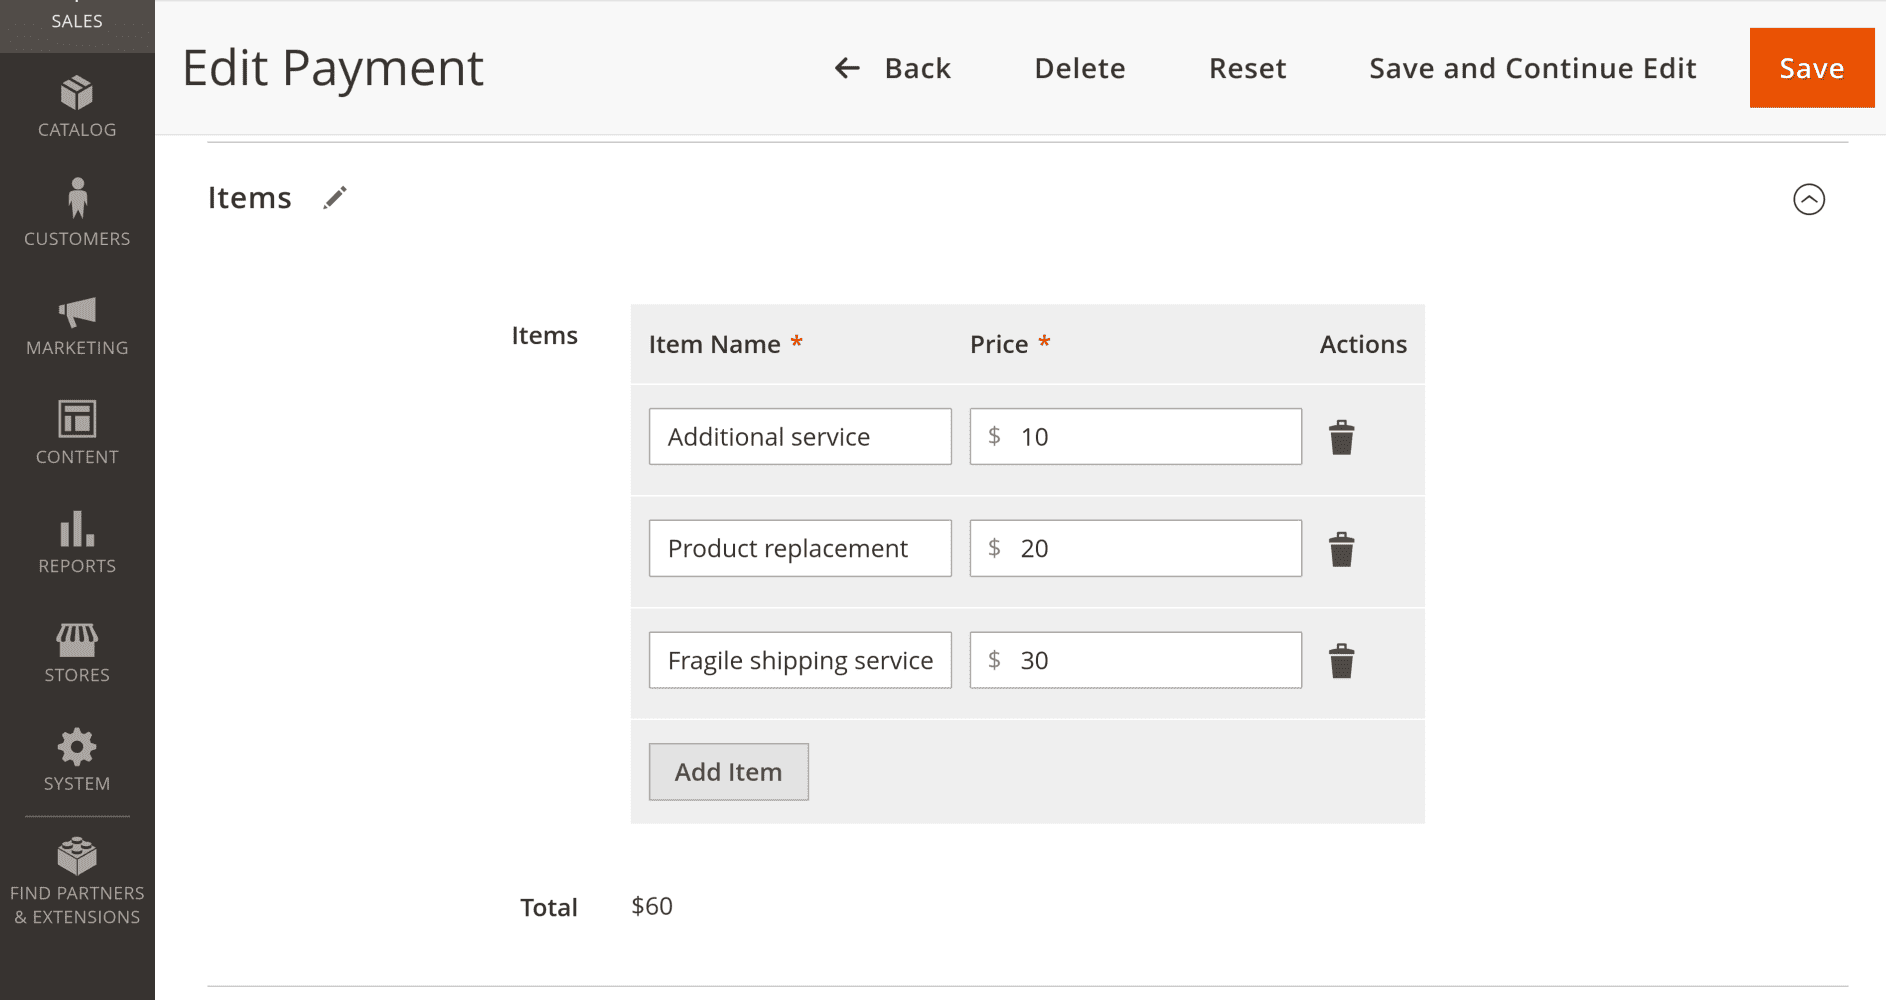
Item is a brief description of the reason for which the extra payment was issued. Each extra payment can contain several items with individual prices assigned to them.
In the Magento 2 backend admin panel, the extra payment that contains several items is presented as a single order with purchased virtual products E_PMNT. The number of the products is equal to the number of items in the extra payment.
Additional
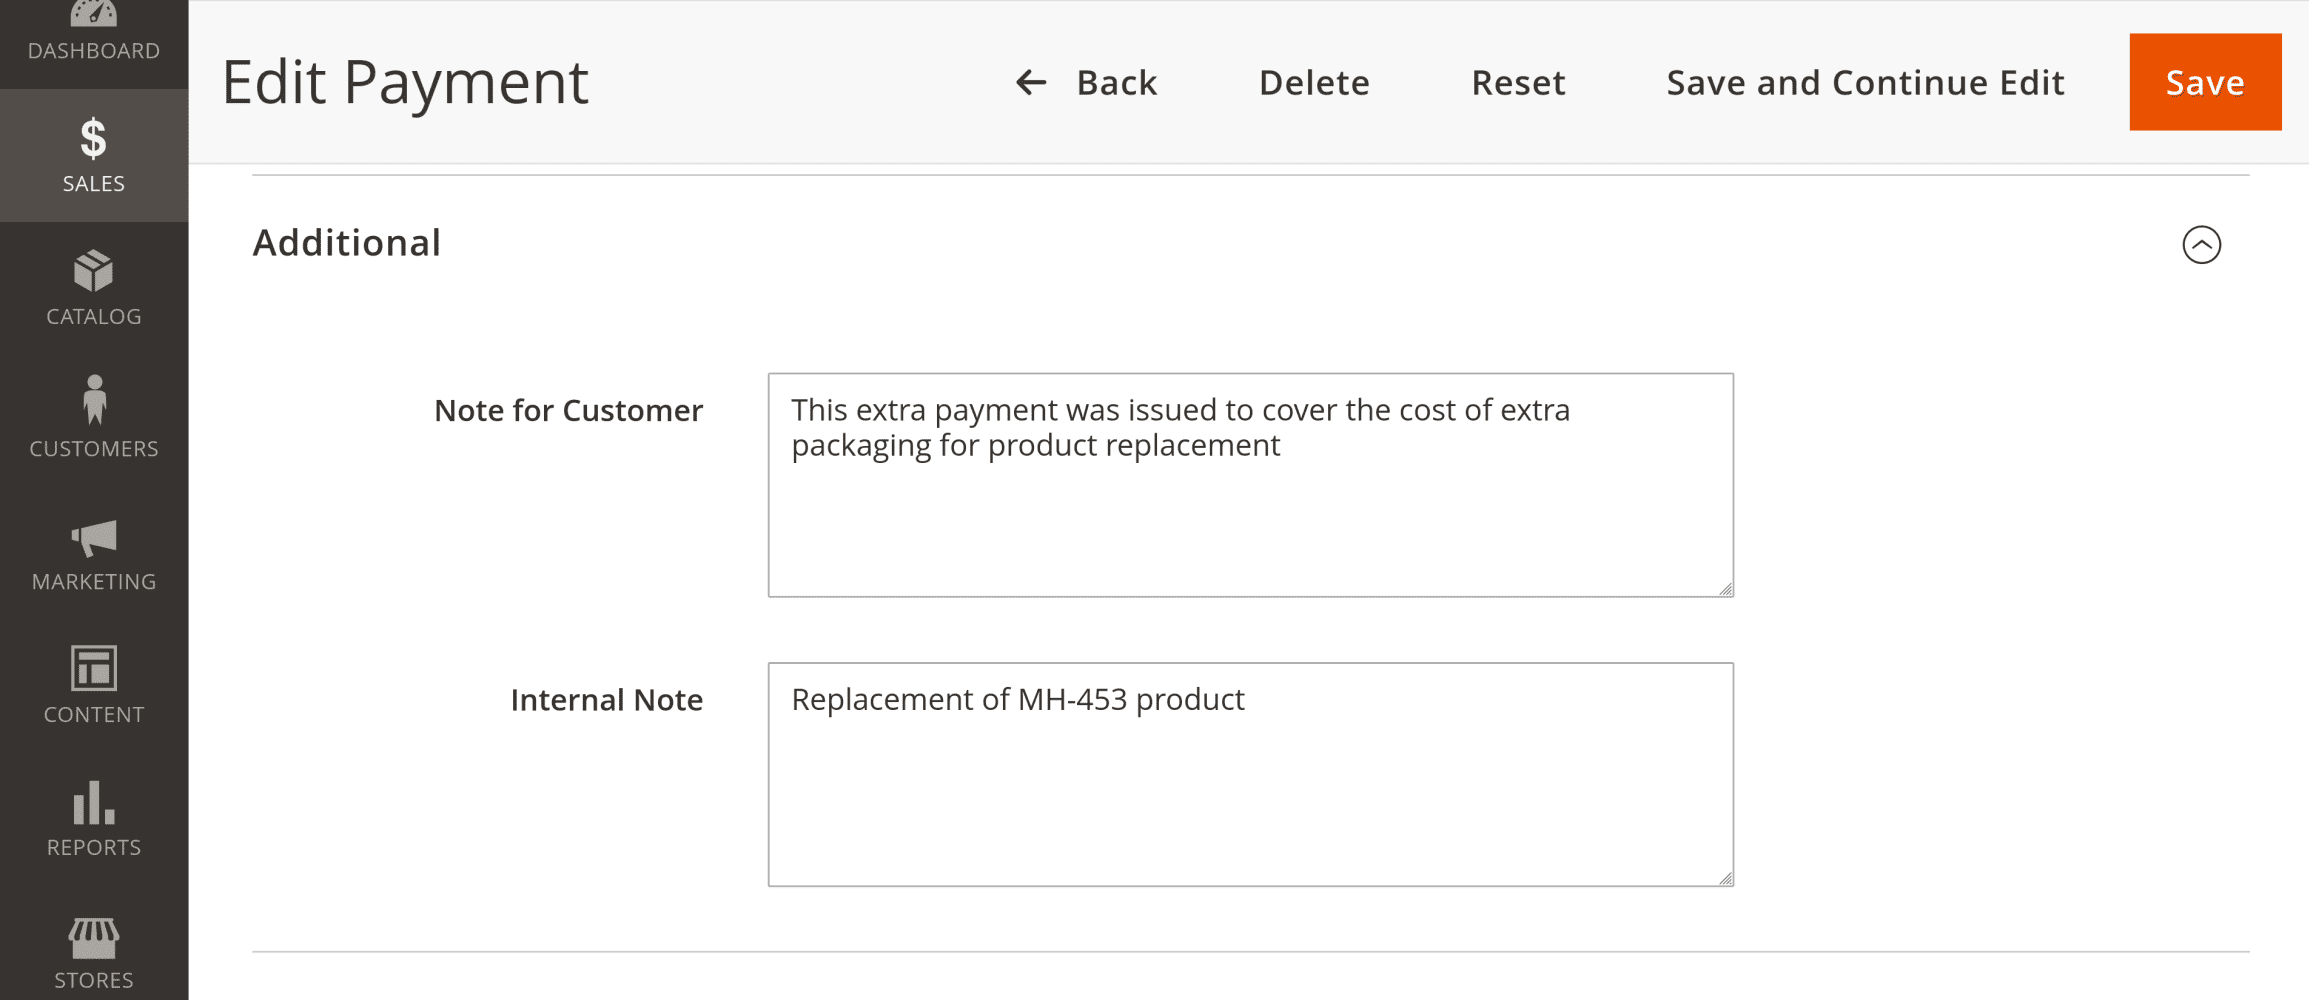
This section allows you to put in explanatory notes on the extra payment. It provides two fields: a Note for Customer and an Internal Note. The former can be viewed by the customer in their account, and the latter is meant for internal viewing by the store admins.
Frontend of the Extra Payments module
Making extra payment
To close the transaction on issued extra payment, the customer should get a link to it. Logged in customers can find the link in their account. Guest customers can receive a direct link from a store admin.
The link on extra payment will bring the customer to the Shopping Cart checkout page. Here, the customer can specify a preferred payment method and finish the extra payment process.
Extra Payments tab
Logged in customers can view all extra payments that were issued for their account on the tab Extra Payments. Go to Customer name > My Account > Extra Payments to open this tab.
My Extra Payments tab provides information on the date and time that the extra payment was issued, and its transactional status. It also displays the names of the items the extra payment was issued for. The price is shown individually for each item in the extra payment order, as well as the total sum. Additionally, the My Extra Payments tab shows explanatory notes for the extra payments.
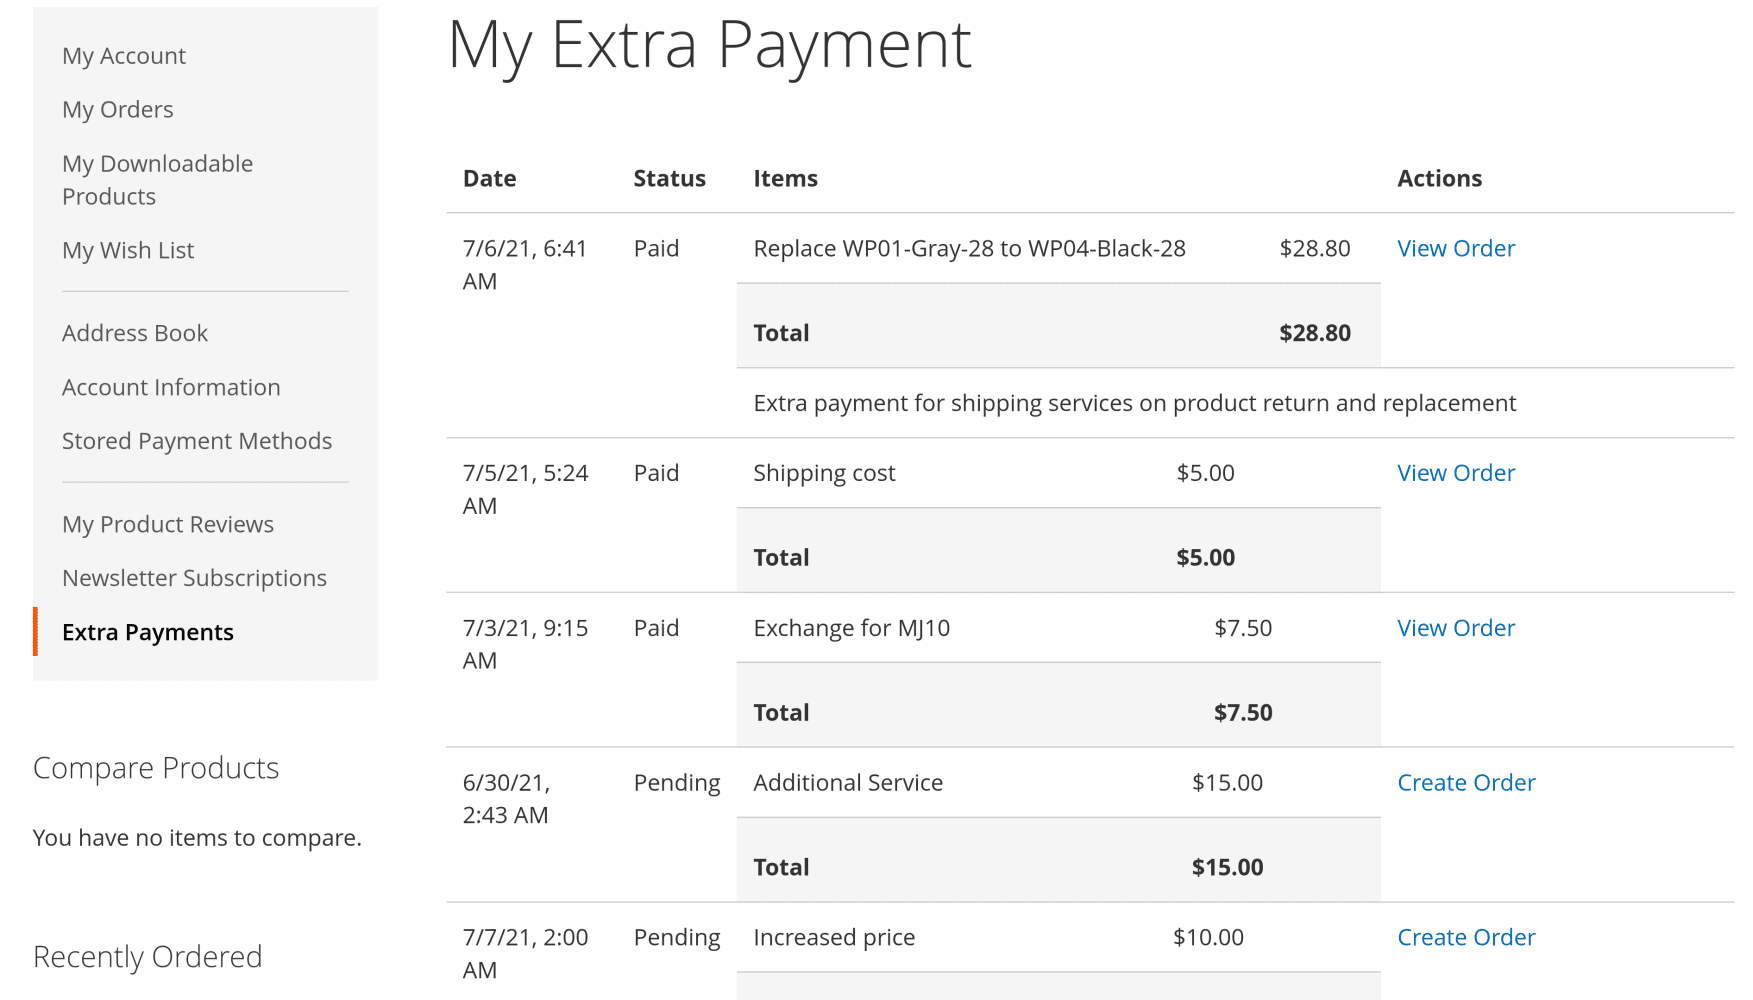
The customer has two options for actions on the My Extra Payments tab. For the extra payments with a paid status, it is possible to view the extra payment order by clicking the View Order link. If the extra payment has a pending status, the customer can Create Order to go to the checkout cart and finish the transaction on the issued extra payment.
How to upgrade extension
To upgrade the extension, follow these steps:
- Back up your store's database and web directory.
- Log in to the SSH console in your server and navigate to the root directory of the Magento 2 store.
- Run the command
composer require mirasvit/module-extra-payment:* --update-with-dependenciesto update the current extension with all dependencies.Note
In some cases, the command above is not applicable, or it's not possible to update just the current module, or you need to upgrade all Mirasvit modules in a bundle. In this case, the command above will have no effect.
Run insteadcomposer update mirasvit/*command. It will update all Mirasvit modules installed in your store.
- Run the command
php -f bin/magento setup:upgradeto install updates. - Run the command
php -f bin/magento cache:cleanto clean the cache. -
Deploy static view files
rm -rf pub/static/*; rm -rf var/view_preprocessed/*; php -f bin/magento setup:static-content:deploy
Disabling the Extension
Temporarily Disable
To temporarily disable the extension, please take the following steps:
- Log in to the SSH console on your server and navigate to the root directory of the Magento 2 store.
- Run the command
php -f bin/magento module:disable Mirasvit_ExtraPaymentto disable the extension. - Log in to the Magento backend and refresh the store cache (if enabled).
Extension Removal
To uninstall the extension, please follow these steps:
- Log in to the SSH console on your server and navigate to the Magento 2 store's root directory.
- Run the command
php -f bin/magento module:disable Mirasvit_ExtraPaymentto disable the extension. - Run the command
composer remove mirasvit/module-extra-paymentto remove the extension. - Log in to the Magento backend and refresh the store cache (if enabled).
1.0.1
(2026-04-24)
Fixed
- Fixed a type error that could occur when generating payment URLs for customer emails and the admin payment listing when the store ID was not strictly an integer
1.0.0
(2026-04-14)
Features
- REST API for extra payments — manage extra payments via REST API: create, read, update, delete, list payments, and send payment emails (endpoints under
/V1/mst-extra-payment/) - Automatic extra payment on order edit — when an already-invoiced order is edited via Mirasvit Order Editor and the item total increases, an extra payment is automatically created for the price difference. The customer receives an email with a payment link, and an invoice is generated automatically once the payment is completed
- Pending payment notice on order view — a warning banner now appears at the top of the admin order view page when there are pending extra payments, showing the amount with a link to payment details
Fixed
- Fixed admin permission check for the customer search in the payment form — it now correctly requires the Extra Payment permission
- Fixed invoicing for orders with extra payments — invoices now use offline capture, preventing errors with online payment methods (like Google Pay)
0.2.2
(2025-08-21)
Fixed
- Payment link is displayed as a button in the customer notification email
0.2.1
(2025-06-24)
Fixed
- Save button for Extra Payment
0.2.0
(2025-06-04)
Improvements
- WCAG 2.2 AA accessibility
0.1.9
(2025-04-14)
Fixed
- Compatibility with PHP 8.4
0.1.8
(2024-12-26)
Improvements
- The 'Back' button in the payment edit form returns you to the previous page
- Pre-selected customer when adding a new payment
0.1.7
(2024-03-21)
Improvements
- Note for customer selection in payment form
0.1.6
(2023-12-11)
Improvements
- Improved email notifications for customers
0.1.4
(2023-02-22)
Fixed
- Error "Argument 1 passed to Mirasvit\ExtraPayment\Block\Payment\Listing::getViewOrderUrl() must be an instance of Magento\Sales\Model\Order, null given"
0.1.3
(2022-12-27)
Fixed
- Display of the "Add Extra Payment" button
0.1.1
(2022-06-20)
Improvements
- remove db_schema_whitelist.json
0.1.0
(2022-05-23)
Improvements
- Migrate to declarative schema
0.0.8
(2022-03-10)
Fixed
- Add Extra Payment button
0.0.7
(2022-01-28)
Improvement
- Added payment column to the order grid
- Added ability to send emails with payment link
0.0.5
(2022-01-11)
Fixed
- Display correct currency symbol in the backend
- Payment URL
0.0.4
(2021-12-09)
Fixed
- Error "Call to a member function getOptionByCode() on bool"
- Compatibility with m2.3.1
0.0.3
(2021-10-22)
Fixed
- Payment URL for multistores
0.0.2
(2021-10-01)
Fixed
- Error for the orders without quote
- MSI compatibility
0.0.1
(2021-07-13)
Features
- Initial release