Getting Started
Welcome to the Custom Form Builder documentation.
Whether you are a new or an advanced user, you can find some useful information here.
Go ahead, dive in!
Firstly, please, find our extension in My Downloadable Products section of our store. Learn how to install extension.
How to install the extension
How to install the extension using composer
- Backup your store's database and web directory.
- Login to the SSH console on your server and navigate to the root directory of the Magento 2 store.
-
Copy the installation instructions from the page My Downloadable Products to the SSH console and press ENTER.
-
Enable the extension:
php -f bin/magento module:enable Mirasvit_Core Mirasvit_FormBuilder -
Install the extension:
php -f bin/magento setup:upgrade -
Clean the cache
php -f bin/magento cache:clean - Deploy static view files
    rm -rf pub/static/*
    rm -rf var/view_preprocessed/*
    php -f bin/magento setup:static-content:deploy
How to install the extension manually
- Backup your store's database and web directory.
- Download archive from My Downloadable Products.
- Unzip the extension locally.
- Copy unzipped folder to the root directory of the Magento store.
-
Enable the extension:
php -f bin/magento module:enable Mirasvit_Core Mirasvit_FormBuilder -
Install the extension:
php -f bin/magento setup:upgrade -
Clean the cache
php -f bin/magento cache:clean - Deploy static view files
    rm -rf pub/static/*
    rm -rf var/view_preprocessed/*
    php -f bin/magento setup:static-content:deploy
Install the extension for Hyva
-
Run the command
composer require mirasvit/module-form-builder-hyva:* -
Enable installed Hyva modules:
bin/magento module:enable Hyva_MirasvitFormBuilder -
Update Magento database schema and data with the command:
bin/magento setup:upgrade -
Update Magento database schema and data with the command:
bin/magento setup:upgrade -
Compile the code of the installed extension:
cd /path/to/theme/web/tailwind/npm run build-prod -
Run the command below to clean the cache:
cd /path/to/project/bin/magento cache:flush - Deploy static view files
    rm -rf pub/static/*
    rm -rf var/view_preprocessed/*
    php -f bin/magento setup:static-content:deploy
Quick Start
Our Custom Form Builder for Magento 2 is a simple, yet powerful extension, that allows creating eye-catching forms (call back forms, price match requests, contact forms, order forms, etc.) of various complexity in a visual editor.
Start from the following settings:
- Forms - create your own Custom Form or with ready-made templates without touching a single line of code.
- Answers - manage all submitted Forms in one place.
- Statuses - create unique Status of submitted Form for easy management.
Forms
To see and manage all created forms in one place, go to Content -> Form Builder -> Forms.
You may create your own by the Add Form or choose one of the predefined forms: Call Back, Contact Us, Price Match Request, Satisfaction Survey.
On the forms grid page, you can sort by ID, Name, Code, Status, Answers. At the Action column, click Select for Deleting or Editing the necessary Form.
Edit page consists of sections:
- General Information
- Form Builder
- Success Actions
- Email Configuration
- Additional Info
Take a look at the Custom Form shown on the frontend click Preview at the editing page.
To display a finished form in the frontend, check our example here.
General Information
- Active - Form status.
- Internal Name - Form name. Used only for internal purposes.
- Store View - store view where Form can be applied.
- Customer Groups - customer groups where Form can be applied.
- Internal Note - Form Notes for admin. Used only for internal purposes.
Form Builder
Creating a form is as simple as dragging visual components in the Form Builder window and dropping them where you need them on the form. Each component that serves as a field on the resulting form comes with reasonable defaults, but you can fine-tune each field by setting their properties while editing the form.
Success Actions
This section is for redirecting customers after he/she fulfills the Form.
- Success URL - Redirect visitor after submitting the form. Leave empty to preventing redirecting.
- Success Message - It will be shown to the customer once the Form sent. You can use the variables.
Email Configuration
- Admin emails - Specify the particular admin email.
- Admin Email Template - Specify an email template.
Additional Info
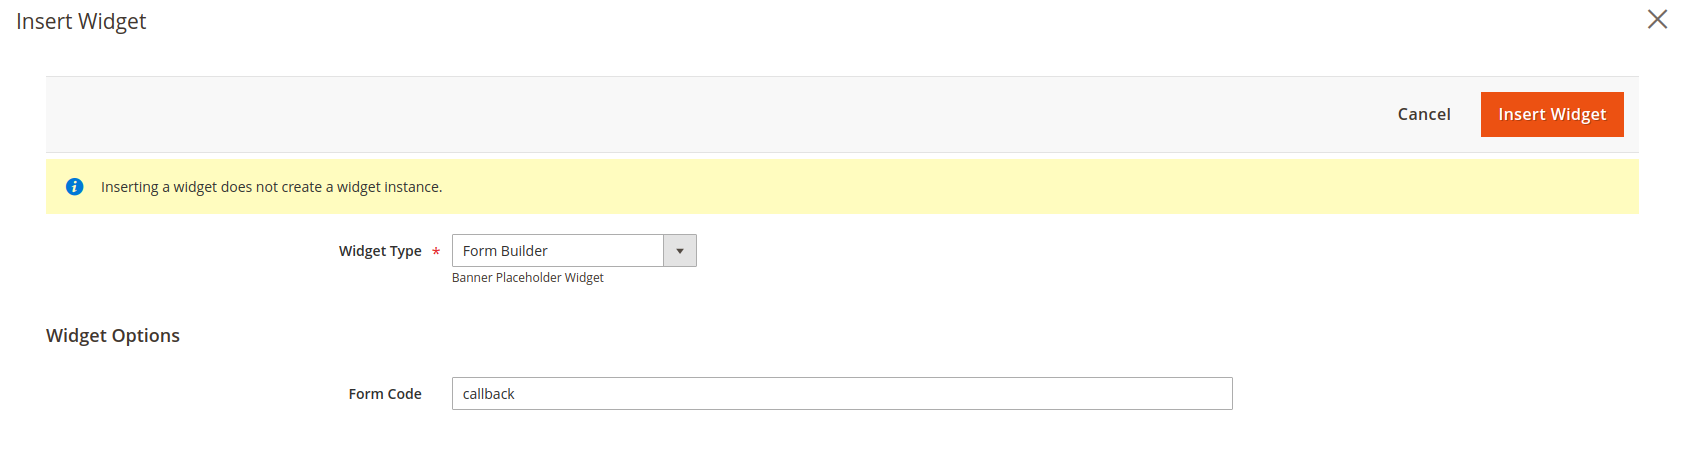
- Form Code - Form Code. Used for internal purposes (will be displayed at the Insert Widget page).
How to display Form on the frontend
Custom Forms will be displayed through the Magento Widgets.
For example, you want to add Call Back form at the 404 Not Found page. Hence, on the Admin sidebar, go to Content -> Elements -> Pages select required CMS Page, or create a new one. At the Contend editor, add Insert Widget -> Widget Type choose Form Builder and enter the necessary Form Code.
Answers
To see and manage all submitted forms in one place, go to Content -> Form Builder -> Answers.
On the Answers grid page, you can sort by ID, Form, Store View, Status, Created At. At the Action column click Select for Deleting or Editing the necessary Form.
Edit page consists of sections:
- General Information - divided into two parts: Submitted Data (will be available in the preview window on the Answers grid
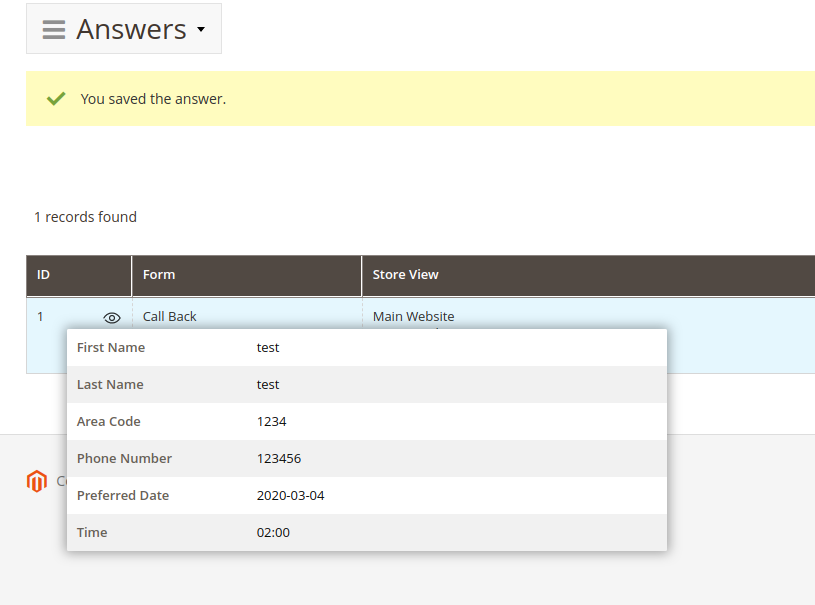 and Information (data about user which submitted the form).
 - Internal Note - Form Notes for admin. Used only for internal purposes.
- Status - Admin sets the status of the answer.
Statuses
To see and manage all Statuses in one place, go to Content -> Form Builder -> Statuses.
On the Statuses grid page, you can sort by ID, Title, Sort Order, Color. At the Action column, click Select for Deleting or Editing the necessary status. You may create your own by Add New Status.
Edit page consists of General Information:
- Title - Status title.
- Code - Status Code. Used for internal purposes.
- Color - Set the Status color label.
How to upgrade extension
To upgrade the extension, follow these steps:
- Backup your store's database and web directory.
- Login to the SSH console of your server and navigate to the root directory of the Magento 2 store.
- Update the extension with all dependencies:
composer require mirasvit/module-form-builder:* --update-with-dependenciesNote
In some cases, the command above is not applicable, or it's not possible to update just the current module, or you need to upgrade all Mirasvit modules in a bundle. In this case, the command above will have no effect.
Run insteadcomposer update mirasvit/*command. It will update all Mirasvit modules installed in your store.
-
Install the updates:
php -f bin/magento setup:upgrade -
Clean the cache
php -f bin/magento cache:clean - Deploy static view files
    rm -rf pub/static/*
    rm -rf var/view_preprocessed/*
    php -f bin/magento setup:static-content:deploy
Disabling the Extension
Temporarily Disable
To temporarily disable the extension please follow these steps:
- Login to the SSH console on your server and navigate to the root directory of the Magento 2 store.
- Disable the extension:
php -f bin/magento module:disable Mirasvit_FormBuilder - Log in to the Magento backend and refresh the store cache (if enabled).
Extension Removal
To uninstall the extension, please follow these steps:
- Login to the SSH console on your server and navigate to the root directory of the Magento 2 store.
-
Disable the extension:
php -f bin/magento module:disable Mirasvit_FormBuilder - Remove the extension:
composer remove mirasvit/module-form-builder - Log in to the Magento backend and refresh the store cache (if enabled).
2.0.7
(2026-05-21)
Fixed
- Fixed widget.xml XSD validation error ("attribute 'translate' is not allowed" on
<widget>and<parameter>elements); thetranslateattribute now lives on the child<label>/<description>elements where Magento'swidget.xsddeclares it. Resolves admin libxml errors and lets the Form Builder widget register correctly on the Content → Widgets page.
2.0.6
(2026-05-19)
Improvements
- Localized to 15 core e-commerce locales (ar, cs, de, es, fr, it, ja, nl, pl, pt-BR, pt-PT, sv, tr, uk, zh-Hans)
- Added in-memory cache for store name resolution during CSV answer export
2.0.5
(2026-03-04)
Improvements
- Added new columns to the CSV export for form answers: "Store View", "Created At", "Status"
2.0.4
(2026-02-12)
Fixed
- Fixed "Undefined array key element" error during answers export
2.0.3
(2026-02-09)
Improvements
- Added the ability to select a sender email identity per form
2.0.2
(2025-11-11)
Improvements
- Some inline tags (like a, b, span, i, em, strong) are alloved in choise options and help text
2.0.1
(2025-11-03)
Fixed
- Content of "Form Builder" section is not loaded on the form editing page
2.0.0
(2025-08-21)
Improvements
- Code refactoring. Version 2.x requires Magento 2.4+. Version 1.x remains available for Magento 2.3.x.
1.2.0
(2025-06-27)
Improvements
- Improve WCAG 2.2 AA compliance and implement translations for React UI
1.1.26
(2025-05-28)
Fixed
- Issue related to reCAPTCHA v3 Invisible on Hyva theme
1.1.25
(2025-04-14)
Fixed
- Compatibility with php8.4
1.1.24
(2025-01-29)
Improvements
- Added delete mass action on the answer listing page
1.1.23
(2025-01-23)
Improvements
- Loaded files are added to the admin email as attachments
1.1.22
(2024-09-09)
Improvements
- Added billing address variable {{var billing_address.[attribute_code]}}
1.1.21
(2024-08-29)
Fixed
- Issue related to v2 google reCaptcha
1.1.20
(2024-08-21)
Fixed
- Added link to the file in the admin notification email in case of file input field
1.1.19
(2024-07-16)
Fixed
- Form Code should be unique
1.1.18
(2024-04-25)
Fixed
- Price variable is empty in case of bundle product
1.1.17
(2024-04-16)
Fixed
- Page Builder issue
1.1.16
(2024-02-14)
Improvements
- Adding an ability to use product attributes as variables in form builder fields
- Triggering data layer event 'mst_form_has_been_submitted' on form submitting
1.1.15
(2023-12-27)
Features
- Adding note to admin emails field
1.1.14
(2023-11-28)
Fixed
- Visibility for
tags
1.1.13
(2023-11-24)
Fixed
- Issue when dependency field does not work
1.1.12
(2023-09-01)
Fixed
- Error "Mirasvit\FormBuilder\Repository\FormRepository::getByCode(): Argument #1 ($code) must be of type string, null given"
1.1.11
(2023-07-18)
Fixed
- Error "Call to a member function setTemplate() on bool in FormBuilder/Block/Form.php:135"
1.1.10
(2023-07-10)
Fixed
- Recaptcha for Hyva theme
1.1.9
(2023-05-10)
Fixed
- Unable to submit form when a file element is not required
1.1.8
(2023-02-13)
Fixed
- $form must be of type Mirasvit\FormBuilder\Api\Data\FormInterface, null given, called in FormBuilder/Block/Form.php
- Saving of the "Email Configuration"
- Displaying of the file upload errors
1.1.7
(2022-10-21)
Improvements
- Added answer data to the email template.
1.1.6
(2022-10-13)
Improvements
- ReCaptcha config
1.1.5
(2022-09-30)
Fixed
- Compatibility with php8
1.1.4
(2022-07-11)
Fixed
- Sending answers to email for m2.4.4
1.1.3
(2022-06-20)
Improvements
- remove db_schema_whitelist.json
1.1.2
(2022-06-01)
Improvements
- Added Prev/Next buttons for multi pages form.
- Ability to set CSS classes to form elements
1.1.0
(2022-05-23)
Improvements
- Migrate to declarative schema
1.0.22
(2022-04-27)
Improvements
- Added the ability to export answers to CSV
1.0.21
(2022-04-11)
Fixed
- The issue "validation is not a function"
1.0.20
(2022-02-21)
Fixed
- An issue when click on Pending it is throwing an exception error
- Default admin email template
1.0.19
(2022-02-07)
Fixed
- Form element's css class name
Improvements
- Send a copy of form answer to customer
- Integration with Help Desk MX for Magento 2
1.0.18
(2021-10-22)
Fixed
- Display of the field label
1.0.17
(2021-10-05)
Fixed
- Error "Undefined index: children in vendor/mirasvit/module-form-builder/src/FormBuilder/Service/BuilderService.php"
1.0.16
(2021-10-01)
Improvements
- Increase max length of the notification text
- Added notification conditions
Fixed
- Compatibility with m2.3 and page builder
- Empty sort order caused errors
1.0.15
(2021-07-09)
Improvements
- Add the option "Notification Text" to the form
1.0.14
(2021-05-13)
Fixed
- Form visibility
1.0.13
(2021-04-19)
Fixed
- Fix delete message for m2.4
1.0.11
(2021-04-12)
Fixed
- Script error for: Mirasvit_FormBuilder/js/element/choice
1.0.10
(2020-11-02)
Fixed
- Error "Exception #0 (ReflectionException): Class Magento\ReCaptchaAdminUi\Model\OptionSource\Type does not exist" (since 1.0.9)
1.0.9
(2020-09-24)
Improvements
- Added reCaptcha
1.0.8
(2020-09-24)
Fixed
- Compatibility with m2.2.0
1.0.7
(2020-08-11)
Improvements
- Small spelling fixes
1.0.6
(2020-08-19)
Improvements
- Added hidden type for text field input
- Added new variable {{ page.url }}
1.0.5
(2020-08-17)
Fixed
- Issue with escaper
1.0.4
(2020-08-17)
Improvements
- Ability to print results
- Ability to edit results in the backend
- New autocomplete field (products autocomplete)
- Display form submissions in the account
1.0.3
(2020-07-30)
Improvements
- Support of Magento 2.4
1.0.2
(2020-07-02)
Fixed
- Minor fixes
1.0.0
(2020-06-02)
Improvements
- Initial release
0.0.1
(2020-05-21)
Improvements
- Pre-release version