Getting Started
Welcome to the Improved Asynchronous Re-indexing Documentation.
This is a backend-only extension, which brings all your indices to a single panel and allows you to schedule reindexing, perform a manual reindex, and maintain a history of indices updates.
Go ahead, dive in!
Firstly, please check out our extension in the My Downloadable Products section of our store. Learn how to install extension.
Since this extension brings all its functions to a single panel, you may visit System -> Tools -> Index Management and start working with your indices within our Dashboard.
How to install the extension
- Back up your store's database and web directory.
- Log in to the SSH console on your server and navigate to the root directory of the Magento 2 store.
- Copy the installation instructions from the page My Downloadable Products to the SSH console and press ENTER.
- Run the command
php -f bin/magento module:enable Mirasvit_Core Mirasvit_Indexerto enable the extension. - Run the command
php -f bin/magento setup:upgradeto install the extension. - Run the command
php -f bin/magento cache:cleanto clean the cache. - Run the command
php -f bin/magento indexer:set-mode scheduleto change the indexer mode to "Update by Schedule" -
Deploy static view files
rm -rf pub/static/*; rm -rf var/view_preprocessed/*; php -f bin/magento setup:static-content:deploy
Reindexing Dashboard
All functions of Asynchronous Reindexing extension are combined on a single dashboard, located at System -> Tools -> Index Management.
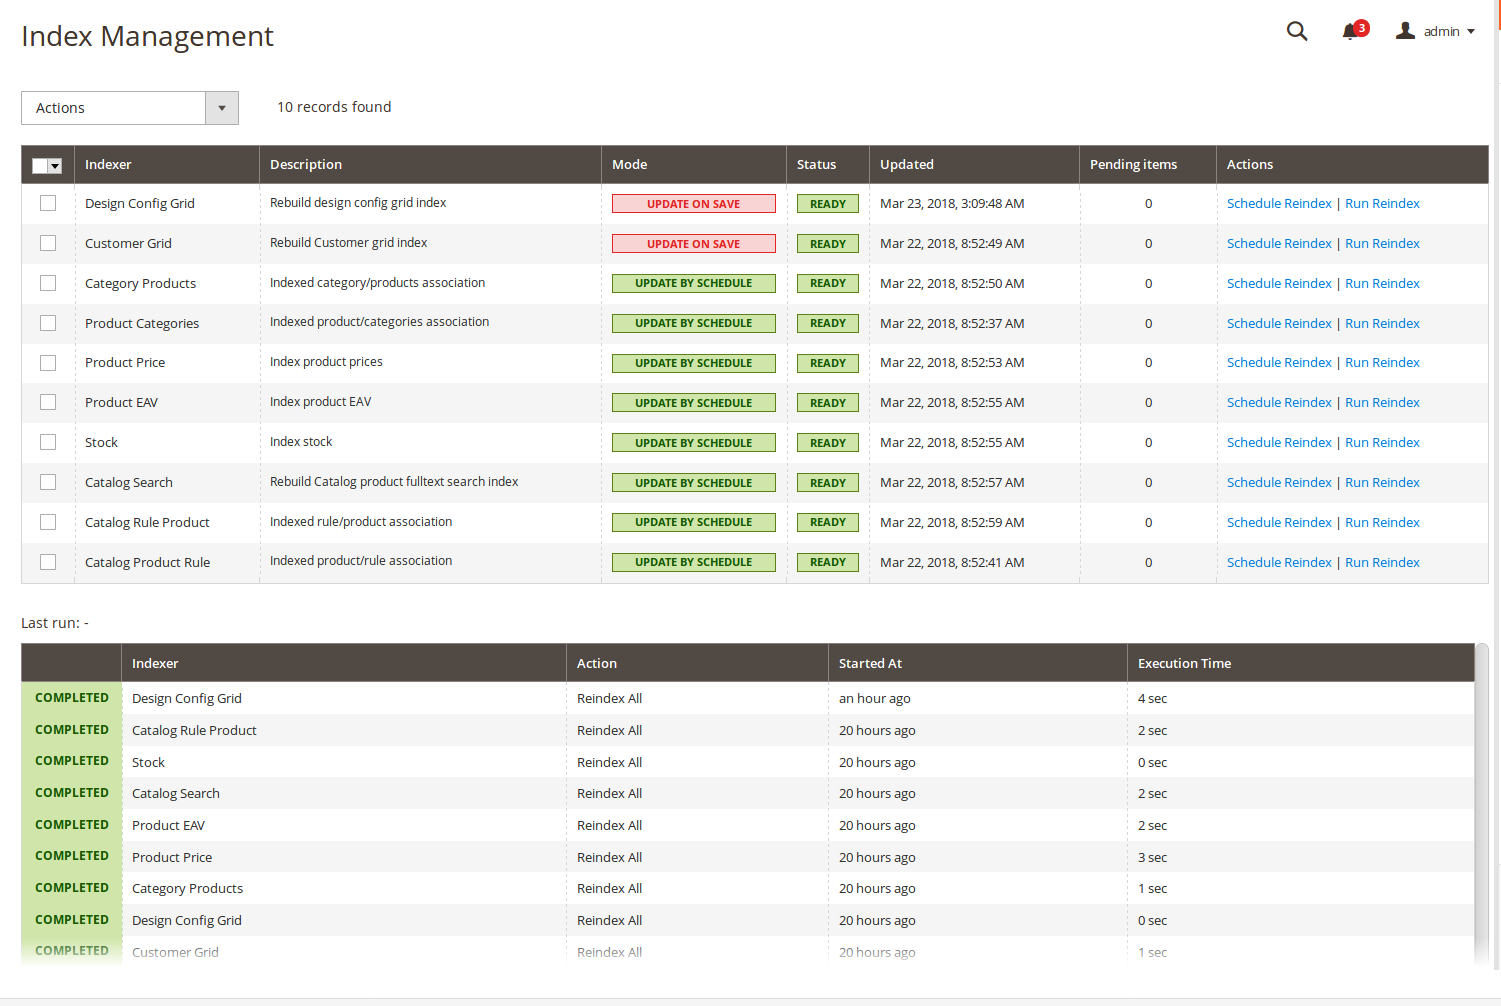
As you can see from the screenshot above, it breaks into two sections:
- Indices Table - contains all indices defined in your store. From this table, all reindex actions are started (see below).
- Last Run - a history table which holds the last 9 reindexing schedules.
Refer to the following subsections to learn more:
- Working with Indices Table
- Reindex History
- Managing Crontasks
Working with Indices Table
Indices table contains all indices that are registered on your store:
- Indexer - name of the index.
- Description - short description of that index.
- Mode - mode of update. There are two available modes:
- Update on Save - indexed data will be updated on their next change. For example, when a new product is added to the indexed category, a reindex will also be made.
Note
Update on Save is the default Magento mode. - Update on Schedule - the index will be updated on the next start of our cron task.
- Update on Save - indexed data will be updated on their next change. For example, when a new product is added to the indexed category, a reindex will also be made.
- Status - status of current index
- Updated - date of latest update
- Pending Items - number of schedules
- Actions - actions that can be performed on the current row. There's two possible actions you can take:
- Schedule Reindex - schedule index update
- Run Reindex - run reindex now
From Actions drop-down menu, you can select mass-actions that can be performed on selected indices:
- Update on Save - set mode of selected indices to Update on Save mode.
- Update by Schedule - set mode of selected indices to Update on Schedule mode.
- Schedule Full Reindex - schedule selected indices to the next run of our cron task.
- Run Full Reindex - perform full reindex on selected indices.
- Reindex Pending Items - our extension runs reindex only for those chunks of reindexed data which have been changed. This action is useful when a reindex is needed for very large indices.
Note
If you have scheduled a reindex, but also run this action - it does not cancel the schedule, since data will be updated only partially.
Reindex History
Reindex history holds records about any reindex actions performed in your store. It allows you to track not only errors in the reindexing, but also the performance:
- Status of last update - although unnamed, it displays the status of the latest reindex.
- Indexer - name of index
- Started at - when reindex was started
- Execution Time - time that was spent for the reindexing.
Note
Unfortunately, our extension does not store precise information on reindex error - it just displays the summary in terms of whether it was completed, or failed.To determine which exception occurred, you need to run a manual reindexing, after which a full error will be displayed in the top message box.
Managing Crontasks
Our extension adds two new cron tasks that will help you to manage your indices. They are:
- indexer_reindex_scheduled - runs reindex on scheduled indices (see above for details).
- indexer_validate - validates indexed data.
Note
For now, only the products' data is validated.
These cron tasks are executed every second by default. The reindex queue is accompanied by a special lock-file indexer.cli.lock, located in the /var/tmp by default. It prevents conflicts when a previous reindexing cron task is not finished, but a new one has already started.
Note
If you wish to adjust the time of reindexing schedule (for example, for performance tuning), you need to manually adjust crontab in this config XML file:/src/vendor/mirasvit/module-indexer/src/Indexer/etc/crontab.xml- Find the task names corresponding to cron in this file
<job>tag mentioned above, and in the<schedule>child tag adjust execution period. - Then run the
bin/magento setup:upgradecommand, clean cache, and regenerate static content to apply all changes.
Reindexing Dashboard
All functions of Asynchronous Reindexing extension are combined on a single dashboard, located at System -> Tools -> Index Management.
As you can see from the screenshot above, it breaks into two sections:
- Indices Table - contains all indices defined in your store. From this table, all reindex actions are started (see below).
- Last Run - a history table which holds the last 9 reindexing schedules.
Refer to the following subsections to learn more:
- Working with Indices Table
- Reindex History
- Managing Crontasks
Working with Indices Table
Indices table contains all indices that are registered on your store:
- Indexer - name of the index.
- Description - short description of that index.
- Mode - mode of update. There are two available modes:
- Update on Save - indexed data will be updated on their next change. For example, when a new product is added to the indexed category, a reindex will also be made.
Note
Update on Save is the default Magento mode. - Update on Schedule - the index will be updated on the next start of our cron task.
- Update on Save - indexed data will be updated on their next change. For example, when a new product is added to the indexed category, a reindex will also be made.
- Status - status of current index
- Updated - date of latest update
- Pending Items - number of schedules
- Actions - actions that can be performed on the current row. There's two possible actions you can take:
- Schedule Reindex - schedule index update
- Run Reindex - run reindex now
From Actions drop-down menu, you can select mass-actions that can be performed on selected indices:
- Update on Save - set mode of selected indices to Update on Save mode.
- Update by Schedule - set mode of selected indices to Update on Schedule mode.
- Schedule Full Reindex - schedule selected indices to the next run of our cron task.
- Run Full Reindex - perform full reindex on selected indices.
- Reindex Pending Items - our extension runs reindex only for those chunks of reindexed data which have been changed. This action is useful when a reindex is needed for very large indices.
Note
If you have scheduled a reindex, but also run this action - it does not cancel the schedule, since data will be updated only partially.
Reindex History
Reindex history holds records about any reindex actions performed in your store. It allows you to track not only errors in the reindexing, but also the performance:
- Status of last update - although unnamed, it displays the status of the latest reindex.
- Indexer - name of index
- Started at - when reindex was started
- Execution Time - time that was spent for the reindexing.
Note
Unfortunately, our extension does not store precise information on reindex error - it just displays the summary in terms of whether it was completed, or failed.To determine which exception occurred, you need to run a manual reindexing, after which a full error will be displayed in the top message box.
Managing Crontasks
Our extension adds two new cron tasks that will help you to manage your indices. They are:
- indexer_reindex_scheduled - runs reindex on scheduled indices (see above for details).
- indexer_validate - validates indexed data.
Note
For now, only the products' data is validated.
These cron tasks are executed every second by default. The reindex queue is accompanied by a special lock-file indexer.cli.lock, located in the /var/tmp by default. It prevents conflicts when a previous reindexing cron task is not finished, but a new one has already started.
Note
If you wish to adjust the time of reindexing schedule (for example, for performance tuning), you need to manually adjust crontab in this config XML file:/src/vendor/mirasvit/module-indexer/src/Indexer/etc/crontab.xml- Find the task names corresponding to cron in this file
<job>tag mentioned above, and in the<schedule>child tag adjust execution period. - Then run the
bin/magento setup:upgradecommand, clean cache, and regenerate static content to apply all changes.
How to upgrade extension
To upgrade the extension, take the following steps:
- Back up your store's database and web directory.
- Log in to the SSH console of your server and navigate to the root directory of the Magento 2 store.
- Run the command
composer update mirasvit/module-indexerto update the extension sources.Note
In some cases, the command above is not applicable, or you are unable to update just the current module, and need to upgrade all Mirasvit modules in a bundle. In this case, the command above will have no effect.
Instead, run thecomposer update mirasvit/*command. It will update all Mirasvit modules installed in your store.
- Run the command
php -f bin/magento setup:upgradeto install updates. - Run the command
php -f bin/magento cache:cleanto clean the cache. -
Deploy static view files
rm -rf pub/static/*; rm -rf var/view_preprocessed/*; php -f bin/magento setup:static-content:deploy
Disabling the Extension
Temporarily Disable
To temporarily disable the extension, please take the following steps:
- Log in to the SSH console on your server and navigate to the root directory of the Magento 2 store.
- Run the command
php -f bin/magento module:disable Mirasvit_Indexerto disable the extension. - Log in to the Magento backend and refresh the store cache (if enabled).
Extension Removal
To uninstall the extension, please take the steps:
- Log in to the SSH console on your server and navigate to the root directory of the Magento 2 store.
- Run the command
composer remove mirasvit/module-indexerto remove the extension. - Log in to the Magento backend and refresh the store cache (if enabled).
Change Log
1.2.3
(2026-06-03)
Fixed
- Fixed an indexation error on PHP 8.1 and newer (including Magento 2.4.8-P5) that could interrupt the indexer and the admin indexation history grid when a history record had no recorded start time
1.2.2
(2026-04-21)
Improvements
- Added i18n support for 15 core locales (ar_SA, cs_CZ, de_DE, es_ES, fr_FR, it_IT, ja_JP, nl_NL, pl_PL, pt_BR, pt_PT, sv_SE, tr_TR, uk_UA, zh_Hans_CN)
1.2.1
(2026-03-11)
Fixed
- Magento 2.4.9 compatibility
1.2.0
(2025-07-11)
Improvements
- WCAG 2.2 AA compliance
- Migrated mst_indexer_history table to declarative schema
1.1.6
(2024-03-26)
Improvements
- Added cronjob to auto cleanup old records (indexation history)
1.1.5
(2023-04-11)
Improvements
- Added support of Magento 2.4.6
1.1.4
(2022-06-30)
Fixed
- flock(): supplied resource is not a valid stream resource
1.1.3
(2021-11-17)
Fixed
- Indexer lock files issue
1.1.2
(2021-11-12)
Improvements
- Indexation Timeline
1.1.1
(2021-03-17)
Fixed
- Compatibility issue with Magento 2.1.10
1.1.0
(2020-12-10)
Improvements
- Database performance improved
1.0.21
(2020-09-22)
Fixed
- Fixed issue with different time in timeline and indexers table
1.0.20
(2020-07-30)
Improvements
- Support of Magento 2.4
1.0.19
(2020-03-16)
Fixed
- Issue with history for multiple indexers
1.0.17
(2019-09-23)
Fixed
- Issue wiht lock files
1.0.16
(2019-06-25)
Fixed
- Reduce rows size in timeline
1.0.15
(2019-06-13)
Fixed
- Issue with history
1.0.14
(2019-04-30)
Improvements
- New Timeline
- Added MView actions to history
1.0.13
(2019-04-25)
Fixed
- Compatibility issue with Magento 2.1
1.0.12
(2018-11-29)
Fixed
- Compatibility with Magento 2.3
1.0.11
(2017-11-16)
Fixed
- Issue with updating the queue
1.0.10
(2017-11-07)
Fixed
- Possible issues with locks
1.0.9
(2017-10-12)
Fixed
- Issue with schedule reindex
1.0.8
(2017-10-04)
Fixed
- M2.2
1.0.7
(2017-09-12)
Fixed
- Issue with queue size
1.0.6
(2017-06-14)
Improvements
- Added delay between ajax requests
1.0.5
(2017-04-27)
Fixed
- Issue with CLI cron
1.0.4
(2017-04-20)
Improvements
- Reindex process indications
1.0.3
(2017-04-18)
Features
- Added product index validator (based on flat index)
Improvements
- History time indicators
1.0.2
(2017-04-05)
Improvements
- New console commands
1.0.1
(2017-03-21)
Documentation
- User manual
1.0.1-beta3
(2017-03-20)
Fixed
- Fixed an issue with timezezones
1.0.1-beta2
(2017-03-20)
Improvements
- Appearance
1.0.1-beta1
(2017-03-20)
Improvements
- Performance
1.0.0
(2017-03-10)
Improvements
- Initial release