Getting Started
Welcome to the Gift Registry Documentation. Whether you are new to Gift Registry or an advanced user, you can find useful information here.
First of all we recommend to check the following links:
Installation
- Login to Magento backend.
-
Go to System > Tools > Compilations.
If Compiler Status is Enabled, disable the compilation by clicking the button Disable in the upper right corner.
- Backup your store database and web directory.
- Download extension from your Personal Account.
- Unzip the extension locally.
- Copy contents of the folder step1 to the root directory of Magento store.
- Copy contents of the folder step2 to the root directory of Magento store.
-
Completely clear the site cache.
Go to System > Cache Management. Click button Flush Magento Cache. If you want to clear the cache manually, you need to remove a folder
/var/cacheat the server. - Logout from Magento backend and login again.
- Go to System > Configuration > Mirasvit Extensions > System, at form Installed Extensions press the button Run validation tests for all extensions for check extension installation and configuration.
- If compilation was enabled before installation, you need to run recompilation process to enable compilation. Go to System > Tools > Compilation and click on Run Compilation Process.
If you did not disable compilation and store is down after installation, follow the link and make next steps to recover the store.
Gift Registry Configuration
All settings of Gift Registry are located at Gift Registry -> Settings, and break into three subsections.
- General - contains the mostly used options for tune-up your Gift Registry polioy.
- Notifications - contains definition of templates, which are used for email notifications.
- Sharing - contains options for sharing Gift Registries in social networks.
General
| Option | Description |
|---|---|
| Gift Registry Image Placeholder | Defines a title image (icon) for Gift Registry view page. |
| Show Middle Name | Allows to append registrant's Middle Name to emails, registries, etc. |
| Set gift registry item status to 'Invoiced' when order receives status | Defines, when gift item shall receive status Invoiced. |
| Set gift registry item status to 'Received' when order receives status | Defines, when gift item shall receive status Received. |
| Allow customers to add not configured products to Gift Registry | If this option is set to Yes, customers will be able to add configurable products to their Gift Registries without pre-configuring. Otherwise such an products will be required to pre-configure before added to Gift Registry. Note: Not configured products cannot be added to the shopping cart automatically. |
| Display only a Gift Owner's address as the shipping address at checkout | If option set to No, the checkout will show both the Gift Registrant's and customer's shipping addresses. Otherwise only the shipping address defined in a gift registry will be visible. Note: The extension does not allow to add mixed items(from gift registry and catalog) to the shopping cart, except cases when the above mentioned option is set to "Yes" and the multi-shipping feature is enabled at your store. |
| Display 'Add to Gift Registry' at category page | When enabled, allows to add items to the Gift Registry directly from Category Pages. |
| Allow free shipping for gifts only if gift registry owner and gift registry buyer are different users | If enabled, allows free shipping only when Gift is bought by a different person. Prevents possible frauds with buying Gift for yourself, and receiving free shipping. |
| Display public gift registries in the search result by default | When enabled, allows Gift Registries appear at the top of Search Result Pages. |
| Show Layered Navigation if Items Count is Greater Than | If enabled, allows to collapse/expand Gift Registry list and makes Gift Registry more convenient for search, when it is too long for full display. |
Notifications
| Option | Description |
|---|---|
| Email Sender | Email, which will be used as sender in all Gift Registry Notifications. |
| Owner Notification Template | Defines email template for informing Gift Registry owner about new order. |
| Gift Registry Sharing Notification Template | Defines email template for sharing Gift Registry with friends. |
| Out Of Stock Item Notification Template | Defines email template for informing gift registry owner about out of stock item in gift registry. |
Sharing
- Facebook Application ID - this option is needed for allowing sharing via Facebook. For that you will need to create an Facebook Application. Useful Guide about Facebook Apps can be found here.
Form Fields
Form Fields are the most basic component of Gift Registries. Each field defines a parameter, that customer should fill in order to create Gift Registry.
Once fields are defined, they should be combined into larger bricks - sections, and they - in turn - define a Registry creation page.
How to create a Form Field
Go to Gift Registry -> Dictionaries -> Registry Form Fields, and press Add New button. You will be taken to the creation page, which contains the following fields:
- Title - a title of field. It is store-dependent, so you can have different names (for example, translated) for different storeviews. To create such a store field, use store switcher.
- Code - an internal code, which will be used in database. Therefore, it should contain only letters, digits and underscore, and it shall be unique.
- Type - widget type, that will be used for entering and displaying a value of this field. There's five standard types available:
- Text - regular one-line text field
- Multi-line text - a text area for entering large texts
- Date - a date field, with date chooser
- Checkbox - a checkbox
- Drop-down list - a combobox drop-down selection menu.
- Description - a description of this field, which will be shown as hint below the field on creation page
- Active - whether this field is active and should be displayed.
- Sort Order - a priority, that field should have within its section.
value | label, where value is actually stored value of field, and label is how that value should be displayed in drop-down menu.Example: if possible values are Blue, Black, Red, but should be displayed in Deutsch, then options list would be
   red | Rot
   blue | Blau
   black | Schwarz
Form Sections
Form sections are the building block for Registry creation page, and backend Registry edit page.
Each form section consists of one or more Fields, which are defined in separate grid.
There's four standard form sections, that can be combined to a creation/edition form depending on Event Types:
- General Information
- Registrant
- Co-Registrant
- Shipping Address
They all are located at Gift Registry -> Dictionaries -> Registry Form Sections grid. You can also create there your own sections.
How to create a Form Section
Go to Gift Registry -> Dictionaries -> Registry Form Sections. You will be taken to the creation dialog page, which consists of the following fiedls:
- Title - a title of section. It is store-dependent, so you can have different names (for example, translated) for different storeviews. To create such a store field, use store switcher.
- Sort Order - a priority of this section within the registry creation form.
- Section Fields - a list of fields, which should consist this section. These fields should not be assigned to other sections.
If you see this field empty, go to Gift Registry -> Dictionaries -> Registry Form Fields, and either create new, or unassign existing ones.
- Active - whether this section is active and should be displayed at creation and edition forms.
Event Types
Event types are the one of the most basic parts of Gift Registry. They define special events, on which customer can receive a gift from other customers.
By default there's three basic events, which you can find at Gift Registry -> Dictionaries -> Events Types grid:
- Birthday
- Wedding
- Baby Shower
These are the most common events, that every customer can have. But you can also define your own event type from the their grid.
How to create an Event Type
Go to Gift Registry -> Dictionaries -> Events Types, and press Add New. You will ne taken to the creation dialog page, which consists of the following fields:
- Title - a title, which will be shown on event selection drop-down menu at customer's account.
- Sort Order - priority, that this event should have. It affects order, in which drop-down menu items are sorted.
- Form Sections - a list of sections - e. q. separately defined set of fields, that should be shown to customer at Registry creation stage, when this event type is selected.
- Active - defines, whether Event Type is active and available for Registry creation.
Gift Registries
Gift Registry is the only entity in our extension, which can be created only by customer.
Backend provides only means of viewing and editing of already created registries in order to maintain store's policy.
All registries are located at their respective grid at Gift Registry -> Gift Registry.
It provides you with two useful mass actions:
- Change status - allows you to disable registries, that should not be used any longer, or enable them back.
- Delete - allows you to remove unnecessary registries.
Also, using Guest View link you can preview customer's Gift Registry in frontend.
How to edit and manage Gift Registry
Pick up a registry and enter its edition page. It divided to three separate tabs: General, Products and Orders - each contains respective information.
General tab is totally built from sections, defined for given type of Event.
For reference on fields, displayed here, check respective record of Event Type at Gift Registry -> Dictionaries -> Events Types. Then pick up sections, defined there, and proceed to Form Registry Sections grid - where you can see fields, assigned to that sections.
Products tab contains product list, that customer had added to his registry. You can forcibly add there additional products, using Add Product button above products grid. There's also a mass Delete actions, that allows you to remove unnecessary products from Gift Registry.
Product records here also are editable - you need just to click on respective product. It will bring you to the Item editing dialog, which consists of following fields:
- Qty - is the quantity of this product, that customer wishes to have.
- Ordered Qty - is the quantity of actually ordered products from this Gift Registry.
- Received Qty - is the actually received products by customer.
- Priority - defines importance of this product for a customer.
- Note - additional note on this product.
Orders contains just a list of Orders, made from current Gift Registry, with a filter for quick searching.
Item Priorities
Each item, that customer has put to his Gift Registry, can have priority, which defines its importance for a customer and its place in Gift Registry. It can be also set from backend.
There's three basic priorities, which our extension provide: High, Medium and Low.
They are located at Gift Registry -> Dictionaries -> Item Priorities grid. There you can also create your priority.
How to create an Item Priority
Go to Gift Registry -> Dictionaries -> Item Priorities, and press Add New button. You will be taken to the simple creation page with only two fields:
- Title - a title of priority. It is store-dependent, so you can have different names (for example, translated) for different storeviews. To create such a store field, use store switcher.
- Sort Order - a constant, which defines place of this priority in drop-down menu, and respective Items in Gift Registry.
Integration with Cart Price Rules
Integration with Cart Price Rules comes out-of-box, and does not require installation of any other Mirasvit products.
Shopping Cart Price Rules are default Magento feature, which allows providing customers with discounts, when their cart contents meets certain conditions. These rules can be created at Promotions -> Shopping Cart Price Rules.
Each rule has Condition section, which define conditions, on which discount should be provided. Gift Registry adds to default conditions a set of new conditionals, which allows to analyze customers Gift Registries during checkout:
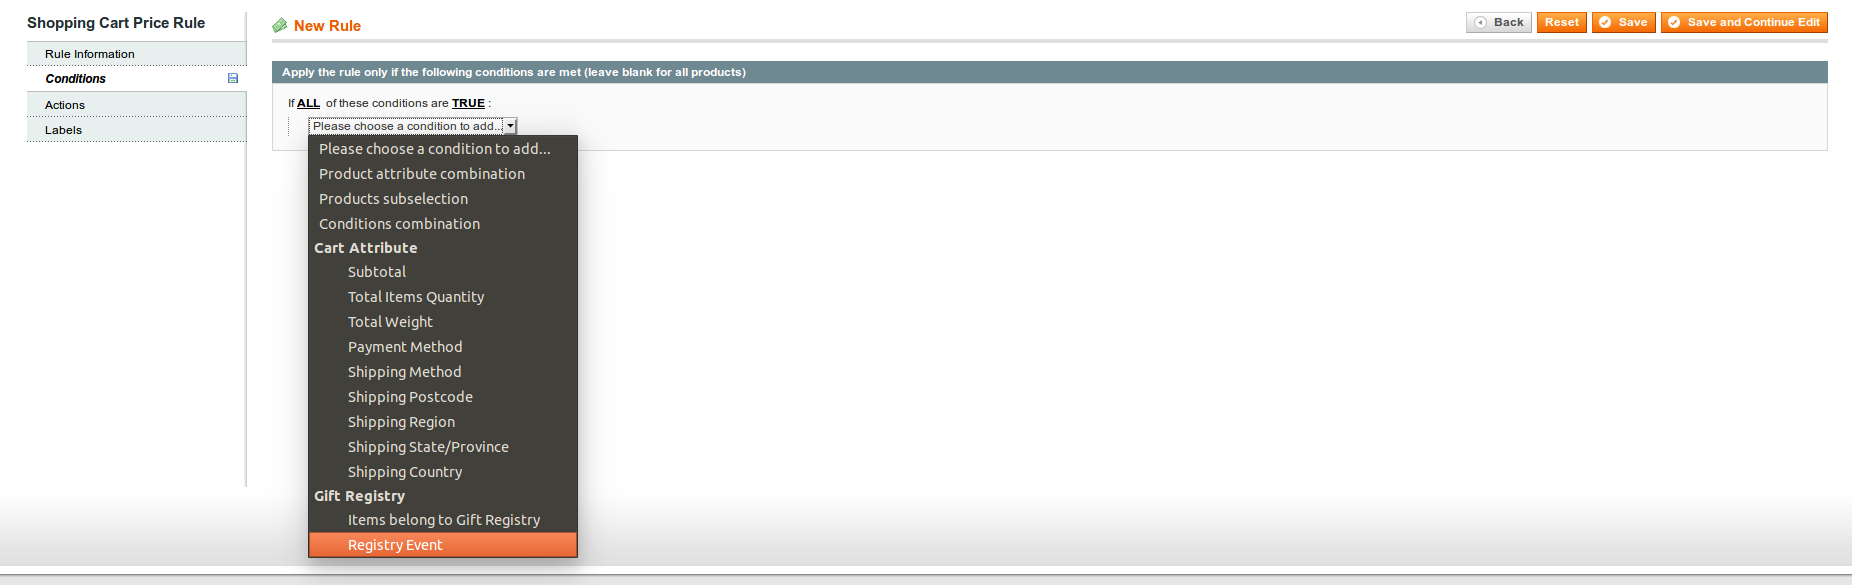
As you see on screenshot above, Gift Registry adds two conditionals:
- Items belong to Gift Registry - checks, whether one is products in the Cart belongs to someone's Gift Registry
- Registry Event is ... - allows to check, whether one of Events, defined at Gift Registry -> Dictionaries -> Event Types, has come.
Take a look to the examples of their use:
-
Provide customer with a special 20% discount on their Wedding date
- Conditions
Registry Event is Wedding
- Actions
- Apply:
Percent of Product Price Discount - Discount Amount:
20
- Apply:
- Conditions
-
If customer buys for a $100 or more, and in his order there's items from Gift Registry, provide him with $50 of discount and free shipping for Gifts
- Conditions
Items belong to Gift Registry is YesSubtotal greater than 100
- Actions
- Apply:
Fixed discount amount for a whole cart - Discount Amount:
50 - Free Shipping:
For matching items only
- Apply:
- Conditions
Upgrading
To upgrade extension follow next steps:
- Login to Magento backend.
-
Go to System > Tools > Compilations.
If Compiler Status is Enabled, disable the compilation by clicking the button Disable in the upper right corner.
-
Backup your store database and web directory.
If you have customizations, please, create a separate backup of app/code/local/Mirasvit before upgrading to the new version. - Download new extension package from your Personal Account.
- Unzip the extension locally.
- Temporary disable extension. Check Temporary Disabling section.
- Copy contents of the folder step1 to the root directory of Magento store.
- Copy contents of the folder step2 to the root directory of Magento store.
- Completely clear the site cache. Go to System > Cache Management. Click button Flush Magento Cache. If you want to clear the cache manually, you need to remove a folder /var/cache at the server.
- Logout from Magento backend and login again.
- If compilation was enabled before upgrade, you need to run recompilation process to enable compilation. Go to System > Tools > Compilation and click on Run Compilation Process.
If you did not disable compilation and store is down after upgrade, follow the link and make next steps to recover the store.
Disabling and Removing
Temporary Disabling
To temporary disable extension please follow the next steps:
- Disable Compilation Mode (if enabled).
-
Remove following files:
app/etc/modules/Mirasvit_Giftr.xml
-
If you have only one extension from Mirasvit installed, remove following file:
app/etc/modules/Mirasvit_MstCore.xml
- Login in to Magento back-end and refresh site cache (if enabled).
Uninstalling
To uninstall extension please follow the next steps:
- Disable Compilation Mode (if enabled).
-
Remove following files:
app/etc/modules/Mirasvit_Giftr.xml
-
If you have only one extension from Mirasvit installed, remove following file:
app/etc/modules/Mirasvit_MstCore.xml
- Login in to Magento back-end and refresh site cache (if enabled).
-
Remove following folders:
app/code/local/Mirasvit/Giftr
-
Remove templates and layouts files of extension from your theme folder. List of such files can be collected from files in the extension package.
- Run the following SQL Query (before running it, replace [db_table_prefix] to your database table prefix. It can be found in the file /app/etc/local.xml).
DROP TABLE [db_table_prefix]m_giftr_field;
DROP TABLE [db_table_prefix]m_giftr_item;
DROP TABLE [db_table_prefix]m_giftr_priority;
DROP TABLE [db_table_prefix]m_giftr_purchase;
DROP TABLE [db_table_prefix]m_giftr_registry;
DROP TABLE [db_table_prefix]m_giftr_section;
DROP TABLE [db_table_prefix]m_giftr_section_field;
DROP TABLE [db_table_prefix]m_giftr_type;
DROP TABLE [db_table_prefix]m_giftr_type_section;

DELETE FROM [db_table_prefix]core_resource WHERE code='mst_giftr_setup';- If you have only one extension from Mirasvit installed, run:
DROP TABLE [db_table_prefix]m_mstcore_attachment;
DROP TABLE [db_table_prefix]m_mstcore_logger;
DROP TABLE [db_table_prefix]m_mstcore_urlrewrite;

DELETE FROM [db_table_prefix]core_resource WHERE code='mstcore_setup';
Change Log
1.1.33
(2018-12-21)
Fixed
- Gift registry items are not shown on the item edit page (affects since 1.1.32)
1.1.32
(2018-12-19)
Improvements
- Note on adding products from admin panel
1.1.31
(2018-12-14)
Fixed
- Error displaying Gift Registry guest page when configurable swatches enabled
- Add to gift registry on multiple registries with Grouped Options ([#38]())
1.1.30
(2018-08-27)
Improvements
- Compatibility with Ide_OneStepCheckout module
Fixed
- Add grouped configurable products
- Products not visible in Registry list
- Issue with Idev_OneStepCheckout module
1.1.29
(2018-05-15)
Fixed
- Wrong sort order by price
- fixed issue with event date change from backend
- Error displaying guest view page for gift registry after creating new registry
Documentation
- update info for new options
1.1.28
(2018-03-13)
Features
- Layered navigation and toolbar for Gift Registry items
- Added support of Inovarti Onestepcheckout
Fixed
- Issue with Checkout Ideasa_IdeCheckoutvm
- Merge guest and customer cart
1.1.27
(2017-12-05)
Improvements
- Improved sharing to Facebook
1.1.26
(2017-10-27)
Improvements
- Free shipping for concrete events
1.1.25
(2017-05-08)
Improvements
- Display qty of a product as desired qty minus ordered qty
1.1.24
(2017-02-21)
Improvements
- Display Gift Registry products details in the grid of products at the admin panel
1.1.23
(2017-02-15)
Fixed
- Fix problem with adding product to registry if 'addto' block placed outside of product form
1.1.22
(2017-02-08)
Fixed
- Fixed the error which occurred while creating a Gift Registry from the admin panel
1.1.21
(2017-02-01)
Fixed
- Correctly save registry image name
1.1.20
(2017-01-27)
Improvements
- Compatibility with AheadWorks extension 'Afptc'
1.1.19
(2017-01-17)
Features
- Ability to add products to Gift Registry from admin panel
Fixed
- Set registry website id to current store, instead of customer's store
Improvements
- Redirect to the last active tab after saving registry in admin panel
1.1.18
(2016-11-29)
Improvements
- Display child product image for configured products
1.1.17
(2016-11-03)
Fixed
- Adjust z-index for the dialog window at product page
Improvements
- Sort gift registries by created at field in descending order within admin panel by default
1.1.16
(2016-10-13)
Improvements
- Hide not configured gift registry items from guest view
1.1.15
(2016-10-07)
Fixed
- Process registries without address as simple orders
- Remove required field for massaction
Improvements
- Hide empty registry fields
1.1.14
(2016-08-08)
Improvements
- Associate the purchased product shared via email with the Gift Registry
1.1.13
(2016-08-03)
Fixed
- Fixed an error which appears in different php versions
1.1.12
(2016-08-03)
Improvements
- Ability to use free shipping for orders placed for Gift Registries
1.1.11
(2016-08-01)
Fixed
- Avoid new array syntax
Improvements
- Ignore cases when 'order_save_after' event is repeated few times
- Retrieve store specific url for registry guest view
Tests
- Validate extension's CRC values
1.1.10
(2016-07-07)
Improvements
- Ability to purchase items in mass action
1.1.9
(2016-06-24)
Improvements
- Refactoring, added search service
1.1.8
(2016-06-24)
Fixed
- Correctly count number of Gift Registry orders
- Display all registries in grid
Improvements
- Integration with AW Onestepcheckout
- Display default gift registry title, if its title is not specified
1.1.7
(2016-06-15)
Fixed
- Improved process of handling grouped products
Improvements
- Improve workflow of adding registry item to the shopping cart
1.1.6
(2016-06-10)
Improvements
- Integration with Magecheckout SecuredCheckout
1.1.5
(2016-06-08)
Fixed
- Fix typo in the method name dispatched when emptying cart
1.1.4
(2016-06-07)
Improvements
- Small style improvements
1.1.3
(2016-06-01)
Features
- Ability to show/hide public registries from search results by default
Fixed
- Process gift registries per website
1.1.2
(2016-04-26)
Features
- Ability to set placeholder for new gift registries
Improvements
- Ability to translate options for field of type 'select'
1.1.1
(2016-04-12)
Improvements
- Add order to gift registry purchase
- Compatibility with the checkout "Ideasa_IdeCheckoutvm"
- Checkout validation
1.1.0
(2016-04-08)
Features
- Update minicart using AJAX
Fixed
- Fix issue with searching registries by registrant name in admin panel
Documentation
- Description of general settings
Improvements
- Improved workflow with registry types, sections and fields
- Change template for creating/editing registry
- Change AJAX loader
- Add button 'Add to Gift Registry' using layout
- Data script for installation fields/sections
- Change schema for table related with registry's sections
- Small adjustments for templates
- UI improvements
1.0.5
(2016-03-04)
Features
- Initial stable release