Getting Started
Welcome to the Follow-Up Email documentation.
Here, you can find everything you need to set up your Follow-Up fully-featured campaigns and create a vast promotional network, motivating your customers with a rich income.
Go ahead, dive in!
Firstly, please visit our extension in the My Downloadable Products section of our store. Learn how to install extension, and proceed with Quick Start, which will guide you through setting up your Follow-Up service.
How to install the extension
- Back up your store database and web directory.
- Log in to the SSH console on your server and navigate to the root directory of the Magento 2 store.
-
Copy installation instructions from the page My Downloadable Products to the SSH console and press ENTER.
- Run the command
php -f bin/magento module:enable Mirasvit_Core Mirasvit_EmailDesigner Mirasvit_Email Mirasvit_EmailReport Mirasvit_Eventto enable the extension. - Run the command
php -f bin/magento setup:upgradeto install the extension. - Run the command
php -f bin/magento cache:cleanfor clean cache. -
Deploy static view files
rm -rf pub/static/*; rm -rf var/view_preprocessed/*; php -f bin/magento setup:static-content:deploy
Note
If you install the module manually to the"app/code/" directory, you additionally need to install the required libraries through the composer:composer require "liquid/liquid":"~1.4"
composer require "geoip2/geoip2":"^2.9"
Quick Start
Our extension is simple yet powerful. Once you install it, you can proceed with the creation of your promotional campaigns.
Here are some tips to quickly tackle our key features:
-
Basic building blocks are Templates, which contain actual messages, sent in emails. Enrich them with Liquid Variables and give them a consistent look & feel with Themes.
-
Create Campaigns to start your promotional service. Each campaign will require at least one Trigger - an action that starts sending emails chain.
We have a nice set of examples of campaigns and triggers, which will help you master them.
-
Test your campaign with our built-in simple testing framework.
-
Analyze Mail Logs and Event Logs and adjust your promotional campaigns for maximum efficiency.
- If you need to adjust your service to GDPR, consult our GDPR Tips section.
This should be a good start. Refer to the respective sections of this manual to learn more.
General Settings
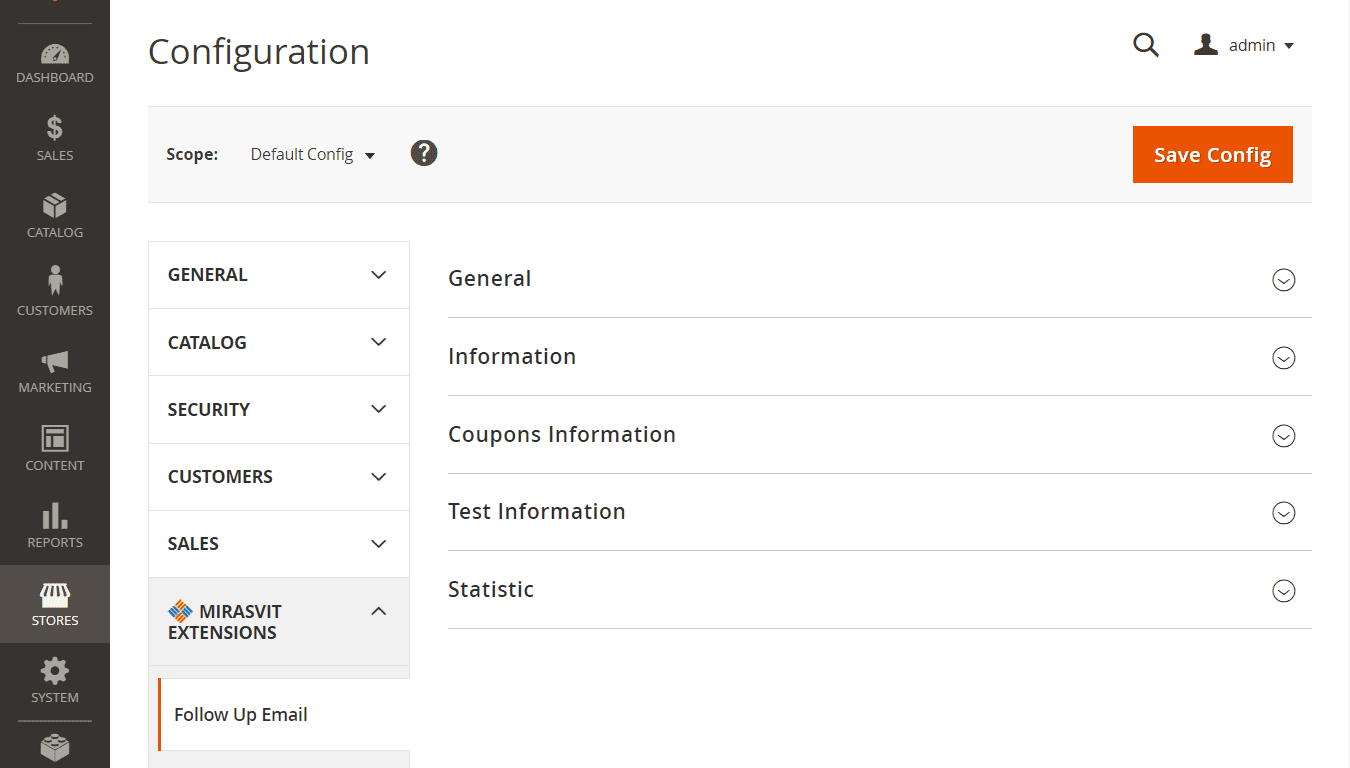
General Follow Up Email settings are located at Marketing -> Follow Up Email -> Settings, and consist of the following sections:
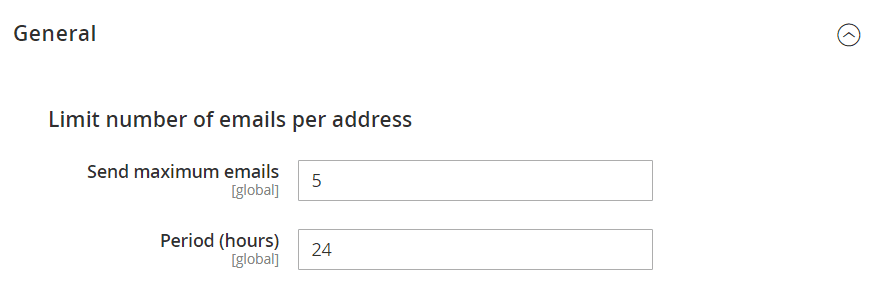
General
| Option | Description |
|---|---|
| Limits the number of emails per address | Allows you to limit the maximum number of emails sent per address within the specified period. |
| Send maximum emails | Sets a maximum number of emails allowed for a specified Period. |
| Period (hours) | Sets the period for the maximum amount of emails which can be set at Send maximum emails. |
Example
Limit the number of emails:Send maximum emails 3
Period (hours) 24If a customer has already received 3 emails from you within 24 hours, all other emails during the same 24 hours will be canceled
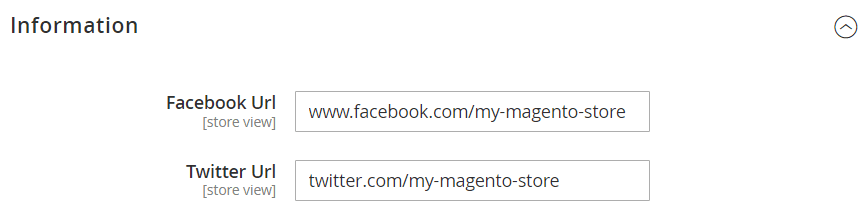
Information
| Option | Description |
|---|---|
| Twitter Url | Allows you to add a Twitter URL to the trigger emails. |
| Facebook Url | Allows you to add a Facebook URL to the trigger emails. |
Coupons Information
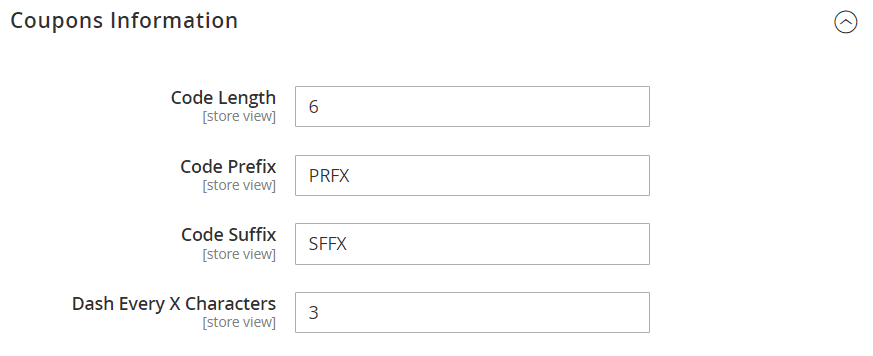
The Follow Up Email extension generates the coupon codes based on the selected shopping cart price rule. Using the settings below, you can configure an appearance of the generated coupon code.
| Option | Description |
|---|---|
| Code Length | Length of the coupon code, excluding prefix, suffix, and separators. |
| Code Prefix | Specifies common prefix used for coupon codes generated by Follow Up Email extension. |
| Code Suffix | Specifies common suffix used for coupon codes generated by Follow Up Email extension. |
| Dash Every X Characters | Adds dash character every X symbol to the coupon code. |
Test Information
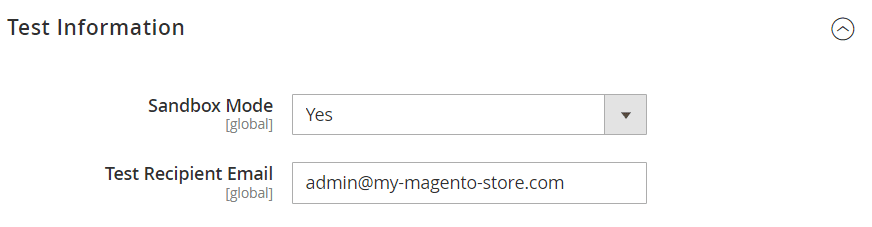
This section governs Sandbox Mode, which can be used for Campaign Testing.
| Option | Description |
|---|---|
| Sandbox Mode | if this option is enabled, all emails will be sent only to the Test Recipient Email. |
| Test Recipient Email | Sets receiving email for trigger emails if Sandbox Mode is enabled. |
Statistic
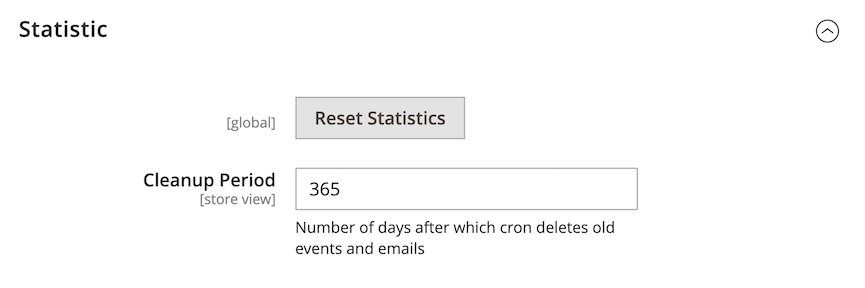
| Option | Description |
|---|---|
| Reset statistic | Clears your campaigns' data. |
| Cleanup Period | Sets a number of days after which cron deletes old events and emails. The default is 365. Skips cleanup if set to 0. |
Event Settings
Go to Stores -> Settings -> Configuration. In the panel on the left under Mirasvit Extensions, choose Event. You will see the following settings:
General
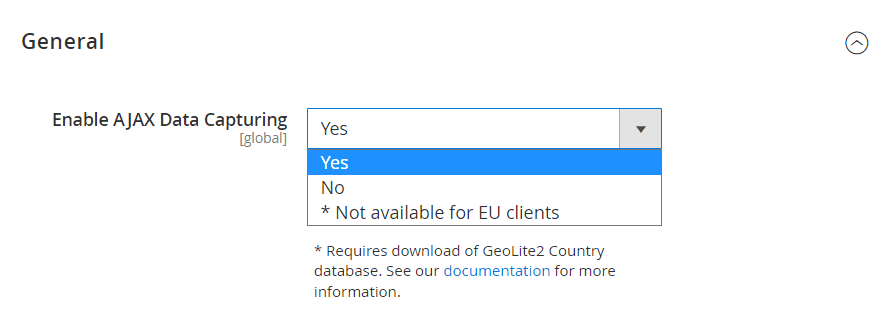
-
Enable AJAX Data Capturing - allows you to control guest users' data capturing.
Useful Info
When enabled, our module automatically captures the guest customer's (not logged in) first name, last name, and email when a client enters this information in your store's fields for later use while sending emails.Available options:
- Yes - data capturing enabled for all users
- No - data capturing disabled for all users
- No for EU clients only - data capturing disabled for EU users only
Note
To use this option, make sure that you download the GeoLite2 Country database, otherwise the data capturing is disabled for all users.
-
GeoLite2 Country database path - the absolute path to the GeoLite2 Country database on your server.
Make sure to copy the database file GeoLite2-Country.mmdb to the folder available for the web-server user, e.g./magento_root_folder/var/GeoLite2-Country.mmdbUseful Info
If the email extension was installed manually, GeoLite2 package should be installed on the server via composer command: composer require geoip2/geoip2:~2.0
Unsubscription List
The extension allows you to manage customer emails' subscription/unsubscription.
Go to Marketing -> Follow Up Email -> Unsubscription List.
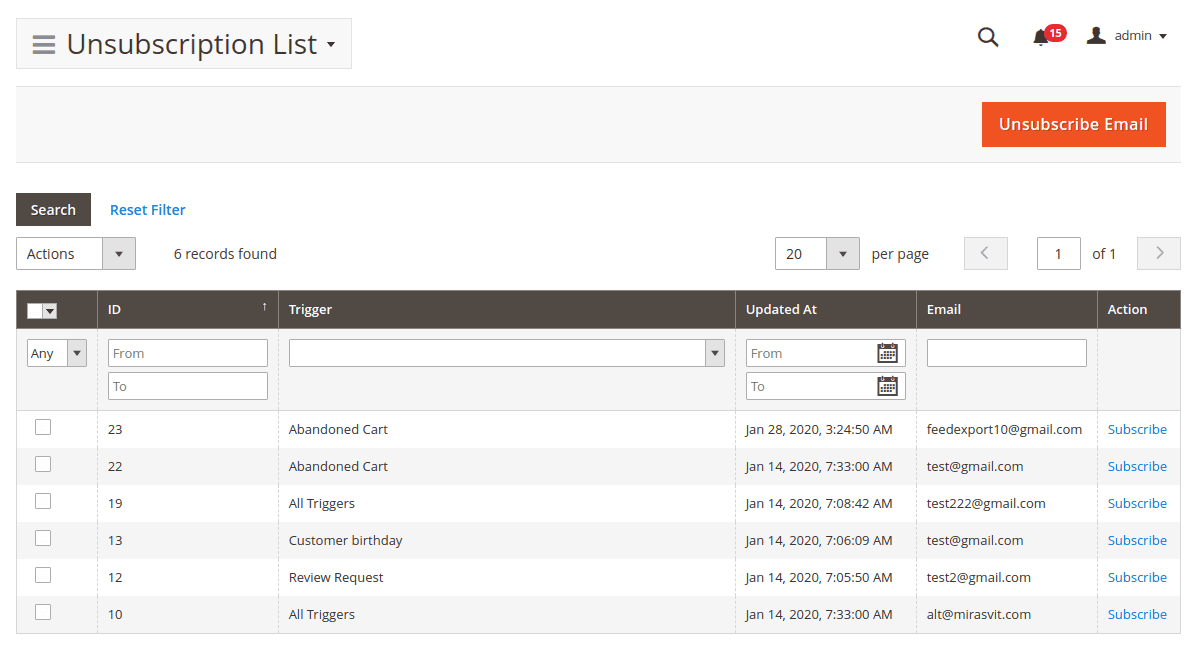
At the main grid, you can see a list of all customers who have unsubscribed from the trigger emails, where:
- ID - internal unsubscription id number
- Trigger - trigger the customer unsubscribed from.
If the customer unsubscribed from all triggers emails, the value will be "All Triggers" - Updated at - last unsubscription status update
- Email - customer email
Note
Click the button Subscribe to remove customer unsubscription.
It is possible to make emails mass subscription by clicking the button Subscribe at tab menu Actions
Unsubscribe Emails Manually
At the main grid, click the button Unsubscribe Email.
On the new page will be the following fields:
- Set emails via comma to unsubscribe - set customer email addresses
- Triggers - select customer triggers for unsubscription. To unsubscribe a customer from all trigger emails, select the option "All Triggers".
Campaigns Dashboard
A campaign is a central point in our Follow-Up Emails extension. Each campaign is a project which consists of one or more Triggers, each with its own Audience, triggering Event and Emails Chain.
All campaigns are located at Marketing -> Follow-Up Email -> Manage Campaigns and organized in the Dashboard with statistics, quick info, and basic actions. It is shown on the screenshot below:
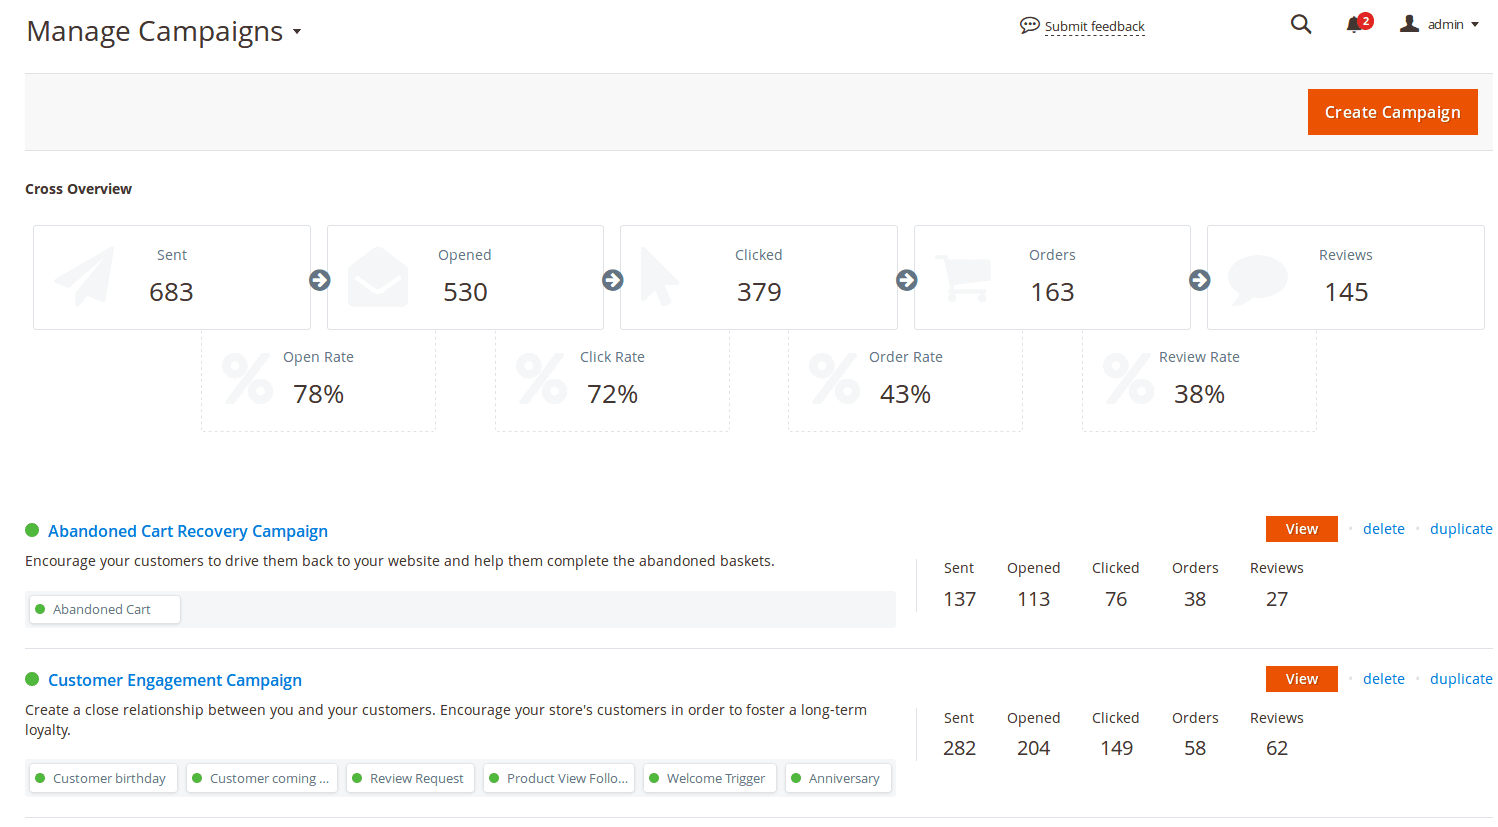
As you can see, the Dashboard consists of two subpanels - top and bottom.
The top is a Cross Overview - an overall statistics hub, where displayed, how all of your campaigns succeeded in general. It breaks into two rows:
- Campaigns Metrics - is the first row, which displays raw metrics, such as the quantity of Sent emails, Opened messages, Clicked links, created Orders and Review written and approved.
- Rate Metrics - is the second row, where displayed metrics relative to overall success, such as:
- Open Rate - is calculated from Sent emails;
- Click Rate - is calculated from Open Rate;
- Order Rate - is the rate of placed Orders from Click Rate.
- Review Rate - is the rate of approved Reviews from Click Rate.
The bottom contains the list of all Campaigns that are defined in your store(s). Each row on this list contains the following information:

- Title - name of the Campaign. The green point shows whether current campaigns are active;
- Short Description - a few words about the current campaign;
- Assigned Triggers Pane - a list of triggers assigned to this campaign. Each element is a button, which instantly brings you to Trigger edit pane. The green point shows whether it is active;
- Actions Pane - which contains basic actions:
- View - allows you to edit a campaign, or view it;
- Delete - allows you to remove a campaign instantly;
- Duplicate - creates a precise copy of the current campaign, saving time for creating similar campaigns;
- Raw Metrics Pane contains all raw performance metrics of the current campaign (see above).
Note
There is a cron job mst_email_clean_history that removes old emails and events. Therefore, campaign statistics are displayed only for a certain period specified in the Stores -> Settings -> Configuration -> MIRASVIT EXTENSIONS -> Follow Up Email -> Statistic -> Cleanup Period field.Creating a Campaign
The simplest way to create a Campaign is to use the Duplicate action, and then adjust it to your needs.
Still, in most cases, you will need a custom campaign. You can create one by pressing Create Campaign button at Marketing -> Follow-Up Email -> Manage Campaigns. It will bring you to the first stage of Campaign creation:
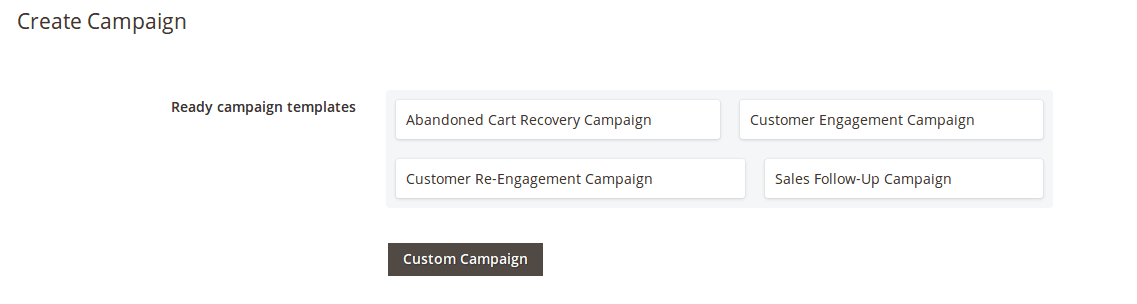
At this stage, you can select one of the suggested (and defined before) campaigns as a template. Pressing on one of them is identical to employing the Duplicate function - our extension will create a campaign using one of the pre-defined templates, automatically creating all necessary events and triggers.
There is also a Custom Campaign button. It starts creating a Campaign from scratch, and brings you to the empty Campaign workspace.
To operate successfully, a Campaign needs to have one or more Triggers assigned to it. You can add a Trigger by pressing the Add Trigger button. You will then see a Trigger definition dialog which contains the basic data, broken into three categories:
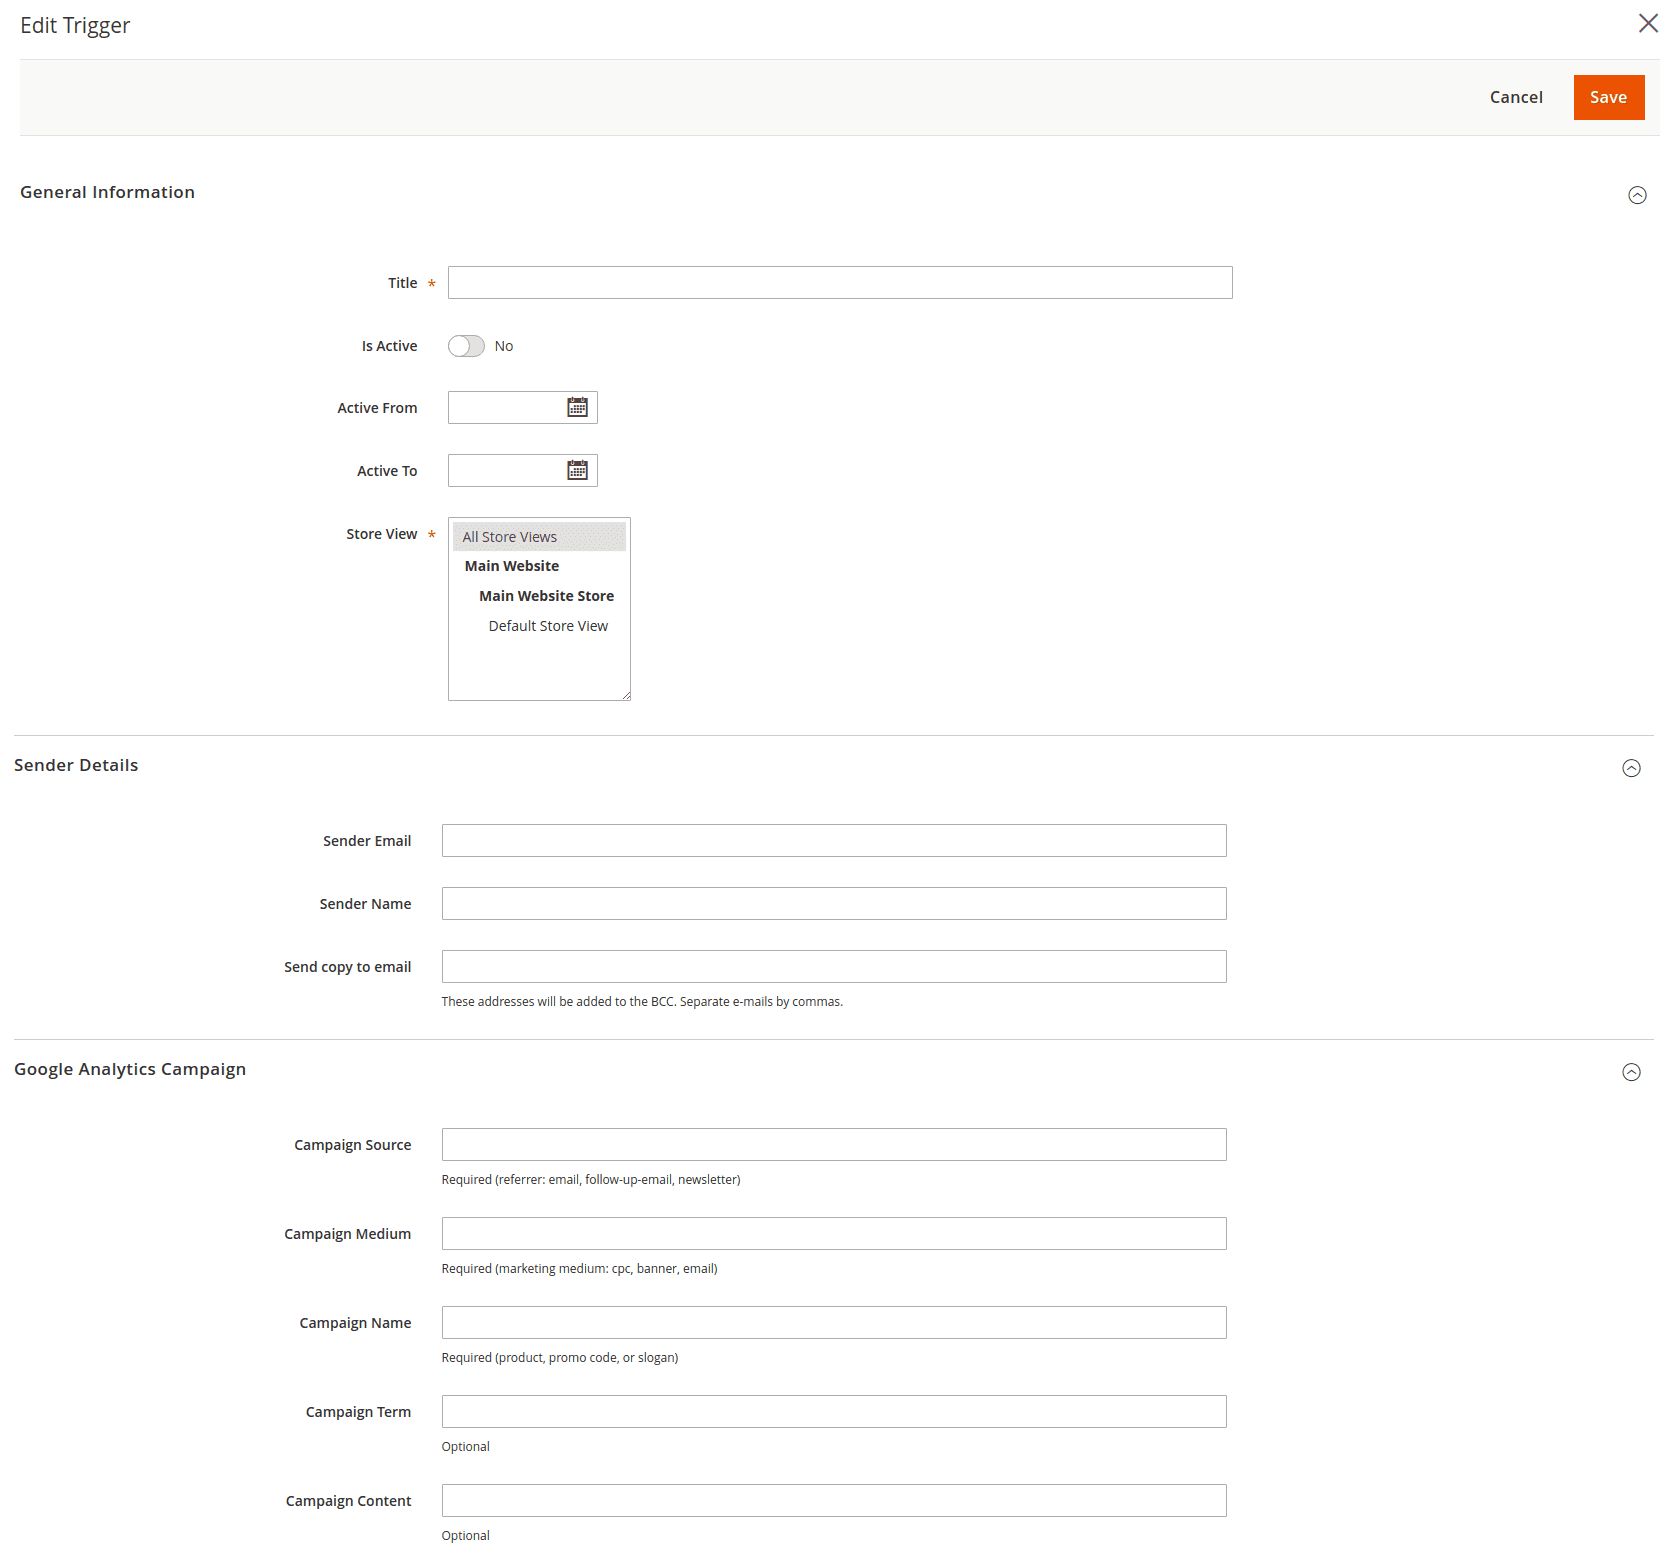
- General Information
- Title - a sensible name for a Trigger
- Is Active - defines whether a Trigger is active, and emails should flow
- Active From, Active To - defines the date period during which a Trigger should be active
- Store View - defines which store Trigger should work on.
- Sender Details
- Sender Email - email address which will be used for sending emails
- Sender Name - name (or title), which will be used for sending emails
- Send a copy to email - here you can add one or more emails, where blind copies of all emails within this Trigger will be sent. It is used for email flow analysis.
- Google Analytics Campaign - a unique feature that allows you to analyze the number of visits, conversion rate, time of visits, etc. for those who arrive after reading a specific email. Read more about this service.
- Campaign Source - defines the search engine, newsletter name, or other data sources. (available:
email,follow-up-email,newsletter) - Campaign Medium - defines which medium analytics shall be used, e.g.
cpc,banner,email. - Campaign Name - the name of your Google Analytics service.
- Campaign Term - paid keywords for your campaign.
- Campaign Source - defines the search engine, newsletter name, or other data sources. (available:
Note
After configuring the Google Analytics section, the extension will automatically add specialGET params to all links in the emails. This way, following them will be recorded by Google automatically without any additional adjustments.
Example: http://example.com/about-us/ will be converted to http://example.com/about-us/?utm-source=email&utm-medium=trigger-email&utm-name=review-request.
To track the campaign performance at Google Analytics, log in to your Google account and go to Traffic Sources -> Campaigns. Select the campaign source from the list, and you will receive a report.
After the Trigger is attached to the Campaign, you need to set it up and assign audience.
Setting Up an Email Trigger
A Trigger is an event or sequence of events that, as a result, generates a chain of emails.
Each campaign has at least one trigger attached to it. To edit the trigger, you need to proceed to Marketing -> Follow-Up Email -> Manage Campaigns and select a Campaign, or directly click on the corresponding button on the Trigger Pane.

Each trigger has its own sub pane on the Campaign edit page.
It has two basic parameters that are required for proper work:
- Event - the action that will trigger email sending;
- Audience - the customers' group who are eligible to receive emails.
Assigning an Event
Event - a certain action of a visitor (e.g., login, registration, placing an order) or action of a system (e.g., change order status, change of price).
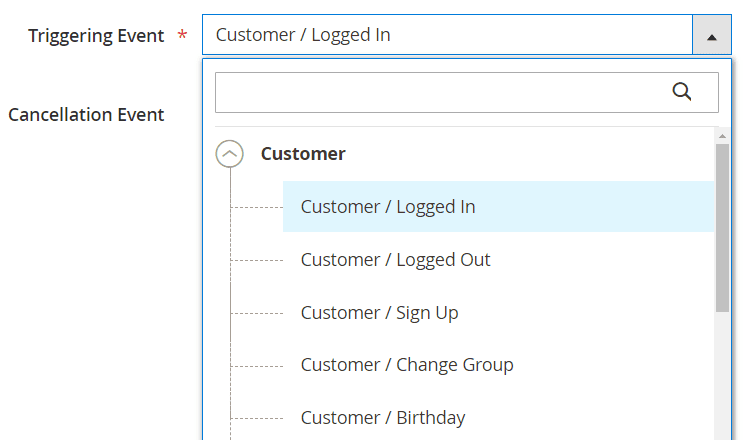
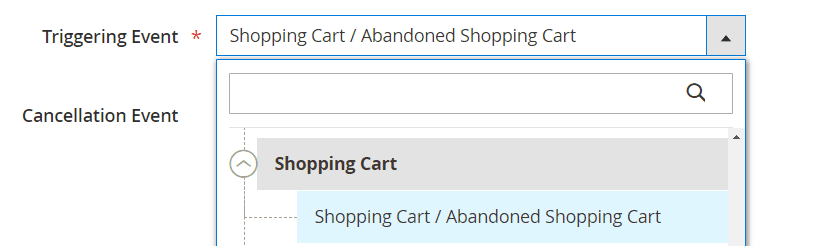
To assign an event to Trigger, press the edit link on the Event block. You will be asked for two parameters:
- Triggering Event - the event that launches a campaign;
- Cancellation Event - the event that will stop sending emails.
Both parameters use the same Event List which can be seen here.
Example
If you need to send follow-ups for tracking order status, then:- Triggering Event:
Sales / Order obtained Pending status - Cancellation Event:
Sales / Order obtained Completed status
Marking an Audience
The audience is defined as the group of customers who are eligible to receive emails during the current campaign.
This block can be empty: in this case, all of your customers will be eligible for the campaign and email sending. However, if you wish to have different email flows for different groups of customers, you need to mark Audience.
You need to press the edit link on the Audience block to view the audience's conditions.
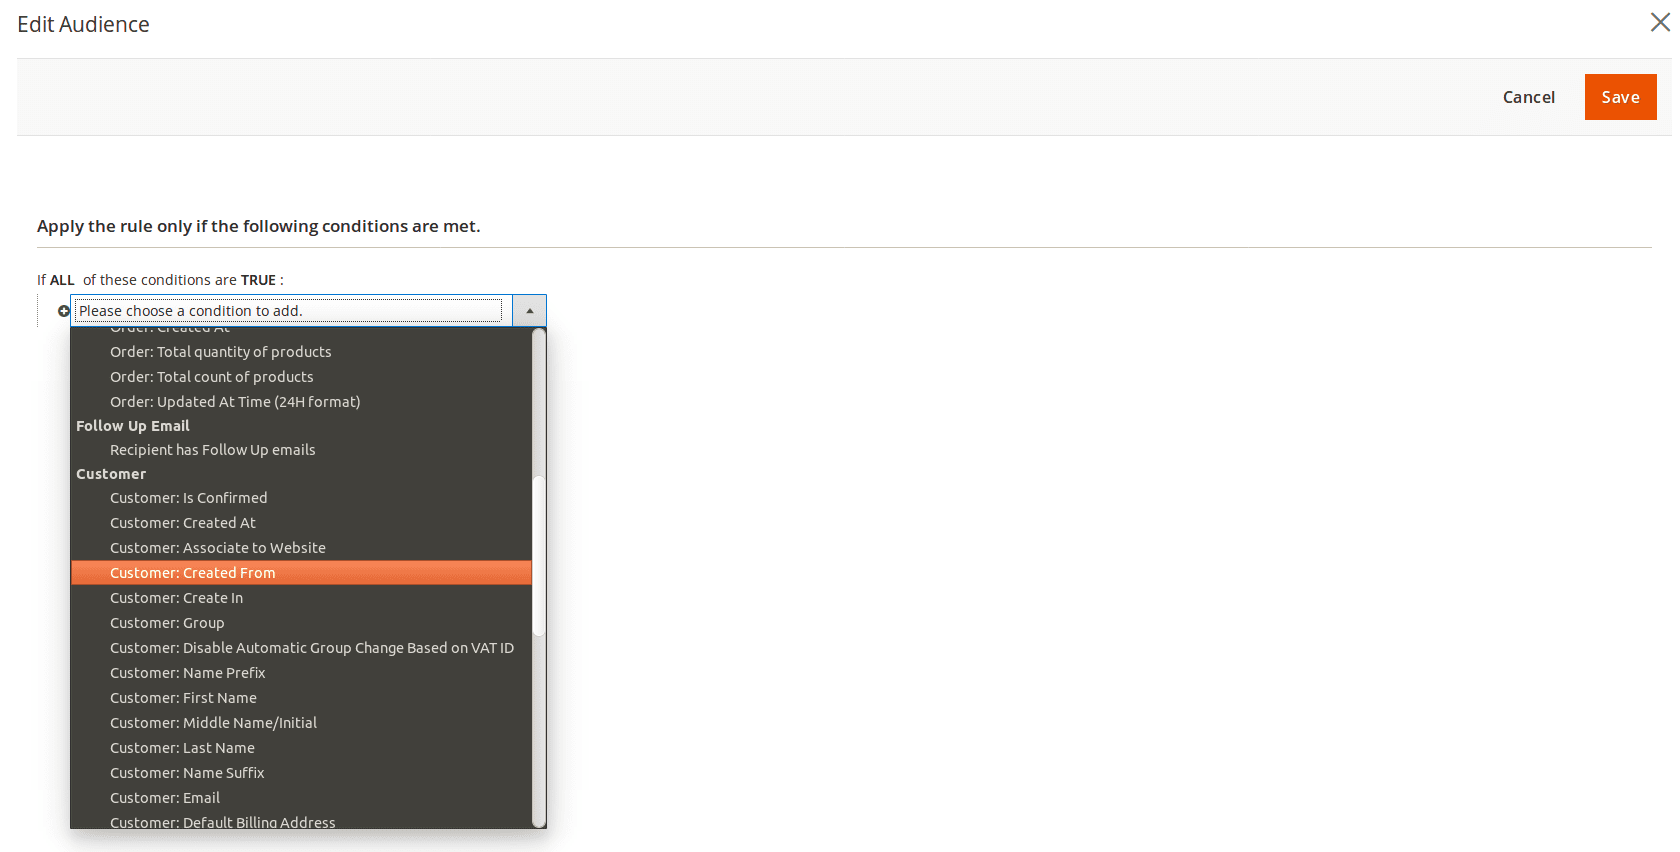
This rule allows you to use the following conditions to limit the campaign audience, which are grouped to categories:
- Store
- Lifetime Sales
- Number of Orders
- Products
- Products Subselection - allows you to analyze the current cart or order (this condition is used on Order-connected events). It spawns condition sub-block
If ALL/ANY products in cart/order matching these conditions, which can contain one or more product's properties, which should trigger an email. - Products Attribute Value Comparison - allows for comparing elements of a cart or order, also spawning a sub-block with one or more conditions.
- Products Subselection - allows you to analyze the current cart or order (this condition is used on Order-connected events). It spawns condition sub-block
- Order
- Grand Total
- Shipping Method
- Shipping Created
- Payment Method
- Invoice Created
- Status
- Created At - should use the format YYYY-MM-DD
- Updated At - should use the format YYYY-MM-DD
- Total Quantity of Products - the total quantity of ordered products.
- Total Count of Products - a count of unique product titles in the ordered quote.
- Updated At Time
- Follow-Up Email
- **Recipiend has Follow-Up Emails
- Customer contains the customer's properties, such as Name, Email, Gender and so on.
- Shipping Address contains the address properties, such as Country, City, Street, and so on.
After configuring the Event and Audience, you can add email to the chain and test the new trigger.
-
(DEPRECATED) Administrator Trigger
In older versions in addition to simple triggers, there were also Administrator Triggers.
The benefit of the Administrator Trigger is that you can use it to send an email to yourself when a particular event is triggered in your store, meaning that it serves just like a notifier or reminder about certain events which occurred in your store.
Here are some examples of situations when you may want to send a message to yourself:
- someone places an order for a large quantity
- a customer leaves a review for your products
- a new customer from a specific country is registered
- a customer adds some specific product to the wishlist
- customer's lifetime sales exceed some designated level, ensuring that you remind yourself to contact them individually
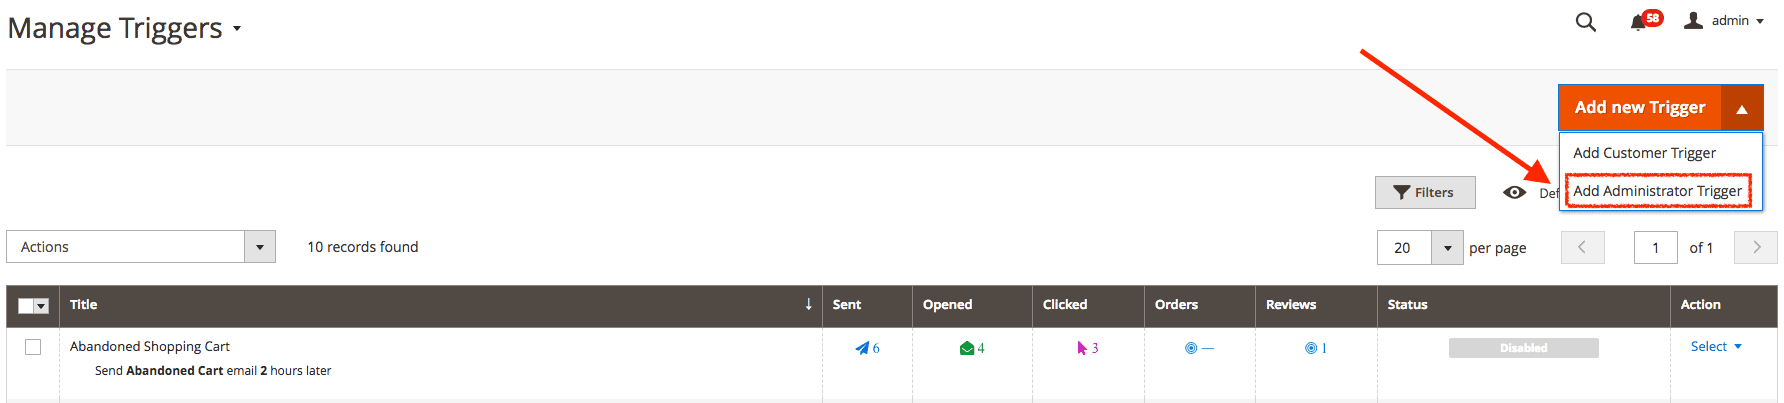
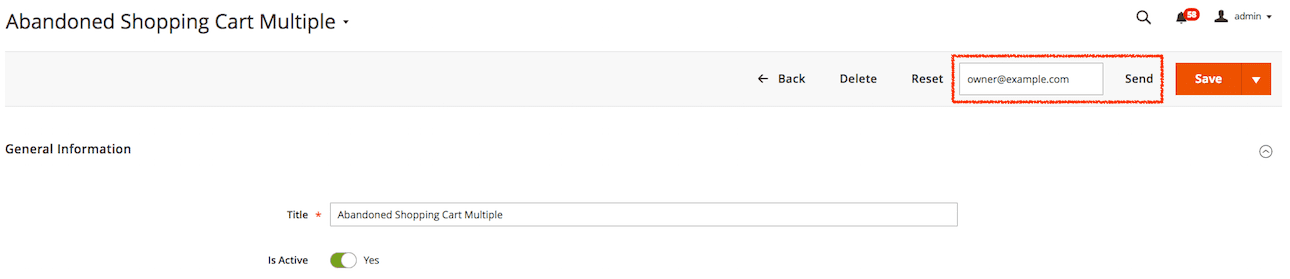
If you still use the old version, you can create an Administrator Trigger with Add New Administrator Trigger at the Trigger edit page.
After that, you should complete one additional field in the trigger's settings:
- Recipient Email - specify target email addresses, separate e-mails by commas.
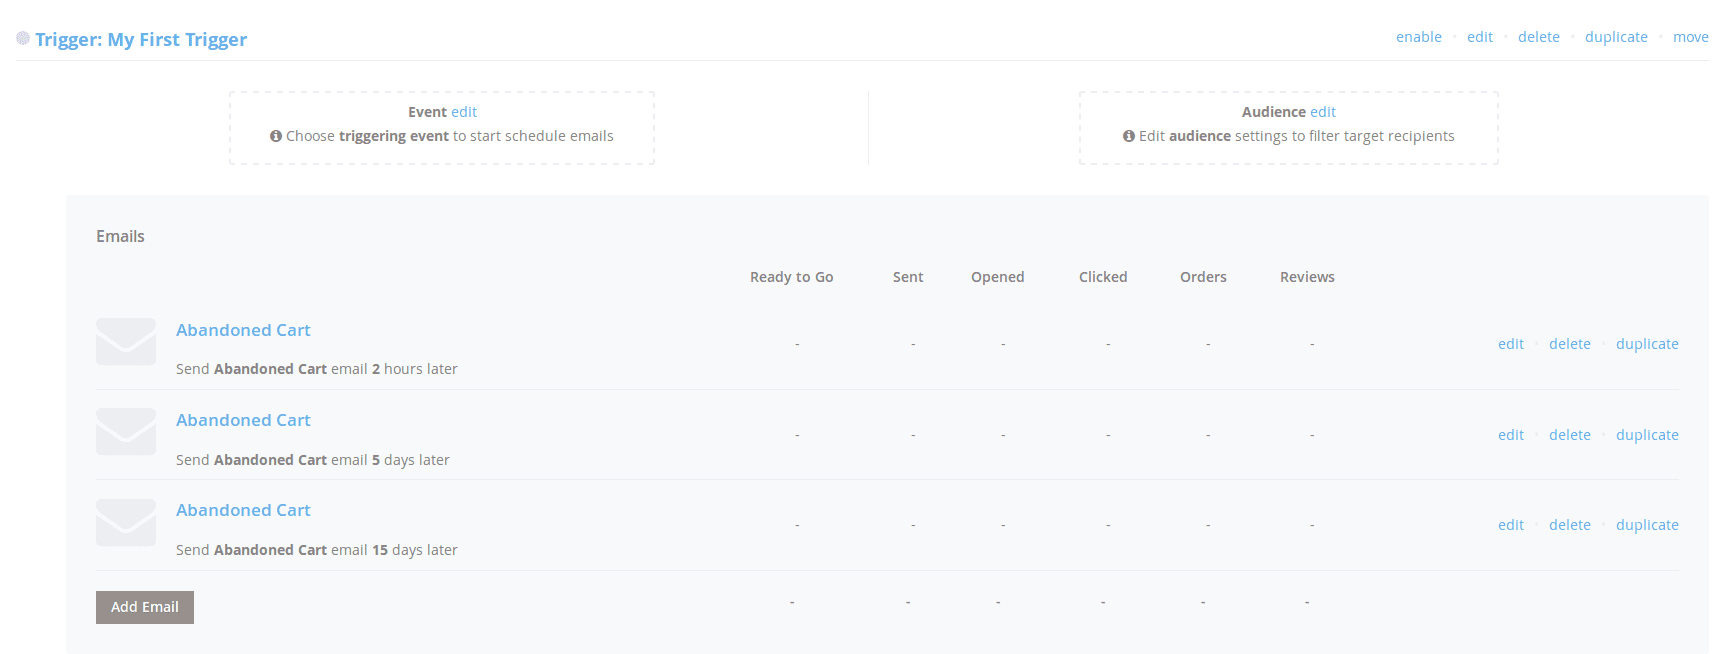
Manage Email Chain
You can create an unlimited number of emails that will be sent after event triggering.
All of them will be displayed on the Emails sub pane at the Trigger pane of the Campaign edit page:
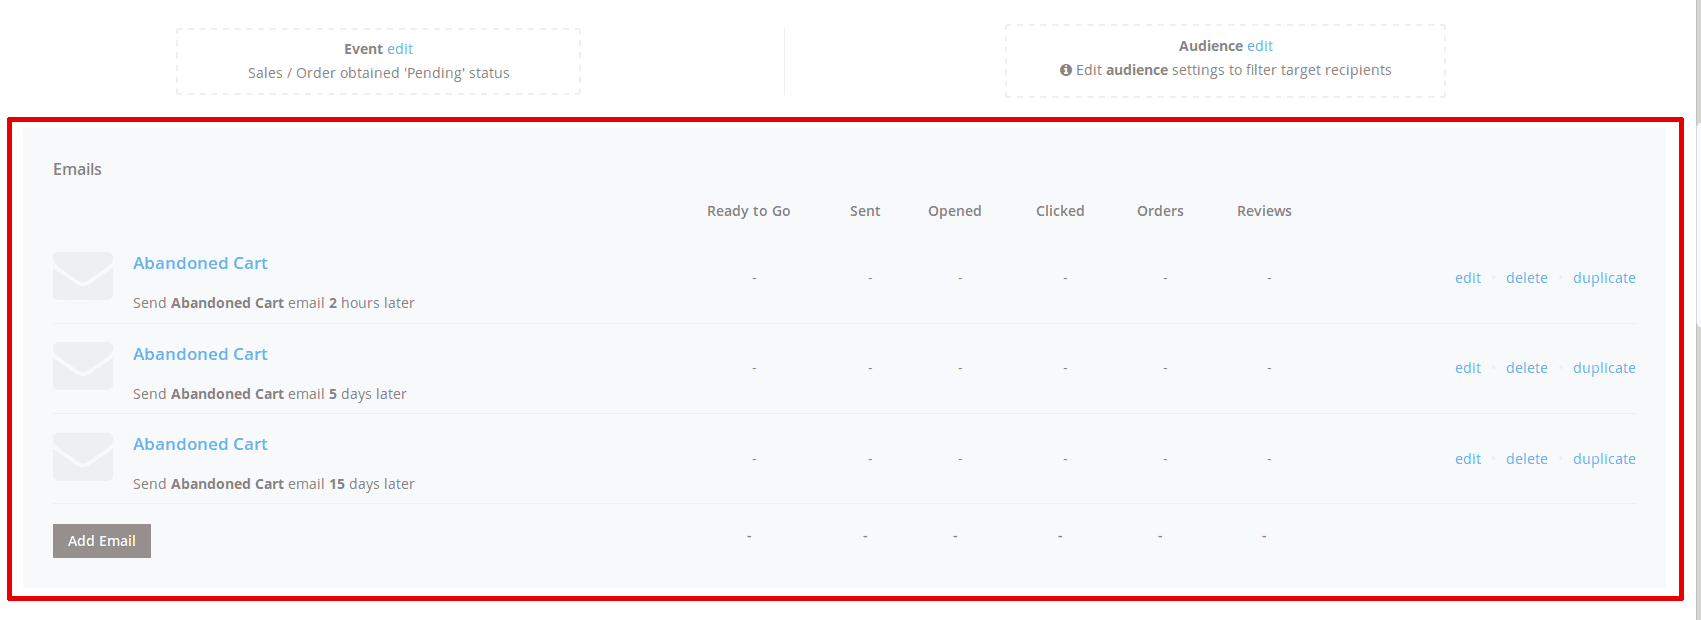
Press Add New Email to add a new email to your Trigger, and you will see an Email adding dialog with the following properties:
- General
- Email Template - selects a template, which will be used for emails. Templates for the emails can be defined using Email Designer.
- Delivery Time Delay - the delay after which a triggered message will be sent. It can be set in days, hours and minutes.
Note
By default, it will send immediately after a triggering event (0 days 0 hours 0 minutes). You can choose times from as short as one minute to as long as a few years after the trigger's criteria is met. - Excluded Weekdays - allows you to select the days of the week when emails won't be sent. Typically, it is on Saturday and Sunday.
- Coupons - used when an email template supports coupons.
- Include coupon in email - turns on/off coupon sending.
- Shopping Cart Price Rule - select shopping cart price rule, dependent on the size of the discount
- Coupon expires after __ days - fill in the time of the coupon's expiration
Note
Our extension can generate coupon codes only via the Shopping Cart Rule. Make sure that the option Use Auto Generation is enabled from the selected rule. Otherwise, coupons won't be generated.
- Cross-sells - used when an email template supports cross-sells products
- Include cross-sells in email
- Cross-sells source - select a cross-sells block whose products are added to the email
- Cross-sell products
- Related products
- Upsell products
List of Events
Customer Events
-
Customer Logged In
-
Customer Logged out
-
New Customer Sign up
-
Customer Birthday
-
Newsletter subscription
By default, Magento sends its own Success Email Template after a new client has subscribed to a newsletter.
If you want to use our module for this type of email, you need to disable the standard Magento template.
To disable it, navigate to Stores > Settings > Configuration > Customers > Newsletter, and selected the option Disable for the Success Email Template field. - Newsletter Unsubscription
Shopping Cart
-
Abandoned Shopping Cart
The event is triggered when the shopping cart is not updated in the last 60 minutes.
- Product price was changed
Order Events
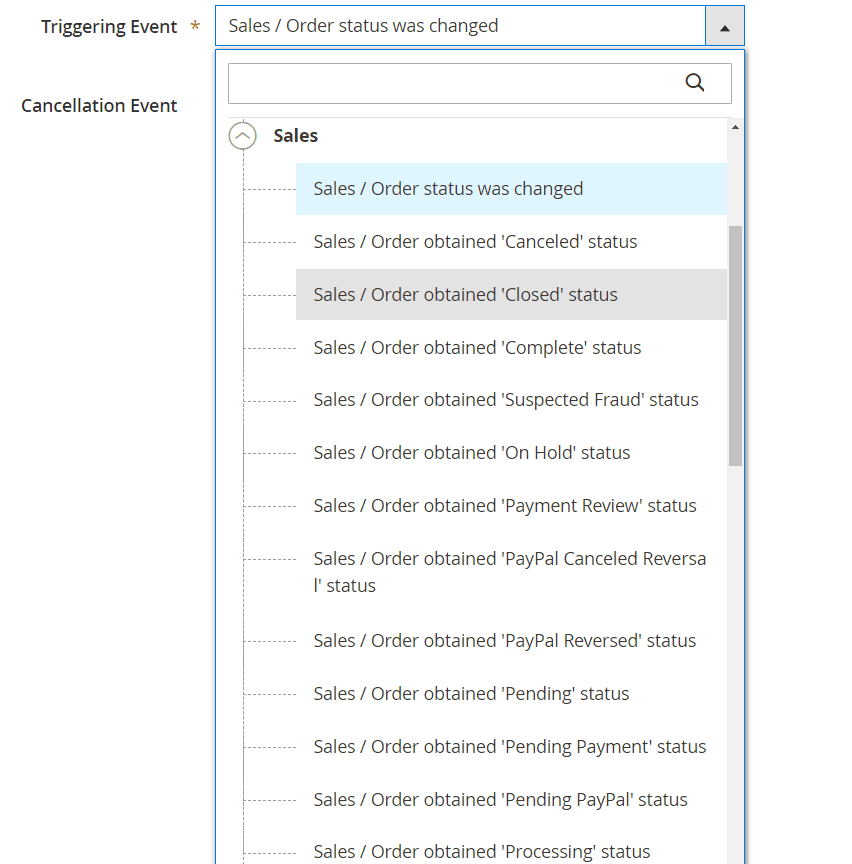
-
Order obtained a new status
-
Order obtained '###' status
-
Order obtained 'Pending' status
-
Order obtained 'Processing' status
-
Order obtained 'Completed' status
- ...
-
Product Events
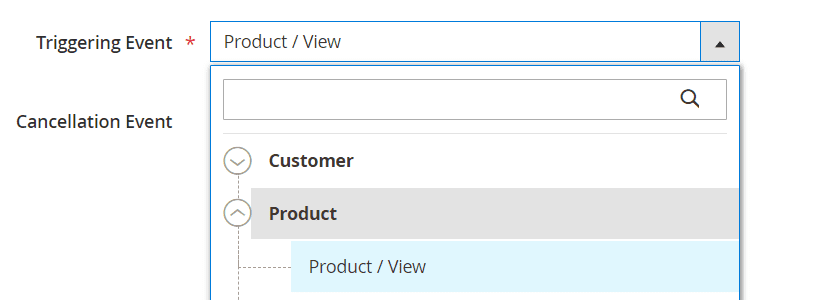
- Product view
Wishlist Events
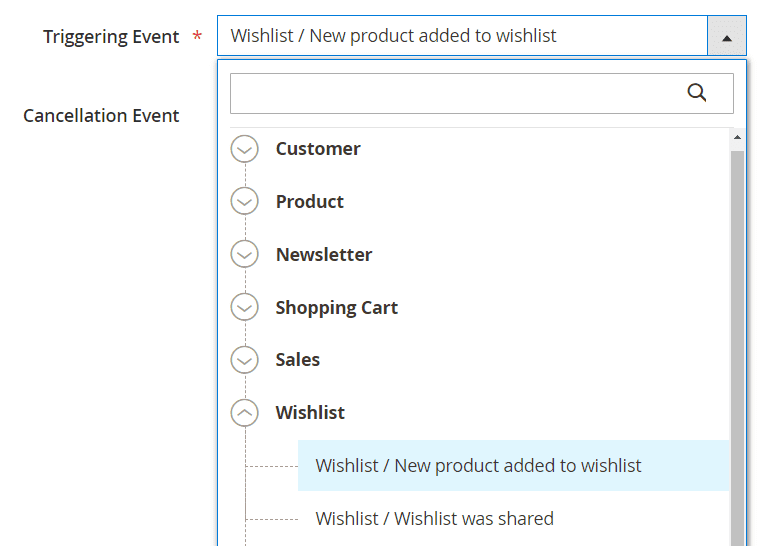
-
Product was added to wishlist
- Wishlist was shared
Review Events
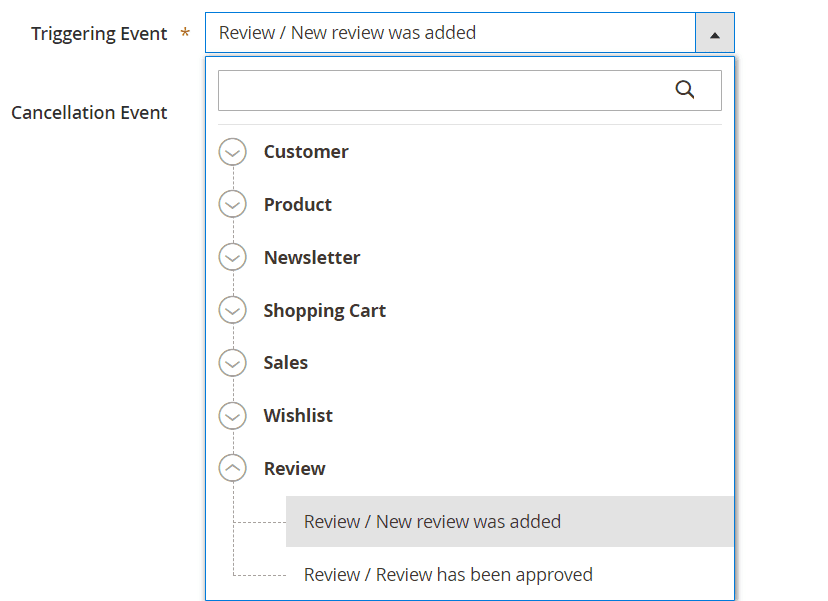
-
New review was added
- Review has been approved
Testing Campaigns
Our extension allows you to test your campaign without starting a real one. Just take the following steps:
- Go to Marketing -> Follow Up Email -> Manage Campaigns and open the campaign for editing, or directly press the Trigger access button.
- Select the template which you would like to test, and open it in order to edit.
- On the top actions ribbon, you will find a Send Test Email button. Press it to start testing.
- Enter your staging email address and press Send.
- The Extension then will send an email as if it were part of an email chain.
Tip
You can boost testing using Sandbox mode, which can be turned on at Stores -> Configuration -> Follow Up Email -> Test Information.In this mode, sending emails to actual customers will be suppressed. Instead, all of them will flow directly to the mailbox, set in the Test Recipient Email setting in the section above.
Note
For test emails, the extension will generate test data based on current customers.Examples of Campaign and Triggers Configurations
Our application comes with a set of handy examples, which can easily be adjusted to most cases of promotional plans. They are:
- Abandoned Cart Recovery Campaign
- Customer Engagement Campaign
- Customer Re-Engagement Campaign
- Sales Follow-Up Campaign
Let's delve into their details:
Abandoned Cart Recovery Campaign

The Abandoned Cart campaign is meant to remind customers of their unfinished shopping and encourage them to either complete their purchase or continue shopping for new products.
Typically the campaign consists of one trigger with three emails:
-
Trigger: Abandoned Cart
- Event:
- Triggering Event:
Shopping Cart / Abandoned Shopping Cart - Cancellation Event:
Sales / Order obtained Pending status
- Triggering Event:
- Audience:
Quote: Total count of products greater than 0
Email Chain:
- Abandoned Cart (2 hours)
- Email Template:
Abandoned Cart - Delivery Time Delay:
2 hours
- Email Template:
- Abandoned Cart (5 days)
- Email Template:
Abandoned Cart - Delivery Time Delay:
5 days
- Email Template:
- Abandoned Cart (15 days)
- Email Template:
Abandoned Cart - Delivery Time Delay:
15 days
- Email Template:
- Event:
Customer Engagement Campaign
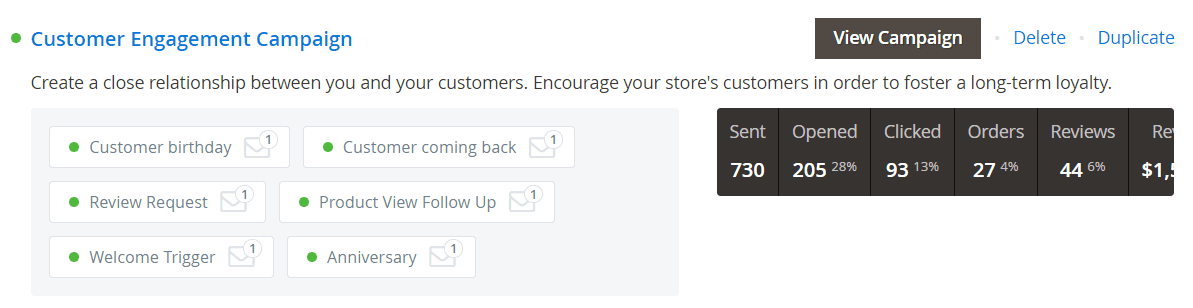
Engagement Campaign is the most complex of all campaigns. It consists of the most used triggers that can attract customers to your store and create a close relationship between you and your customers.
-
Trigger: Customer birthday
This trigger sends an email to the customer on his/her birthday. Since the corresponding event occurs at 00:00, we need an extra 10-hours delay.
- Event:
- Triggering Event:
Customer / Birthday - Cancellation Event:
none
- Triggering Event:
- Audience:
not set(means all customers are eligible)
Email Chain:
- Happy Birthday
- Email Template:
Happy Birthday - Delivery Time Delay:
10 hours
- Email Template:
Trigger: Customer coming back
This trigger is used when a customer hasn't visited the store for over a year, and therefore, should receive information about our newest picks.
- Event:
- Triggering Event:
Customer / Logged In - Cancellation Event:
none
- Triggering Event:
- Audience:
Customer: Last activity (in days) equals or greater than 10
Email Chain:
- Customer coming back
- Email Template:
Customer coming back - Cross-sells:
- Include cross-sells in email:
Yes - Cross-sells source:
Cross-sell products
- Include cross-sells in email:
- Email Template:
Trigger: Review Request
This trigger watches which products a customer has bought, and automatically requests that the customer give a product review if they have not returned a product for ten days (approx. period of return).
- Event:
- Triggering Event:
Sales / Order obtained 'Complete' status - Cancellation Event:
none
- Triggering Event:
- Audience:
not set
Email Chain:
- Review Request
- Email Template:
Review Request - Delivery Time Delay:
10 days - Cross-sells:
- Include cross-sells in email:
Yes - Cross-sells source:
Cross-sell products
- Include cross-sells in email:
- Email Template:
Trigger: Product View Follow Up
This trigger monitors which products a customer has viewed recently and automatically suggest similar products.
- Event:
- Triggering Event:
Product / View - Cancellation Event:
Sales / Order obtained Pending status
- Triggering Event:
- Audience:
Recipient does not have emails with Ready to Go status in the Mail Log for the trigger(s) Anniversary within last 7 daysProduct is one of 20 top selling products is Yes
Email Chain:
- Recently viewed product
- Email Template:
Recently Viewed Products - Delivery Time Delay:
3 hours - Cross-sells:
- Include cross-sells in email:
Yes - Cross-sells source:
Related products
- Include cross-sells in email:
- Email Template:
Trigger: Welcome Trigger
This is the most basic trigger. It activates after customer registration and sends a welcome message and a list of the latest picks.
- Event:
- Triggering Event:
Customer / Sign Up - Cancellation Event:
none
- Triggering Event:
- Audience:
not set
Email Chain:
- Welcome
- Email Template:
Welcome - Cross-sells:
- Include cross-sells in email:
Yes - Cross-sells source:
Cross-sell products
- Include cross-sells in email:
- Email Template:
Trigger: Anniversary
This trigger allows you to create anniversary event for your customer, celebrating their yearly anniversary of using your store.
- Event:
- Triggering Event:
Customer / Sign Up - Cancellation Event:
none
- Triggering Event:
- Audience:
not set
Email Chain:
- Anniversary
- Email Template:
Anniversary - Delivery Time Delay:
365 days
- Email Template:
Customer Re-Engagement Campaign
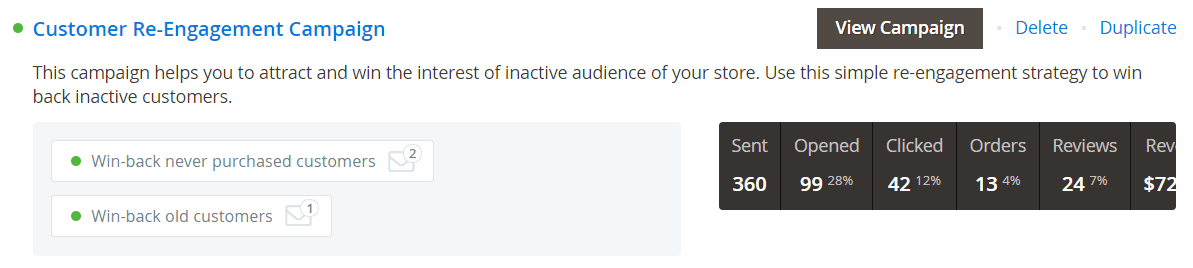
This campaign consists of triggers that should help you attract customers to return, namely those who had purchased items at your site in the past, but were not convinced to stay.
-
Trigger: Win-back never purchased customers
This trigger monitors customers who had registered, but never created a cart or purchased a product. After 30 days, we will send them an email with our newest picks.
- Event:
- Triggering Event:
Customer / Sign Up - Cancellation Event:
Sales / Order obtained Pending status
- Triggering Event:
- Audience:
not set(means all customers are eligible)
Email Chain:
- We miss you
- Email Template:
We miss you - Delivery Time Delay:
30 days - Cross-sells:
- Include cross-sells in email:
Yes - Cross-sells source:
Cross-sell products
- Include cross-sells in email:
- Email Template:
- We miss you 2
- Email Template:
We miss you 2 - Delivery Time Delay:
60 days - Cross-sells:
- Include cross-sells in email:
Yes - Cross-sells source:
Related products
- Include cross-sells in email:
- Email Template:
Trigger: Win-back old customers
This trigger is used when a customer purchased something but hasn't visited the store for two months. Therefore, they should receive a friendly reminder and information about our newest picks.
- Event:
- Triggering Event:
Sales / Order obtained 'Complete' status - Cancellation Event:
Sales / Order obtained Pending status
- Triggering Event:
- Audience:
not set
Email Chain:
- We miss you 2
- Email Template:
We miss you 2 - Delivery Time Delay:
60 days - Cross-sells:
- Include cross-sells in email:
Yes - Cross-sells source:
Related products
- Include cross-sells in email:
- Email Template:
Sales Follow-Up Campaign
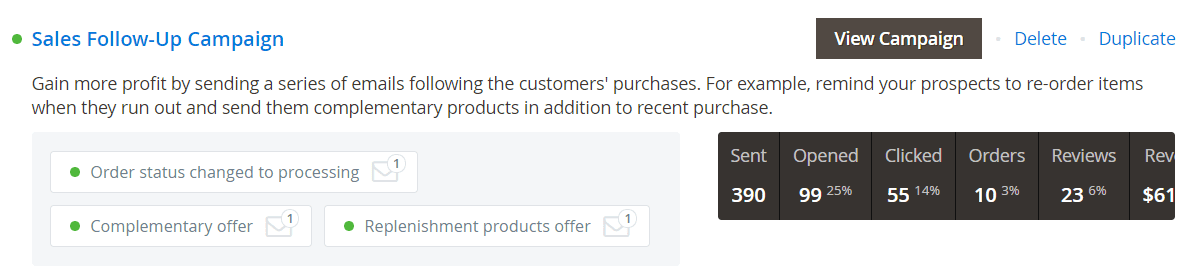
This campaign was created to suggest customers check out other products that are connected with their purchases.
-
Trigger: Order status changed to processing
This trigger is activated when a customer had placed an order, and it is processed. Therefore, the customer might be interested in purchasing an additional related item.
- Event:
- Triggering Event:
Sales / Order obtained 'Processing' status - Cancellation Event:
none
- Triggering Event:
- Audience:
not set(means all customers are eligible)
Email Chain:
- Order status changed
- Email Template:
Order status changed - Cross-sells:
- Include cross-sells in email:
Yes - Cross-sells source:
Cross-sell products
- Include cross-sells in email:
- Email Template:
Trigger: Complementary offer
This trigger is used when a customer has placed an order, and it was processed two days prior, presuming it's still fresh in their mind. This means that we should suggest they consider buying another complementary item from the store.
- Event:
- Triggering Event:
Sales / Order obtained 'Pending' status - Cancellation Event:
none
- Triggering Event:
- Audience:
not set
Email Chain:
- Complementary offer
- Email Template:
Complementary offer: related products - Delivery Time Delay:
5 days - Cross-sells:
- Include cross-sells in email:
Yes - Cross-sells source:
Related products
- Include cross-sells in email:
- Email Template:
Trigger: Replenishment products offer
This trigger is used when a customer purchased something, and we would like to suggest they consider buying related accessories or replaceable components (batteries, for example).
- Event:
- Triggering Event:
Sales / Order obtained 'Complete' status - Cancellation Event:
none
- Triggering Event:
- Audience:
not set
Email Chain:
- Replenishment products
- Email Template:
Replenishment products - Delivery Time Delay:
30 days - Cross-sells:
- Include cross-sells in email:
Yes - Cross-sells source:
Upsell products
- Include cross-sells in email:
- Email Template:
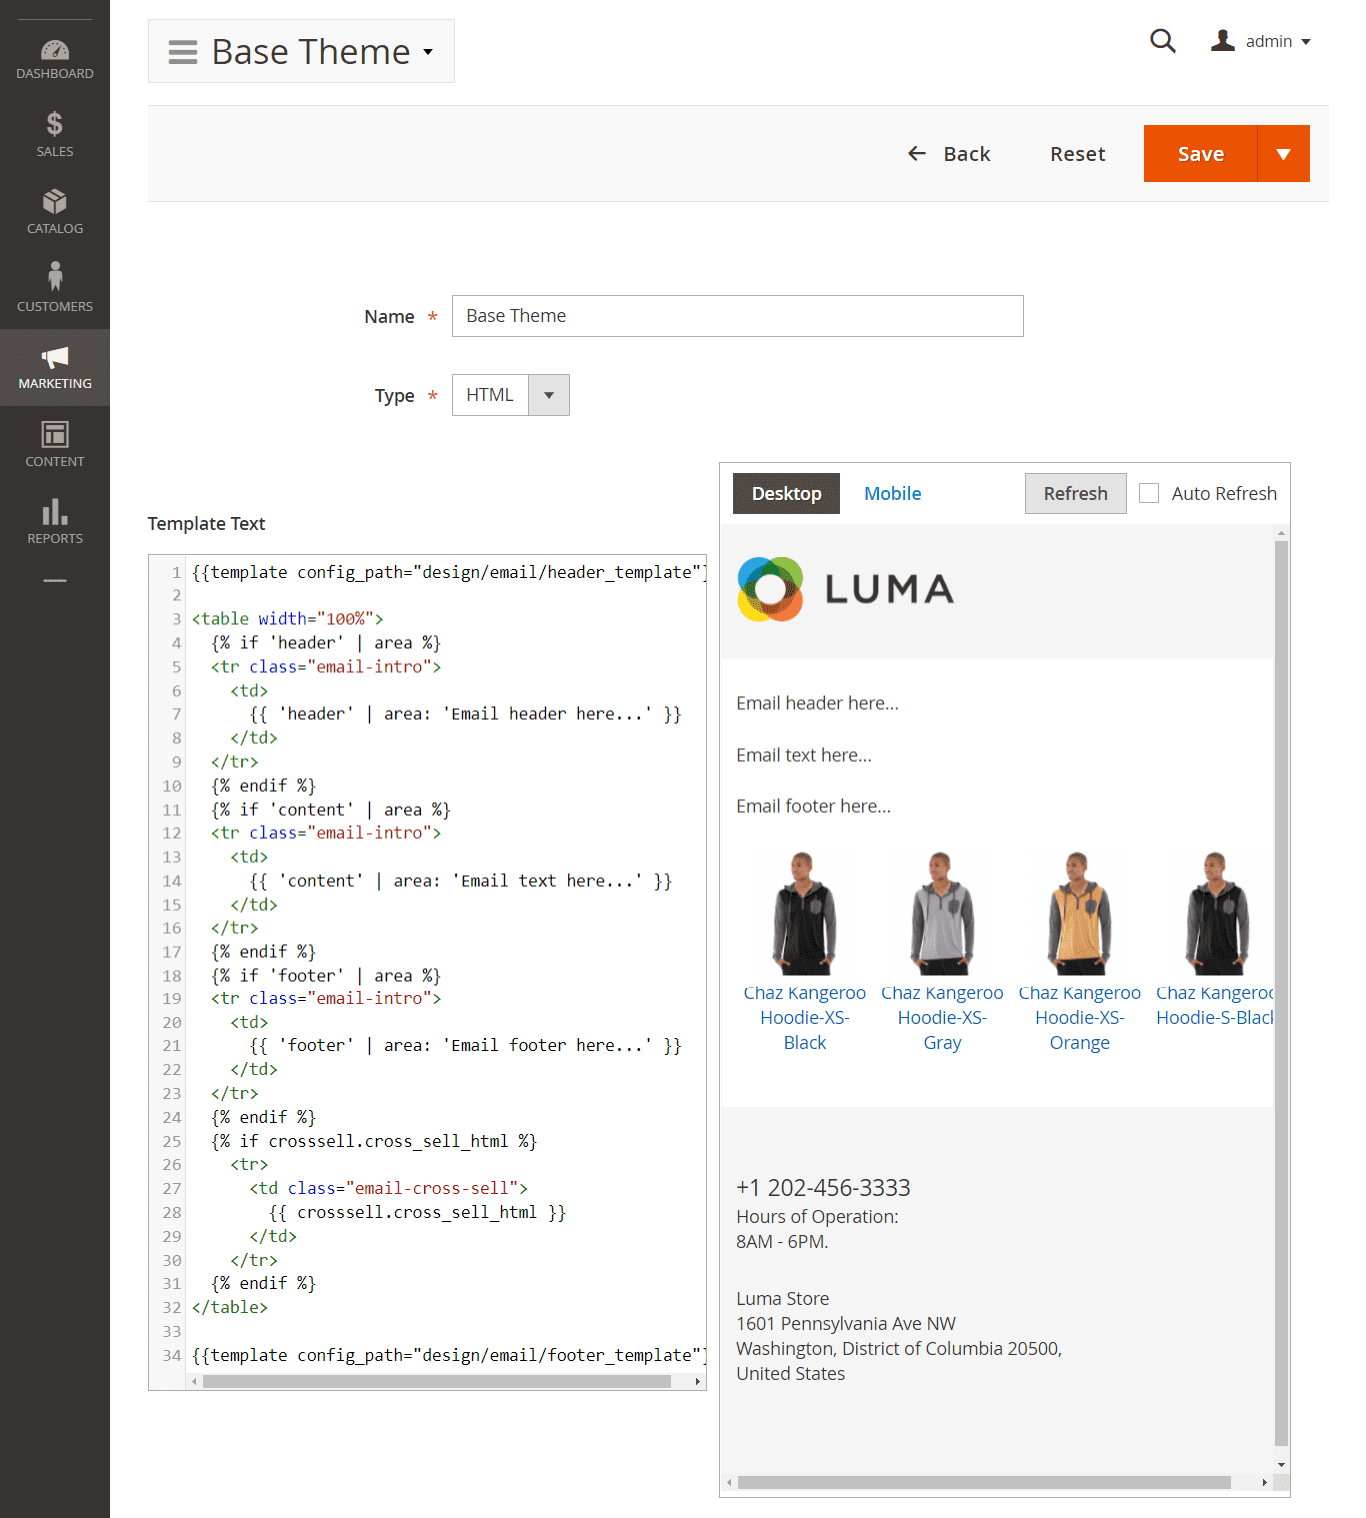
Managing Themes
Themes are the most generic templates that allow you to have all general elements of your email design (such as headers, styles, and footers) in one place. When designing a template, you can just select a theme and specify the message - the rest will be done by our extension.
To create a new theme, visit Marketing -> Follow Up Email -> Email Designer -> Manage Themes and press the Add Theme button.
The theme consists of the following properties:
- Name - name of the template.
- Type - template type. There's two available types: HTML (default) and Text.
- Template - the basic design template, which will use all subsequent templates.
The Template covers all email areas - including headers, footers and even the main content. These editable areas are defined using special liquid variables:
{{ 'header' | area: 'Email header here...' }}- places a header area{{ 'content' | area: 'Email text here...' }}- places a main body area{{ 'footer' | area: 'Email footer here...' }}- places a footer area
Example
Since the template does not have to define all of the areas, we recommend that you use this construction - it will insert an area only if it is defined:{% if 'content' | area %} {{ 'content' | area: 'Email text here...' }} {% endif %}If you prefer to use callout-style, use the
<?php echo $this->area('header') ?>directive instead.You can also use Variables and Callouts in your design.
All these parts can be previewed on the Preview Pane in both Desktop and Mobile versions.
Tip
You can also change the template area, and have an instant preview without saving. For that, you need to set the Auto-Refresh checkbox at Preview Pane, or press the Refresh button.Save the theme and proceed with Templates creation.
Managing Templates
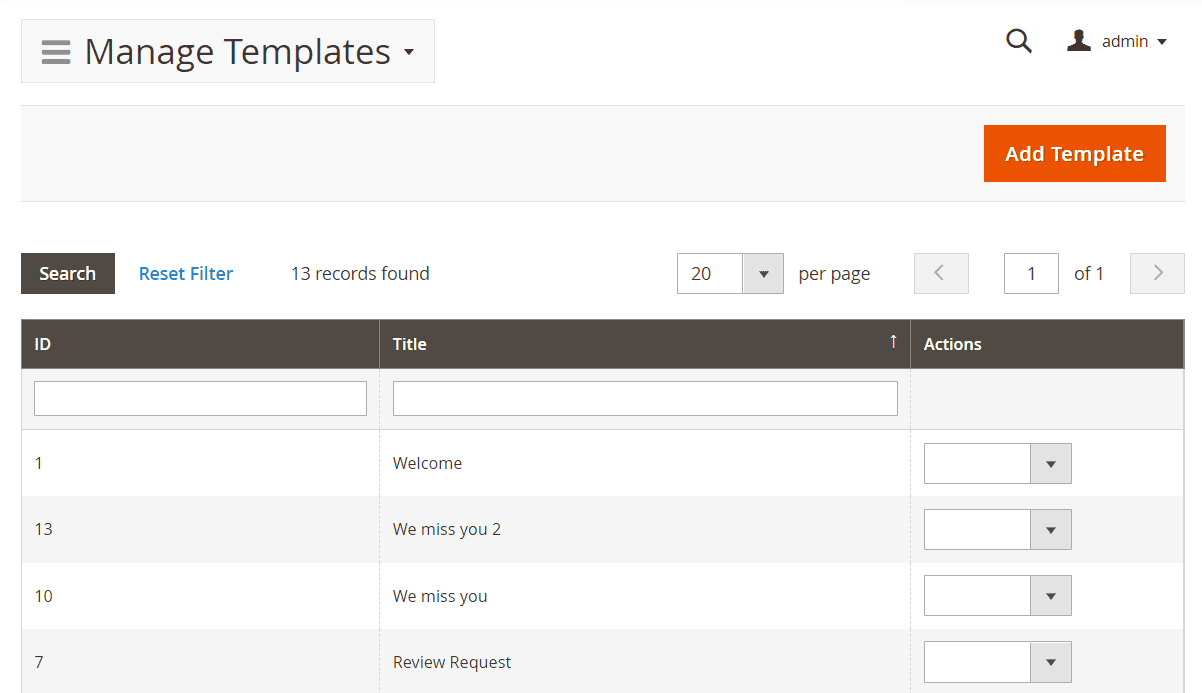
All templates used in Follow-Up Emails are located at their respective Grid at Marketing -> Email Designer -> Manage Templates.
Actions performed on templates can be selected from the Actions drop-down. Here you can Edit or Remove Template.
How to Create New Template
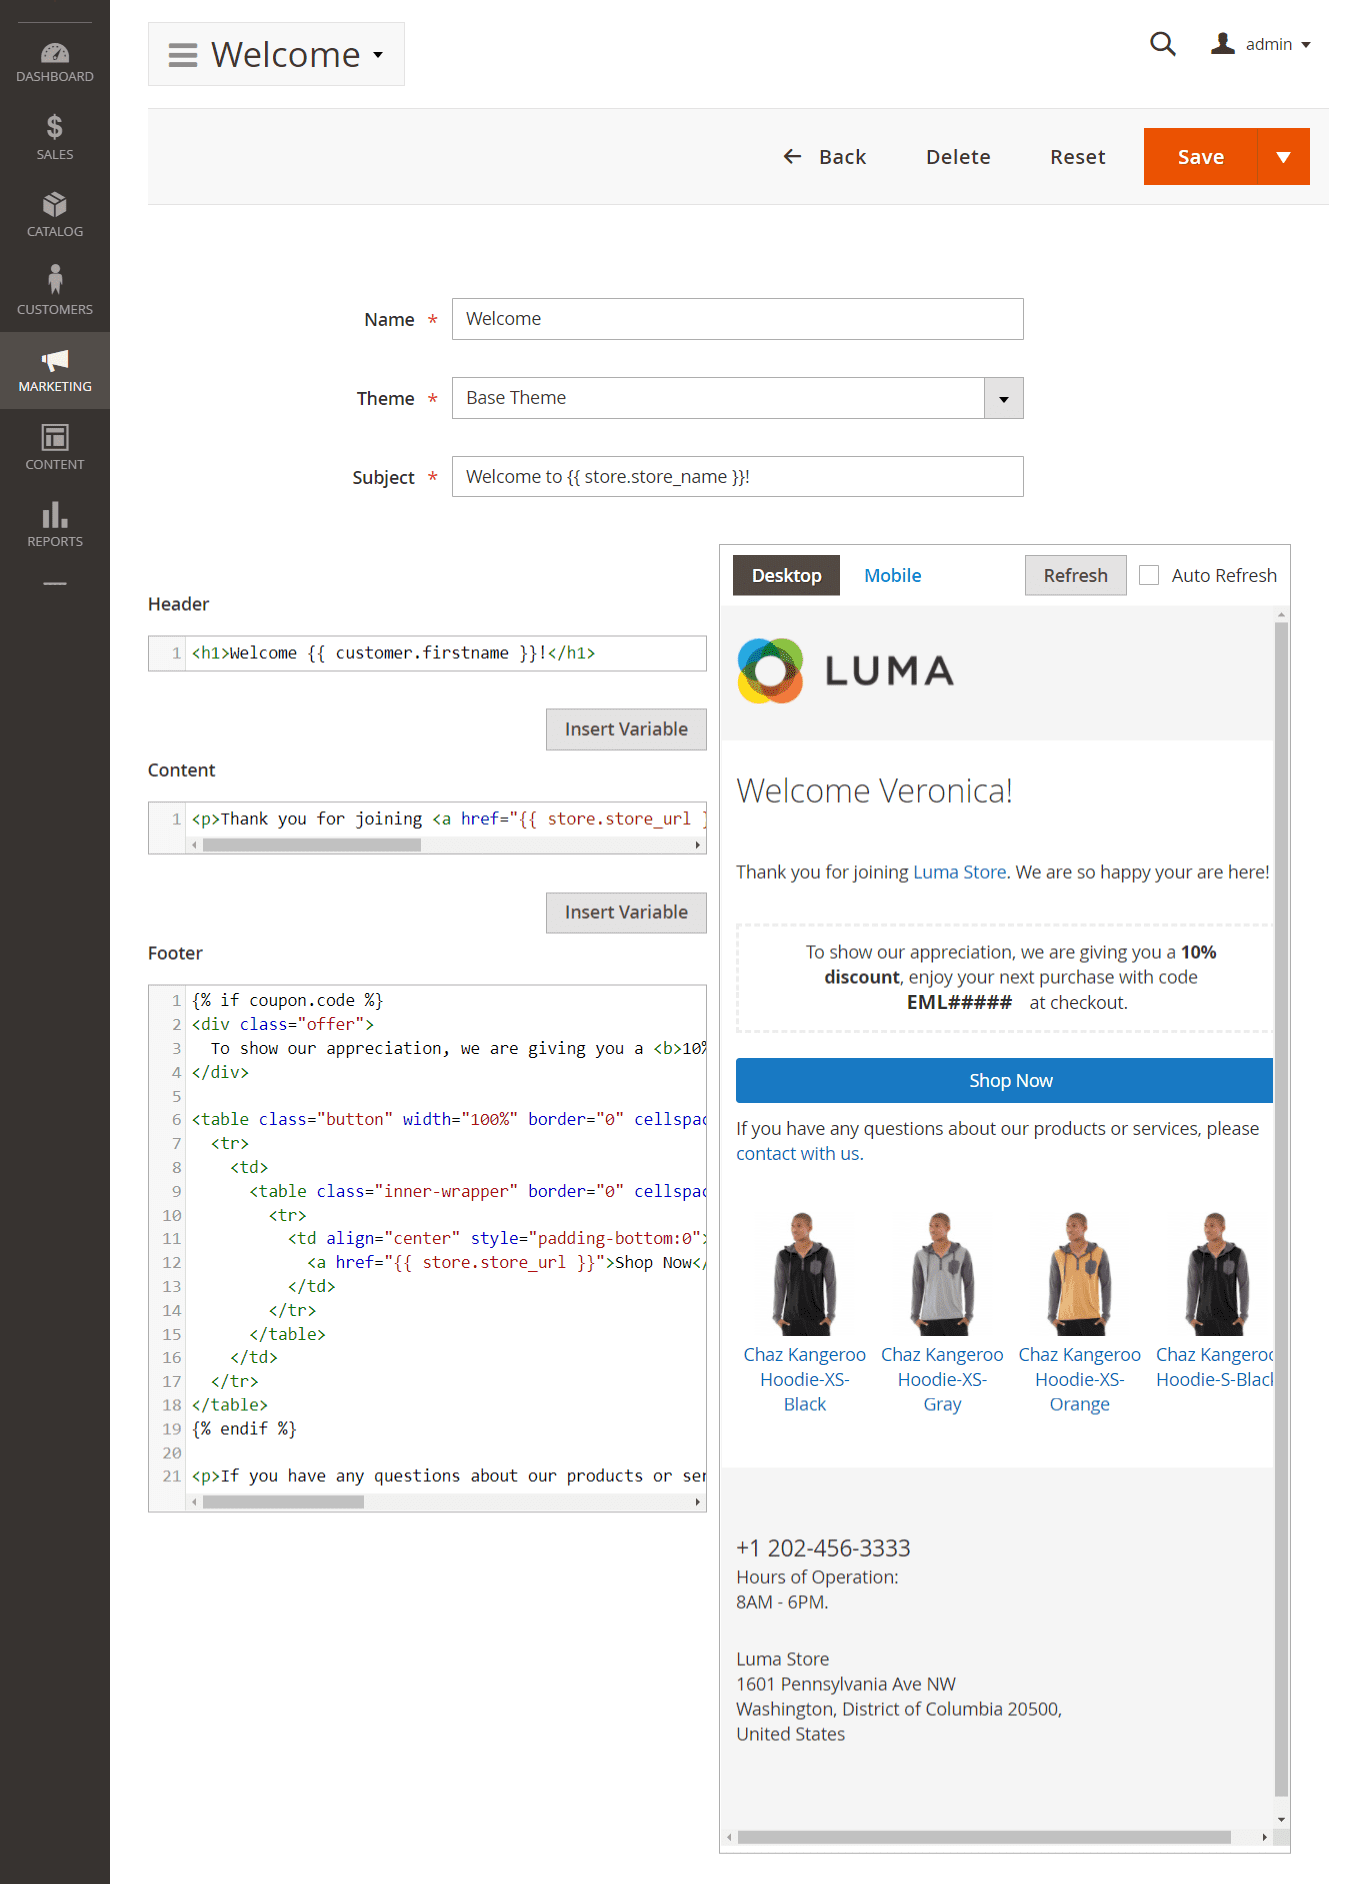
Go to Marketing -> Email Designed -> Manage Templates, and press the Add Template button. It will bring you to the first stage of Template creation, with the following basic properties:
- Name - name of the template
- Theme - one of the themes, defined at Marketing -> Email Designed -> Manage Themes. Read more in the Themes section.
- Subject - the default subject which will be used in emails, based on this template.
Saving a template at this stage does not actually create a template, but a draft stub. After it is saved, you need to reopen it using the Edit action, and enter contents.
The Template Edit Page breaks into two panels - left (Areas Pane) and right (Preview Pane).
Areas are parts of your email. They depend on your store's design, and your desired look & feel, but should consist of three areas:
- Header - will be displayed at the very top of your email.
- Content - is the main body of your template. Here you can enter your message and other details.
- Footer - will be displayed at the very bottom of your email.
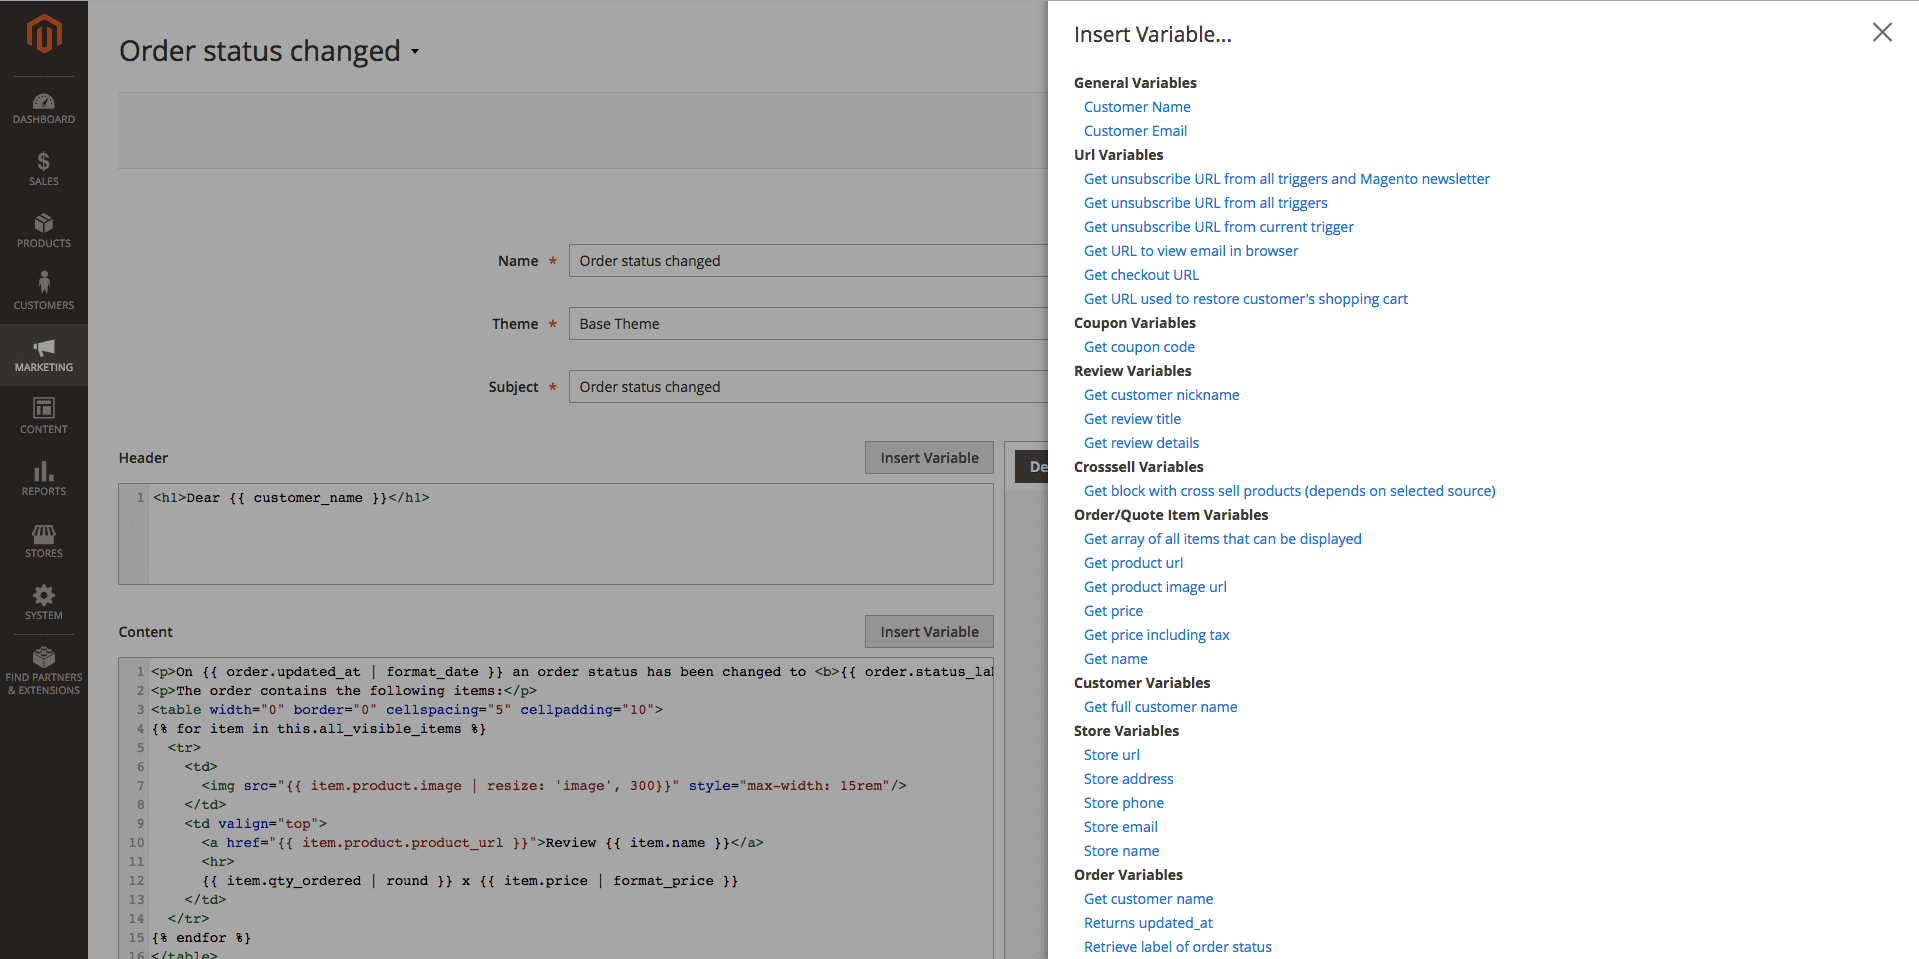
You can use Variables in any part of template. The Insert Variables button will help you to pick up the desired variable interactively.
All of these parts can be previewed on the Preview Pane in both Desktop and Mobile versions.
Tip
You can also change the template area, and have an instant preview without saving. For that, you need to set the Auto-Refresh checkbox at the Preview Pane, or press the Refresh button.Example
The templates used the basic pattern to show all products from the quote/order in an email :{% for item in this.all_visible_items %} --- {% endfor %}To send only the first active product in an email, you need to modify this pattern:
{% for item in this.first_visible_item %}

---

{% endfor %}
Variables & Methods
Our extension allows you to use variables and PHP callouts in your emails, which can greatly enhance and personalize them.
Note
Both variables and callouts can be used simultaneously, and are fully interchangeable so you can select your preferred syntax, and use it for all of your customizations.
Liquid is the preferred syntax for use with Email Templates. It allows you to avoid errors with the absence of attributes or values. Moreover, we provide a convenient helper dialog for inserting liquid variables into the editor.
Callouts are deprecated syntax, and used mainly for backward compatibility with older Follow-Up Email versions.
Liquid Variables
Liquid variables are a new way to enhance email templates. This syntax was introduced in version 1.1.15 and is the preferred syntax for use in Email Templates.
All variables should be enclosed in curly brackets. Each variable can also have a filter, added after pipe sign, and have one or more parameters.
Example
{{ attribute | filter }}{{ entity.attribute | filter | filter: param1 }}{{ entity.entity.attribute | filter: param1,param2 }}
These variables can be added interactively from edit pages of Theme or Template.
You just need to press the button Insert Variable near the content element, and select the variable you want to use - as shown below:
Modifying Variables with Filters
Filters are methods that allow you to alter or enhance the output of a variable. They also should be enclosed to the variable block
{{}}, but separated from the variable with a pipe (|) character. The parameters of filters are added using the colon (:) character.Example
{{ item.product.name | truncate: '150' }}- truncates the name of the product to 150 characters/{{ item.product.weight | round: '2' }} kg- rounds the weight of the product to 2 decimal digits
Here is the list of available filters, grouped into categories, with examples:
-
String/HTML Filters
-
downcase- converts a string into lowercase.{{ item.product.name | downcase }}- Original:
Dash Digital Watch - Output:
dash digital watch
- Original:
-
upcase- converts a string into uppercase.{{ item.product.name | upcase }}- Original:
Dash Digital Watch - Output:
DASH DIGITAL WATCH
- Original:
-
replace- replaces all occurrences of a string with a substring.{{ item.product.name | replace: 'Digital', 'Analog' }}- Original:
Dash Digital Watch - Output:
Dash Analog watch
- Original:
-
append- appends characters to a string.{{ item.product.name | append: ' - best choice' }}- Original:
Dash Digital Watch - Output:
Dash Digital Watch - best choice
- Original:
-
prepend- prepends characters to a string.{{ item.product.name | prepend: 'Best choice - ' }}- Original:
Dash Digital Watch - Output:
Best choice - Dash Digital Watch
- Original:
-
capitalize- capitalizes words in the input sentence.{{ item.product.color | capitalize }}- Original:
dark red - Output:
Dark red
- Original:
-
escape- escapes HTML tags in a string.{{ item.product.description | escape } -
newline_to_br- inserts a<br>linebreak HTML tag in front of each line break in a string.{{ item.product.short_description | newline_to_br } -
remove- removes all occurrences of a substring from a string.{{ item.product.name | remove: 'Digital' }}- Original:
Dash Digital Watch - Output:
Dash Watch
- Original:
-
strip_html- strips all HTML tags from a string.{{ item.product.description | strip_html } -
truncate- truncates a string down to 'x' characters.{{ item.product.name | truncate: '15' }}- Original:
Dash Digital Watch - Output:
ash Digital Wa
- Original:
-
if_empty- return argument, if the value is an empty stringDear {{ customer_name | if_empty: 'Client' }}!- Original:
empty string - Output:
Dear Client!
- Original:
-
date- converts a string to a specified date-time format.{{ item.product.created_at | date: '%d.%m.%Y %H:%M' }}- Original:
2016-02-18 10:11:12 - Output:
18.02.2016 10:11
Full list of formatters can be found here
- Original:
-
format_date- converts a string to a specified date-time format.{{ item.product.created_at | format_date: 3 }}- Original:
2016-02-18 10:11:12 - Output:
18/02/16
Possible formatters:
0, 1 , 2 , 3 - Original:
-
-
Numeric Filters
-
ceil- rounds the output up to the nearest integer.{{ item.product.weight | ceil }}- Original:
1.423 - Output:
2
- Original:
-
floor- rounds the output down to the nearest integer.{{ item.product.weight | floor }}- Original:
1.423 - Output:
1
- Original:
-
round- rounds the output to the nearest integer or specified decimal digits.{{ item.product.weight | round: '2' }}- Original:
1.423 - Output:
1.42
{{ item.product.weight | round }}- Original:
1.423 - Output:
1
- Original:
-
number_format- formats number to specified format (php function).{{ item.product.price | number_format: '2', '.', ',' }}
-
-
Price/Currency Filters
-
format_price- formats price to default format.{{ item.product.price | format_price }}- Original:
100.42 - Output:
$100.42
- Original:
-
convert- converts a price from base currency to specified currency.{{ item.product.price | convert: 'EUR' }}- Original:
100 - Output:
92.28
- Original:
-
-
Array Filters
-
first- return first element in array. -
last- return last element in array. -
join- join array to string using glue. size- return the size of an array or a string.
-
-
URL Filters
-
resume- resume customer's session and redirect it to base URL{{ item.product.product_url | resume }}
-
-
Image Filters
-
resize- resize image{{ item.product.image | resize: 'small_image', 100, 100 }}- Original:
http://example.com/pub/media/catalog/product/m/h/mh03-black_main.jpg - Output:
http://example.com/pub/media/cache/100x100/catalog/product/m/h/mh03-black_main.jpg
- Original:
-
PHP Callouts
PHP Callouts is a very powerful tool to enhance your templates. It allows you to include PHP code directly to the HTML Code.
Here is the list of possible callouts with respective examples:
-
Global Methods
-
getUnsubscribeUrl- a direct link to unsubscribe from current trigger.The customer will be unsubscribed from all already scheduled emails (Follow Up Email -> Mail Log (Queue)) for the current trigger.
This link does not unsubscribe customers from future emails (triggered by other events) or native Magento subscription.
Usage:
<a href="<?php echo $this->getUnsubscribeUrl() ?>">Unsubscribe</a> -
getUnsubscribeAllUrl- a direct link to unsubscribe from all triggersThe customer will be unsubscribed from all already scheduled emails (Follow Up Email -> Mail Log (Queue)) for all triggers.
This link does not unsubscribe customers from native Magento subscription.
Usage:
<a href="<?php echo $this->getUnsubscribeAllUrl() ?>">Unsubscribe</a> -
getViewInBrowserUrl- a direct link to open email in browserUsage:
<a href="<?php echo $this->getViewInBrowserUrl() ?>">View it in your browser.</a> -
getResumeUrl- a direct link to resume (restore, log in) customer sessionUsage:
<a href="<?php echo $this->getResumeUrl() ?>">Open</a>i.e., the customer will be automatically authorized in the store.
Additionally, you can pass a parameter to the method to redirect the customer to a specific URL after authorization.
Example
    <?php foreach($this->getOrder()->getAllVisibleItems() as $item): ?>
      <tr>
        <td>
          <a href="<?php echo $this->getResumeUrl($item->getProduct()->getProductUrl()) ?>">Review <?php echo $item->getName() ?></a>
        </td>
      </tr>
    <?php endforeach ?>
i.e., the customer will be redirected to the product page to leave a review after automatic authorization.
-
getStoreUrl- a direct link to the store home pageUsage:
<?php echo $this->getStoreUrl() ?> -
getStoreName- a curent store nameUsage:
<?php echo $this->getStoreName() ?> -
getStorePhone- a curent store phoneUsage:
<?php echo $this->getStorePhone() ?> -
getStoreAddress- a curent store addressUsage:
<?php echo $this->getStoreAddress() ?> -
getStoreEmail- a curent store general transactional emailUsage:
<?php echo $this->getStoreEmail() ?>
-
-
Customer Methods
-
getCustomerName- returns customer's full nameUsage:
Dear <?php echo $this->getCustomerName() ?>You can pass a parameter to the method getCustomerName() which will be used instead of the customer name, if the customer's name is empty:
Dear <?php echo $this->getCustomerName(null, 'Customer') ?>, results in Dear Customer, if customer's name is empty (since version 1.0.34). -
getFirstname- returns customer's firstname (since version 1.0.36)Usage:
Dear <?php echo $this->getFirstname() ?> -
getLastname- returns customer's lastname (since version 1.0.36)Usage:
Dear <?php echo $this->getLastname() ?> -
getCustomer- retrurns customer's object (only for registered customers)Usage:
Hi <?php echo $this->getCustomer()->getFirstname() ?><?php echo $this->getCustomer()->getEmail() ?>
-
-
Shopping Cart Methods
-
getRestoreCartUrl- a direct link to customer shopping cartUsage:
<a href="<?php echo $this->getRestoreCartUrl() ?>">Finish Checkout!</a> -
getReorderCartUrl- redirects the customer to the quote with the products purchased from the previous orderUsage:
<a href="<?php echo $this->getReorderCartUrl() ?>">Reorder</a> -
getQuote()->getAllVisibleItems()- return collection of products in cart for feature outputUsage:
    <?php foreach ($this->getQuote()->getAllVisibleItems() as $item): ?>
        <?php echo $item->getName() ?>
    <?php endforeach ?>
How to display only the first product:
Example
    <?php $i = 0 ?>
    <?php foreach ($this->getQuote()->getAllVisibleItems() as $item): ?>
        <?php if ($i++ >= 1): ?>
            <?php break ?>
        <?php endif ?>
        ...
        other methods
        ...
    <?php endforeach ?>
-
-
Order Methods
-
getOrder()->getStatus()- the status of orderUsage:
order status is <?php echo $this->getOrder()->getStatus() ?> -
getOrder()->getIncrementId()- the order numberUsage:
Order #<?php echo $this->getOrder()->getIncrementId() ?> -
getOrder()->getStoreGroupName()- the store name of orderUsage:
You placed order in <?php echo $this->getOrder()->getStoreGroupName() ?> -
getOrder()->getAllVisibleItems()- return list of products in order for feature outputUsage:
    <?php foreach ($this->getOrder()->getAllVisibleItems() as $item): ?>
        <?php echo $item->getName() ?>
    <?php endforeach ?>
How to display only the first product:
Example
<?php $i = 0 ?> <?php foreach ($this->getOrder()->getAllVisibleItems() as $item): ?> <?php if ($i++ >= 1): ?> <?php break ?> <?php endif ?> ... other methods ... <?php endforeach ?> -
Additional Methods
Usage:
    <?php echo $this->getOrder()->getBaseTaxAmount() ?>
    <?php echo $this->getOrder()->getBaseGrandTotal() ?>
    <?php echo $this->getOrder()->getBaseShippingAmount() ?>
    <?php echo $this->getOrder()->getShippingDescription() ?> - returns shipping method name
-
-
Coupons
-
getCoupon()->getCode()- get the expiration date of an autogenerated coupon codeUsage:
Expiration date: <?php echo $this->formatDate($this->getCoupon()->getExpirationDate()) ?>Different date formats:
    <?php echo $this->formatDate($this->getCoupon()->getExpirationDate()) ?>
    <?php echo $this->formatDate($this->getCoupon()->getExpirationDate(), \IntlDateFormatter::MEDIUM) ?>
    <?php echo $this->formatDate($this->getCoupon()->getExpirationDate(), \IntlDateFormatter::LONG) ?>
Example
    <?php if ($this->getCoupon()): ?>
        Let us offer you a discount to complete your purchase.<br>
        Your coupon code: <?php echo $this->getCoupon()->getCode() ?> valid till <?php echo $this->formatDate($this->getCoupon()->getExpirationDate(), \IntlDateFormatter::MEDIUM) ?>
    <?php endif ?>
i.e., we only display this text block if a coupon is available.
-
getCoupon()->getExpirationDate()- the autogenerated coupon codeUsage:
Your coupon code: <?php echo $this->getCoupon()->getCode() ?>Example
    <?php if ($this->getCoupon()): ?>
        Let us offer you a discount to complete your purchase.<br>
        Your coupon code: <?php echo $this->getCoupon()->getCode() ?>
    <?php endif ?>
i.e., we only display this text block if a coupon is available.
-
-
Cross-sell products
-
getCrossSellHtml- html block of cross sell productsUsage:
<?php echo getCrossSellHtml() ?>Example
    <?php if ($this->getCrossSellHtml()): ?>
        <h1>See also:</h1>
        <?php echo $this->getCrossSellHtml() ?>
    <?php endif ?>
i.e., we only display this text block if products are available.
-
Products Methods
-
getProductUrl- a direct link to the productUsage:
<?php echo $item->getProduct()->getProductUrl() ?> -
getPrice- a price of the productUsage:
<?php echo $item->getProduct()->getPrice() ?><?php echo $this->formatPrice($item->getProduct()->getPrice()) ?> -
getPriceInclTax- a price of the product with tax (saved in order/shopping cart)Usage:
<?php echo $item->getPriceInclTax() ?><?= $this->formatPrice($item->getPriceInclTax()) ?> -
getName- a name of the productUsage:
<a href="<?php echo $item->getProduct()->getProductUrl() ?>"><?php echo $item->getName() ?></a> -
Image Directive
Usage:
<img src="<?php echo $this->getImageUrl($item->getProduct(), 'image', 100) ?>"/><img src="<?php echo $this->getImageUrl($item->getProduct(), 'small_image', 150) ?>"/><img src="<?php echo $this->getImageUrl($item->getProduct(), 'thumbnail) ?>"/>
Wishlist Methods
-
getWishlist()->getItemCollection()- return collection of products in wishlist for feature outputUsage:
    <?php foreach ($this->getWishlist()->getItemCollection() as $item): ?>
        <img src="<?=$this->getImageUrl($item->getProduct(), 'image', 300) ?>"/>
        <a href="<?= $item->getProduct()->getProductUrl() ?>"><?php echo $item->getProduct()->getName() ?></a>
    <?php endforeach ?>
Alternative way of retrieving wishlist products:
<?php foreach ($this->getWishlistItemCollection() as $item): ?> <img src="<?=$this->getImageUrl($item->getProduct(), 'image', 300) ?>"/> <a href="<?php echo $item->getProduct()->getProductUrl() ?>"><?php echo $item->getProduct()->getName() ?></a> <?php endforeach ?> -
getWishlistProduct()- return last added product to wishlist for feature outputUsage:
<a href="<?php echo $this->getWishlistProduct()->getProductUrl() ?>"><?php echo $this->getWishlistProduct()->getName() ?></a>Price: <?php echo $this->getWishlistProduct()->getPrice() ?>
Helper Methods
Tip
The code below can be used to see available methods/properties for each of the mentioned above objects (product, quote, quote item, order, order item, order shipping address, order payment, customer, wishlist):-
Print all properties for order object:
Usage:
<?php echo '<pre>'; print_r($this->getOrder()->debug()); echo ' </pre>'; die(); ?> -
Print all properties for order item object:
Usage:
<?php foreach ($this->getOrder()->getAllVisibleItems() as $item): ?> <?php echo '<pre>'; print_r($item->debug()); echo ' </pre>'; die(); ?> <?php endforeach ?> -
Print all properties for product object:
Usage:
<?php foreach ($this->getOrder()->getAllVisibleItems() as $item): ?> <?php echo '<pre>'; print_r($item->getProduct()->debug()); echo ' </pre>'; die(); ?> <?php endforeach ?> -
Print all properties for customer object:
Usage:
<?php echo '<pre>'; print_r($this->getCustomer()->debug()); echo ' </pre>'; die(); ?> -
Print all properties for wishlist object:
Usage:
    <?php
    echo '<pre>';
    print_r($this->getWishlist()->debug());
    echo ' </pre>';
    die();
    ?>
Note
Object data returned as an array consisting of all the available data for the specified object. The object properties are displayed in the following way:[property_code] => property value [another_property_code] => property value [one_more_property_code] => property valueEach property can be accessed separately as follows:
<?php echo $this->getOrder()->getPropertyCode() ?>
<?php echo $this->getOrder()->getAnotherPropertyCode() ?>
<?php echo $this->getOrder()->getShippingAddress()->getAnotherPropertyCode() ?>
<?php echo $this->getOrder()->getPayment()->getPropertyCode() ?>
<?php echo $this->getCustomer()->getPropertyCode() ?>
<?php echo $this->getWishlist()->getOneMorePropertyCode() ?>
<?php echo $item->getProduct()->getPropertyCode() ?>
Mail Log (Queue)
This extension allows you to track triggered emails.
Go to Marketing > Follow Up Email > Mail Log (Queue). You will see the following fields:
- ID - ID of the mail
- Status - current status of the trigger email. You can track emails with these statuses:
- Ready to go - email is ready to be delivered
- Sent - email has already been delivered
- Canceled - email delivery was cancelled
- Error - error has occured while email was being delivered
- Missed - email delivery didn't occur
- Unsubscribed - customer unsubscribed from the email newsletter
- Trigger - name of the email trigger
- Scheduled At - time when email was added to the queue
- Sent At - time when email was delivered to the recipient
- Recipient Email - customer email
- Recipient Name - customer name
- Action - actions on the selected emails in the queue:
- Cancel - cancel processing of the trigger email in the queue
- Send - send the trigger email to the Recipient Email (available in the mass actions)
- Change Status - allows you to change the Status of the trigger email
Click on the triggered email. You will see detailed information about the triggered email in the next tabs: General information, History, Variables.
Event Log
This extension allows you to track triggered events at the store.
Go to Marketing > Follow Up Email > Event Log. You will see the following fields:
- ID - ID of the event.
- Event - a certain action of a visitor (login, registration, placing an order) or action of a system (change order status, change of price), which can be used as a trigger for emails.
- Created At - time when the event occurred.
- Arguments - additional data of the event (uniq_key, customer email, name, quote_id, order_id, store_id, time).
- Triggers - information about the amount and status of triggers for the current event.
- Actions - actions on the selected events:
- Reset & Process - allows you to reset the current event's trigger status and bring it back to the queue.
- Delete - remove the event from the list.
Note
Click the button Fetch New Events to show new triggered events at the store.GDPR Compliance Tips
Since our module collects user data for sending emails, please check out some tips for making the extension fully compliant with the GDPR:
- Send emails only to confirmed customers. You can use the rules to filter the target audience:
Example
- Customer: Is subscriber of the newsletter is Yes
- There is a cron job email_clean_history which removes a month's worth of old emails and events
- You can disable automatic guest user data capturing
- You can manually delete all of the stored user data:
- To remove emails, go to Marketing > Follow Up Email > Mail Log, select the required emails, choose the Delete option in the Actions dropdown, and press Submit.
- To remove registered events, go to Marketing > Follow Up Email > Event Log, select the required events, choose the Delete option in the Actions dropdown, and press Submit.
- To reset a particular statistics go to Marketing > Follow Up Email > Settings, press the button Reset Statistics at the Statistics tab.
- Do not forget to include the unsubscription link to the emails using the variable
{{ url.unsubscribe_newsletter_url }}- to unsubscribe from all triggers and the newsletter.
Troubleshoot
This section describes the most common problems that customers report and how they can be resolved:
- The email does not show the coupon code
- The related, upsell or cross-sell products are not displayed
- How do I translate an email template?
The email does not show the coupon code
The coupon code is not visible in the email.
Solution:
- Make sure the coupon code is enabled in the email settings of your trigger.
- If there are no available Cart Price Rules in the email settings, make sure that the option Use Auto Generation is checked at least in one rule.
Note
The Use Auto Generation checkbox is available in the Cart Price rules only when you choose the Specific Coupon option at the Coupon field of your Cart Price Rule.
The related, upsell or cross sell products are not displayed
The block with the selected cross-sell, related, or upsell products is not displayed in the email.
The products for the cross-sell block are selected based on the products associated with the customer's orders or shopping cart.
Before using one of the types as the source for cross-sell block, make sure that an appropriate type of product is configured.Note
In the preview emails, the module shows random products in the cross-sell block.Solution:
Make sure your products have the cross-sell, related, or upsell products:
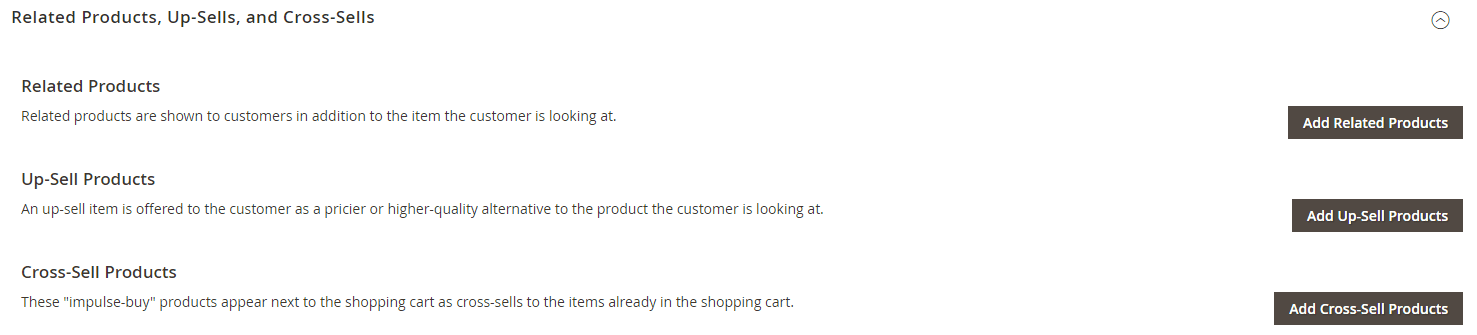
- Open one of your products in the admin panel in edit mode.
- Scroll down and expand the Related Products, Up-Sells, and Cross-Sells section.
- You'll see products there if you have configured these settings earlier, but if there are no products, you should configure them.
For more information refer to Magento documentation: https://docs.magento.com/m2/ce/user_guide/catalog/settings-advanced-related-products.html. Also you may find interesting to insert our Related Products for Magento 2 in your emails.
How do I translate an email template?
There are several ways to translate emails:
-
Separate email templates per language:
- Create a new email template in the desired language.
- Create a separate trigger per store and for emails using templates in the corresponding language.
-
Use the Magento translation mechanism:
For example, you want to translate the text Shop Now in the Welcome email template. To translate it, copy the source string with this text to the CSV file located in your theme directory. The translation may look as follows:Example
<a href="{{ store.store_url }}">Shop Now</a>
<a href="{{ store.store_url }}">Shop Right Now</a>
Or if you want translate the subject:
Example
Hello {{ customer_name }}!, Hola {{ customer_name }}!Note
If the string you want to translate contains commas, then you should wrap the translation string with the double quotation mark ("). But if the string in addition to comma contains a double quotation mark, then you should replace all double quotes in the original text with the single quotation mark (').
After extension update php code in the templates stopped working
According to the Magento security policies starting with the module-email version 2.1.28 and module-email-designer version 1.1.31 ability to use php code in the templates was disabled.
If this ability is vital for your store, it is possible to revert the function code located at the file
vendor/mirasvit/module-email-designer/src/EmailDesigner/Service/TemplateEngine/Php.php-
Should be modified function
getHtmlwith the next code:private function getHtml($tplPath) { ob_start(); include $tplPath; $html = ob_get_clean(); return $html; }
After a Magento or extension update, the event log is empty and emails don't send.
To fix this, open the
/app/etc/env.phpfile and check if you have the consumers section.... 'cron_consumers_runner' => [ 'cron_run' => false, 'max_messages' => 20000, 'consumers' => [ 'consumer1', 'consumer2' ] ], ...If you have it, you should add our job
'mirasvit.event.mq.register'to the list. Once added, run the commandphp -f bin/magento queue:consumers:start mirasvit.event.mq.registerto start it.Example:
...
    'cron_consumers_runner' => [
        'cron_run' => false,
        'max_messages' => 20000,
        'consumers' => [
            'product_action_attribute.update',
            'inventory.source.items.cleanup',
            'mirasvit.event.mq.register'
        ]
    ],
...
How to upgrade the extension
To upgrade the extension, take the following steps:
- Back up your store's database and web directory.
- Log in to the SSH console of your server and navigate to root directory of the Magento 2 store.
- Run the command
composer require mirasvit/module-email:* --update-with-dependenciesto update the current extension with all dependencies.Note
In some cases, the command above is not applicable, or you are unable to update just the current module, and need to upgrade all Mirasvit modules in a bundle. In this case, the command above will have no effect.
Instead, run thecomposer update mirasvit/*command. It will update all Mirasvit modules installed in your store.
- Run the command
php -f bin/magento setup:upgradeto install updates. - Run the command
php -f bin/magento cache:cleanto clean the cache. -
Deploy static view files
rm -rf pub/static/*; rm -rf var/view_preprocessed/*; php -f bin/magento setup:static-content:deploy
Disabling Extension
Temporarily Disable
To temporarily disable the extension, please take the following steps:
- Log in to the SSH console on your server and navigate to the root directory of the Magento 2 store.
- Run the command
php -f bin/magento module:disable Mirasvit_Email Mirasvit_EmailDesigner Mirasvit_EmailReportto disable the extension. - Log in to the Magento backend and refresh the store cache (if enabled).
Extension Removal
To uninstall the extension, please take the following steps:
- Log in to the SSH console on your server and navigate to the root directory of the Magento 2 store.
- Run the command
composer remove mirasvit/module-emailto remove the extension. - Log in to the Magento backend and refresh the store cache (if enabled).
Change Log
2.11.6
(2026-06-09)
Fixed
- "Customer / No Activity" trigger failed to send emails on MySQL 8 — Stores running MySQL 8 (which enforces strict
ONLY_FULL_GROUP_BYby default) received a database error each time the trigger event query ran, preventing all inactivity follow-up emails from being dispatched. The query has been corrected and the trigger now works correctly on MySQL 8.
2.11.5
(2026-06-08)
Features
- Capture guest emails from any input field before checkout — A new lightweight script runs on every storefront page and listens to email, name, and username fields — including third-party newsletter popups and login forms. As soon as a guest types their email address, it is saved to their session and current cart so abandoned-cart triggers can fire even if they never reach the checkout page. Three modes are available: Always on, Off, or Disabled for EU visitors (the EU option requires the MaxMind GeoLite2 database configured under Stores → Configuration → Mirasvit Extensions → Developer → IP Geolocation). Configure at Stores → Configuration → Follow Up Email → AJAX data capturing. Works on both Luma and Hyva themes.
Improvements
- Manage Campaigns revenue dashboard now shows the correct currency per storefront — A new store scope picker on the Manage Campaigns page lets you filter revenue and order counts by storefront. When "All Store Views" is selected, revenue is summed in the website's base currency so the figures are comparable across stores. When a specific storefront is selected, revenue is shown in that store's display currency and filtered to orders from that store only. The selected store scope is preserved when changing the date range or navigating within the page. ⚠️
mst_emailreport_ordergains two new columns:store_id(smallint) andbase_amount(decimal 12,3). Both columns are backfilled automatically fromsales_orderonsetup:upgrade.
Fixed
- Manage Campaigns info banner text was partially obscured by an icon — A Magento status icon overlapped the first word of the scope note shown above the campaigns list. The conflicting CSS class has been removed and the banner now displays correctly.
- Duplicate question-mark icon on the Manage Campaigns toolbar — A generic Adobe "What is this?" tooltip appeared alongside the module-specific "Learn more about Email Campaigns" link, producing two identical icons side by side. The redundant icon has been removed.
2.11.4
(2026-06-02)
Improvements
- XML schema locations in all
etc/configuration files now use URN catalog references instead of relative paths, ensuring correct IDE validation regardless of where the module is installed on disk.
Fixed
- ⚠️ Generic
DataObjectmethods (getData,setData,hasData,addData,save,load,delete, and others) have been removed from theCampaignInterface,ChainInterface,QueueInterface,TriggerInterface, andUnsubscriptionInterfaceAPI Data interfaces — they were incorrectly exposed in REST and SOAP API responses. Also removed:TriggerInterface::getRule()/setRule()andQueueInterface::setArgs(). Custom code that calls these methods through an interface type hint must be updated to use the concrete model class or the specific typed getter/setter instead.
2.11.3
(2026-05-26)
Fixed
- Removed
unserialize()fallback inMirasvit\Email\Helper\Serializer. The helper is now JSON-only and marked@deprecatedin favour of\Magento\Framework\Serialize\Serializer\Json.
2.11.2
(2026-05-15)
Features
- Trigger emails when a specific product is added to cart or purchased — Two new trigger events let you send targeted follow-ups based on individual product interactions. "Product / Added to Cart" fires each time a customer adds a product to their cart (with a configurable deduplication window to avoid sending the same email too frequently), and "Product / Ordered" fires for each product line in a completed order. Both events make product, customer, cart/order, and store data available in your email templates.
Improvements
- Follow Up Email tab on the customer profile now loads faster and shows more controls — The "Follow Up Email" tab on the admin customer edit page now loads its content on demand (AJAX), so the customer page opens faster. The tab also gains column sorting, filters, the email subject column, and a Cancel button to remove a pending scheduled email directly from the customer profile without navigating away.
Fixed
- Campaign listing page errored when a condition class was no longer available — If a trigger condition referenced a class that was removed or renamed (for example after uninstalling a module), the campaigns listing page threw a fatal error. The page now skips unresolvable condition classes and continues loading the rest of the campaigns. The "no campaigns" empty-state banner is also now hidden when at least one campaign exists.
2.11.1
(2026-05-13)
Fixed
- Trigger audience and product conditions broken after upgrading to 2.11.0 — Triggers with audience or product conditions (e.g. "only send to customers in group X", "only if cart contains product Y") silently ignored those conditions after the 2.11.0 upgrade. Run
setup:upgradeto apply the included data migration that repairs the stored condition rules. - Abandoned cart emails not sending in some environments — Quote IDs retrieved from the event queue as text strings caused cart lookups to fail, preventing abandoned cart emails (and other quote-based triggers) from being sent or populated with the correct cart data.
2.11.0
(2026-05-11)
Features
- One-click unsubscribe compliance — All Follow Up emails now include RFC 8058
List-Unsubscribeheaders, satisfying Google's and Yahoo's 2024 bulk-sender requirements. Subscribers can unsubscribe with a single click directly from Gmail, Outlook, and other supporting email clients, improving deliverability and reducing spam reports. - Invoice, shipment, and credit memo triggers — New trigger events fire when an invoice, shipment, or credit memo is created for an order. Shipment emails can include the carrier name and tracking number via the
{{ order.carrier_name }}and{{ order.tracking_number }}template variables. - Wishlist event triggers — Triggers can now fire when a customer's wishlist product comes back in stock, drops in price, or runs low on inventory. Two additional triggers cover when an item is added to a wishlist or the wishlist is shared.
- Configurable event parameters — When editing a trigger, the form now shows settings specific to the chosen event type (for example, the inactivity period for a "no activity" event) so each trigger can be tuned without touching the global configuration.
- Admin alert for missing message queue consumer — A warning banner appears in the Email admin panel if the
mirasvit.emailevent.mq.registerconsumer is not configured inenv.php, preventing silent event-processing failures.
Improvements
- Pre-built wishlist and re-engagement campaign templates — New built-in campaign templates are available in the sample data: a Wishlist Campaign (back in stock, price drop, low stock) and a Customer Re-engagement campaign to win back shoppers who have been inactive.
- Improved admin accessibility — Admin panel pages now meet WCAG 2.2 AA standards, with better keyboard navigation and screen reader support.
- ⚠️ Email event engine is now self-contained — The event engine (previously shipped as the separate Mirasvit_Event module) is now built directly into module-email. If Mirasvit_Event was installed, all event records, wishlist product states, and tracking flags are migrated automatically on
setup:upgrade. Themst_event_eventandmst_event_wishlist_product_statetables are replaced bymst_email_eventandmst_email_wishlist_product_state.
Fixed
- Slow email delivery on stores with large queues — Database indexes on
mst_email_queue.uniq_hashandmst_email_queue.recipient_emailwere missing, causing full table scans that took 3+ minutes on queues with 100,000+ rows and blocking all email delivery. The indexes are added automatically viasetup:upgrade.
2.10.1
(2026-04-28)
Features
- Quick email preview in campaign management — click the eye icon on any email step card to instantly see a fully rendered preview of the email (subject and content) in a popup, without leaving the page. Available on both the campaign listing and the campaign detail view. Preview is generated with randomised test data so no real customer records are created or affected.
Fixed
- Fixed SOAP API WSDL generation errors caused by untyped
@return arraydocblocks in the module's API interfaces — resolves failures for stores using SOAP-based integrations with this module.
2.10.0
(2026-04-20)
Features
- Selected product options in cart item emails — new
{{ item.options }}Liquid variable exposes the selected size/color/custom options for each cart or order item, so abandoned-cart and similar emails can show which variant the shopper had in their cart. The default abandoned-cart template now renders options automatically. Existing custom templates are unaffected; to opt in, insert theitem.optionssnippet from the "Insert Variable" picker or paste{% for opt in item.options %}{{ opt.label }}: {{ opt.value }}{% endfor %}. - Admin UI localization — wrapped admin strings in
__()across the Email and Email Designer modules and shipped translations for 44 locales (uk_UA, de_DE, fr_FR, es_ES, it_IT, pt_BR, nl_NL, pl_PL, cs_CZ, sk_SK, hu_HU, ro_RO, bg_BG, hr_HR, sl_SI, ca_ES, de_CH, fr_CA, pt_PT, es_AR, nl_BE, en_GB, en_AU, da_DK, sv_SE, nb_NO, fi_FI, is_IS, et_EE, lv_LV, lt_LT, el_GR, mk_MK, tr_TR, ja_JP, ko_KR, zh_Hans_CN, zh_Hant_TW, th_TH, vi_VN, hi_IN, id_ID, ar_SA, he_IL).
2.9.2
(2026-04-17)
Fixed
- Fixed abandoned cart emails being sent to customers who had already placed an order when Magento assigned a new quote ID mid-checkout (e.g. after login, switching devices, or using certain payment methods)
- Fixed prices displaying in the wrong currency in emails sent from non-default store views — the
format_priceLiquid filter was using the default store's currency instead of the store view's configured currency - Fixed email links with URL anchors (e.g.
-form) breaking when UTM tracking parameters were appended — the anchor was placed before the query string and ignored by the browser - Fixed cross-sell product recommendations rendering left-aligned instead of centered in email templates
- Fixed newsletter unsubscribe URL not being available as a template variable in PHP-based email templates (it was already available in Liquid templates)
2.9.1
(2026-03-23)
Fixed
- Fixed missing
unsubscriptions_urltemplate variable in the Liquid template engine
2.9.0
(2026-03-20)
Features
- Unsubscription management page — customers can now view and manage their email subscriptions per trigger from a dedicated frontend page
- REST API — full API coverage for campaigns, triggers, chains, queue, unsubscriptions, and events (CRUD operations, test sending, duplication, and more)
- Configurable unsubscription redirect — choose which CMS page customers see after unsubscribing via a URL link (configured in admin settings)
Fixed
- Fixed date filters and selectable filters not displaying correctly in audience conditions
2.8.11
(2026-03-06)
Improvements
- Magento 2.4.9 compatibility
2.8.10
(2026-02-06)
Features
- Wishlist product events — three new trigger events: wishlist product back in stock, wishlist product discounted, and wishlist product low stock
2.8.9
(2026-01-21)
Fixed
- Fixed cross-sell product recommendations not loading when using Mirasvit Related Products integration
2.8.8
(2025-11-28)
Fixed
- Fixed "Call to a member function getValue() on bool" error when processing event conditions
2.8.7
(2025-11-24)
Fixed
- Fixed coupon codes remaining valid past their expiration date
2.8.6
(2025-11-18)
Fixed
- Fixed "Cancel" button not working when creating a new campaign
- Fixed custom campaign name not saving when creating a campaign from a template
- Fixed trigger help block styles in admin
2.8.5
(2025-10-24)
Fixed
- Fixed error when sending emails with cross-sell product recommendations
- Fixed typo "Unsubcribed" in queue status labels
2.8.4
(2025-10-21)
Features
- Campaign-level email limits — set a maximum number of emails per campaign within a configurable time period to prevent over-sending
- ⚠️ Two new database columns added to
mst_email_campaign:max_emailandmax_email_period
Improvements
- Added Mirasvit Customer Segments events support
2.8.3
(2025-09-01)
Improvements
- Emails are no longer sent to inactive B2B company customers
2.8.2
(2025-08-08)
Fixed
- Fixed email cancellation not working due to overly restrictive condition logic
2.8.1
(2025-07-25)
Fixed
- Restored the "All Triggers" option in the Unsubscriptions dropdown
2.8.0
(2025-06-06)
Improvements
- WCAG 2.2 AA compliance — added ARIA attributes, semantic HTML, and improved alt text across admin and frontend templates
2.7.12
(2025-05-22)
Fixed
- Fixed trigger email validation being bypassed when saving triggers
2.7.11
(2025-05-02)
Fixed
- Fixed email template and theme file operations failing with remote storage (e.g., AWS S3)
2.7.10
(2025-04-10)
Improvements
- PHP 8.4 compatibility — updated nullable type declarations across the module
2.7.9
(2025-04-07)
Fixed
- Fixed infinite loop when loading a quote in email templates (circular dependency removed)
2.7.8
(2025-03-11)
Fixed
- Fixed sorting not working on the Event Logs page
2.7.7
(2025-01-09)
Fixed
- Fixed input fields display issue in admin forms
2.7.6
(2025-01-08)
Improvements
- Redesigned admin settings page with improved labels, tooltips, and descriptions
- Converted Email Designer template and theme grids to Magento UI components with mass actions
2.7.5
(2024-12-18)
Features
- Related Products integration — use product selections from Mirasvit Related Products blocks as cross-sell recommendations in emails
2.7.4
(2024-12-10)
Improvements
- Added
altattribute to<img>tags in cross-sell templates and tracking pixel for improved accessibility and SEO - ⚠️ Changed
subjectcolumn type fromtexttovarchar(1024)in the queue table to optimize database size
2.7.3
(2024-12-02)
Improvements
- Internal version bump (accessibility changes included in 2.7.4)
2.7.2
(2024-11-25)
Improvements
- Added "Unsubscription List" to the admin access control list for fine-grained role permissions
Fixed
- Fixed SQL error in campaign quick data bar when no triggers are assigned
- Fixed SQL error when generating the restore cart URL
2.7.1
(2024-10-02)
Fixed
- Fixed Facebook and Twitter URLs not rendering in email templates
2.7.0
(2024-07-24)
Features
- Reward Points variables — use reward balance, earned/spent points, spent amount, invitation link, and customer tier in email templates (requires Mirasvit Reward Points module)
- Campaign reporting with time range — filter campaign statistics (emails, opens, clicks, orders, revenue) by date range with sparkline charts
2.6.4
(2024-06-14)
Fixed
- Fixed "Send Test Email" button not working in trigger and campaign views
2.6.3
(2024-06-03)
Fixed
- Fixed email open tracking not working when the email layout does not contain a
<body>tag
2.6.2
(2024-05-27)
Improvements
- Added "We Miss You" cancellation events to pre-installed trigger templates
- Added GDPR cookie compatibility for Mirasvit GDPR Cookie module
Fixed
- Fixed abandoned cart emails being scheduled one hour earlier than configured
- Added XSS protection to admin form fields
2.6.1
(2024-04-11)
Improvements
- Improved directory permission checks before modifying file permissions
Fixed
- Fixed email cancellation not working for order status change events
- Fixed date picker display issue in admin
2.6.0
(2024-03-06)
Features
- Remote storage support — email templates and themes now work with AWS S3 and other remote storage providers configured via Magento Remote Storage
2.5.10
(2024-02-13)
Fixed
- Fixed PHP 8.2 deprecation warning when deleting an email template ("Creation of dynamic property is deprecated")
2.5.9
(2024-01-25)
Improvements
- Added output escaping to admin preview pages to prevent XSS
2.5.8
(2024-01-18)
Fixed
- Fixed incorrect links in emails when sending via cron in some configurations
2.5.7
(2023-12-19)
Fixed
- Fixed click tracker error: "strpos(): Argument must be of type string, bool given"
2.5.6
(2023-12-08)
Fixed
- Fixed success message not displaying when a customer unsubscribes from trigger emails
2.5.5
(2023-11-10)
Fixed
- Fixed
{% if crosssell.cross_sell_html %}condition not evaluating correctly in email templates
2.5.4
(2023-11-06)
Features
- Configurable cleanup period — set the number of days after which old events and emails are automatically deleted by cron (Marketing > Follow Up Email > Settings)
2.5.3
(2023-10-13)
Improvements
- Trigger events are now checked only for stores assigned to the trigger
- Added error handling to prevent the cron schedule from hanging on failures
Fixed
- Fixed "Excluded Weekdays" field not saving correctly on the email edit page
- Fixed chain saving issue in some configurations
2.5.2
(2023-08-15)
Fixed
- Fixed cancellation events failing when multiple abandoned carts are processed in a single cron run
2.5.1
(2023-08-02)
Fixed
- Fixed PHP 8.2 deprecation warnings: "Creation of dynamic property is deprecated" in email template filters and trigger source
2.5.0
(2023-07-06)
Improvements
- Deleting a theme that is used by a template is now blocked with an error message
- Deleting a template that is used by a campaign chain is now blocked with an error message
- Unsubscribe confirmation is now shown on a dedicated page instead of the homepage
Fixed
- Fixed trigger "Active From" and "Active To" dates not working (timezone conversion issue)
- Fixed error when sending a test email
- Fixed email template not updating after clicking "Auto Refresh"
- Fixed "Argument must be of type Order\Address, null given" error when sending emails for orders without a shipping address
2.4.9
(2023-06-15)
Fixed
- Fixed error on the Unsubscription grid page in admin
2.4.8
(2023-06-13)
Fixed
- Fixed events being processed for triggers not assigned to any store
2.4.7
(2023-06-05)
Features
- Audience rules for events — validate events against trigger audience rules before sending
Improvements
- Redesigned the campaigns overview interface
- Replaced Queue and Event admin grids with Magento UI components for better filtering, sorting, and mass actions
2.4.6
(2023-03-27)
Fixed
- Fixed abandoned cart cancellation events not canceling scheduled emails
2.4.5
(2023-02-07)
Fixed
- Fixed email cancellation canceling all emails for a trigger instead of only emails for the current entity (e.g., the specific cart or order)
- Fixed PHP 8.1 type error in unsubscription handling
2.4.3
(2022-10-13)
Improvements
- Code improvements for Magento Marketplace compliance
2.4.1
(2022-09-16)
Fixed
- Fixed missing products in wishlist emails
- Fixed "Delivery Time Delay" period not updating correctly in the email editor
- Updated button styles in pre-installed email templates
2.4.0
(2022-08-16)
Improvements
- Added support for Magento Message Queue for asynchronous email processing
Fixed
- PHP 8.1 compatibility
2.3.5
(2022-08-09)
Fixed
- Fixed variable errors in email templates
2.3.4
(2022-07-15)
Fixed
- Fixed error when processing events
- Fixed error with
number_formatfunction in templates
2.3.3
(2022-07-13)
Fixed
- Fixed error with
base64_encodefunction in templates - Fixed error when sending test emails
- Fixed incorrect redirect when clicking email links
2.3.2
(2022-06-28)
Fixed
- Fixed emails not being sent
2.3.1
(2022-06-23)
Fixed
- Fixed PHP return type errors
2.3.0
(2022-06-22)
Improvements
- ⚠️ Merged module-email-design and module-email-report into module-email — these are no longer separate packages
- ⚠️ Removed service and repository interfaces (replaced with simplified implementations)
- Updated admin interface
- Removed
db_schema_whitelist.json
Fixed
- Fixed variable rendering in email templates
2.2.3
(2022-05-25)
Fixed
- Fixed admin page styles on Magento 2.4.4
- Fixed declarative schema issue
2.2.0
(2022-05-23)
Improvements
- ⚠️ Migrated to Magento declarative schema (from InstallSchema/UpgradeSchema)
2.1.45
(2020-11-03)
Fixed
- Fixed missing "Send Test Email" button on Magento 2.4.x
- Fixed checkout processing issue
- Fixed event grid filtering
2.1.44
(2020-09-07)
Fixed
- Fixed checkout processing compatibility with Magento 2.4
2.1.43
(2020-07-29)
Improvements
- Magento 2.4 compatibility
2.1.42
(2020-06-18)
Fixed
- Fixed "Send" action button not working in Mail Log (Queue)
2.1.41
(2020-05-27)
Improvements
- Added warning message when sending a test email without a trigger event specified
Fixed
- Fixed HTML tags displaying as raw text in emails
2.1.40
(2020-03-13)
Improvements
- Added Mageplaza SMTP compatibility
2.1.39
(2020-03-04)
Fixed
- Fixed incorrect redirect URLs for cross-sell products in emails
2.1.38
(2020-02-26)
Fixed
- Fixed incorrect redirect URLs for cross-sell products in emails
2.1.37
(2020-02-18)
Features
- Coupon expiration date variable — use
{{ coupon.expiration_date }}in email templates
2.1.36
(2020-02-10)
Features
- Reorder URL variable — use a URL that creates a new checkout cart for reorder in email templates
2.1.35
(2020-01-08)
Features
- Unsubscription management — manage email subscriptions and unsubscriptions at Marketing > Follow Up Email > Unsubscription List
Improvements
- Added recipient email validation before sending to prevent errors with invalid addresses
2.1.34
(2020-01-08)
Features
- Mass "Reset & Process" action — reset and reprocess events in bulk from the Events grid
2.1.33
(2019-12-16)
Features
- Customer group change event — trigger emails when a customer changes their group
2.1.32
(2019-12-05)
Fixed
- Fixed cross-sell block showing out-of-stock and disabled products
2.1.31
(2019-12-03)
Improvements
- Added Mageplaza SMTP compatibility
Fixed
- Fixed coupon codes remaining active after their expiration date
2.1.30
(2019-11-05)
Fixed
- Fixed "Call to undefined method EmailMessage::setSubject()" error
2.1.29
(2019-10-31)
Improvements
- Magento 2.3.3 compatibility
2.1.28
(2019-08-14)
Improvements
- Code quality improvements for Magento Marketplace
2.1.27
(2019-07-30)
Fixed
- Fixed conflict with Mageplaza SMTP extension
2.1.26
(2019-07-11)
Fixed
- Fixed events not being processed
2.1.25
(2019-06-26)
Fixed
- Fixed incorrect "Scheduled At" date display for queued emails
2.1.24
(2019-04-22)
Improvements
- Ebizmarts Mandrill compatibility
2.1.23
(2019-03-27)
Fixed
- Fixed incorrect "Sender From" name in emails
2.1.22
(2019-03-22)
Fixed
- Fixed missing Google Analytics parameters in email URLs
2.1.21
(2019-03-18)
Fixed
- Fixed compatibility with Magento 2.1
- Fixed sending test emails
- Fixed error when deleting a trigger's email chain from a campaign
2.1.20
(2019-02-21)
Fixed
- Fixed compilation error on Magento 2.1
2.1.19
(2019-02-11)
Fixed
- Fixed "Active From" and "Active To" dates not saving correctly for triggers
2.1.18
(2019-02-08)
Fixed
- Fixed error blocking Magento installation
- Fixed "View in Browser" showing the wrong email
- Fixed "recipient address is not a valid RFC-5321" error when sending emails
2.1.17
(2018-12-24)
Fixed
- Fixed error after clicking a link in an email
2.1.16
(2018-12-10)
Fixed
- Fixed trigger rule edit section not loading
2.1.15
(2018-11-30)
Improvements
- Magento 2.3 compatibility
2.1.14
(2018-10-22)
Fixed
- Fixed incorrect data in email reports
- Fixed CSS issue in admin
2.1.12
(2018-10-03)
Improvements
- Improved email reports with more detailed statistics
2.1.11
(2018-09-26)
Fixed
- Fixed test emails continuing to be sent automatically
- Fixed error when opening a campaign after its email chain template was removed
- Fixed DI compilation error
2.1.10
(2018-09-06)
Fixed
- Fixed emails being queued without a recipient email address
2.1.9
(2018-09-05)
Fixed
- Fixed mass "Send" action not working in Mail Log
2.1.8
(2018-08-30)
Fixed
- Fixed test email not sending when admin URL differs from the frontend URL
2.1.7
(2018-08-29)
Fixed
- Fixed unsubscribe variable not working in email templates
2.1.6
(2018-08-03)
Fixed
- Fixed campaign edit page not loading after update
2.1.5
(2018-07-31)
Fixed
- Fixed campaigns page not loading on Magento 2.1.0
2.1.4
(2018-07-13)
Features
- Disable newsletter success email — option to suppress Magento's default newsletter subscription success email
2.1.3
(2018-07-09)
Improvements
- Internal code refactoring
2.1.2
(2018-07-09)
Fixed
- Fixed incorrect Facebook and Twitter URLs in emails
2.1.1
(2018-07-03)
Improvements
- Improved cross-sell product retrieval in emails
- Email template text can now be translated via i18n CSV files
- Muted payment-related rendering errors in native Magento email templates (logged instead)
- Test and preview emails now use the latest order information
Fixed
- Fixed campaigns not being created correctly from templates
- Fixed email template editor losing focus in Safari
- Fixed image rendering errors in test and preview emails
- Fixed native Magento email templates not rendering correctly
- Fixed compilation error on Magento versions prior to 2.2
2.1.0
(2018-06-28)
Features
- Native Magento email templates — use standard Magento email templates within Follow Up Email campaigns
Improvements
- Improved product image selection algorithm in email templates
Fixed
- Fixed product price changes incorrectly triggering the Abandoned Cart event
2.0.4
(2018-05-31)
Fixed
- Fixed invalid trigger link on the Queue Preview page
- Fixed "Cannot save trigger" error related to resource permissions
2.0.3
(2018-05-24)
Fixed
- Fixed error during
setup:upgradeafter module installation
2.0.2
(2018-05-17)
Fixed
- Fixed error opening campaigns on Magento versions prior to 2.2
2.0.1
(2018-05-11)
Fixed
- Fixed error during module update (incorrect Email Designer module version)
- Fixed DI compilation error
2.0.0
(2018-05-11)
Features
- Major release — redesigned UI, new campaigns system, improved statistics and reporting
1.1.25
(2018-04-27)
Improvements
- Compatibility with latest email report module
Fixed
- Fixed error previewing templates (negative SQL offset)
- Fixed "Active From" and "Active To" dates not saving
1.1.24
(2018-03-02)
Fixed
- Removed "custom" area from the default email design
1.1.23
(2018-02-27)
Fixed
- Fixed emails being sent to all store views instead of only the configured ones (regression from 1.1.19)
1.1.22
(2018-02-16)
Fixed
- Fixed same coupon code being reused across different emails of the same trigger
1.1.21
(2018-02-12)
Improvements
- Migrated Email Theme editor to Liquid template syntax — avoids ModSecurity blocking template rendering
Fixed
- Fixed coupon block displaying in emails even when disabled
1.1.20
(2018-02-09)
Features
- Product View event — trigger emails when a customer views a product, with a default trigger template included
- New condition — "Recipient does not have emails for triggers" to prevent duplicate sends
Fixed
- Fixed cross-sell products not displaying in emails
Improvements
- Only active events are now registered for processing
1.1.19
(2018-01-30)
Improvements
- Events are now processed in real-time using Magento message queue
1.1.18
(2018-01-26)
Fixed
- Fixed error during
setup:di:compile - Fixed error in restore checkout — used correct Quote model alias
1.1.17
(2018-01-24)
Improvements
- A new cart is now created if the previous one was already completed, preventing restore cart errors
1.1.16
(2018-01-18)
Fixed
- Fixed test emails not being sent
1.1.15
(2018-01-16)
Features
- Liquid template engine — new UI for working with variables in emails, with a menu of available variables
- Queue status is now set to "Error" when email sending fails
Fixed
- Fixed incorrect product URLs in emails (wrong store emulation)
- Fixed incorrect restore cart URL redirect from emails
1.1.10
(2017-12-11)
Fixed
- Fixed product URLs using incorrect store base URL
- Fixed Follow Up Email settings not showing for website and store view scopes
- Fixed sender name and email not using store-scope values when available
- Fixed trigger being duplicated on save
- Fixed incorrect restore cart URL redirect from emails
1.1.9
(2017-12-01)
Fixed
- Fixed non-triggering events being validated during event check
1.1.8
(2017-11-23)
Improvements
- Renamed admin grid columns for clarity
1.1.7
(2017-11-03)
Fixed
- Fixed test events being processed as real events
1.1.6
(2017-11-01)
Fixed
- Fixed trigger "Excluded Weekdays" setting not working
1.1.5
(2017-11-01)
Fixed
- Fixed installation error
- Fixed trigger listing not loading due to trigger rules loading error
1.1.4
(2017-10-30)
Fixed
- Fixed incorrect MySQL column type for created/updated timestamps
1.1.3
(2017-10-30)
Improvements
- PHP 7.0+ compatibility
1.1.2
(2017-10-27)
Fixed
- Fixed rule migration issues
1.1.1
(2017-10-27)
Fixed
- Removed unused classes and cleaned up console commands
1.1.0
(2017-10-26)
Features
- Sample triggers — pre-built trigger templates to get started quickly
- Event module integration — integrated with Mirasvit Event module for extensible event handling
Improvements
- Trigger rules automatically update when the event type is changed
- Only events available for Follow Up Email are shown in the event selector
Fixed
- Fixed incorrect trigger link in Queue view
- Fixed shopping carts with associated orders being incorrectly processed
- Fixed payment methods without labels not being filtered
1.0.57
(2017-09-28)
Fixed
- Fixed compilation error
1.0.56
(2017-09-27)
Improvements
- Magento 2.2 compatibility
1.0.55
(2017-09-05)
Fixed
- Fixed Administrator triggers being created incorrectly
- Event:
- Event:
- Event: