Welcome to the Event Watcher User Manual
Whether you are new to Event Watcher or an advanced user, you can find some useful information here.
In this guide, you'll learn how to:
- Install extension
- Quick Start:
- Create first Channel
- Create first Recipient
- Create first Notification
How to install the extension
- Backup your store database and web directory.
- Login to SSH console on your server and navigate to the root directory of the Magento 2 store.
- Copy installation instructions from the page My Downloadable Products to SSH console and press ENTER.
- Run command
php -f bin/magento module:enable Mirasvit_Core Mirasvit_Event Mirasvit_Mq Mirasvit_Notificatorto enable extension. - Run command
php -f bin/magento setup:upgradeto install extension. - Run command
php -f bin/magento cache:cleanfor clean cache. -
Deploy static view files
php -f bin/magento setup:static-content:deploy
Note
If you install the module manually to the"app/code/" directory, additionally install the required liquid/liquid and messengers' API libraries through composer:composer require "liquid/liquid:^1.3" "irazasyed/telegram-bot-sdk:^2.2" "maknz/slack:^1.7"
General Settings
Go to System -> Event Watcher and Notification -> Settings. You will see the following settings:
Events
-
Allowed Error Level - allows you to select registered error levels by the extension.
Note
The Error event has multiple levels, the low-level errors (Debug, Info, Notice, Warning) generate too many records that are registered by our extension and stored in the DB table mst_event_event.
Therefore in order to avoid the fast overflow of this table, we recommend you to observe only high priority error levels.
Setting Up a Channel
Channel is a medium used for communication or the passage of information to the target recipient or a group of recipients.
Out of the box, our extension provides 3 channels:
- Email - allows you to receive regular messages through your mail client.
- Slack - is a corporate messenger. It can be very useful to print some urgent messages to certain channels in order to inform responsible persons or the whole team about some event.
- Telegram - as Slack, Telegram is also a cloud-based cross-platform messaging app. It will always keep you posted.
How to Create New Channel
To create a new channel follow these steps:
- Go to System > Event Watcher and Notification > Manage Channels. Press the button Add New Channel.
- Fill in the following settings:
- Title - the name of a channel.
- Is Active - activate a channel.
- Channel Type - select desired channel type.
- Finally, fill in channel-specific settings. For more information, refer to the concrete channel details page.
- Press Save to complete.
How to establish Email Channel
How to establish Slack Channel
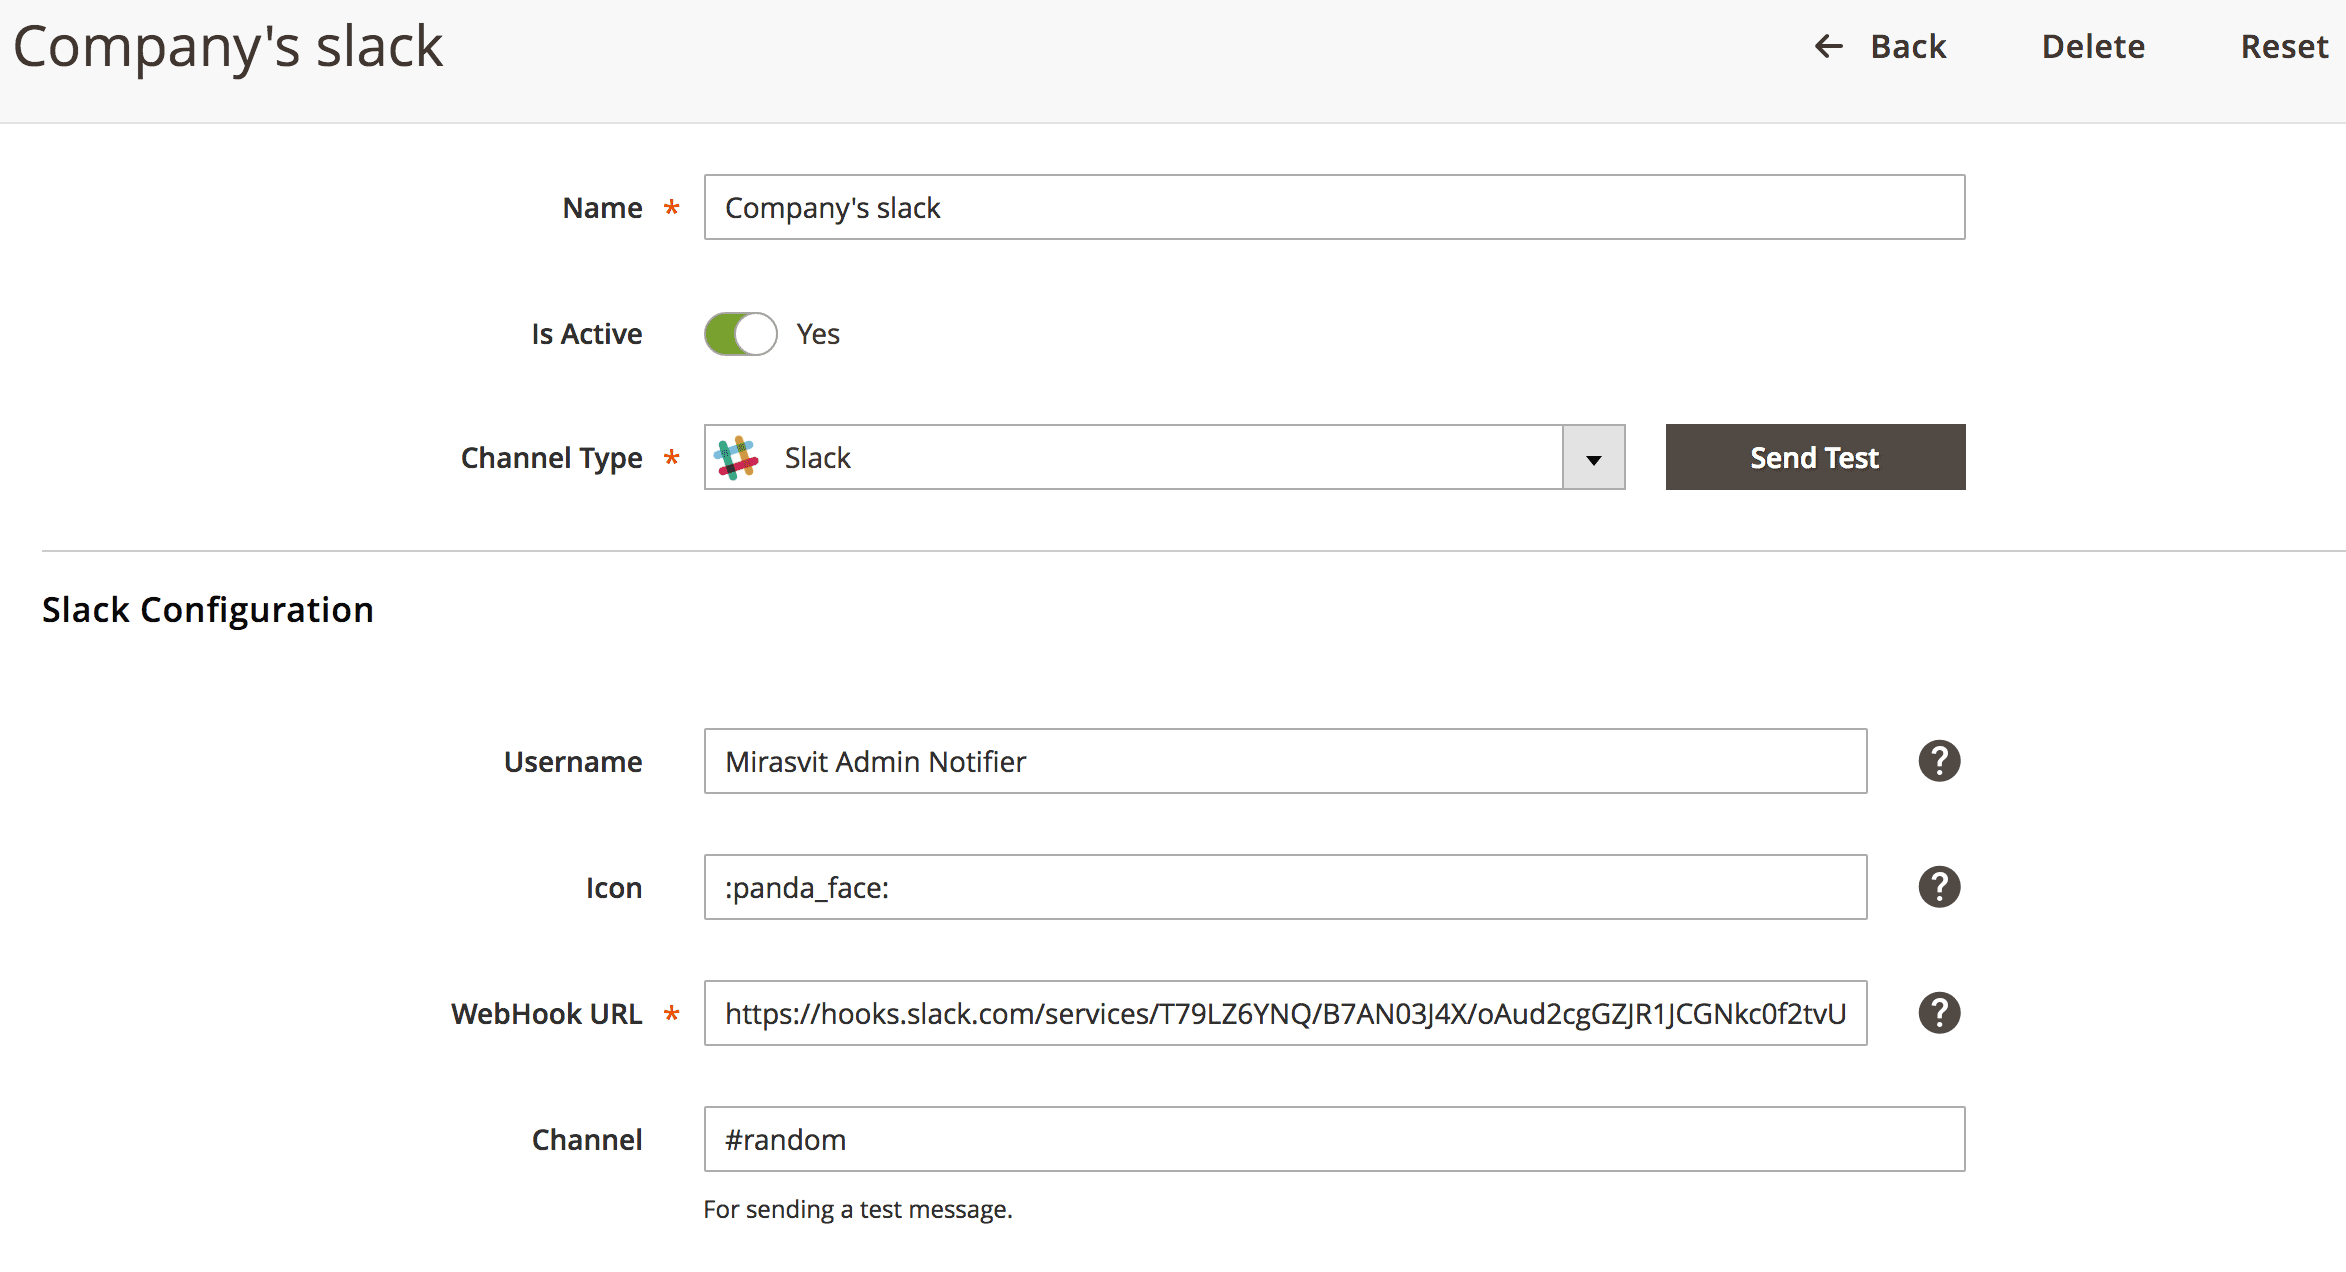
To use Slack, you need to create an incoming webhook. You can create it on your Slack account following this instruction.
Additionally, you can specify the following fields:
- Username - used as a name for the bot publishing the messages.
- Icon - used as an avatar for your bot.
- Channel - a Slack channel to send text messages to, including the leading hashtag character, e.g., #general
To verify a connection, you can send a test message which will be published in the default channel specified when creating an Incoming WebHook or to the channel specified in the settings.
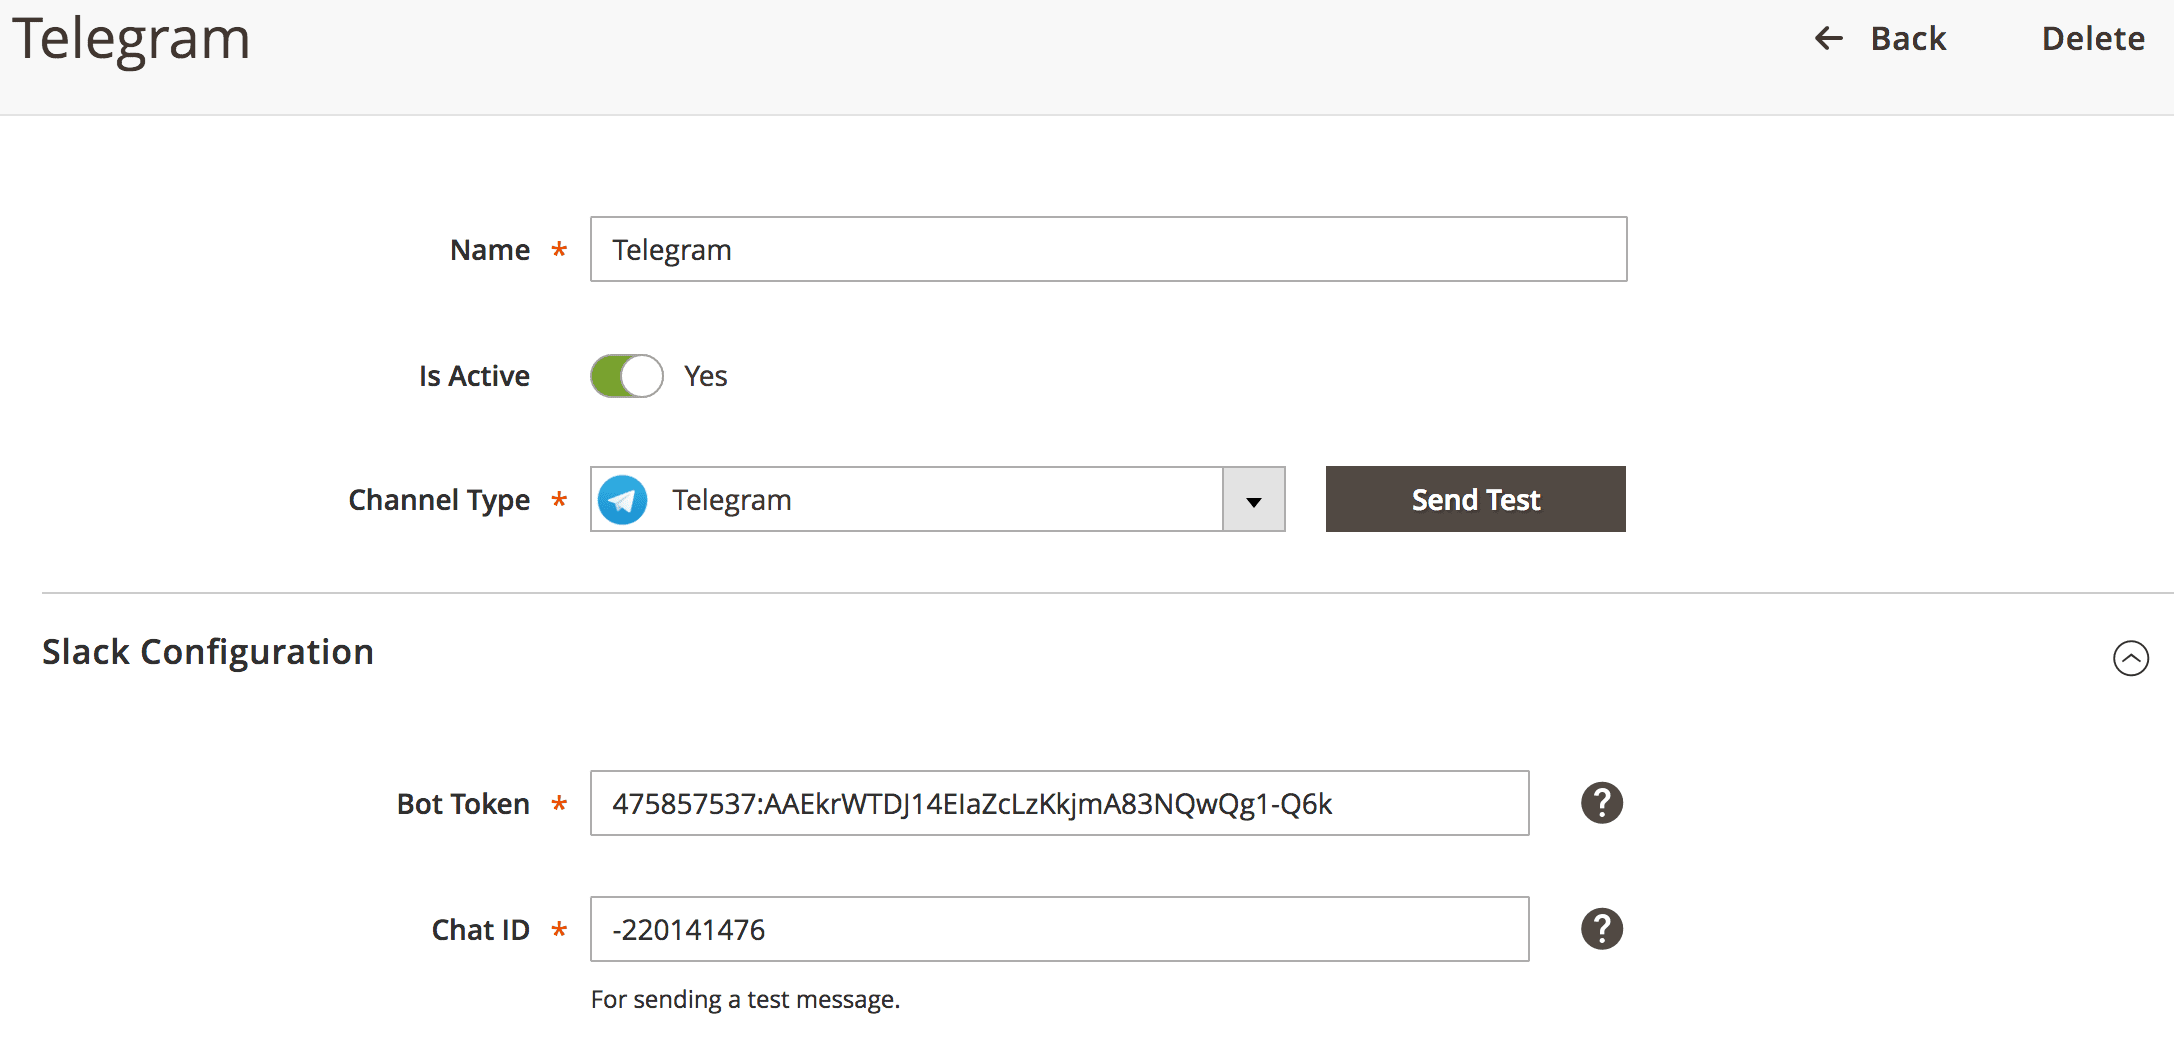
How to establish Telegram Channel
To use Telegram, you need to obtain a bot token. To get a Bot Token, you should create a bot first. For this follow the steps below:
- Find the BotFarther, talk to it, and follow a few simple steps.
- Upon completion, you will get an HTTP API token, which you should copy to the Bot Token field in the channel settings.
- In the end, you should start a chat with your bot to activate it.
To get a Chat ID follow the steps below:
- Find and start a chat with the GetId Bot.
- To get a Chat ID, send the
/my_idto the telegram bot @get_id_bot.
You can also publish messages to a group chat. To get a Group Chat ID follow the steps below:
- Find the GetId Bot.
- Add the @get_id_bot to the group you want to send messages to.
- Then send
/my_group_idin the group (group chat ID starts with a dash symbol). To send messages to a group, you should invite your bot (whose token is used for the channel) to the required group in Telegram.
To verify the connection, you can send a test message which will be published in the chat specified in the settings.
Setting Up a Channel
Channel is a medium used for communication or the passage of information to the target recipient or a group of recipients.
Out of the box, our extension provides 3 channels:
- Email - allows you to receive regular messages through your mail client.
- Slack - is a corporate messenger. It can be very useful to print some urgent messages to certain channels in order to inform responsible persons or the whole team about some event.
- Telegram - as Slack, Telegram is also a cloud-based cross-platform messaging app. It will always keep you posted.
How to Create New Channel
To create a new channel follow these steps:
- Go to System > Event Watcher and Notification > Manage Channels. Press the button Add New Channel.
- Fill in the following settings:
- Title - the name of a channel.
- Is Active - activate a channel.
- Channel Type - select desired channel type.
- Finally, fill in channel-specific settings. For more information, refer to the concrete channel details page.
- Press Save to complete.
How to establish Email Channel
How to establish Slack Channel
To use Slack, you need to create an incoming webhook. You can create it on your Slack account following this instruction.
Additionally, you can specify the following fields:
- Username - used as a name for the bot publishing the messages.
- Icon - used as an avatar for your bot.
- Channel - a Slack channel to send text messages to, including the leading hashtag character, e.g., #general
To verify a connection, you can send a test message which will be published in the default channel specified when creating an Incoming WebHook or to the channel specified in the settings.
How to establish Telegram Channel
To use Telegram, you need to obtain a bot token. To get a Bot Token, you should create a bot first. For this follow the steps below:
- Find the BotFarther, talk to it, and follow a few simple steps.
- Upon completion, you will get an HTTP API token, which you should copy to the Bot Token field in the channel settings.
- In the end, you should start a chat with your bot to activate it.
To get a Chat ID follow the steps below:
- Find and start a chat with the GetId Bot.
- To get a Chat ID, send the
/my_idto the telegram bot @get_id_bot.
You can also publish messages to a group chat. To get a Group Chat ID follow the steps below:
- Find the GetId Bot.
- Add the @get_id_bot to the group you want to send messages to.
- Then send
/my_group_idin the group (group chat ID starts with a dash symbol). To send messages to a group, you should invite your bot (whose token is used for the channel) to the required group in Telegram.
To verify the connection, you can send a test message which will be published in the chat specified in the settings.
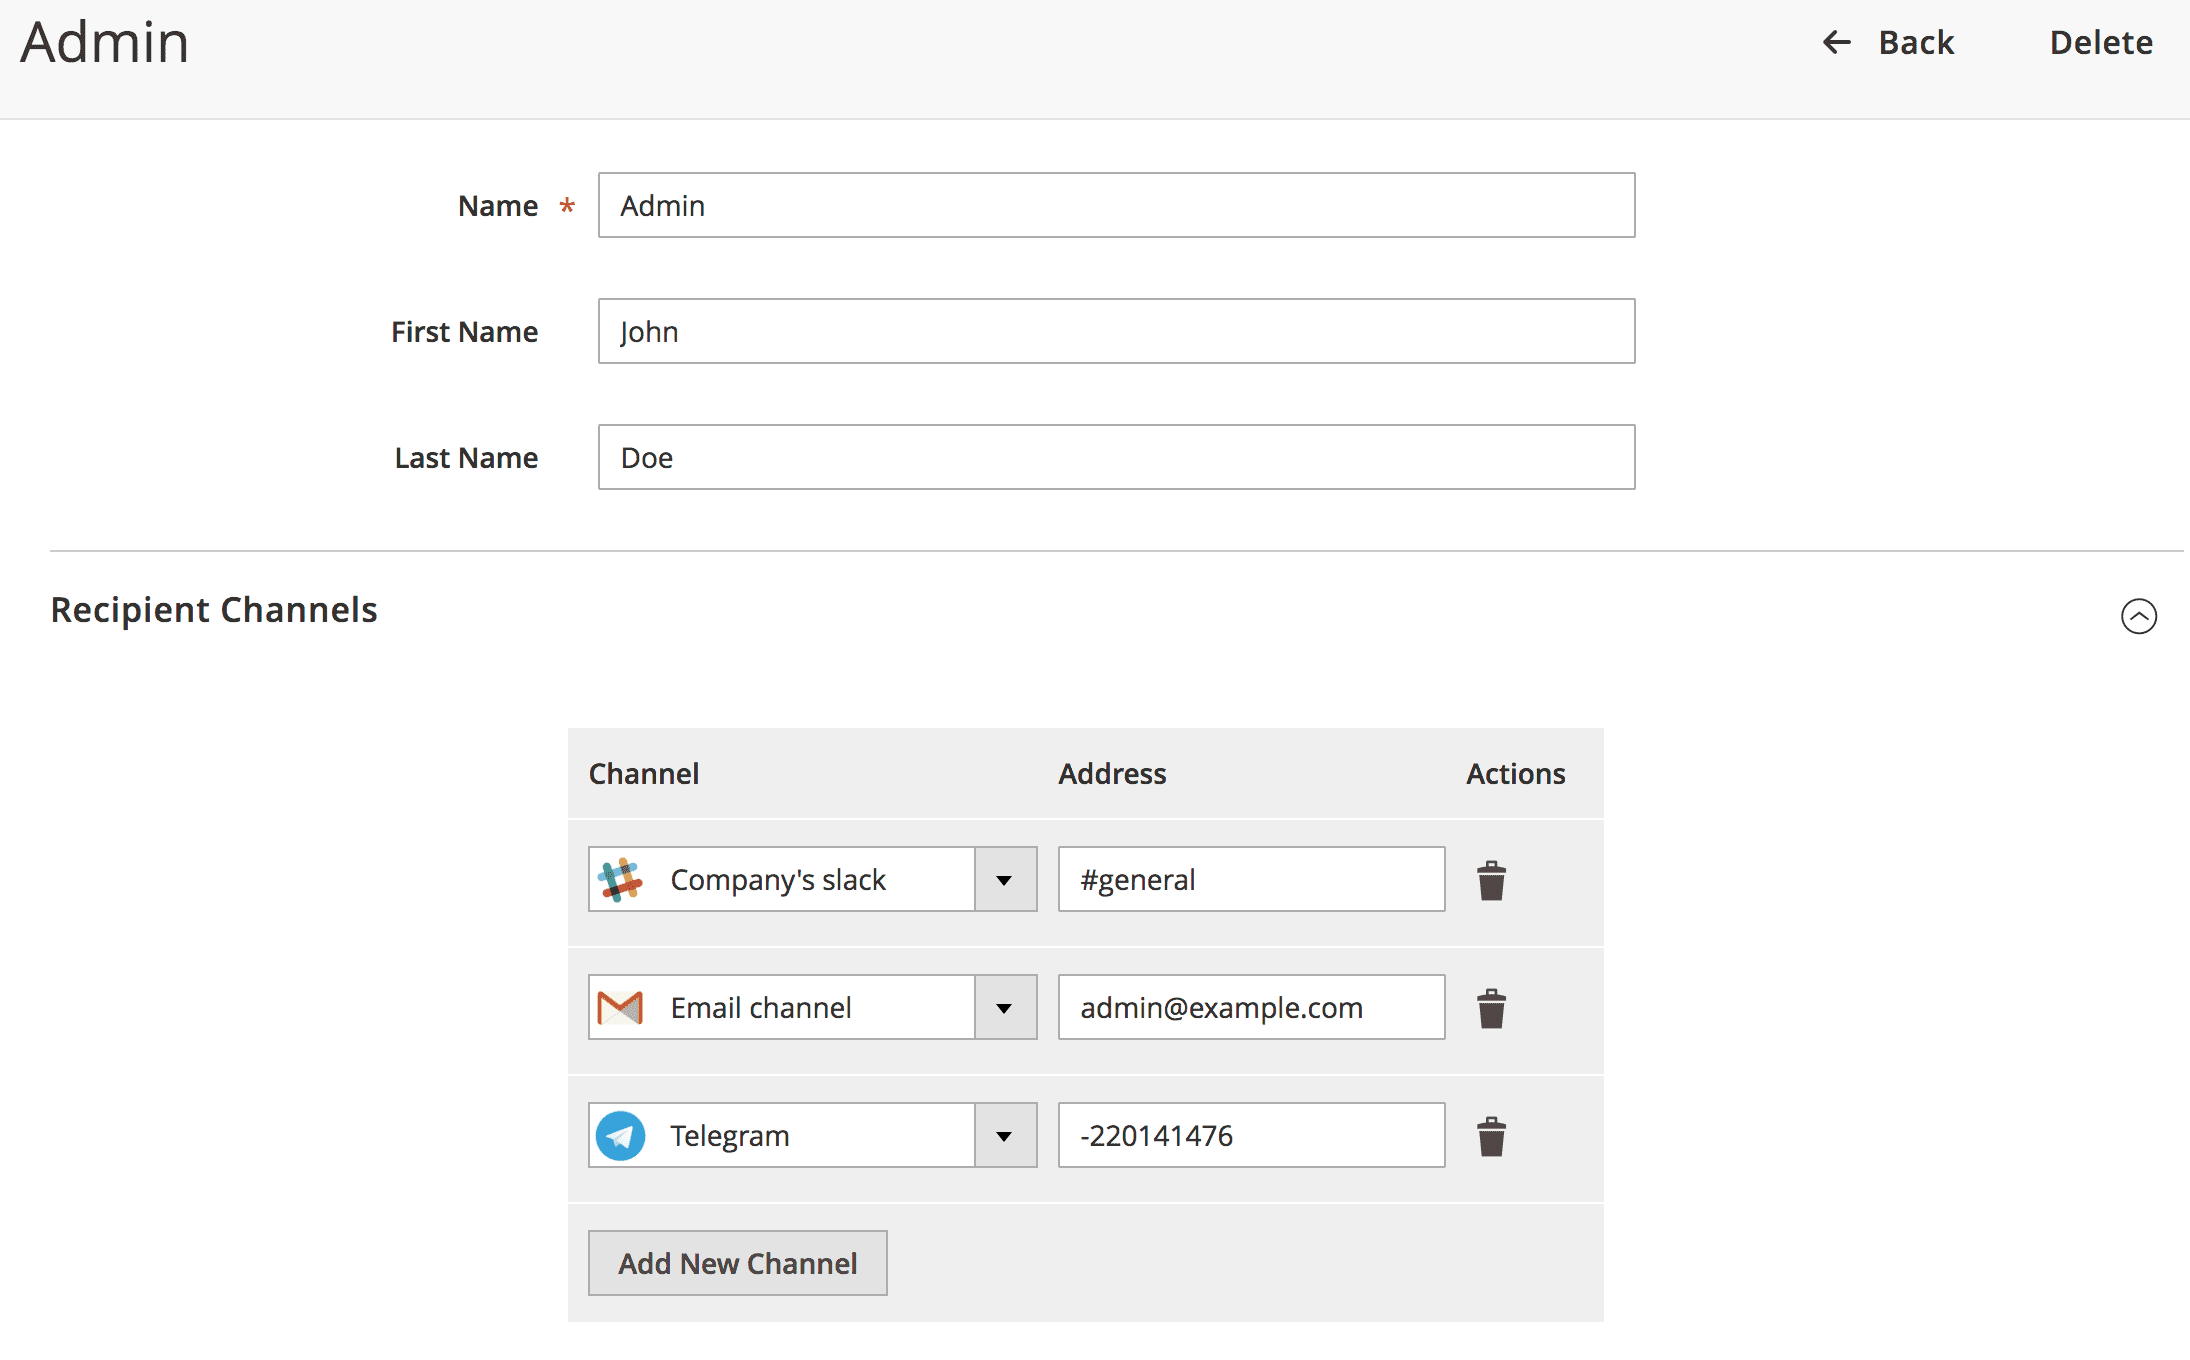
Setting Up a Recipient
Recipient is a target person who will receive the messages sent by notification.
To create a new channel follow these steps:
- Go to System > Event Watcher and Notification > Manage Recipients. Press button Add New Recipient.
- Fill in the following settings:
- General Information:
- Name - name of trigger.
- First Name - recipient first name.
- Last Name - recipient last name.
- General Information:
- Specify the channel details associated with this recipient:
- Channel - select one of the available channels.
- Address - specify the channel-specific address. For example:
- Slack Address - Slack channel starting with leading hash: #general.
- Telegram Address - here you should enter the Telegram Chat ID: 223151425.
- Email Address - use an email address of the desired recipient: [email protected]
Setting Up a Notification
Notification purpose is to send messages to the specified recipients when some certain event has occurred in your system.
In this context, an event is the certain action of a visitor of your site (e.g., login, registration, placing an order) or an action of a system (e.g., change order status, cron job execution).
All notifications are located at System -> Event Watcher and Notification -> Manage Notifications section. There you can edit existing notification, or create a new one.
Event watcher & notification for Magento 2 works for different store views.
How to Create New Notification
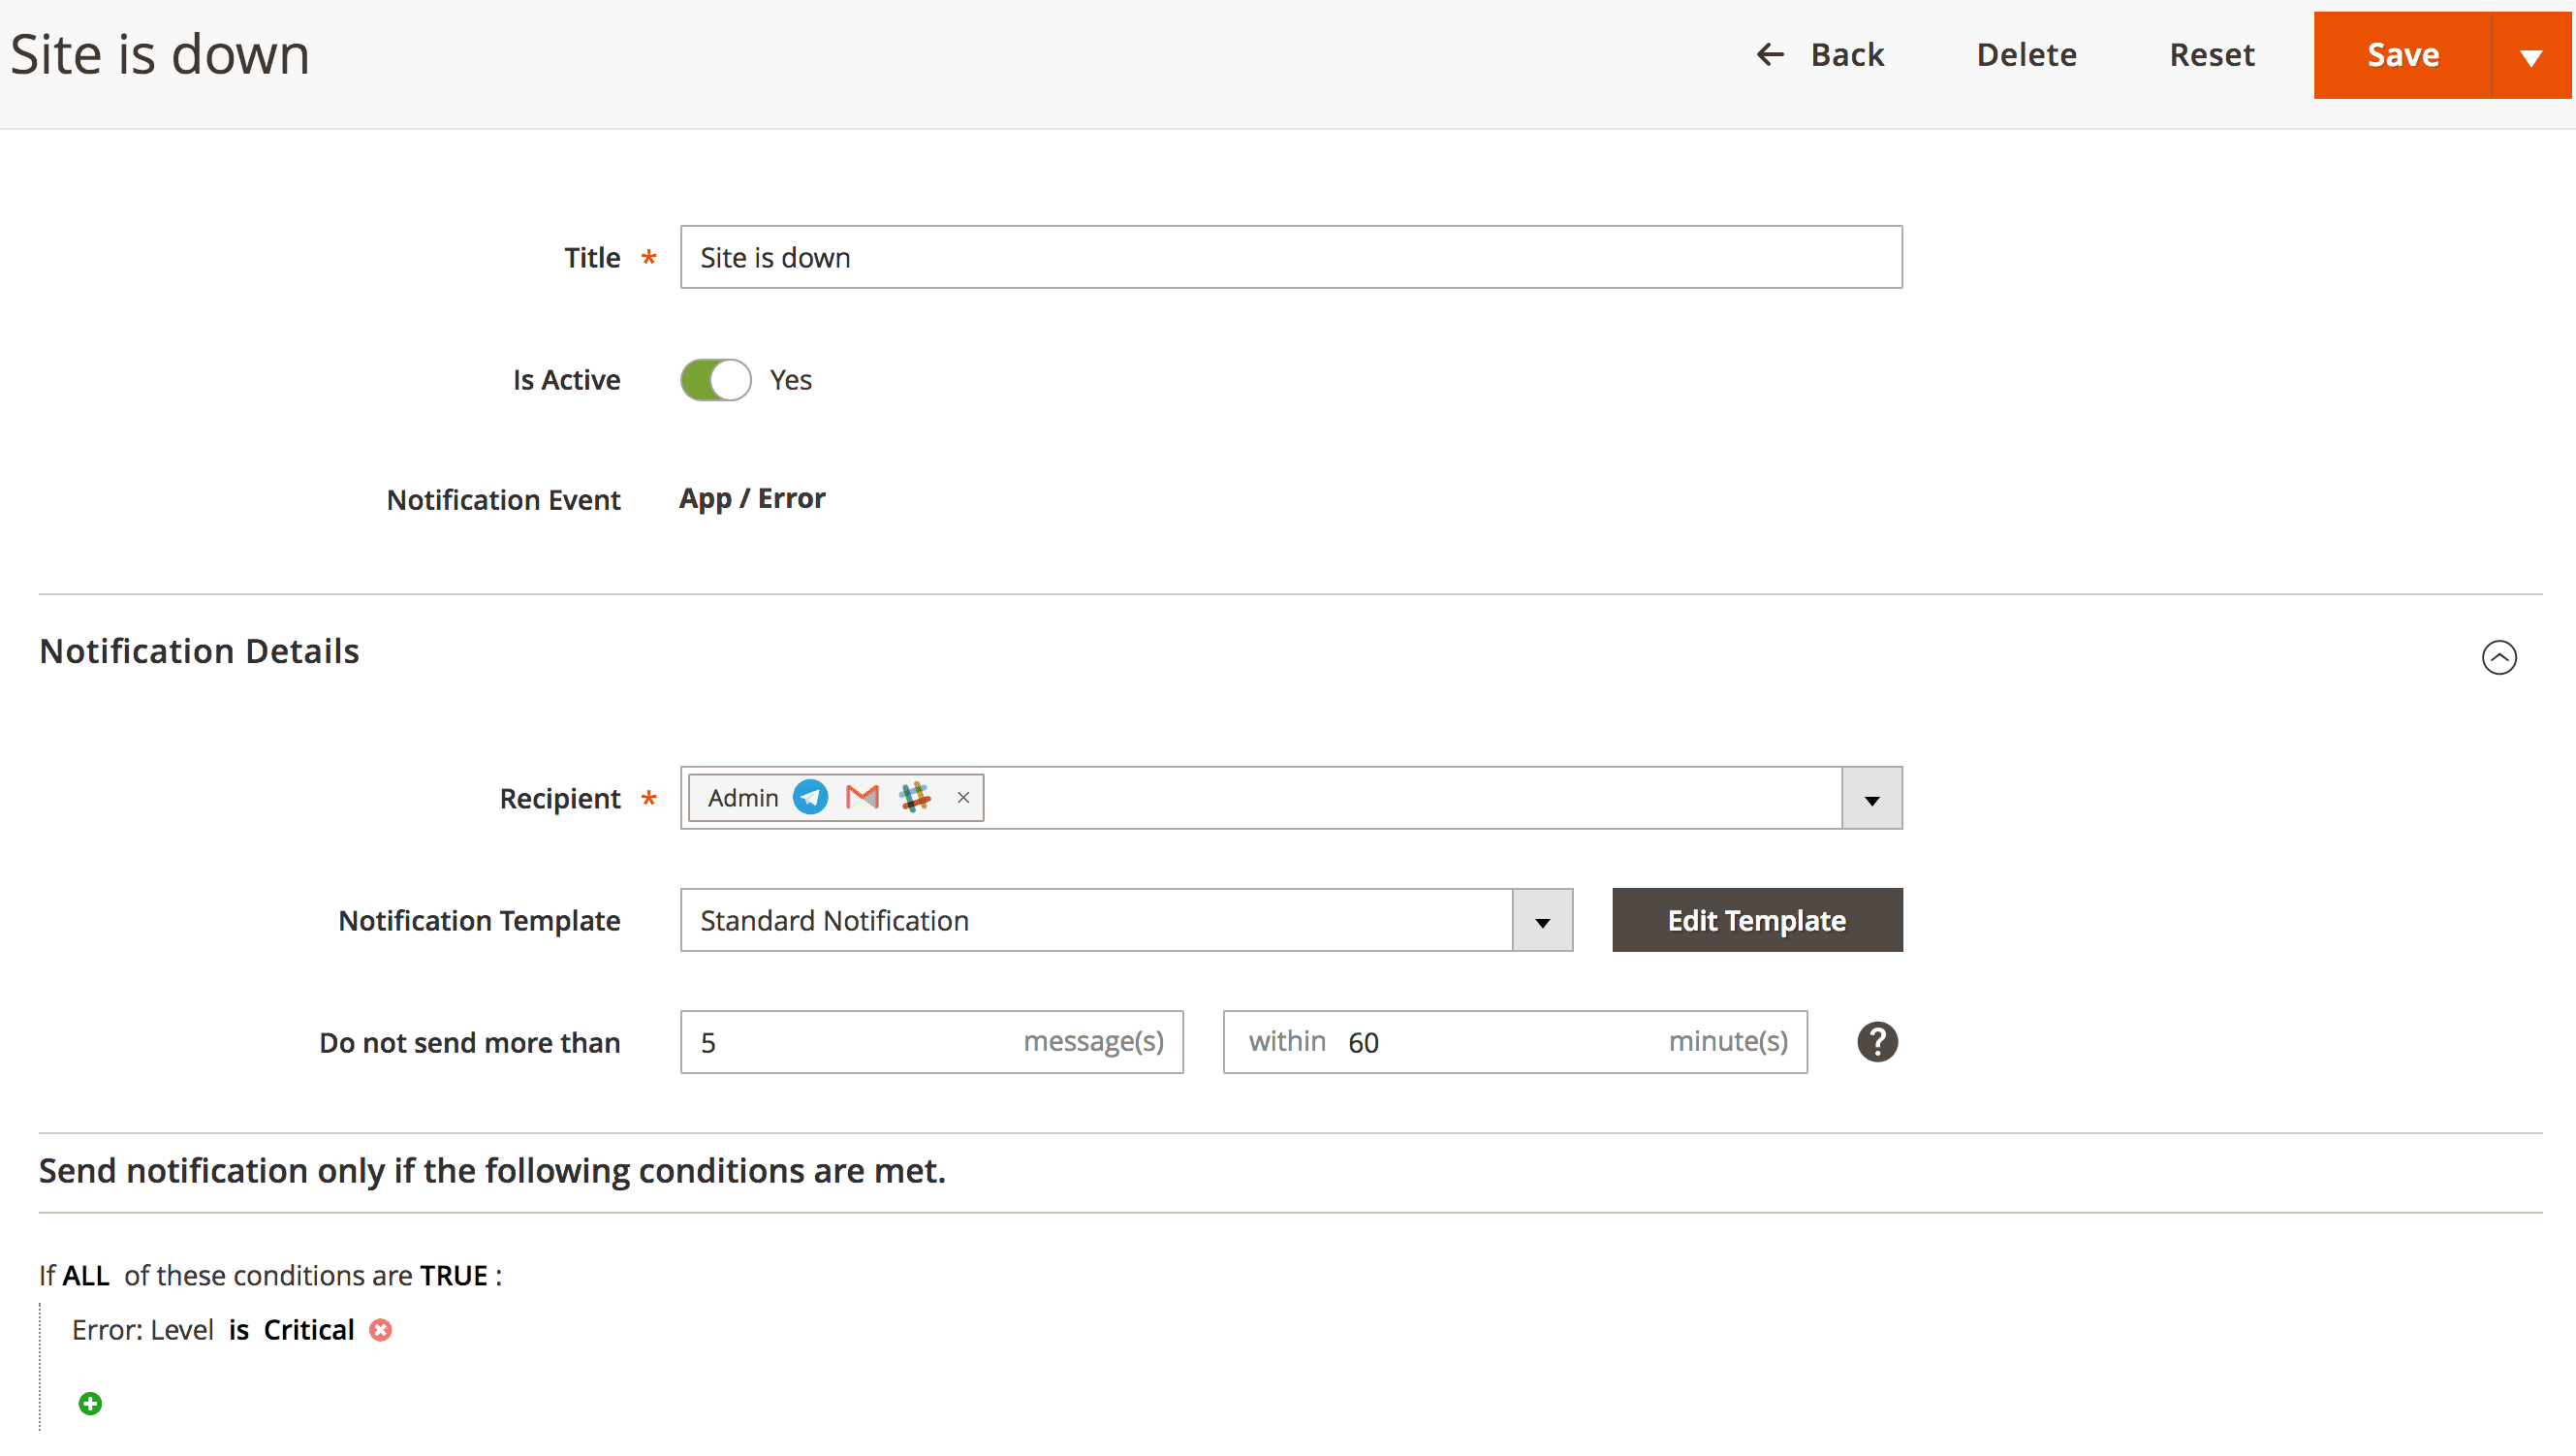
Visit System -> Event Watchers -> Manage Notifications and press Add New Notification button to open creation page. It breaks into two subsequent stages:
- On the first stage, you need to configure general settings:
- Title - name of a notification.
- Is Active - activate a notification.
- Event - an event which should trigger a notification. They are grouped in the drop-down menu. Select it and press Continue to proceed to the next stage.
Note
After you had selected the Event, it can not be undone later. You will need to create a new notification, bound to another event.
- On the second stage, you need to configure details, which break into two sections:
- Notification Details
- Recipient - select recipient of a notification.
- Notification Template - select existing template or create a new one by editing an existing.
- Do not send more than - here you can limit the number of sent messages within a specified number of minutes. Messages, which exceed this limit will be muted.
- Conditions: It allows you to send messages only if the selected conditions are met for the target event.
- Notification Details
- Make sure that rules are activated and press Save to complete.
Adding Conditions to Notifications
Each notification has Conditions section, where you can set conditions that define when notification should be sent.
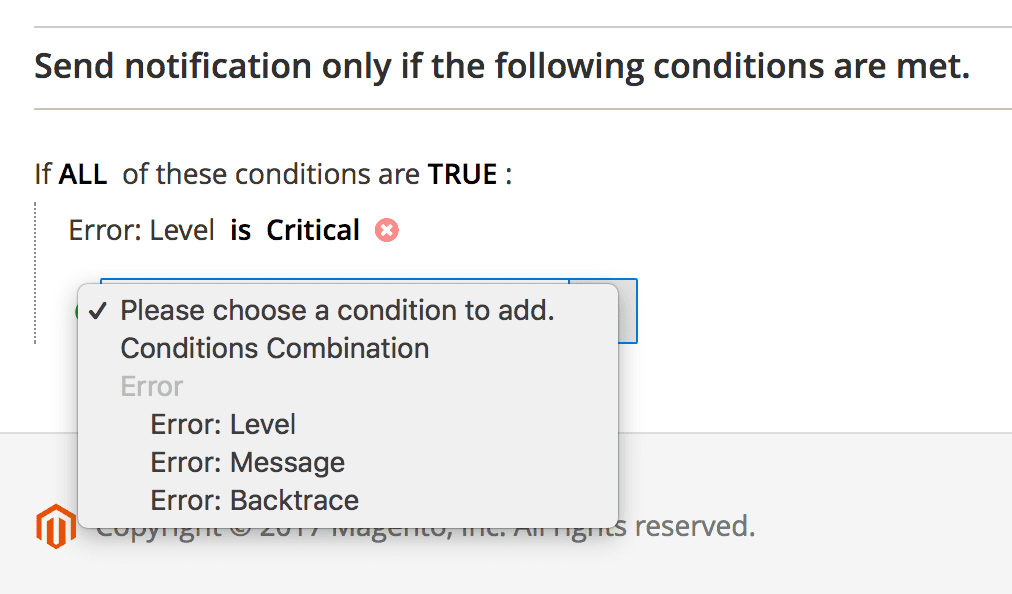
All conditionals should be enclosed in the global mode block. They have four possible global modes of applying, shown in special header If *[apply mode]* of these conditions are *[validation mode]*:
Applying modes define, when rule shall be triggered:
- ALL - implies, that rule will be executed only when strictly all conditions were met;
- ANY - implies, that rule will be executed only when one or more (but not all) of conditions were met;
Validation modes define, which result can produce each condition to be counted as "met":
- TRUE - implies. that conditions should be valid.
- FALSE - implies, that conditions should be invalid.
You can also define multiple nested mode blocks by selecting the Conditions Combination option. These modes allow creating flexible condition sets to satisfy a policy of any complexity.
Once you had selected global mode (or left it as default), press the green (+) button, and pick up a condition type.
There are many possible conditions, which depend on the every Event field. Here is their list, depending on event types:
-
Customer
- Is Confirmed - whether the customer is confirmed.
- Created At - where the customer was created.
- Associate to Website - to which Website customer is associated.
- Create In - at which Store customer is registered.
- Group - to which Group customer belongs.
- Personal Information - such as Gender, First Name, Last Name, Email, Date of Birth and so on.
- Billing and Shipping Addresses - these conditions work with multiline text address representation, so use contains and does not contain operators for it.
- Failures Number - number of last tried failures to login (counts as errors before successful login, or last fail attempt).
- First Failure Date - date of first registered login failure.
- Lifetime Sales - total amount, paid for all orders, placed by a customer, and completed.
- Average Sales - average amount, which customer pays per order.
- Number of Orders - the number of orders that the customer had placed and completed.
- Last Activity - checks the last date of customer visit and returns the number of full days from that date.
-
Store
- Lifetime Sales - total amount, paid for of all orders in the current store.
- Number of Orders - the number of all completed orders in the current store.
-
Admin (User)
- Personal Information - such as Username, First Name and Last Name.
- Is Active - whether the current admin user is active.
- Number of Logins - total number of successful logins of the current user.
- Last Login Date - date of the last login of the current user.
- number of failed logins - total number of failed logins of the current user.
- Admin IP - IP address, from which admin user has been registered.
- Is Admin Logged In from a New IP - a special flag, which is set only when an admin user is logged from IP, other than he used for registration.
-
Schedule
- Job Code - identifier, set as
nameattribute for<job>tag in/etc/crontab.xmlconfig file of the module.Example
Job Code for Message Queue processing task would bemq_process, and can be seen in/vendor/mirasvit/module-message-queue/src/Mq/etc/crontab.xmlconfig. - Status - the status of the job at the time of cron check. There are the following options available:
- Pending - used when the job was just scheduled for execution.
- Running - used when the job is running now
- Error - used when the job was terminated unexpectedly.
- Missed - used, when the job was not executed (for example, queue waiting time was over).
- Success - used when the job was executed successfully.
- Message - text condition, which allows you to check job results. Use contains and does not contain operators.
- Time Frame Information - such as Created At, Scheduled At, Executed At and Finished At.
- Finished Ago - allows to check, how many minutes ago was finished last cron task. Used in combination with Code to check when was certain task was last executed.
- Run Time - allows to check, how much time cron task has consumed.
- Last heartbeat time - allows to check, how many minutes ago was executed so-called heartbeat task. It runs each time with cron started, so using this condition, you can check whether cron actually runs.
- Job Code - identifier, set as
-
Product
These conditions are used in events of the following event groups: Customer, Shopping Cart, Wishlist, Review. They break into two large categories:
- Product - contains all attributes, defined at Stores -> Attributes -> Product.
- Additional Product Conditions - contains two shortcuts, which allow you to track sales of your top products:
- Newest Products is a shortcut to
Product is one of [X] most recently added products is [Yes/No]expression, whereXis limit of newly added products list to check.Example
If you need to know whether one of your 10 newest products was bought, you need conditionProduct is one of 10 most recently added products is Yes. - Top Selling Products - is a shortcut to
Product is one of [X] top selling products is [Yes/No], whereXis also a limit for a list of top-performing products to check.Example
Likewise - if you need to know whether one of your top 10 products was bought, you need conditionProduct is one of 10 top-selling products is Yes.
- Newest Products is a shortcut to
-
Product Special Block
There are two special options used in conditions:
- Product Subselection - opens a special block
If [ALL/ANY] products in cart/order matching these conditions:, which can contain one or more Products condition from category above
This block simplifies complex conditions and makes conditions more logical and readable. - Product Attribute Value Comparison - opens a special block
If [Comparison Mode] [Constant] of [Selection Mode] [Attribute] found while ALL of these conditions match, which also can contain one or more Products condition from category above.
This block is quite complex. It allows you to create a collection of products using Products conditionals. Then, using Selection Mode optionsSameandDifferent, you can pick up an Attribute and compare that attribute value to some Constant. There are three possible Comparison Modes: Equal To, More than, and Less Than.
Refer to the Examples section to know how these blocks can be properly used.
- Product Subselection - opens a special block
-
Shipping Address
- Country - allows checking which country product should be delivered.
- City - a city name, where shipping should be provided.
- State/Province - a state name, where shipping should be provided (works only with USA, Australia, Canada, and other federal-type countries).
- Region - a region where shipping should be provided.
- Postcode - postal code (precise format depends on country).
-
Quote
- Subtotal - allows checking subtotal (without tax and shipping fees).
- Total quantity of products - the total quantity of items ordered in the current Cart.
- Total count of products - total number of product titles in current Cart.
- Shopping Cart products available for purchase - checks, whether Quote contains products, eligible, or do not eligible to buy.
-
Order
- Status - current status of Order. List of possible order statuses can be seen at Stores -> Settings -> Order Status.
- Total quantity of products - the total quantity of items ordered in the current Order.
- Total count of products - total number of product titles in current Order.
- Grand Total - actually paid money amount for current order
- Payment Method - payment method, used for current order. List of possible Payment Methods can be seen at Stores -> Configuration -> Sales -> Payment Methods.
- Shipping Method - shipping method, used for the current order. List of possible Shipping Methods can be seen at Stores -> Configuration -> Sales -> Shipping Methods.
- Invoice Created - this condition is Yes, if the invoice is already issued.
- Shipping Created - this condition is Yes, if shipping is already created.
- Updated At Time - checks, whether Order event triggered at some time point. This condition is text-based and uses 24-hours clock notation. If you wish to check creation or update time in Magento notation, use Created At or Updated At conditions.
-
Wishlist
- Total quantity of products - the total quantity of items in the current Wishlist.
- Total count of products - total number of product titles in current Wishlist.
- Subtotal - total money amount for current Wishlist (the price of each product is multiplied by item count of its kind, and then all prices summed).
-
Admin Notifications
- Title - the title of admin notifications sent to the current site.
- Description - contents of admin notifications, sent to current site. It is text-based condition, so use contains or does not contain operators.
- Severity - importance of notifications. There are the following possible values:
- Notice – updates, releases, and other Magento news;
- Minor – minor updates and other messages;
- Major – important notifications, which you should check shortly;
- Critical – vulnerability issues and other most important notifications.
- Url - URL, supplied with notification. It is also a text-based condition.
- Is Read - whether notification was already read.
- Is Removed - whether notification was removed from Inbox.
- Date Added - date on which notification was added to the Inbox.
-
Error
- Level - level of throwed error or exception. There are the following possible values, in their importance order:
- Debug
- Info
- Notice
- Warning
- Error
- Critical
- Alert
- Emergency
- Message - message that describes error. It is a text-based condition, so use contains or does not contain operators to check its contents.
- Backtrace - stack trace of the error. It's also a text-based condition, like above.
- Level - level of throwed error or exception. There are the following possible values, in their importance order:
Back to Notification creation
Working with Templates
Templates are the basic building blocks of Notifications sent to selected recipients (store admins, for example).
How to Create or Edit a Template
The templates are used together with notification and can contain information about the event.
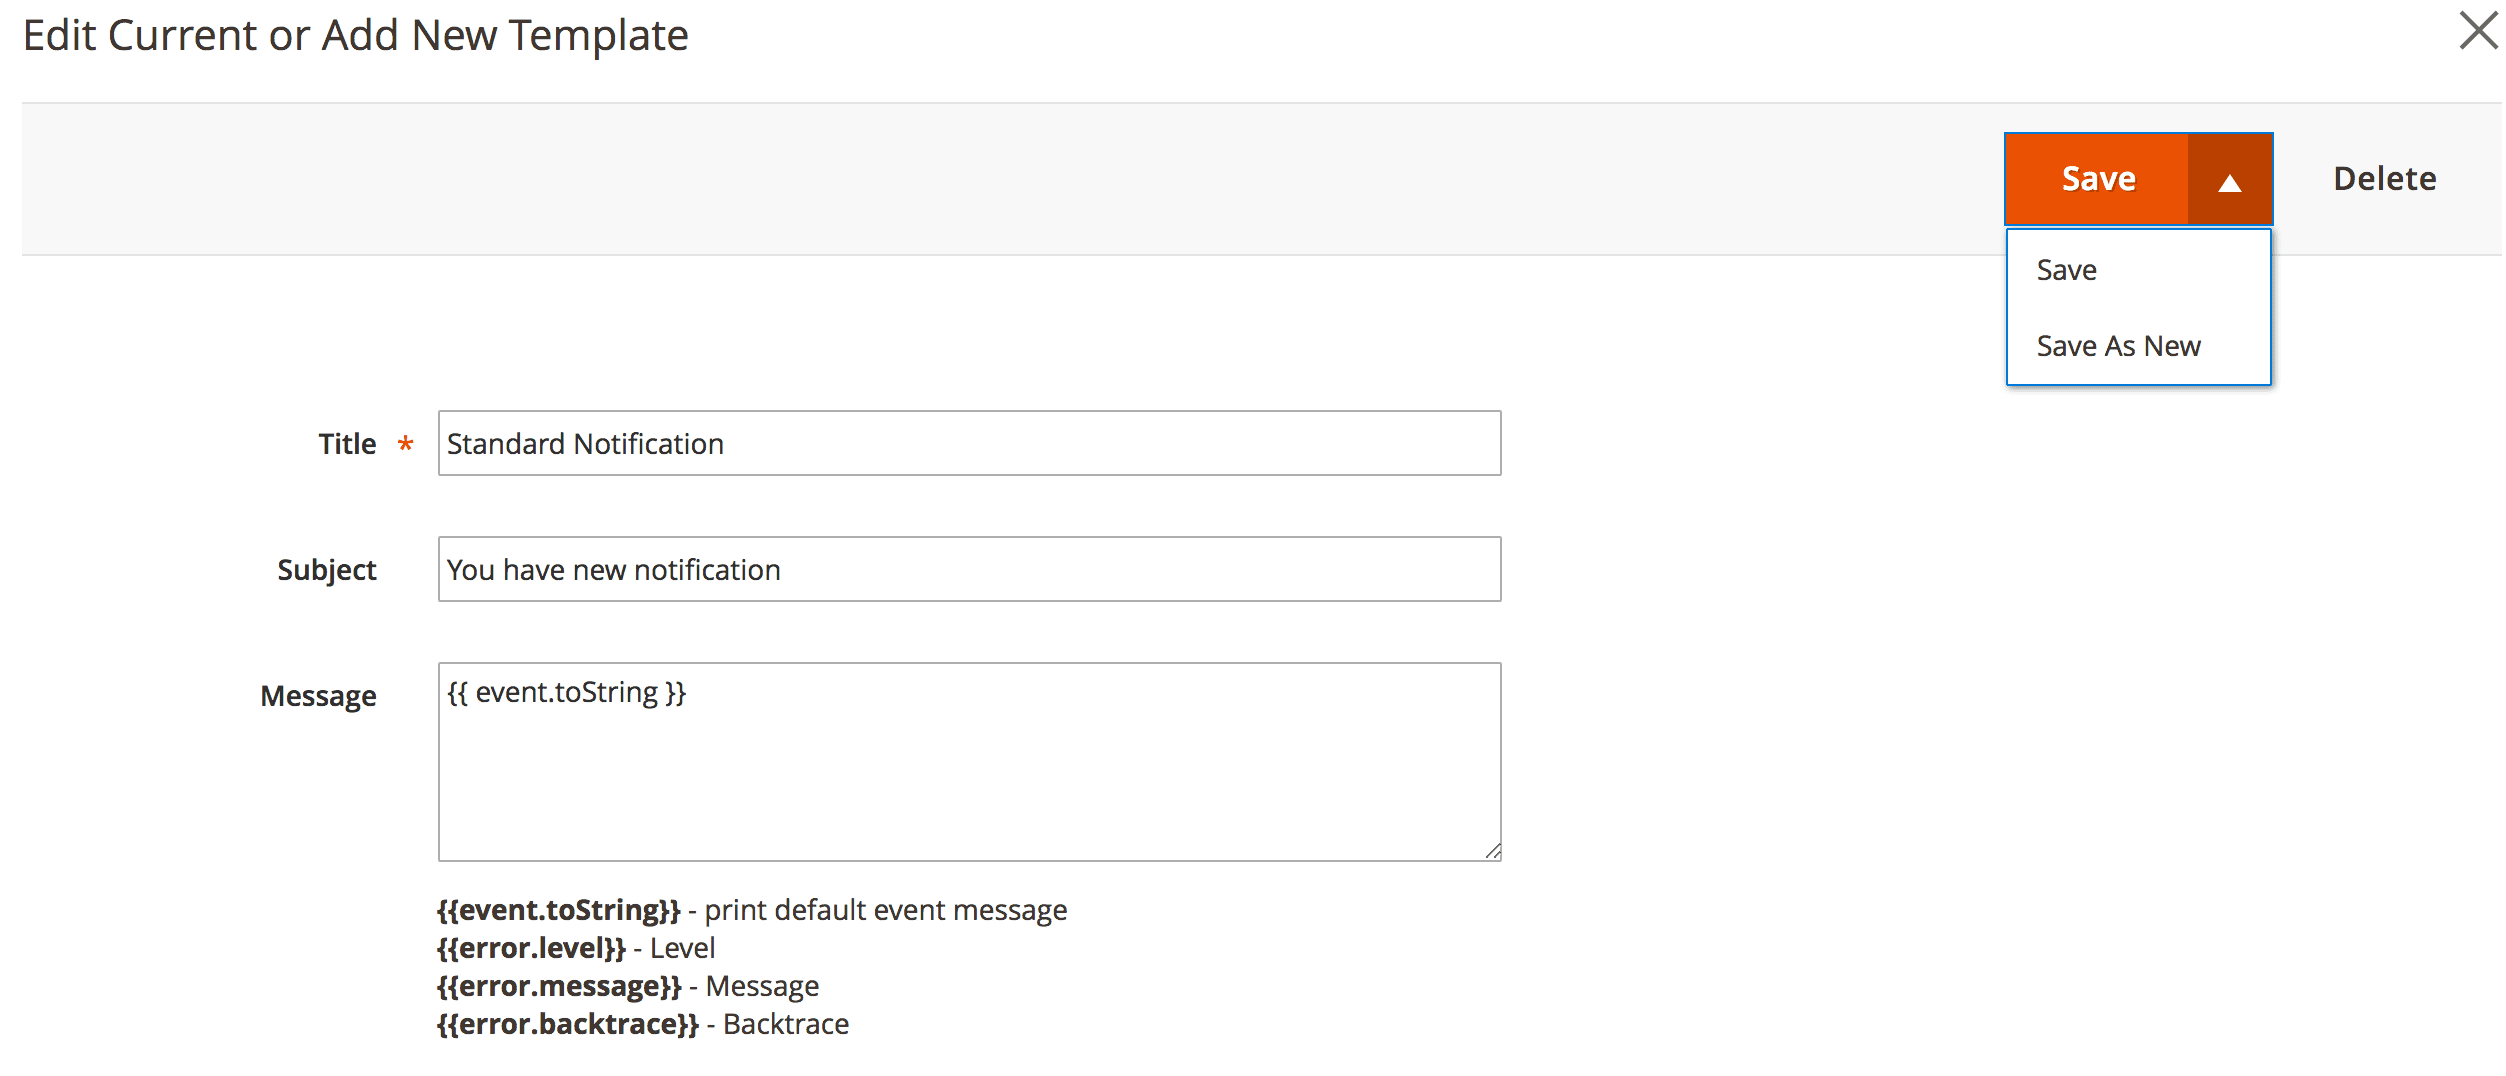
To edit an existing or create a new template, follow steps below:
- Open a notification you want to edit.
- Under the Notification Details section find the field Notification Template
- Select the required template and press the button Edit Template. A modal window will appear with a content based on a selected template.
- Edit required fields and press the button Save - to edit the existing template or Save As New - to create a new one.
Note
In the message field of a template, you can use all the listed variables. The variable {{event.toString}}``` prints a default message of the event defined by the system. The variables vary for each event.Back to Notification creation
Transactional Variables
Depending on the event type used for notification, the following transactional variables are available:
{{event.toString}}- print default event message{{order.increment_id}}- Order's number-
{{order.grand_total}}- Grand total of an orderUseful Info
After the dot character you can specify any field name available in the DB tablesales_order {{wishlist.summary_qty}}- Total quantity of products{{wishlist.summary_count}}- Total count of products{{wishlist.subtotal}}- Subtotal{{customer.confirmation}}- Is Confirmed{{customer.created_at}}- Created At{{customer.website_id}}- Associate to Website{{customer.created_in}}- Created From{{customer.store_id}}- Create In{{customer.group_id}}- Group{{customer.disable_auto_group_change}}- Disable Automatic Group Change Based on VAT ID{{customer.prefix}}- Name Prefix{{customer.firstname}}- First Name{{customer.middlename}}- Middle Name/Initial{{customer.lastname}}- Last Name{{customer.suffix}}- Name Suffix{{customer.email}}- Email{{customer.default_billing}}- Default Billing Address{{customer.default_shipping}}- Default Shipping Address{{customer.updated_at}}- Updated At{{customer.dob}}- Date of Birth{{customer.failures_num}}- Failures Number{{customer.taxvat}}- Tax/VAT Number{{customer.gender}}- Gender{{customer.first_failure}}- First Failure Date{{customer.lock_expires}}- Failures Number{{customer.lifetime_sales}}- Lifetime Sales{{customer.number_of_orders}}- Number of Orders{{customer.avgsale}}- Average Sales{{customer.is_subscriber}}- Is subscriber of newsletter{{customer.subscription_status}}- Newsletter subscription status{{customer.reviews_count}}- Number of reviews{{customer.last_activity}}- Last activity (in days){{store.lifetime}}- Lifetime Sales{{store.num_orders}}- Number of Orders{{product.name}}- Name{{product.qty}}- Product stock quantity{{product.activity}}- Activity{{product.attribute_set_id}}- Attribute Set{{product.category_ids}}- Category{{product.category_gear}}- Category Gear{{product.climate}}- Climate{{product.collar}}- Collar{{product.color}}- Color{{product.eco_collection}}- Eco Collection{{product.erin_recommends}}- Erin Recommends{{product.features_bags}}- Features{{product.format}}- Format{{product.gender}}- Gender{{product.material}}- Material{{product.new}}- New{{product.pattern}}- Pattern{{product.performance_fabric}}- Performance Fabric{{product.sku}}- SKU{{product.sale}}- Sale{{product.size}}- Size{{product.sleeve}}- Sleeve{{product.strap_bags}}- Strap/Handle{{product.style_bags}}- Style Bags{{product.style_bottom}}- Style Bottom{{product.style_general}}- Style General
Example
In notification associated with order event, to display info of purchased items you can use the code below:
{% for item in order.items %}
  <p>{{ item.name }}: {{ item.price }}</p>
{% endfor %}
Setting Up a Notification
Notification purpose is to send messages to the specified recipients when some certain event has occurred in your system.
In this context, an event is the certain action of a visitor of your site (e.g., login, registration, placing an order) or an action of a system (e.g., change order status, cron job execution).
All notifications are located at System -> Event Watcher and Notification -> Manage Notifications section. There you can edit existing notification, or create a new one.
Event watcher & notification for Magento 2 works for different store views.
How to Create New Notification
Visit System -> Event Watchers -> Manage Notifications and press Add New Notification button to open creation page. It breaks into two subsequent stages:
- On the first stage, you need to configure general settings:
- Title - name of a notification.
- Is Active - activate a notification.
- Event - an event which should trigger a notification. They are grouped in the drop-down menu. Select it and press Continue to proceed to the next stage.
Note
After you had selected the Event, it can not be undone later. You will need to create a new notification, bound to another event.
- On the second stage, you need to configure details, which break into two sections:
- Notification Details
- Recipient - select recipient of a notification.
- Notification Template - select existing template or create a new one by editing an existing.
- Do not send more than - here you can limit the number of sent messages within a specified number of minutes. Messages, which exceed this limit will be muted.
- Conditions: It allows you to send messages only if the selected conditions are met for the target event.
- Notification Details
- Make sure that rules are activated and press Save to complete.
Adding Conditions to Notifications
Each notification has Conditions section, where you can set conditions that define when notification should be sent.
All conditionals should be enclosed in the global mode block. They have four possible global modes of applying, shown in special header If *[apply mode]* of these conditions are *[validation mode]*:
Applying modes define, when rule shall be triggered:
- ALL - implies, that rule will be executed only when strictly all conditions were met;
- ANY - implies, that rule will be executed only when one or more (but not all) of conditions were met;
Validation modes define, which result can produce each condition to be counted as "met":
- TRUE - implies. that conditions should be valid.
- FALSE - implies, that conditions should be invalid.
You can also define multiple nested mode blocks by selecting the Conditions Combination option. These modes allow creating flexible condition sets to satisfy a policy of any complexity.
Once you had selected global mode (or left it as default), press the green (+) button, and pick up a condition type.
There are many possible conditions, which depend on the every Event field. Here is their list, depending on event types:
-
Customer
- Is Confirmed - whether the customer is confirmed.
- Created At - where the customer was created.
- Associate to Website - to which Website customer is associated.
- Create In - at which Store customer is registered.
- Group - to which Group customer belongs.
- Personal Information - such as Gender, First Name, Last Name, Email, Date of Birth and so on.
- Billing and Shipping Addresses - these conditions work with multiline text address representation, so use contains and does not contain operators for it.
- Failures Number - number of last tried failures to login (counts as errors before successful login, or last fail attempt).
- First Failure Date - date of first registered login failure.
- Lifetime Sales - total amount, paid for all orders, placed by a customer, and completed.
- Average Sales - average amount, which customer pays per order.
- Number of Orders - the number of orders that the customer had placed and completed.
- Last Activity - checks the last date of customer visit and returns the number of full days from that date.
-
Store
- Lifetime Sales - total amount, paid for of all orders in the current store.
- Number of Orders - the number of all completed orders in the current store.
-
Admin (User)
- Personal Information - such as Username, First Name and Last Name.
- Is Active - whether the current admin user is active.
- Number of Logins - total number of successful logins of the current user.
- Last Login Date - date of the last login of the current user.
- number of failed logins - total number of failed logins of the current user.
- Admin IP - IP address, from which admin user has been registered.
- Is Admin Logged In from a New IP - a special flag, which is set only when an admin user is logged from IP, other than he used for registration.
-
Schedule
- Job Code - identifier, set as
nameattribute for<job>tag in/etc/crontab.xmlconfig file of the module.Example
Job Code for Message Queue processing task would bemq_process, and can be seen in/vendor/mirasvit/module-message-queue/src/Mq/etc/crontab.xmlconfig. - Status - the status of the job at the time of cron check. There are the following options available:
- Pending - used when the job was just scheduled for execution.
- Running - used when the job is running now
- Error - used when the job was terminated unexpectedly.
- Missed - used, when the job was not executed (for example, queue waiting time was over).
- Success - used when the job was executed successfully.
- Message - text condition, which allows you to check job results. Use contains and does not contain operators.
- Time Frame Information - such as Created At, Scheduled At, Executed At and Finished At.
- Finished Ago - allows to check, how many minutes ago was finished last cron task. Used in combination with Code to check when was certain task was last executed.
- Run Time - allows to check, how much time cron task has consumed.
- Last heartbeat time - allows to check, how many minutes ago was executed so-called heartbeat task. It runs each time with cron started, so using this condition, you can check whether cron actually runs.
- Job Code - identifier, set as
-
Product
These conditions are used in events of the following event groups: Customer, Shopping Cart, Wishlist, Review. They break into two large categories:
- Product - contains all attributes, defined at Stores -> Attributes -> Product.
- Additional Product Conditions - contains two shortcuts, which allow you to track sales of your top products:
- Newest Products is a shortcut to
Product is one of [X] most recently added products is [Yes/No]expression, whereXis limit of newly added products list to check.Example
If you need to know whether one of your 10 newest products was bought, you need conditionProduct is one of 10 most recently added products is Yes. - Top Selling Products - is a shortcut to
Product is one of [X] top selling products is [Yes/No], whereXis also a limit for a list of top-performing products to check.Example
Likewise - if you need to know whether one of your top 10 products was bought, you need conditionProduct is one of 10 top-selling products is Yes.
- Newest Products is a shortcut to
-
Product Special Block
There are two special options used in conditions:
- Product Subselection - opens a special block
If [ALL/ANY] products in cart/order matching these conditions:, which can contain one or more Products condition from category above
This block simplifies complex conditions and makes conditions more logical and readable. - Product Attribute Value Comparison - opens a special block
If [Comparison Mode] [Constant] of [Selection Mode] [Attribute] found while ALL of these conditions match, which also can contain one or more Products condition from category above.
This block is quite complex. It allows you to create a collection of products using Products conditionals. Then, using Selection Mode optionsSameandDifferent, you can pick up an Attribute and compare that attribute value to some Constant. There are three possible Comparison Modes: Equal To, More than, and Less Than.
Refer to the Examples section to know how these blocks can be properly used.
- Product Subselection - opens a special block
-
Shipping Address
- Country - allows checking which country product should be delivered.
- City - a city name, where shipping should be provided.
- State/Province - a state name, where shipping should be provided (works only with USA, Australia, Canada, and other federal-type countries).
- Region - a region where shipping should be provided.
- Postcode - postal code (precise format depends on country).
-
Quote
- Subtotal - allows checking subtotal (without tax and shipping fees).
- Total quantity of products - the total quantity of items ordered in the current Cart.
- Total count of products - total number of product titles in current Cart.
- Shopping Cart products available for purchase - checks, whether Quote contains products, eligible, or do not eligible to buy.
-
Order
- Status - current status of Order. List of possible order statuses can be seen at Stores -> Settings -> Order Status.
- Total quantity of products - the total quantity of items ordered in the current Order.
- Total count of products - total number of product titles in current Order.
- Grand Total - actually paid money amount for current order
- Payment Method - payment method, used for current order. List of possible Payment Methods can be seen at Stores -> Configuration -> Sales -> Payment Methods.
- Shipping Method - shipping method, used for the current order. List of possible Shipping Methods can be seen at Stores -> Configuration -> Sales -> Shipping Methods.
- Invoice Created - this condition is Yes, if the invoice is already issued.
- Shipping Created - this condition is Yes, if shipping is already created.
- Updated At Time - checks, whether Order event triggered at some time point. This condition is text-based and uses 24-hours clock notation. If you wish to check creation or update time in Magento notation, use Created At or Updated At conditions.
-
Wishlist
- Total quantity of products - the total quantity of items in the current Wishlist.
- Total count of products - total number of product titles in current Wishlist.
- Subtotal - total money amount for current Wishlist (the price of each product is multiplied by item count of its kind, and then all prices summed).
-
Admin Notifications
- Title - the title of admin notifications sent to the current site.
- Description - contents of admin notifications, sent to current site. It is text-based condition, so use contains or does not contain operators.
- Severity - importance of notifications. There are the following possible values:
- Notice – updates, releases, and other Magento news;
- Minor – minor updates and other messages;
- Major – important notifications, which you should check shortly;
- Critical – vulnerability issues and other most important notifications.
- Url - URL, supplied with notification. It is also a text-based condition.
- Is Read - whether notification was already read.
- Is Removed - whether notification was removed from Inbox.
- Date Added - date on which notification was added to the Inbox.
-
Error
- Level - level of throwed error or exception. There are the following possible values, in their importance order:
- Debug
- Info
- Notice
- Warning
- Error
- Critical
- Alert
- Emergency
- Message - message that describes error. It is a text-based condition, so use contains or does not contain operators to check its contents.
- Backtrace - stack trace of the error. It's also a text-based condition, like above.
- Level - level of throwed error or exception. There are the following possible values, in their importance order:
Back to Notification creation
List of Events
Event is a certain action of a visitor to your site (e.g., login, registration, placing an order) or an action of a system (e.g., change order status, cron job execution).
Events are used in the notifications as a signal for the extension to start sending messages.
Each event has a set of related variables - which can be used in the template and conditions - that are used in the rules and allow you to set up a notification in such a way as to receive only the messages that interest you.
-
App Events
-
Error
This event is triggered when a new error is occurred in your site and allows you to be aware of all critical errors.
When a new error is occurred by using this event, you can immediately inform your developer on the need to investigate it. In addition, you can send a message to the support team of a company that developed the extension, which thrown an error.
- Related Conditions for Notifications: Error
- Related Variables for Templates:
Note
The Error event has multiple levels, the low-level errors (Debug, Info, Notice, Warning) generate too many records that are registered by our extension and stored in the DB table mst_event_event. Therefore in order to avoid the fast overflow of this table, we recommend you observe only high priority error levels. You can select observed error levels at the global settings of the extension: System > Event Watcher and Notification > Settings
-
-
Admin Events
-
Admin Logged In
This event is triggered whenever Admin User is logged in to the backend.
You can configure notifications to be sent when admin users use new devices to log in to your store, or even possible password stealing.
- Related Conditions for Notifications: Admin (User)
- Related Variables for Templates:
-
Admin Login Failed
This event is triggered whenever Admin User tries to log in to the backend but failed.
You can configure notifications to be sent when login failures reach a certain limit, so you can detect a brute-force hacker attack.
- Related Conditions for Notifications: Admin (User)
- Related Variables for Templates:
-
-
Cron Events
-
Cron job
The event is triggered whenever a new cron job is added to a schedule.
With this event, you can always be aware of failed and long-running cron jobs or be notified when the cron schedule has stuck and can send notifications to your server admin to handle problems with cron. Or, you can also automatically contact the support of a company that developed the extension whose cron job got failed.
- Related Conditions for Notifications: Schedule
- Related Variables for Templates:
-
-
Admin Notification Events
-
New Notification
The event is triggered whenever your site receives a new Admin Notification. These messages feature in Magento is used for notifying an admin user about variability issues, security patches, updates, and other news. Read more about them.
With this event, you can configure the extension to receive only the notifications of a selected severity, therefore, notifying different staff members about respective problems.
- Related Conditions for Notifications: Admin Notifications
- Related Variables for Templates:
-
-
Product Events
-
Decreased QTY
The event is triggered whenever a product quantity is decreased. This event allows you to be aware, when product stock quantity falls below the threshold, and to notify responsible staff on the need to replenish the warehouse.
- Related Conditions for Notifications: Product
- Related Variables for Templates:
-
Product View
The event is triggered when a product is viewed by a registered customer. This rule can be used for tracking down the interest in specially promoted products, or some experimental goods.
- Related Conditions for Notifications: Product, Customer, Store.
- Related Variables for Templates:
-
-
Customer Events
-
Customer Logged In
The event is triggered whenever a customer logs in to the store.
- Related Conditions for Notifications: Customer, Store.
- Related Variables for Templates:
-
Customer Logged out
The event is triggered whenever a customer logs out of the store.
- Related Conditions for Notifications: Customer, Store.
- Related Variables for Templates:
-
New Customer Sign up
The event is triggered when a customer is registered in your store.
- Related Conditions for Notifications: Customer, Store.
- Related Variables for Templates:
-
Customer Birthday
The event is triggered whenever a customer has a birthday.
Note
This event is fired at 00:00 of the day of the customer's birth.- Related Conditions for Notifications: Customer, Store.
- Related Variables for Templates:
-
-
Newsletter Events
-
Newsletter subscription
The event is triggered when a customer subscribes to the newsletter.
- Related Conditions for Notifications: Customer.
- Related Variables for Templates:
-
Newsletter unsubscription
The event is triggered when a customer cancels the subscription to the newsletter.
- Related Conditions for Notifications: Customer.
- Related Variables for Templates:
-
Subscription status change
The event is triggered when a customer enables or cancels the subscription to the newsletter.
- Related Conditions for Notifications: Customer.
- Related Variables for Templates:
-
-
Shopping Cart
-
Abandoned Shopping Cart
The event is triggered when the shopping cart was not updated in a reasonable period, or customer logged off but did not place an order. Criteria for such a cart can be configured at Stores -> Settings -> Configuration -> Dotmailer -> Abandoned Carts.
- Related Conditions for Notifications: Customer, Store, Product Special Blocks, Quote, Shipping Address.
- Related Variables for Templates:
-
-
Order Events
-
Order status was changed
The event is triggered whenever the order is saved to apply some changes (it includes placing an Invoice or Shipping documents).
- Related Conditions for Notifications: Customer, Store, Product Special Blocks, Order, Shipping Address.
- Related Variables for Templates:
-
Order obtained 'XXX' status
Our extension features a set of generic Events, which act as a shortcut to Order was changed event with a check of Order status. These events have similar names as shown in the header (
Order obtained 'Complete' status, for example), and trigger, whenever Order receives particular status.- Related Conditions for Notifications: Customer, Store, Product Special Blocks, Order, Shipping Address.
- Related Variables for Templates:
-
-
Review Events
-
New review was added
This event is triggered whenever a new Review is added (but before Approvement).
- Related Conditions for Notifications: Customer, Store, Product Special Blocks, Product.
- Related Variables for Templates:
-
Review has been approved
This event is triggered whenever a new Review is approved and displayed in the store.
- Related Conditions for Notifications: Customer, Store, Product Special Blocks, Product.
- Related Variables for Templates:
-
-
Wishlist Events
-
Product was added to wishlist
This event is triggered whenever a new product is added to the customer's wishlist.
- Related Conditions for Notifications: Wishlist, Customer, Store, Product Special Blocks, Product.
- Related Variables for Templates:
- Wishlist was shared
-
Note
Did you not find an event for your needs? Contact our support team, and we will be glad to help you.Event Log
Event Log is a special Grid, which holds all registered notifications sent to recipients with respective information on each event.
It is a great tool for analyzing store performance.
The grid provides the following data:
- Identifier - a type of event, which triggered the notification
- Info - the detailed info, sent to recipients
- Created At - the date of the event triggering
- Updated At - the date of notification sending (typically should be equal with Created At).
Troubleshooting
-
You do not receive messages
In order to send messages, the extension starts a background process, which runs continuously. It listens for the new registered events and sends notifications.
This background process is launched by cron, and it requires the function
execto be enabled to run it.However, you won't be able to receive the messages if this function is disabled. So, in that case you can ask your server admin to enable the PHP
execfunction or just add the cron job below to the server crontab:* * * * * <path to php binary> <magento install dir>/bin/magento mirasvit:message-queue:subscribe > /dev/null 2>&1
How to upgrade the extension
To upgrade the extension, follow these steps:
- Backup your store's database and web directory.
- Login to the SSH console of your server and navigate to the root directory of the Magento 2 store.
- Run command
composer require mirasvit/module-notificator:* --update-with-dependenciesto update current extension with all dependencies.Note
In some cases, the command above is not applicable, or it's not possible to update just the current module, or you need to upgrade all Mirasvit modules in a bundle. In this case, the command above will have no effect.
Run insteadcomposer update mirasvit/*command. It will update all Mirasvit modules installed in your store.
- Run command
php -f bin/magento setup:upgradeto install updates. - Run command
php -f bin/magento cache:cleanto clean the cache. -
Deploy static view files
rm -rf pub/static/*; rm -rf var/view_preprocessed/*; php -f bin/magento setup:static-content:deploy
Disabling Extension
Temporarily Disable
To temporarily disable the extension please follow these steps:
- Login to the SSH console on your server and navigate to the root directory of the Magento 2 store.
- Run command
php -f bin/magento module:disable Mirasvit_Notificatorto disable the extension. - Log in to the Magento backend and refresh the store cache (if enabled).
Extension Removal
To uninstall the extension, please follow these steps:
- Login to the SSH console on your server and navigate to the root directory of the Magento 2 store.
- Run command
composer remove mirasvit/module-notificatorto remove the extension. - Log in to the Magento backend and refresh the store cache (if enabled).
Change Log
1.6.0
(2025-06-06)
Improvements
- WCAG 2.2 AA compliance
1.5.3
(2025-04-18)
Improvements
- HTTP channel improvement: support for GET requests; ability to set HTTP headers; Basic Authorization fields.
1.5.2
(2025-04-10)
Fixed
- PHP8.4 compatibility
1.5.1
(2024-10-21)
Fixed
- Fixed the issue with the error: Undefined array key 'message'
1.5.0
(2024-08-21)
Fixed
- Rendering PHP code removed from templates for security reasons
1.4.5
(2024-08-15)
Fixed
- Fixed the issue when the Mirasvit_Email module is not installed (Impossible to process constructor argument Parameter [#4]() [
Mirasvit\Email\Repository\TriggerRepository $triggerRepository ] of Mirasvit\Event\Event\Product\ViewEvent class)
1.4.4
(2024-05-23)
Fixed
- Fixed the issue with notifications with multiple recipient sent to one email
1.4.3
(2024-05-14)
Fixed
- Fixed the issue with saving checkout fields in the admin panel (Amasty_Checkout)
1.4.2
(2024-01-10)
Fixed
- Fixed the issue with the error 'Message has been rejected: Deprecated Functionality: Implicit conversion from float ... to int loses precision'
1.4.1
(2023-01-13)
Fixed
- Fixed possible issue 'preg_split(): Compilation failed: regular expression is too large'
1.4.0
(2022-08-16)
Improvements
- Support of Magento MQ
Fixed
- Console command return value
1.3.2
(2022-07-12)
Improvements
- foreign keys to handle deletions of entities
1.3.1
(2022-06-20)
Improvements
- remove db_schema_whitelist.json
1.3.0
(2022-05-31)
Improvements
- Migrate to declarative schema
1.2.0
(2022-03-15)
Fixed
- PHP 8.1 compatibility
- Magento versions support - 2.3, 2.4
1.1.1
(2021-09-28)
Fixed
- confilct with Mageplaza_Smtp
1.1.0
(2021-07-15)
Fixed
- fixed the issue with cron notifications not sent
1.0.47
(2021-01-29)
Fixed
- Fixed dependencies
1.0.46
(2020-10-23)
Fixed
- added module compatibility with the php 7.4
1.0.45
(2020-09-23)
Fixed
- Fixed issue with not able to edit templates for notifications in Magento 2.4.0 ([#54]())
1.0.44
(2020-09-10)
Fixed
- Fixed conflict with Mageplaza_Smtp module ([#52]())
1.0.43
(2020-09-09)
Fixed
- Fixed issue with creating new channel in Magento 2.4 ([#50]())
1.0.42
(2020-08-26)
Fixed
- Magento 2.4 compatibility ([#47]())
1.0.41
(2020-07-30)
Improvements
- Support of Magento 2.4
1.0.40
(2020-03-16)
- Code improvements
1.0.39
(2019-11-01)
Improvements
- Notification levels
1.0.38
(2019-10-28)
Fixed
- Compatibility with Magento 2.3.3 mail system
1.0.37
(2019-10-16)
Fixed
- Issue with slow error level detection
1.0.36
(2019-10-03)
Fixed
- Issue with incorrect data displayed after removing filters
1.0.35
(2019-05-23)
Improvements
- PHP Template Processor
1.0.34
(2019-05-14)
Fixed
- Issue with message formatting (with enabled HTML minification)
1.0.33
(2019-05-02)
Fixed
- Issue with blocking cache clearing during save configuration
1.0.32
(2019-04-30)
Improvements
- New Transport: HTTP Request
1.0.31
(2019-03-20)
Fixed
- Error sending wishlist and helpdesk test notifications
1.0.30
(2019-03-20)
Fixed
- Error sending test notifications
1.0.29
(2019-02-08)
Fixed
- Error blocking Magento installation
1.0.28
(2019-02-05)
Improvements
- Add store name and url variables to templates
1.0.27
(2019-01-31)
Improvements
- Log request URI for error events
1.0.26
(2019-01-22)
Improvements
- New Order notification formatting (Slack)
Fixed
- Order notifications not sent via telegram (since 1.0.22)
1.0.25
(2019-01-18)
Fixed
- Notifications with HTML not sent via telegram
1.0.24
(2019-01-18)
Fixed
- Order notifications not sent via telegram (since 1.0.22)
1.0.23
(2019-01-18)
Improvements
- Slack notifications
- Notifications
Fixed
- Test notification error message
1.0.22
(2019-01-17)
Improvements
- Notifications
1.0.21
(2018-12-21)
Fixed
- Error during executing cron job (since 1.0.19)
1.0.20
(2018-12-20)
Improvements
- Ability to use Magento directives/variables in email templates, e.g. include default email header and footer
Documentation
- More info about variables
1.0.19
(2018-12-10)
Improvements
- Ability to use own order attributes
1.0.18
(2018-11-29)
Improvements
- M2.3 support
Documentation
- Install required libraries
1.0.17
(2018-07-20)
Fixed
- Issue with FK keys
1.0.16
(2018-04-23)
Improvements
- Do not display rules on first step of notification creation
Fixed
- Do not show error in notification listing if event does not exists
1.0.15
(2018-02-09)
Improvements
- Register only active events mirasvit/module-event#9
1.0.14
(2018-02-05)
Bugfixes
- Fix error during deploy of Magento Cloud Edition
Improvements
- Ability to use nested variables in templates
1.0.13
(2018-01-25)
Improvements
- Allow to use the new line character for Email transport
1.0.12
(2018-01-18)
Improvements
- Performance improvement: in cron job check only events registered by cron
1.0.11
(2018-01-11)
Bugfixes
- Error installing module for M2.2.2
1.0.10
(2017-12-01)
Improvements
- CLI command to send notification for event ID from Event Log
1.0.9
(2017-11-30)
Fixed
- Ignore event if it does not exist anymore
Documentation
- Troubleshooting: messages are not sent
1.0.8
(2017-11-27)
Documentation
- Extension documentation
1.0.7
(2017-11-27)
Fixed
- Ignore recipients in the notification chain that do not exist anymore
1.0.6
(2017-11-23)
Fixed
- Do not use keyword Test in the filename
1.0.5
(2017-11-20)
Improvements
- Support of php > 7.0
1.0.4
(2017-11-09)
Fixed
- Extra parameter passed to parent construct
1.0.3
(2017-11-02)
Improvements
- Use event handler to register error events instead of plugin
- Move error event from module-event and add ability to disable error reporting
Documentation
- Add basic docs
1.0.2
(2017-10-30)
Features
- Integrate with MQ
Fixed
- Error 'Area code already set'
1.0.1
(2017-10-26)
Fixed
- Issue with CLI commands
1.0.0
(2017-10-18)
Fixed
- Reset previous transport before creating a new one
- Correct installation data