Getting Started
Welcome to the Push Notifications documentation.
A push notification is a message that a store can show to its customer directly on its pages via special popups.
The customer can subscribe to these messages, so he doesn't have to keep your store open to get the notifications. Notifications will be sent directly to the customer's browser, so he will be aware of all activities and actions on your store - that's why they called push notifications.
This way is much quicker and powerful than just email notifications.
Our extension brings Push Notifications to the next level, providing rich and flexible tools for building push notifications policy.
Go ahead, dive in!
Firstly, please, find our extension in My Downloadable Products section of our store.
Learn how to install extension, and proceed with Quick Start, which will guide you to setup your Push Notifications service.
How to install the extension
- Backup your store's database and web directory.
- Login to the SSH console of your server and navigate to the root directory of the Magento 2 store.
- Copy the installation instructions from the page My Downloadable Products to the SSH console and press ENTER.
- Run command
php -f bin/magento module:enable Mirasvit_Core Mirasvit_Mq Mirasvit_Event Mirasvit_PushNotificationto enable the extension. - Run command
php -f bin/magento setup:upgradeto install the extension. - Run command
php -f bin/magento cache:cleanto clean the cache. -
Deploy static view files
rm -rf pub/static/*; rm -rf var/view_preprocessed/*; php -f bin/magento setup:static-content:deploy
Note
Important: Our extension works only with secure connection (HTTPS) is enabled, so for proper work of our extension, make sure, that SSL is enabled on your store.Installation via direct file upload
You can also install the extension via direct files uploading.
- Go to My Downloadable Products / View & Download
- Unpack .zip package and copy contents to magento root directory
- Run command
composer require mobiledetect/mobiledetectlib:^2.8to install required libraries. - Run command
php -f bin/magento module:enable Mirasvit_Core Mirasvit_Mq Mirasvit_Event Mirasvit_PushNotificationto enable all extensions. - Run command
php -f bin/magento setup:upgradeto run upgrade procedure. - Run command
php -f bin/magento cache:cleanto clean the cache. - Re-deploy static view files
rm -rf pub/static/*rm -rf var/view_preprocessed/*php -f bin/magento setup:static-content:deploy
Quick Start
Our Push Notifications extension can be easily used out-of-box, and you can start building your push messages policy just after installation:
-
Start with Templates. They define messages, which you can push to your customers.
-
Each Template can be used for constructing one or more Notifications, which are actually will be pushed. They can be bound to certain customer actions or pushed on schedule making your notification policy flexible and convenient.
-
Create customizable Prompts for your customers to ask them to join your push notifications policy.
-
Monitor your push notifications policy with Subscribers grid, which holds all information about customers, which receive your pushes.
- When your subscribers' audience grows, think about purchasing Mirasvit Advanced Reports extension. It will allow you to build integrated reports, so you can measure your policy efficiency even better.
This will be good for a start. Refer to corresponding sections of our manual to know more.
Notification Templates
Each Notification should contain a message and a click to follow. They are defined as templates, so different notifications can share the same message.
All templates, defined in your store, are located at Marketing -> Push Notifications -> Templates, in their dedicated grid.
Each row provides you with the following information:
- Icon - a preview of the icon, associated with the message.
- Subject - a subject which notification will use.
- Destination URL - is the link to follow, when the push notification is clicked.
The grid does not provide mass actions, but using Action column, you can edit or delete individual templates. You can also create a new one.
How to Create a New Template
Navigate to Marketing -> Push Notifications -> Templates, and press Add New Template button. You will be brought to the creation page, which breaks into two panels - as shown on the screenshot below.
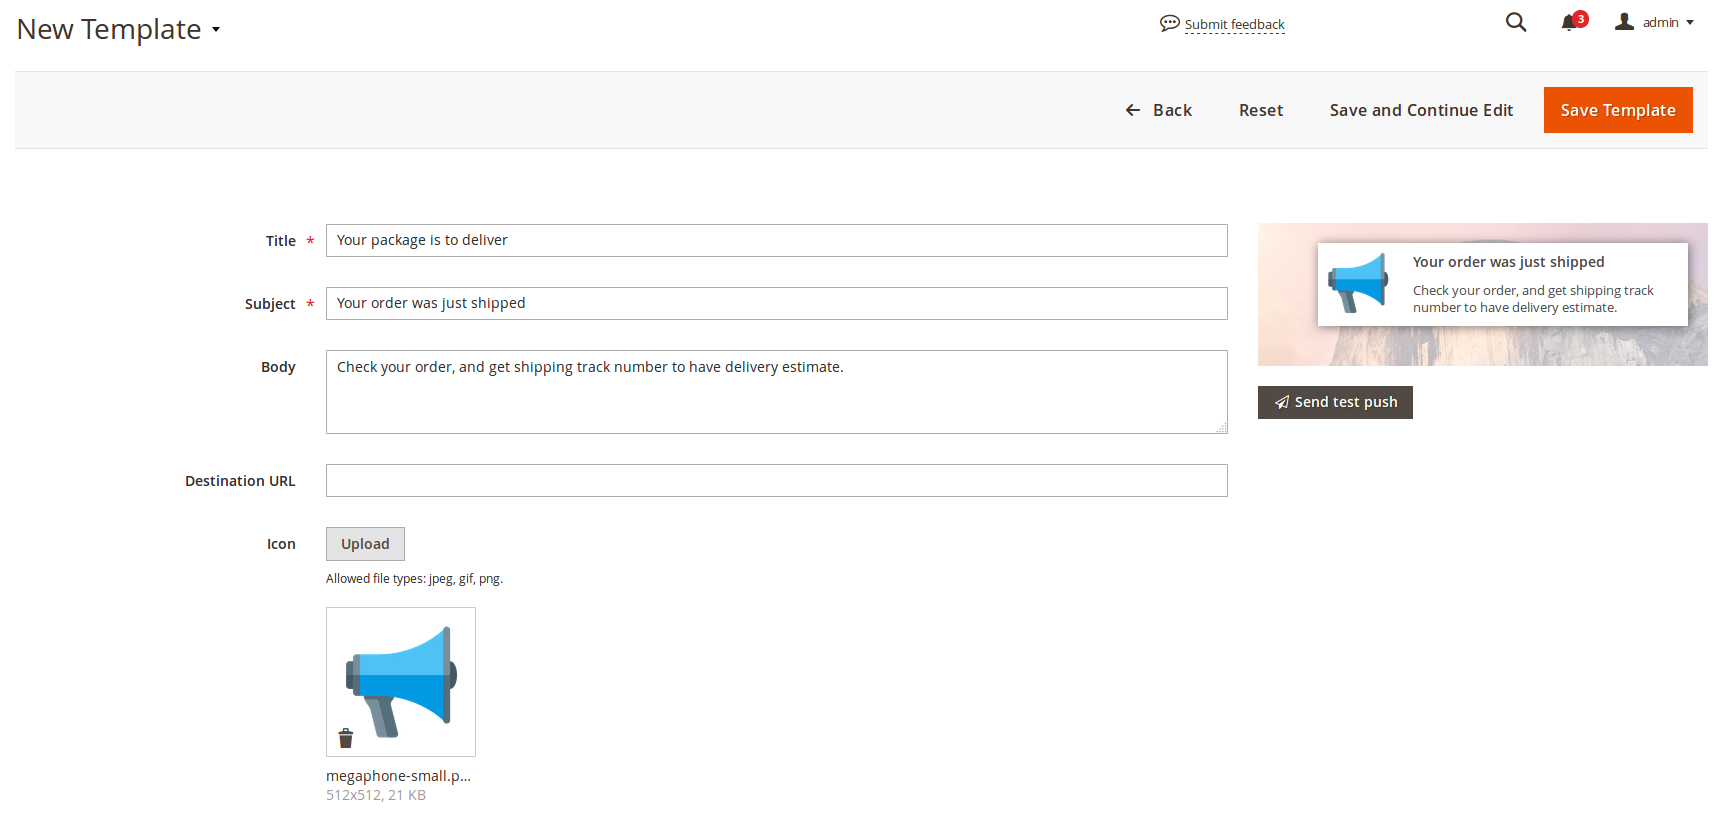
Central pane holds fields for the main template properties:
- Title - a sensical title, which will be displayed at the grid.
- Subject - a subject which notification will use.
-
Body - a short message for the customer or a header of the main article or page. It is limited to 90 characters.
Note
To enhance and personalize your messages, you can use special variables. Here is their shortlist:-
Message Body Variables
[base_url]- base URL of your store.[order_id]- ID of current order. Can be used only on order-related events.[order_number]- Number of current order. Can be used only on order-related events.[order_status]- Status of current order. Possible order statuses can be seen and defined at Stores -> Order Status. Can be used only on order-related events.[quote_id]- current Quote ID. Can be used only in cart and order-related events.[cart_qty]- total quantity of items in Cart. Can be used only in cart and order-related events.[customer_id]- ID of current customer. Can be used only, when customer shall be registered.[customer_email]- Email of current customer. Can be used only, when customer shall be registered.[customer_firstname]- First name of current customer. Can be used only, when customer shall be registered.[customer_lastname]- Last name of current customer. Can be used only, when customer shall be registered.-
[customer_name]- Full name of current customer. Can be used only, when customer shall be registered.Refer to Message Body Variables section for explaining how these variables work.
-
Destination URL - URL, which will be used on notification click.
Note
This field allows using special variables since some links can depend on the particular event - for example, customer signing, order placing, or product reviewing. Here is their shortlist:-
Destination URL Variables
[base_url]- Base URL of your store.[order_id]- Order identifier.[customer_id]- Customer identifier.-
[product_id]- Product identifier.
Right pane contains possible render of a push notification, and a button Send test push, which allows you to test newly created notification.
Note
Render is updated only when the appropriate field loses focus. E. q. if you need to see how the message should look, enter values there, and click back to Title field. It will surely make render refresh.Notifications
Notifications are the carriers for messages. Each notification contains a message, that a customer should receive, and a link to be clicked - which are defined separately in Templates.
There are two types of notifications':
- Manual Notification - extension sends a push to all subscribers.
- Triggered Notification - extension sends push to the particular customer on the firing of event, which is assigned to the notification.
All of them are located in their dedicated Grid at Marketing -> Push Notifications -> Notifications, which provides the following information per row:
- ID - database unique identifier of Notificator.
- Status - whether notification is enabled and sent to the customer.
- State - is the possible state of Notification. There are four possible values:
- Draft - default state for all notifications, which are not active.
- Pending - is a state for manual notifications, which are not yet sent, or triggered, which are not yet bound to event.
- Scheduled - is a state for triggered notifications, which are bound to event.
- Sent - is a state for manual notifications, which are sent to customers.
- Type - is the type of notification (see above)
- Pushed - how many pushes of this notification were sent.
- Fetched - how many pushes of this notification were received by customers.
- Clicked - how many links, associated with templates, were followed.
Additional column Action allows you to edit notification or delete it. Mass actions are not available.
Here you can also create new Notification.
How to create New Notification
Visit Marketing -> Push Notifications -> Notifications, and press Add New Notification. It will bring you to the creation page, which contains the following fields:
- Name - is the sensical name of the notification. It will not be seen by the customer, instead the Subject of Template will be used.
- Active - whether notification is active.
- Template - template, which contains message, pushed to customer. Read more at Template section.
- Notification Type - type of notification. There are two possible options, which triggers different kinds of Schedule subsection:
- Manual Notification - selects schedule pane for manual notifications.
- Triggered Notification - selects event binding.
After a notification type is selected, Schedule subsection is displayed with different options for sending notifications. Below are explained different kinds of that section.
Schedule for Manual Notification
Schedule - defines the type of sending a push to the customer. There are two available options:
- Send immediately - push will be sent just on notification activation. It is very useful for an emergency announcement (store maintenance, etc.).
- Schedule Push - brings hidden field, which schedules push to a certain date.
- Schedule Date - triggered, when Schedule Push is selected. It dispatches a push message to be sent on certain date. Notification is pushed on the first cron executing on that date. Useful for announcing a marketing campaign start and ends.
Schedule for Triggered Notification
- Trigger Event - allows binding a notification to a certain event.
All events, which push can be bound to, grouped into logical categories. Here is their respective list:
-
Customer
- Logged In - the push is sent on customer login.
- Logged Out - the push is sent on customer logout.
- Sign Up - push is sent on signing up a new customer.
- Birthday - push is sent on the birthday of the customer.
-
Admin
- Logged In - the push is sent on successful logging in staff. Useful for announcing about some service (chat, online consultation, and so on).
- Login Failed - the push is sent on failed logging in staff.
-
Cron
- Cron Job - push will be sent on each execution of our extension's respective cron task
push_notification_event.
- Cron Job - push will be sent on each execution of our extension's respective cron task
-
Product
- Decreased QTY - push will be sent on a product sale.
- View - push will be sent on each product view.
-
Newsletter
- Customer was subscribed - push will be sent on subscription event.
- Customer was unsubscribed - push will be sent on unsubscription event.
- Customer subscription was changed - push will be sent on both above events.
-
Shopping Cart
- Abandoned Shopping Cart - push will be sent when a customer session was expired, but his cart contains products.
-
Sales
- Order was changed - push will be sent on every order saving (leaving a comment, state change, invoicing, shipping, etc.).
- Order obtained Canceled status - push will be sent on order cancellation.
- Order obtained Closed status - push will be sent on order closing.
- Order obtained Completed status - push will be sent on order completion (e. q. invoicing & shipping).
- Order obtained Suspected Fraud status - push will be sent on failing order fraud check.
- Order obtained On Hold status - push will be sent on freezing the order.
- Order obtained Pending status - push will be sent immediately after the order is placed.
Additional events can be added to this category automatically, based on order statuses, defined at Stores -> Order Status.
-
Wishlist
- New product added to the Wishlist - push will be sent on placing a product to the wishlist.
- Wishlist was shared - push will be sent whenever the customer shares his wishlist.
-
Admin Notification
- New Notification - push will be sent whenever the system admin message has arrived.
-
Review
- New Review was added - push will be sent whenever a customer places a review.
- Review has been approved - push will be sent, whenever customer review is approved.
Managing Prompts
Prompts are a special type of Notifications, which also contain a question to answer and two buttons - for accepting and rejecting.
All of them are located in their dedicated Grid at Marketing -> Push Notifications -> Prompts, which provides the following information per row:
- ID - identifier of Prompt.
- Name - a sensical name for Prompt. It won't be displayed on the customer's side.
- Status - whether Prompt is enabled and can be shown to customers.
- Headline - is the subject for Prompt notification.
- Is Default - whether it should be displayed on every customer visit to store.
Additional column Action allows either to edit notification, or delete it. Mass actions are not available.
Here you can also create new Prompt.
How to create a New Prompt
Visit Marketing -> Push Notifications -> Prompts and press Add New Prompt button. You will be brought to the creation page, which contains the following fields:
- Name - a sensical name for Prompt. It won't be displayed on the customer's side.
- Active - whether Prompt is enabled and can be displayed to the customer.
- Headline - is the subject for Prompt notification.
- Body - is the text of Prompt request.
Note
You can also use here special variables, the same as described for regular Templates. Read more here. - Default - whether this Prompt is sent by default on each customer visit.
- Accept Button Text - text, which will be displayed on the accepting button.
- Reject Button Text - text, which will be displayed on the rejecting button.
- Prompt show delay - is the time, in seconds, which customers should stay on any of your store pages to receive Prompt.
Subscribers
Subscribers are customers, that had subscribed to the push notifications of your store.
Our extension tracks them and places to the single Grid, located at Marketing -> Push Notifications -> Subscribers.
We store the following information about each customer:
- Browser Name - the name of the browser used by the customer.
- Device Type - device type, e. q. desktop, mobile, or other platforms.
- Operation System - the name of OS, used by the customer.
- IP - IP, used by the customer.
- Country - location of the customer.
- Store View - store view.
This information can become a powerful tool for analyzing and boosting your marketing policy.
Unfortunately, our extension does not have reports for their visualization. However, you can install our Advanced Reports extension, and use integration to define such reports for yourself.
Refer to Generating Reports with ADVR section to know more.
Generating Reports with ADVR
Our Push Notification extension does not provide any reports out-of-box. However, if you have our Advanced Reports for Magento 2 extension installed on your store, you can use Report Builder for analyzing your push notification policy.
If you wish, you can check first our Examples of Advanced Reports for Push Notifications.
How to create Reports for Push Notifications
Visit Reports -> Report Builder section and select Build New Report from top menu. You will be given with complex workspace, which allows you to generate your own reports, as shown on the screenshot:
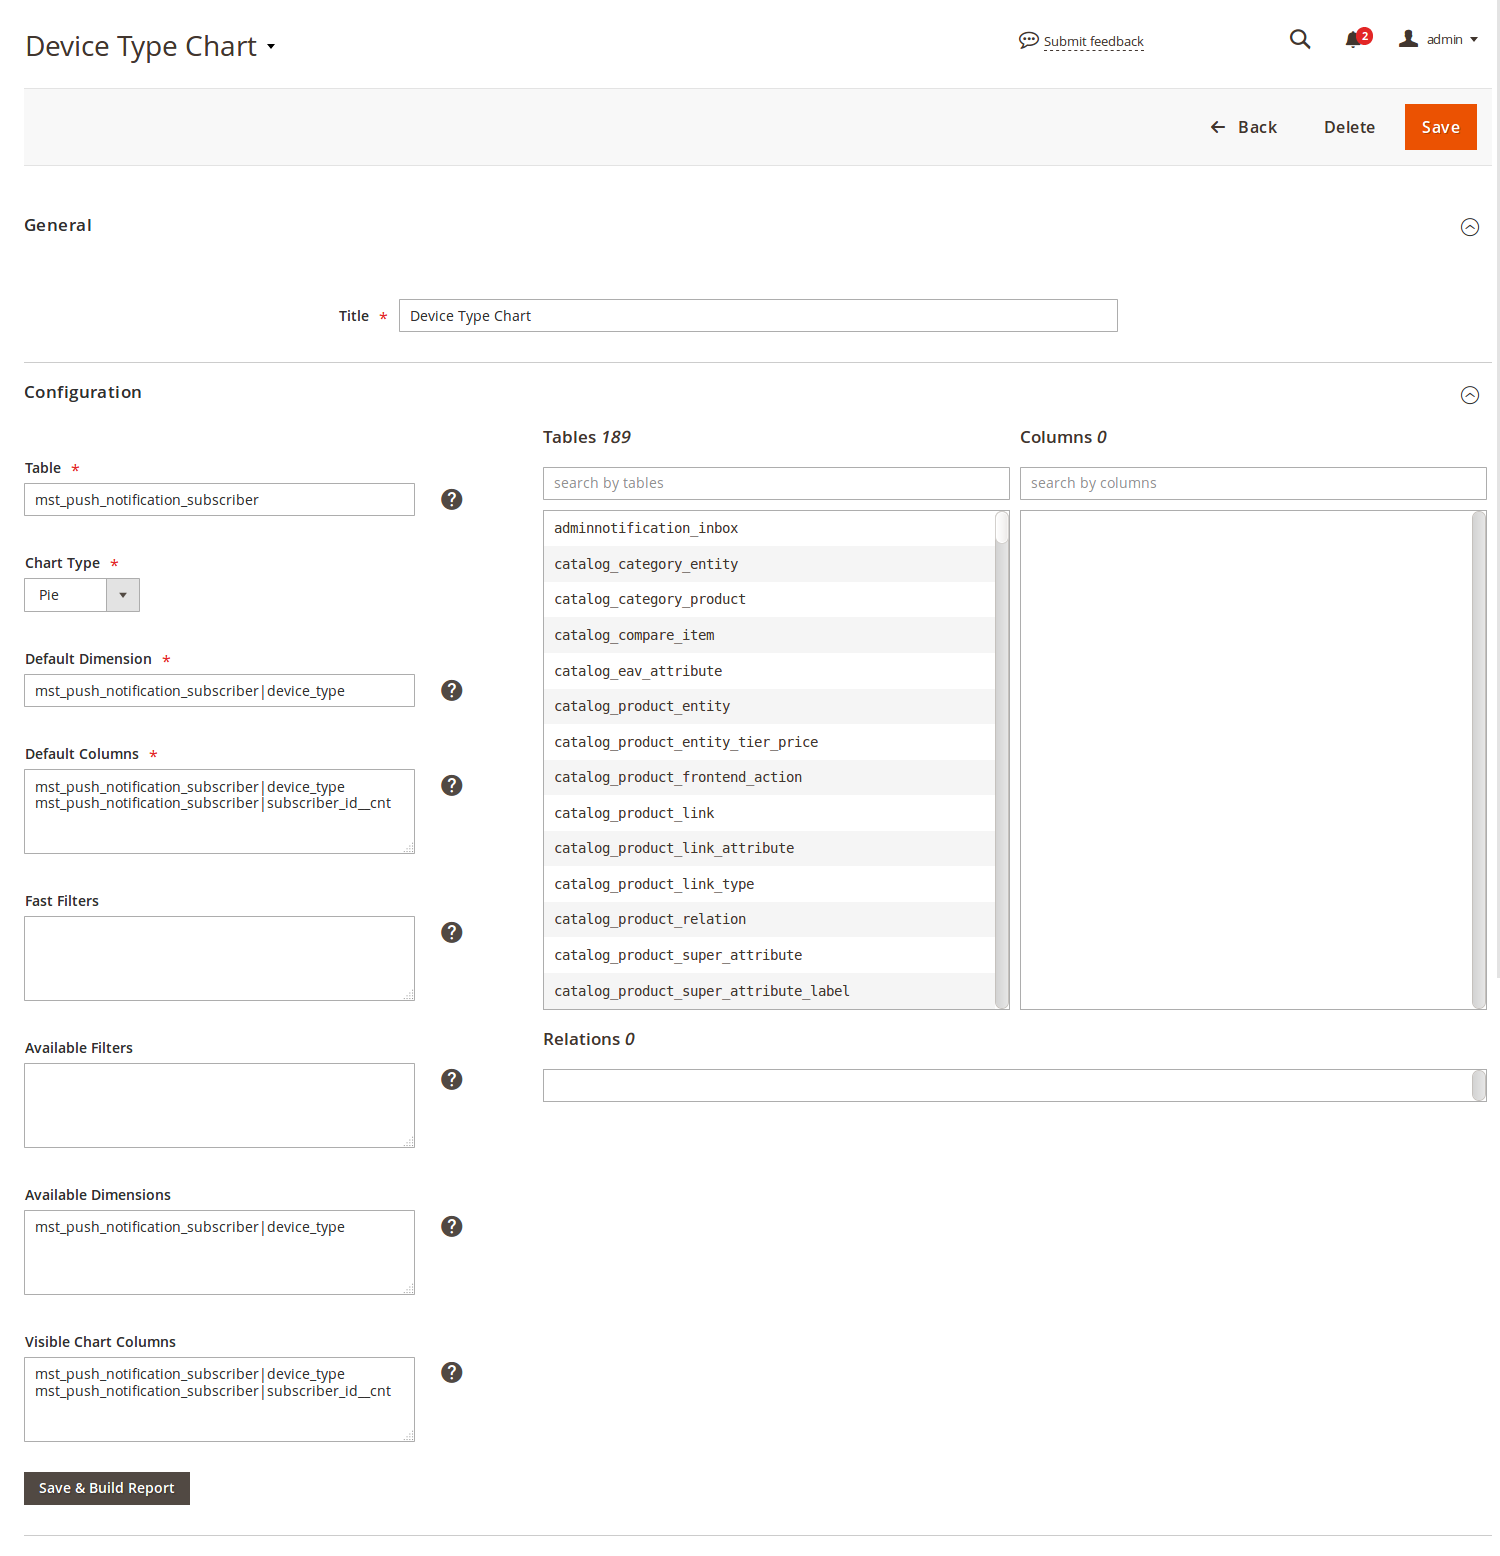
Consider creating a simple report, which demonstrates which device types customers use for your store.
Here is what you should do:
- Select a table
mst_push_notification_subscriberin Tables list. This is the main table, which holds information about push notifications subscribers.
Double click to copy name to the clipboard, and paste it to Table field. - Select a column
device_typein Columns list. This property contains device types, recorded from customer visits. Double click to copy name to the clipboard, and paste it to Default Columns field. It should look like this:mst_push_notification_subscriber|device_type. - Select a column
subscriber_id__cntin Columns list. This property acts as a grouping parameter and allows you to calculate the number of subscribers based on previously selected field(s). Double click to copy name to the clipboard, and add it to Default Columns field. It should look like this:mst_push_notification_subscriber|subscriber_id__cnt. - Copy
mst_push_notification_subscriber|device_typealso to the Available Dimensions. This field defines the views that a chart can have. - Copy contents of Default Columns to Visible Chart Columns. This field defines the data table for building charts.
- Give the report a sensical name, and put it to Title field.
- Press Save and Build Report to save it.
After saving, this report is available from top menu at Reports -> Advanced Reports section, and will look, as shown on the screenshot below:
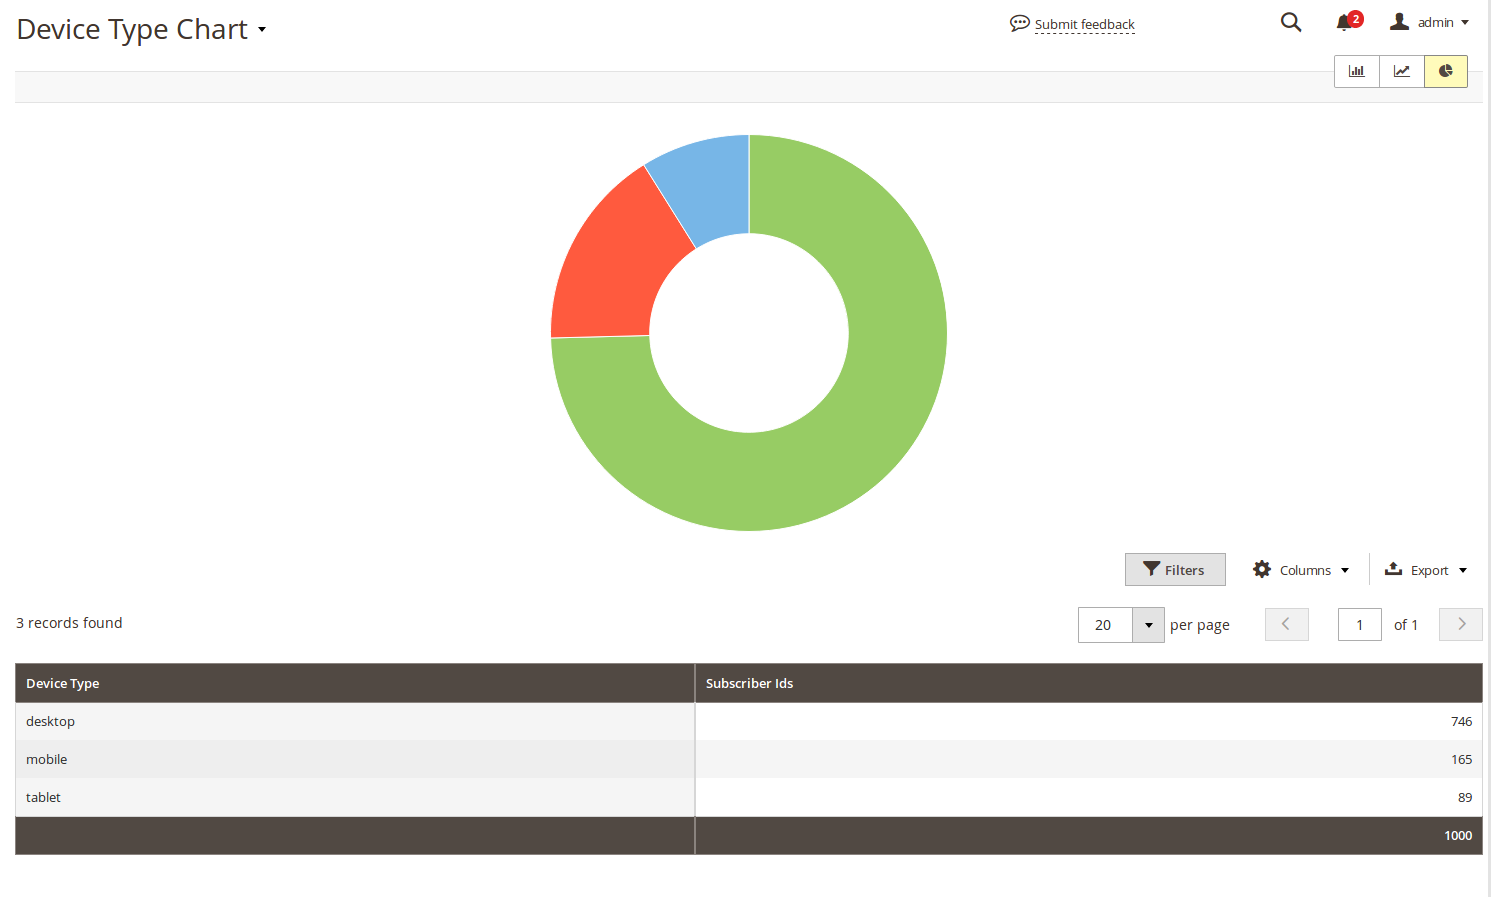
You can add other properties (or even more than one) to Default Columns, Available Dimensions and Visible Chart Columns, you can create complex reports, which allow you to have all statistics in one place.
Refer to the next Examples section, to see, how you can track your Push Notifications policy efficiency with Advanced Reports.
Examples of Advanced Reports for Push Notifications
-
Browser Statistics
This report will demonstrate which browsers customers use to visit your store.
- Title:
Browser Statistics - Table:
mst_push_notification_subscriber - Chart Type: Pie
- Default Dimension:
mst_push_notification_subscriber|browser_name - Default Columns:
mst_push_notification_subscriber|browser_namemst_push_notification_subscriber|countrymst_push_notification_subscriber|ipmst_push_notification_subscriber|operation_systemmst_push_notification_subscriber|device_typemst_push_notification_subscriber|subscriber_id__cnt
- Available Dimensions:
mst_push_notification_subscriber|browser_name
- Visible Chart Columns:
mst_push_notification_subscriber|browser_namemst_push_notification_subscriber|subscriber_id__cnt
- Title:
-
Country Statistics
This report will demonstrate, from where customers come to your store.
- Title:
Country Statistics - Table:
mst_push_notification_subscriber - Chart Type: Pie
- Default Dimension:
mst_push_notification_subscriber|country - Default Columns:
mst_push_notification_subscriber|countrymst_push_notification_subscriber|subscriber_id__cnt
- Available Dimensions:
mst_push_notification_subscriber|country
- Visible Chart Columns:
mst_push_notification_subscriber|countrymst_push_notification_subscriber|subscriber_id__cnt
- Title:
-
Subscribers Statistics Report
This is a complex report, which allows you to see all stats on your push notifications subscribers in one place.
- Title:
Subscribers Statistics Report - Table:
mst_push_notification_subscriber - Chart Type: Pie
- Default Dimension:
mst_push_notification_subscriber|device_type - Default Columns:
mst_push_notification_subscriber|browser_namemst_push_notification_subscriber|countrymst_push_notification_subscriber|ipmst_push_notification_subscriber|operation_systemmst_push_notification_subscriber|device_typemst_push_notification_subscriber|subscriber_id__cnt
- Available Dimensions:
mst_push_notification_subscriber|browser_namemst_push_notification_subscriber|countrymst_push_notification_subscriber|ipmst_push_notification_subscriber|operation_systemmst_push_notification_subscriber|device_type
- Visible Chart Columns:
mst_push_notification_subscriber|browser_namemst_push_notification_subscriber|countrymst_push_notification_subscriber|ipmst_push_notification_subscriber|operation_systemmst_push_notification_subscriber|device_typemst_push_notification_subscriber|subscriber_id__cnt
- Title:
-
Notifications Statistics Report
This is a complex report, which allows you to see how your push notifications are performing.
- Title:
Notifications Statistics Report - Table:
mst_push_notification_notification - Chart Type: Pie
- Default Dimension:
mst_push_notification_notification|clicked - Default Columns:
mst_push_notification_notification|clickedmst_push_notification_notification|fetchedmst_push_notification_notification|pushedmst_push_notification_notification|notification_id__cnt
- Available Dimensions:
mst_push_notification_notification|clickedmst_push_notification_notification|fetchedmst_push_notification_notification|pushed
- Visible Chart Columns:
mst_push_notification_notification|clickedmst_push_notification_notification|fetchedmst_push_notification_notification|pushedmst_push_notification_notification|notification_id__cnt
- Title:
Return to How to create Reports for Push Notifications to know how they were built.
How to upgrade the extension
To upgrade the extension, follow these steps:
- Backup your store's database and web directory.
- Login to the SSH console of your server and navigate to the root directory of the Magento 2 store.
- Run command
composer require mirasvit/module-push-notification:* --update-with-dependenciesto update current extension with all dependencies.Note
In some cases, the command above is not applicable, or it's not possible to update just the current module, or you need to upgrade all Mirasvit modules in a bundle. In this case, the command above will have no effect.
Run insteadcomposer update mirasvit/*command. It will update all Mirasvit modules installed in your store.
- Run command
php -f bin/magento module:enable Mirasvit_Core Mirasvit_PushNotificationto re-enable the extension. - Run command
php -f bin/magento setup:upgradeto install updates. - Run command
php -f bin/magento cache:cleanto clean the cache. -
Deploy static view files
rm -rf pub/static/*; rm -rf var/view_preprocessed/*; php -f bin/magento setup:static-content:deploy
Disabling the Extension
Temporarily Disable
To temporarily disable the extension please follow these steps:
- Login to the SSH console of your server and navigate to the root directory of the Magento 2 store.
- Run the command
php -f bin/magento module:disable Mirasvit_PushNotificationto disable the extension. - Log in to the Magento backend and refresh the store cache (if enabled).
Extension Removing
To uninstall the extension, please follow these steps:
- Login to the SSH console of your server and navigate to the root directory of the Magento 2 store.
- Run the command
composer remove mirasvit/module-push-notificationto remove the extension. - Log in to the Magento backend and refresh the store cache (if enabled).
Change Log
1.3.8
(2026-05-04)
Fixed
- Magento 2.4.9 compatibility for console command signatures
1.3.7
(2026-04-23)
Improvements
- Localize module to 15 locales (ar_SA, cs_CZ, de_DE, es_ES, fr_FR, it_IT, ja_JP, nl_NL, pl_PL, pt_BR, pt_PT, sv_SE, tr_TR, uk_UA, zh_Hans_CN)
1.3.6
(2023-03-15)
Fixed
- Prompt display issue
1.3.5
(2023-03-12)
Fixed
- Issue with sending notifications if notification is for multiple stores
1.3.4
(2022-12-29)
Fixed
- Compatibility with php8.1
1.3.3
(2023-03-06)
Improvements
- Ability to schedule sending times
- Added support of Magento 2.4.6
Fixed
- Error Deprecated Functionality strlower() on Subscribers page
1.3.2
(2022-12-29)
Fixed
- PHP8.1 fixes
1.3.1
(2022-11-15)
Fixed
- ACL
1.3.0
(2022-08-16)
Improvements
- Support of Magento MQ
1.2.2
(2022-06-28)
Improvements
- Ability to use emoji in Prompt
1.2.1
(2022-06-20)
Improvements
- remove db_schema_whitelist.json
1.2.0
(2022-05-31)
Improvements
- Migrate to declarative schema
1.1.44
(2022-04-08)
Fixed
- Disabled prompt for Safari
1.1.43
(2022-03-16)
Fixed
- CORS error with Page Bulder
- Issue with Safari
1.1.42
(2021-10-13)
Fixed
- Issue with exporting subscribers
1.1.41
(2021-08-10)
Fixed
- Issue with sending track requests if the frontend and backend are on different domains.
- Do not display prompt in the backend
1.1.40
(2021-07-30)
Fixed
- loopped redirection on backend login page
1.1.39
(2021-04-19)
Fixed
- Fix delete message for m2.4
1.1.38
(2021-01-28)
Fixed
- Issue with performance
1.1.37
(2021-01-11)
Fixed
- Issue with export to CSV notifications
- Issue with incorrect displaying of notifications
1.1.36
(2020-12-03)
Fixed
- Magento 2.4.* compatibility
1.1.35
(2020-11-18)
Fixed
- Magento 2.4 compatibility
- Fixed issue related to scheduled notifications send immediately
1.1.34
(2020-10-23)
Improvements
- Mobile Detect package validation ([#47]())
1.1.33
(2020-10-13)
Improvements
- Misspelling corrections
1.1.32
(2020-07-30)
Improvements
- Support of Magento 2.4
1.1.31
(2020-07-27)
Fixed
- Fixed issue with create/edit templates when icon file removed from file system (Warning: filesize(): stat failed for [image_path]) ([#41]())
1.1.30
(2020-01-28)
Fixed
- reset password issue
1.1.29
(2019-12-31)
Fixed
- Issue with backend session
1.1.28
(2019-12-27)
Fixed
- Issue with javascript loading stack ("*" is undefined)
1.1.27
(2019-12-03)
Improvements
- Prompt conditions
Fixed
- Issue with unable to register service worker
- Issue with triggered notifications
1.1.26
(2019-11-21)
Improvements
- Update Firebase lib
1.1.25
(2019-11-19)
Improvements
- Push logic
- Subscribers list
- Debugger toolbar
1.1.24
(2019-11-08)
Improvements
- Styles
Fixed
- Issue with prompt popup
1.1.23
(2019-11-07)
Improvements
- Switch to Firebase
1.1.22
(2019-10-29)
Fixed
- Test push notification with custom admin URL
1.1.21
(2019-10-11)
Fixed
- Issue with filters
1.1.20
(2019-09-03)
Fixed
- Issue with duplicated messages
- Issue with stores
1.1.19
(2019-06-11)
Improvements
- FCM
1.1.17
(2019-01-02)
Fixed
- Support of M2.3
- Error after remove message
1.1.16
(2018-11-27)
Fixed
- Cronjob
1.1.15
(2018-11-05)
Fixed
- Issue with subscribers
1.1.13
(2018-10-29)
Fixed
- Issue with schedule date
1.1.12
(2018-10-19)
Features
- Multistore support
1.1.11
(2018-08-14)
Improvements
- Moved Authentication keys to settings
1.1.10
(2018-02-26)
Fixed
- Issue with template preview (unsupported browser message)
1.1.9
(2018-02-09)
Improvements
- Register only active events mirasvit/module-event#9
1.1.8
(2018-01-16)
Fixed
- Unsupported browsers
1.1.7
(2018-01-09)
Fixed
- Crontab
1.1.6
(2018-01-09)
Fixed
- Event system
1.1.5
(2017-12-27)
Fixed
- Issue with wrong service worker url
1.1.4
(2017-12-19)
Fixed
- Removed Add Customer button
1.1.3
(2017-12-13)
Fixed
- Issue with server-worker
1.1.2
(2017-12-04)
Improvements
- Added option requireInteraction
1.1.1
(2017-11-24)
Fixed
- Issue with prompt on iOS
1.1.0
(2017-11-14)
Improvements
- Refactoring
- New event system
Fixed
- Issue with requirements
- Issue with Test notification
1.0.0
(2017-05-18)
Fixed
- Removed wrong references