Getting Started
Welcome to the RMA Documentation.
Here you will find everything you need to set up Return Merchandise Authorization (RMA) and create a flexible policy for product returns and refunding.
Our extension allows customers to submit request for return, after his order is complete. This request can result either in Exchange Order, or in Refund, making return process easy and flexible.
Go ahead, dive in!
Firstly, please, find our extension in My Downloadable Products section of our store. Learn how to install extension, and proceed with Quick Start, which will guide you to setup your return policy.
How to install extension
- Backup your store's database and web directory.
- Login to the SSH console on your server and navigate to the root directory of the Magento 2 store.
-
Copy installation instructions from page My Downloadable Products to SSH console and press ENTER.
- Run command
php -f bin/magento module:enable Mirasvit_Core Mirasvit_Report Mirasvit_Rmato enable the extension. - Run command
php -f bin/magento setup:upgradeto install the extension. - Run command
php -f bin/magento cache:cleanto clean the cache. -
Deploy static view files
rm -rf pub/static/*; rm -rf var/view_preprocessed/*; php -f bin/magento setup:static-content:deploy
Note
As of Magento 2.3* the GraphQl module can be also installed. The command is composer require mirasvit/module-rma-graph-ql
Install the extension for Hyva
-
Run the command
composer require mirasvit/module-rma-hyva:* -
Enable installed Hyva modules:
bin/magento module:enable Hyva_MirasvitRma Hyva_CompatModuleFallback -
Update Magento database schema and data with the command:
bin/magento setup:upgrade -
Compile the code of the installed extension:
bin/magento setup:di:compile - Run the command below to clean the cache:
bin/magento cache:flush
Quick Start
Our Return Merchandise Authorization (RMA) extension for M2 is a simple, yet powerful tool for managing products returns. Most of its functions are quite intuitive, and work just out-of-box.
However, it also features rich configuration, which allows to employ almost any return policy. Here is a short guide, which will help you in building your returns workflow.
-
Each Return begins from Return Request. It can be submitted either from three sources:
- Customer's Account. This source can be disabled, if you wish to have RMA created only for staff. To do that, you need simply set option RMA -> Settings -> Customer Account -> Show RMA section in Customer Account to No;
- Guest RMA Page. This source is always enabled by default, and currently can not be disabled.
- Backend RMA Grid. This source also is always enabled.
When customer submits RMA, it also shall supply three main parameters:
- Reason - why did he choose to return the product. Although pre-defined reasons are relatively simple, you can always define your own in Reasons grid.
- Condition - describes condition, which currently product has. Conditions also can be defined, using Conditions grid.
- Resolution - defines action, which he expects to conduct. You can define your custom actions, but base actions - Exchange and Refund shall remain in place. If you do not need, just add new and disable unneeded records in Resolutions grid.
You can control, which parameters shall customer supply, and which staff shall fill-in. It is done using option RMA -> Settings -> Customer Account -> Customers are required to select.
You can even add your own parameters for submission, using our feature of Custom Fields.
-
Request submission can have certain limitation, like days quantity since original order, or particular status, which should have order to be eligible for requests. These limitations you can set at RMA -> Settings -> RMA Policy.
-
Once Return is submitted and saved, it receives a number. You can use default numbering scheme, which is simple counter, prefixed with store ID - or create your own numbering scheme using options in RMA -> Settings -> RMA Number section.
-
Each Return document proceeds through different stages - from pending to approval or decline. These stages are called Statuses, and they can be defined in Statuses grid. Each time RMA assigned in new status, our extension can send automated notification for customer, or for staff. They are set in corresponding status record, in Notification section. Use these fields wisely to automate your communication with customer.
-
While communicating with customer, you may encounter typical situations, that require typical answers. We call it Quick Responses, and you can create them at appropriate grid.
-
Sometimes you need to set product return not to your store, but to some alternative address - a warehouse, for example. Use for that Return Addresses grid, which allows you to work with multiple return addresses.
-
Finally, you can automate your RMA requests - for example, automatically decline all broken products. You will need to create one or more Workflow Rule for that. You can also use these rules to create your own email notifications flow.
- Observe return statistics frequently with our Reports, that allow you to see - which products are returned, which reasons are most popular and so on, making your Return policy flexible and responsive to customer's demands.
This should be a good beginning.
Refer to appropriate sections of our manual to have more info.
RMA Settings
This section describes the most of settings, that you can use for configuring your returns policy, except of Email Notification Settings, which is included in other section:
- General Settings
- Customer Account Settings
- RMA Policy
- RMA Number
General Settings
| Option | Description |
|---|---|
| Return Address | Default Return address of the store. Will be shown in the RMA Packing Slip. See Return Addresses. |
| Default status for new RMA | When the customer creates a new RMA, this option sets the RMA default status. |
| Default owner for the new RMA | Sets the default owner for a new RMA. |
| Ask customer to confirm shipping | If the option is enabled, the customer will be asked to confirm the shipping of the returned items. |
| Shipping confirmation text | Text of the shipping confirmation dialog. |
| Allow RMA for offline orders | If option is enabled, RMA requests will be available for offline orders. |
| Enable option "This was a gift" | This option is useful when your customers buy gifts for their friends. Friends can create an RMA request for a gift and the initial customer will not be notified about such RMA. |
| Enable integration with Help Desk | Allows to integrate RMA requests to the Help Desk system. |
| Code of "Brand" attribute | You can set the code of the brand attribute. |
| Allow the attachment to upload with extensions | Customers will be allowed to upload only those types of files. |
| Allow the shipping label to upload with extensions | Customers will be allowed to upload shipping labels with the specified types of files. |
| Limit of the attachments size, Mb | Customers will not be able to upload files with a size that is greater than this limit. |
Customer Account
| Option | Description |
|---|---|
| Show RMA section in Customer Account | If the option is enabled, the RMA section is displayed in a customer account. |
| Show RMA for guest customer by order | If the option is enabled, the guest customer will only see RMA for the entered order number. |
| Customers are required to select | List option that allows you to choose which basic return parameters (e. q. Reasons, Conditions, Resolutions) shall be submitted by the customer. |
RMA Policy
| Option | Description |
|---|---|
| Allow for requesting an RMA after order completion, days | Number of days after order completion when a customer can create an RMA request. |
| Allow for requesting an RMA if order has status | Sets product's order status(es) which allows a customer to create a RMA request. |
| Allow RMA for multiple orders | If the option is enabled, the module allows for creating an RMA that includes items from two or more orders. |
| Request only shipped products | If the order has only been partially shipped, then only the shipped items will be available for the RMA. |
| Ask to agree with RMA policy text | If option is enabled, RMA policy is shown when customer creates a new RMA. Customer must accept the policy to proceed with the RMA. |
| CMS block with RMA policy text | Sets CMS static block with the text of the RMA policy. To create and manage this block go to the: CMS > Static Blocks |
RMA Number
| Option | Description |
|---|---|
| Allow a Manual RMA Number | If option is enabled, "RMA #" can be changed on backend RMA edit page |
| Number Format | You can specify a custom format for RMA numbers. You can use variables [store], [counter], [order]. For example, you have a format 'RM-[store][counter],' and you'll receive RMAs with the numbers RM-1000001, RM-1000002, RM-1000003, etc. Or format '[order]', you'll receive RMAs with the numbers equal to the original order number. |
| Reset Counter For Order | Allows resetting RMA order numbers for the RMAs created for the next orders. |
| Start Counter From | Initial number of the counter. |
| Counter Increment Step | Counter's increment step. |
| Counter Length | Number of digits in the counter. |
Email Notifications
RMA extension sends emails with different types of notifications to the customer and store agents. You can customize the templates of those emails.
In this section, you will find:
- How to Configure Email Notifications
- How to Disable Email Notifications
- How to Customize Email Template
- How to Use Variables in Email Notifications
Note: If you need to create your own emails flow, refer to Workflow Rules section.
How to configure Email Notification workflow
Email notifications are governed by the corresponding section of Sales -> RMA -> Settings, as was noted below. There is a short description of the options that are available.
| Option | Description |
|---|---|
| Email Sender | Sets email from which letters will be sent to a customer. |
| Template of Notification Email for Customer | Template of email notifications for customers. |
| Template of Notification Email for RMA Owner | Template of email notifications for RMA agents. |
| Template of Rule Notification | Template of Workflow Rule email notifications for customers. |
| Send Email Copy Method | If you wish to send a copy of all the RMA messages to a separate email (depends on the setting "Send copy of all emails to") you may select the sending method. |
| Send a copy of all emails to | All outgoing emails will be sent to this list of emails. You should create a comma-separated list of emails. |
How to disable Email notifications
To disable Email notifications, you need to go to the Sales > RMA > Settings > Email Notification Settings. In the dropdown list of the necessary notification, select the option Disable these emails. Save configuration.
How to customize the email template
To change the email template of RMA, you need to do the following steps:
- Go to the Marketing > Email Templates.
- Press the button Add New Template.
- In the dropdown list, select the template that you would like to customize. The current extension templates are placed at the Mirasvit_Rma header.
- Press button Load Template.
- Enter new Template Name (e.g. Email notification for Customer).
- Change Template Subject and Template Content as you need, and save the template.
- Go the to Sales > RMA > Settings > Email Notification Settings. Select your new template in the dropdown list of necessary notifications. Save configuration.
How to use variables in the Email notification
Email templates can contain special variables, which allows a high level of customization.
RMA supports standard Magento Email Template variables, such as {{var logo_alt}}, and supports function calling, like {{var store.getFrontendName()}}, and also adds a set of its own variables.
{{var customer}}- allows access to customer properties;{{var rma}}- allows access to RMA properties, including custom fields (see below).{{var getReply()}}- contains a message sent to a customer or staff in RMA discussion.{{var email_body}}- contains a customized at module helper message
Access to properties is similar to Javascript, with dot (.) operator. For example, if we need to include a customer's name to the notifier, we can write {{var customer.name}}. If RMA contains custom fields, they can be accessed by codes which are found at Sales > RMA > Custom Fields > Dictionaries > Custom Fields > Custom Field edit page > Code, in similar manner - if custom field has code customdate, then the variable will be {{var rma.customdate}}.
The most usable properties are:
{{var store.getName()}}- name of current store{{var store.getCode()}}- code of current store (e. q.adminfor backend, ordefaultfor default store){{var user.getFirstname()}}- First Name of current agent{{var user.getLastname()}}- Last Name of current agent{{var user.getName()}}- Full Name of current agent{{var user.getEmail()}}- Email of current agent{{var rma.getIncrementId()}}- current RMA number{{var rma.getGuestId()}}- displays a Guest ID of current RMA.{{var rma.getUrl()}}- URL of current RMA{{var rma.getBackendUrl()}}- backend URL to RMA page{{var rma.getGuestPrintUrl()}}- URL of the printable version of the current RMA{{var status.getName()}}- current status of RMA{{var customer.getName()}}- Full Name of current customers{{var customer.getEmail()}}- Email of current customer{{var rma.getReturnAddressHtml()}}- address where the package is returned
There is a number of variables that allow you to use your Store Information, as set in Stores -> Configuration -> General -> Store Information
{{var storeInfo.getName()}}- name of your store{{var storeInfo.getPhone()}}- phone of current store{{var storeInfo.getCountry()}}- country of your store's location{{var storeInfo.getCity()}}- city, where your store is located{{var storeInfo.getRegion()}}- region, where your store is located (if available).{{var storeInfo.getPostcode()}}- postal code of your location
If Helpdesk is also integrated with RMA, it is possible to use two other variables:
{{var hidden_separator}}- allows separating the answer from the communication history{{var hidden_code}}- allows hiding the ticket code in the email template which is used to bind the email with the ticket
You also can use special variables to check, whether particular RMA has items with appropriate Reasons, Conditions and Resolutions. These special variables can be used for creating complex notifications, with sections, dependable from items properties. See more on this matter here:
{{var rma_getHasItemsWithReason_XXX}}- allows to check, whether RMA has items with Reason, which have ID=XXX.{{var rma_getHasItemsWithCondition_XXX}}- allows to check, whether RMA has items with Condition, which have ID=XXX.{{var rma_getHasItemsWithResolution_XXX}}- allows to check, whether RMA has items with Resolution, which have ID=XXX.
If necessary, it is possible to use RMA templates standard custom variables. These variables are created with System > Custom Variables and can be inserted with {{customvar code="var_name"}}. For example, if the custom variables have a code "test", then the variable will be {{customvar code="test"}}.
Statuses
Each RMA request proceeds through a set of stages, on which data are gathered, goes communication with customers, and performed some actions. Each of these stages corresponds with Status, which is crucial part of RMA.
By default RMA can have the following statuses:
- Pending approval - RMA request isn`t reviewed yet. Assigned just after submission, if other not set at RMA -> Settings -> General Settings -> Default status for new RMA.
- Approved - RMA request is approved. Customer can print the RMA packing slip and ship their items.
- Package Sent - customer has confirmed sending the RMA items to the store.
- Rejected - RMA request is rejected.
- Сlosed - RMA request is closed.

But sometimes RMA processing can be more complex, so our extension provides customers with ability to create their own Statuses, thus creating their own return processing procedure.
How to create a new status
Go to the Sales > RMA > Statuses. Press the button Add New.
You'll see following fields:
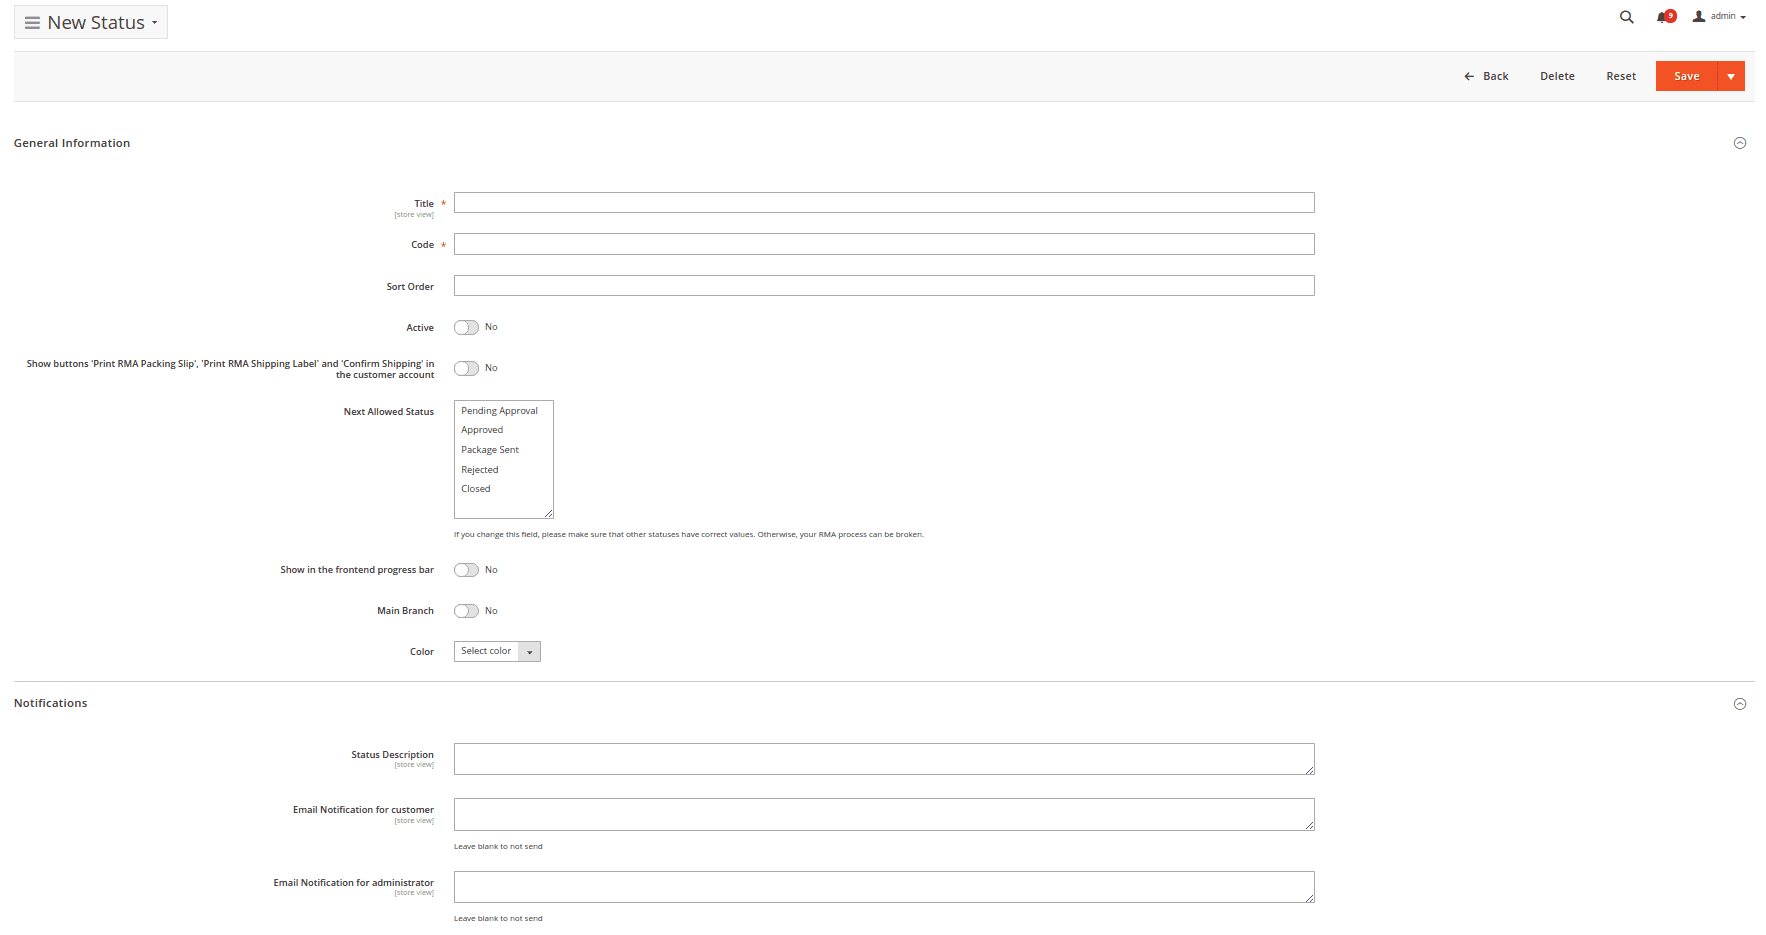
General information
- Title - Title of the new status.
- Code - Unique internal code for the statuses.
- Sort Order - sorting order (used for displaying in drop-down menu)
- Is Active - whether current reason is visible on RMA creation and edit page.
- Show buttons 'Print RMA Packing Slip' and 'Confirm Shipping' in the customer account - When the RMA request recieves current status, additional buttons Print RMA Packing Slip and Confirm Shipping will be displayed on the customer RMA page.
- Next Allowed Status - defines which the next status is available for the admin in the RMA order.
- Show in the frontend progress bar - If enabled - the status is visible on the frontend in the progress bar for the current RMA
- Main Branch - Used for sorting statuses: if it's possible that RMA appears in several statuses. For example, if RMA in status "Approved" and you can switch to statuses "Return" or "Shipping". Only one status will be shown on the frontend as the next status which has option "Main Branch" = "Yes" or which priority is lower
- Color - The color for the status in the progress bar in customers account, also in the RMA and status grid.
Notifications
Assigning a status to a RMA can be accompanied with automated email notification. It can be used for speeding up RMA handling in standard use cases. There's three types of them:
- Email Notification for customer - Text of email notification for customer.
- Message for RMA history - Text of the message to the RMA history.
- Email Notification for administrator - Text of the email notification for the store agent.
To send notification, enter in corresponding field contents of that notification. To disable it - just make it empty and save status.
You can use the following umbrella variables in the notification text:
- rma
- order
- customer
- status
- store
You can gain access to their properties and even methods using point operator. For example, if you need to add customer's name - use variable {{var rma.getCustomerEmail()}}.
Example
For example, you can use the following code as notification text:Dear {{var customer.name}},<br><br>
Your Return request has been approved.
<br>
{{depend rma_getHasItemsWithResolution_1}}
You choose to receive your money back, so we will refund the following items:<br><br>
{{block class="Mirasvit\\Rma\\Block\\Rma\\View\\Items" area='frontend' template='Mirasvit_Rma::email/rma/items.phtml' rma=$rma resolution_id=1}}<br><br>
{{/depend}}
{{depend rma_getHasItemsWithResolution_2}}
You choose to exchange your product, we will contact you about the following items:<br><br>
{{block class="Mirasvit\\Rma\\Block\\Rma\\View\\Items" area='frontend' template='Mirasvit_Rma::email/rma/items.phtml' rma=$rma resolution_id=2}}
<br><br>
{{/depend}}
Please, print <a href='{{var rma.guest_print_url}}'>RMA Packing Slip</a>.Note: You can have different notifications for different stores, but for the same Statuses. To do it, just switch store switcher to desired one, and enter contents to the proper field. It will be saved independently just for selected store.
Reasons
Each product, returned by customer, can be supplied with Reason, why did customer choose to return this particular product. It is extremely useful for monitoring return statistics (refer to Report by Reason), and can be used for improving your sales.
Our extension provides you with basic conditions set, but you're free to create your own.
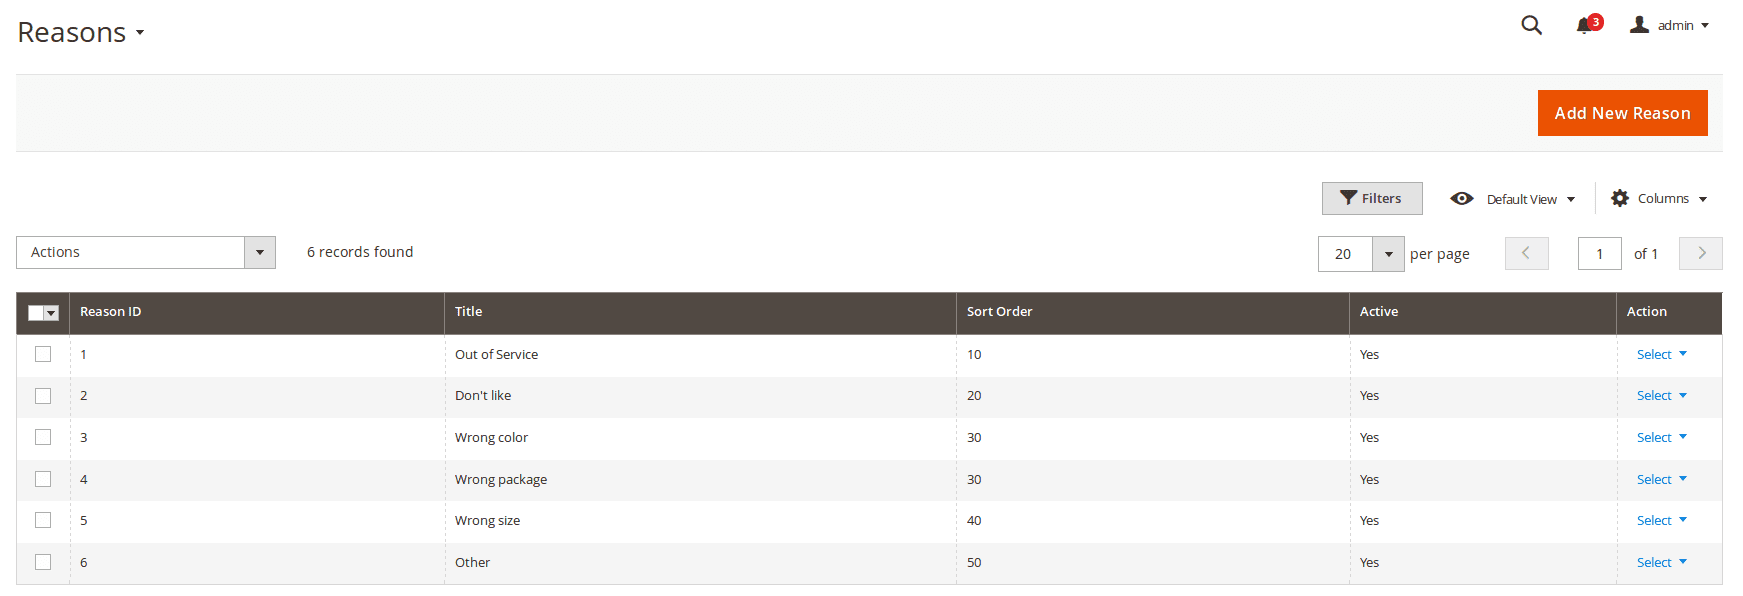
How to create a new reason
Go to the Sales > RMA > Reasons. Press the button Add New. You'll see following edit page:
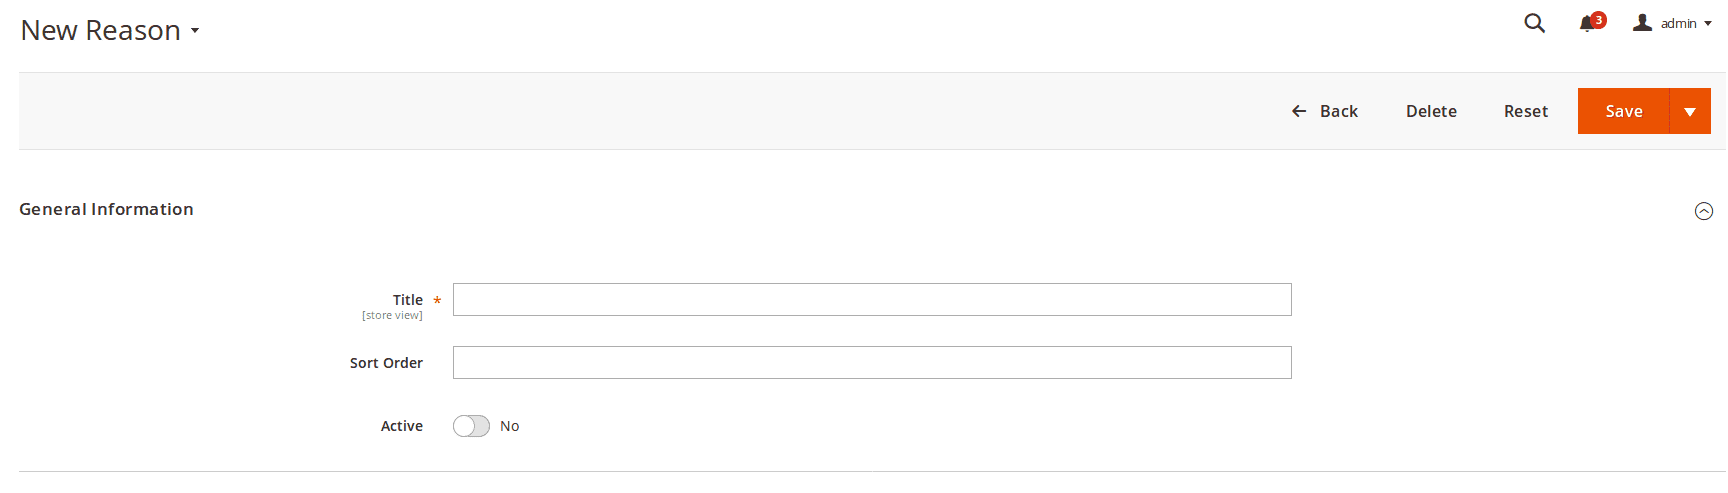
- Title - Title of the reason.
- Sort Order - sorting order (used for displaying in drop-down menu)
- Is Active - whether current reason is visible on RMA creation and edit page.
Conditions
Each product, returned by customer, can be supplied with description of its current (or on arrival - depending on your police) Condition.
Our extension provides you with basic conditions set, but you're free to create your own.
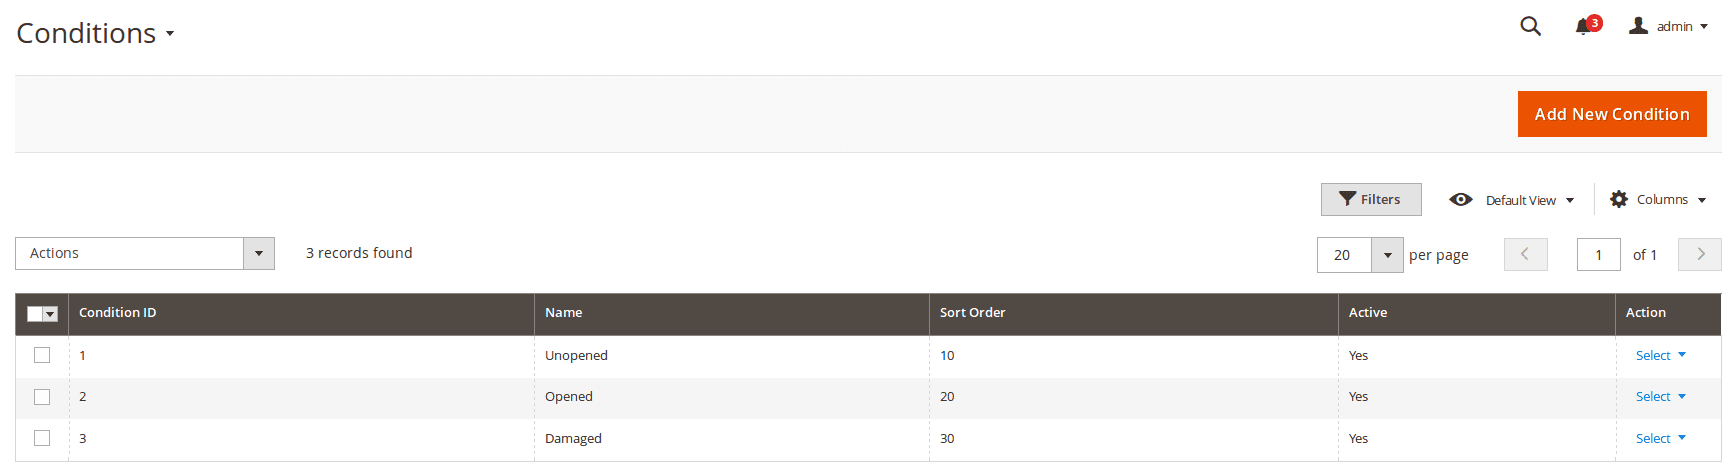
How to create a new condition
Go to the Sales > RMA > Conditions. Press the button Add New. You'll see the following edit page:
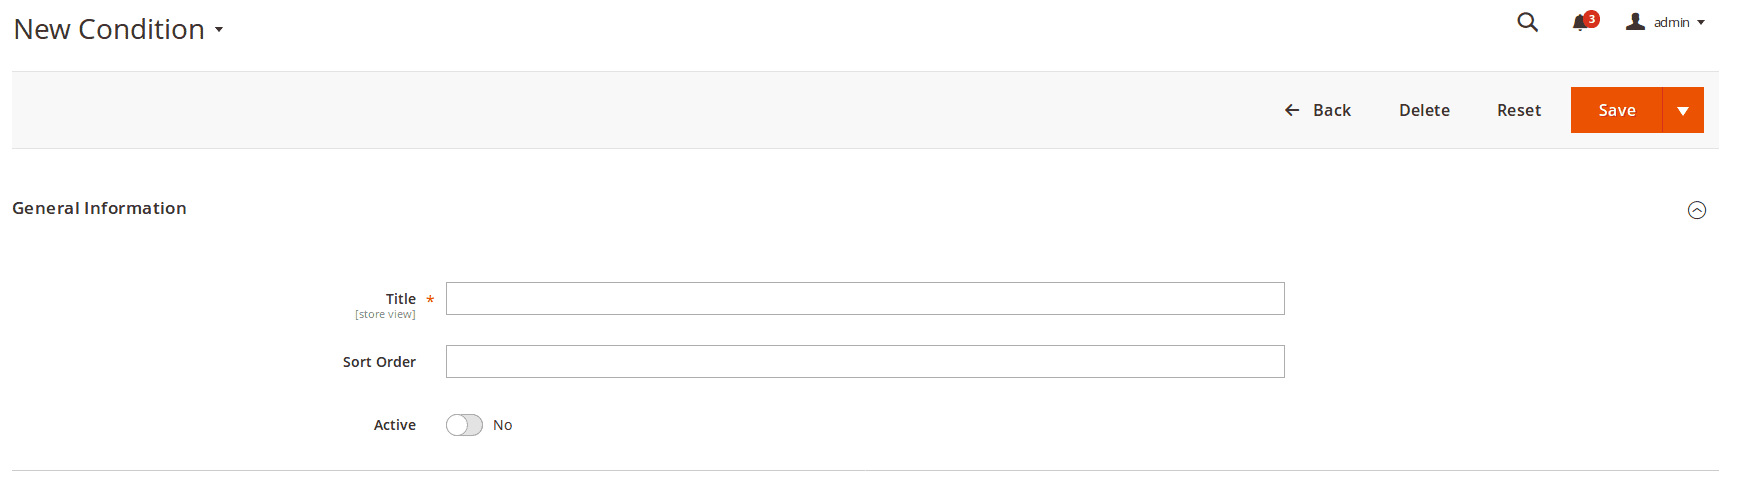
- Title - Title of the condition.
- Sort Order - sorting order (used for displaying in drop-down menu)
- Is Active - whether current condition is visible on RMA creation and edit page.
Resolutions
When customer submits an RMA, it can mark, which service he would select - for example, Exchange or Refund. Typically, these two are enough to create reliable return service, but sometimes you need an extended resolutions - different kinds of Refund, or even Repair service.
Our extension allows you to create as many possible return Resolution, as your policy need.
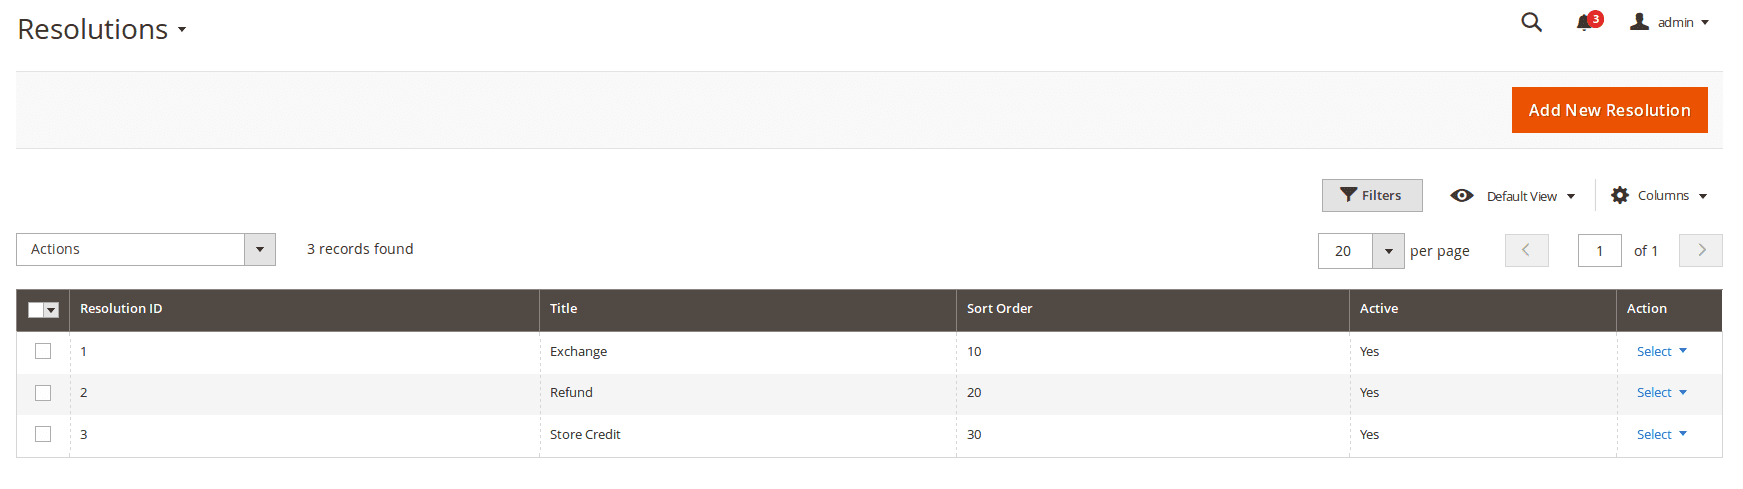
How to create a new resolution
Go to the Sales > RMA > Resolutions. Press the button Add New. You'll see following edit page:
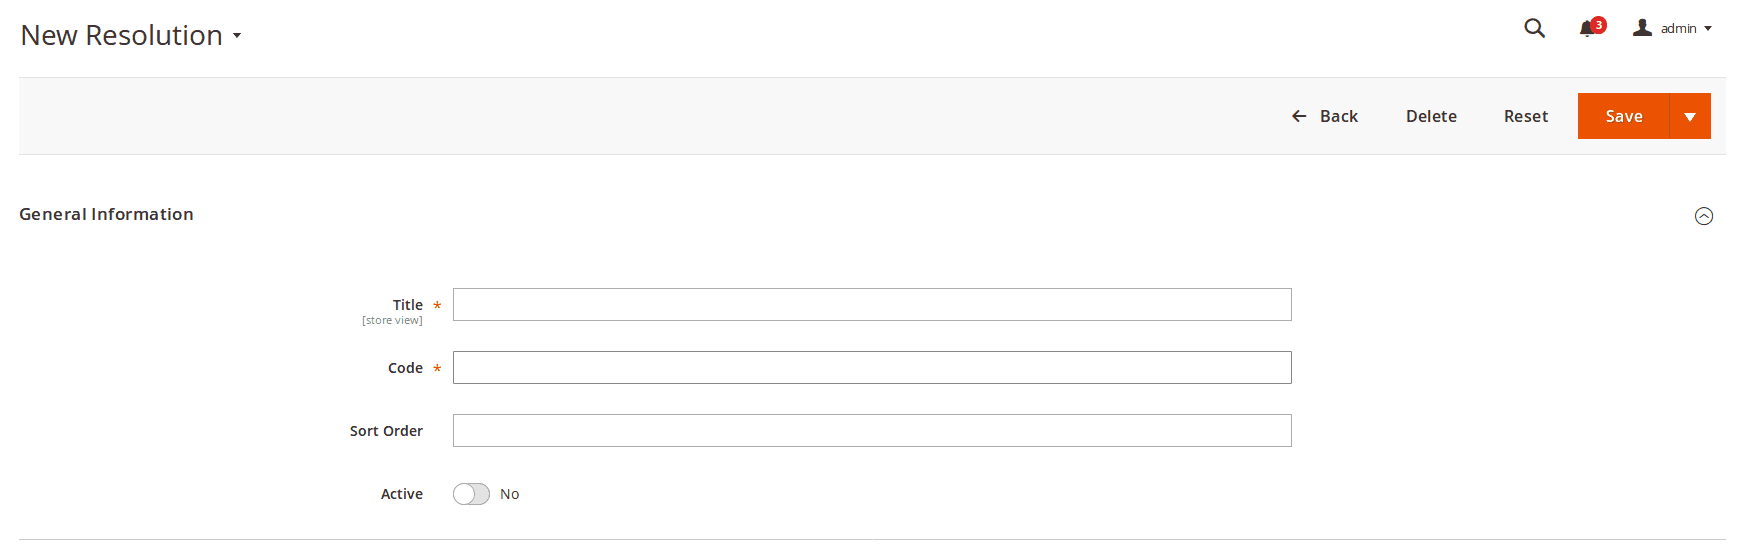
- Title - Title of the reason.
- Code - Unique internal code of the resolution.
- Is Active - whether current condition is visible on RMA creation and edit page.
- Is Exchange Order Allowed - if enabled, admin can create an Exchange order from RMA order page.
- Is Replacement Order Allowed - if enabled, admin can create a Replace order from RMA order page.
- Is Creditmemo Allowed - if enabled, admin can create a Credit Memo from RMA order page.
- Sort Order - sorting order (used for displaying in drop-down menu).

Custom Fields
Custom fields are poweful instrument to boost your return services, especially when you had defined additional Resolutions. You can use them to store additional information about RMA.
For example, when a customer confirms the shipment of RMA package, you can use custom fields to get additional information about the shipment (like carrier, tracking number).
How to create a new custom field
Go to the Sales > RMA > Custom Fields. Press the button Add New. You'll see the following edit page:
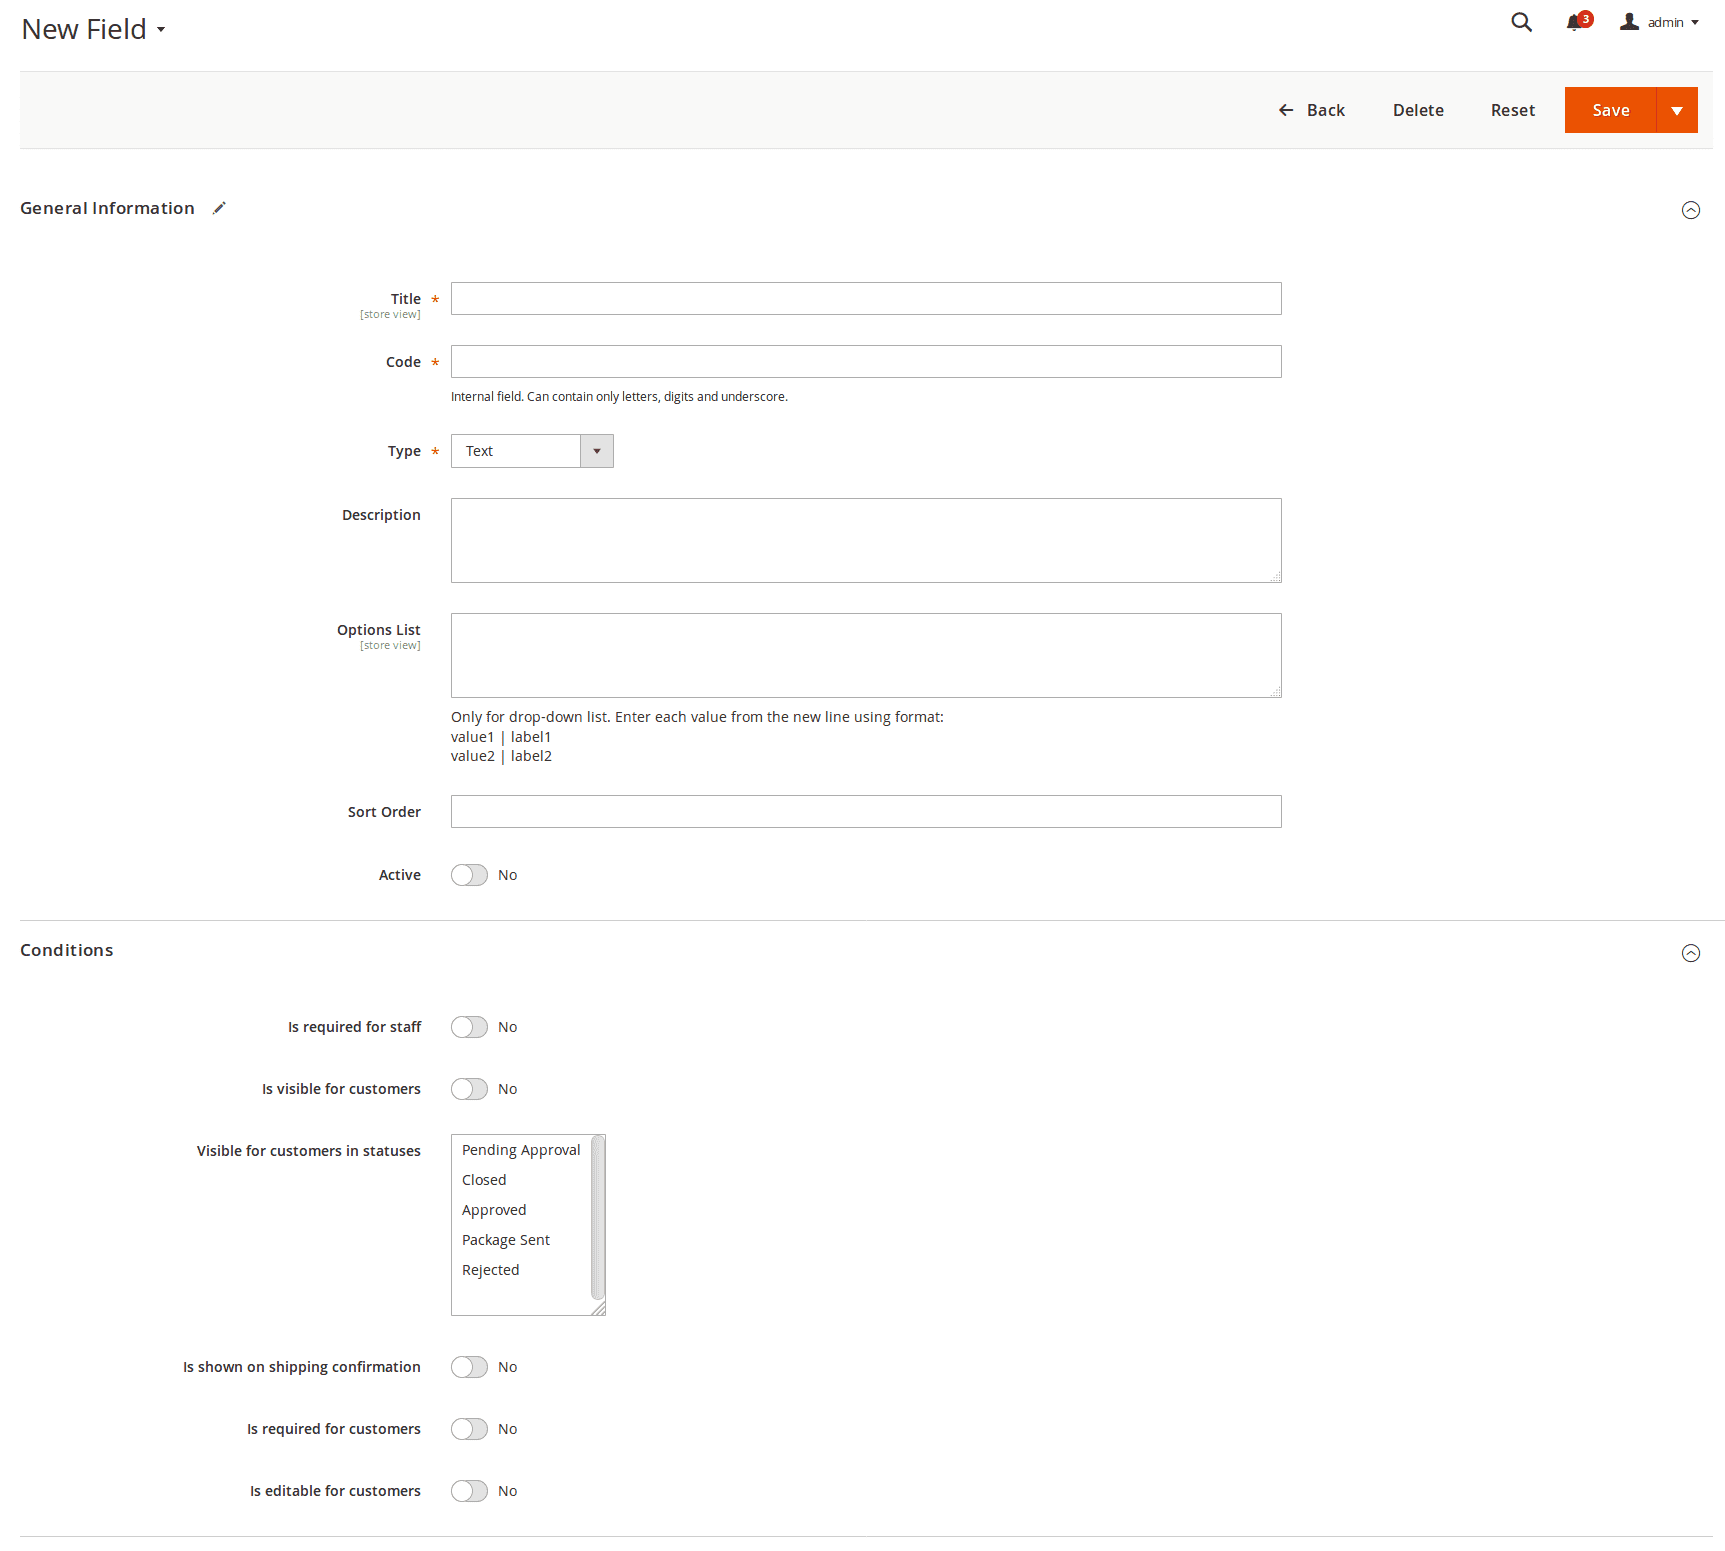
- Title - Title of the field.
- Code - A unique internal code of the field.
- Type - Field type, which defines - which control element will be used for entering values. The following types are possible:
- Text - One line text field.
- Multi-line text - Multi-line text field (textarea).
- Date - Date with calendar.
- Checkbox - a checkbox
- Drop-down list - a menu-like widget with drop-down select (also requires Options List).
- Description - Description of the field. Will appear in interface as small tooltip.
- Options list - Used only for fields with type drop-down list. Enter each value from the new line using the format:
value1 | label1 value2 | label2 - Active - If this option is enabled, the custom field is active.
- Sort Order - Displays the sequence of the fields.
- Is required for staff - If this option is enabled, an agent is required to fill-in this field.
- Is required for customers - If this option is enabled, a customer is required to fill-in this field.
- Visible for customers in statuses - This option allows you to show the field to customers only in specified statuses of RMA.
- Is show in confirm shipping dialog - If this option is enabled, this field will be shown in the confirm shipping dialog.
- Is editable for customers - If this option is enabled, customers can enter a value to this field.
Example
To insert a custom field value inside an email template, you can use the variable {{var rma.custom_field_code}}.
Quick Responses
While communicating with your customers, you might encounter typical situations, which need typical answers.
This can be resolved by many ways. Some of them you may resolve by establishing a special Status or even Workflow Rule, with automated message. But some will require a semi-manual response, which should be changed a little - depending on particular customer (his name, for example).
In this case you can use Quick Response, to paste a predefined answer into the reply field, edit it if necessary and send the message to the client. It greatly speeds up your communication and RMA handling.
How to create a New Quick Response
Go to the Sales > RMA > Quick Responses. Press the button Add New. You'll see following edit page:
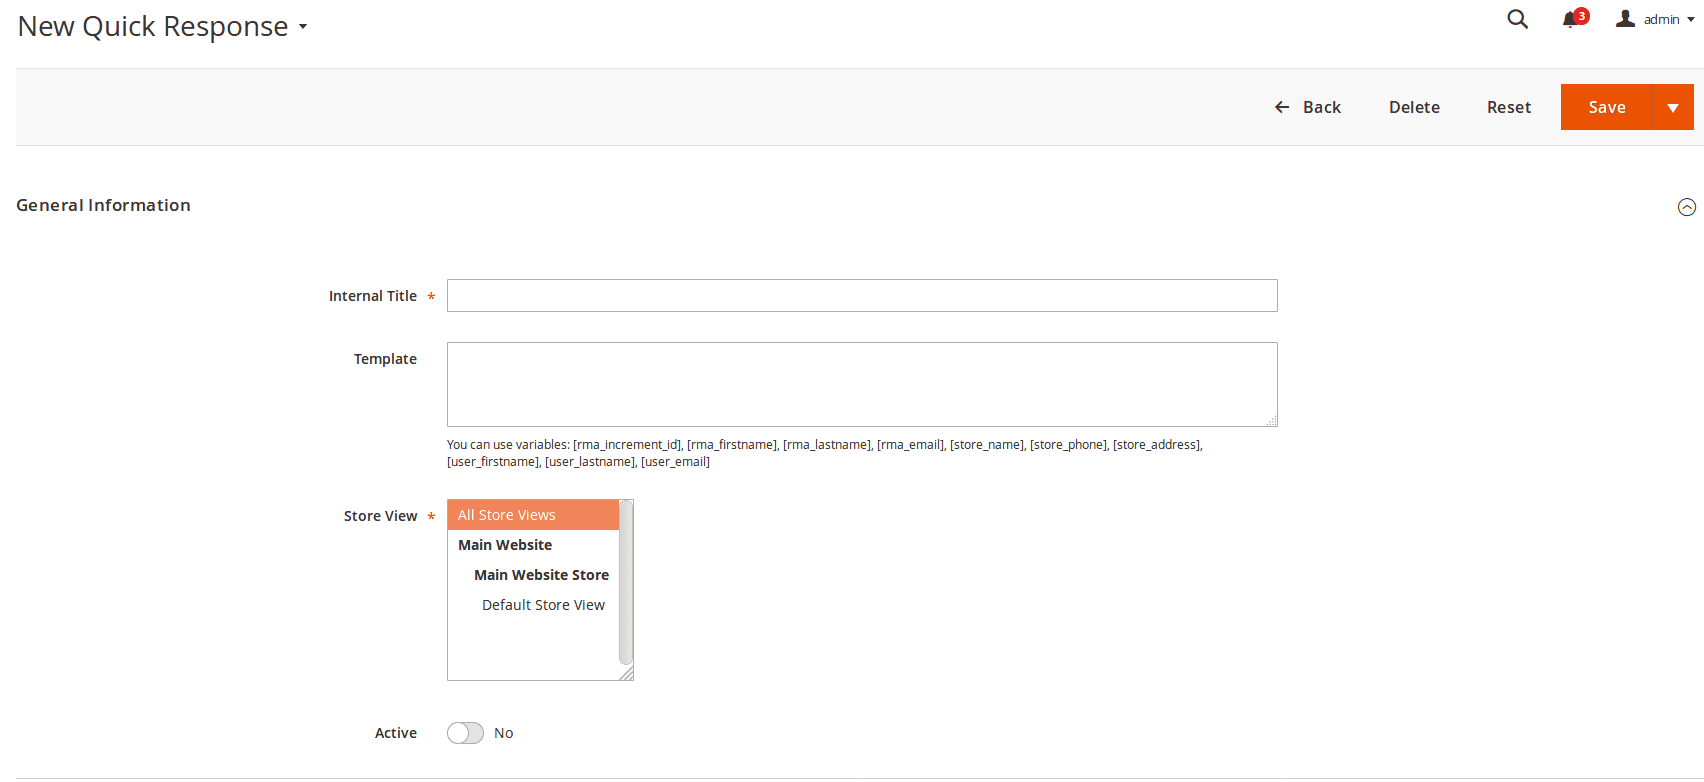
- Internal Title - Internal title of quick response. It will be shown only in backend, in section of submitting new message from the staff.
- Is Active - Enables or disables current quick response.
- Template - Text of quick response. This text will be inserted into reply fields. You can use following variables:
[rma_increment_id]- RMA ID[rma_firstname]- Customer First Name[rma_lastname]- Customer Last Name[rma_email]- Customer Email[store_name]- Store name[store_phone]- Store phone[store_address]- Store address[user_firstname]- Agent name[user_lastname]- Agent last name[user_email]- Agent Email
- Stores - Store views where you can use this quick response. If you have several languages, you need to have different quick responses for different store views.
Quick Responses, created in this section, will appear on RMA edit page, in Add Message block - where drop-down widget option Insert Quick Response will appear.
Just select proper title from the list, and it will be pasted to the message text area. All variables will be replaced with their corresponding values in this RMA.
Note: Quick Responses are store-dependent. So, if you do not see in RMA particular Quick Response, please, use Order field to open original order. Then check Purchased From field there. This store should be also set in desired Quick Responses.
Workflow Rules
Workflow Rules are powerful tool for automating standard situation, that can occur during RMA submission, or processing.
Each rule is binded to certain event, which will trigger their execution. When rule is triggered, it validates its conditions - and if they met by current RMA, action is executed. There's wide range of actions, that can be performed by our Workflow Rules.
For example, you can automatically assign RMA with different Resolutions to your responsive staff members, so they can provide the best service to your customers and to get the job done.
Also, you can auto-assign to RMA certain status after the first reply of a support team member, notify all the department members when a new RMA is created, send a reminder to the RMA owner if there is no reply during 3 days, and so on.
How to create Workflow Rule
Go to Sales -> RMA -> Workflow Rules and add a new rule. You will see a complex creation page, divided into several sections:
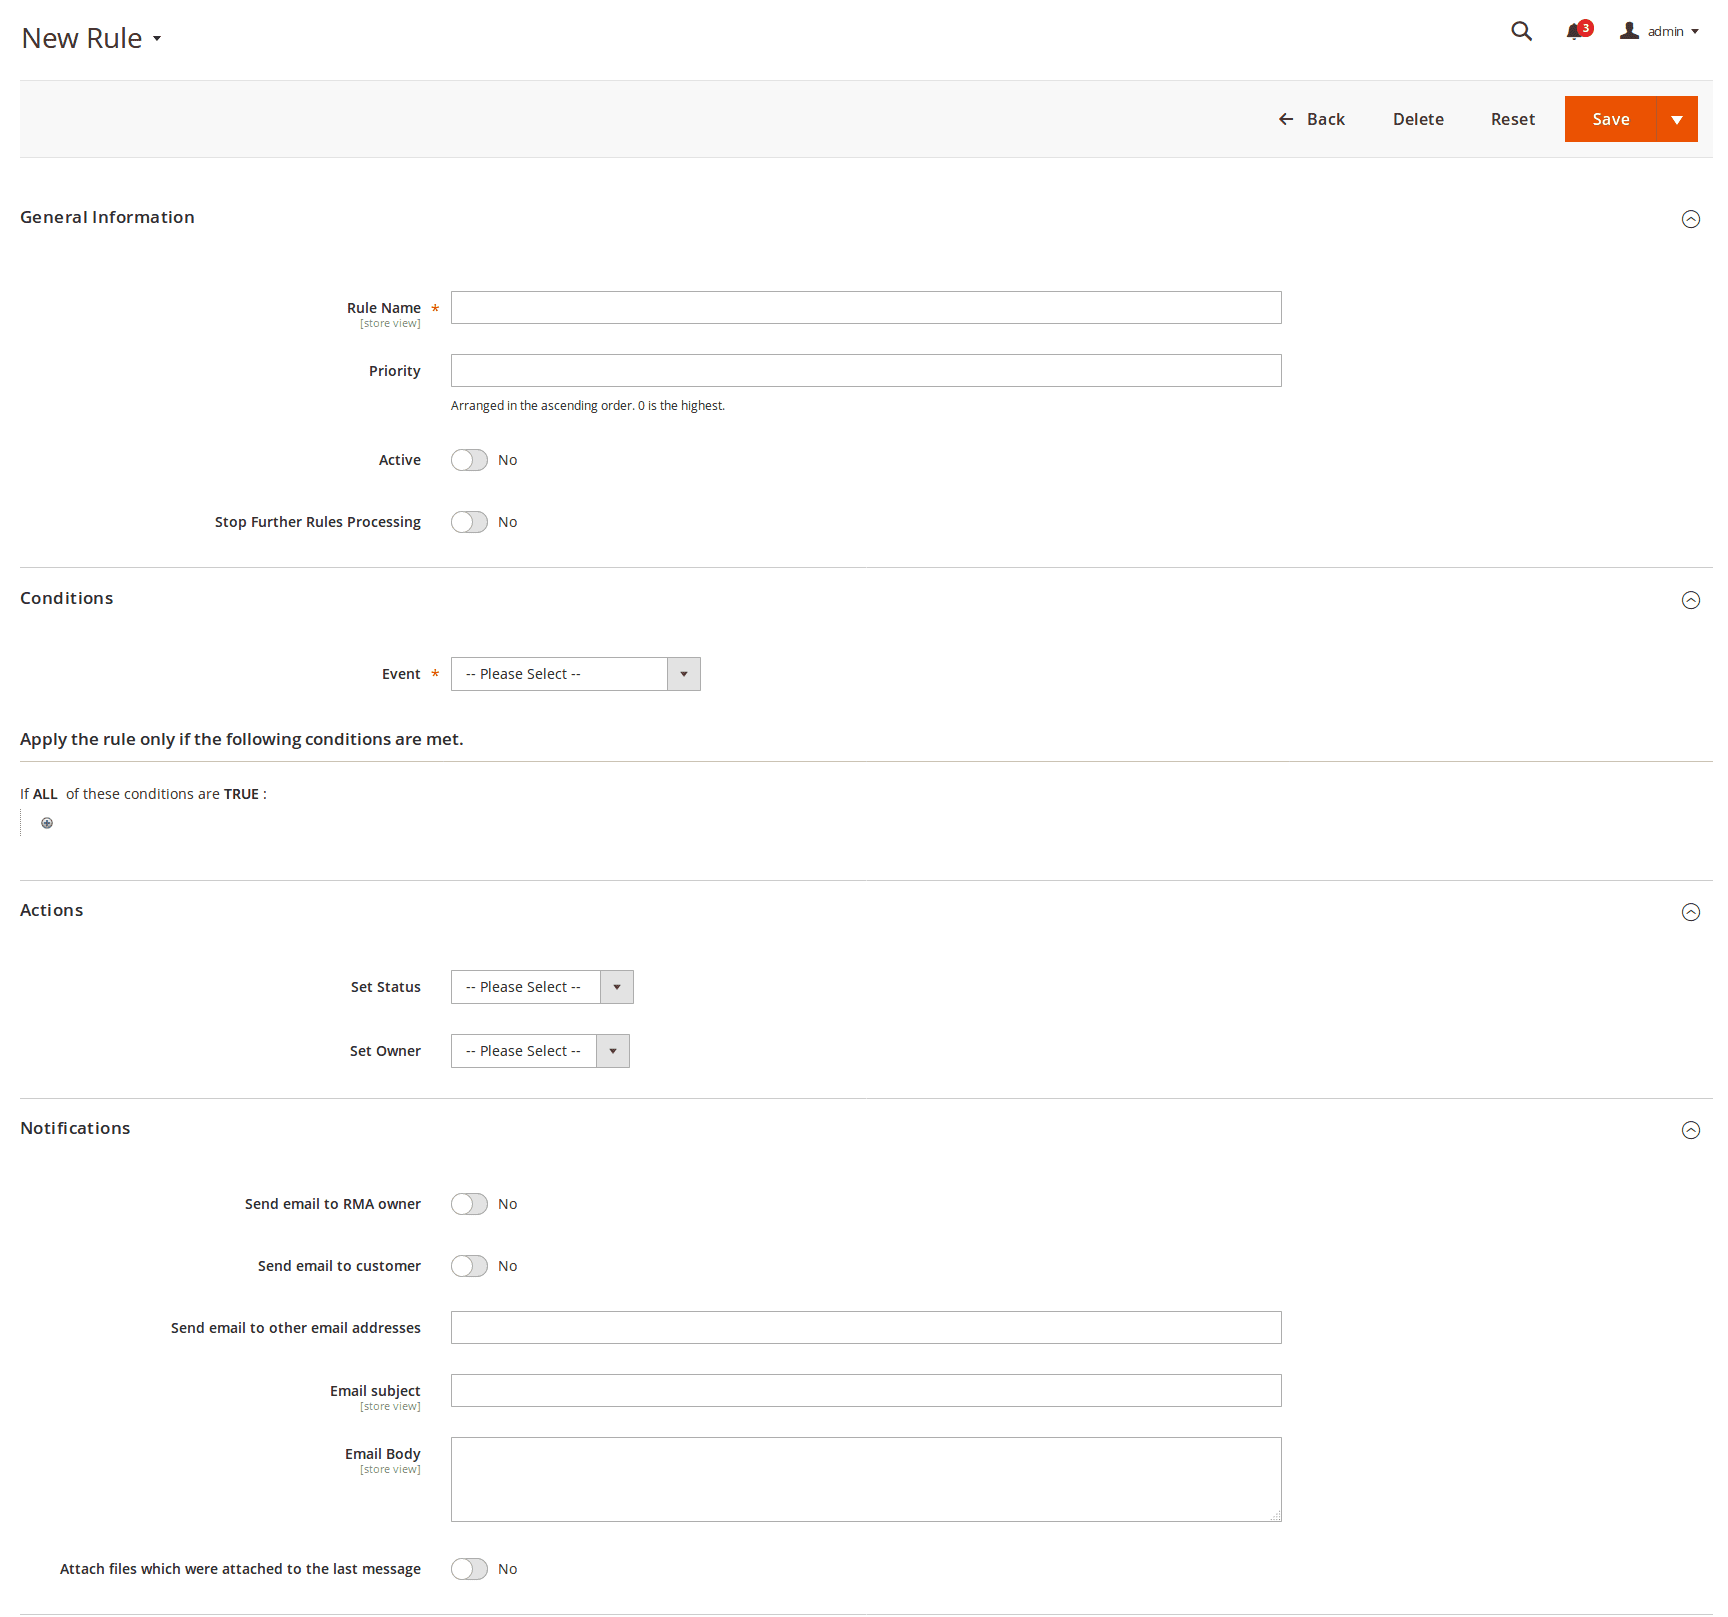
General Information
This section contains basic options:
- Rule Name - Name of this particular rule
- Priority - Sorting order. Used, when multiple rules are binded to the same event, and triggered in order, determined by this field.
- Active - Whether this rule is active.
- Stop Further Rules Processing - Used, when multiple rule are binded to the same event. If this option is On, other rules with same or lower priority won't be triggered at all.
Conditions
This section breaks into two blocks.
At the Event block settings you can set the required RMA Event condition:
- New RMA has been created
- RMA has been changed
- New reply from customer
- New reply from staff
Next blocks allow to select conditions, which will be checked on rule triggering. Only if current RMA met them, actions will be executed. Here is the list of currently available conditions:
- Last message body - Content of the last public message, left in particular RMA
- Created at - Date of RMA creation
- Updated at - Date of RMA's last update (e. q. new message appeared, or properties changed)
- Store - Store from where the RMA was submitted (note: this condition can not detect backend-created RMAs, as they can be binded to any store.)
- Status (before change) - Status which particular RMA has prior to event firing (used only for RMA has been changed event)
- Status - Current RMA status
- Owner (before change) - Owner which held particular RMA prior to event firing (used only for RMA has been changed event)
- Owner - Current RMA owner
- Last Reply By - Last replier in this RMA: Customer or Staff agent
- Hours since Created - Time period from the creation of particular RMA (note: this condition is not precise, use equal or greater or equal or lesser comparators here)
- Hours since Updated - Time period from the last update of a particular RMA (note: this condition is not precise, use equal or greater or equal or lesser comparators here)
- Hours since Last Reply - Time period from last message appearance in a particular RMA (note: this condition is not precise, use equal or greater or equal or lesser comparators here)
Also, if you have RMA Custom Fields, they also can be used as a condition.
Each field will be listed in two forms: standard field value and "before changed", used especially for a RMA has been changed event. F. e., if the field is Telephone, then the conditions will be Telephone and Telephone (before change) respectively.
Actions
RMA Actions will be executed when conditions are met.
Currently only two Actions are supported:
- Set Status - Sets new Status for the RMA
- Set Owner - Sets new Owner for the RMA
Other actions are planned for adding in upcoming releases.
Notifications
The extension allows you to send Notification Emails after the Workflow Rule action was executed.
- Send email to RMA owner - If option is enabled, the current email will be sent to RMA owner
- Send email to customer - If option is enabled, thecurrent email will be sent to the customer
- Send email to other email addresses - Allows you to send emails to additional addresses
- Email subject - Email subject
- Email body - Text of the email can be used to Email Template variables. For more information about variables, go to Email Notifications
This section is extremely useful, when you're creating your own email communication flow.
Return Adresses
RMA extension allows you to create a list of return addresses for RMA.
How to create a new return address
Go to the Sales > RMA > Return Addresses. Press the button Add New. You'll see following edit page:
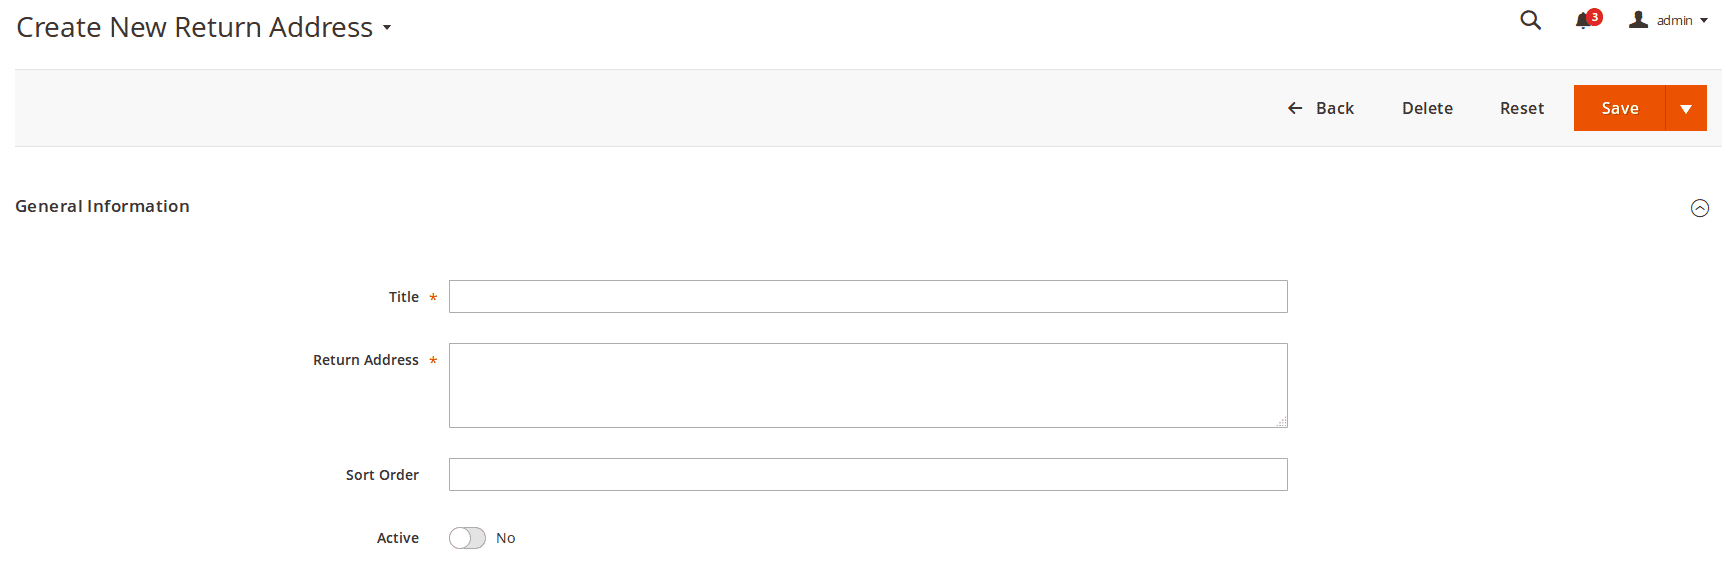
General information
- Title - Title of the new return address.
- Address.
- Sort Order
- Is Active
GraphQL Objects Reference
Query object
The Query object can contain the following attributes:
| Attribute | Data Type | Description |
|---|---|---|
customerRmas |
CustomerRmas | List of customer RMAs |
rmaDictionary |
RmaDictionary | List of RMA dictionaries |
CustomerRma object
RMA mapping fields
The CustomerRma object can contain the following attributes:
| Attribute | Data Type | Description |
|---|---|---|
id |
String | RMA ID |
increment_id |
String | The RMA number |
created_at |
String | Created at date |
status |
String | Status |
CustomerRmas object
Array of RMAs
The CustomerRmas object can contain the following attributes:
| Attribute | Data Type | Description |
|---|---|---|
items |
[CustomerRma] | Array of RMAs |
RmaDictionary object
RMA Dictionary
The RmaDictionary object can contain the following attributes:
| Attribute | Data Type | Description |
|---|---|---|
statuses |
[RmaStatus] | Array of RMA statuses |
conditions |
[RmaCondition] | Array of RMA conditions |
reasons |
[RmaReason] | Array of RMA reasons |
resolutions |
[RmaResolution] | Array of RMA resolutions |
RmaStatus object
RMA Status object
The RmaStatus object can contain the following attributes:
| Attribute | Data Type | Description |
|---|---|---|
name |
String | Status name |
is_active |
Boolean | Is status active |
color |
String | Status color |
is_visible |
Boolean | Is the status visible in the status bar |
RmaCondition object
RMA Condition object
The RmaCondition object can contain the following attributes:
| Attribute | Data Type | Description |
|---|---|---|
name |
String | Condition name |
is_active |
Boolean | Is condition active |
RmaReason object
RMA Reason object
The RmaReason object can contain the following attributes:
| Attribute | Data Type | Description |
|---|---|---|
name |
String | Reason name |
is_active |
Boolean | Is reason active |
RmaResolution object
RMA Resolution object
The RmaResolution object can contain the following attributes:
| Attribute | Data Type | Description |
|---|---|---|
name |
String | Resolution name |
is_active |
Boolean | Is resolution active |
Mutation object
The Mutation object can contain the following attributes:
| Attribute | Data Type | Description |
|---|---|---|
createRma |
CreateRmaOutput | Create RMA |
CreateRmaInput object
Defines the input to the run createRma mutation
The CreateRmaInput object can contain the following attributes:
| Attribute | Data Type | Description |
|---|---|---|
guest_customer |
RmaGuestCustomerInput | Defines guest customer information |
rma_orders |
[RmaOrderInput!]! | Defines orders information |
custom_fields |
[RmaCustomFieldInput] | List of custom fields |
agree_box |
Boolean | Agree with RMA policy text |
reply |
String | RMA Customer message |
CreateRmaOutput object
Defines the output for the createRma mutation
The CreateRmaOutput object can contain the following attributes:
| Attribute | Data Type | Description |
|---|---|---|
rma |
Rma! | Rma Object |
RmaGuestCustomerInput object
Defines RMA guest customer information
The RmaGuestCustomerInput object can contain the following attributes:
| Attribute | Data Type | Description |
|---|---|---|
order_id |
Int | Order ID |
customer_email |
String! | Customer Email |
customer_name |
String | Customer Name |
RmaOrderInput object
Defines RMA order information
The RmaOrderInput object can contain the following attributes:
| Attribute | Data Type | Description |
|---|---|---|
order_id |
String! | Order or Receipt # |
store_id |
Int! | Storeview ID |
type |
String! | Order type. Allowed values: regular, offline |
items |
[RmaItemInput!]! | List of RMA order items |
RmaItemInput object
Defines RMA order item information
The RmaItemInput object can contain the following attributes:
| Attribute | Data Type | Description |
|---|---|---|
order_item_id |
Int! | Order item ID |
qty_requested |
Int! | Qty requested to return |
product_sku |
String! | Product Sku |
condition_id |
Int | Condition ID |
reason_id |
Int | Reason ID |
resolution_id |
Int | Resolution ID |
RmaCustomFieldInput object
Defines RMA custom field information
The RmaCustomFieldInput object can contain the following attributes:
| Attribute | Data Type | Description |
|---|---|---|
code |
String | Product Sku |
value |
String | Condition Code |
Rma object
Defines RMA information
The Rma object can contain the following attributes:
| Attribute | Data Type | Description |
|---|---|---|
increment_id |
String | RMA # |
status_id |
Int | Status ID |
date_requested |
String | Requested date |
orders [RmaOrder] Defines RMA orders list
messages | [RmaMessage] | Defines RMA messages information
return_address | String | Rma return address information
RmaOrder object
Defines RMA orders list
The RmaOrder object can contain the following attributes:
| Attribute | Data Type | Description |
|---|---|---|
order_number |
String | Order # |
type |
String | Order type. Allowed values: regular, offline |
items |
[RmaItem] | Defines RMA order items information |
RmaItem object
Defines RMA order item information
The RmaItem object can contain the following attributes:
| Attribute | Data Type | Description |
|---|---|---|
order_number |
String | Order # |
image_url |
String | Item image |
item_name |
Int | Item name |
item_sku |
String | Item sku |
qty_requested |
Int | Item qty requested |
condition_id |
Int | Condition ID |
reason_id |
Int | Reason ID |
resolution_id |
Int | Resolution ID |
RmaMessage object
Defines RMA messages information
The RmaMessage object can contain the following attributes:
| Attribute | Data Type | Description |
|---|---|---|
type |
String | Message type. Possible values are: customer, user, system |
author_name |
String | Message author name |
message |
String | Message text |
date |
String | Message date |
attachments |
MessageAttachment | Message attachments information |
MessageAttachment object
Message attachment information
The MessageAttachment object can contain the following attributes:
| Attribute | Data Type | Description |
|---|---|---|
name |
String | Attachment name |
url |
String | Attachment url |
Guide for Store Agents
This section is divided into following subsections:
- RMA Listing
- Overview of RMA Workflow
- RMA Workflow Explained
RMA Listing
Go to the Sales -> RMA. There all RMAs are located, and there they can be managed, edited and removed. New RMA also can be created from here, both regular and offline.
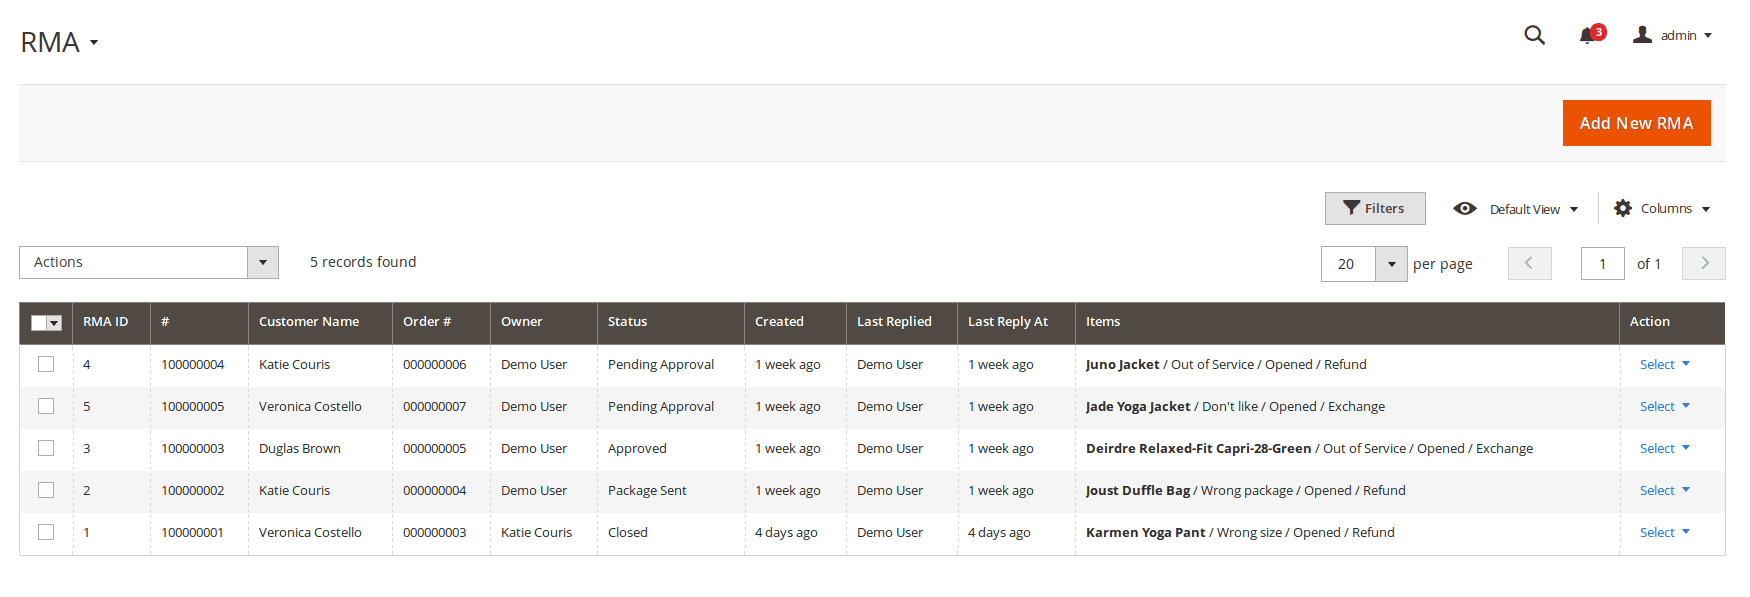
RMA grid has the following default columns (you can add your own - using Columns button):
- RMA# - RMA ID.
- Order# - Order ID.
- Customer Name
- Owner - An agent of the store, who works with the RMA.
- Last Replier - Name of the person who added the message to the RMA last time.
- Status - Status of the RMA request. See also RMA Statuses.
- Created Date - Date of the RMA request creation.
- Last Activity - Time from RMA last activity.
- Items - RMA's items with statuses.
- Resolved - Using the field you can filter resolved/unresolved RMA's. This field shows that the RMA order is completely closed. "Resolved" mark should be added using workflow rules
RMA have a lifecycle, which staff agent should adhere, and which is discussed below.
Overview of RMA Workflow
Consider a RMA workflow chart and its detailed explanation, that fully describes typical everyday returning process.
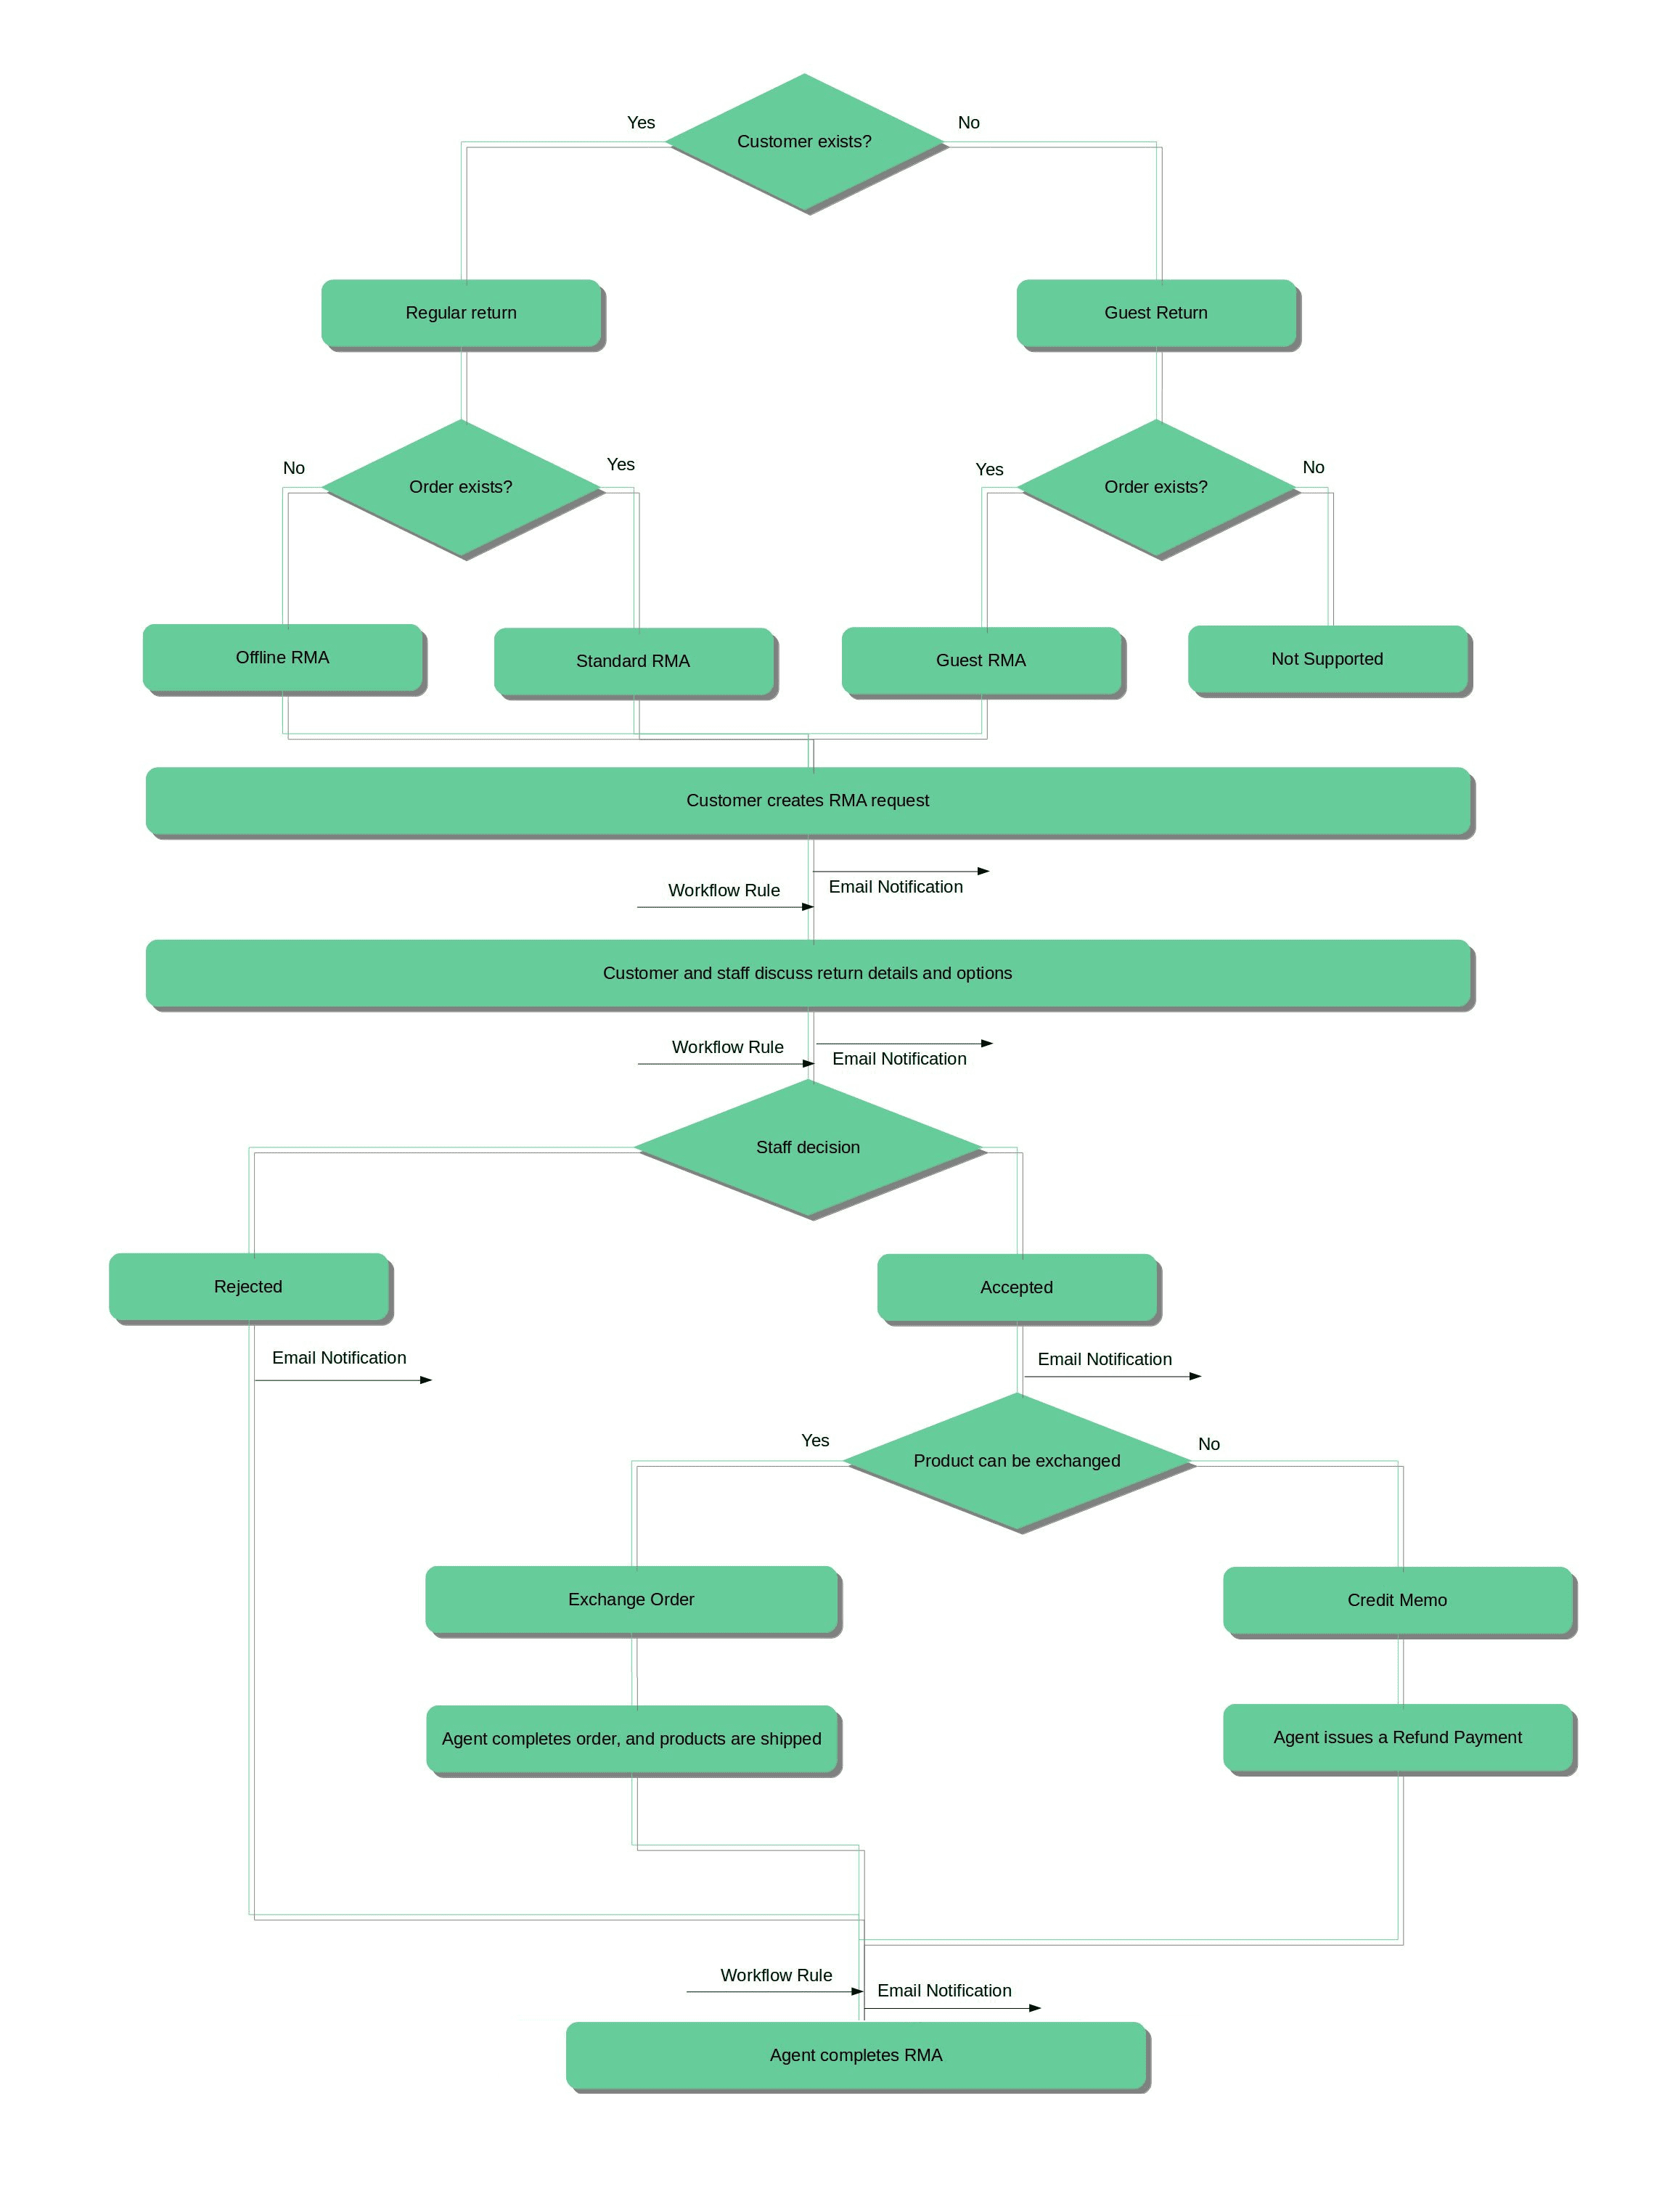
You can see, that there's two possible types of RMA:
- Regular RMA - it is the most part of all returns, they are properly based on original orders and have full document cycle.
- Offline RMA - this type of RMA can be placed, when there's no original order. There can be many cases: order, placed by a phone, an order from point-of-sale device, even other site, but still applied to your store.
Note
In order to allow/forbid placing of Offline Orders make sure that you had set the following option:- Allow RMA for offline orders - located at General Settings section of Configuration Settings. If set to Yes, placing Offline Orders is allowed.
RMA Workflow Explained
- If customer would like to make a refund or exchange of the ordered item(s) he can follow two possible paths:
- If he is registered customer, then he should visit dedicated My Returns section in his Customer Account and press Request New Return button.
- If he is a Guest, Guest RMA Form is available for him (by default accessible from the footer of frontend pages).
-
Original order should be completed by default (e. q. invoiced, shipped and received Complete state). You can change order status, required for return using Allow for requesting an RMA if order has status option from the RMA Policy settings section.
They also should be placed during time period, set in Allow for requesting an RMA after order completion, days option at the same settings section. Only if these two conditions met, customer can issue a return.
- If order exists, RMA can be placed in Regular mode, e. q. can be either selected in drop-down menu (for registered customers), or entered in Guest Form.
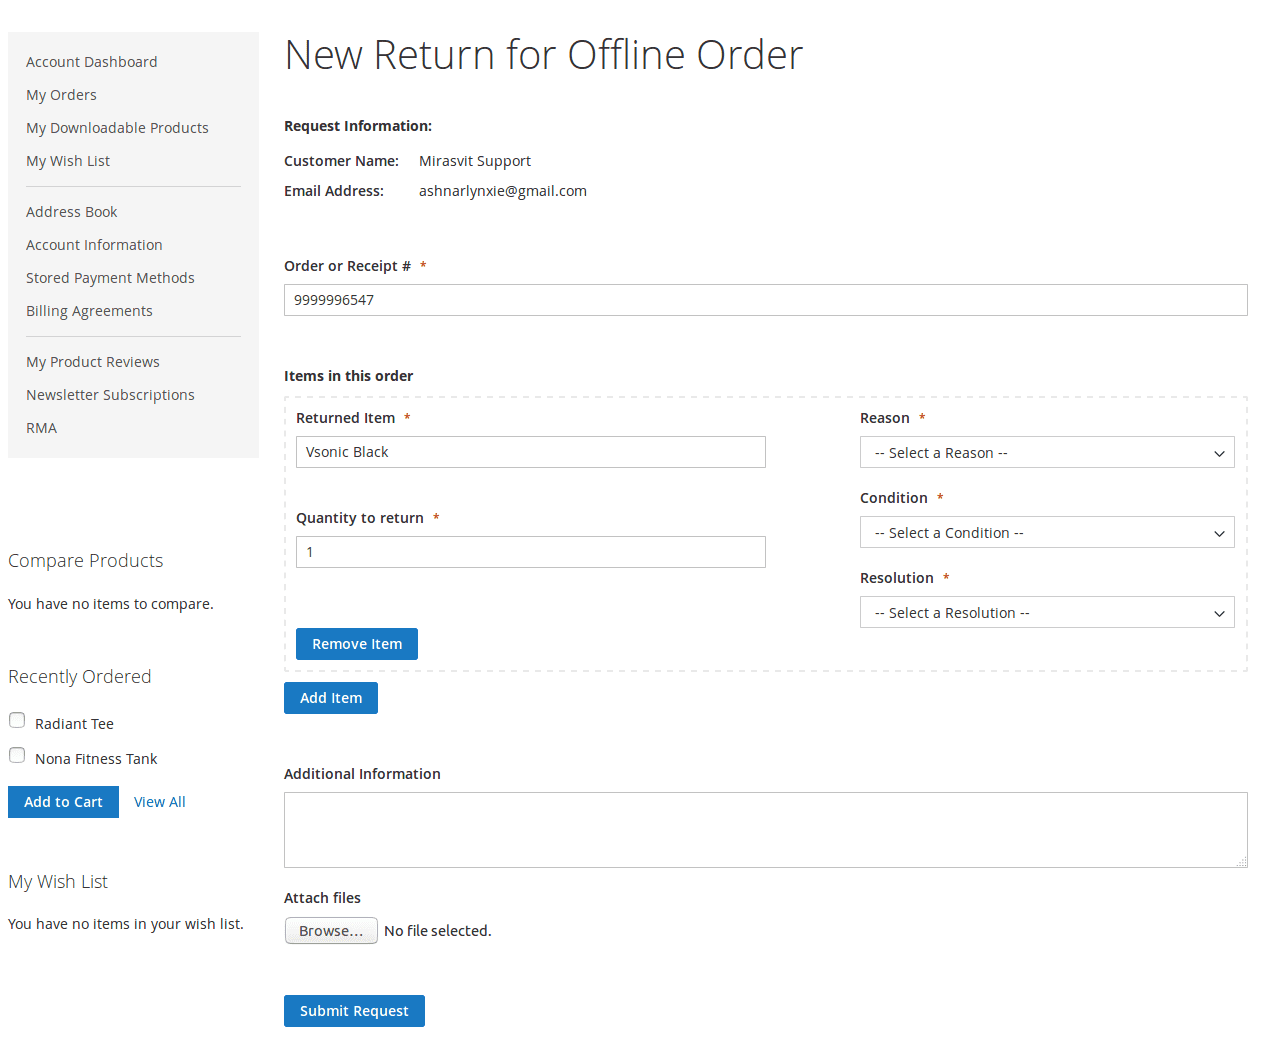
- If order does not exist, RMA can be placed in Offline mode, using Create Offline Order item from drop-down. Customer will be asked to enter order number and products to return manually.
-
Regular RMA Request Form
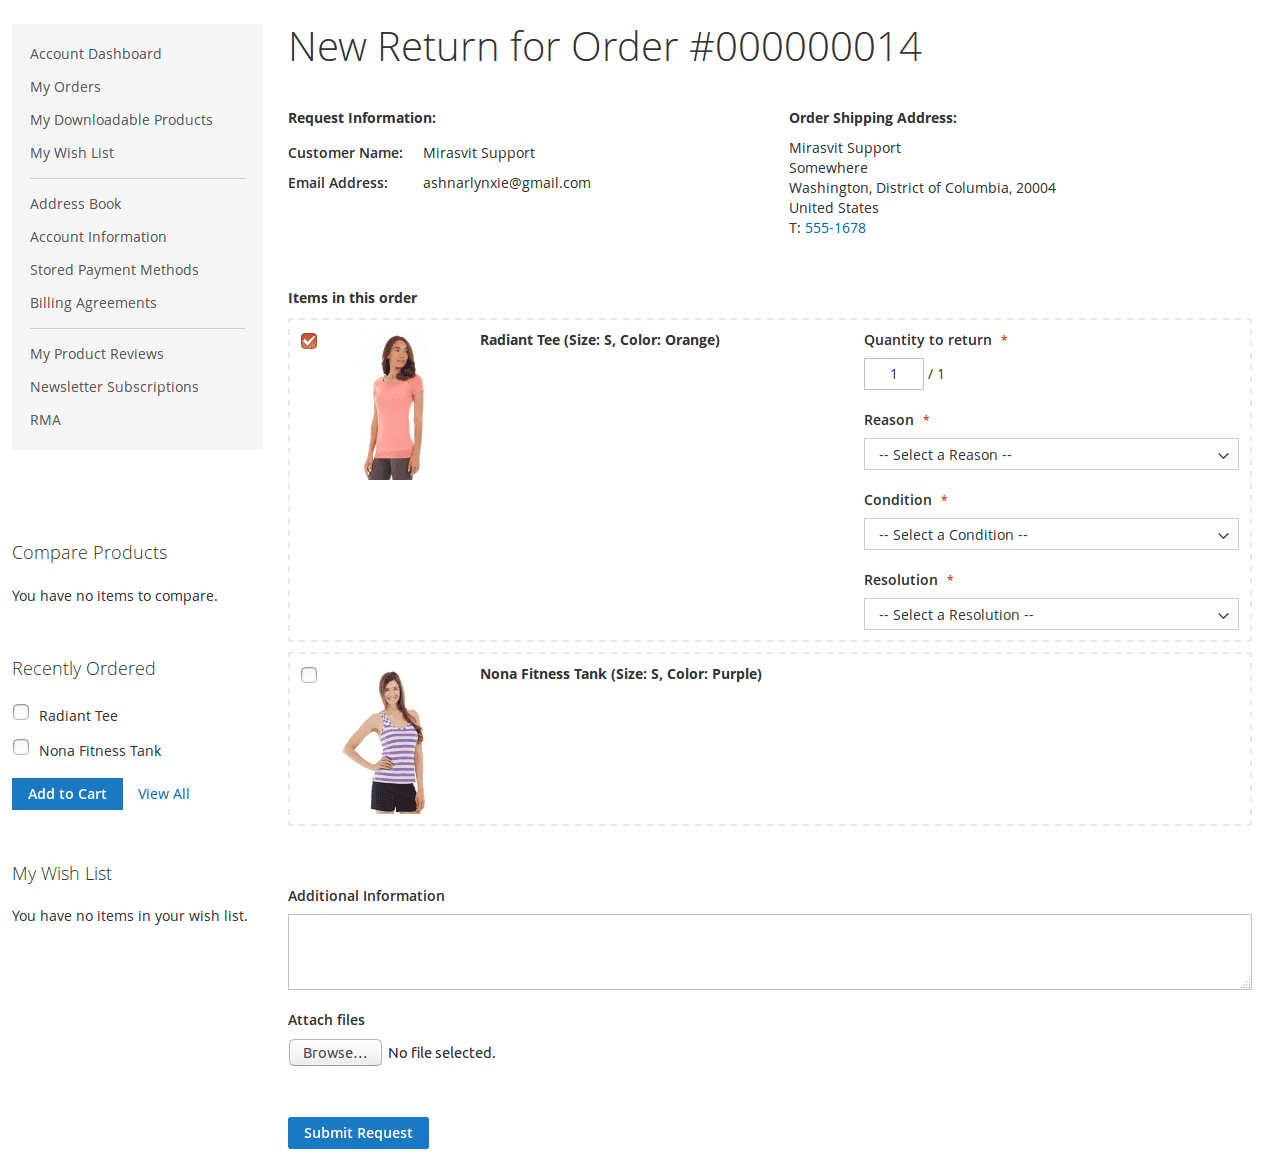
-
Offline RMA Request Form
- By default customer also should provide for each returned product its Condition, Reason for returning and desired Resolution.
Note
You can select, which product conditionals shall be provided, at Customers are required to select option at Customer Account section of Settings. - After products are selected and their conditionals provided, RMA Request can be placed. By default, each new RMA immediately receives status Pending Approval, and assigned to default staff user. Customer will receive Email Notification about this.
Note
You can change, which status will be automatically received by RMA using Default status for new RMA, and default staff user using Default owner for new RMA option. Both of them are located at General Settings section of Settings.
Also, email notification, sent on default status assigment, is changed at corresponding Status edit page, at Email Notification for customer field. -
RMA Request, just placed by customer, can be automatically processed by Workflow Rule.
Note
In fact, during placing RMA request, two subsequent events are fired:- New RMA has been created - on this stage basic properties are set, such as RMA Number, initial Status assigment, and saving of customer and custom fields data.
- RMA has been changed - on this stage returned items are added, and original orders are binded to RMA.
If you wish to process with rules Status or other basic property of RMA (or custom fields), use first event. If you wish to process items and their conditionals, use second one.
- After Request is placed, and initial status is assigned, staff agent and customer can communicate with each other, to have additional details and return arrangement. Communication goes through emails (since each message will trigger notification), or through frontend. Both answers of staff and customer can be additionally processed using Workflow Rules.
-
There can be two possible ways for agent to complete RMA:
- If the item can not be returned or refunded, agent would set the RMA status to Rejected, and archive it.
- If decision is positive, agent sets status Approved (or similar status), and return procedure begins.
In both cases customer will receive automatic Email Notification (defined inside corresponding Status).
- On RMA approval, customer obtains possibility to print RMA Packing Slip and Confirm Shipping (corresponding buttons will appear in frontend).
- Customer prints an RMA Packing Slip, and sends a package to your store.
- After sending it, Customer shall confirm shipping from his account (using button mentioned above). RMA then automatically receives status Package sent.
- When package is arrived on store and desired resolution is Exchange, agent have the following options:
- If product can be exchanged to a identical one (useful for exchanging broken to a working items), he can create a Replacement Order. This option creates automatic order of zero-total, with the same product as requested.
- If product can be exchanged with a cheaper/expensive one, he need to create Exchange Order. It will open a standard order dialog, where agent can pick product for exchange. If price is larger, use Custom Price option, and enter difference between old and new product.
Note
Magento allows very little flexibility for Order Creation dialog, so you can not automate the following properties:- Order number. Magento will number Exchange Order as any other. However, link to this order will be attached to corresponding RMA (see Exchange Order field at RMA backend edit page).
- Automatic address pickup. If Exchange Order is created for registered customer, his Default Shipping address will be used. If original order, however, was placed in Guest Mode - regardless, whether customer is registered, will be used shipping address from original order.
- Automatic exchange product pickup. You always need to add products for exchange manually.
- Special surcharge. If you really need to have a fee for the exchange, you also need either to add it manually, or create a special virtual product as a workaround.
- When package is arrived on store and desired resolution is Refund, agent have the following options:
- Issue a Credit Memo, and return money to customer.
- If customer received exchange or refunded money, agent would set RMA status to Closed (or similar status), e. q. completes RMA, and archives it.
Processing RMA
RMA Edit Page has the following layout:
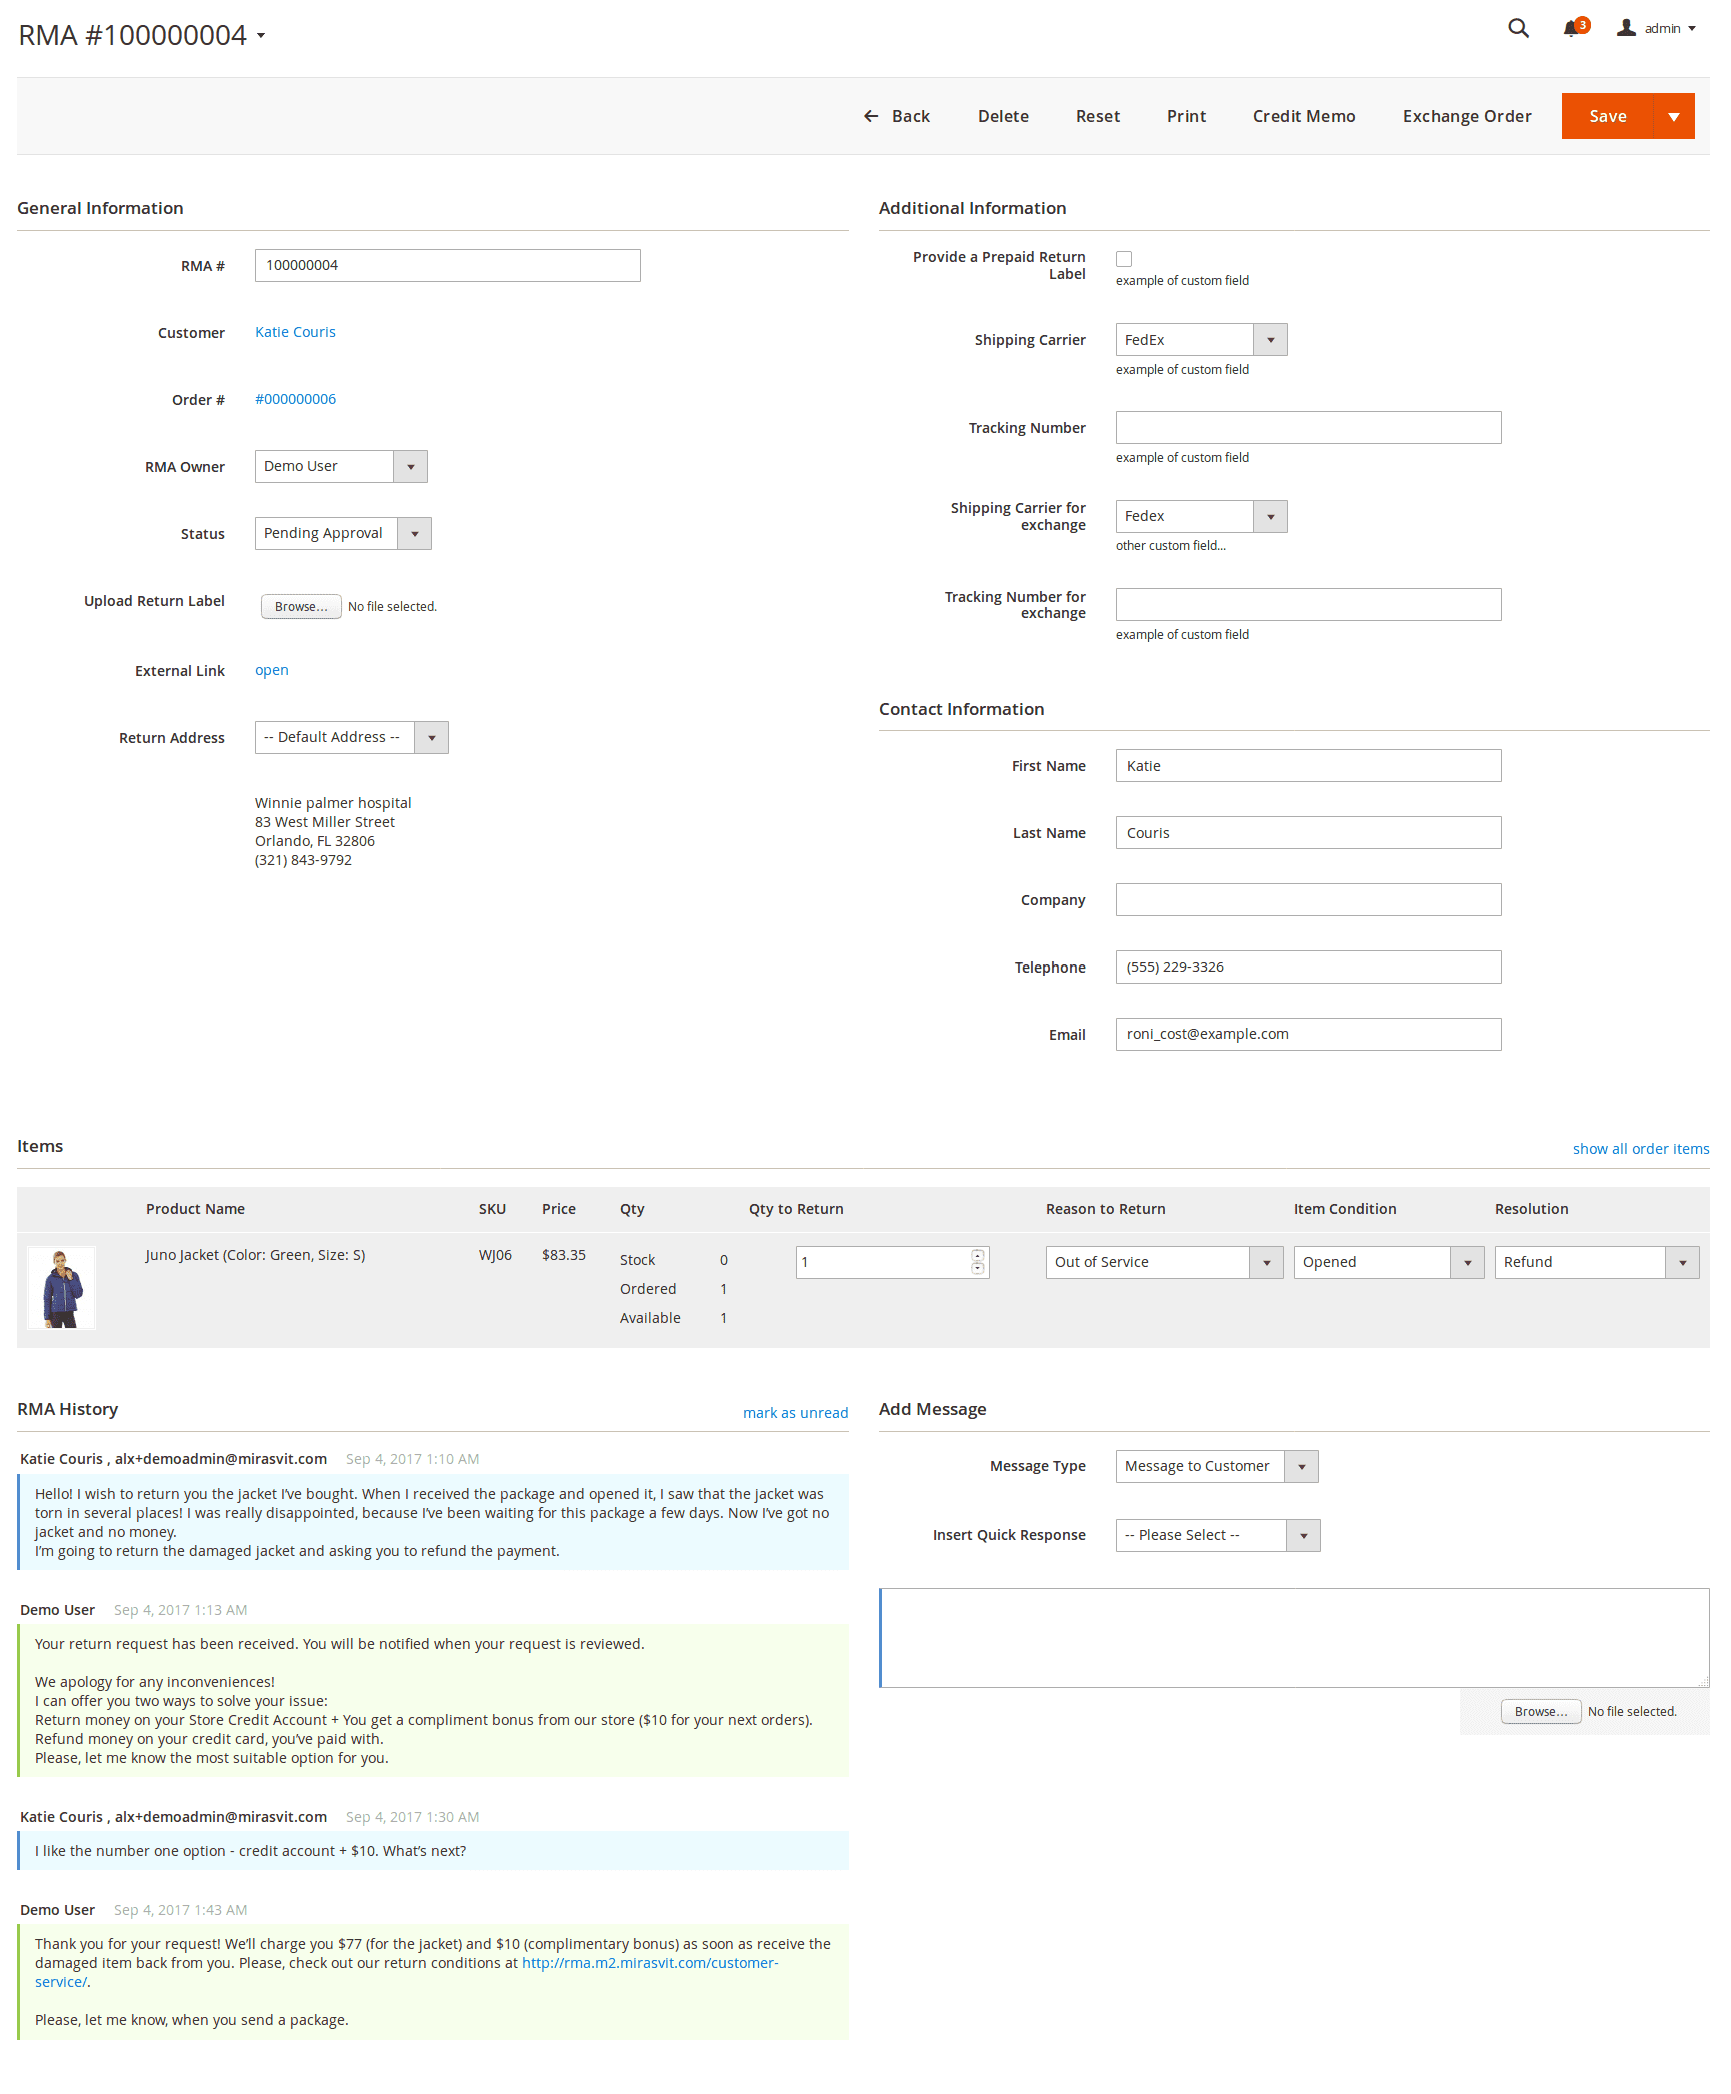
On top of RMA Edit page Action Ribbon is located, which allows the following functions:
- To apply changes the agent should press the button Update.
- To apply changes and send a message to the customer, the agent should press the button Update And Send Message.
- If the RMA has items with the resolution Exchange, the agent can create an exchange order by pressing the button Create Exchange Order.
- If the RMA has items with resolution Refund, the agent can create a credit memo by pressing the button Create Credit Memo.
Below this ribbon several sections are resided, each with its own purpose.
General Information
- RMA#
- Order#
- Customer#
- RMA Owner - An agent of the store who works with the RMA.
- Status - Status of the RMA.
- Upload Return Label - Agent can upload a return label (image or PDF). If the RMA has a return label, the customer will be able to print it via their account.
- External Link - Agent can open the current RMA request page on the frontend.
- Return Address - Return address of the RMA. See Return Addresses.
Additional Information
The section contains set of custom fields. See Custom Fields.
Items
The section contains a list of the RMA's items, and can differ depending on RMA type. Regular RMA contain full product information - e. q. Name, SKU, Price and thumbnail Image, while Offline contains only Name.
-
Items section for Regular RMA

-
Items section for Offline RMA

The rest fields of Items section are the same for both types:
- Qty to Return - Quantity of the RMA's item.
- Reason to Return - Reason why the customer would like to return the item. You can create your own Reason to Return.
- Item Condition - Item's condition. You can create your own Condition.
- Resolution - Resolution for the item. You can create your own Resolution.
To add new items to the RMA, click the link Show all order items and change the Qty of the necessary items.
Contact Information
This section contains information regarding RMA's customer.
- First Name - Customer First Name.
- Last Name - Customer Last Name.
- Company - Customer company.
- Telephone - Customer telephone.
- Email - Customer Email.
RMA History
This section contains a list of all RMA messages (status changes, replies of customer or agent).
Internal notes are marked with red background, staff answers with green.
Add Message
This section allows store agent to send a message to the customer or add an internal note to the RMA.
- Message Type - Allows you to send one of these message types:
- Message to Customer - Reply will be sent to the customer. Default message type.
- Internal Note - Internal RMA message. Only agents will be able to see it. Customer will not see it and will not receive it by email.
- Insert Quick Response - Allows to you select a predefined answer into the reply field. For more information about Quick Responses, go to Quick Responses
Reports
Our extension allows you to observe your RMA flow, and gather statistics of returns, based on different parameters. Currently, we support the following types of Reports:
- Report By Product
- Report By Attribute
- Report By Status
- Report By Reasons
- Report by Offline Product
Report by Product
Report by Product displays return statistics from the product view. It is a table, that looks like shown on screenshot:
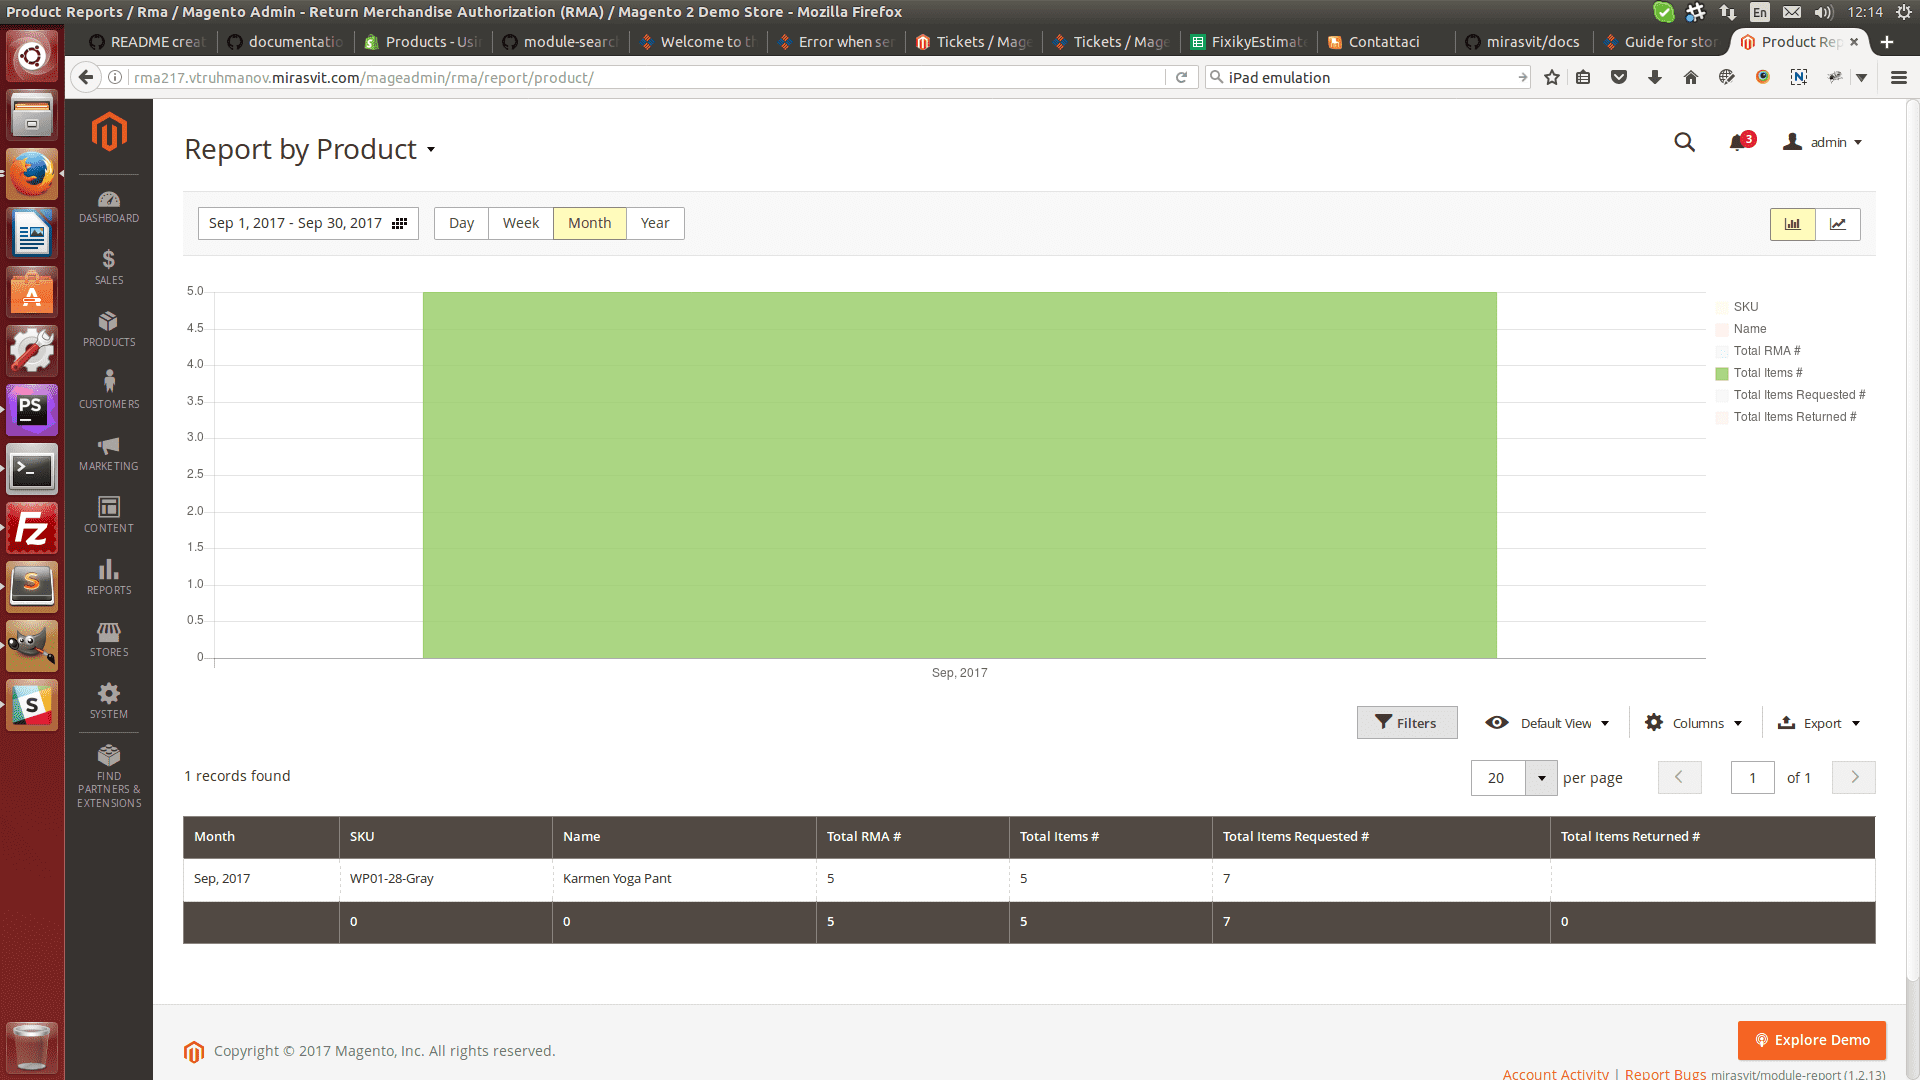
You can choose the following parameters of this report:
- Time period
- Step period (Day, Week, Month, Year)
Report by Attribute
Report by Attribute also displays return statistics from the product view, but unlike previous one - allows you to pick up a product's attribute, and thus - dynamically create report on-the-fly. For that there's additional parameter to choose - Attribute.
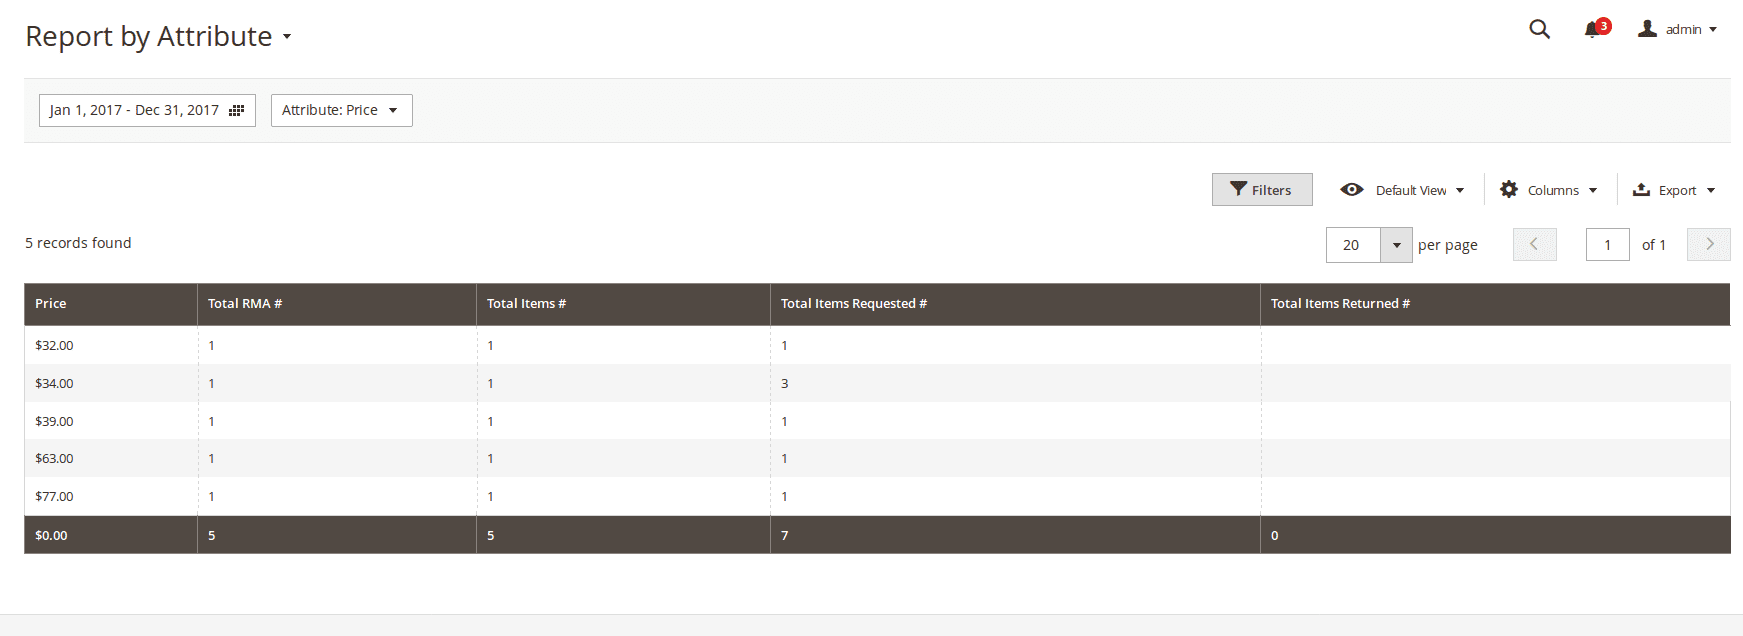
Unfortunately, this type of report does not allow to choose step period, only Time Period.
Report by Status
This type of report displays statistics, depending from status, that particular RMA have in selected period of time.
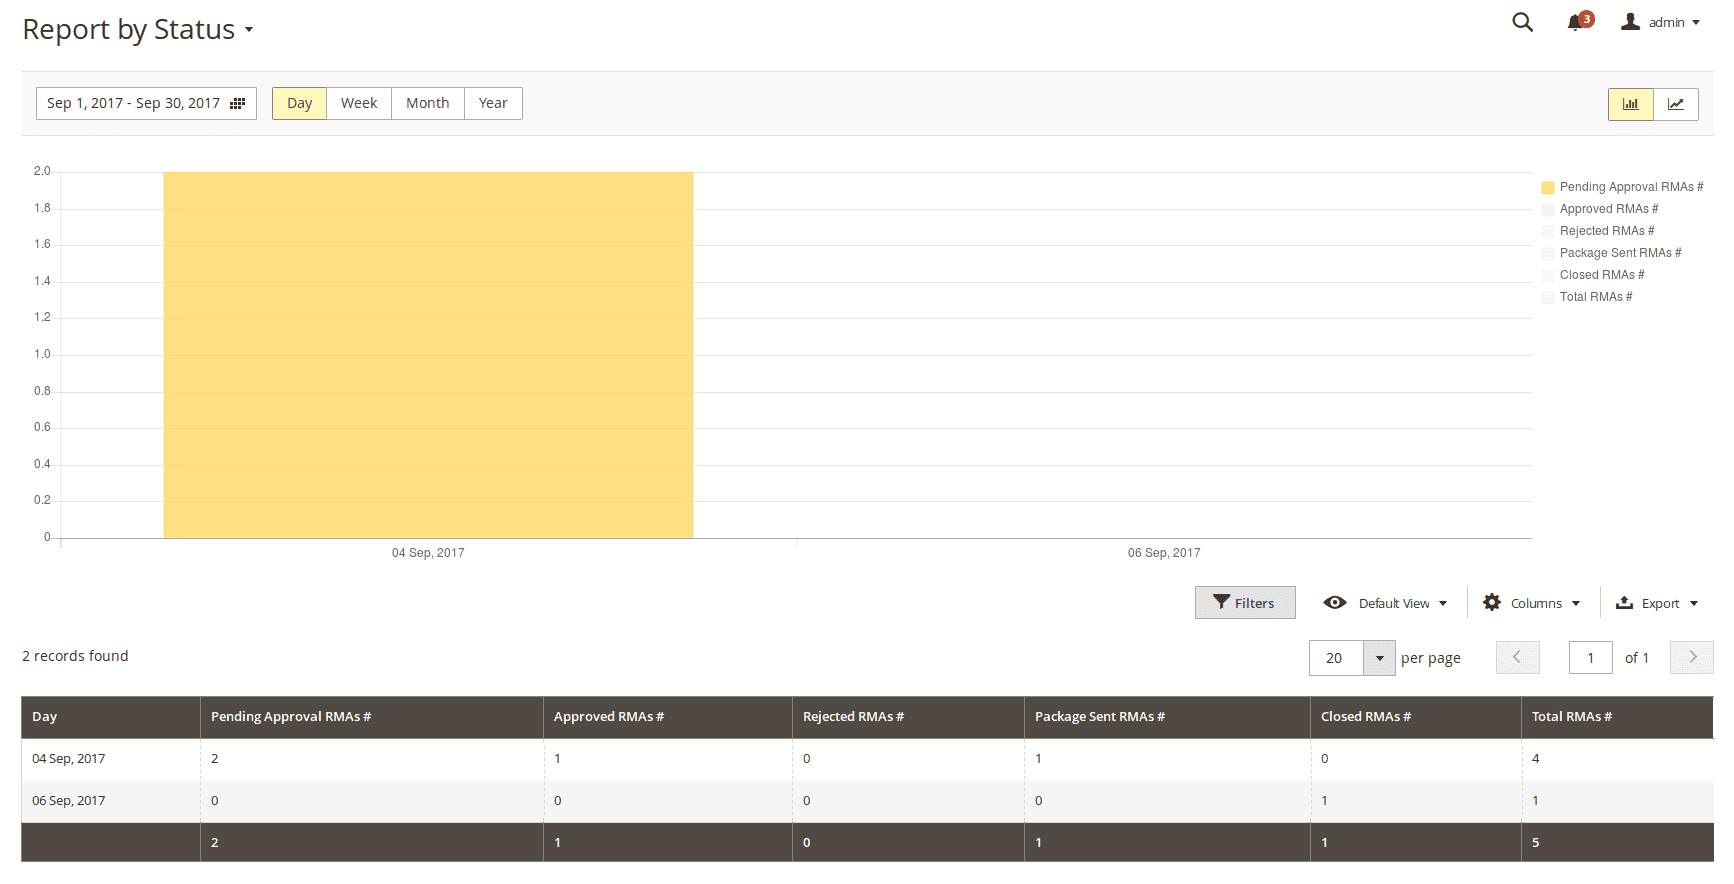
You can choose the following parameters of this report:
- Time period
- Step period (Day, Week, Month, Year)
Report by Reason
This type of report displays statistics, depending from reason, that customer had chosen for returning a product.
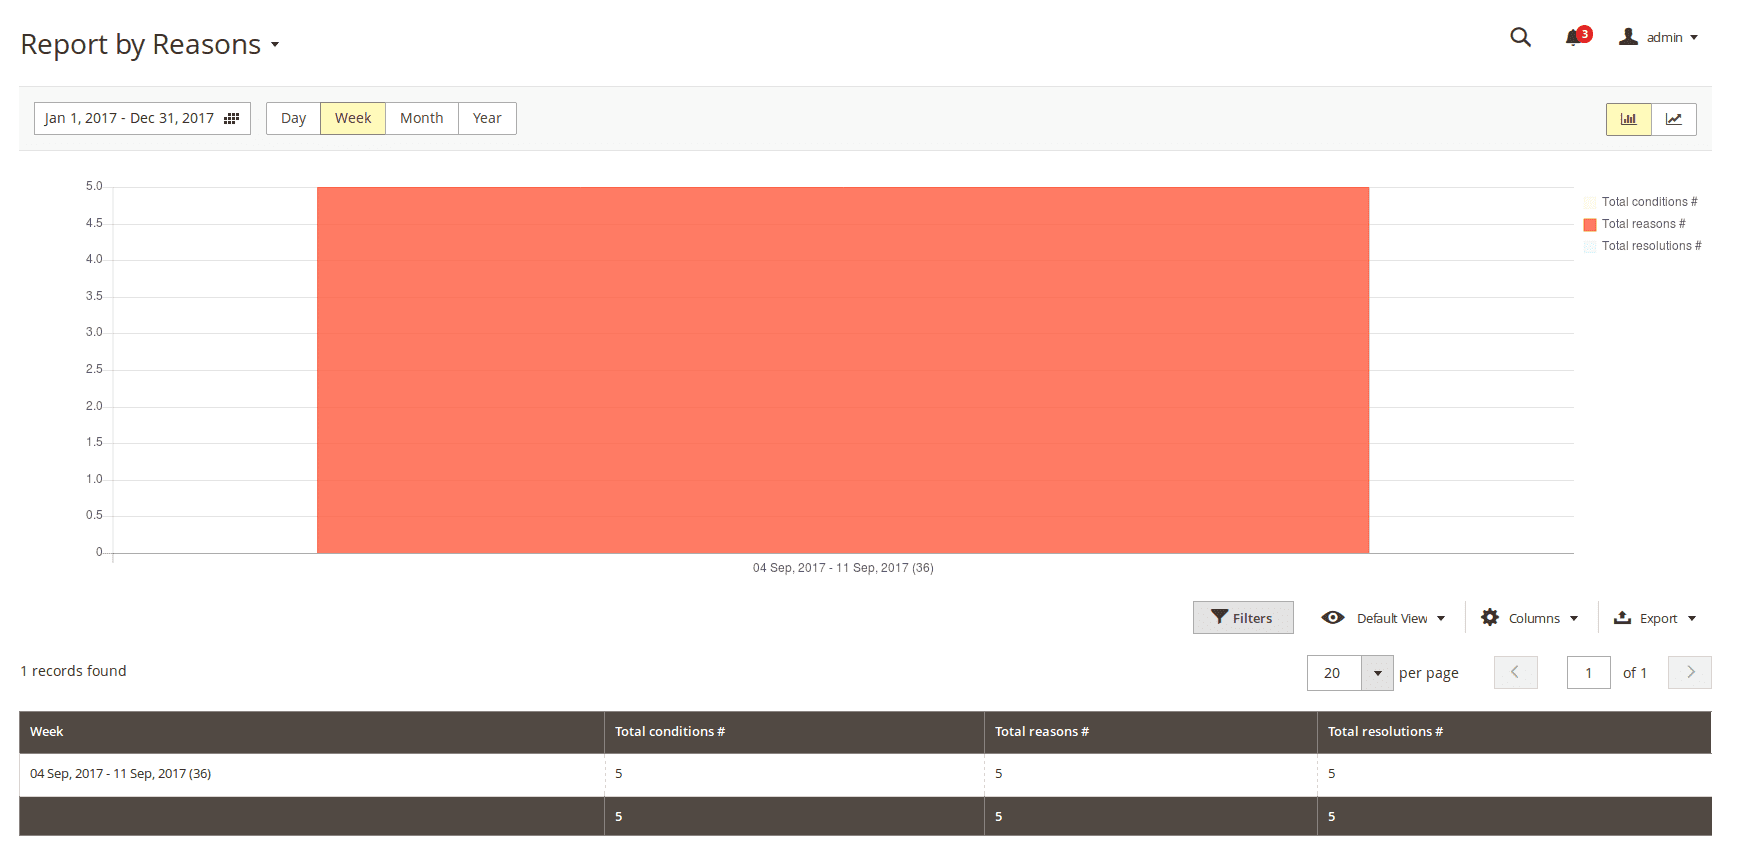
You can choose the following parameters of this report:
- Time period
- Step period (Day, Week, Month, Year)
Report by Offline Product
This type of report displays statistics is dependent on offline RMAs created in the store for the required period.
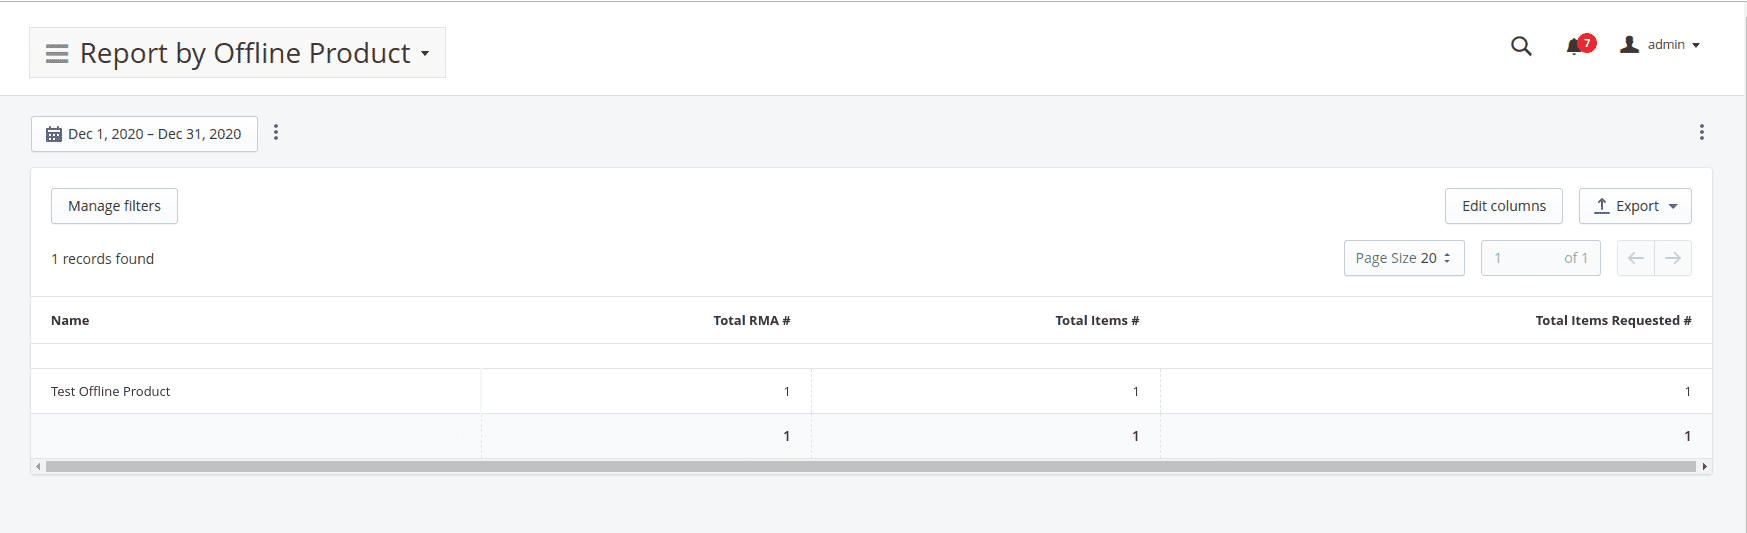
You can select the following parameters of this report:
- Time period
- Step period (Day, Week, Month, Year)
How-To
This section contains resolution advices for a most common problems, that you can notice.
- How can I disable guest RMA
- How can I prevent product from being returned?
- How shall I create auto-reply messages to customer?
- How shall I use "Template of Rule Notification" and the "Notification Email for Customer" settings?
- How can I customize our notification emails so that they are different depending on the resolution type the customer requested?
How can I disable guest RMA
Currently, our extension does not allow disabling guest RMA form. However, you can do it using manual redirect. Here is what shall be done:
- Go to Marketing -> SEO & Search -> URL Rewrites and create a new rewrite of Custom type;
- In Request Path field should be placed Guest RMA request path:
/returns/guest/new/ - Target Path set to 404, and Redirect Type to Permanent (301)
- Save Rewrite and purge cache.
How can I prevent product from being returned?
- Go to Catalog -> Products and edit appropriate product.
- Jump to the RMA subsection, and set option Return Allowed to No.
Note
For Bundled, Grouped and Configurable products, you need not only disable return for 'parent' product, but for associated simple products as well.How shall I create auto-reply messages to customer
Auto-reply messages in our RMA extension can be implemented in two ways:
- Using Statuses. In this case automated message will be sent, whenever this particular status is assigned to RMA. You just need to put it to the Email Notification for Сustomer field.
- Using Workflow Rule. In this case you need to pick up proper event, add some conditions and when RMA became applicable for that event and conditions - automated message, set in Notifications subsection, will be sent.
How shall I use "Template of Rule Notification" and the "Notification Email for Customer" settings?
Notification Email for Customer is the main template, which is used for sending notification to customer. It is used in following cases:
- New RMA is created.
- New staff message is posted to your RMA.
- Your RMA had changed its status, and automatic message was added.
Template of Rule Notification is the wrapper template for all notifications, that are sent using Workflow Rules.
Note
To make the your custom template properly work as Template of Rule Notification, you shall include to its contents this special variable:{{var email_body | raw}}. It will be replaced with actual message, set in Workflow Rule, at Notifications tab.
How can I customize our notification emails so that they are different depending on the resolution type the customer requested (i.e store credit, refund, etc)?
Our RMA extension allows customer to have in the same RMA items with different return options. However, you can split your email template into parts, which will be included to the final email. Magento 2 provides a special condition block, called {{depend XXX}}, where XXX is boolean-like condition.
Our extension provides three variables, which allow to check presence in current RMA items with certain properties:
{{var rma_getHasItemsWithReason_XXX}}- allows to check, whether RMA has items with Reason, which have ID=XXX.{{var rma_getHasItemsWithCondition_XXX}}- allows to check, whether RMA has items with Condition, which have ID=XXX.{{var rma_getHasItemsWithResolution_XXX}}- allows to check, whether RMA has items with Resolution, which have ID=XXX.
Include these variables to {{depend XXX}} block to have different messages for different return options.
Example
Task: have different messages for a different conditions Unopened (ID=1), Opened (ID=2) and Damaged(ID=3).Solution: add to the email template (in Status, for example) the following code:
    {{depend rma_getHasItemsWithCondition_1}}
    Your items are unopened, so you can have a replacement. Please, wait for a call from our staff.
    {{/depend}}

    {{depend rma_getHasItemsWithCondition_2}}
    Your items are opened, so please, allow our specialist to check, whether issue existed before using.
    {{/depend}}

    {{depend rma_getHasItemsWithCondition_3}}
    Your items are damaged, so we can not do a replacement for you at all.
    {{/depend}}
This approach will work both in auto-replies in Statuses, and in notifications, created by Workflow Rule.
Migration from Magento 1 to Magento 2
Below are examples of scripts, which may be used for transferring data from Mirasvit RMA for Magento 1 to Mirasvit RMA for Magento 2.
To use scripts you need a help of PHP developer. Scripts may contain bugs and may not transfer all necessary data. So you may need to fit them for your needs. Migration service is not a part of our support service. If you need a help of our team, you'll need to buy a migration service. Click on the names of scripts below to download:
mirasvit_rma_m1_export.php- script for exporting RMA data to XML file.mirasvit_rma_m2_import.php- script for importing RMA data from XML file.
How to perform Migration
Follow these steps to correctly perform migration:
- Run standard Magento 2 migration, and make sure, that customers and orders were transferred from your M1 store to M2;
- Make sure, that RMA for Magento 2 is installed on your M2 store.
- Place
mirasvit_rma_m1_export.phpto the root of your M1 store, and run it either:- From browser by opening URL
http://store_m1.com/mirasvit_rma_m1_export.php, or - From SSH/Console: navigate to your store's root and run command
php -f mirasvit_rma_m1_export.php
- From browser by opening URL
- If script returned success, file
rma_export.xmlwill be created at the root of the store, with all your data. Transfer it to the root of your M2 store; - Place
mirasvit_rma_m2_import.phpto the root of your M2 store, and run it either:- From browser by opening URL
http://store_m1.com/mirasvit_rma_m2_import.php, or - From SSH/Console: navigate to your store's root and run command
php -f mirasvit_rma_m2_import.php
- From browser by opening URL
- Check migrated data. 7, If there was some RMA skipped due to missing customers, their emails will be listed in missing-rma-customers.log file, at the root of the store. Create (or transfer) that customers and repeat step 5.
- When migration is completed, remove both migration scripts.
Note
Our extension currently do not support Offline Orders migration. These RMA will be skipped and logged to missing-rma.log file, for your reference.Troubleshooting
Crush on timeout or exceeding available memory.
This error appears due to large quantities of data.
Solution:
Just restart import script by reloading browser page. It will skip previously uploaded data, and proceed from the last unprocessed record.
Crush with PHP Fatal Error during export
Typically this issue can appear, when you migrate from very old RMA for Magento 2, which has different table structure, or your store has old version of offline RMA.
Solution:
Open mirasvit_rma_m1_export.php file, and remove code block, marked with // 0.6. Offline Orders. This should be enough for most cases.
If script crushed even after custom fix above, contact Mirasvit Support.
How to upgrade the extension
To upgrade the extension follow these steps:
- Backup your store's database and web directory.
- Login to the SSH console of your server and navigate to the root directory of the Magento 2 store.
- Run the command
composer require mirasvit/module-rma:* --update-with-dependenciesto update current extension with all dependencies.Note
In some cases the command above is not applicable, it's not possible to update just current module, or you just need to upgrade all Mirasvit modules in a bundle. In this case command above will have no effect.
Run insteadcomposer update mirasvit/*command. It will update all Mirasvit modules, installed on your store.
- Run command
php -f bin/magento setup:upgradeto install updates. - Run command
php -f bin/magento cache:cleanto clean the cache. -
Deploy static view files
rm -rf pub/static/*; rm -rf var/view_preprocessed/*; php -f bin/magento setup:static-content:deploy
Disabling Extension
Temporarily Disable
To temporarily disable the extension please follow these steps:
- Login to the SSH console on your server and navigate to the root directory of the Magento 2 store.
- Run command
php -f bin/magento module:disable Mirasvit_Rmato disable the extension. - Login in to the Magento back-end and refresh the store cache (if enabled).
Extension Removing
To uninstall extension please follow these steps:
- Login to the SSH console on your server and navigate to the root directory of the Magento 2 store.
- Run the command
composer remove mirasvit/module-rmato remove the extension. - Login to the Magento back-end and refresh the store cache (if enabled).
2.3.2
(2025-07-03)
Fixed
- Customers can't send messages
- Tags displayed in checkbox custom fields
2.3.1
(2025-07-01)
Improvements
- add RMA item weight to GraphQL
2.3.0
(2025-06-06)
Improvements
- WCAG 2.2 AA compliance
2.2.54
(2025-05-30)
Fixed
- Unable to apply data patch DataPatch1017
2.2.53
(2025-05-20)
Fixed
- Automatic conversion of false to array in Adminhtml/Rma/Add.php
2.2.52
(2025-05-06)
Improvements
- Compatibility with php84
- Added filered columns "Company" and "Customer Email" in RMA admin grid
Fixed
- Prevent loading broken attachment
2.2.50
(2025-02-03)
Fixed
- Incorrect item qty on create RMA page
- Readonly qty input fir RMA item on new RMA page if qty = 1
2.2.49
(2025-01-10)
Improvements
- Display attachments as images and open them in popup in the RMA messages history
2.2.46
(2024-11-13)
Improvements
- Ability to attach several attachments in a bulk
2.2.45
(2024-10-30)
Improvements
- Compatibility with M2.4.8
2.2.44
(2024-10-29)
Fixed
- Issue with the report by attribute
2.2.43
(2024-10-18)
Fixed
- rma_getHasItemsWithReason rma_getHasItemsWithCondition rma_getHasItemsWithResolution vars do not work in status emails for the offline RMAs
- Custom field displayed with html tags on shipping confirmation in customer account
2.2.42
(2024-10-16)
Fixed
- foreach() argument must be of type array|object, null given for offline RMA
2.2.41
(2024-10-15)
Fixed
- Added pagination to the RMA grid in the customer account
- Disallow exchange order items for the product that was removed from the store
2.2.40
(2024-09-25)
Fixed
- Improved performance for new RMA page in customer account
- Improve admin RMA view page performance
2.2.39
(2024-09-09)
Fixed
- Status name in emails is in json format for multi-stores
2.2.37
(2024-08-23)
Fixed
- html tags are displayed in RMA policy block on the create RMA page in customer account
2.2.36
(2024-08-21)
Fixed
- "Could not add an invalid email address to the mailing queue" when send ruleevent notification with empty "Send email to other email addresses" option
2.2.35
(2024-07-09)
Fixed
- Rma convert to ticket redirects to create new Rma page
- Get itemOptions on null when view or create the RMA on the frontend if customer have removed original Magento orders
- Class "Zend\Mime\Part" not found in TransportBuilder when send message with attachment
2.2.34
(2024-06-10)
Fixed
- html tags are displayed in custom fields on the create RMA page in customer account
2.2.33
(2024-04-17)
Fixed
- html tags are displayed in the customer account->view order->Rma tab
2.2.32
(2024-03-15)
Fixed
- Tags are displayed on the Status grid page in admin
2.2.31
(2024-02-21)
Fixed
- Cannot access protected property History::$_escaper on My Orders page in customer account
- Return address and status message display html tags on the frontend print and view page
2.2.30
(2024-02-12)
Fixed
- Interface "Zend\Stdlib\JsonSerializable" not found
2.2.29
(2023-12-20)
Fixed
- Custom Field type dropdown required is not validated
2.2.28
(2023-11-13)
Fixed
- Error "Deprecated Functionality: strtolower(): Passing null to parameter #1 ($string) of type string is deprecated in Mirasvit/Rma/Service/Order/Login.php"
2.2.27
(2023-10-27)
Improvements
- Added event "Check every hour" to the Workflow Rules
2.2.26
(2023-10-25)
Improvements
- Added custom field datepicker to Hyva
Fixed
- Order label displayed default currency code instead order currency in the order selection on RMA creation step
- Customer telephone and company is not displayed in the admin for guest customer RMAs
- Order info links are not displayed in the customer account in Hyva theme
2.2.25
(2023-10-10)
Fixed
- Exchange Orders were not bound to the RMAs
2.2.24
(2023-09-26)
Fixed
- Replacement Order creation lead to the 'Invalid customer address id' error due to the active old cart
- Submit button is disabled on invalid rma form validation in admin for new RMA
2.2.23
(2023-09-15)
Fixed
- Replacement Order creation lead to the "Invalid customer address id" error due to the active old cart
2.2.22
(2023-09-01)
Improvements
- Added translations for the default RMA email templates
2.2.21
(2023-08-29)
Fixed
- Removed default configuration "color" attribute from the "Report by Attribute" due to the different attributes existing in the stores
Improvements
- Added an option to show/hide guest RMA link in the footer
- Allow to send rule notification to several emails
2.2.20
(2023-07-31)
Improvements
- Added customer reply to the graph-ql CreateRma mutation
2.2.19
(2023-07-26)
Fixed
- Customer email and name not displayed on the RMA creation page
- Replaced email variables getHasItemsWithCondition, getHasItemsWithReason, getHasItemsWithResolution to use them in Magento 2.4.4 and above
2.2.18
(2023-06-14)
Improvements
- Added php item validation
2.2.17
(2023-06-02)
Fixed
- Unable to upload multiple files if create RMA from the order page
2.2.16
(2023-05-25)
Fixed
- Creation of the RMAs directly from order on the storefront did not add the order data
- Used hasRmaResolution instaed of hasRmaReason in Model\Rma::getHasItemsWithReason method
2.2.15
(2023-04-17)
Fixed
- Attacment stored in db and fs if selected storage fs
- Multiple attachment weren't allowed in guest RMAs
- Uncaught ArgumentCountError: Too few arguments to function getHasItemsWithResolution
2.2.14
(2023-03-02)
Fixed
- Undefined variable rma in SaveMessage.php
- explode() expects parameter 2 to be string, null given in admin RMA grid
- Create RMA page downs if customer has thousands of orders available for return
- RMA button is displayed for non-return orders in the customer order grid
- stripos(): Passing null to parameter #1 ($haystack) of type string is deprecated when edit Workflow rule
Improvements
- Compatibility with M246
2.2.13
(2023-01-12)
Fixed
- Deprecated Functionality: Passing null to parameter is deprecated in ShippingAddress.php
2.2.12
(2022-12-21)
Fixed
- Empty order is added to a multiRMA if order items are not selected
- Undefined variable $blockHtml in OrderTemplate.php
- Performance issue with the Magento order creation
- createRma mutation did not work for guest customers
2.2.11
(2022-10-24)
Fixed
- Changed condition/reason/resolution name column to 'text' to allow saving long names
- Added exception for wrong guest rma order input
- Skip customer creation step for guest rma replacement orders
- Undefined offset: 1 in Rma/Model/Field.php
- "Argument 1 passed to RmaManagement::getOrders() must implement interface RmaInterface, null given" for Mass RMA Status change in admin
- Passing null to parameter #1 of type string is deprecated in Model/Status.php
2.2.10
(2022-09-22)
Fixed
- Deprecated Functionality: nl2br()
- Changed status name column to 'text' to allow saving long names
2.2.9
(2022-08-15)
Fixed
- Argument 'value' must be type of string, NULL given on RMA view page on the frontend M245
2.2.8
(2022-08-10)
Improvements
- Added option "Show Quick Data Bar"
2.2.7
(2022-08-01)
Fixed
- Allow creation RMA for orders with store_id=null
- php8 compatibility issues
2.2.6
(2022-07-27)
Fixed
- RMA links shown on the frontend in the order and order history when disabled for the customer account
- Compatibility with Smartmage_Inpost
2.2.5
(2022-07-04)
Improvements
- Quickbar refactoring
2.2.4
(2022-06-20)
Improvements
- remove db_schema_whitelist.json
2.2.3
(2022-06-09)
Improvements
- Added quickbar
2.2.2
(2022-06-07)
Fixed
- Fixed the issue with error on the Product Report
- save buton dropdown desing is broken onclick
2.2.1
(2022-05-04)
Improvements
- Switch to declarative DB schema
2.1.36
(2022-05-04)
Fixed
- Credit memo button is not displayed in RMA if one memo was created but still available from original order
- Invalid Document Element 'pk': This element is not expected. Expected is ( column ) in RMA reports
- Email variable customer.name doesn't work
Improvements
- Added Credit Memo column to the RMA grid in the admin panel column
2.1.35
(2022-03-31)
Fixed
- Button 'Convert to RMA' in ticket redirects to the order selection page instead of creating of the RMA for the selected order in the ticket
- Added class '_guest' to the guest rma view page
- Replacement Order' button is not disabled on onClick and allows creating several Replacement Orders
Improvements
- Compatibility with M2.4.4
- Added rma creation button in the order history in the customer account
2.1.34
(2022-01-25)
Fixed
- New RMA created when admin press the 'convert to ticket' button in RMA grid in admin
2.1.33
(2021-12-10)
Improvements
- Compatibility with OrderManagement modules
2.1.32
(2021-11-04)
Improvements
- Updated default reports configuration
- Visualization
Fixed
- When RMA created from order the order items are not loaded and the customer is forced to select the order again
- Customer postcode is not displayed on the RMA print page
- Incorrect Config Data field name
2.1.31
(2021-09-23)
Fixed
- If RMA output is disabled the RMA menu is available by URL
2.1.30
(2021-09-20)
Fixed
- Offline RMA is saved several times in admin
- Filesize on the RMA view pages is displayed for two different settings
Improve
- Added option to switch attachment storage to filesystem
2.1.29
(2021-06-08)
Fixed
- Multiple RMAs are not created for one order
- Items doubled in the admin panel for the existing RMAs on RMA save
- "Integrity constraint violation" when save offline RMA in admin
2.1.28
(2021-05-27)
Fixed
- Custom field type checkbox is not unchecked in RMA backend edit form
- Double RMA creation for one order item on the frontend in different tabs
- RMA Number -> Number Format does not not work in the backend for the storeview
- Performance issue in the admin panel on RMA view page when original order or RMA contains many items
- Not possible to create Rma for bundle items if 'Request only shipped products' is enabled
- Remove attachment on RMA remove
Improvements
- Added maximum allowed size attachment for RMA create/view pages
2.1.27
(2021-04-12)
Fixed
- Unread mark is not displayed in admin RMA grid for guest RMA
- RMA attachments weren't deleted with the RMA deletion
2.1.26
(2021-02-08)
Fixed
- Error "Too few arguments to function ..., 0 passed"
- Issue when status fields display the 'default storeview' scope value for 'All Storeviews' scope
2.1.25
(2021-01-13)
Fixed
- RMA message status read/unread isn't changed in admin rma grid
- Customer Email is missing from RMA Contact Information if RMA was created via Storefront
2.1.24
(2021-01-05)
Fixed
- Issue when in the backend RMA grid the name of the selected RMA is not displayed when delete it from Actions
- Error 'Must implement interface Mirasvit\Rma\Api\Data\RmaInterface, null given' in mass change status in RMA backend grid
- Attachments are not uploaded on the frontend
2.1.23
(2020-12-17)
Fixed
- Issue when RMA attachment is downloading but then fails with a network error message - the issue is reproducible only on cloudflare for loggedIn customers
- Slow RMA loading if it contains attachments on frontend RMA view page
2.1.22
(2020-12-03)
Fixed
- Content must be string or resource TransportBuilder.php when send RMA message with an attachment
2.1.21
(2020-11-25)
Fixed
- Slow RMA loading if it contains attachments
2.1.20
(2020-11-12)
Fixed
- Conditions reasons resolutions statuses addresses custom fields responces and rules are saved twice in the backend
- Variables for custom templates >=m234
2.1.19
(2020-11-05)
Fixed
- Variable guest_print_label_url didn't work in >=m234 for Workflow rules and changedname of the message variable
2.1.18
(2020-10-07)
Fixed
- Fixed issue when credit memos from different orders are linked to the same RMA
- last_reply_name is not displayed for the guest customer in the backend RMA grid
2.1.17
(2020-09-10)
Fixed
- Stock column replaced to the bottom in the qty-table in the backend RMA view
- Calculation of available products when option "Request only shipped products" is enabled
2.1.16
(2020-08-05)
Fixed
- Spelling inprovements and added replacement order displaying to RMA edit page
- Added replacement order displaying to RMA edit page
- Parsing of RMA emails(empty, several messages per RMA)
2.1.15
(2020-07-29)
Improvements
- Support of Magento 2.4
Fixed
- RMA fails to save the postcode in the database
- rma comments and quick responces use the same tagsas Magento orders
- foreign key constraint fails customer_id for guest RMA messages
2.1.14
(2020-06-19)
Fixed
- Issue when unable to download RMA attachment
- RMA backend grid use the same format date as Magento orders
Improvement
- Improved display of RMA items in the admin email
- Added target _blank to exchange orders and credit memo links in backend rma edit page
2.1.13
(2020-05-29)
Fixed
- Email notification for mass action "Change Status"
- Calculation of available products when the option "Request only shipped products" is enabled
2.1.12
(2020-04-24)
Fixed
- Display of the "Credit Memo" button on the edit page
-
Display of product sku for removed products in the backend
- Added ability to choose sending method of emails copy
2.1.11
(2020-04-14)
Fixed
- Display of shipping address on the print page
2.1.10
(2020-03-26)
Fixed
- Spelling mistakes in resolution form, settings and RMA listing on the frontend
- 'Fatal error: Method Result::__toString() must not throw an exception' when all the statuses are deleted
Improvement
- Added GraphQl API
2.1.9
(2020-03-11)
Fixed
- Error "Unique constraint violation found" during RMA creation
2.1.8
(2020-03-10)
Fixed
- Issue when status displays on frontend with option "Show in the frontend progress bar" = "No"
- Status order does not work for old version of statuses
2.1.5
(2020-03-03)
Fixed
- Sort order for dropdown list for rma creation
- Made buttons for statuses and fields identical to others in backend
- Dispalying rmaList columns following the default Magento view
2.1.4
(2020-02-06)
Fixed
- Issue when was possible to remove status/reason/resolution/condition if it used in RMA
- Compatibility with m2.2.5 (optional params should be at the end in Rma/Model/UI/Status/StatusDataProvider.php)
- RMA date validation in the backend
2.1.3
(2020-01-24)
Fixed
- Hide continue button at rma creating window
- Display of bundle products in the frontend RMA creation form
- Display of return address on the RMA frontend view page
- The navigation arrows are missing from nav menu on Customer Account Page
- Hide add and delete buttons if such actions is not permitted
Improvement
- Add admin username to the rma history message
- Available from backend to request only shipped products if such option enabled
2.1.2
(2019-12-27)
Fixed
- Remove cache tag for OrderStatusHistory model
- MailSending for name with Non-ASCII symbols
- Validation of allowed order statuses for guest orders
2.1.1
(2019-12-20)
Fixed
- Duplicating of items in RMA grid
- Solved possible XSS issue
- Renamed RMA guest links
- Display of bundle products in backend RMA creation form
Improvements
- Change rma statuses workflow
2.0.61
(2019-11-17)
Fixed
- Wrong format of view of the status RMA in Order View
- Attachment sending in 2.3.3
- Files sending in backend since 2.0.59
2.0.60
(2019-10-22)
Improvements
- Added ability to separate custom fields for online/offline RMA
2.0.59
(2019-10-17)
Fixed
- All reports
- Minor fixes
2.0.58
(2019-10-10)
Fixed
- File validation on RMA create page
- Saving of information in "Contact Information" block
- Variables in quick response
2.0.57
(2019-10-02)
Fixed
- Custom dateField validation
2.0.56
(2019-10-01)
Fixed
- Compatibility with Magento 2.3.2-p1
2.0.55
(2019-09-26)
Fixed
- Quick responses saving for store view
- Custom fields saving for store view
2.0.53
(2019-09-13)
Fixed
- Displaying of exchange orders in backend RMA grid
Improvements
- Redesign frontend part
2.0.52
(2019-08-09)
Fixed
- Error "Unknown column 'order.entity_id'"
- Undefined index: email in Rma/Observer/AddMessageObserver.php
- "Remove order" and "Remove item" buttons does not work in Create New Offline RMA backend form
2.0.51
(2019-07-30)
Fixed
- Search by customer name in RMA grid
2.0.50
(2019-07-25)
Fixed
- Order filter on backend RMA list page
- Issue when RMA unbinds from customer
- Display of multi orders on RMA print page
- Return period does not display on frontend
2.0.48
(2019-07-24)
Fixed
- Unable to save multiorder RMA in backend
- Duplicating of orders in multiorder RMA in backend
2.0.47
(2019-07-05)
Fixed
- RMA creation for multiple order types
- Issue when offline orders do not show in backend RMA grid
2.0.46
(2019-06-19)
Fixed
- Display order's RMA in backend in RMA tab on order edit page
- Offline order form validation
- Translation
2.0.45
(2019-05-02)
Fixed
- RMA print page styles
- Issue when it was not able to create Replacement Order when Free Shipping method is disabled
- RMA policy block does not display in RMA form
- "Add RMA" link on order view page in backend
Improvements
- Added option "Allow a Manual RMA Number"
2.0.44
(2019-04-10)
Fixed
- Order links in the backend RMA grid
2.0.43
(2019-04-08)
Fixed
- Popup styles for customers account
Improvements
- Added ability to add several orders to one RMA
2.0.42
(2019-03-28)
Fixed
- Header styles for ultimo mobile version
- Removed button "Replacement Order" for offline RMAs
Improvements
- Added storeview to product report
2.0.41
(2019-03-12)
Fixed
- Email attachments conflict
- Filters are not applied during rma mass delete [#151]()
- Incorrect fetch of allowed orders (since version 2.0.39)
- Errors for Reports
2.0.39
(2019-03-07)
Fixed
- Error "Call to a member function getIsOffline() on boolean ... frontend/templates/rma/list/list.phtml"
- Allow to return old orders
2.0.38
(2019-02-27)
Fixed
- Shipping method for RMA replacement order
2.0.37
(2019-02-26)
Fixed
- RMA customer name does not save for guest customer
2.0.36
(2019-02-19)
Fixed
- Default storeview for guest RMA
- Issue when {{customer.name}} does not work for offline order
2.0.35
(2019-01-24)
Fixed
- Replacement and Exchange order for guest RMA
2.0.34
(2019-01-21)
Improvements
- Added report for Offline RMAs
2.0.33
(2019-01-16)
Fixed
- Error "PHP 7.2. Warning: count(): Parameter must be an array or an object that implements Countable in ..."
- Display RMA for removed orders
2.0.32
(2019-01-04)
Fixed
- Attribute Report does not show
2.0.31
(2019-01-03)
Fixed
- Issue errors for replacement order
- Issue when customer edit page does not work on Magento 2.1.x
2.0.30
(2018-12-12)
Fixed
- RMA "Created At" field updates on message send
- Issue when was possible to create RMA when all items were returned
Improvements
- Added other RMAs information on the backend pages
2.0.29
(2018-11-29)
Fixed
- Compatibility with Magento 2.3.0
2.0.27
(2018-11-01)
Fixed
- Custom statuses send messages for wrong storeview
- Styles for product image on RMA view page
Improvements
- Added Replacement order
- Added ability to assign Rma buttons (Exchange Order, Replacement Order and Credit Memo) to Resolution
- Added an RMA button on the order details page
- Added an RMAs section in the customer account in backend
- Added an RMA qty to the Items Ordered section of an order
2.0.26
(2018-10-01)
Fixed
- Issue when guest customer does not allow to post message
- Wrong product image in backend rma
- Wrong email sender
2.0.25
(2018-09-13)
Fixed
- Issue when guest customer does not allow to post message
2.0.24
(2018-09-13)
Fixed
- Stock amount does not show
- Renamed field in RMA guest login form
- Status does not show in emails
Improvements
- Fixed option "Force theme to apply styles"
2.0.23
(2018-08-29)
Improvements
- added RMA tab to backend order edit page
2.0.22
(2018-08-02)
Fixed
- RMA creation for bundle products
- Displaying of customer name on RMA backend edit page
2.0.21
(2018-07-30)
Fixed
- Issue when on status change changed owner for user message
- Unable to load RMA label in backend
2.0.20
(2018-06-19)
Features
- Added Offline Orders
Fixed
- Error "Undefined index: items"
2.0.19
(2018-05-22)
Fixed
- Email's variables
- Translation
- Duplicated styles
2.0.18
(2018-04-13)
Fixed
- Issue when customer is able to create two custom field with the same code
- Event "New reply from customer" does not work
Improvements
- Improved RMA guest page layout
2.0.17
(2018-04-03)
Fixed
- RMA frontend menu is not recognized as active
- Search in RMA select order grid
2.0.16
(2018-03-26)
Fixed
- Issue when removed exchange order cause fatal error
Improvements
- Added option that adds Rma style to pages if theme ignore it
2.0.15
(2018-03-09)
Fixed
- Support of new reports module
2.0.14
(2018-03-05)
Fixed
- Status changed by workflow rule does not send email notification
Improvements
- Added option "Show RMA for guest customer by order" displays only RMAs either for order, or for customer
2.0.13
(2018-01-18)
Improvements
- Added new variables(rma.getHasItemsWithReason(XXX), rma.getHasItemsWithConditions(XXX), rma.getHasItemsWithResolution(XXX)) for transactional emails, which allow to check existence of items with certain Reason, Resolution and Condition.
Fixed
- Added compatibility with Emizentech_CustomSmtp. Before this fix, if store had Emizentech_CustomSmtp, the option "Send blind carbon copy (BCC) of all emails to" was not working correctly.
- Fixed an issue with incorrect RMA URL. If a magento installation has stores with URL prefixes (e.g. "/usa/..", "/fr/.."), extension were not including those prefixes into RMA URLs.
2.0.12
(2017-12-20)
Fixed
- Extension registration fix
- Compilation crush fix
2.0.11
(2017-11-15)
Fixed
- Reports
- Compatibility with Magento 2.2.x
2.0.10
(2017-11-13)
Fixed
- Fixed images in backend
2.0.9
(2017-11-08)
Improvements
- RMA can be created for orders with deleted products
Fixed
- Report by Attribute
- Report by Product
- Product images in RMA creation form
- Exchange order filter in backend rma grid
- RMA urls
- Double emails on RMA creation
2.0.8
(2017-10-06)
Improvements
- Added reasons to print template
2.0.7
(2017-10-04)
Improvements
- Added "Resolved" to Workflow Rules actions
Fixed
- Email templates for multi store
- Customer notifications on status changes
2.0.6
(2017-09-27)
Fixed
- Compatibility with Magento 2.2.0
2.0.5
(2017-09-26)
Improvements
- Added ability to forbid products for return
2.0.4
(2017-09-19)
Fixed
- Bugs
2.0.3
(2017-09-11)
Improvements
- Reworked module documentation
2.0.2
(2017-09-07)
Improvements
- Improved admin UI
2.0.1
(2017-09-07)
Fixed
- Compatibility with Magento 2.2.0rc
- Displaying variations for configurable products
2.0.0
Improvements
- Interface refactored using XML UI Components
- Added mass action for change statuses in RMA Grid
1.1.26
(2017-08-17)
Improvements
- Added price column to items' grid in RMA form in backend
- Added mass action "Change Status" on RMA grid in backend
1.1.25
(2017-07-11)
Fixed
- Styles, misspelling and report filters
1.1.24
(2017-06-09)
Fixed
- RMA's reasons validation
- Dispaying status's messages
Improvements
- Added reports by product and by attribute
1.1.23
(2017-05-31)
Fixed
- RMA validation
Improvements
- Added return address on frontend
1.1.22
(2017-05-10)
Improvements
- Added option "Reset Counter For Order"
- Added "Ticket was converted to RMA" event
1.1.21
(2017-04-26)
Fixed
- Notifications for guest
1.1.20
(2017-04-10)
Fixed
- Configuration for multistore
Features
- Added new conditions to workflow rules
1.1.19
(2017-04-05)
Features
- Added reports by reasons
1.1.16
(2017-04-04)
Features
- Added option that allows request to return only shipped items
1.1.14
(2017-03-31)
Fixed
- Fixed RMA for partial shipment
- Fixed issue when admin does not get notification about new RMA
1.1.13
(2017-03-30)
Features
- Added Helpdesk integration
Fixed
- Fixed RMA for orders migrated from Magento 1
1.1.12
(2017-03-13)
Fixed
- Fixed auto selecting items
1.1.11
(2017-03-09)
Fixed
- Fixed styles for confirm shipping dialog
1.1.10
(2017-03-07)
Fixed
- Fixed a possible issue with store id
1.1.9
(2017-03-03)
Fixes
- Fixed translations for Resolutions, Conditions, Reasons
- Fixed option "Allow to request RMA after order completion"
- Fixed issues with ability to delete reserved Resolutions
1.1.8
(2017-02-28)
Fixes
- Fixed compilation crush due to incomplete aggregation in reports
1.1.7
(2017-02-27)
Fixes
- Fixed compilation crush due to Reports requirement missing
1.1.6
(2017-02-24)
Features
- Added Report by RMA Status
1.1.5
(2017-02-24)
Improvements
- Added option to hide Condition, Resolution, Reason for customer
1.1.4
(2017-02-15)
Fixed
- Saving of translated dictionary (reasons, resolutions, conditions) titles for storeviews.
1.1.3
(2017-01-13)
Improvements
- Added ability to set different Return Addresses for each RMA
1.1.2
(2017-01-11)
1.1.1
(2016-12-21)
Fixed
- Quick Response in RMA edit form
- Issue with merged js in production mode
1.1.0
(2016-12-08)
Fixed
- "Items" column in Rma grid
1.0.8
(2016-06-24)
Improvements
- Support of Magento 2.1.0
1.0.7
(2016-05-06)
Fixed
- Issue with sending emails via office.com smtp
1.0.6
(2016-04-11)
Fixed
- Issue with menu
- Fixed an issue with generation RMA increment ID
1.0.5
(2016-03-24)
Fixed
- hide button "Print RMA Shipping Label"
1.0.4
(2016-03-21)
Improvements
- Email styles
Fixed
- Compatibility with PHP7
- Compatibility of print templates with Proto theme
1.0.3
(2016-03-07)
Fixed
- Problem with shipping block on the RMA page in frontend
1.0.2
(2016-03-03)
Fixed
- RMA2-23 - Visible HTML tags in emails
1.0.1
(2016-03-01)
Improvements
- Backend and Frontend styles
Fixed
- RMA2-22 - Issues with PHP 7
1.0.0
(2016-02-01)
- initial stable release