Store Credit & Refund
v1.2.21

Transactions

All Store Credit transactions are located in the Sales -> Store Credit -> Transactions section. Each of them provides the following information:
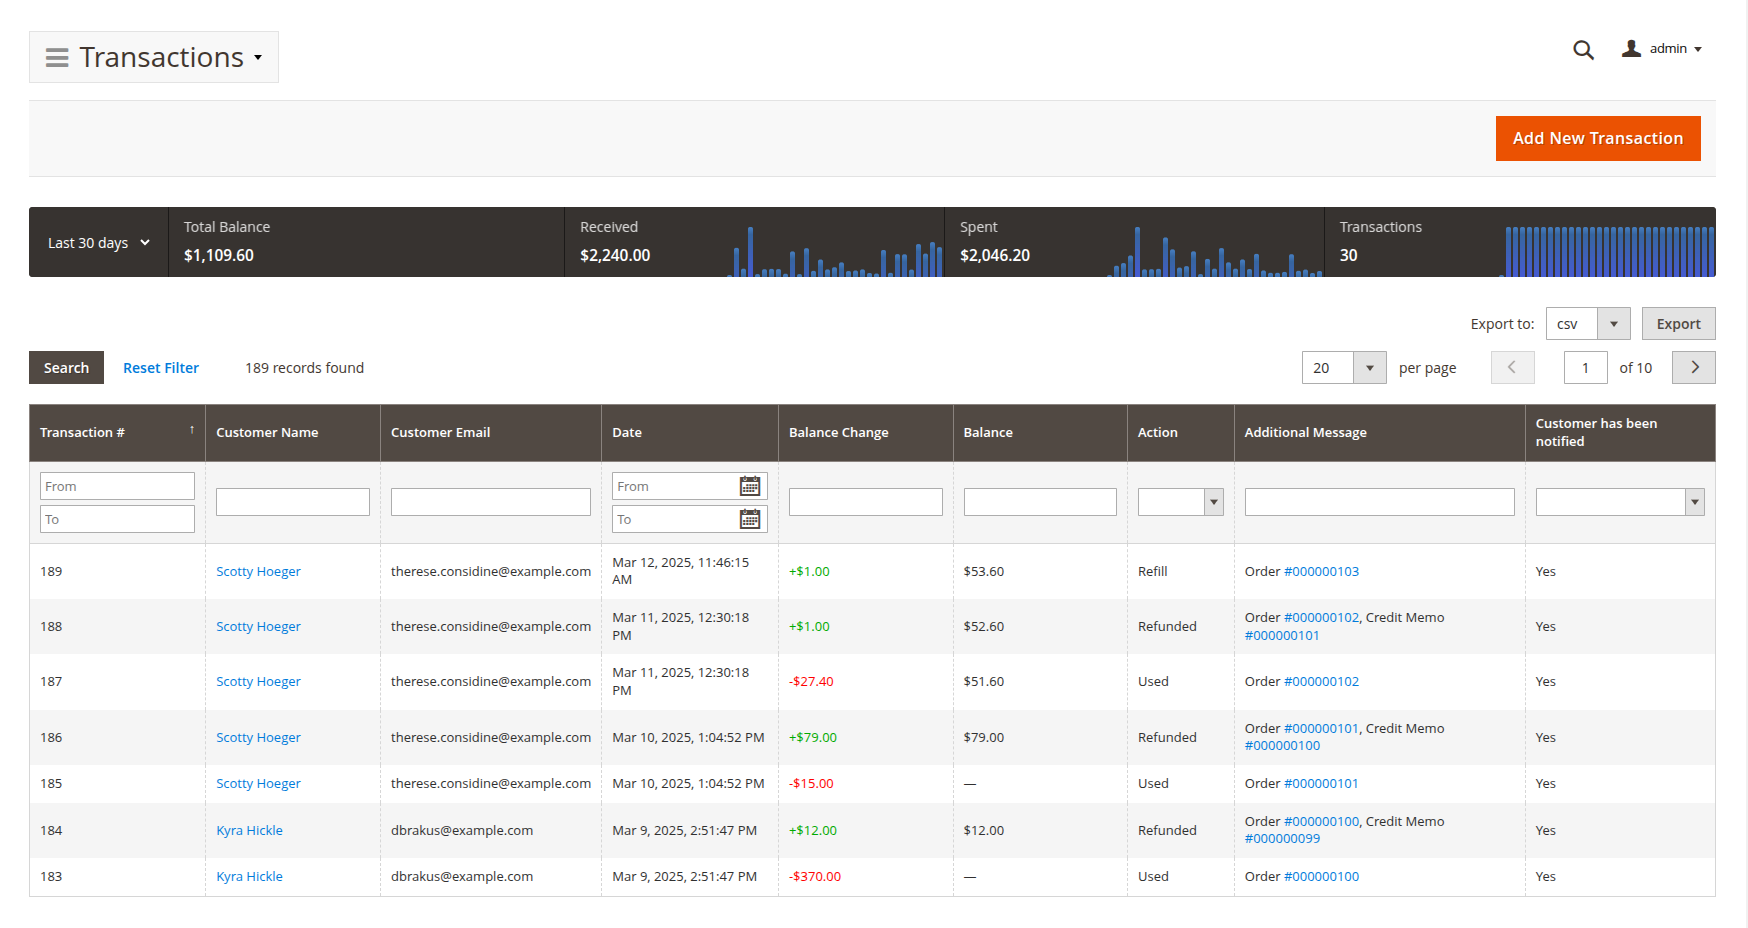
  • Transaction # - ID of the transaction.
  • Customer Name - the name of the customer, to whom the refund of Store Credit was issued.
  • Customer Email - email of that customer.
  • Date - date of transaction. The filter, available from the grid's header, allows you to show customer transactions only for the selected period.
  • Balance Change - the amount added or withdrawn from the balance by the current transaction.
  • Balance - total Store Credit balance of the customer.
  • Action - action, by which the transaction was created. Below are the following possible cases:
    • Refunded - adding to the balance created using Credit Memo, with a Refund to Store Credit option.
    • Earning - adding to the balance as the result of triggering of an Earning Rule.
    • Purchased - adding to the balance by purchasing a special Credit Product.
    • Refilled - adding to the balance by purchasing a special virtual Refill Product.
    • Used - withdrawal from the balance as payment to order.
    • Manual - manual transaction. It can be both adding and withdrawal. More on this case can be found below.
  • Additional Message - provides additional transaction information, i.e. Order id, Credit memo id, and shortcuts to appropriate documents.
  • Has Been Notified? - displays if the balance update email has been sent to the customer.

Creating Manual Transaction

A manual transaction can be created both for adding and withdrawal from the balance. Generally, it is used for mass actions and correcting customer balances.

However, it can also be used as a powerful tool for promotional purposes - such as crediting customers for Black Friday, for example.

To create a manual customer transaction, perform the following steps:

  1. Go to the Sales -> Store Credit section, and click the Add New transaction button.
  2. Store Credit Balance Change - the sum of money that should be added or withdrawn from the balance.
  3. Additional Message - additional information about a new transaction. It will be displayed on the Grid, so it should be logical.
  4. Currency - specifies the currency of the transaction.
  5. In the customer's list below, select the customers that are eligible for this action.
  6. Save the transaction to apply it (if you have selected more than one customer, it will be propagated to each as different transactions).

Importing Transactions

Our extension allows data importing from other extensions using the CSV data format.

Note

Unfortunately, we can not add a download sample file due to Magento restrictions.

You can get a sample file by visiting the Transactions page and then exporting it using Export -> CSV action of the Grid.

How to Import Transactions data

1) Extract data from your Reward Points extension to the CSV file, so that it contains the following columns (each line of that file would consist of transactions):

  • transaction_id - a unique ID of each transaction. Can be simple counter;
  • customer_name - first and last name of the customer;
  • customer_email - customer email;
  • updated_at - date and time the transaction was updated;
  • balance_delta - change on the credit balance;
  • balance_amount - amount of funds available;
  • action - type of the transaction (refill, refund, use);
  • message - additional message sent alongside the transaction;
  • is_notified - dsplays if the notification was sent;
  • website_id - shall contain not actual Website ID, but its code, according to your M2 store view setup. base is the most common code used by default

    Note

    If you're importing data from Mirasvit Reward Points extension, you can use special Migration script.

It will extract your data directly into '/tmp/points_export.csv' file. Feel free to change this SQL to suit your needs.

2) Go to System -> Data Transfer -> Import, and on the drop-down menu Entity Type, select Store Credit Transactions. You will see the following options:

  • Import Behavior - defines which action should be performed. Currently supported:

    • Add/Update - adds or updates of transactions (if transaction_id matches);
    • Replace - replaces transactions regardless of their existence.
    • Delete - deletes all transactions with no IDs on the import file. Useful for cleaning up incorrect upload.
      • Validation Strategy:
    • Stop on Error - stops importing, if errors are found;
    • Skip Error Entries - upload data as valid data will be uploaded, while others will be dropped off.
      • Allowed Errors Count - used if Stop on Error is selected, and it determines the number of errors allowed.
      • Field separator, Multiple value separator and Fields enclosure are CSV parameters, make them match your file format.
  • File to Import - specifies the data file to import.

    • Select File to Import - drop here CSV file, that you had exported in the previous step;
    • Images File Directory - used, if links to pictures are used in the file exported. Typically it's not used at all.

    Note

    Magento 2 Import function can have restrictions on the file size. By default, it's only 2M. The best way to increase it is to - open your .htaccess file, and enter the following options (let us make a limit of 40M):

        php_value upload_max_filesize 40M
        php_value post_max_size 40M

    Select appropriate options, and press Check Data. It will conduct data validation.

3) After validation is finished, you will see the messages with errors found under the optionsection. If data validation is passed (errors' quantity did not exceed the Allowed Errors Count parameter), the Import button appears. Press it to import transactions.

Note

You can also upload only the customer's balance. Just treat them as transactions -per customer.