Getting Started
Welcome to the Help Desk MX documentation.
Here you will find everything you need to set up your Help Desk service and create a flexible customer service, which will boost up your support.
Our extension provides you with a single point of handling all queries, emails, offline chat messages, and other contact sources. Each of them will be turned into either a separate thread or added to an already created one. It will greatly help you to communicate with customers and provide them with the speedy support they need.
Tickets can later be collected and analyzed via reports, which will also help you to build a better support strategy and improve your services and products.
Go ahead, dive in!
Firstly, please find our extension in the My Downloadable Products section of our store. Learn how to install extension, and proceed with Quick Start, which will guide you through setting up your Help Desk service.
How to install the extension
How to install the extension using composer
- Back up your store's database and web directory.
- Log in to the SSH console on your server and navigate to the Magento 2 store's root directory.
- Copy the installation instructions from the page My Downloadable Products to the SSH console and press ENTER.
- Run the command
php -f bin/magento module:enable Mirasvit_Core Mirasvit_Report Mirasvit_Helpdeskto enable the extension. - Run the command
php -f bin/magento setup:upgradeto install the extension. - Run the command
php -f bin/magento cache:cleanto clean the cache. -
Deploy static view files
rm -rf pub/static/*; rm -rf var/view_preprocessed/*; php -f bin/magento setup:static-content:deployNote
If you're using Magento 2.2.x, run the commandphp -f bin/magento setup:static-content:deploy -fto deploy static contents. -
Set up a cron job for Magento.
You can skip this step if you have already configured cron jobs for your Magento 2 store.
How to install the extension manually
- Back up your store's database and web directory.
- Download an archive from My Downloadable Products.
- Unzip the extension locally.
- Copy the unzipped folder to the root directory of the Magento store.
- Run the command
php -f bin/magento module:enable Mirasvit_Core Mirasvit_Report Mirasvit_Helpdeskto enable extension. - Run the command
php -f bin/magento setup:upgradeto install the extension. - Run the command
php -f bin/magento cache:cleanto clean the cache. -
Deploy static view files
rm -rf pub/static/*; rm -rf var/view_preprocessed/*; php -f bin/magento setup:static-content:deployNote
If you are using Magento 2.2.x, command usephp -f bin/magento setup:static-content:deploy -fto deploy static contents. -
Set up a cron job for Magento.
You can skip this step if you have already configured cron jobs for Magento 2 store.
Install the extension for Hyva
-
Run the commands:
composer require hyva-themes/magento2-mirasvit-helpdesk -
Enable the installed Hyva modules:
bin/magento module:enable Hyva_MirasvitHelpdesk -
Update the Magento database schema and data with the command:
bin/magento setup:upgrade -
Compile the code of the installed extension:
bin/magento setup:di:compile - Run the command below to clean the cache:
bin/magento cache:flush
Quick Start
Our Help Desk MX extension is a simple yet powerful extension for building and boosting your customers' support. Most of its functions work out-of-box, but for full productivity, several settings can be tuned up.
-
Start by establishing an organizational structure for support. All staff members (they're regular backend users, defined at System -> Permissions -> All Users) should be registered in their corresponding Department. Each staff member's Permission can be defined to ensure proper duties separation.
-
Establish an Email Gateways service. This allows customers to place tickets and communicate via email. It will include two additional steps:
- Enable IMAP access on your mailbox(es). If you're using a two-step authorization service (which is provided by GMail, for example), you also will need to create a special password for application, which you will use in Gateway;
- Set your Gateways mailboxes as Sender Email in the corresponding Department. It is crucial that you create a full cycle of email flow.
-
Create a ticketing workflow. Each stage of ticket resolving is marked by corresponding Status. Our extension provides a set of legal statuses out-of-box, but you may also extend or even define your statuses.
-
Create a ticket ranking system. Our extension provides a Priorities dictionary, which contains standard priorities that allow it to rank tickets by their urgencies. You may also extend it or define your set of priorities.
-
If you have a set of standard questions or situations that require typical answers, create Quick Responses to help speed up support in these cases.
-
If you need customers to supply additional information upon ticket submission, use our Custom Fields. In the same vein, you can create additional internal properties for tickets that can speed up your staff members' interoperability - for example, case details, intermediate results, and so on.
-
Observe your tickets flow, and if you encounter spamming, eliminate it by adding Spam Patterns. They will be used by our email fetch submodule to cut off spammers.
-
Automate your regular tasks with our Workflow Rules, with an extensive set of conditions allowing you to automate almost every routine task.
- Review your support productivity, using our Reports, and adjust your policy, making your support correspond with customers' demands.
This should be a good beginning.
Refer to appropriate sections of our manual to find out more info.
Configuration Settings
Go to the Customers > Help Desk MX > Settings. There you will find all Help Desk MX setting, divided into the following sections:
- General Settings
- Feedback Tab
- Email Notification Settings
- Customer Satisfaction Survey
- Customer Account
- Reports
- Developer Settings
- Notification Settings
General Settings
It contains the most available options you can use for global Help Desk configuration.
| Option | Description |
|---|---|
| Helpdesk title in the customer account | Sets the ticket page header that is visible for the customer in their account on the frontend. |
| Priority for new tickets | Sets the default priority for new tickets. |
| Status for new tickets | Sets the default status for new tickets. |
| Sign staff replies | This option allows you to specify how the agent's replies should be signed. Help Desk can sign them using the agent's name, or the name of the agent's department. |
| Move Ticket to Archive if it has one of the following statuses | Option allows you to place solved tickets into the archives solved- e.g., you can automatically move tickets to the archive with the status Closed. |
| Lock Ticket if it has one of following statuses | When activated, the customer cannot add a new message to the ticket. Choose the ticket status for the option to automatically lock tickets with the selected status. |
| Create Tickets from the Contact Us form | If the option is enabled, Help Desk will replace the default Magento contact form (/contacts/) with the Help Desk contact form. This form has additional fields and allows you to create a new ticket when the customer posts a message. |
| Send a blind carbon copy (BCC) of all emails to | Here you can enter a comma-separated list of emails. The Help Desk will send a blind carbon copy (BCC) of all outgoing emails using the email addresses. |
| Use WYSIWYG Editor in backend | Allows for a rich text editor in backend messages and dictionary forms options. After setting this option, you need to purge the cache to apply the options changed and make the editor appear or disappear. |
| Show previous/next button at the backend ticket edit page | Allows you to jump from ticket to ticket using two additional buttons on the toolbar - Previous Ticket and Next ticket. |
| Use the default Magento cron | If the option is enabled, the default Magento cron will be used. To set up a cron job, follow this manual. |
| Allow customer to open ticket by unique URL (without additional authentication) | A button "Show source" appears when customer hovers over a reply in a ticket in his acccount. The "Show source" button has a direct link to the reply. |
| Auto-removing old attachments | Enables automatic removal of files attached to ticket messages. |
| Remove attachments older than, days | Set the threshold in days for the automatic removal of attachments. |
| Only allow upload of attachments with extensions | Sets a list of filetypes alowed for uploading in the ticket. |
| Tickets autosave period, sec | Specify in seconds a time period for the ticket reply to be autosaved. |
| Show Help Desk link in customer menu | A link to the Helpdesk page is placed in the customer menu dropdown on the frontend. |
| Show Quick Data Bar in admin ticket grid | Уnables the tickets grid page i admin to display a data block with recent statistics on tickets. It shows the number of current admin tickets (My Tickets), the total number of tickets, ticket statistics for each admin, and the number of open, closed, and in-progress tickets. |
| Show User Activity Data Bar in admin ticket grid | Enables the tickets grid page in the backend to display statistics on tickets per admin at the bottom. |
| Store attachments in | Sets storage place for the ticket attachments. |
| Only allow the upload of attachments with extensions | Lets you block forbidden files in the attachments for ticket's messages. The blocked files' names will be displayed in red, so you can request this file again. |
| Tickets autosave period, sec | Governs autosaving of message form on the Ticket Edit form. On heavy-loaded systems can cause productivity loss - in this case, place empty value here or increase this value to 500-600 secs. |
Feedback Tab
This section governs a special pop-up dialog activated at the side button "Contact Us" button, visible on each store page. The pop-up enables the customer to submit a ticket with a source link to the page from where it was placed. The Feedback Tab is a convenient way to post a guest ticket or a ticket about a particular product or service page.
| Option | Description |
|---|---|
| Enable Feedback Tab | If the option is enabled, Help Desk will show a Feedback Tab at the side of each frontend page. |
| Assign to Department | Sets default department for new tickets created via Feedback Tab. |
| Tab Color | Sets the color of the Feedback Tab. |
| Tab Title | Sets the title of the Feedback Tab. |
| Tab Position | Sets the position of Feedback Tab ( at the left or right side of your store). |
| Form Title | Sets the title of the popup window. |
| Subject Title | Sets the title of field 'Subject' |
| Subject Placeholder | Sets placeholder of field 'Subject' |
| Description Title | Sets the title of field 'Description' |
| Description Placeholder | Sets the placeholder of the field 'Description' |
| Allow customer to attach files | Enable or disable the ability to attach files |
| Allow customers to select Priority | Enable or disable the ability to set the priority |
| Allow customer to select Department | Enable or disable the ability to select the department |
| Search Knowledge Base Topics first | A store-based setting can be used when Mirasvit Knowledge Base is installed, and integration enabled. Then, just the prior ticket submission customer will be presented with search results of their inquiry in Knowledge Base articles. |
Email Notification Settings
This section governs templates which are used for email notifications. Each option corresponds with a specific type of email sent to customers or staff on a certain event.
| Option | Description |
|---|---|
| Show Ticket ID in the email title | If the option is enabled, the email subject will contain a ticket ID (e.g. [#VEP-728-96190] Email subject here..) |
| Add customers Cc emails to the ticket | Enables sending a CC email. Warning: If option is enabled spam CC email is possible. |
| The Number of last replies to be shown in the ticket history | When a customer receives a reply from an agent, the email includes a conversation history. You can limit the number of last replies to the history using this option. If you set it to 0, you will completely hide the history. |
| Template of New Ticket Email for Customers' | When a customer creates a new ticket, he or she receives an email with confirmation. This option sets a template for this email. |
| Template of New Ticket Email for Staff | When the customer creates a new ticket, the agent receives an email notifying the agent about the new ticket. This option sets a template for an email. |
| Template of New Message Email for Customers' | When the agent replies to a ticket, the customer receives an email with this reply. This option sets a template for this email. |
| Template of New Message Email for Staff | When a customer replies to a ticket, the agent receives an email with this reply. This option sets a template for this email. |
| Template of New Message Email for a Third-Party | This option sets a template for an email that an agent sends to 3rd party users. |
| Template of Ticket Reminder | This option sets a template for an email that the Help Desk reminder sends to an agent. |
| Template of Rule Notification | This option sets a template for an email that can be sent using the Help Desk Workflow Rules. |
| Template of Survey Satisfaction Result | This option sets a template of an email that allows a customer to rate the quality of the agent's reply. |
Customer Satisfaction Survey
The satisfaction survey is an additional block displayed both on email notifications and in messages in frontend. It features three base rate classes and allows you to measure the clients' satisfaction level.
| Option | Description |
|---|---|
| Include a satisfaction survey in the reply email from staff members | Includes a satisfaction block to the email notifications, sent after staff have submitted a message to the ticket. |
| Show survey results in the frontend ticket history | Enables the customer to view the satisfaction rating they provided in their account. |
| Show survey results in the backend ticket history | Enables display of customer satisfaction rates (per message) in the backend ticket Edit page. |
| Send survey results to the ticket owner | If the option is enabled, the store agent will receive a result of the customer's support rate for their reply. |
| Send survey results to emails | Sets emails that will receive the results of the support survey. You can enter multiple emails separated by a comma. |
Customer Account
It contains options that manage a policy of ticket submission for registered customers.
| Option | Description |
|---|---|
| Show the Help Desk section in the Customer Account | If the option is enabled, customers will see a Help Desk section in the customer account of the store. |
| Allow customers to select Priority | If the option is enabled, customers can select a priority for a new ticket. |
| Allow customers to select Department | If the option is enabled, customers can select a department for a new ticket. |
| Allow customers to select Order | If the option is enabled, customers can select an order for a new ticket. |
| Allow customers to attach files | Enable/disable the ability to attach files |
Reports
This section contains only one option - Solved Statuses. This list box allows you to set custom ticket Statuses, which will be used by the Help Desk MX reporting subsystem to determine how many tickets were resolved for a certain period.
Ticket reports can be seen at Customers -> Help Desk MX -> Reports.
Working Hours
The section contains the Working Hours display options. For more information on this topic, see Working Hours
| Option | Description |
|---|---|
| Show online/offline status on the Contact Us page | If this option is enabled, customers will see your store's status on the Contact Us page. |
| Show online/offline status in the Feedback popup | If this option is enabled, customers will see your store's status in the Feedback popup. |
| Show online/offline status in the Customer Account > My Tickets | If the option is enabled, customers will see your store's status in the Customer Account > My Tickets. |
| Default message when we are open | Default message when we are open. Can be overwritten for each schedule in Customers > Help Desk MX > Working Hours. |
| Default message when we are closed | Default message when we are closed. Can be overwritten for each schedule in Customers > Help Desk MX > Working Hours. You can use the variable [time_left_to_open] |
| Show the working hours on the Contact Us page | If the option is enabled, customers will see the Working Hours of your store on the Contact Us page. |
| Show the holiday schedule X days before activation | The number of days to display holiday schedule before activation |
| Working schedule title | Title of Working Hours block on the Contact Us page |
| Upcoming working schedule title | Title of Upcoming Working Hours block on the Contact Us page |
Developer Settings
Normally, these options should be used only in a staging environment. Make sure that they are turned off after moving to production. For example, if Sandbox remains enabled, customers won't receive any email notification.
| Option | Description |
|---|---|
| Activate Sandbox | If the option is enabled, the Help Desk will not send any email to your customers. All emails will be sent to the sandbox email. |
| Send All Outgoing emails to Email | Specifies a sandbox email (see previous option). |
| Force store's theme to apply styles | If a store theme overrides the Magento way of including styles, this option will add Help Desk styles to the page. |
| Log ticket deletion | This option logs ticket deletion in file /var/log/mirasvit/helpdesk.log |
Notification Settings
This section manages desktop notifications used for real-time information about the ticket's arrival or update. On heavy-loaded systems, this can cause production loss - so in this case, you need to disable this feature, or increase the check period to 500-600 secs.
| Option | Description |
|---|---|
| Notifications check period, sec | Frequency of updates checks. Setting to 0 will disable them. |
| Show notification about the arrival of new tickets for | Users to display a notification for. |
| Enable notification about the arriving new messages in tickets assigned for user | If the option is enabled, users will receive notifications about new messages in their tickets. |
| Enable notification about assigning a ticket to the user | If the option is enabled, users will receive notifications about new tickets assigned to them. |
Extended Settings
This section manages desktop notifications used for real-time information about the ticket's arrival or update. On heavy-loaded systems, this can cause production loss - so in this case, you need to disable this feature, or increase the check period to 500-600 secs.
| Option | Description |
|---|---|
| Help Text | This text will be shown under title on "Contact Us" page and "Feedback" tab |
| Show customer the local time in backend | Display the customer's local time in the backend. To ensure the option works correctly, you need to download a timezone database. |
| Path to GeoLite2 City database | Used for determining a customer's timezone by using a timezone file. You can download it here https://dev.maxmind.com/geoip/geoip2/geolite2/. Please enter a full absolute path to the file. E.g. /var/lib/GeoLite2-City.mmdb. |
| Enable Google reCaptcha | This option allows to control Google reCaptcha on Helpdesk pages. Find settings for Google reCaptcha in Configuration > Security > Google reCaptcha. |
Departments
To work correctly, the Help Desk MX requires you to have at least one department where all staff members are registered.
Creating a New Department
To create a new department, go to the Customers > Help Desk MX > Departments backend page. Press the button Add New. You will see the following properties in two sections:
General Information
- Title - name of the department.
- Is Active - whether the department is active.
- Is Shown at the Frontend - If the option is enabled, customers can select this Department upon submitting new tickets.
- Sort Order - sort order, in which departments are shown in drop-down selection menus.
- Sender Email - Email address will be used as
Fromwhen a member of this department replies to a ticket, so the customer can directly reply to email notifications. Such replies will be automatically fetched and added to tickets only when the corresponding mailbox is registered as a Gateway. - Members of Department - List of agents assigned to a department. They are regular backend users, defined at System -> Permissions -> All Users. The agent can also be registered in multiple departments.
- Stores - Sets the store's view or views where this department shall be used for assigning tickets.
Notification
-
If a ticket is unassigned, send notifications to all department members - If this option is activated, all agents (all agents in all departments) will receive notifications (i.e., new messages) about unassigned tickets (including notifications about new tickets).
- If a ticket is unassigned, send some notifications via email (deprecated) - You can receive notifications (new messages) about unassigned tickets (including notifications about new tickets) via email.
Email Gateways
Help Desk MX can automatically fetch emails from your email account and convert them into tickets. To enable this feature, you have to connect your email account with Help Desk using Gateway, and enable cron.
All Gateways have their Grid, at Customers -> Help Desk MX -> Gateways, where you can create, edit and remove Gateways.
Creating New Gateway
Go to the Customers -> Help Desk MX -> Gateways backend page. Press the button Add New and fill in the following properties:
- Title - the internal title of the gateway. You can use any phrase.
- Email - the email address of your mailbox
- Login - the login to your mailbox
- Password - the password to your mailbox. If you have set a two-step authentication, you need to generate a special password to apply and use instead of your regular one. Here is how it can be done for GMail.
- Is Active - whether Gateway is active. Our cron task fetches emails via a registered mailbox only when it is activated here.
- Host - the hostname of your mail server
- Folder - is a special field which forces Help Desk MX to fetch emails only from a specific folder inside the mailbox. Typically this option is used when the Help Desk shares a mailbox with some other service or extension.
- Protocol - the protocol used by your mail server (IMAP or POP3)
- Encryption - the encryption method used by your mail server
- Port - the port used by your mail server
- Fetch Frequency (minutes) - how often the help desk should fetch new emails from your mailbox
- Fetch Max - the maximum number of fetched emails per one connection to your email server
- Fetch Only X Last Emails - can be useful for some mailboxes. Leave empty to disable this feature.
- Remove emails after fetching - makes our extension remove emails after fetching them.
- Auto-assign tickets to Store View - allows you to automatically set a storeview for tickets created from emails on this Gateway. It is extremely useful for multi-stores and separating staff duties.
- Auto-assign tickets to department - allows you to automatically set tickets created for the Department from emails on this Gateway. It is extremely useful in separating staff duties.
- Notes - any additional notes.
Our extension supports the following types of encryption:
- SSL - Secure Sockets Layer, used in most public mail servers, like Gmail.
- TLS - Transport Layer Security, used in private mail servers. Our extension supports both TLS with or without certificate validation.
-
Example of connecting Gateway to Gmail
You will need the following setup to connect to the Gmail mailbox.
- Title:
Gmail gateway(in fact, there can be any logical name) - Email:
[email protected] - Login:
[email protected] - Password:
the password to your Gmail account - Is Active:
Yes - Host:
imap.gmail.com - Protocol:
IMAP - Encryption:
SSL - Port:
993
Note
Before connecting to Gmail, make sure that you have enabled IMAP access.If you use the Two-Step Authentication, you will need to create a special Password for Application and provide it at Password property instead of a regular one.
- Title:
-
Example of connecting Gateway to Outlook/Exchange server
You will need the following setup to connect to the Outlook/Exchange mailbox:
- Title:
Outlook gateway - Email:
[email protected] - Login:
[email protected] - Password:
the password to your Outlook account - Is Active:
Yes - Host:
imap-mail.outlook.com - Protocol:
IMAP - Encryption:
SSL - Port:
993
- Title:
Checking Gateway Mailbox
You can check Gateway's current status by pressing the Debug button at the top menu ribbon.
This button will start our special script, to connect to your mailbox using the provided credentials, and display the following data:
- Number of emails in your mailbox
- Subjects of last 10 emails and their status (read/unread).
The debug page is used to troubleshoot fetching issues. Read more here.
Statuses
Statuses mark the different stages of a ticket's resolution. Our extension provides three default variations:
- Open - assigned at the stage of creating a ticket or in its initial message reply;
- In Progress - assigned after further replies.
- Closed - assigned when the ticket is counted as resolved.
If you wish, you can create a set of statuses. If so, you also need to include them to your tickets workflow using the following options:
- Set initial status, which is assigned to the ticket upon its creation, at Help Desk MX -> Settings -> General Settings -> Status for new tickets
- Choose statuses, which will automatically move tickets to the Archive, at Help Desk MX -> Settings -> General Settings -> Move Ticket to Archive if it has one of the following statuses.
- Choose statuses which will mark tickets as resolved at Help Desk MX -> Settings -> Reports -> Solved Statuses.
You can also assign different statuses, using Workflow Rules, or by setting a reminder for a ticket.
Creating New Status
To create a new status, go to the Customers > Help Desk MX > Statuses backend page. Press the button Add New. You will see the following settings:
- Title - label of the status.
- Code - unique code of the status. It can contain only letters, digits, and underscore.
- Sort Order - sorting order, in which statuses will be displayed on a drop-down selection menu.
- Color - the color of the status label (used for better visualization in Grid)
- Stores - sets the store view or views where the status will be used for ticket workflow.
Note
Status labels are not translated using standard Magento means of translation.If you wish to have the same status displayed differently on other stores, use the Store View switcher to jump to other store views and put a translation into the Title field.
Priorities
Priorities are used to rank tickets by their urgency (or other metrics you are using). Our extension comes with three default priorities:
- Low
- Medium
- High
If you think you can create your priority set, you also need to include them in your tickets workflow using the following options:
- Set the initial priority for tickets assigned on their creation at Help Desk MX -> Settings -> General Settings -> Priority for new tickets.
You can also assign different priorities using Workflow Rules, or by setting a reminder for a ticket.
Creating New Priority
To create a new priority, go to the Customers > Help Desk MX > Priorities backend page. Press the button Add New. You will see the following settings:
- Title - Label of the priority.
- Sort Order - sorting order, in which priorities will display at the drop-down selection menu.
- Color - the color of priority label (used for better visualization in a Grid)
- Stores - sets the store's view or views where this priority can be used for ticket workflow.
Note
Priority labels can not be translated using the standard Magento translation means.If you wish to have the same priority displayed differently on other stores, use the Store View switcher to jump to other store views and put translation to the Title field.
Quick Responses
Quick Responses are message templates which are used to give stereotypical answers to queries about tickets. They are visible only by staff and used only as answers to customers' questions, which are found at the backend Ticket Edit Page.
For detailed information on how to use Quick Response, refer to the How to Reply to a Ticket section.
Creating Quick Response
To create a new quick response, go to the Customers > Help Desk MX > Quick Responses backend page. Press the button Add New. You'll see the following properties:
- Internal Title - the internal title of the quick response. Customers will not see it.
- Is Active - whether this Quick Response is active will be displayed at the Ticket Edit page.
- Template - text of the quick response. This text will be inserted into the reply field. You can use the following variables here:
[ticket_customer_name]- Customer's full name.[ticket_customer_email]- Customer's email address.[ticket_code]- Ticket number (eg. #TX-234234).[store_name]- Name of the store.[user_firstname]- Agent's first name.[user_lastname]- Agent's last name.[user_email]- Agent's email address.
- Stores - Store views where this quick response can be used. If you have multiple languages, you need to have different quick responses for different store views.
Note
If, for some reason, a Quick Response is not visible on the Ticket Edit page, jump to the Additional tab, and check the Store View field. The same shall be selected in the Stores field of that Quick Response.Custom Fields
Help Desk MX allows you to create custom fields. You can use them to store any additional information about tickets. You can set it up where you would like to show some custom fields, and can filter and search tickets by custom fields.
Creating New Custom Field
To create a new custom field, go to the Customers > Help Desk MX > Custom Fields, and press the button Add New. You will see the following properties:
- Title - Name of the field.
- Code - Internal code of the field. It can contain only letters, digits, and the underscore.
- Type - Field's type. The following types are possible:
- Text - One line text field.
- Multi-line text - Multiple lines text field (textarea).
- Date - Date with calendar.
- Checkbox
- Drop-down list
- Description - Field's description.
- Options list - Used only for fields with the 'drop-down list' type. Enter each value from the new line using the format:
value1 | label1 value2 | label2 - Active
- Sort Order
- Show value in customer account - If the option is enabled, the field's value will be shown in the customer's account (ticket's page).
- Show in creating ticket form - If the option is enabled, the field will be shown in the customer's account (create new ticket form).
- Show in contact-us form - If the option is enabled, the field will be shown in the contact form and the feedback tab.
- Required for customers - If the option is enabled, customers will be required to fill in this field when they create a new ticket.
- Required for staff - If the option is enabled, agents will be required to fill in this field when they create a new ticket or reply.
- Stores
Custom fields can also be used in email templates by their codes. For a detailed description, see the How to customize email notifications template section.
Spam filters
The Help Desk MX allows you to filter incoming emails automatically and cuts off spammers. It is done via special patterns to which emails are compared, and if a match is found - the corresponding message moves to the Spam folder.
How to Create Spam Pattern
To create a new spam pattern, go to Customers > Help Desk MX > SPAM Pattern. Press the button Add New. You will see the following properties:
- Title - Internal title of spam pattern.
- Is Active The period from which the spam pattern starts being active till it stops being active.
- Scope - Sets an email field that will be checked for a matching pattern. You can set the following areas:
- Headers - Service information that is generated by email client while sending the email.
- Subject - Subject of the email.
- Body - Main text of the letter or email.
- Pattern - Expression in which an email is considered spam. The pattern supports regular expression, see Regular Expressions. Patterns must be covered in slashes A useful service in testing patterns can be found here.
Examples Of Spam Patterns
-
Spam filter for all emails with the domain example.com
Scope: Headers
Pattern:/[^@][email protected]/ -
Filter for users who have emails which includes
user, works for any domain.
Matches with: "[email protected]", [email protected]", "[email protected]".Scope: Headers
Pattern:/.*user.*[@](?!domain\.com).*$/ -
Filter block for emails beginning with the word "free" or containing the base word "free" after space.
Matches with: "free", "free money!", "free discount".
Doesn't match: "freeze", "nofree".Scope: Subject
Pattern:/^free[ ].*|^free/ -
Filter block for emails with text: Special offer.
Matches with: "$pecia1 Offer", "!!special Offer!!", "Special 0ffer?!".Scope: Body
Pattern:/.*[\$Ss]pecia[l1]\W[Oo0]ffer.*/
Permissions
The permission grid provides the backend agents with the ability to limit access to tickets. It promotes the separation of duties and can boost effectiveness.
Go to Customers > Help Desk MX > Permissions. Here you can add restrictions for each role, defined on a particular Magento store. By default, there is only one record which allows full access to all agents:
| Role | Has access to tickets of department | Can remove tickets |
|---|---|---|
| All Roles | All Departments | Yes |
That means that any staff member has access to tickets from all departments, and any user can delete tickets.
Administrators can edit this record and add additional ones to set up the correct permissions.
Example
Let's imagine that we have three roles in our store: Administrators, Support, and Sales. We can set up a Help Desk in a way that administrators will be able to access every department and have the ability to delete tickets. Still, Support and Sales will have restricted access to all but tickets from their departments without deleting them. Doing this enables us to make the following set up:
| Role | Has access to tickets of department | Can remove tickets |
|---|---|---|
| Administrators | All Departments | Yes |
| Support | Support | No |
| Sales | Sales | No |
Also, take note that if, due to any reason, a ticket is sent to the wrong department, that department's team members can redirect the ticket to another department. For example, even if the Support Department team does not have access to the Sales Department tickets, they can assign the ticket to the Sales Department.
Workflow Rules
The Workflow Rules allow you to automate your task routines.
Each rule is bound to a certain event, contains a set of conditions - which an average ticket needs to meet - and an action that should be executed if the conditions are met. Here is a list of the most frequently used examples:
- Automatically assigns any ticket to your expert staff members depending on the subject;
- Automatically assigns any ticket to a certain department;
- Auto-sets up a ticket's status to 'In Progress' after the first reply of a support team member;
- Creates a custom notification for both staff and customers;
- Creates a special reminder, which requires more complex conditions than follow-up reminders.
The possibilities are nearly endless. Please, check this blog post for detailed information on https://mirasvit.com/blog/how-to-streamline-workflow-with-a-unique-help-desk-mx-rules-feature.html.
Also, a set of useful examples can be found in Workflow Rule Examples section.
Creating Workflow Rule
Rule creation is quite complex; therefore, we will divide this section into five respective subsections:
- General Settings
- Events
- Conditions
- Actions
- Notifications
General Settings
Here are the basic properties that manage rules execution:
- Rule Name - a logical name for a rule.
- Active - verifies whether the rule is active or not.
- Stop Further Rules Processing - If multiple rules are defined for the same event, this option can help control their execution (see below).
Events
Each Workflow rule shall be bound to an event. These are the following possible events:
- New ticket is created - this is triggered upon ticket creation, but before any reply (including initial) is added.
- New Reply from Customer - this is triggered when a new reply from a customer appears.
- New Reply from Staff - this is triggered when a new reply from a staff appears.
- New Reply from Third Party - this is triggered when a new reply from a third-party appears.
- Ticket Assigned to Staff - this is triggered when a ticket owner changes his or her ticket.
- Ticket Was Changed - this is triggered whenever any change is done to a ticket (added message, changed status or priority, or even changed custom field).
- Ticket Was Converted to RMA - this is triggered when a ticket is converted to RMA. This event can be used only when Mirasvit RMA extension is installed.
- Check Every Hour - this is triggered by our cron task. Make sure that the cron is enabled when using this event.
Conditions
Each rule can contain conditions that allow you to determine whether the rule can be applied to the tickets or not, as is listed below:
- Subject - the title on a ticket
- Last message body - the contents of the last public message left on a particular ticket
- Created at - the date a ticket was created
- Updated at - the date of a ticket's latest update (e. g. new message appeared, or properties changed)
- Store - this is the place the ticket was submitted into (note: this condition does not properly detect backend-created tickets, as they can be bound to any store. If you wish to detect backend creation, you need to use the Ticket Source condition in addition).
- Priority (before change) - a priority which a particular ticket has before the ending of the event (used only for Ticket was changed event)
- Priority - current ticket priority
- Status (before change) - the status of a particular ticket before the end of an event (used only for Ticket was changed eve
- Status - current ticket status
- Department (before change) - the department to which a particular ticket was assigned before the end of an event (used only for a Ticket was changed event)
- Department - current ticket department
- Owner (before change) - the person who held a particular ticket before an event ended (used only for a Ticket was changed event)
- Owner - current ticket owner
- Last Reply By - who gave the last reply on this ticket: Customer or Staff agent
- Last Reply Type - the type of message last left on the ticket. Can be of the following types (refer to How to Reply to a Ticket for more information):
- Public Reply
- Internal Note
- Message from Third Party
- Internal Message from Third Party
- Hours since Created - a period from the creation of a particular ticket (note: this condition is not precise, use equal or greater or equal or lesser comparators here)
- Hours since Updated - the period from the latest update of a particular ticket (note: this condition is not precise, use equal or greater or equal or lesser comparators here)
- Hours since the Last Reply - the period from when the last message appeared on a particular ticket (note: this condition is not precise, use equal or greater or equal or lesser comparators here)
- Tags - the tags associated with a particular ticket in the Additional tab of the Tags field.
- Ticket Source -the creation source of a ticket, which has four options: Email, Backend, Contact Tab , Contact Form and Customer Account.
If there is a custom field, it can also be used as a condition. Each field will be listed in two forms: a standard field value and "before changed," especially for Tickets, which has changed event-- e.g., if the field is Telephone, then conditions will be Telephone and Telephone (before change), respectively.
Conditions can be organized into groups using a mode selector, which appears as a separate condition Conditions Combination. It allows for the creation of very complex rule sets.
Actions
Each rule also contains actions that should be executed if a ticket has met its conditions. For now, supported are the following:
- Set Status - changes the status of the ticket applied.
- Set Priority - changes the priority of the ticket applied.
- Set Department - changes the department of the ticket applied.
- Set Owner - changes the owner of the ticket applied.
- Archive - moves the ticket to the archive.
- Add Tags - automatically allows for adding of tags upon the triggering of a rule.
- Remove Tags - automatically allows the removal of tags upon the triggering of a rule.
Notifications
This rule definition section allows for the creation of custom email notifications, which are sent upon the triggering of a rule.
To establish a custom notification, you can use the following options:
- Send email to ticket owner - notification should be sent to the current ticket assignees.
- Send email to all department users - notification should be sent to all users registered in the ticket's department.
- Send email to customer - notification is sent to the customer
- Send email to other email addresses - notifications are sent to a specified email address.
- Email Subject - the subject of the email notification.
- Email Body - the body of the email notification.
Note
Email Body shall contain only the message that should be sent as notification. A full template of such an email can be set at Help Desk MX -> Email Notification Settings -> Template of Rule Notification. Refer to the How to create a custom Notification Email section for more info. - Attach files previously attached to the last message - indicates whether the notification will include an attachment from the last reply to the ticket.
Satisfaction Widgets
Beginning from version 1.1.84, we have added two widgets:
- Helpdesk Satisfaction Block - this shows the current satisfaction rate. It allows you to set the URL to another page with the last 100 satisfaction reviews or other information.
- Helpdesk Satisfaction List - display last 100 satisfaction reviews
General Information
You can use API to attract customers and increase sales rate in your store. At this point, you can simultaneously use Help Desk MX from external tools that work on separate servers and use other programs, which includes the use of mobile applications. Using Help Desk MX a store can get a single point of handling all queries, emails, offline chat messages, and other contact sources.
To get the full list of available GraphQL APIs, check GraphQL Reference.
GraphQL Objects Reference
The full documentation on GraphQL is available on the Magento DevDocs page GraphQL Developer Guide
Prerequisites
Your store should have installed the module Help Desk MX. In order to begin using GraphQL in the Help Desk MX module it is mandatory to install Helpdesk GraphQl for Magento 2 module. It is not available separately, but it can be installed after the purchase of Help Desk MX.
After you have installed the module Helpdesk Graph Ql, open command line interface and go to the directory with your Magento setup. Run command composer require mirasvit/module-helpdesk-graph-ql and after it finishes activate Helpdesk Graph Ql module with
command bin/magento module:enable Mirasvit_HelpdeskGraphQl.
In the end run bin/magento setup:upgrade to avoid errors regarding the unavailability of the module's data.
Helpdesk GraphQl objects
Customer object
The Customer object is responsible for providing data on the tickets that include a specific customer.
The Customer object can contain the following attributes.
| Attribute | Data Type | Description |
|---|---|---|
mstHelpdeskTickets |
HelpdeskTickets | Displays the tickets of the chosen customer. On input requires customer or parameters "external_id" or "order_id" is required |
Mutation object
A mutation can create, update, or delete objects and fields. In REST terminology, queries operate like GET requests, while mutations are similar to POST, PUT, and DELETE.
A mutation contains the following elements:
- The keyword mutation
- An operation name for your local implementation. This name is required if you include variables. Otherwise, it is optional.
- The mutation name
- The input object or attributes. Most mutations require an input object that contains data or individual attributes for the Magento server to process. However, some mutations, such as createEmptyCart, do not require an input object.
- The output object, which specifies which data the mutation returns.
The Mutation object in this module can contain the following attributes.
| Attribute | Data Type | Description |
|---|---|---|
mstHelpdeskCreateTicket |
MstHelpdeskTicketInput | This attribute is used for creating ticket. The attribute in non-nullable. |
mstHelpdeskAddMessage |
MstHelpdeskMessageInput | Adds a message for created ticket. The attribute in non-nullable. |
HelpdeskTicketInput input object
Being an input type the HelpdeskTicketInput object can consist of fields that are a scalar, list or other input types.
The HelpdeskTicketInput object can contain the following attributes:
| Attribute | Data Type | Description |
|---|
subject | String | The subject of the ticket. The field is non-nullable.
message | String | The body message of the ticket. The field is non-nullable.
channel | HelpdeskTicketChannel object | Depicts the communication channel that was used for the ticket. The field is non-nullable.
telephone | String | Customer's phone number.
current_url | String | Depicts current URL to the ticket.
close_ticket | Boolean | Displays if the ticket is closed.
department_id | Int | Shows the ID of the department the ticket belongs to.
priority_id | Int | Displays the ticket priority level.
custom_fields | Array | Array of of HelpdeskCustomField input objects.
Attributes customer_name and customer_email each can have a description field that is used only for guest customer
HelpdeskTicketsFilterInput input object
This is another object of the HelpDesk MX module and it is used to filter out the tickets from the database. The HelpdeskTicketsFilterInput object can contain the following attributes:
| Attribute | Data Type | Description |
|---|---|---|
external_id |
String | Filters the list of tickets by specific External ID. |
order_id |
Int | Filters tickets by the Order ID. |
HelpdeskMessageInput input object
It contains the message that has to be sent by the Helpdesk service. The HelpdeskMessageInput object can contain the following attributes:
| Attribute | Data Type | Description |
|---|---|---|
customer_name |
String | This attribute is used only for guest customer. |
customer_email |
String | This attribute is used only for guest customer. |
message |
String | Message that has to be placed in the ticket. |
HelpdeskCustomFieldInput input object
The HelpdeskCustomFieldInput input object can contain the following fields regarding the
| Field | Data Type | Description |
|---|---|---|
code |
Srting | Shows the code ID of the custom field. The field in non-nullable |
value |
String | Contains the information of the custom field. |
HelpdeskTicketsOutput output object
It displays the general information on the list of tickets. The MstHelpdeskTicketsOutput object can contain the following attributes.
| Attribute | Data Type | Description |
|---|---|---|
items |
Array | Is the array of MstHelpdeskTicket objects. The field in non-nullable. |
total_count |
Int | Displays a number of total tickets in the output. |
page_info |
SearchResultPageInfo | Displays search results. |
HelpdeskStatus object
This object shows the curent status of the HelpDesk. The MstHelpdeskStatus contains data with the following attributes:
| Attribute | Data Type | Description |
|---|---|---|
status_id |
Int | ID of the HelpDesk current status. The field is non-nullable. |
name |
String | Displays the name of the status. The field is non-nullable. |
code |
String | Displays the code of the HelpDesk status. The field is non-nullable. |
color |
String | Depicts the color of the HelpDesk status. The field is non-nullable. |
HelpdeskDepartment object
This object is used to work with the HelpDesk department data. The MstHelpdeskDepartment contains data with the following attributes:
| Attribute | Data Type | Description |
|---|---|---|
department_id |
Int | ID of the HelpDesk department. The field is non-nullable. |
name |
String | Displays the name of the HelpDesk department. The field is non-nullable. |
HelpdeskPriority object
This object is used to work with the HelpDesk priority data. The MstHelpdeskPriority contains data with the following attributes:
| Attribute | Data Type | Description |
|---|---|---|
priority_id |
Int | ID of the HelpDesk priority level. The field is non-nullable. |
name |
String | Displays the name of the HelpDesk priority level. The field is non-nullable. |
color |
String | Shows the color coding of the HelpDesk priority level. The field is non-nullable. |
HelpdeskTicket object
This object is used to work with the ticket data. The MstHelpdeskTicket contains data with the following attributes:
| Attribute | Data Type | Description |
|---|---|---|
subject |
String | The text for the subject field of the ticket. The field is non-nullable. |
code |
String | Displays the code of the ticket type. The field is non-nullable. |
priority |
MstHelpdeskPriority | Shows the ticket priority level. |
status |
MstHelpdeskStatus | Depicts the current ticket status. |
department |
MstHelpdeskDepartment | Shows the data on the department the ticket is processed in. |
customer |
Customer | Shows the data on the customer. |
order |
Order | Shows the data on the order. |
messages |
MstHelpdeskMessages | Displays the list of messages created in the ticket. |
customFields |
Array of MstHelpdeskTicketCustomField | Displays the custom fields data of the ticket. |
HelpdeskMessages object
It is used to work with the ticket's messages data. The MstHelpdeskMessages contains data with the following attributes:
| Attribute | Data Type | Description |
|---|---|---|
items |
Array of MstHelpdeskMessage | Represents the messages of the ticket. The field is non-nullable. |
page_info |
SearchResultPageInfo | Displays the resulting page of the search. |
total_count |
Int | Depicts the total number of messages. |
HelpdeskMessage object
It is used to work with the message data fields. The MstHelpdeskMessage contains data with the following attributes:
| Attribute | Data Type | Description |
|---|---|---|
triggeredBy |
MstHelpdeskTriggeredBy | Represents who has triggered the message. The field is non-nullable. |
ownerName |
String | Shows the name of a person who triggered the message. The field is non-nullable. |
text |
String | represents a message content. The field is non-nullable. |
createdAt |
String | Depicts a date and time the message was created. The field is non-nullable. |
HelpdeskTicketCustomField object
It is used for the message's custom fields. The MstHelpdeskTicketCustomField contains data with the following attributes:
| Attribute | Data Type | Description |
|---|---|---|
name |
MstHelpdeskTriggeredBy | Represents a name for the custom field. The field is non-nullable. |
value |
String | Depicts the custom field content. |
HelpdeskCustomFieldsFilterInput object
It is used to filter the input type of custom fields. The MstHelpdeskCustomFieldsFilterInput contains data with the following attributes:
| Attribute | Data Type | Description |
|---|---|---|
is_visible_customer |
Boolean | Filters the customer visible fields. |
is_visible_contact_form |
Boolean | Filters the input contact form. |
HelpdeskCustomFieldsOutput object
It is used to output the custom fields. The MstHelpdeskCustomFieldsOutput contains data with the following attributes:
| Attribute | Data Type | Description |
|---|---|---|
items |
Array of MstHelpdeskCustomField | Represents the custom fields of the ticket The field is non-nullable. |
total_count |
Int | Depicts the total number of messages. |
page_info |
SearchResultPageInfo | Displays the resulting page of the search. |
HelpdeskCustomField object
Works with the custom fields of the ticket. The MstHelpdeskCustomField contains data with the following attributes:
| Attribute | Data Type | Description |
|---|---|---|
name |
String | Represents the name of the custom field. The field is non-nullable. |
code |
String | Stands for the code marking of the custom field. The field is non-nullable. |
type |
String | The type of the custom field data. The field is non-nullable. |
options |
Array of MstHelpdeskCustomFieldOption | Options of the custom field. |
description |
String | Description of the custom field. The field is non-nullable. |
is_required_customer |
Boolean | If the field requires customer actions. The field is non-nullable. |
is_visible_customer |
Boolean | If the field is customer visible. The field is non-nullable. |
is_editable_customer |
Boolean | If the field can be edited by customer. The field is non-nullable. |
is_visible_contact_form |
Boolean | If the field contains customer visible contact form. The field is non-nullable. |
HelpdeskCustomFieldOption object
Sets the options for the custom fields of the ticket. The MstHelpdeskCustomFieldOption contains data with the following attributes:
| Attribute | Data Type | Description |
|---|---|---|
value |
String | Represents the value of the custom field option. The field is non-nullable. |
label |
String | Stands for the label of the custom field option. The field is non-nullable. |
Managing Tickets
This section contains all you need to do to manage tickets from the backend (i.e. by acting as an Agent). There you will find the following topics addressed:
- Working with Tickets Grid
- How to Create New Ticket
- How to Reply to a Ticket
- How to Set Reminder for Ticket
- How to Use Additional Info of Ticket
- How to Set Satisfaction Survey to the Ticket
Working with Tickets Grid
The main part of the Help Desk MX extension is the Ticket Grid. It is located at Customers > Help Desk MX and contains a list of all tickets submitted by customers. It is also divided into three separate folders (by default all tickets are shown):
- Inbox - contains all active tickets (e.g. those which have not been sent to the archive).
- Archive - contains all archived tickets.
- SPAM - contains all tickets, marked as SPAM.
Normally, tickets are sent to a proper folder automatically by two checks:
- If a ticket's properties match one of Spam Patterns, then the ticket is sent to the SPAM folder;
- If a ticket's status is one that is defined in Help Desk MX -> Settings -> General Settings -> Move Ticket to Archive if it has one of the following statuses, it will be sent to Archive.
The same action can also be done manually or by using a **Workflow Rule.
Note
To force Ticket Grid display tickets from only one folder, make a field Folder visible in the Columns section of the grid, and then filter tickets by the Folder using the Filters section.Near the drop-down account menu (see screenshot below), the ticket counter is shown.
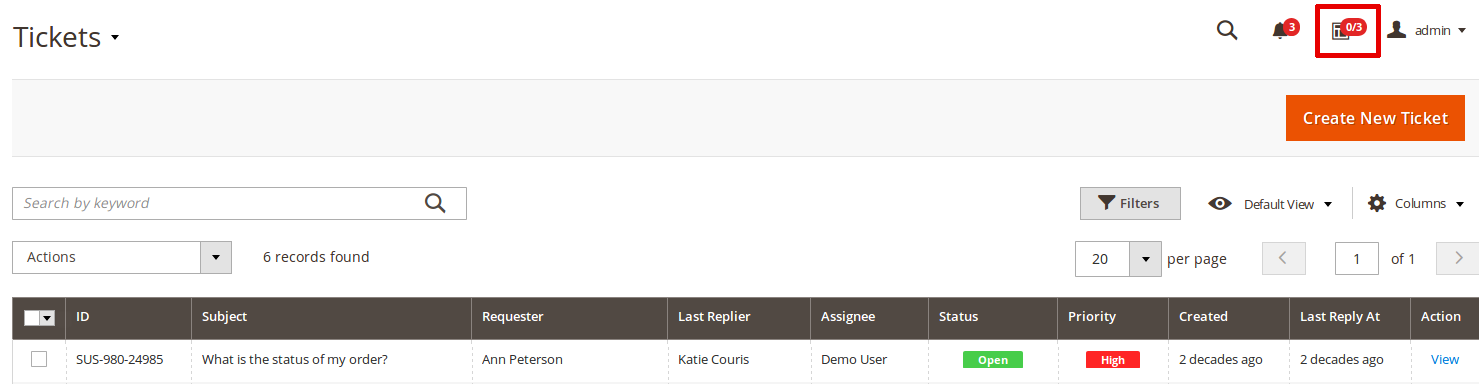
It consists of two values:
- Quantity of New tickets, located in the Inbox folder, but not linked to the assignee yet.
- Quantity of tickets, located in the Inbox, and assigned to a current staff agent.
Note
Both values displayed in the ticket counter do not rely on active filters. e.g. if the customer filters the tickets' grid, the value will still be calculated from the entire folder.The Ticket Grid also provides you with some practical actions.
- Standard Magento Grid actions such as filtering (using Filter section), altering columns display (using Columns section) and sorting tickets by columns;
- Search box allows you to search for tickets by its properties (mainly, Ticket ID, Subject, Messages or Tags);
- Mass actions that can be performed on selected tickets:
- Change Status. Statuses which are assigned here can be defined in the Statuses section.
- Change Assignee. Modify the current assignee of the ticket. Select a new owner from the dropdown list available after clicking the "Change Assignee" action.
- Mark as Spam. Moves tickets to the Spam Folder;
- Mark as Archive. Moves tickets to the Archive Folder;
- Mark as Inbox. Moves tickets to the Inbox Folder (e. g. restores ticket);
- Delete. Remove tickets.
Note
Administrators can restrict access to tickets and restrict some actions using permissions.How to Create New Tickets
- To create a new ticket from backend, go to the Customers > Help Desk MX. Press the button Create New Ticket. The ticket creation page contains three sections: General, Additional, Follow Up. Their fields will be covered below;
- For ticket creation purpose, you are required to fill in only the fields below - all others are non-mandatory:
- To - contains the email of the customer for whom the ticket is created. If that customer is registered, you can type his or her name in this field - and the email will be automatically selected;
- Subject - the subject of this ticket;
- Status - the initial status of this ticket. Statuses listed in this drop-down select can be defined in the Statuses section.
- Priority - initial priority, which this ticket should have. Priorities listed in this drop-down select can be defined in the Priorities section.
- Assignee - staff member that is in charge of this ticket. Members are defined in the System -> Permissions -> All Users section, but in order to appear, they should also be assigned to proper departments in the Departments sections.
- Initial reply at the stage of ticket creation is not required. However, you can still use the Reply Area to leave such a message. Refer to How to Reply to a Ticket for additional details.
- If some tags are marked on this ticket, jump to the Additional tab, and enter them in a comma-separated format in the Tags field.
- You can also set up a periodic reminder for this ticket by using the Follow Up tab. Refer to How to Set Reminder for Ticket subsection for more info.
- Save the ticket.
Note
If you have chosen not to leave the initial reply, only two events will be fired upon the ticket's creation - New ticket created and Ticket was changed.If you have chosen to leave the initial reply, then three events will be fired into the ticket's creation - New ticket created, Ticket was changed and New reply from staff.
Use these events wisely to properly create your Workflow Rules and automate workflow.
How to Reply to a Ticket
You can reply to a ticket by either using the Help Desk backend interface or by email, using a special notification which is sent to staff on each customer's reply.
Using Backend Interface.
When you open a particular ticket, you will see that the General tab is divided into two areas - the left-sided panel with To and Ticket Summary section, and the Reply Area, which contains the Public Reply section, which allows you to reply to the ticket.
There are four main options in replying:
- Public Reply - this is a standard reply of a staff member, visible both at the backend and frontend. Its content will be sent to the customer as an email notification.
- Internal Note - private notes will be visible only at the backend by the Help Desk agents. This option is used as an in-company communication.
- Message to Third Party - when this option is selected, an additional field appears - for a third-party email. It is useful in adding other actors such as the customer's developers to the tickets. The invited party will receive an email notification with some message contents. This reply will be visible at the frontend.
- Internal Message to Third Party - when this option is selected, an additional field for email appears, but this time, a reply will only be visible at the backend. This option is used for in-company communication.
If you have Quick Responses, you can use them in the Reply Area, using the Insert Quick Response drop-down menu.
Note
Quick Responses are store-dependent, so if you do not see some pre-defined Quick Responses in the drop-down menu, jump to the Additional tab and check the Store View field. It is a store view, from which ticket was placed (by default it is Default Store View).Then go to Help Desk MX -> Quick Responses, and select a record. The field Store View shall contain the same store view (or All Store Views).
Using Email Notification.
This type of reply is available only when you have configured one or more Email Gateways, and registered them in their Departments as a Sender Email. Then, to each customer (or a third party), a reply is added to the particular ticket; an email notification will come to an agent's mailbox.
Just answer that email, and a reply will come to the Gateway and be properly added to the ticket.
Note
If you use a custom Notification Template, make sure, that variable{{var ticket.getHiddenCodeHtml() | raw}} is present on your template. Otherwise, our fetch procedure will turn the reply into a separate ticket (it will think that this is a new ticket request).
Note
You can also reply to tickets using email, but make sure that your sending mailbox is not a Gateway. All emails originated from Gateway mailboxes will be skipped to avoid infinite cycles due to "conversations" between Gateways.How to Set A Reminder for Ticket
An agent can set an email reminder for him or herself (or other agents) and customers - if a ticket is not answered for a long time, the action will be executed along with the reminder.
To establish such a reminder, pick up a ticket, and proceed to the Follow Up tab. There, you will find the following properties which allow you to set up reminders easily:
- Period - Units of time, in which the reminder period is measured. Can be:
- In minutes;
- In hours;
- In days;
- In weeks;
- In months;
- Custom - these options are not used, but are added for customers who wish to modify this feature.
- Period Value - Quantity of the units of time, defined above.
- Send Reminder - Also sends a reminder email to a specified email. It is useful in enforcing the timetable of the ticket's response.
- Set Status To - Status, which will be assigned to the ticket upon triggering a reminder.
- Set Priority To - Priority, which will be assigned to the ticket upon triggering a reminder.
- Set Owner To - A staff member will be assigned to a ticket upon triggering a reminder.
Three last properties are extremely useful in building an effective policy for managing tickets. For example, using Follow-Up reminders, you can automatically pass long and unfinished tickets on to an expert. The possibility of assigning statuses and priorities allows you to bring the staff's attention to such tickets.
How to Use Additional Info of Ticket
Each ticket also contains useful info that can be used for different kinds of analytics. It is located in the Additional tab, and consists of the following properties:
- Subject - Precise subject of the initial message, that started this ticket (or email, if it was converted from it).
- Store View - Displays the store's view or views where this ticket was created.
- Channel - Assigned automatically during ticket creation. It contains a description of how a ticket has been created. There are four possible ways of creating a ticket:
- Email - from the message, via Gateways.
- Feedback Tab - from Contact Tab, displayed at the left or right side of the frontend page, and governed by the Help Desk MX -> Settings -> Feedback Tab section.
- Contact Form - from our general Contact Us form, which is overridden by our extension, and typically located at
http://store.com/contact/. - Backend - from Tickets Grid, or additional tab at Order Edit Page.
- External Link - Contains link, which is sent in email notifications, and can be sent to the third parties to access a ticket message thread.
- Tags - Tags of the current ticket. Unlike other properties, they can be set here using a comma-separated format. This feature is extremely useful in ticket reviewing as it controls their workflow.
- Ticket History - Displays log of all changes to the ticket and assignees in charge.
How to Set Satisfaction Survey to the Ticket
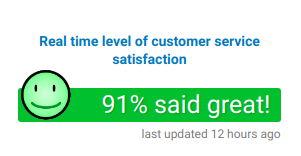
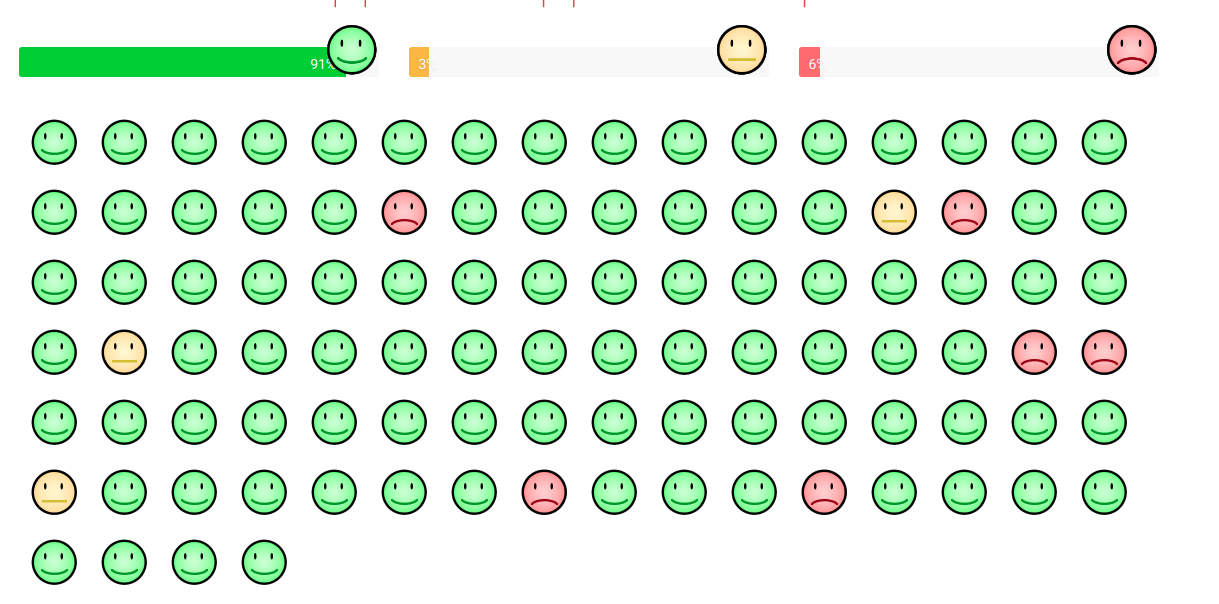
Help Desk MX includes a satisfaction survey in the tickets, which is extremely useful in measuring a level of support and staff productivity.
This survey appends a special block containing a simple form that allows customers to rate each staff reply to all email notifications. There are three possible remarks:
- Awesome;
- Just OK;
- Not good
When a customer selects one, he or she is transferred via a corresponding link to the form, where he or she can write detailed feedback.
This feedback can later be seen at Customers > Help Desk MX > Satisfaction Survey Results, with the possibility of per-staff and per-customer filtering.
You can enable this feature at Store > Configuration > Help Desk > Customer Satisfaction Survey, and control the display of its results:
- Include a satisfaction survey in the reply email from staff members - This adds a satisfaction survey to each customer's email notification.
- Show survey results at the backend ticket history - allows agents to see satisfaction rates and replies at the backend Ticket Edit page.
- Send survey results to the ticket owner - triggers a notification email to the ticket's owner when a new satisfaction rate is added.
- Send survey results to emails - triggers additional notifications on adding satisfaction rate. This option is useful in informing the higher-level staff about maintaining statistics.
- Show survey results in the frontend ticket history - in each ticket created by the customer, it shows the satisfaction rating the customer gave for the support replies.
Building Email Notifications Policy
This section describes how Email Notifications are being used and fitted to suit your needs. It consists of the following subsections:
- Help Desk Templates
- Customizing email notifications template
- Adding variables to custom Notification Emails
- Signing messages with a custom signature
- Disabling a Notification Email
- Examples of custom Notification Email
Help Desk Templates
Help Desk MX allows the sending of emails with different types of notifications to the customer and support team. Here is a list of all of our templates, along with its associated actions:
- New Ticket Email for Customer - sent when a ticket is created, with a basic confirmation message.
- New Ticket Email to Staff - sent when a ticket is created, and a summary is made for it.
- Ticket Email, Assigned to Staff - sent whenever a ticket is assigned or re-assigned to a particular agent. It also contains a summary.
- New Message Email for Customer - sent whenever a new message from staff or a third party is added to the ticket.
- New Message Email for Staff - sent whenever a new message from a customer or third-party is added to the ticket
- New Message Email for Third-Party - sent whenever a new message from a customer or staff is added to the ticket to a third-party user (or a customer) who has been added to the conversation.
- Template of Ticket Reminder - sent when a reminder is set for a particular ticket.
- Template of Rule Notification - sent when a Workflow Rule is configured to send notifications. This template acts as a wrapper to a message from the rule.
- Template of Survey Satisfaction Result - sent when the customer has left a response to satisfaction survey.
These templates cover virtually any action which can take place while working with customers.
Customizing email notifications template
All Email Notification Templates from the Help Desk are regular transactional emails - e. g. they can be customized using default Magento 2 means.
To customize the Help Desk MX email template, you need to perform the following, according to the steps enlisted below:
- Go to Marketing > Communications > Email Templates
- Press the button Add New Template
- Pick up a template in the dropdown that you would like to customize. They begin with Helpdesk prefix - Helpdesk - Customer - New Message, for example.
- Press the button Load Template
- Enter the new Template Name (e.g. My Helpdesk - Customer - New Message)
- Change Template Subject and Template Content if necessary
- Press the button Save Template
- Go to Store > Configuration > Help Desk > Email Notification Settings. Select your new template in the dropdown list of necessary notifications. Save the configuration.
In email templates, you can use the following variables:
{{var customer.name}}- customer name{{var customer.email}}- customer email{{var ticket.code}}- ticket code{{var ticket.name}}- ticket subject{{var ticket.department}}- name of ticket department{{var ticket.status}}- name of ticket status{{var ticket.priority}}- name of ticket priority{{var ticket.getCreatedAtFormated($format)}}- date ticket was created{{var ticket.getUpdatedAtFormated($format)}}- date ticket was updated{{var ticket.getLastMessageHtmlText()}}- current ticket's message (in HTML format){{block class='Mirasvit\\Helpdesk\\Block\\Email\\History' area='frontend' template='Mirasvit_Helpdesk::email/history.phtml' ticket=$ticket}}- block with ticket history{{var ticket.getExternalUrl() }}- external ticket's URL{{var store.getFrontendName()}}- name of your store{{var user.firstname}}- first name of ticket owner{{var user.lastname}}- last name of ticket owner{{var user.email}}- email of ticket owner{{var department.name}}- name of ticket's department
Note $format can only be of one of these types: "none", "full", "long", "medium", "short", "traditional", "gregorian". For more information, please check https://www.php.net/manual/en/class.intldateformatter.php#intl.intldateformatter-constants
Custom fields can also be used as variables through their codes, which are prefixed with "f_" prefix. If you have a custom field with the code "test_field", the proper email variable should be "{{var ticket.f_test_field}}". For custom fields of type "Drop-down list", the variable "{{var ticket.f_test_field_label}}" displays a label for the selected value.
Adding variables to custom Notification Emails
Help Desk notifications also support standard Magento Email Template variables, such as {{var logo_alt}}, and supports function calling, like {{var store.getFrontendName()}}, and adds a set of its own variables.
{{var customer}}- allows access to customer properties;{{var ticket}}- allows access to ticket properties, including custom fields (see below).{{var department}}- allows access to department properties.
The most usable properties are:
{{var customer.getName()}}- Name of current customer-
{{var customer.getEmail()}}- Email of current customer {{var department.getName()}}- Name of department to which current ticket was assigned-
{{var department.getSenderEmail()}}- Sender email, used as the fieldFromin notificators {{var ticket.getCode()}}- Code of current ticket, e. g. YVB-459-53185.{{var ticket.getName()}}- Subject of current ticket.{{var ticket.getCustomerEmail()}}- Email of current customer.{{var ticket.getCustomerName()}}- Full name of current customer.{{var ticket.getLastReplyName()}}- Full name of customer or staff member who last replied to the current ticket.{{var ticket.getFrontendLastReplyName()}}- Name of the author to the last reply as it is displayed at the frontend (depending from option Store > Configuration > Help Desk -> General Settings -> Sign staff replies){{var ticket.getChannel()}}- Name of the channel that created the ticket - e.g. 'email', 'backend' or 'feedback_tab'.{{var ticket.getExternalUrl()}}- Frontend URL of current ticket.{{var ticket.getBackendUrl()}}- Backend URL of current ticket. The variable works correctly if the "Stores > Configuration > ADVANCED > Admin > Security > Add Secret Key to URLs" option is disabled.{{var ticket.getLastMessagePlainText()}}- Contents of last message posted.{{var ticket.getUserName()}}- Full name of current ticket owner.{{var ticket.getOrder()}}- Returns Order object to which current ticket was binded. It provides access to all order's properties (see example below, note that these properties can be used within {{depend}} tag).
Example
Assume that you have to get the order number, to which the current ticket is binded. This requires the following code:{{depend ticket.getOrder()}}
{{var ticket.getOrder().getIncrementId()}}
{{/depend}}Also, if there is a custom field, it can be used as an email variable. Each custom field has a code. Assume that we have created a field with the custom_reason code. Then the corresponding email variable is:
{{var ticket.getCustomReason()}}- Email of the current customer.
Signing messages with a custom signature
Our extension allows agents to have their signatures automatically added at the end of each response to the ticket. To add a signature, perform the following steps:
- Go to System -> All Users grid, and pick up a record for a particular agent.
- In the Help Desk additional tab, enter the signature to the field Signature for Emails (you can use HTML code, if need be).
- Save user record to apply the signature.
From that moment, each notification sent by that agent will be signed with the entered text.
Disabling a Notification Email
To disable a Notification Email, you need to go to the Store > Configuration > Help Desk > Email Notification Settings. In the dropdown list of notifications, select the option Disable these emails. Then save the configuration to apply changes.
Examples of custom Notification Email
All custom Notification Emails in Help Desk are created using Workflow Rules.
To add a separate notification to the email flow, you need to set the conditions that should trigger emails to customers' properly, and add a message to the Email Subject and Email Body in Notifications tab. Here are a few real-life examples, which will help you create your custom notifications.
-
Notify Staff of Change of Ownership
Event:
Ticket assigned to staff
Conditions:None
Notifications: Send email to ticket owner:Yes -
Notify a customer about ticket closing, if the customer has not answered for 30 days
Event:
Check every hour
Conditions:
Hours since Last reply is 720
Status is not Closed
Notifications: Send email to customer:Yes -
Notify if a ticket has not been answered within three days
Event:
Check every hour
Conditions:
Hours since Last reply greater then 72
Status is Waiting for Customer
Notifications: Send email to customer:Yes
Working Hours
This feature allows you to set a timetable for your store. It is displayed on the Contact Us page in the form of a working hours table.
The Contact Us popup will display only the current status message (open/closed - as defined in particular Schedule).
How to Create Schedule for Working Hours
To create a new schedule, go to the Customers > Help Desk MX > Working Hours backend page. Press the button Add New Schedule. You will see the following settings:
- Title - the name on the schedule.
- Working Hours - days of the week and hours for the shedule to be applied.
- Is Active - whether it is active and should be shown as active.
- Active From - the date when the schedule will be active.
- Active To - the date when the schedule stops being active.
- Stores - sets store view or views where this schedule will apply
- Sort Order - sorting order for a grid display.
- Is Holiday - whether it is a timetable for holidays
- Timezone - in which time zone the scheduled time should be displayed (makes hours adjust respectively to the time zone).
- Open message - message to be displayed when the store is open.
- Closed message - message to be displayed when the store is closed.
Reports
Reports are used in monitoring the statistics of tickets' flow and support quality.
They are divided into two separate menu actions:
- Refresh Statistics which is used to keep statistics up-to-date, and concentrate data for display.
- Reports which is used in visualizing data.
These actions can be selected from the menu drop-down in the Customers -> Help Desk MX section.
Reports contain the following metrics:
- New tickets
- Changed tickets
- Solved tickets
- 1st Reply Time (in hours)
- Total Responses
The statistics of tickets' flow and support quality
- If you have not gathered statistics recently, go to Customers -> Help Desk MX and select Refresh Statistics. It will force data gathering, after which you will be redirected to the Reports page that has been updated with current data;
- Press the button on the top bar to show a chart concerning the following parameters:
- Hour of Day - shows a current day statistics;
- Day - shows daily statistics;
- Week - shows weekly statistics;
- Month - shows monthly statistics.
- Year - shows yearly statistics.
- User Name - shows statistics per staff member.
- Reports will be automatically refreshed
Workflow Rules Examples
-
Automatically assigns a ticket to sales staff members only if the tickets have 'Order' as the subject
Selects a department and a staff member, who will be responsible for the basic Order questions - say, Jane Doe from the Sales department.
Event:
New ticket created
Conditions:Subject contains Order
Actions:- Set Department ->
Sales - Set Owner ->
Jane Doe
- Set Department ->
-
Automatically assigns a ticket, created from email, to a certain department
Event:
New ticket created
Conditions:Ticket Source (Channel) is Email
Actions:- Set Department:
Support
- Set Department:
-
Automatically sets a ticket's status to 'In Progress' after the first reply of a support team member
Event:
New Reply from Staff
Conditions:None
Actions:- Set Status:
In Progress
- Set Status:
-
Creates a custom manager notification when the tag "Problem" is added to the ticket
Event:
Ticket was changed
Conditions:Tags contains Problem
Actions:
NoneNotifications:
- Send email to other email address:
[email protected] - Email subject ->
'A problem ticket arrived' - Email body ->
(your notification message)
-
Change priority to High when it has not been answered for three days
Event:
Check every hour
Conditions:Hours since the Last reply is greater than 72Last Reply Type is the Last Reply of the CustomerActions:- Set Priority:
High
Known Issues
This section describes the most common problems that customers report and how they can be resolved:
- Can not submit ticket. Error with Pelago\Emogrifier->addStyleElementToDocument
- Help Desk suddenly stopped fetching emails
- When I save a gateway, I see the error message 'Authentication failed for user..'
- IMAP has limited support or is completely disabled at the shell level
- Quick Responses contain weird javascript code
- Email replies do not bind to their tickets and are fetched as new tickets.
- Our staff replies, sent via email, do not appear in tickets.
- I have upgraded my extension, and have received a Fatal Error in one of the Mirasvit_Ddeboer_Imap classes
Can not submit ticket. Error with Pelago\Emogrifier->addStyleElementToDocument
If you see an error message like "Fatal error: Uncaught Error: Call on a member function appendChild() on null in ../emogrifier/src/Emogrifier.php:1419", please run the following command composer require pelago/emogrifier:2.0.0.
Help Desk has suddenly stopped fetching emails
There are several possible reasons why the fetch stopped:
-
IMAP fetch capacity limit
IMAP Protocol has a limited time window in fetching an email collection. When your mailbox contains over 2048 emails, the fetching collection becomes too long, and IMAP returns an empty collection. Our extension, therefore, thinks that there are no new emails and exits.
- How to confirm this reason: Go to Customers -> Help Desk MX -> Gateways, select a proper Gateway, and press the Debug button at its edit page. It will display the current number of emails. If it is above 2048, the reason will be confirmed.
- How to resolve:
- Remove all unnecessary emails. This way, the fetched collection size will be reduced, and the fetch will work properly.
- Create a Folder or Label in a mailbox, and force a fetch from there. Please enter the name of the created Folder or Label in the Folder field of Gateway, and this will force our extension to fetch emails only from there. It will also reduce the size of the fetched collection.
-
Incorrect Email Format
Some emails can come in a special format, such as a non-standard encoding (Chinese Unicode, for example) or non-standard origin (Telnet, for example). Not all of them can be parsed since they are not standard. But they can block subsequent emails' fetch since a parse error stops the fetching cron task.
- How to confirm this reason: Go to Customers -> Help Desk MX -> Gateways, select the proper Gateway, and press the Debug button in the edit page. It will display the current number of emails. If it's below 2048 and one of the last emails is unread, the reason will automatically be confirmed.
- How to resolve: Log in to your mailbox separately, and force that message read. Our extension will skip it and then proceed with others. Note: There can be other incorrect emails, so you might need to read several such emails forcefully.
-
Third-Party Tool or Extension Conflict
Our extension requires a monopoly in the mailbox, which is registered as Gateway. It fetches unread emails and marks them as read - so they will not be fetched next time. If you use a third-party tool which also uses the same mailbox, it can also mark emails as read, and our extension will skip them.
- How to confirm this reason: Go to Customers -> Help Desk MX -> Gateways, select the proper Gateway and press the Debug button edit page. It will display the current number of emails. If it is below 2048, the last emails will be marked as read, but if they are not converted to tickets or messages, the reason will be confirmed.
- How to resolve: Prevent your third-party extension from marking emails as read, or stop using it entirely.
Note
There is a rare case when two different stores on different servers (both with Help Desk installed) use the same database. In this case, emails will be fetched only by one store, and the Help Desk, on the other hand, will skip all emails.To resolve this case, you need to create two different Gateways for each store.
-
Latest fetch was incomplete due to the issue with the server
The reason why the emails weren't fetched may be that probably the latest fetch was incomplete due to the issue with the server(may be due to the upgrade process etc) and the fetch process was locked. To check if fetching works, you can run the following command to fetch emails manually:
bin/magento mirasvit:helpdesk:runIf the process is locked you should only delete the helpdesk.lock file and fetch emails again. The file is created with each cron run, so the file is always on the server, you should remove the file only if there is an issue with fetching.
When I save a gateway, I see the error message 'Authentication failed for user..'
This error indicates that the extension could not connect to the mailbox. Possible causes are:
-
You use two-factor authentication in your mailbox
In this case, you need to create a separate password for the helpdesk and use it when you configure the gateway.
-
IMAP is disabled for your mailbox
Please, contact your mailbox provider and ask them to email IMAP.
IMAP has limited support or is completely disabled at the shell level
This issue is reported by our Email Fetching module and can be seen at Customers > Help Desk MX > Gateways, where the error "Can't fetch" appears.
You can also run the following test: Open your shell console and run the following command: php -m | grep imap. If you see an empty result, then IMAP is not enabled, and you need to enable it.
The cause of this issue is that PHP has two configurations. One for Apache (or other servers), the other for shell where the php-imap extension should work. Our extension fetches emails at shell level (via cron tasks) to use only php shell.
Solution:
Contact your hosting provider and ask to enable php-imap for PHP at the shell level.
Quick Responses contain weird javascript code
Example:
/* <![CDATA[ */!function(){try{var t="currentScript"in document?document.currentScript:function(){for(var t=document.getElementsByTagName("script"),e=t.length;e--;)if(t[e].getAttribute("cf-hash"))return t[e]}();if(t&&t.previousSibling){var e,r,n,i,c=t.previousSibling,a=c.getAttribute("data-cfemail");if(a){for(e="",r=parseInt(a.substr(0,2),16),n=2;a.length-n;n+=2)i=parseInt(a.substr(n,2),16)^r,e+=String.fromCharCode(i);e=document.createTextNode(e),c.parentNode.replaceChild(e,c)}}}catch(u){}}();/* ]]> */, OKD-384-58649, AntioxiBoost, AntioxiBoost, Administrator, [email protected]
/* <![CDATA[ */!function(){try{var t="currentScript"in document?document.currentScript:function(){for(var t=document.getElementsByTagName("script"),e=t.length;e--;)if(t[e].getAttribute("cf-hash"))return t[e]}();if(t&&t.previousSibling){var e,r,n,i,c=t.previousSibling,a=c.getAttribute("data-cfemail");if(a){for(e="",r=parseInt(a.substr(0,2),16),n=2;a.length-n;n+=2)i=parseInt(a.substr(n,2),16)^r,e+=String.fromCharCode(i);e=document.createTextNode(e),c.parentNode.replaceChild(e,c)}}}catch(u){}}();/* ]]> */
This script is used by the CloudFlare Email Protection cloud service, which masks 'on-the-fly' email addresses by placing a special script after them.
Solution:
- Turn off the CloudFlare Email Protection service, or
- Go to Customers > Help Desk MX > Quick Responses and adjust the Quick Response content so that it does not contain free email addresses or variables translated to them.
Email replies do not bind to their tickets and are fetched as new tickets.
Possible causes:
-
Variable {{var ticket.getHiddenCodeHtml()}} is missing on the email template
This issue can appear when a special variable {{var ticket.getHiddenCodeHtml()}} is missing in the email template. Also, it can be caused by some filter or spam protection means of your email provider.
Solution 1
- Go to Store > Configuration > Help Desk MX -> Email Notification Settings and check the name of the particular template
- If a custom template is selected, go to System -> Transaction Emails and edit that template. Put the variable {{var ticket.getHiddenCodeHtml()}} in the appropriate place and save.
- If the standard template is selected, check templates at the app/locale/[YOUR_LOCALE]/template/email/mst_helpdesk/ directory. Put it back {{var ticket.getHiddenCodeHtml()}} to the appropriate template and save it.
- Purge ALL your cache.
Solution 2
- Go to Store > Configuration > Help Desk MX -> Email Notification Settings and set the Show Ticket ID in the email title option to Yes
-
Email service removes hidden ticket code
This issue can appear when the email service (Office360, for example), which cleans all additional email attributes, is used as either a sender or a gateway. This means that the ticket code is stripped from the email, and the customer's answer cannot be bound to the proper ticket.
Solution:
- Go to Store > Configuration > Help Desk MX -> Email Notification Settings and set the option Show Ticket ID in the email title to "Yes".
Our staff replies, sent via email, do not appear in tickets.
Please, check your sender emails: if they are also registered as Gateways, these replies are skipped because our extension treats them as auto-notifications.
Moreover, all emails that originate from Gateway mailboxes will be skipped to avoid an infinite cycle due to "conversations" between Gateways.
Solution:
Remove all mailboxes that are used as sender emails from Gateways or provide your staff with separate mailboxes.
I have upgraded my extension and have received a Fatal Error in one of the Mirasvit_Ddeboer_Imap classes
Please, check the full error message. It should look like one of these examples (or similar):
PHP Fatal error: Call to undefined method Mirasvit_Ddeboer_Imap_Message::getErrors() in /.../app/code/local/Mirasvit/Helpdesk/Helper/Fetch.php on line 299 Fatal error: Uncaught Error: Class 'Mirasvit_Ddeboer_Imap_Server' not found in /.../app/code/Mirasvit/Helpdesk/Helper/Fetch.php:83Causes: during upgrade or installation, not all of the required files of our extension were copied.
Solutions:
- If you're using M2.1 and have installed our extension manually, make sure that the folder
lib/Mirasvitfrom the installation package was correctly installed tolib/internalsubdirectory into your Magento store root. - If you're using M2.2, then perform the update via composer - it should restore all dependencies.
How-To
This section describes the most frequently asked tasks with a detailed description, on how to do it:
- Adding Help Desk Widget to Custom Forms
- Disabling staff switching on staff response to the ticket
- Help Desk integration with chat
- How to customize the email template
Adding Help Desk Widget to Custom Forms
You can insert the help desk contact form to the CMS page as a Magento widget.
To do this, please take the following steps:
- Open the CMS page at the backend.
- In the WYSIWYG editor, click on the Insert Widget icon.
- Select Help Desk Contact Form from the dropdown list.
- Press the Insert widget button.
Disabling staff switching on staff response to the ticket
It is our extension's default behavior, so we do not recommend changing it unless you need it to be changed.
If you have decided to go through with changing, nevertheless, do the following steps:
- Open the module
/vendor/mirasvit/module-helpdesk/src/Helpdesk/Model/Ticket.phpand find the functionaddMessage. - Comment on all the expressions of
$this->setUserId($user->getId());type. - Clean the Magento cache and regenerate a static content to enable changes to apply.
Help Desk integration with chat
The module works with the different chats that send offline messages. You only need to send the offline messages to the email that is configured as a Gateway
How to customize the email template
To change the email template of the Helpdesk, you need to do the following steps:
- Go to the Marketing > Email Templates.
- Press the button Add New Template.
- In the dropdown list, select the template that you would like to customize. The current extension templates are placed at the Mirasvit_Helpdesk header.
- Press the button Load Template.
- Enter the new Template Name (e.g. Email notification for Customer).
- Change Template Subject and Template Content as you need, and save the template.
- Go to the Sales > Helpdesk > Settings > Email Notification Settings. Select your new template in the dropdown list of necessary notifications. Save configuration.
Migration from Magento 1 to Magento 2
Below are examples of scripts that can be used in transferring data from Mirasvit Help Desk MX for Magento 1 to Mirasvit Help Desk MX for Magento 2. To use these scripts, you need the help of a PHP developer. The scripts may contain bugs which may not transfer all necessary data. Therefore, you may need to change them to meet your needs. Migration service is not a part of our support service, so if you need our team's help, you will need to buy a migration service.
Click on the names of scripts below to download:
mirasvit_helpdesk_m1_export.php- script for exporting Help Desk data to XML file.mirasvit_helpdesk_m2_import.php- script for importing Help Desk data from XML file.freshdesk_migration.php- script for importing Freshdesk json data.
How to perform Migration
Follow these steps to correctly perform the migration:
- Run a standard Magento 2 migration, and make sure that your customers and their orders were transferred from your M1 store to M2;
- Ensure that Help Desk MX for Magento 2 is installed on your M2 store.
- Place
mirasvit_helpdesk_m1_export.phpat the root of your M1 store, and run it either:- From your browser by opening URL
http://store_m1.com/mirasvit_helpdesk_m1_export.php, or - From the SSH/Console: navigate to your store's root and run the command
php -f mirasvit_helpdesk_m1_export.php
- From your browser by opening URL
- If the script returns successfully, the file
helpdesk_export.xmlwill be created at the store's root with all your data. Transfer it to the root of your M2 store; - Place
mirasvit_helpdesk_m2_import.phpat the root of your M2 store, and run it either:- From browser by opening URL
http://store_m1.com/mirasvit_helpdesk_m2_import.php, or - From SSH/Console: navigate to your store's root and run the command
php -f mirasvit_helpdesk_m2_import.php
- From browser by opening URL
- Check the migrated data.
- When the migration is completed, remove both migration scripts.
Migration from Freshdesk to Mirasvit Helpdesk Magento 2
- Place the import tickets.json file to the root folder of your store.
- Read comments at the beginning of the script and do the required changes for your store.
- Place
mirasvit_helpdesk_m2_import.phpto the root of your M2 store, and run it either:- From browser by opening URL
http://store_m1.com/freshdesk_migration.php, or - From SSH/Console: navigate to your store's root and run the command
php -f freshdesk_migration.php
- From browser by opening URL
- Check the migrated data.
- When the migration is completed, remove both migration scripts.
Troubleshooting
In some cases, imported scripts can crash at the stage of a timeout or memory overloading errors (due to a large quantity of data). In this case, all you have to do is restart the import script by reloading the browser page. It will skip the previously uploaded data and proceed to the last unprocessed record.
How to upgrade the extension
To upgrade the extension, follow the next steps:
- Back up your store's database and web directory.
- Log in to your server's SSH console and navigate to the root directory of the Magento 2 store.
-
Run the command
composer require mirasvit/module-helpdesk:* --update-with-dependenciesto update the current extension with all dependencies.Note
If you have the Hyva theme, run:composer require mirasvit/module-helpdesk:* hyva-themes/magento2-mirasvit-helpdesk:* --update-with-dependenciesNote
In some cases, the above command is not applicable, or you cannot update just the current module, and need to upgrade all the Mirasvit modules in a bundle. In this case, the above command will have no effect.
Instead, run the commandcomposer update mirasvit/*. It will update all the Mirasvit modules installed in your store.
- Run the command
php -f bin/magento setup:upgradeto install the updates. - Run the command
php -f bin/magento cache:cleanto clean the cache. -
Deploy the static view files
rm -rf pub/static/*; rm -rf var/view_preprocessed/*; php -f bin/magento setup:static-content:deploy
Disabling the Extension
Temporarily Disable
To temporarily disable the extension, please take the following steps:
- Log in to the SSH console on your server and navigate to the Magento 2 store's root directory.
- Run the command
php -f bin/magento module:disable Mirasvit_Helpdeskto disable the extension.Note
If you have the Hyva theme, run:php -f bin/magento module:disable -f Mirasvit_Helpdesk Hyva_MirasvitHelpdesk - Log in to the Magento backend and refresh the store cache (if enabled).
Extension Removal
To uninstall the extension, please follow these steps:
- Log in to the SSH console on your server and navigate to the Magento 2 store's root directory.
-
Run the command
composer remove mirasvit/module-helpdeskto remove the extension.Note
If you have the Hyva theme, run:composer remove mirasvit/module-helpdesk hyva-themes/magento2-mirasvit-helpdesk - Log in to the Magento backend and refresh the store cache (if enabled).
1.3.13
(2025-06-17)
Fixed
- Csp compatibility in admin panel for desktop notification
1.3.12
(2025-06-03)
Improvements
- Improve WCAG 2.2 AA compliance
Fixed
- Broken styles in Safari on admin ticket view page
1.3.11
(2025-05-21)
Fixed
- Ticket with a file attached from email is not assigned to an admin user
1.3.10
(2025-05-06)
Fixed
- Attachment not sent in the email
1.3.9
(2025-04-03)
Improvements
- Compatibility with php 8.4
1.3.8
(2025-04-03)
Fixed
- Auto-generated emails are converted into tickets
- Search in KB returns non-relevant result
- Recaptcha does not work in Helpdesk widget for m242
1.3.7
(2025-03-14)
Fixed
- Mark auto-submitted emails as processed
1.3.6
(2025-03-04)
Fixed
- Incorrect imageindex in the images preview array
- Changed Contact Us styles
1.3.5
(2025-02-27)
Fixed
- Passing null to parameter of type string is deprecated for emails with empty subject
- Ticket fetched from the email are not parsed correctly
1.3.4
(2025-02-18)
Improvements
- Attachment image preview
1.3.3
(2025-02-10)
Fixed
- ticket_template is not defined in when send ticket email
- Refused to execute inline script because it violates CSP
1.3.1
(2025-02-04)
Fixed
- Added email variable is_message_internal
Improvements
- Added doc links to the admin menu pages
1.3.0
(2025-01-22)
Improvements
- Clear outdated tables data by cron
- Configuration refactoring
Fixed
- Quotes replaced with HTML code in the ticket messages
- Message is cut when emojies are added from the admin to the ticket message
1.2.48
(2025-01-09)
Fixed
- Undefined property: Mirasvit\Helpdesk\Block\Email\Satisfaction::$escapeUrl
1.2.47
(2025-01-08)
Fixed
- Tags displayed in order label in customer account
1.2.46
(2025-01-06)
Fixed
- Email text cut after emoji in Outlook email
1.2.45
(2024-12-12)
Fixed
- Removed deprecated column "Status Sort Order" from admin ticket grid
- Deprecated functionality passing null to parameter 1 in Helpdesk History
- Non-existent attachment is aaded to user notify email
- Display Order Frontend Status Label in tickets
1.2.44
(2024-11-13)
Fixed
- Column user_id in where clause is ambiguous in ticket activity in admin ticket grid
1.2.43
(2024-11-06)
Improvements
- Ability to attach several attachments in a bulk
Fixed
- Orders related to different websites are loaded in ticket customr section if customer is registered on different websites with same email
- Admin ticket grid sorting column does not work on fulltext search
- Last public reply does not added to the ticket history if the current reply type is internal
- "Mail was sent" column is removed from the ticket grid due to possible performance
1.2.42
(2024-10-17)
Fixed
- Recaptcha compatibility with 2.4.3-p3
- Outlook Mac emails parsed incorrectly
1.2.41
(2024-10-07)
Fixed
- Messages sent from outlook are not formatted
- Order links for no order tickets in admin grid
- Email text cut if emoji is added to the email from outlook
- Wrong Department name on ticket view page on in customer account if admin is assigned to several storeview departments
- Contact form name field validation
1.2.40
(2024-08-15)
Fixed
- Deprecated Functionality: explode(): Passing null to parameter #2 of type string is deprecated
1.2.39
(2024-07-31)
Fixed
- Registry key is_ticked_created already exists
1.2.38
(2024-07-26)
Fixed
- reCaptcha does not work in Hyva
1.2.37
(2024-07-23)
Improvements
- Added indexes to the helpdesk report tables
- Added "Order" column to the ticket grid in the admin panel
- Added cronjob & console command to remove old desktop notifications
Fixed
- Removed legasy DOMSubtreeModified event type
- Fallback to JQueryUI Compat activated. Your store is missing a dependency for a jQueryUI widget
- Desktop Notifications about new ticket arrival sent messages about new message arrival
1.2.36
(2024-06-20)
Fixed
- Argument #1 ($array) must be of type array, string given in TicketDistributionDataBlock
1.2.35
(2024-06-13)
Fixed
- Admin ticket grid search performance
1.2.34
(2024-05-30)
Fixed
- Offline chat messages does not converted to tickets
1.2.33
(2024-05-24)
Improvements
- Helpdesk widget GoogleRecaptcha compatibility
Fixed
- Prevent undelivered message autoresponce loop
- Dots were not allowed in the contact us form
- Google ReCaptcha did not validate contact forms
1.2.32
(2024-02-12)
Fixed
- Interface "Zend\Stdlib\JsonSerializable" not found
1.2.30
(2023-12-13)
Fixed
- Show Helpdesk Gatway error message on each page load in the backend & Added message "Authentication failed" for the Gateways
1.2.29
(2023-12-12)
Fixed
- Emails redirected to the Gateway from Outlook are not fetched
Improvements
- Added "Remote Ip" column to the Satisfaction grid in the admin panel
1.2.28
(2023-12-04)
Fixed
- Failed to parse time string in Activity.php
1.2.27
(2023-12-01)
Fixed
- Activity Data Bar displaying is bound to the timezone
- Exclude users not assigned to the Helpdesk Departments from Activity Data Bar
1.2.26
(2023-11-23)
Fixed
- Prevent infinity cycles for the Auto-Submitted emails
1.2.25
(2023-11-06)
Fixed
- Don't show [user_name] in email confirmation of newly created ticket
1.2.24
(2023-11-01)
Fixed
- Creation of dynamic property Mirasvit_Ddeboer_Imap_Message_Attachment::$description is deprecated
- Guest orders was not assigned to the ticket if the customer is registered in the store
Improvements
- Added User Activity bar to the ticket grid in the admin panel
1.2.23
(2023-09-26)
Fixed
- Helpdesk wrapper notification count rewrite magento wrapper notification counter
1.2.22
(2023-08-28)
Improvements
- Added option to auto-remove old ticket attachments
Fixed
- Incorrect use of label for=FORM_ELEMENT in contact form
- Wrong third-party email is set to the message if the last fetched "third party" email differs from the penultimate
- Incorrectly parced links if first level domain contains more than three symbols
1.2.21
(2023-06-29)
Improvements
- Parce URLs in ticket message posts to avoid adding excessive symbols like dot/comma/etc to the end of the urls and broke the url
- Compatibility with Magento246 SMTP
- Added script to migrate tickets data from Freshdesk
Fixed
- Deprecated Functionality: stripos(): Passing null to parameter #1 in module-price-permissions when create rule
1.2.20
(2023-05-19)
Improvements
- Show first and last ticket messages in preview in the admin ticket grid
Fixed
- Rule notification sent email to Cc when customer should not be notified
1.2.19
(2023-04-20)
Fixed
- Added third-party email to display for third-party message on the ticket view page in admin
- Store-view Status & Priority names in email notification
- Third party email is not saved if the customer replies not from the email he was emailed to
- Deprecated functionality: htmlspecialchars() passing null to parameter #1 in Helper/StringUtil.php
- Save empty value in admin config multiselect fields
1.2.18
(2023-02-21)
Fixed
- Remove non-char symbols from the end of the urls in email messages
- Deprecated functionality passing null to parameter in geoip_time_zone_by_country_and_region Timezone.php
- Column in where clause is ambiguous when filter by department or priority in admin ticket grid
- Empty Satisfaction email notification
1.2.17
(2023-02-10)
Fixed
- Rates and history blocks are not added to notification email template
1.2.16
(2023-02-08)
Fixed
- Warning: Attempt to read property "Mailbox" on bool
- Store-view Department name in email notification
- Attachment is not fetched due to specialchars in attribute name
1.2.15
(2023-02-01)
Fixed
- Removed auto-reply header from error headers to avoid ignoring emails fetching, due to outlook & Gmail adding it to the regular emails
- Added Microsoft Ips to block auto satisfation rates
Improvements
- Compatibility with M2.4.6
1.2.14
(2023-01-23)
Fixed
- Deprecated Functionality: explode(): Passing null to parameter
- Deprecated functionality passing null to parameter in geoip_time_zone_by_country_and_region Timezone.php
- Failed to parse time string when save working hours for EU locales, for active_from, active_to fields
- Shorter name for 'Add Ticket ti the Order' button on the admin order view page
- Shorter button name for the customer edit admin page
- Call to a member function getAddress() on array Helpdesk/Helper/Fetch.php
- Added new option "sender template"
1.2.13
(2022-11-21)
Fixed
- Notice: Undefined index: created_at in the ticket grid for nonexistent messsages
- Parse attachment
- record.isQuickView is not a function in the ticket grid in admin
- Quick Responces did not work in wysiwyg in m2.4.5
1.2.12
(2022-10-28)
Fixed
- As of Magento 2.4.4 info & critical methods are added instead of addInfo & addCritical
- Fatal "Allowed memory size" for quick-view message in the tickets grid in the admin
- Allowed memory limit when delete ticket with thousands of messages
1.2.10
(2022-10-06)
Fixed
- Cc & Bcc email addresses weren't validated if added more than one address
- Deprecated Functionality: IntlDateFormatter::parse(): Passing null to parameter #1
1.2.9
(2022-09-12)
Fixed
- Email validation
- strpos() Passing null to parameter #1
1.2.8
(2022-08-23)
Fixed
- Quickbar filters now show only Inbox tickets
- Status and priority are set from Workflow Rules if set in the ticket manually in the admin
- If there is a great number of the non-archived tickets admin panel returns error 500 due to the toolbar collection limit
1.2.7
(2022-08-10)
Fixed
- Notification icon shows for users without permissions.
- Compatibility with Magento 2.4.5
1.2.6
(2022-08-02)
Fixed
- php8 compatibility quick response
1.2.5
(2022-08-01)
Fixed
- php8 compatibility quick response
1.2.4
(2022-07-24)
Fixed
- php8 compatibility issues
- Department, Priority, Status names are not added in the email notification
Improvements
- Added option to enable/disable quickDataBar
1.2.3
(2022-07-21)
Fixed
- Required checkbox is not validated for the new tickets
- Segoe UI Emoji are fetched as questionmarks
- Passing null to parameter #2 () when access Gateway Debug
1.2.2
(2022-07-04)
Improvements
- Added quickbar
Fixed
- Forwarded email messages fetched empty
1.2.1
(2022-06-20)
Improvements
- Remove db_schema_whitelist.json
- Added option 'Add customers Cc emails to the ticket'
- Added headers
1.2.0
(2022-05-24)
Improvements
- Migrate to declarative schema
- Added email variables in the user signature
1.1.158
(2022-05-17)
Improvements
- update mirasvit/module-report dependency
1.1.157
(2022-04-18)
Improvements
- PHP8 compatibility
Fixed
- Helpdesk user signature unset when user logged in the backend
1.1.156
(2022-02-07)
Improvements
- Integration with Magento 2 Custom Form Builder
Fixed
- Workflow rule event 'new reply from staff' doesn't work for internal messages to third party
- Schedule status block is loaded when it disabled from admin
1.1.155
(2022-01-19)
Improvements
- Added option to set statuses which lock ticket
Fixed
- Empty spam tickets created from the feedback tab
1.1.154
(2021-11-23)
Fixed
- Unable to add bmp & xlsx attachment to the tickets
- Added button 'Create New Ticket' to the ticket admin form
1.1.153
(2021-07-27)
Fixed
- Duplicate entry ON DUPLICATE KEY UPDATE in report
1.1.151
(2021-07-19)
Fixed
- Unable to add csv attachment to the tickets
- Integrity constraint violation in reports
- Message parser
1.1.149
(2021-05-31)
Fixed
- Hours not displayed according to server locale in reports
- Helpdesk does not ignore auto response emails
- Made customer Email insensitive in customer_summary in the admin view ticket
- Emoji and inline images parsing
1.1.148
(2021-03-01)
Fixed
- Sender name in department is required field
- Priority is not displayed in the ticket summary on the frontend->ticket view
- Added option Settings->Customer Satisfaction Survey->Show survey results in the frontend ticket history
- Added Max file size for uploading to the ticket create form and to the Contact Us page
- Changed filter for dates in the ticket grid according to the locale format
- Search of the customer by name(instead of the email) in the new ticket make the ticket unassigned to customer
Improvements
- Added customer name to the tickets with Guest orders
1.1.147
(2021-01-26)
Fixed
- Cannot add or update a child row priority_id when customer adds a message or if message is fetched from email if priority is deleted
1.1.146
(2021-01-21)
Fixed
- Issue when values in the workflow rules condition overwrite on save
- Internal notes are sent to Cc if the admin adds an internal message to the ticket that is assigned to another admin
1.1.145
(2021-01-15)
Fixed
- Conditions are not saved in Workflow Rules if they contain selection from the Custom field dropdown
- Broken headers in the emails and backslashes appearing due to unresolved symbols
- Added Arabian translation file
1.1.144
(2020-12-15)
Fixed
- Error "Uncaught Error: Call to a member function getName() on null in Helpdesk/Helper/History.php"
- Satisfaction rate rounding
- Saving of the FollowUp email addresses
1.1.142
(2020-12-07)
Fixed
- Cron error (mailAddress) is not a valid hostname for the email address for the FollowUp addresses with added spaces
- Workflow rules don't work when customer replies(VariableObject->getData on boolean)
- Added full version of polish translation
1.1.141
(2020-11-11)
Fixed
- Recaptcha m2.4.1
- Call to a member function isThirdPartyPublic() on boolean
- Migrating custom email templates
1.1.140
(2020-10-30)
Fixed
- Third party email added as Public after the previous public email reply
Improvements
- Added support of composer 2.0
1.1.139
(2020-10-20)
Fixed
- Parsing ebay members emails
- Selection of customer's orders on the frontend
- Column 'created_at' & 'user_id' in where clause is ambiguous Satisfaction grid filters
- Satisfaction rate IDs Bad and Great are mixed up in the reports and displayed vise versa
- Unstable quick response text appearing when option 'Use WYSIWYG Editor in backend' is active
1.1.138
(2020-09-30)
Fixed
- Styles for backend MaxFileSize
- Misspellings
1.1.137
(2020-09-09)
Improvements
- Added ability to rate ticket messages on the ticket view page
Fixed
- Added maximum allowed size attachment for ticket edit form
- Validation of the custom fields required for admin
1.1.136
(2020-09-03)
Improvements
- Added Quick Response suggestions
1.1.135
(2020-09-02)
Fixed
- Fixed Fatal error: Allowed memory size for the next/Previous buttons collection loading
- Replace See all tickets link to the top of the tickets list in dropdown
- Fixed the password is lost while saving gateway
- Email notification is sent to Cc with internal message to third party
1.1.134
(2020-08-13)
Fixed
- JS error when js template variables used in the text
Improvements
- Added filter for Last Replier field in the backend ticket grid
1.1.133
(2020-07-29)
Improvements
- Support of Magento 2.4
1.1.132
(2020-07-23)
Fixed
- Search filtered mass action issue
- User name displaying in customer account with option Sign staff replies Using Department Names
1.1.131
(2020-07-06)
Fixed
- Assign ticket to guest order
- Autofill of customer and email in contact us widget
- Definition of the last message for the internal note
- Timezone conversion for the field "Execute At" of "Follow Up"
- Sending of internal message for the 3rd party email
- Issue when field "Execute At" of "Follow Up" updated on ticket save
- Using regular expressions in the spam patterns
1.1.130
(2020-05-27)
Fixed
- Insert quick responce content at the current caret position in WYSIWYG
1.1.129
(2020-05-15)
Fixed
- Display of signature with styles
- Logging of follow up changes
- Follow up email sending
1.1.128
(2020-05-14)
Fixed
- Added index to the message_id fild in the attachment table
- Error "DateInterval::__construct(): Unknown or bad format (PD)" in working hours
- Added permission denied exeption for the user who is not assigned to any department
- Issue when administrator user is removed from department during user update data
- ReCaptcha for Helpdesk widget
- Styles for Thunderbird Mail
- Definition of the last message for variable var ticket.getLastMessageHtmlText()|raw
1.1.127
(2020-04-15)
Fixed
- Error "You cannot proceed with such operation, your reCaptcha reputation is too low." on satisfaction page
- Parsing of inline attachments
- Field description in the Feedback tab
1.1.126
(2020-03-27)
Fixed
- Display of message about success ticket creation in Contact Us form
- Tickets assigning to the current user during the ticket creation
- Issue "Help Desk MX popup not closing when background is clicked"
1.1.125
(2020-03-19)
Fixed
- Styles for tickets grid in customer account
- Remove emoji parsing for "quoted-printable" emails.
Improvement
- Added field to create customer note
- Moved user signature from email to message
1.1.123
(2020-03-10)
Fixed
- Error "Type Error occurred when creating object: MSP\ReCaptcha\Model\Provider\Failure\ObserverRedirectFailure"
1.1.122
(2020-02-26)
Fixed
- Display of custom field when option "Show in create ticket form" disabled
1.1.119
(2020-02-25)
Fixed
- Validation messages on contact us page
- Parsing of attachments (affects from 1.1.118)
Improvement
- Allowed to use string names of date formats in the email variables var ticket.getCreatedAtFormated($format) and var ticket.getUpdatedAtFormated($format)
1.1.118
(2020-02-18)
Fixed
- Parsing of emails with emoji (remove emoji)
- Error "PHP Fatal error: Uncaught Error: Call to a member function getFieldByCode() on null Mirasvit/Helpdesk/Controller/Adminhtml/Field/Save.php"
Improvement
- Added console commands:
- mirasvit:helpdesk:is-locked - Show is helpdesk job locked
- mirasvit:helpdesk:unlock - Force to unlock helpdesk job https://3.basecamp.com/4292992/buckets/14246559/todos/2353803811
1.1.117
(2020-02-11)
Fixed
- Display of helpdesk feedback tab on product page for m2.3.4
- Error "PHP Fatal error: Uncaught Error: Call to a member function getSenderNameOrEmail() on null in Helpdesk/Helper/History.php"
- Translation of email subject
- Field "Reply To" contains wrong data
- Draft errors on the backend ticket edit page
1.1.115
(2020-01-17)
Fixed
- Wrong order assigning to the ticket (from email subject)
- Sending emails to bcc and cc in m2.3.3
- Regular expression for parse order ID from email subject
1.1.113
(2019-12-24)
Fixed
- Sending of emails for customers with non-ASCII chars in the Department name
- Compatibility with the Knowledge Base extension (since version 1.1.112)
1.1.112
(2019-12-13)
Fixed
- Issue "Unable to assign order to guest customer"
- Change logging of ticket history
1.1.111
(2019-12-05)
Fixed
- Label for the ticket tab "Other Tickets" for m2.3.3
- Multi emails in "Send survey results to emails" for m2.3.3
- Dates for tickets and messages in migration process
Improvement
- Added option "Enable Google reCaptcha" and captcha to popup form
- Show customer local time
1.1.110
(2019-11-28)
Fixed
- Sending of workflow rules' emails for m2.3.3
- Sending of emails for customers with non-ASCII chars in the name
- Duplication of attachments for multi emails sending
- Report by user
- Error message for incorrect pattern
1.1.109
(2019-11-19)
Fixed
- Issue with parsing of attachments (since 1.1.108)
Improvement
- Allow rule events for tickets from archive
1.1.108
(2019-11-11)
Fixed
- Attachment sending in 2.3.3
- Remove email's line breaks from text part of the email
- Saving history for ticket mass-actions
1.1.107
(2019-11-07)
Fixed
- Error "Call to a member function getDepartmentIds() on null in Helpdesk/Model/ResourceModel/DesktopNotification/Collection.php"
1.1.106
(2019-10-22)
Fixed
- Order loading message on ticket pages
1.1.105
(2019-10-17)
Improvement
- Improve the way of orders loading on ticket pages
1.1.103
(2019-10-11)
Fixed
- minor fixes
1.1.102
(2019-10-01)
Fixed
- Compatibility with Magento 2.3.2-p1
1.1.101
(2019-09-06)
Fixed
- Minor changes
1.1.100
(2019-09-06)
Fixed
- Warning: file_get_contents No such file or directory
Improvement
- Added translation
- Added exception for deleted FS files
Features
- Attachments can be disabled
1.1.99
(2019-08-23)
Improvement
- added spam filters for contact us form
1.1.98
(2019-08-13)
Fixed
- Parsing of internal 3rd party messages
- Error "Unknown column 'main_table.id' in 'where clause' ..." in tickets grid on backend customer edit page
1.1.97
(2019-08-12)
Fixed
- Search results for storeviews in feedback tab
1.1.96
(2019-07-31)
Fixed
- Parsing of internal 3rd party messages
- Redirect on backend main page during message saving
- Paging for search results in backend tickets grid
- PHP Fatal error: Uncaught Error: Call to a member function isThirdPartyPublic() on boolean in Mirasvit/Helpdesk/Helper/Process.php
- Mobile styles for Helpdesk popup
1.1.95
(2019-07-15)
Fixed
- Display of errors in backend
- Issue when source link of the page does not submitted
1.1.94
(2019-07-10)
Fixed
- Address grid does not show in backend on customer edit page
- Allowing autofill the third party email input
- Issue when quick response does not insert in WYSIWYG Editor
- Display of errors in backend
- Parsing of internal 3rd party messages
1.1.93
(2019-06-12)
Fixed
- Compatibility with MSP_ReCaptcha
1.1.92
(2019-06-05)
Fixed
- Encryption for gateways passwords
1.1.91
(2019-06-04)
Fixed
- Translation in emails
- Encoding in attachments
1.1.89
(2019-05-14)
Fixed
- Display of two calendars for custom field of "date" type
- Issue when Feedback form overrides with cache
1.1.88
(2019-05-13)
Fixed
- ... Call to undefined method Mirasvit_Ddeboer_Imap_Message::getIsProcessed() in ... (v1.1.87 only)
1.1.87
(2019-05-06)
Fixed
- Sender name for m2.3.0
- Sending attachement error for m2.2.8
- Save unparsed emails
1.1.86
(2019-04-19)
Fixed
- compatibility with Ebizmarts_Mandrill for m2.3.1
- Warning: Division by zero in ... /Helpdesk/Block/Widget/Satisfaction.php
1.1.84
(2019-03-15)
Fixed
- Migration scripts
Improvement
- Added Satisfaction Widgets
1.1.83
(2019-03-07)
Fixed
- Helpdesk email sender
1.1.82
(2019-02-28)
Fixed
- Error when email has unsupported date format
- Empty "Auto-assign tickets to department" field raises error
- Error "The store that was requested wasn't found."
- Error "draftTicketId is not defined"
- Incorrect displaying of ticket history tags in email
1.1.80
(2019-01-24)
Fixed
- Notice: Undefined variable: fromEmail (v1.1.79 only)
1.1.79
(2019-01-23)
Fixed
- Issue with emogrifier
- Wysiwyg didn't work in M2.3
- Show correct email sender name in messages
1.1.78
(2019-01-09)
Fixed
- Added dependency for pelago/emogrefier. Fixed: Uncaught Error: Call to a member function appendChild() on null in..
1.1.77
(2018-11-30)
Fixed
- Error "Helpdesk email permission denied ..."
1.1.76
(2018-11-29)
Fixed
- Compatibility with Magento 2.3.0
- Error "error: error in [unknown object].fireEvent(): eventname: tinymceBeforeSetContent error message: content.gsub is not a function"
1.1.74
(2018-11-19)
Improvement
- Now unparseable tickets will log to file var/log/mirasvit/helpdesk_fatal.log
1.1.73
(2018-11-16)
Fixed
- Links in message contain unnecessary & nbsp; char
- Error "Notice: Undefined offset: 21 in Helpdesk/Helper/Field.php"
1.1.71
(2018-11-15)
Fixed
- Links in message contain unnecessary & nbsp; char
Features
- Added option that allows to log ticket deletion
1.1.70
(2018-11-01)
Fixed
- Remove Illegal chars from email messages
- Files with extension in uppercase are not allowed
- Custom fields do not filter by store
1.1.69
(2018-09-28)
Features
- Quick View
1.1.68
(2018-09-26)
Fixed
- Hide inactive users from department list
- Undefined property: stdClass::$host in ...
- Compatibility with php5
1.1.67
(2018-09-07)
Improvements
- Added variable to emails that allows to display labels of "Drop-down list" fields
- Added option "Force store's theme to apply styles"
1.1.66
(2018-08-23)
Fixed
- Error: Script error for: calendar
1.1.65
(2018-08-21)
Fixed
- Contact form submit several times
1.1.64
(2018-08-16)
Fixed
- Compilation error
- Contact form submit several times
1.1.63
(2018-07-13)
Fixed
- Permissions do not applies to admin ticket grid
1.1.62
(2018-07-13)
Fixed
- Permissions do not applies to admin ticket grid
- Issue when customer is logged out on Magento EE after customer updates information from frontend
- Assignee massaction operation
1.1.61
(2018-07-04)
Fixed
- Notice: iconv(): Detected an illegal character in input string
- Centering of search results
- Issue when removed department still uses in settings
1.1.60
(2018-05-22)
Fixed
- Translation
- Duplicated styles
1.1.59
(2018-05-08)
Fixed
- Compatibility with Swissup_AddressFieldManager
Improvements
- Added ability to assign order to guest's ticket
- Added ability to set custom text on "Contact Us" page and "Feedback" tab
- Styles for close button. Fixed "Exclude file" option
1.1.58
(2018-04-13)
Fixed
- Compatibility with Swissup_AddressFieldManager
1.1.57
(2018-04-03)
Fixed
- Issue when user can create several custom fields with the same code
- Excluded ticket view page from cache
- Issue when user can create several custom fields with the same code
Improvements
- Added 'Third party' condition to 'Last Reply Type' condition
1.1.56
(2018-03-28)
Fixed
- Displaying of custom fields
1.1.55
(2018-03-26)
Fixed
- Displaying of Contact Us popup form when KB is enabled
- Knowledge Base autocomplete submit contact form
- Issue when user assign department to ticket it reset to current user's department
1.1.54
(2018-03-16)
Security
- Solved possible XSS issue in some cases
1.1.53
(2018-03-13)
Fixed
- Possible error during installation "SQLSTATE[42S22]: Column not found: 1054 Unknown column 'mst_helpdesk_rule.row_id' in 'field list', query was: SELECT MAX(row_id)"
- Unable to close ticket using External Link
1.1.52
(2018-03-01)
Fixed
- Wrong url for ticket view page for multistore
1.1.51
(2018-02-21)
Fixed
- In some cases there is an error during emails fetch Notice: Undefined property: stdClass::$host in ... Imap/Message/Headers.php
- Global ticket search does not work with extended symbols
Improvements
- Added ability to hide Help Desk link in customer menu
1.1.50
(2018-02-14)
Improvements
- Added ability to merge tickets
Fixed
- On Contact Us page with Smartwave Porto theme contact us form displays incorrectly
- Translation for Working Hours
- Fixed issue with redirect to /helpdesk/ticket/getopen/ in some customized cases
- After migration from Magento 2.0, 2.1 to 2.2+ there is an error in workflow rules 'Unable to unserialize value.'
- Fixed issue with plain text
<br>in history messages
1.1.49
(2018-01-31)
Fixed
- Tickets created via Gateways are using the wrong storeview while sending notification about the new ticket creation
- When cache is enabled feedback tab requires Name an Email for logged in customers
- When customer has turned on autoresponse, emails are going in sending loop
- If ticket's Cc or Bcc fields contain gateway emails emails are going in sending loop
- Order statuses are not translatable on the Create Ticket page
Improvements
- Added period filter to reports
- New message event for Issue Watcher & Notification module
Fixed
- Tickets created via Gateways are using the wrong storeview while sending notification about the new ticket creation
- When cache is enable feedback tab requires Name an Email for logged in customers
- When customer has an autoresponse on emails are going in sending loop
- If ticket's Cc or Bcc fileds contain gateway emails emails are going in sending loop
- Order statuses not translating on ticket create page
Improvements
- Added period filter to reports
1.1.48
(2018-01-02)
Fixed
- In Magento 2.2.2, if extension is installed via files upload, helpdesk can't fetch emails and there is error
PHP Fatal error: Uncaught Error: Class 'Mirasvit_Ddeboer_Imap_Server' not found
1.1.46
(2017-10-25)
Fixed
- Amount of customer open tickets
1.1.45
(2017-10-24)
Fixed
- User signature
- Ticket creation for multistore
1.1.44
(2017-10-02)
Fixed
- Small bugs
1.1.43
(2017-09-27)
Improvements
- Improved Tickets Grid
- Added Mass Action to allow Mass Change of Ticket Assignee
- Added to Workflow Rules conditions Last Reply Message Type, Customer Email and Customer Name
Fixed
- Resolved incorrect email fetch issue
- Compatibility with Magento 2.2.0
1.1.41
(2017-09-18)
Improvements
- Added "Change Status" to massactions in backend in ticket grid
Fixed
- Solved XSS issue
1.1.40
(2017-09-14)
Fixed
- Updating amount of ticket in customer menu
1.1.39
(2017-09-05)
Improvements
- Added new condition "Ticket Source (Channel)" to Workflow Rules
Fixed
- Compatibility with Magento 2.2.0rc
1.1.37
(2017-08-30)
Improvements
- Added ability to block files by extension
1.1.36
(2017-08-29)
Fixed
- Variables for email templates
1.1.35
(2017-08-08)
Improvements
- Documentation
- UI in backend
1.1.34
(2017-07-05)
Fixed
- Notification when another admin user is viewing a ticket
Improvements
- Added event "Ticket was converted to RMA"
1.1.33
(2017-04-25)
Fixed
- Satisfaction rate urls
- Compatibility of UI components for Magento 2.0.x
1.1.31
(2017-03-30)
Fixed
- Compatibility with dashboard widgets
- Ability to delete reserved statuses
Features
- Integration with RMA
1.1.30
(2017-03-10)
Fixed
- Compatibility with Firefox browser
1.1.29
(2017-03-07)
Features
- Created migration scripts from HDMX M1 to HDMX M2
Fixed
- Added magento encryptor for gateways passwords
1.1.28
(2017-02-24)
Fixed
- Reports issue
1.1.27
(2017-02-20)
Improvements
- Added tickets tab to admin customer account page
Fixed
- Wrong url for attaches stored in DB
1.1.26
(2017-02-08)
Fixed
- Contact form widget
1.1.25
(2017-02-06)
- Add Knowledge base integration to the contact form
1.1.24
(2017-02-03)
Improvements
- Integration with Knowledge base
- Reports
1.1.23
(2017-01-31)
Improvements
- Added previous/next button to ticket edit form
Fixed
- Option "Show the Help Desk section in the Customer Account"
1.1.22
(2017-01-30)
Improvements
- Added ability to assign ticket to order
- Added tickets autosave period
1.1.21
(2017-01-23)
Fixed
- Admin ticket grid (affects only 1.1.20)
1.1.20
(2017-01-17)
Fixed
- Filters in admin ticket grid
1.1.19
(2017-01-13)
Improvements
- Added mass actions for ticket's grid to move tickets to archive or spam
- Added "Use WYSIWYG Editor" option
1.1.18
(2017-01-11)
Fixed
- Fixed an issue with sorting in the tickets grid in backend
1.1.17
(2017-01-10)
Fixed
- Subject is not displayed in the tickets grid (affects only 1.1.16)
1.1.16
(2016-12-22)
Improvements
- Added email's send date to ticket
1.1.15
(2016-12-08)
Fixed
- Issue when email fetch fail due to imap errors
1.1.14
(2016-11-29)
Fixed
- Debug messages for cron
1.1.12
(2016-10-31)
Fixed
- Issue with Magento bug
- Fixed layout issue (store credit conflict)
Improvements
- Added translation files
1.1.11
(2016-09-07)
Fixed
- Fixed wrong ticket urls when option "Add Store Code to Urls" enabled
1.1.9
(2016-06-29)
Improvements
- Support Magento 2.1.0
Fixed
- Fixed translation generation
1.1.8
(2016-06-24)
Improvements
- Support Magento 2.1.0
1.1.7
(2016-06-22)
Fixed
- Issue with contact form widget
1.1.6
(2016-06-10)
Fixed
- Issue with customer satisfaction block in emails
- Exception "Missed phrase" on run i18n:collect-phrases
1.1.5
(2016-05-27)
Improvements
- Added store column to admin grids
- Increased default notification check period
- Improved ticket answers' parser
1.1.4
(2016-04-30)
Improvements
- Ticket Notifications: added ability to change the check period
Fixed
- Fixed cache issue on the contacts page
1.1.3
(2016-04-26)
Improvements
- Working schedule. Improved backend styles
1.1.2
(2016-04-21)
Features
- Added working status block in the Customer account > My Tickets
- Working schedule. Added additional columns to backend grid
Fixed
- Working schedule status: incorrect time estimation in some cases
Improvements
- Improved working schedule status rounding hours
1.1.1
(2016-04-20)
Improvements
- Improved css
- Added showing of schedule closed days
- Made schedule titles configurable
- Vertical position of popup
Fixed
- Fixed timezones issue
1.1.0
(2016-04-11)
New Features
- Ability to setup working schedule
Improvements
- Improved styles for "Contact Us" form
- Compatibility with 3rd party module Magecomp Recaptcha
- Add validation of patterns before save in backend
- Links in emails
- Improve JQuery load for feedback tab
- Improved styles for Contact Us form
- Improved styles for "Contact Us" form
- Compatibility with 3rd party module Magecomp Recaptcha
- Compatibility with Proto theme
- Add validation of patterns before save in backend
- Links in emails
- Improve JQuery load for feedback tab
- Improved styles for Contact Us form
Fixed
- Issue with menu
- Fixed an issue with "Contact Us" button position
- Styles compatibility with Porto theme
- Incorrect sort order in some cases
- Fixed an issue with contant button possiton (for some stores)
- Fixed PHP7 compatibility issue
- Fixed an issue with wrong relation between role tables
1.0.13
(2016-03-14)
Improvements
- Compatibility with Proto theme
- Add validation of patterns before save in backend
Fixed
- Colors of labels in the frontend
- Emails created by workflow rules dont use html tags correctly
- Missing field in workflow rules
1.0.12
(2016-03-07)
Improvements
- Links in emails
- Improve JQuery load for feedback tab
Fixed
- Styles compatibility with Porto theme
- Fixed PHP7 compatibility issue
- Fixed an issue with wrong relation between role tables
1.0.11
(2016-03-02)
Improvements
- Improved styles for Contact Us form
Fixed
- Incorrect sort order in some cases
- Fixed an issue with contact button position (for some stores)
1.0.10
(2016-03-02)
Fixed
- Fixed PHP7 compatibility issue
1.0.9
(2016-03-01)
Fixed
- Fixed an issue with wrong relation between role tables
Improvements
- Improved popup position on mobile devices
1.0.8
(2016-02-25)
Improvements
- Add email preview preheaders
- Improve history of ticket in backend
- Ability to include attachments in mails
Fixed
- In some cases fatal error on all pages of store
- Fixed an issue with wrong priority at ticket view page
- Remove attached files when we remove a ticket
1.0.7
(2016-02-15)
Improvements
- Improve history of ticket in backend
- Ability to include attachments in mails
- Improved emails styles and layout
Fixed
- In some cases fatal error on all pages of store
- Fixed an issue with wrong priority at ticket view page
- Fixed an issue with loggin cron job errors (on fetch)
- Fixed an issue with wrong location of lib folder
- Fixed an issue with IMAP extension validation when save gateway
- Fixed an issue with workflow rules
- Fixed an issue with change Save
- Removed field is_internal
- HDMX2-24 - field order is not required in the customer account
- HDMX2-26 - Fixed error Invalid template file: 'page/js/calendar.phtml'
- Fixed an issue with switching label colors on priority/status edit/grid pages
- Fixed style issue with gateway password field
- Adjusted css styles