How to configure template
This guide explains how to configure SEO templates. Templates help automate and optimize meta descriptions, titles, and other SEO elements across multiple pages, improving search engine rankings and user engagement. It ensures consistency, reduces manual work, and allows for dynamic content generation using variables. This enhances visibility, boosts CTR, and drives more organic traffic to the store.
To create the template navigate to Marketing -> Advanced SEO Suite -> Templates and click Add template button.
1. Define mandatory information
Specify a clear internal name to easily identify the template among others with the Internal name configuration. Then, choose what kind of pages the template will apply to in Type dropdown. Next, define which store views the template will affect with Store view configuration. Click Save and continue edit button to display type-related configurations.
Type of template can't be changed after saving. Displayed configurations may vary depending on the Type selected. Refer to template manager page to know about configurations used.
2. Activate template and define meta information
Enable the template with the Is active slider (otherwise, results of its work will not be applied). Set the required Sort order that regulates priority of application of the template. Next, specify Meta title, Meta keywords, Meta description, and Title(H1). You may use variables for these fields which is important to dynamically generate content based on predefined parameters, making SEO more efficient.
3. Configure description
If Type of the template is Categories, Layered Navigation, Products or Brand define SEO description that plays a key role in optimizing an online store, improving page visibility in search engines, and increasing CTR. Set the SEO description position on the page and the other type-related description settings if required (Category description for categories and layered navigation, Short description and Full description for products and Brand description for brands).
4. Specify the scope of affected pages if necessary
Select the exact pages for which the template will be applied to with the Conditions builder. Otherwise, the template will be applied to all pages selected in Type configuration.
5. If required, adjust additional settings
For Categories, Layered Navigation and Products you may select whether to apply the template to child categories and whether to stop more prior templates from being applied. For CMS pages you may choose whether to apply the template to the homepage, and for Brand you may choose whether to apply the template to the All brands page.
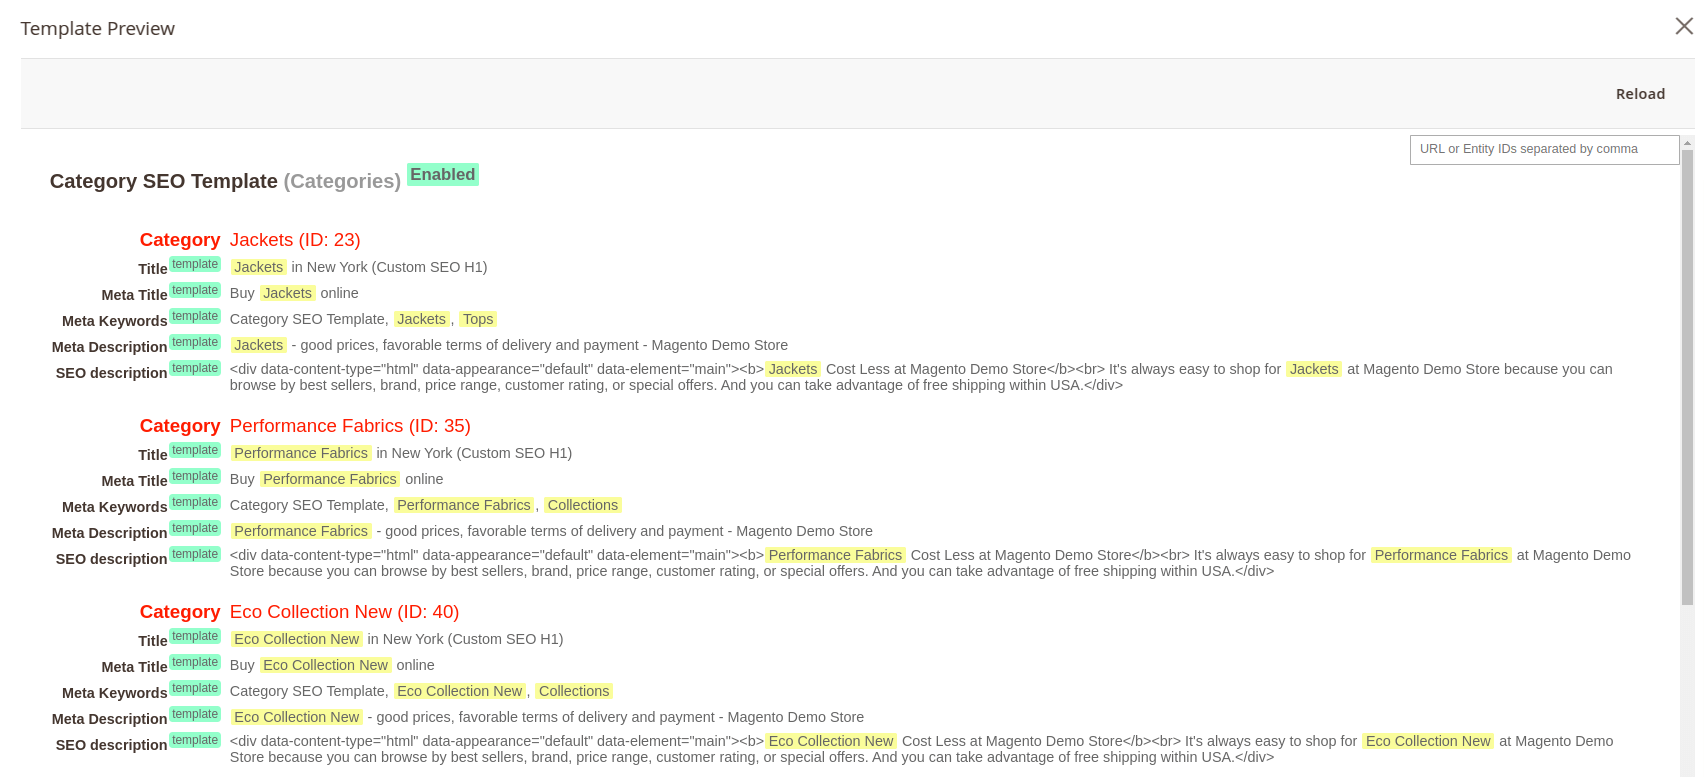
6. Check the changes made by the template
Before finalizing changes, it’s important to preview how the template will look and function. The preview mode helps identify if everything is set up correctly. It can be easily accessed by clicking Preview template button in the top-right corner of the page. Five random pages will be shown and values inserted from variables will be highlighted. However, you can see the changes for the desired page by entering its URL or ID in the field and clicking the Reload button.
Preview does not support the layered navigation, blog and brand template types.
7. Apply template
Click Save button and clean Magento cache to ensure that template has been applied to your store's pages.
Saved template is automatically added to the all templates list, where it can be selected and edited.