Example of GraphQL API usage
Placing an order with the Reward Points + Referral program module
To use GraphQL it is mandatory to install Rewards GraphQL module. Read how to install it here.
In addition to REST architecture and SOAP protocol Magento offers for API a GraphQL. It is an open-source data query and manipulation language, released in 2015 by Facebook.
It has such advantage as getting only the needed parameters of the object in store without the any unnecessary connected information. GraphQL queries also execute quicker than similar on REST or SOAP. Request with REST or SOAP can require several queries, while request in GraphQL executes in one query.
Here is an example of using GraphQL queries to place an order when using.
GraphQL in Magento
GraphQL query retrieves data from the Magento server similarly as a REST GET call. The current set of Magento GraphQL queries allow a mobile app or browser to render such information:
-
A set of products to be displayed. This can include the entire catalog, or those that match customer-specified criteria.
-
Customer data. With a customer token, a query can retrieve basic information about a customer as well as billing and shipping addresses, wish lists, order history, and other sensitive data.
-
Shopping cart contents. GraphQL supports both guest and logged-in customer carts.
-
Store configuration values, including the theme and CMS settings, the currency code, and supported countries.
Over time, the Magento GraphQL queries will duplicate the functionality of all storefront-facing GET calls, while making it possible to query more data in one request. The main difference will be that GraphQL will support storefront use cases, while REST will support admin use cases.
Magento will not run a query that is too complex. The number of fields, objects, and nodes are the factors in determining the complexity of a query.
Software to access GraphQL
In order to be able to use GraphQL you need an additional software. It can be a GraphQL IDE, like GraphiQL or an extension for a Chrome browser, like ChromeiQL or Altair GraphQL. The latter is also available for Mozilla Firefox.
To begin exploring GraphQL, set in the URL bar of your IDE or extension the GraphQL endpoint by entering http://your-magento2-server-adress/graphql. Check that the POST method is selected.
In this example Altair GraphQL browser extension is used.
Using GraphQL to place an order with the Reward Points module
Let's place an order with reward points of our module for a default Magento user Veronica Costello.
Prerequisites
In order to begin placing order using GraphQL the following preconditions must be completed:
-
The store must have the Rewards GraphQL module installed. You can find the instruction on how to install it here
-
The customer should be registered and logged in, as the module doesn't work with guest customers
-
You should have at least one configured and enabled Payment method: Stores -> Settings -> Configuration -> Sales -> Payment Methods
-
You should have at least one configured and enabled Shipping method: Stores -> Settings -> Configuration -> Sales -> Delivery Methods
-
Your customer should have points on his account. Check the points balance: Customers -> All customers
-
Configure a Spending rule according to your requirements. Go to Marketing -> Promotions -> Reward Points and click on Earning Rules to call out the menu where you'll find Spending Rules. Information about parameters of Spending rule is available on Spending Rules page. Examples of Spending Rules are available on page Spending Rules Examples
Step-by-step GraphQL order process
Step 1: Get customer's authorization token
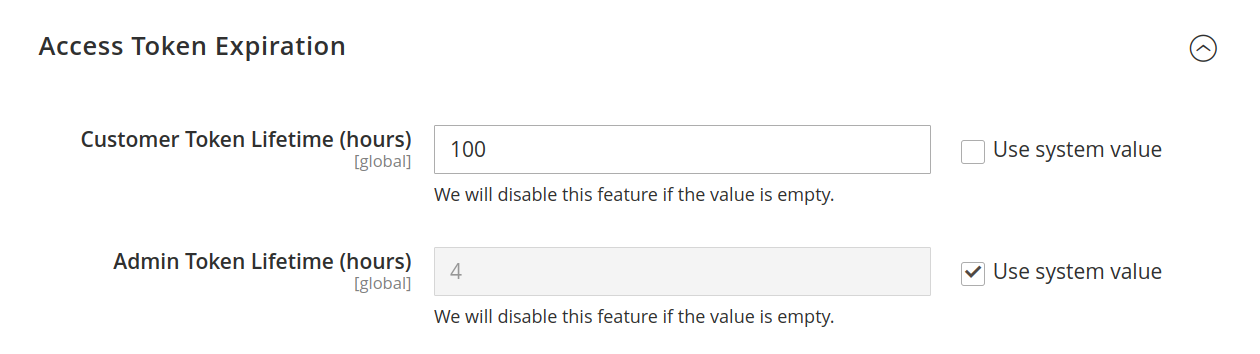
To be able to use GraphQL on behalf of the chosen user firstly you should get this customer's authorization token. Read more on authorization tokens in official Magento Developer Documentation on page Authorization tokens.
By default, a customer token is valid for 1 hour. You can change these values from Admin by selecting Stores -> Settings -> Configuration -> Services -> OAuth -> Access Token Expiration -> Customer Token Lifetime
For generating the token a mutation keyword is used. While GraphQL queries perform read operations, mutations change the data. A mutation can create, update, or delete objects and fields. In REST terminology, queries operate like GET requests, while mutations are similar to POST, PUT, and DELETE. More on the mutations read in Magento Developer Documentation (Magento DevDocs) on page Using mutations
Send request:
mutation {
  generateCustomerToken(
    email: "[email protected]"
    password: "[email protected]"
  ) {
    token
  }
}
You will get response:
{
  "data": {
    "generateCustomerToken": {
      "token": "eyJraWQiOiIxIiwiYWxnIjoiSFMyNTYifQ.eyJ1aWQiOjEsInV0eXBpZCI6MywiaWF0IjoxNzM1MTY2NDk5LCJleHAiOjE3MzUxNzAwOTl9.DcrhaT2nz7nztw8Ys4QHkijHjPLymYtWmWhKfm9pipY"
    }
  }
}
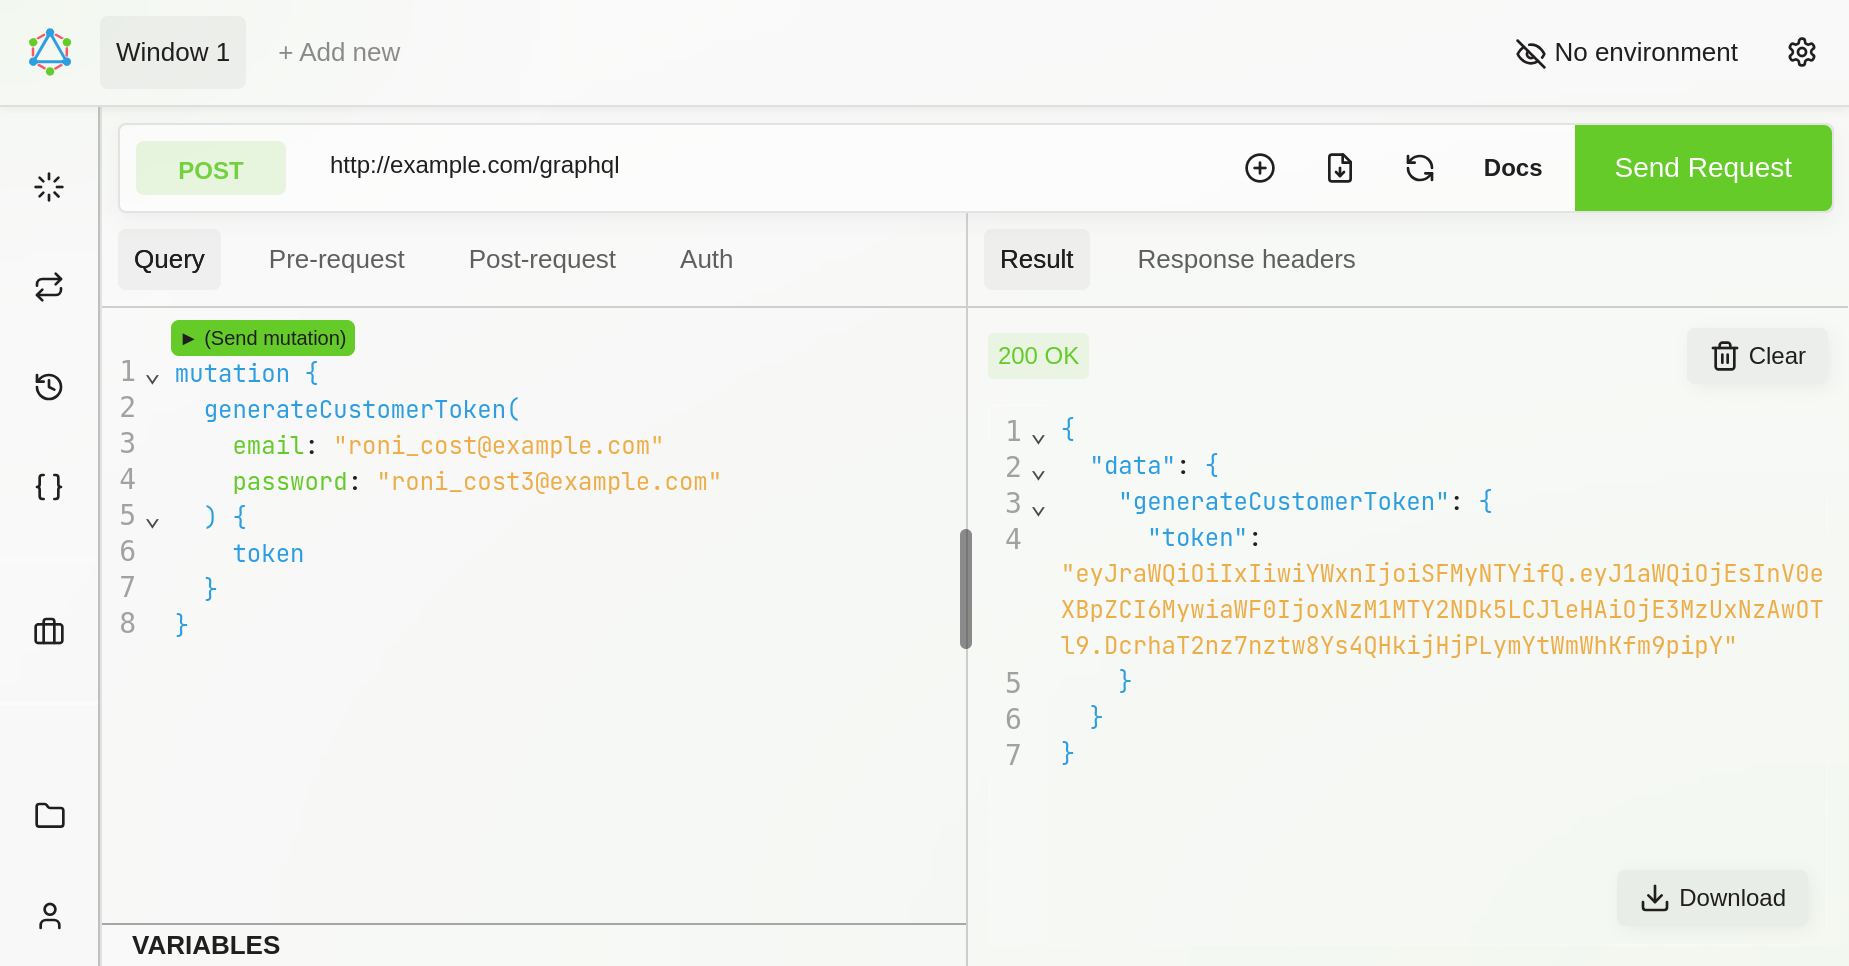
Copy the token, and add it to the header.

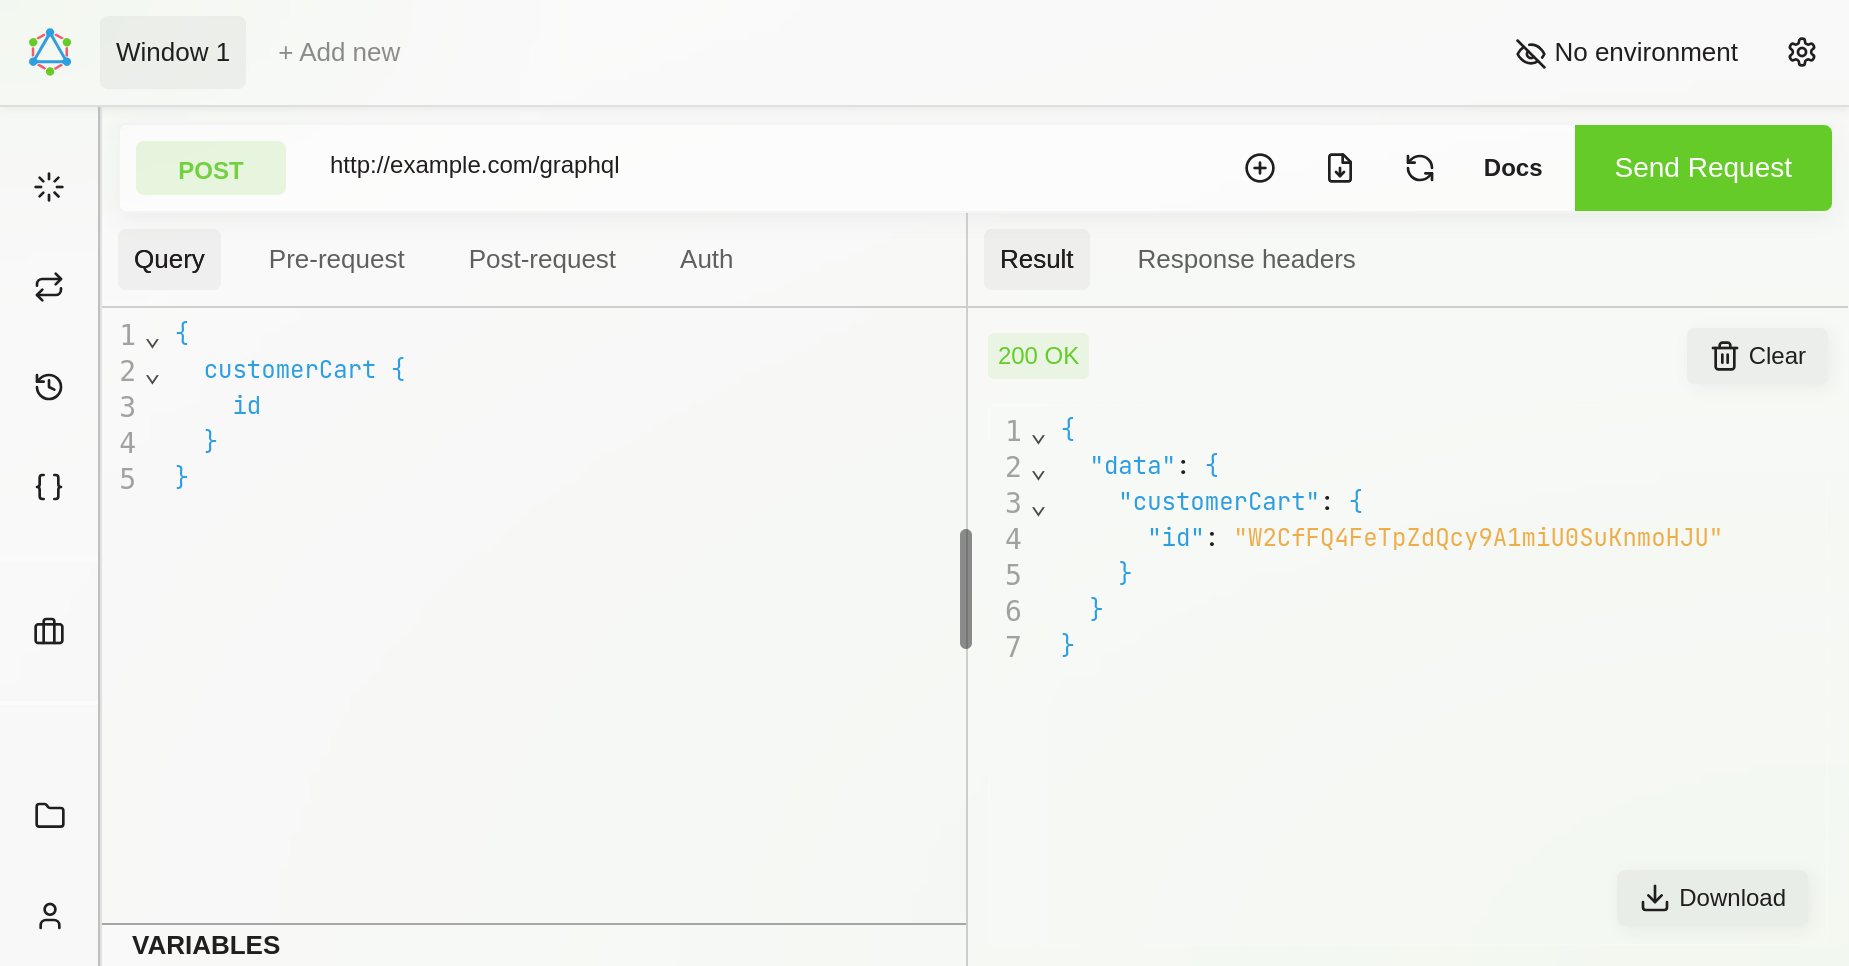
Step 2: Create a customer cart
The customer for whom the token has been generated does not have an active cart. The following query creates an empty cart and returns the cart ID.
Send request:
{
  customerCart {
    id
  }
}
You will get response:
{
  "data": {
    "customerCart": {
      "id": "W2CfFQ4FeTpZdQcy9A1miU0SuKnmoHJU"
    }
  }
}
Step 3. Adding specific product to cart
When we know customer's cart ID, we can add an item to this cart. GraphQL supports all product types, but this tutorial only demonstrates how to add a simple product to the shopping cart. You can find more details how to add other product types on the following pages of Magento DevDocs:
Send request with cart_id value equal to id value obtained in a previous step. Parameter SKU is the identifier of the simple product you want to add to the cart. You can obtain SKU on the product page.
Request:
mutation {
  addSimpleProductsToCart(
    input: {
      cart_id: "W2CfFQ4FeTpZdQcy9A1miU0SuKnmoHJU"
      cart_items: [{ data: { quantity: 1, sku: "24-MB04" } }]
    }
  ) {
    cart {
      items {
        uid
        product {
          sku
          stock_status
        }
        quantity
      }
    }
  }
}
Response:
{
  "data": {
    "addSimpleProductsToCart": {
      "cart": {
        "items": [
          {
            "id": "Mjc1",
            "product": {
              "sku": "24-MB04",
              "stock_status": "IN_STOCK"
            },
            "quantity": 1
          }
        ]
      }
    }
  }
}
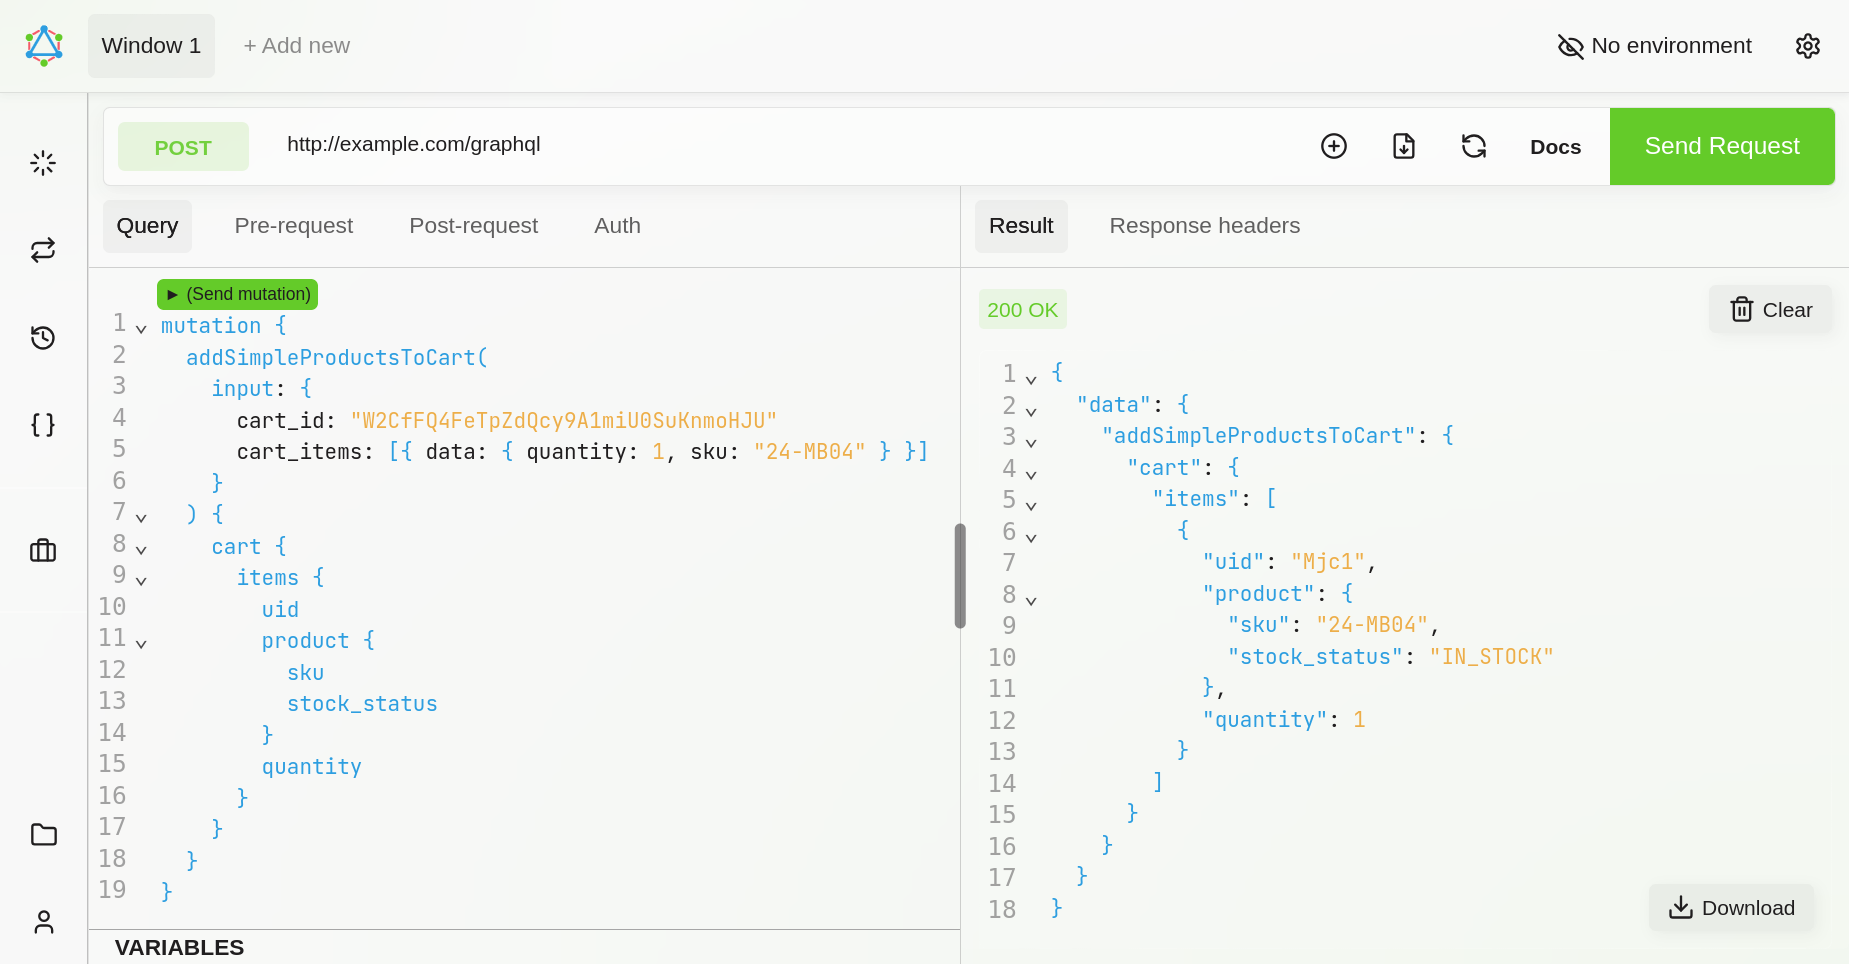
Now previously empty cart has new item, and user can see it in his account.
Step 4. Setting the shipping address
The shipping address is the address where customer wants to receive the items ordered. To set a shipping address for the user a setShippingAddressesOnCart mutation. Its full parameters are available in Magento DevDocs on page setShippingAddressesOnCart mutation
Skip this step for the virtual quotes.
Send request:
mutation {
  setShippingAddressesOnCart(
    input: {
      cart_id: "W2CfFQ4FeTpZdQcy9A1miU0SuKnmoHJU"
      shipping_addresses: [
        {
          address: {
            firstname: "Veronica"
            lastname: "Costello"
            company: "Company Name"
            street: ["3320 N Crescent Dr", "Beverly Hills"]
            city: "Los Angeles"
            region: "CA"
            region_id: 12
            postcode: "90210"
            country_code: "US"
            telephone: "123-456-0000"
            save_in_address_book: false
          }
        }
      ]
    }
  ) {
    cart {
      shipping_addresses {
        firstname
        lastname
        company
        street
        city
        region {
          code
          label
        }
        postcode
        telephone
        country {
          code
          label
        }
        available_shipping_methods {
          carrier_code
          carrier_title
          method_code
          method_title
        }
      }
    }
  }
}
You will get response
{
  "data": {
    "setShippingAddressesOnCart": {
      "cart": {
        "shipping_addresses": [
          {
            "firstname": "Veronica",
            "lastname": "Costello",
            "company": "Company Name",
            "street": [
              "3320 N Crescent Dr",
              "Beverly Hills"
            ],
            "city": "Los Angeles",
            "region": {
              "code": "CA",
              "label": "California"
            },
            "postcode": "90210",
            "telephone": "123-456-0000",
            "country": {
              "code": "US",
              "label": "US"
            },
            "available_shipping_methods": [
              {
                "carrier_code": "flatrate",
                "carrier_title": "Flat Rate",
                "method_code": "flatrate",
                "method_title": "Fixed"
              },
              {
                "carrier_code": "tablerate",
                "carrier_title": "Best Way",
                "method_code": "bestway",
                "method_title": "Table Rate"
              }
            ]
          }
        ]
      }
    }
  }
}
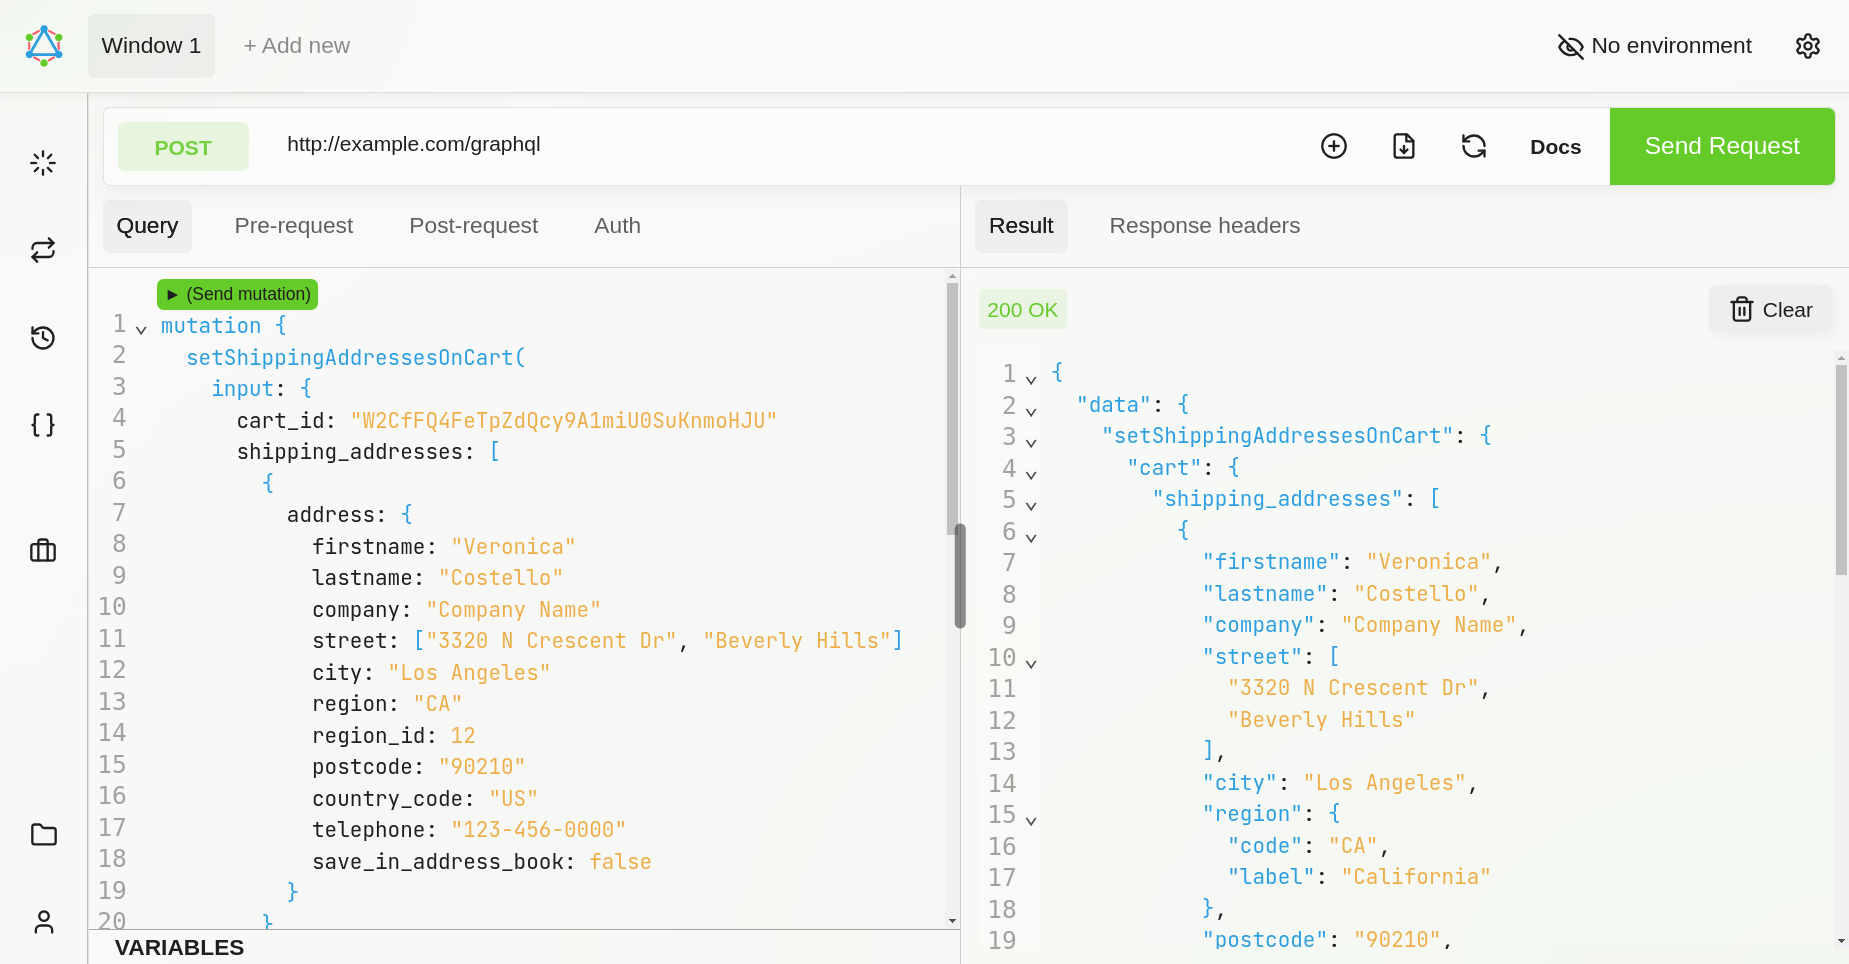
The new shipping adress will be visible when order will be placed.
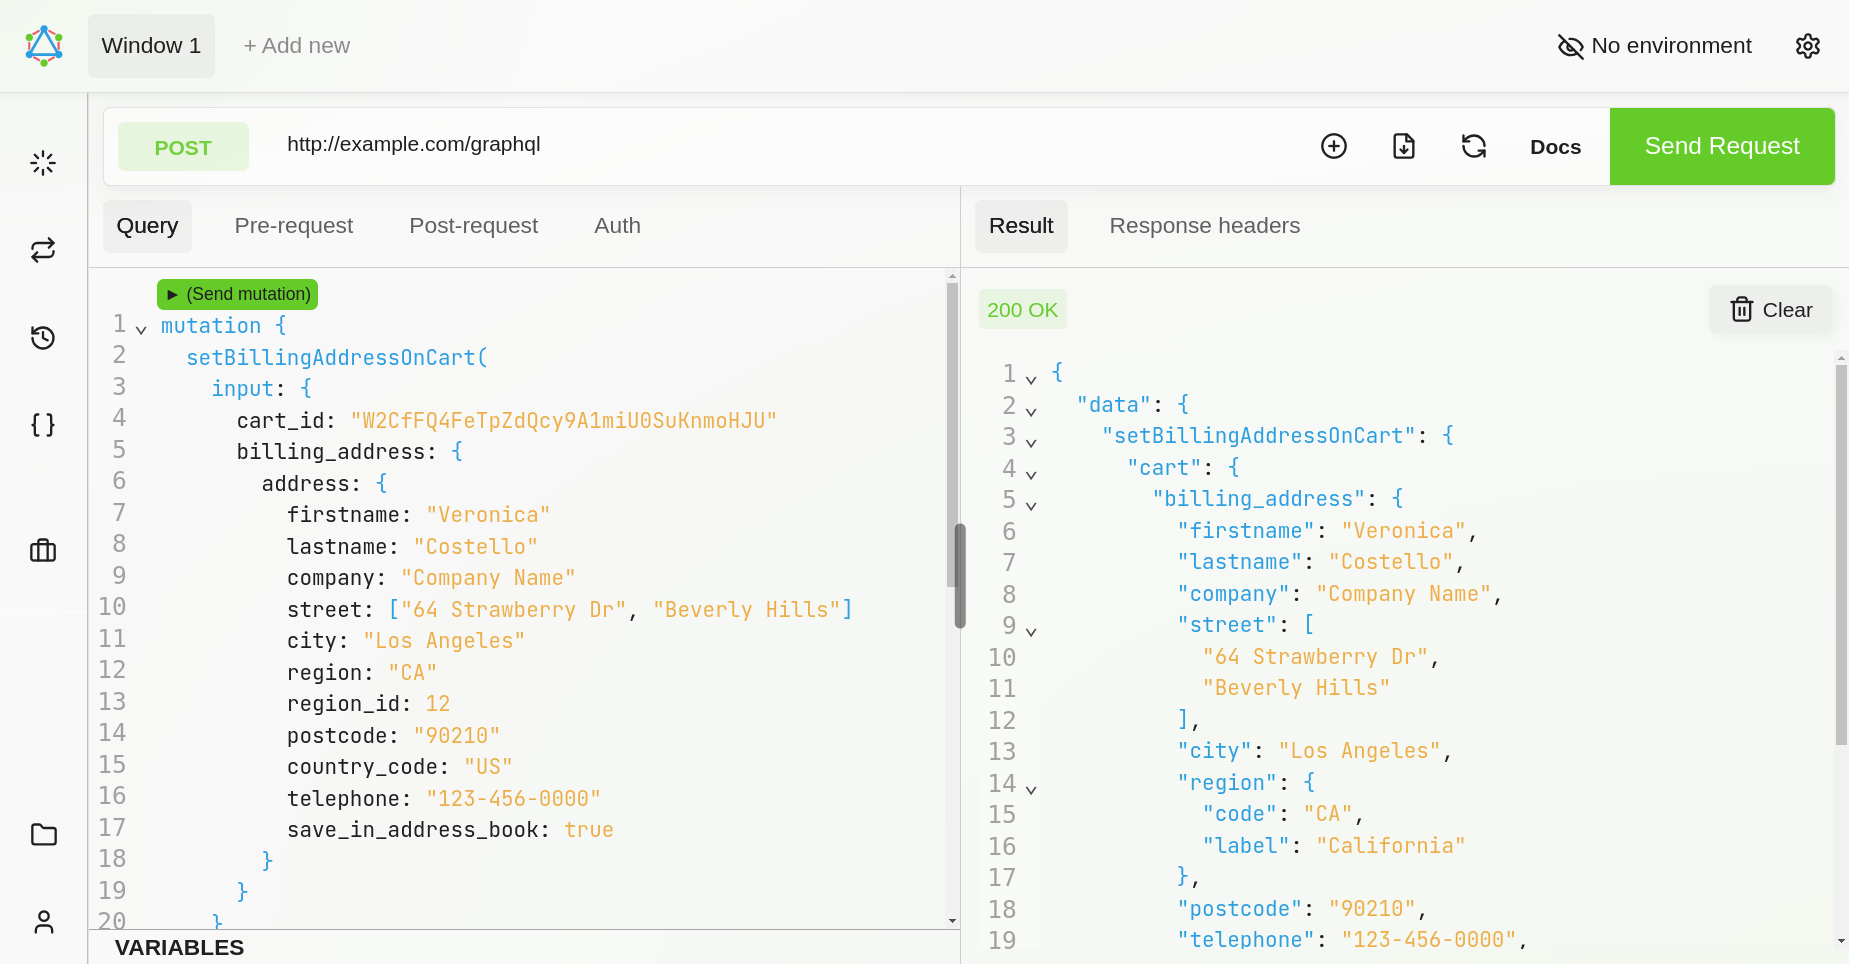
Step 5. Setting the billing address
The folowing step of setting the billing address is similar to the setting of shipping address.
Request:
mutation {
  setBillingAddressOnCart(
    input: {
      cart_id: "W2CfFQ4FeTpZdQcy9A1miU0SuKnmoHJU"
      billing_address: {
        address: {
          firstname: "Veronica"
          lastname: "Costello"
          company: "Company Name"
          street: ["64 Strawberry Dr", "Beverly Hills"]
          city: "Los Angeles"
          region: "CA"
          region_id: 12
          postcode: "90210"
          country_code: "US"
          telephone: "123-456-0000"
          save_in_address_book: true
        }
      }
    }
  ) {
    cart {
      billing_address {
        firstname
        lastname
        company
        street
        city
        region {
          code
          label
        }
        postcode
        telephone
        country {
          code
          label
        }
      }
    }
  }
}
Response
{
  "data": {
    "setBillingAddressOnCart": {
      "cart": {
        "billing_address": {
          "firstname": "Veronica",
          "lastname": "Costello",
          "company": "Company Name",
          "street": [
            "64 Strawberry Dr",
            "Beverly Hills"
          ],
          "city": "Los Angeles",
          "region": {
            "code": "CA",
            "label": "California"
          },
          "postcode": "90210",
          "telephone": "123-456-0000",
          "country": {
            "code": "US",
            "label": "US"
          }
        }
      }
    }
  }
}
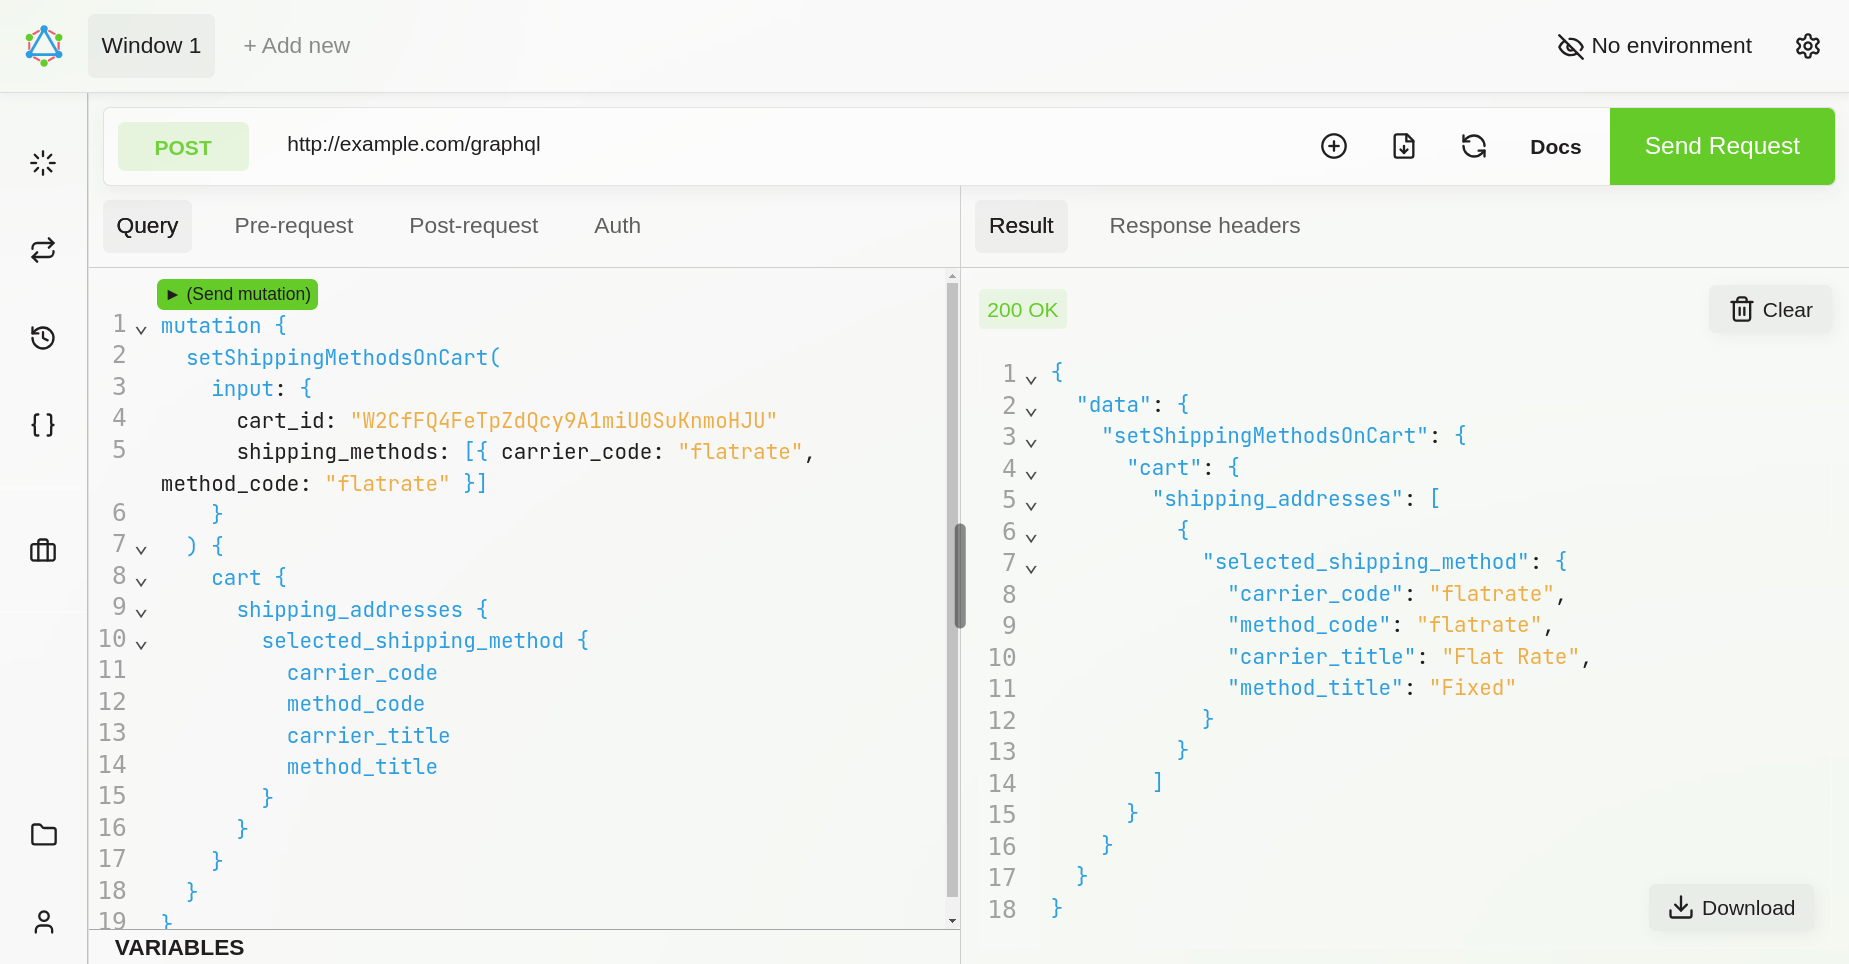
Step 6. Set shipping method
Request
mutation {
  setShippingMethodsOnCart(
    input: {
      cart_id: "W2CfFQ4FeTpZdQcy9A1miU0SuKnmoHJU"
      shipping_methods: [{ carrier_code: "flatrate", method_code: "flatrate" }]
    }
  ) {
    cart {
      shipping_addresses {
        selected_shipping_method {
          carrier_code
          method_code
          carrier_title
          method_title
        }
      }
    }
  }
}
Responce
{
  "data": {
    "setShippingMethodsOnCart": {
      "cart": {
        "shipping_addresses": [
          {
            "selected_shipping_method": {
              "carrier_code": "flatrate",
              "method_code": "flatrate",
              "carrier_title": "Flat Rate",
              "method_title": "Fixed"
            }
          },
          {
            "selected_shipping_method": null
          }
        ]
      }
    }
  }
}
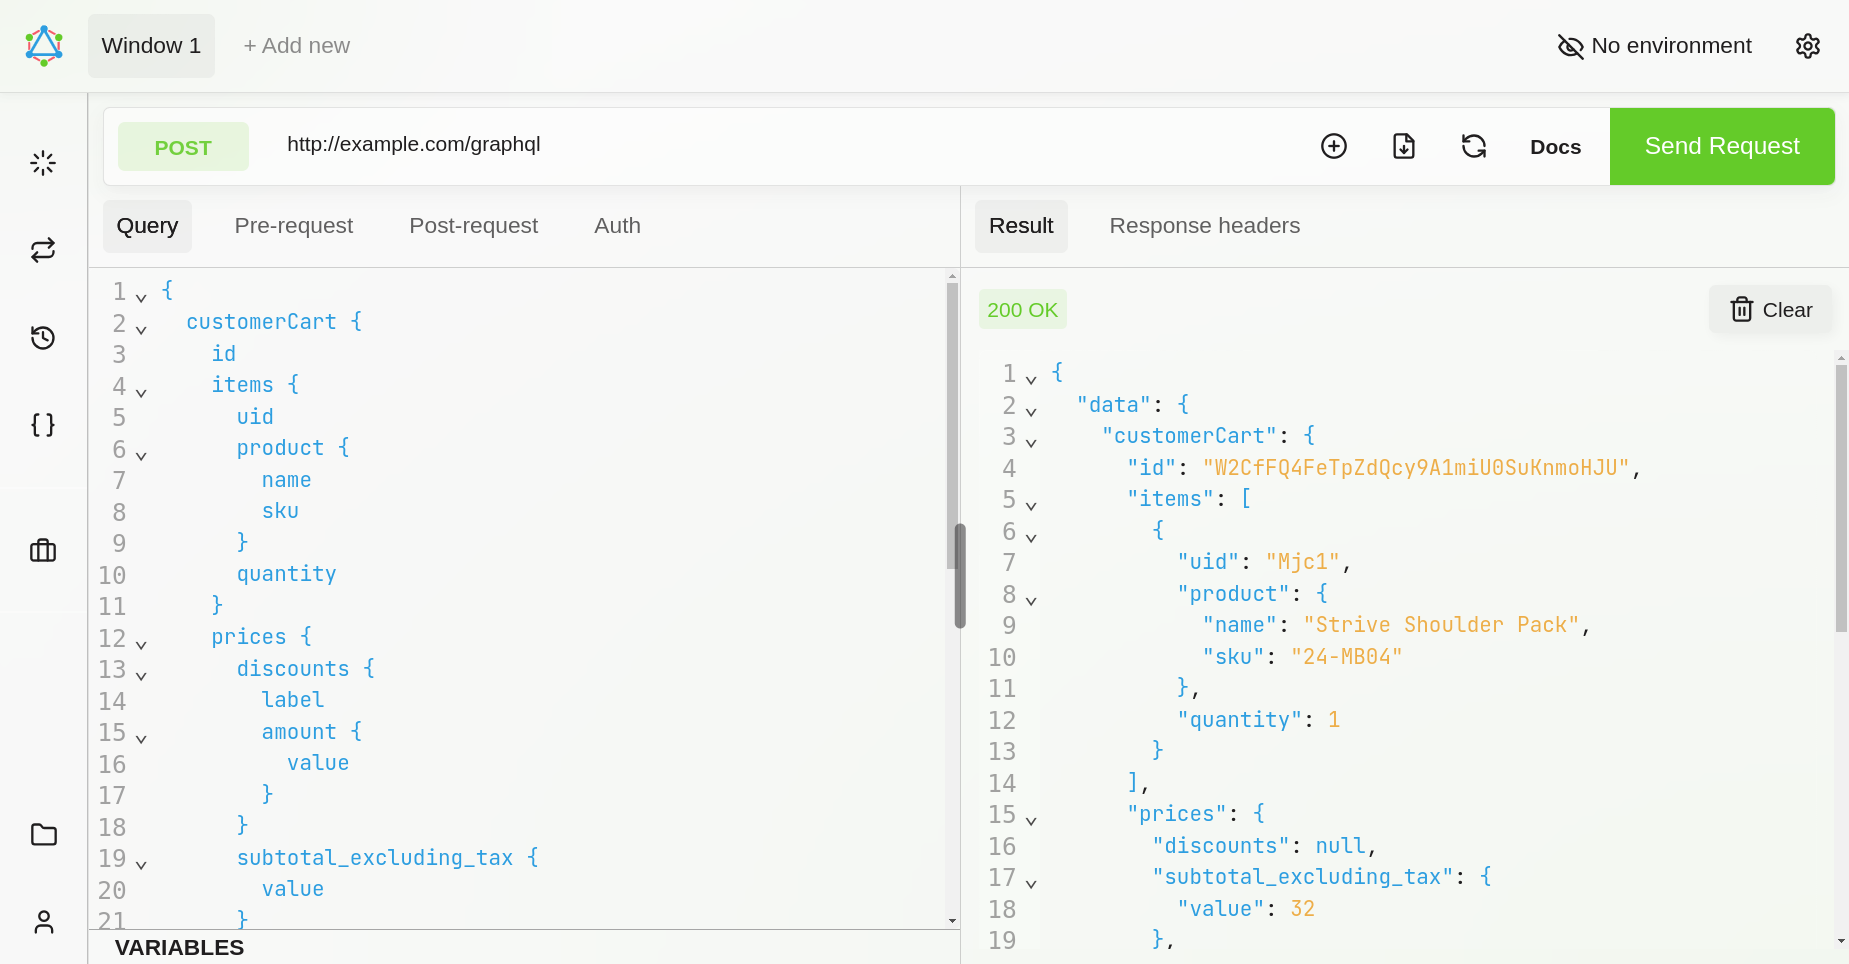
Step 7. Check the order
After the order details and shipping and billing adresses have been set check the order.
Request
{
  customerCart {
    id
    items {
      uid
      product {
        name
        sku
      }
      quantity
    }
    prices {
      discounts {
        label
        amount {
          value
        }
      }
      subtotal_excluding_tax {
        value
      }
      applied_taxes {
        label
        amount {
          value
        }
      }
      grand_total {
        value
      }
    }
    mstRewardPoints {
      is_applied
      spend_points
      base_spend_amount {
        value
      }
      spend_amount {
        value
      }
      spend_min_points
      spend_max_points
      earn_points
    }
  }
}
Result
{
  "data": {
    "customerCart": {
      "id": "W2CfFQ4FeTpZdQcy9A1miU0SuKnmoHJU",
      "items": [
        {
          "uid": "Mjc1",
          "product": {
            "name": "Strive Shoulder Pack",
            "sku": "24-MB04"
          },
          "quantity": 1
        }
      ],
      "prices": {
        "discount": null,
        "subtotal_excluding_tax": {
          "value": 32
        },
        "applied_taxes": [],
        "grand_total": {
          "value": 37
        }
      },
      "mstRewardPoints": {
        "is_applied": false,
        "spend_points": 0,
        "base_spend_amount": {
          "value": 0
        },
        "spend_amount": {
          "value": 0
        },
        "spend_min_points": 10,
        "spend_max_points": 35,
        "earn_points": 0
      }
    }
  }
}
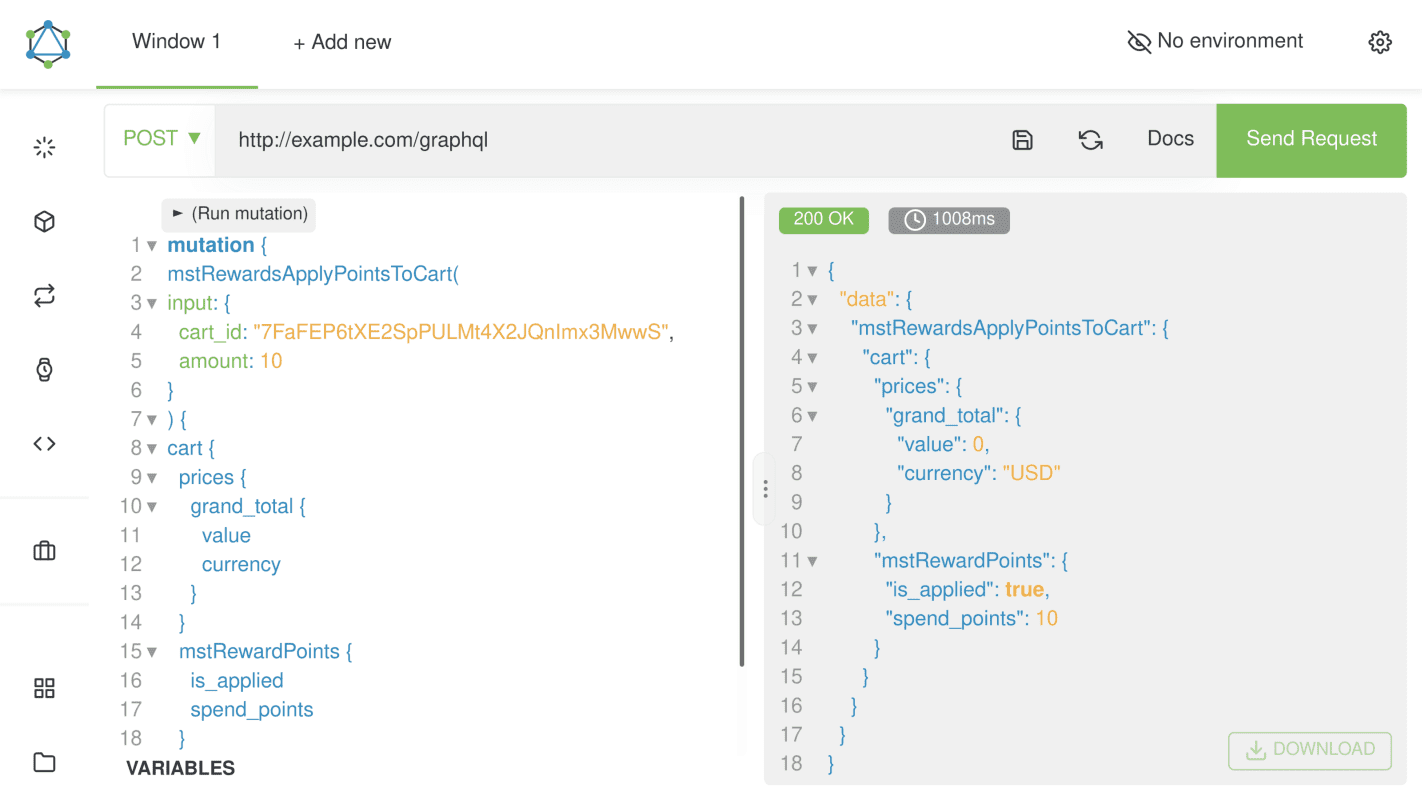
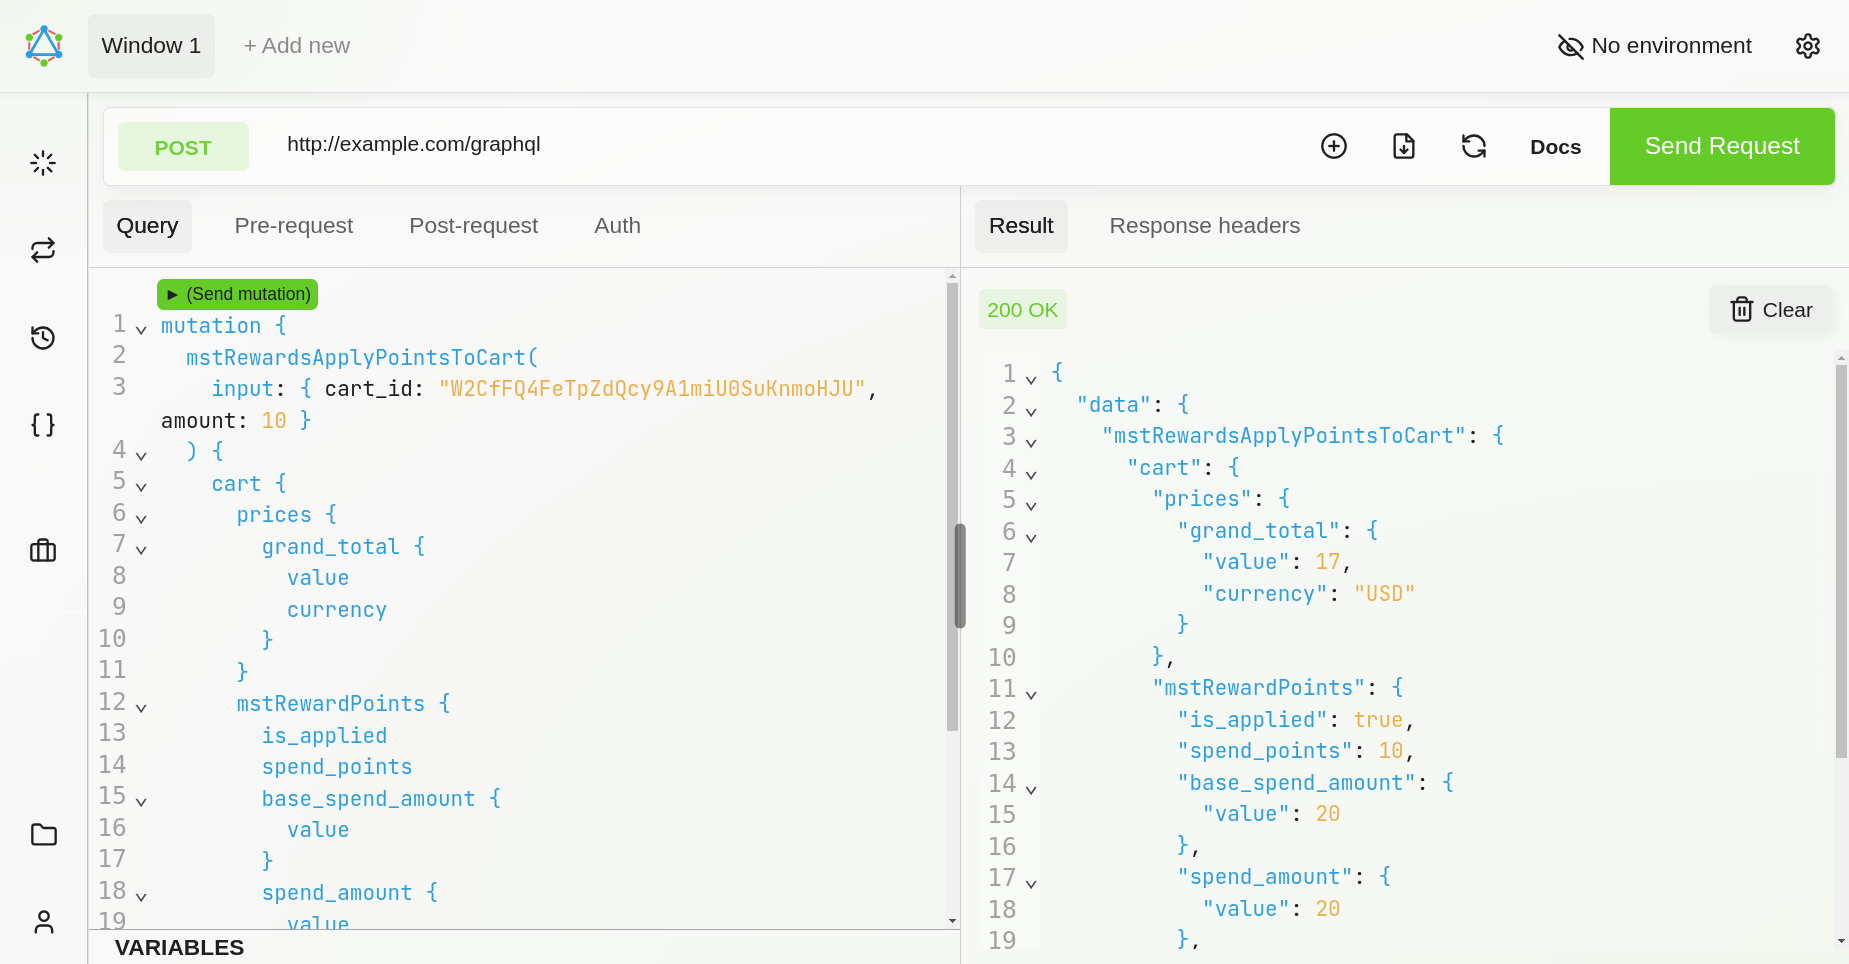
Apply reward points to the order
Step 8. Add reward points to the cart
On this step add to the cart the desired number of reward points. Discount to the order will be applied accordingly to the Spending rule.
Request
mutation {
  mstRewardsApplyPointsToCart(
    input: { cart_id: "W2CfFQ4FeTpZdQcy9A1miU0SuKnmoHJU", amount: 10 }
  ) {
    cart {
      prices {
        grand_total {
          value
          currency
        }
      }
      mstRewardPoints {
        is_applied
        spend_points
        base_spend_amount {
          value
        }
        spend_amount {
          value
        }
        spend_min_points
        spend_max_points
        earn_points
      }
    }
  }
}
Response
{
  "data": {
    "mstRewardsApplyPointsToCart": {
      "cart": {
        "prices": {
          "grand_total": {
            "value": 17,
            "currency": "USD"
          }
        },
        "mstRewardPoints": {
          "is_applied": true,
          "spend_points": 10,
          "base_spend_amount": {
            "value": 20
          },
          "spend_amount": {
            "value": 20
          },
          "spend_min_points": 10,
          "spend_max_points": 20,
          "earn_points": 0
        }
      }
    }
  }
}
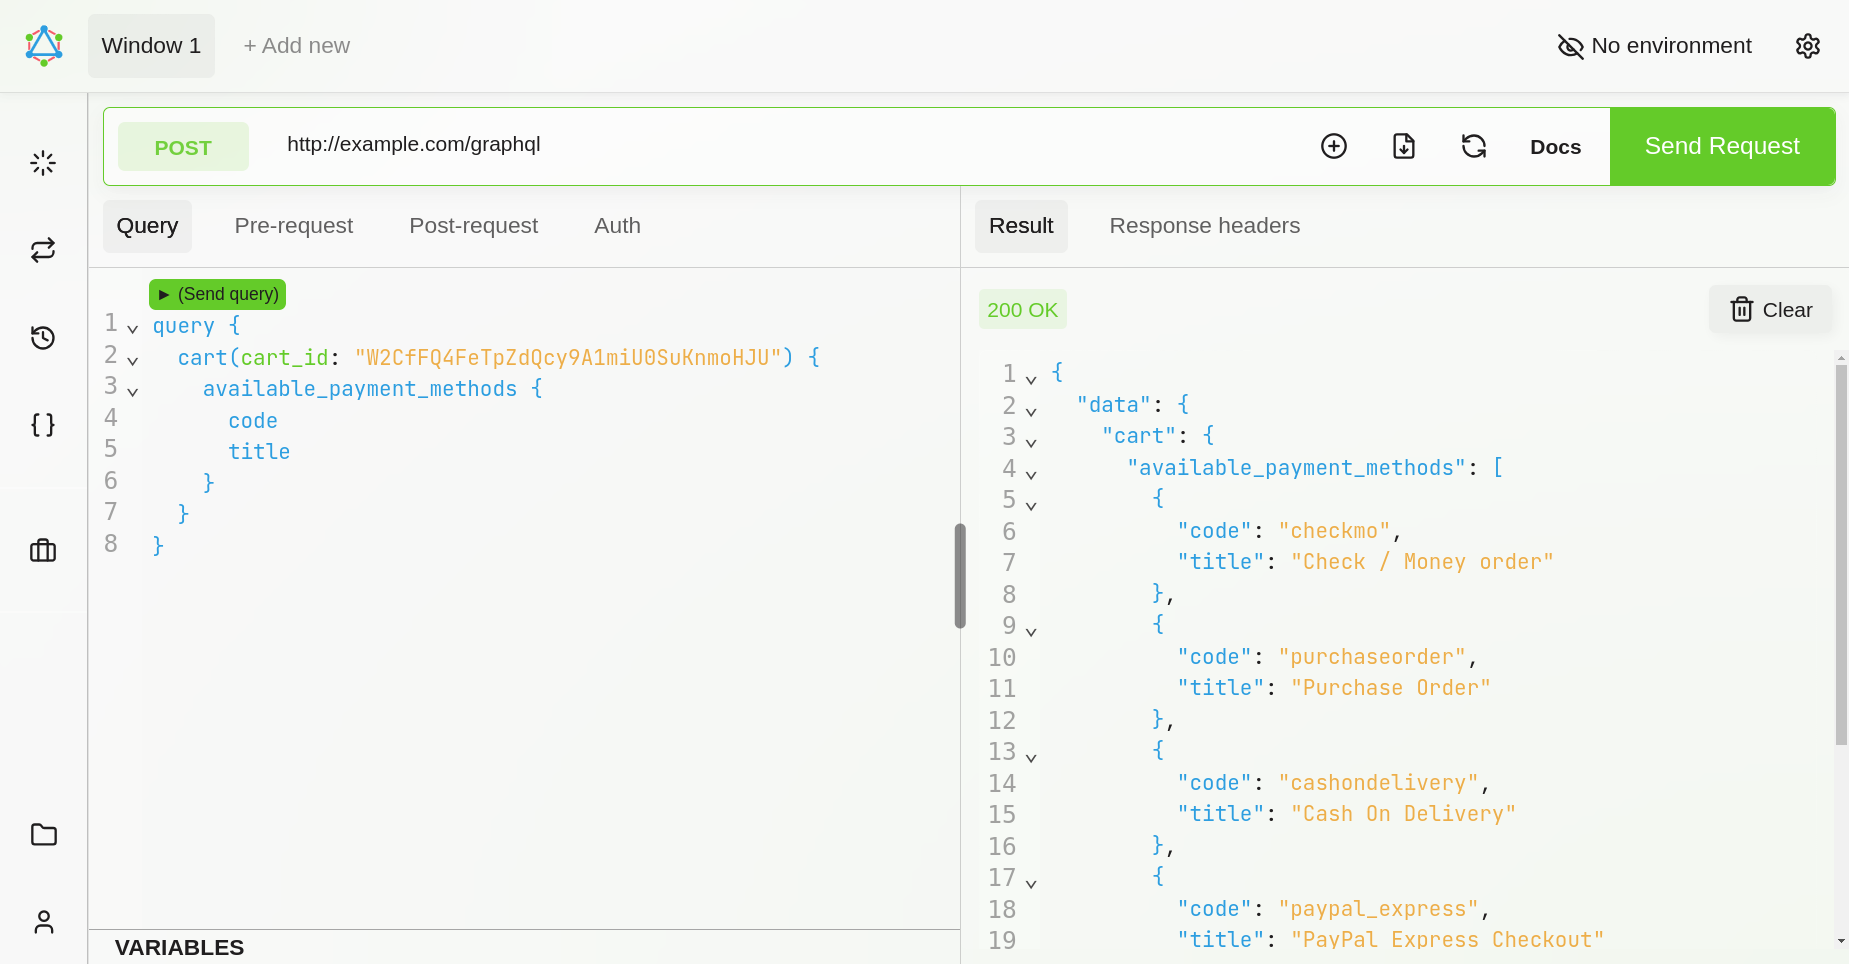
Finishing the order: getting and setting payment method, placing the order
Step 9. Get available payment methods
Check what payment methods are available to the current user.
Request
query {
  cart(cart_id: "W2CfFQ4FeTpZdQcy9A1miU0SuKnmoHJU") {
    available_payment_methods {
      code
      title
    }
  }
}
Response
{
  "data": {
    "cart": {
      "available_payment_methods": [
        {
          "code": "checkmo",
          "title": "Check / Money order"
        }
      ]
    }
  }
}
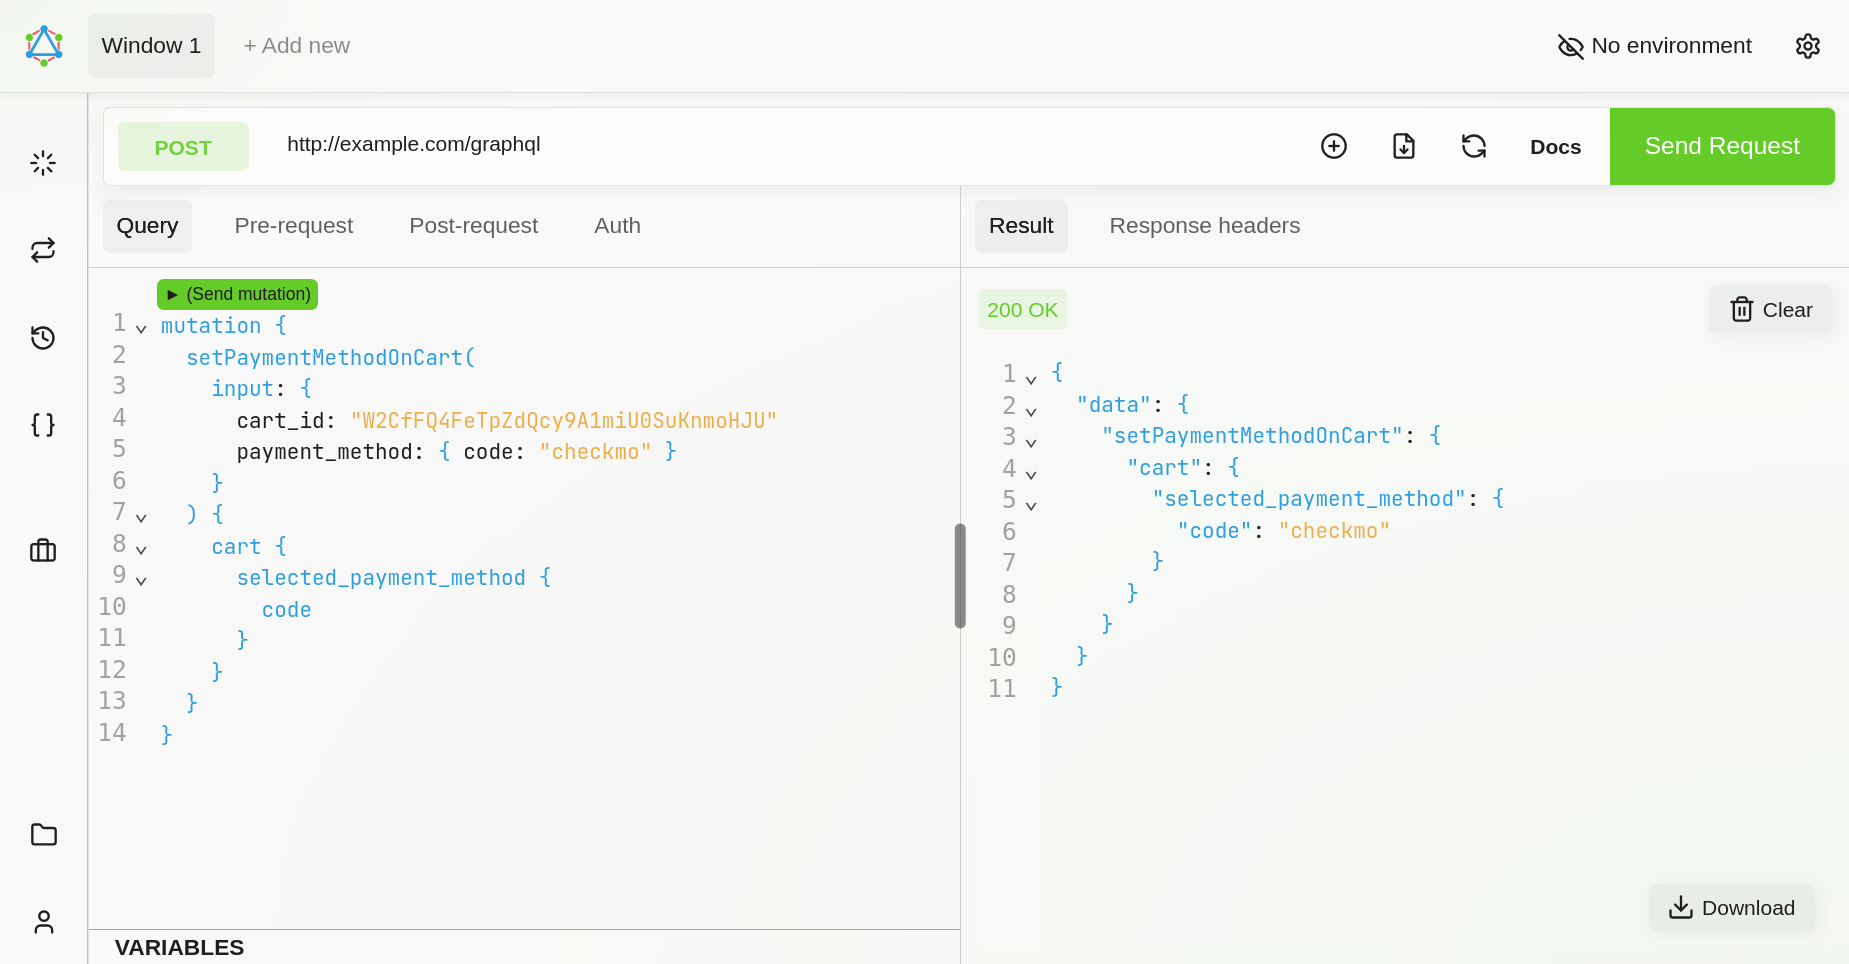
Step 10. Set payment method
Choose one of the available payment methods obtained on the previous step and set this payment method for the current cart.
Request
mutation {
  setPaymentMethodOnCart(
    input: {
      cart_id: "1pFmurBFkwozlAtssXLK9k8jgM3qagtZ"
      payment_method: { code: "checkmo" }
    }
  ) {
    cart {
      selected_payment_method {
        code
      }
    }
  }
}
Response
{
  "data": {
    "setPaymentMethodOnCart": {
      "cart": {
        "selected_payment_method": {
          "code": "checkmo"
        }
      }
    }
  }
}
Step 11. Place the order
Up to this moment all required steps for the order are complete and you can place the order. It can take a few minutes.
Request
mutation {
  placeOrder(input: { cart_id: "W2CfFQ4FeTpZdQcy9A1miU0SuKnmoHJU" }) {
    order {
      order_number
    }
  }
}
Response
{
  "data": {
    "placeOrder": {
      "order": {
        "order_number": "000000134"
      }
    }
  }
}
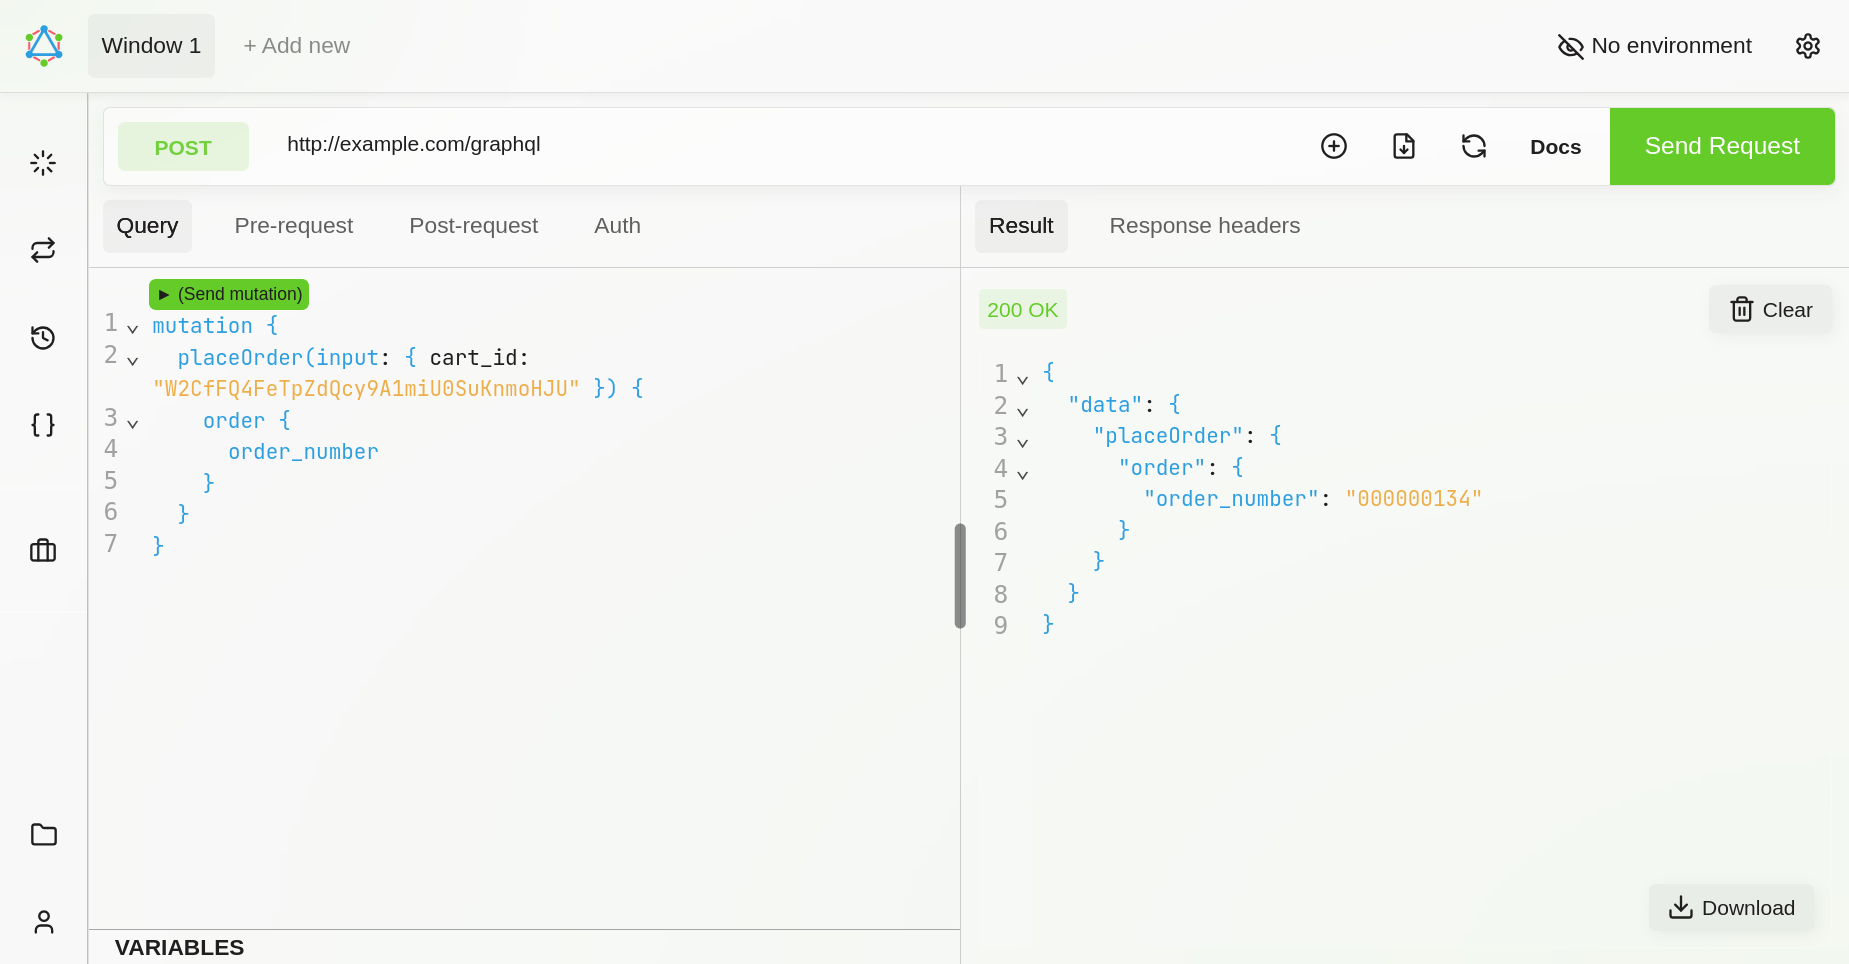
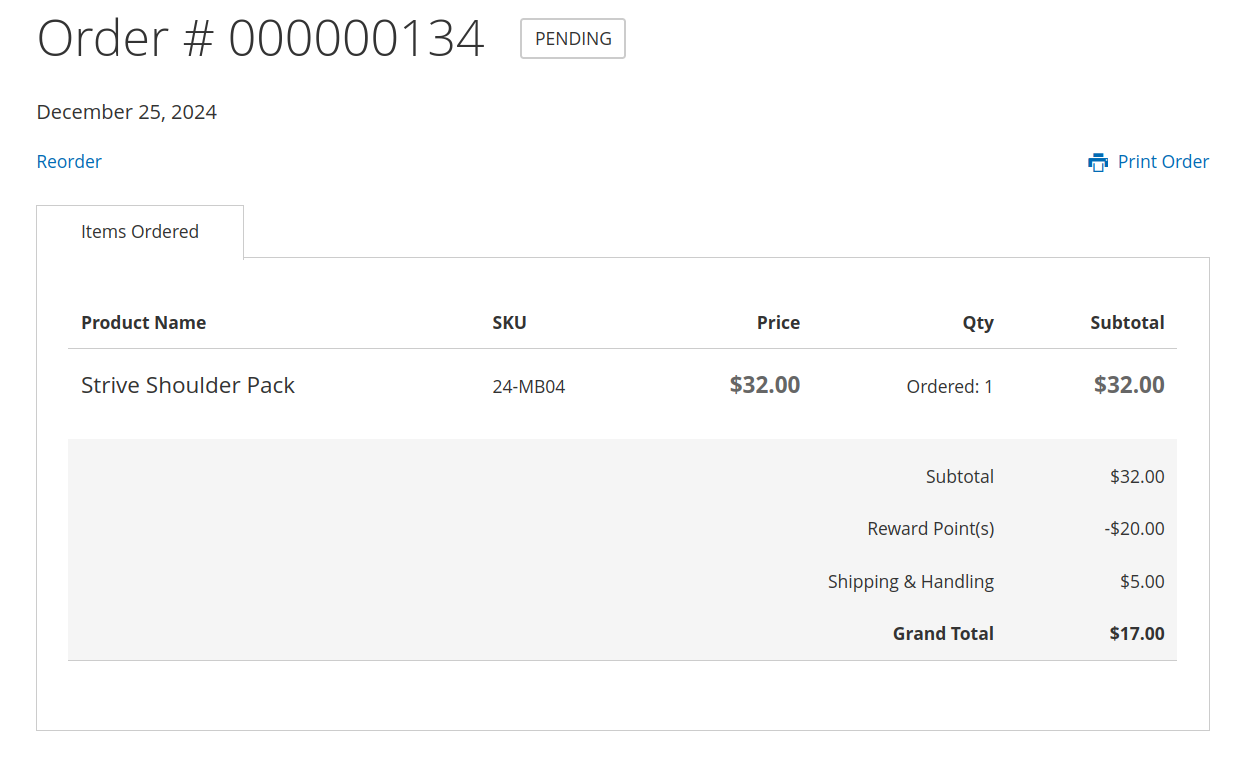
User can check his order with applied reward points
The user in his account will get a new order with the same order_number as in the previous step. He will be able to review order details as usual. This order will have reward points applied, and user will see the respective discount.