Workflow rules
Unlock the full potential of your RMA process with Workflow rules, a powerful automation tool designed to simplify and streamline repetitive tasks during RMA submissions and processing. With Workflow rules, you can ensure timely, efficient, and personalized service, delivering the exceptional experience your customers deserve.
By automating standard scenarios based on predefined events, Workflow rules help reduce manual work, improve response times, and enable your team to focus on delivering quality support. Whether you need to auto-assign tickets to team members, send timely notifications, or manage RMA statuses effortlessly, Workflow rules have you covered.
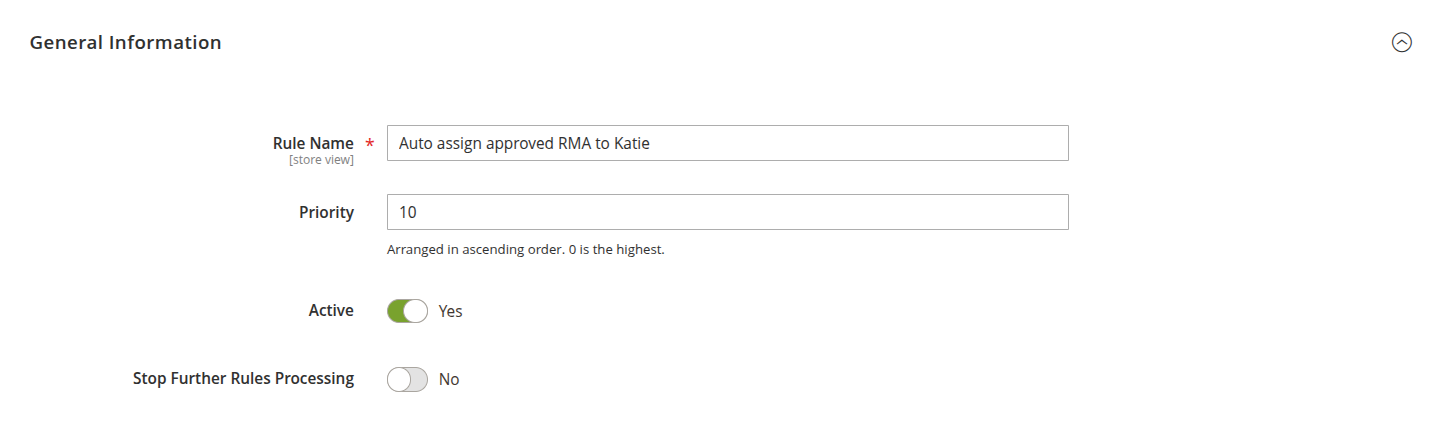
General information
-
Rule name: give your rule a clear, descriptive name.
-
Priority: set the execution order for rules when multiple rules are linked to the same event. Higher priority rules will be triggered first.
-
Active: toggle the rule’s activation status.
-
Stop further rules processing: when enabled, no other rules with the same or lower priority will be triggered if this rule is executed.
Conditions
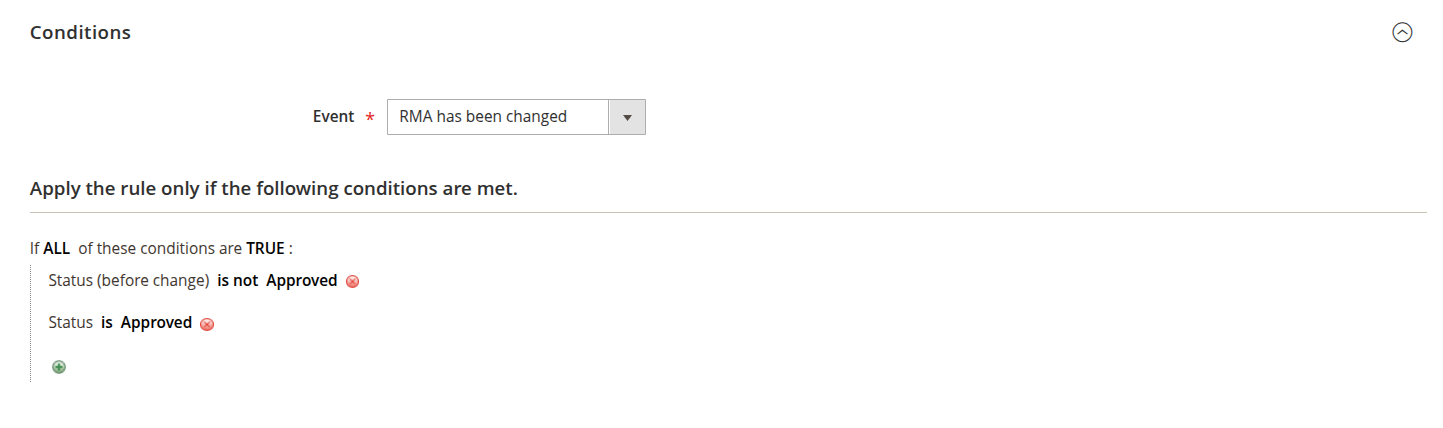
In the event block settings, you can set the required RMA event condition:
-
New RMA created: triggered when a customer submits a new RMA.
-
RMA changed: triggered when any update is made to the RMA.
-
New reply from customer: triggered when the customer responds.
-
New reply from staff: triggered when a support team member replies.
Next, blocks allow you to select conditions, which will be checked upon rule triggering. Only if the current RMA meets them will actions be executed. Here is the list of currently available conditions:
-
Last message body: checks the content of the last public message.
-
Created at: based on the date when the RMA was submitted.
-
Updated at: checks the date of the last update.
-
Store: store from where the RMA was submitted (this condition can not detect backend-created RMAs, as they can be binded to any store.)
-
Status (before change): the status before the event was triggered (for RMA has been changed events).
-
Status: the current status of the RMA.
-
Owner (before change): the owner before the event (for RMA has been changed events).
-
Owner: the current RMA owner.
-
Last reply by: last message from customer or staff in this RMA.
-
Hours since created: time period from the creation of particular RMA (this condition is not precise, use equal or greater or equal or lesser comparators here)
-
Hours since updated: time period from the last update of a particular RMA (this condition is not precise, use equal or greater or equal or lesser comparators here)
-
Hours since last reply: time period from last message appearance in a particular RMA (this condition is not precise, use equal or greater or equal or lesser comparators here)
If you have RMA custom fields, they can also be used as conditions to ensure granular control over actions.
Each field will be listed in two forms: the standard field value and "before changed," used especially for an RMA change event. For example, if the field is Telephone, then the conditions will be Telephone and Telephone (before change) respectively.
Actions
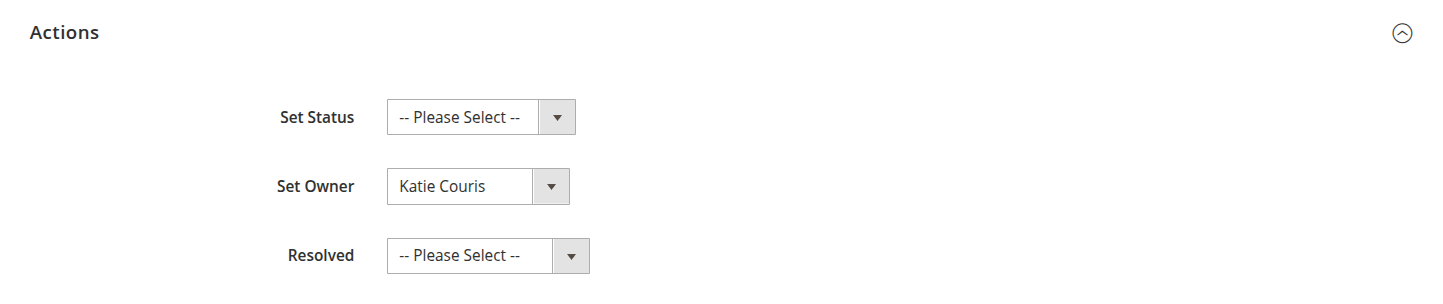
When all conditions are met, the system will automatically execute the associated action. Currently, the following actions are supported:
-
Set status: automatically updates the RMA status.
-
Set owner: reassigns the RMA to a different owner.
-
Resolved: mark the RMA as resolved or unresolved.
Notifications
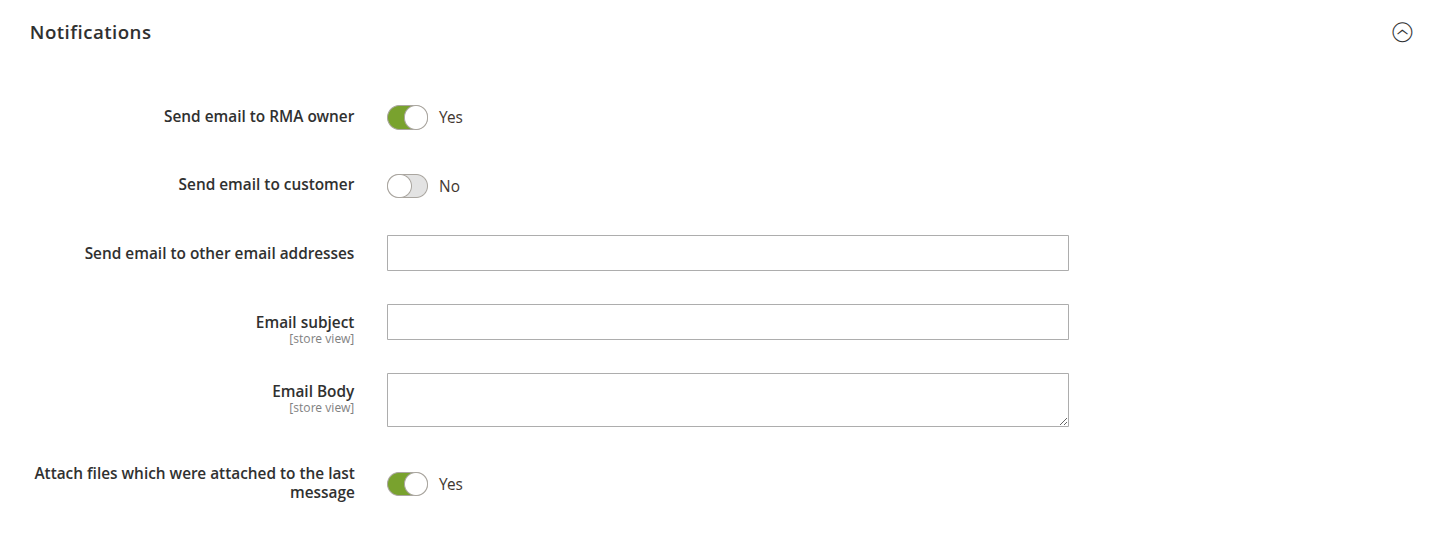
The extension allows you to send notification emails after the workflow rule action is executed.
-
Send email to RMA owner: notifies the staff member assigned to the RMA.
-
Send email to customer: notifies customer to keep him informed with timely updates.
-
Send email to other email addresses: allows you to send notifications to additional recipients.
-
Email subject: customize the subject line for your notification emails.
-
Email body: message of the email. You use dynamic variables to personalize your email templates. For more information about variables, refer to the How to use variables in email notification section of our documentation.
You can customize email subject and body for specific store views directly on the edit page, ensuring your RMA language reflects local nuances and customer preferences. To do this, just switch the store switcher to the desired one, and enter contents into the proper field. It will be saved independently just for the selected store.