Create Manual Google Shopping Feed XML: Step-by-Step for Magento
-
 Andriy Kovalenko
- How to & Tutorials
- Updated: Jul 27, 2026
- 15 min read
Updated with guidance on handling configurable products, common Google Merchant Center feed rejection reasons, and preparing your feed for 2026's AI-driven Shopping search.
There are hundreds of active marketplaces where your Magento products could be selling right now - but none of them see your catalog until you hand them a feed file.
One of the most effective ways to reach them is Google Shopping. To list your products there, you'll need a special file containing details about your inventory, tailored to meet the requirements of the platform.
Here's how to build one using Google Shopping as an example, and how to keep it converting once it's live.
Table of Contents
- What Is a Google Data Product Feed and What Does It Do
- Feed Content and Supported Formats
- Approaches to Creating and Managing Feeds
- Creating a Google Shopping Feed with Advanced Product Feeds
- Step 1: Use a Pre-Built Template
- Step 2: Fill in Feed Information
- Step 3: Configure Content Settings
- Step 4: Apply Filters
- Additional Options to Improve Your Feed
- Integrate Google Analytics
- Set Up Feed Upload via FTP/SFTP
- Create Email Notifications
- Schedule Feed Generation
- Enable Sales Analytics Reports
- Handling Configurable Products
- Common Feed Rejection Reasons (and How to Fix Them)
- Preparing Your Feed for AI-Driven Shopping Search
- Final Thoughts
What Is a Google Data Product Feed and What Does It Do
Before diving into the process of creating a product feed, let's clarify its purpose and how it connects your store to a marketplace.
The success of any e-commerce business depends on sales, which are driven by website traffic. Unfortunately, not every visitor converts into a buyer: Oberlo's ecommerce conversion-rate data puts the average online store at roughly 1.5-3%, depending on the source and industry.
This is why making your store visible matters: appearing in search results and being listed on marketplaces puts you in front of customers you'd otherwise never reach.
Hundreds of active marketplaces exist across the USA, Europe, and beyond: they already attract a targeted audience actively searching for products.
How does it work? As a business owner, you sign an agreement with a marketplace and share information about your inventory and prices. Potential customers visit the marketplace, discover your offering, and are automatically redirected to your store to complete their purchase.
A feed file is the tool that facilitates this exchange of information. It's one of the simplest and most accessible solutions, requiring no advanced skills or tools.
While this article focuses on this straightforward option, it's worth noting that it's not the only one. For instance, APIs can address some limitations of feed files, such as the need to process the entire feed or the inability to update in real time.
Most popular marketplaces work well with feed files and often support multiple methods for receiving product data. This flexibility allows online stores to use one tool across different platforms.
Feed Content and Supported Formats
Simply put, a product feed is a file that lists your inventory along with its attributes, such as price, specifications, and quantity. Each marketplace has specific requirements for how the feed should be structured and what information it must include.
Using Google Shopping as an example, attributes are divided into:
- Required: Title, Description, URL, Price, etc.
- Optional: Sale Price, Installment, Size system, Product dimensions, etc.
Required attributes ensure your products are displayed on the marketplace, while optional attributes provide additional information to help customers make informed purchasing decisions.
Additionally, certain attributes may be classified as required or optional depending on the country or product type. These specifics are usually detailed in marketplace documentation.
The format of a product feed can vary. It could be a simple text file with comma-separated values, an XML file, or an Excel document.
Google Shopping uses XML files, where part of the information (tags) is system-specific. These tags help the system properly process and read your product data.
For example, an XML file might look like this:
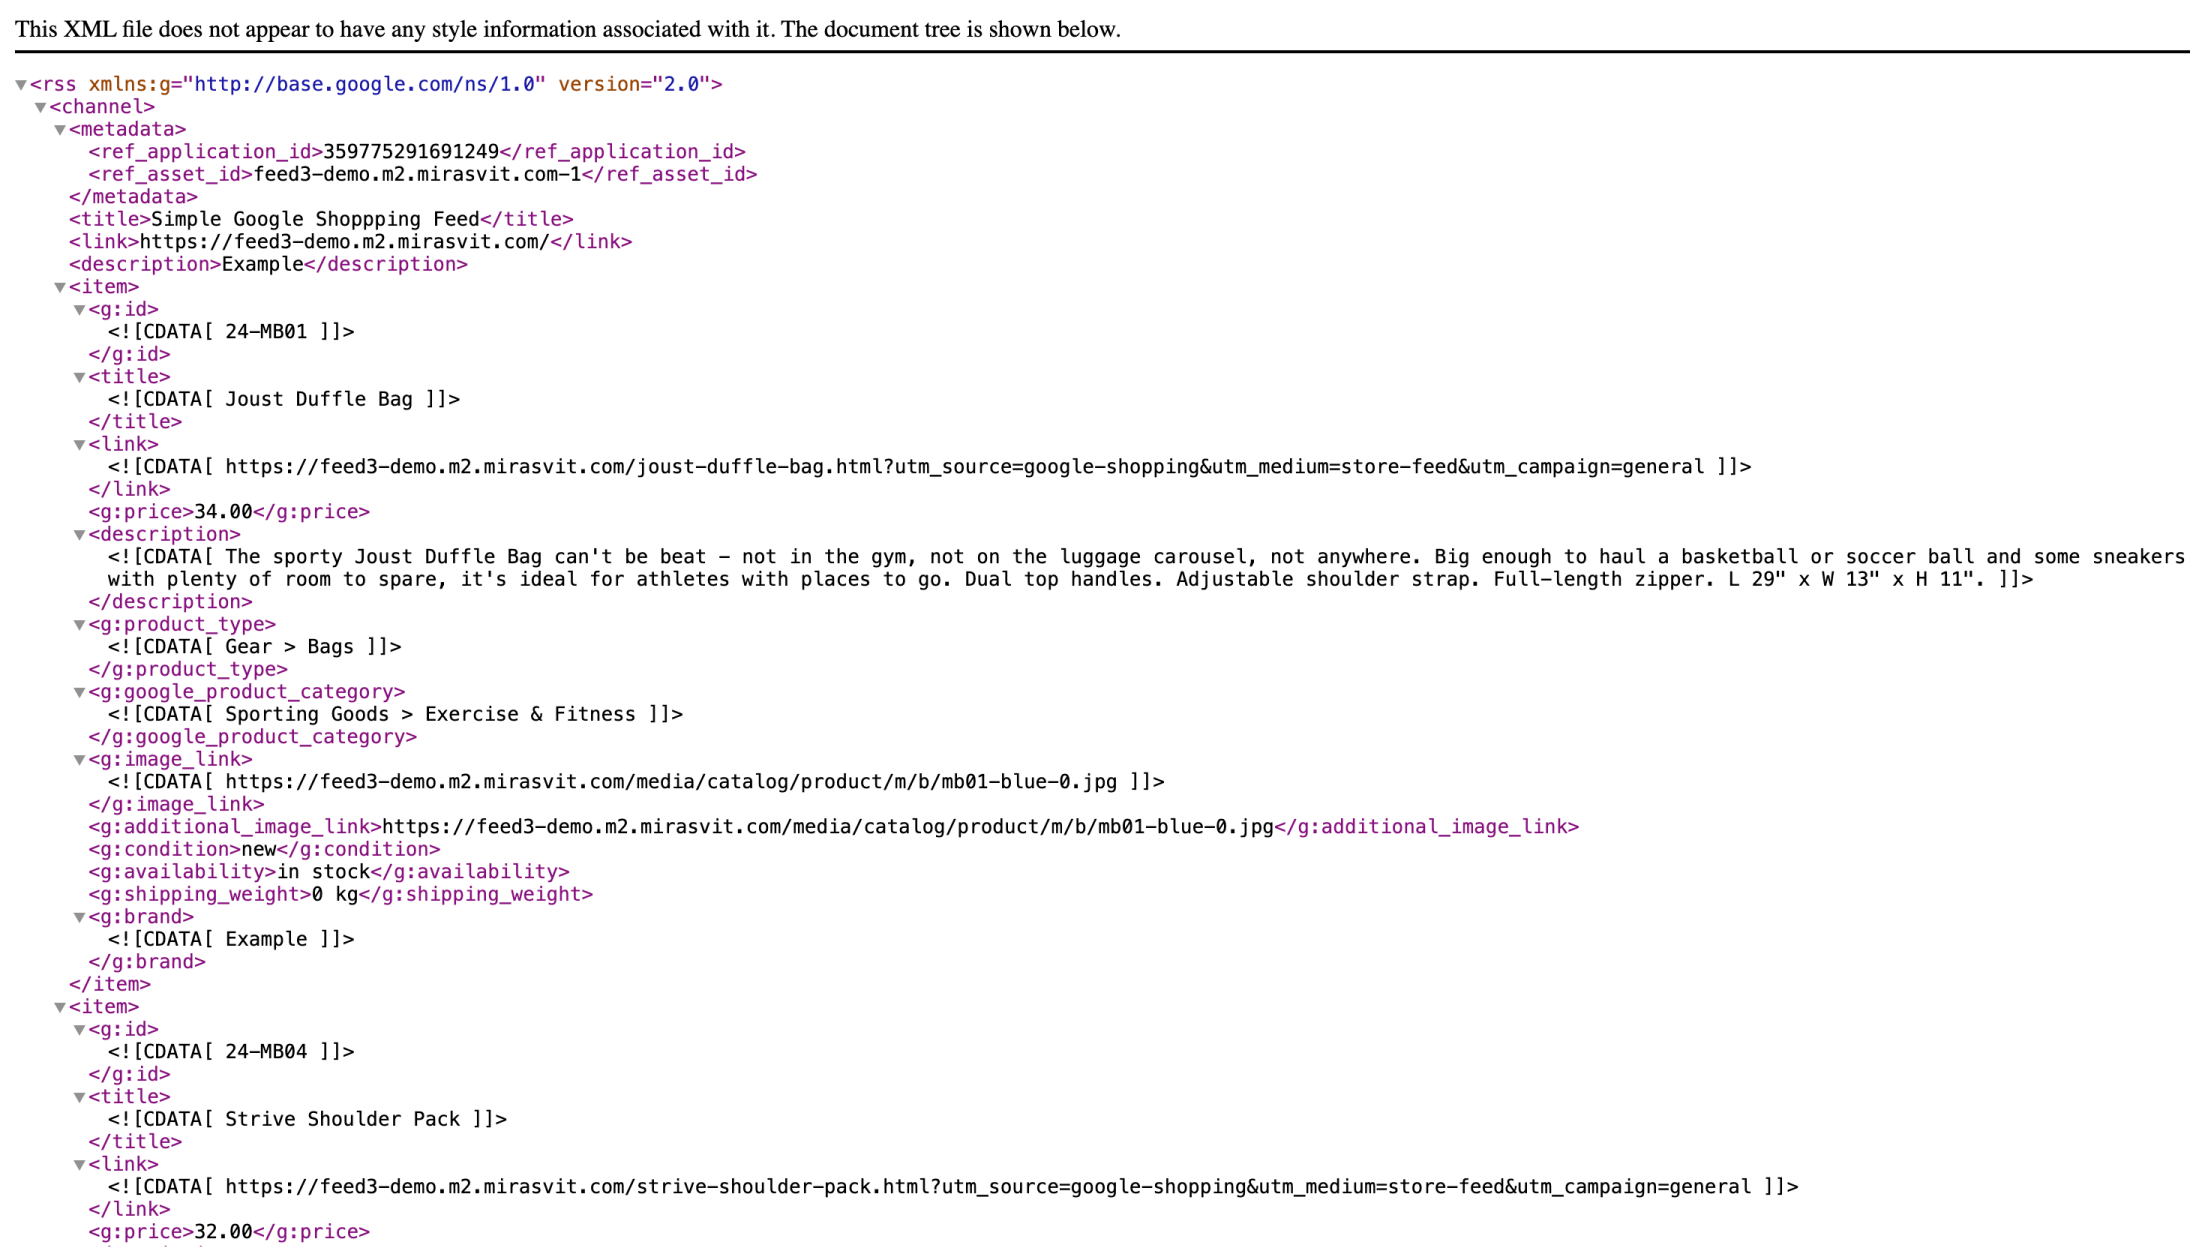
Tags are shown in color, while product data is displayed in black. The tag is used to mark sections of the document, so the XML parser interprets them as character data instead of markup.
Here's a simplified template for a single item, so you can see the structure without opening the extension - each <item> block repeats once per product in your catalog:
<?xml version="1.0"?>
<rss version="2.0" xmlns:g="http://base.google.com/ns/1.0">
  <channel>
    <item>
      <g:id><![CDATA[SKU-001]]></g:id>
      <title><![CDATA[Product Name]]></title>
      <link><![CDATA[https://yourstore.com/product-url.html]]></link>
      <description><![CDATA[Product description text.]]></description>
      <g:image_link><![CDATA[https://yourstore.com/media/product-image.jpg]]></g:image_link>
      <g:price><![CDATA[29.99 USD]]></g:price>
      <g:availability><![CDATA[in stock]]></g:availability>
      <g:condition><![CDATA[new]]></g:condition>
      <g:google_product_category><![CDATA[{ product.mapping:1 }]]></g:google_product_category>
    </item>
  </channel>
</rss>
Advanced Product Feeds fills in these values from your catalog automatically once you select a template - you don't need to write this by hand, but it's useful to know what the extension is generating under the hood.
In a TXT file, each product appears on a single line, with attributes separated by spaces or other delimiters. In a CSV format, the feed resembles a table that can be opened in Excel, with rows representing products and columns listing their attributes.
You can find a detailed description of these and other feed formats, including examples and differences, in this article.
Approaches to Creating and Managing Feeds
The default functionality of Magento Open Source doesn't include options for creating or maintaining product feeds. However, you have two alternative approaches: manual creation or automation tools. Let's examine the pros and cons of each.
Manual Creation
This is a virtually cost-free method, excluding the value of the time you invest. To create a feed, you can use any text editor, Excel, or Google Sheets. You can start with a sample feed provided by the marketplace or create a custom file based on the platform's requirements.
However, this approach comes with several significant challenges:
- High Workload: Compiling all the necessary data into a file isn't too difficult if you have a small inventory. However, this method becomes impractical for larger catalogs - you could spend months just populating the feed.
- Human Error: Even with careful attention, manual input can lead to mistakes: typos in names, incorrect item IDs, or incomplete descriptions. As a result, some of your items might fail to appear on the marketplace.
- Complicated Product Data Feed Management: You've manually created a file and uploaded it to the marketplace, but the situation in your store is constantly changing: some items sell out, new ones are added, prices are adjusted, or new color options become available. The feed must reflect all these changes to stay accurate and up to date.
Using Automation Tools
The second option is to use product data feed software. The cost of such tools typically ranges up to a few hundred dollars. Many tools are available for Magento, but we'll focus on one we know and trust.
Automated feed generation has always been a priority for our clients, who have frequently requested such a solution. To address this, we developed our Product Feeds extension, first for Magento and later adapted for Magento 2.
Initially, it was a basic tool with limited functionality. It allowed users to generate CSV, XML, and TXT files and upload them to marketplaces via FTP. The extension included filters, pre-built templates, and a minimal set of configuration options.
Subsequent improvements were driven by feedback from our customers. They reached out to our support team with marketplace requirements, shared their challenges when managing feeds manually, and provided suggestions for new features. Our developers took this input into account, continually enhancing the extension.
Today, the module offers a wide range of features indispensable for working with product feeds:
- Pre-built templates (over 130)
- Content Editor
- Filters
- Category Mapping
- Dynamic Variables
- Dynamic Attributes
- Reports
- Google Analytics integration
- Feed uploads via SFTP/FTP
- Automated feed generation and uploads
- Email notifications
- Generation history
The extension handles all the tasks required to create, update, and manage a feed, enabling you to start selling on marketplaces easily.
If configured correctly, the tool will automatically apply updates to your feed, such as adding new items, adjusting stock levels, updating prices, and syncing changes with the marketplace. It will also gather analytics for you - no more re-uploading a file by hand every time a price changes.
Creating a Google Shopping Feed with Advanced Product Feeds
As we mentioned earlier, listing your products where shoppers are already searching is the fastest way to reach new customers. It makes sense to start with a marketplace offering the greatest benefits.
We'll use Google Shopping as an example, as it's one of the most popular tools for product promotion. Many of our clients use it, and it comes with several advantages:
- Google can display your items in search results for relevant queries, leveraging its vast audience.
- Extensive documentation and plenty of examples are available in Google's support resources and third-party blogs.
- The registration process is simple, and feed creation rules are easy to understand.
Before creating your feed, you need to complete a few preparatory steps:
- Register with Google Merchant Center (GMC) and verify and claim your website.
- Install a feed-generation extension in your Magento store. Our example uses Advanced Product Feeds by Mirasvit.
- Review the marketplace's requirements for feed files and check out example feeds.
Once these steps are completed, you can start creating your feed.
Step 1: Use a Pre-Built Template
The extension includes pre-configured templates for Google Shopping, so you don't need to create one from scratch. Simply browse the list and select the template you prefer - there's a plain "Google Shopping" template for simple products, and a "Google Shopping (configurable products)" template if your catalog has configurable products (see Handling Configurable Products below).
To get started, go to the Feeds section and create a new feed by navigating to: Catalog > Advanced Product Feed > Feeds > Add Feed button.
When you open the feed, many fields will already have predefined values or helpful hints, making it easy to proceed step by step.
You'll need to:
- Fill in general feed details.
- Configure the content (specify which data will be included in the feed).
- Select the group of items to be exported.
Advanced users can also create a custom feed without relying on pre-built templates.
Step 2: Fill in Feed Information
In the Feed Information tab, give your feed a name, such as "google-shopping." Ensure the file type is set to XML, which is the default.
If your store has multiple storefronts, select the appropriate one. In this example, we're working with a single storefront, so we'll leave the default selection and enable the feed.
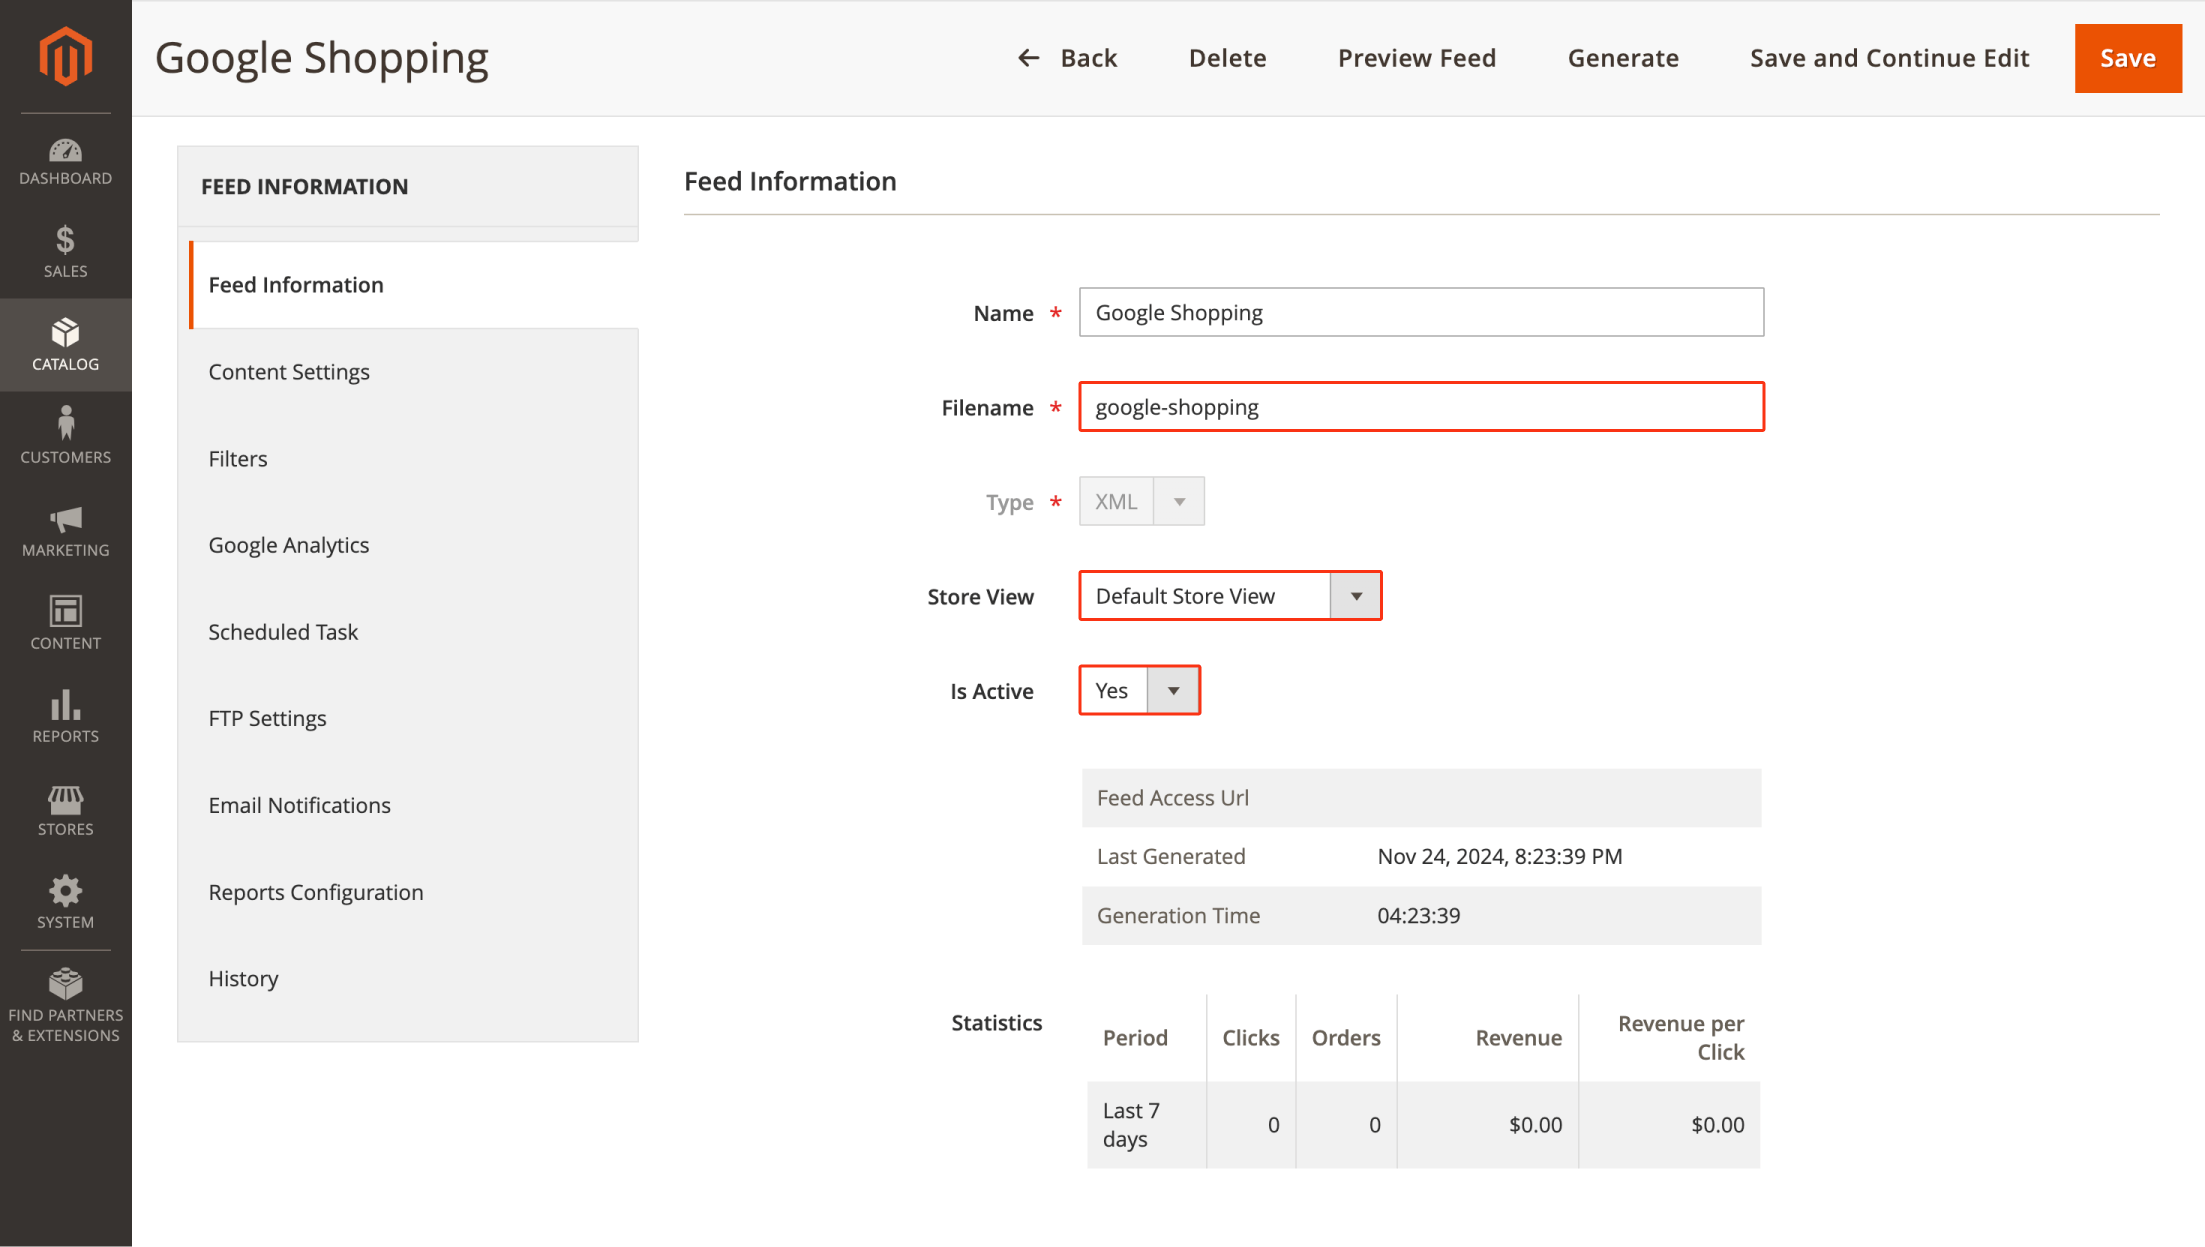
At the end of this step, click the Save and Continue Edit button.
Step 3: Configure Content Settings
In the default template, some variables and tags are not pre-configured, so you'll need to set them manually. Start with "google_product_category."
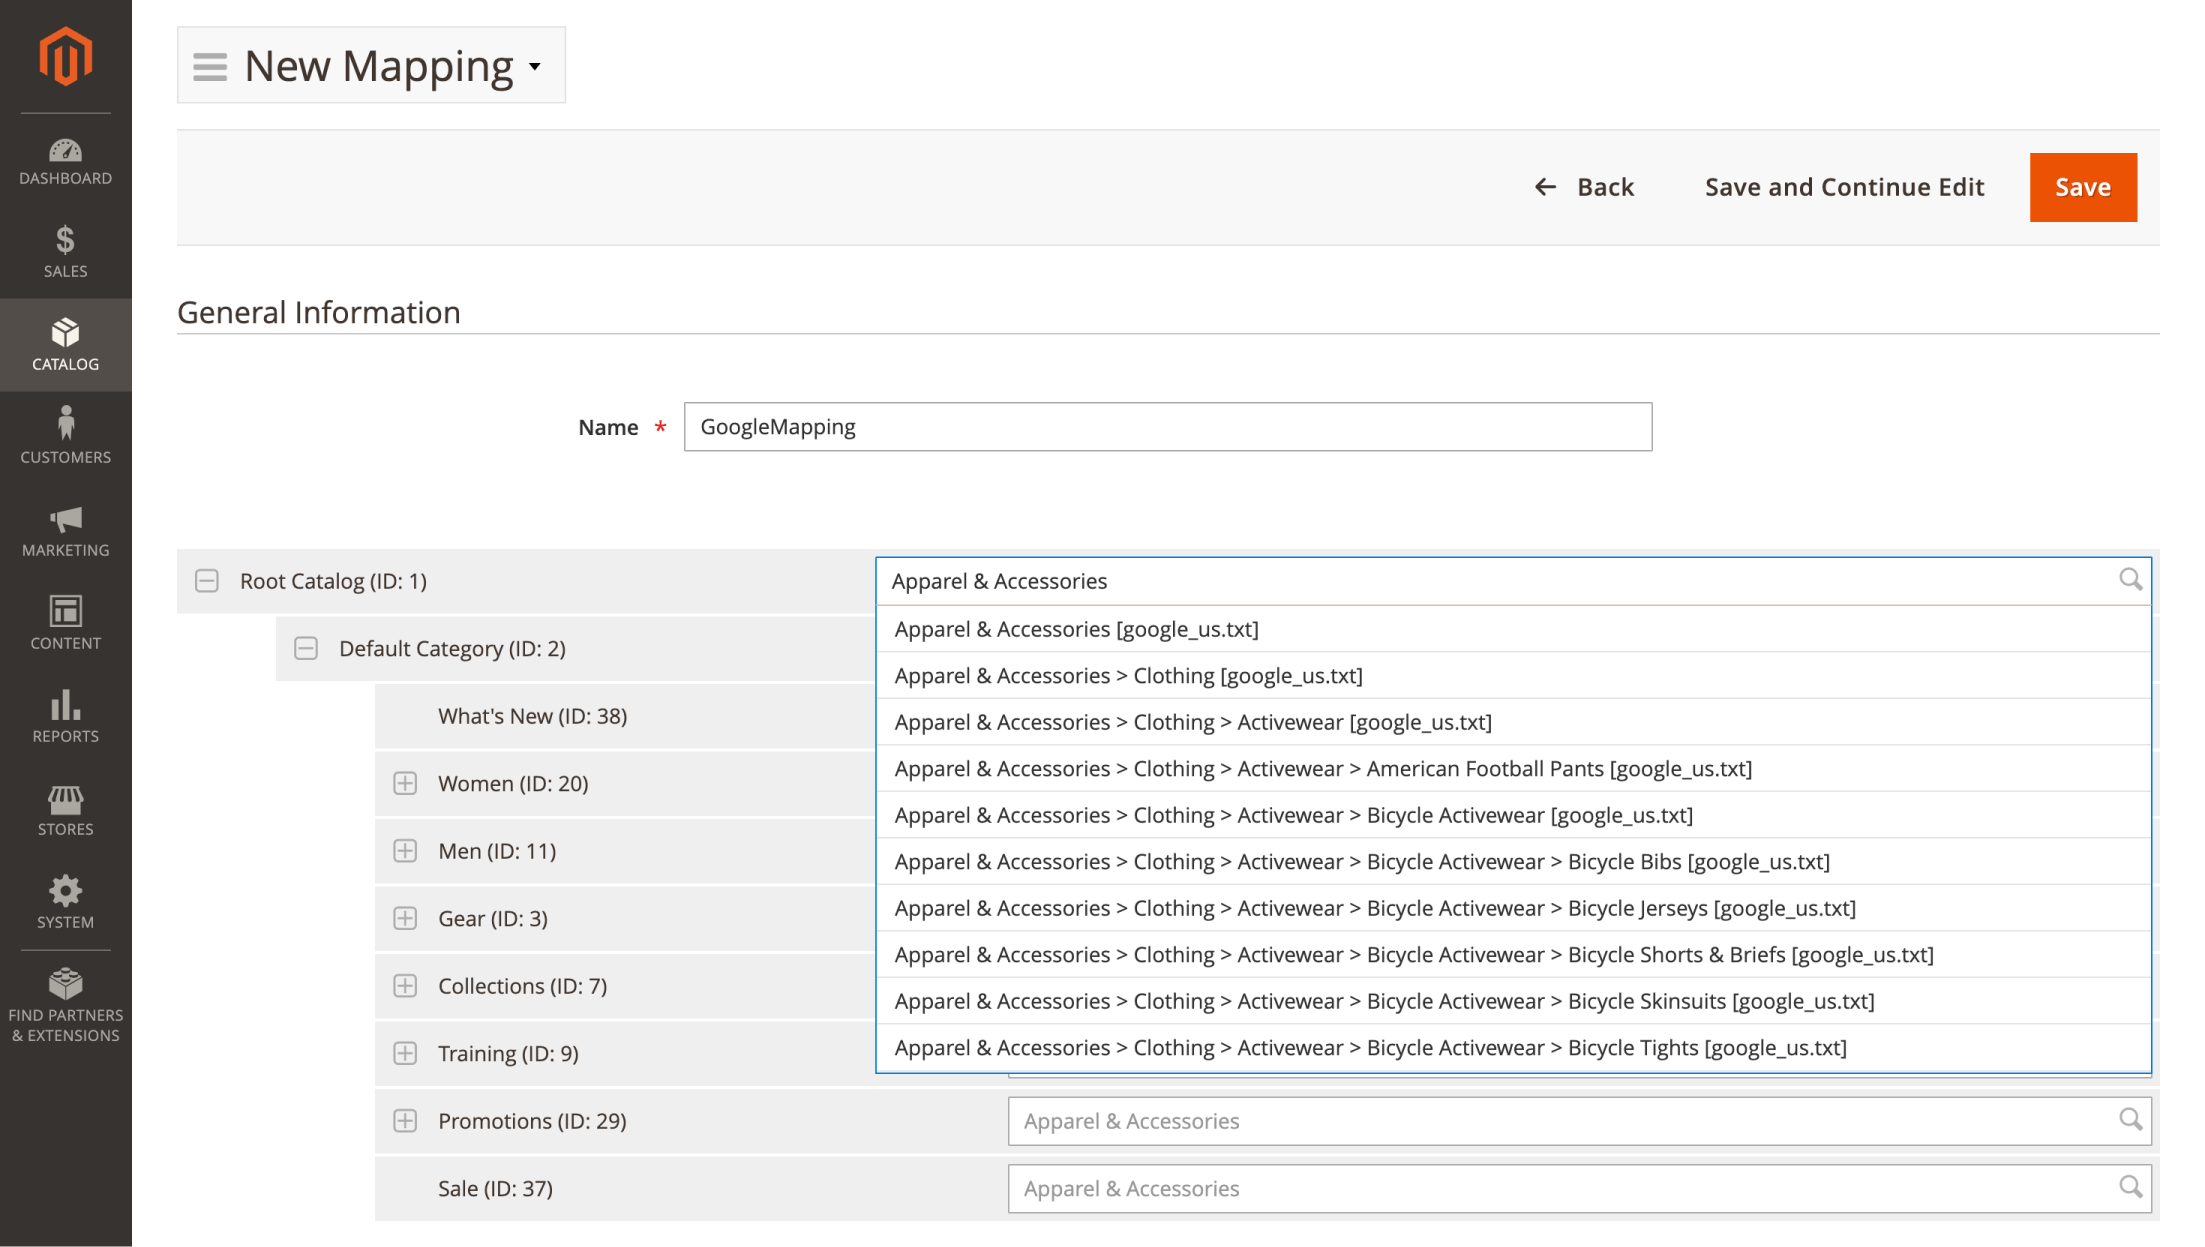
Google's category taxonomy may differ from the categories used in your store. To ensure proper placement of your items, you'll need to map your store's categories to Google's categories. You can learn more about Category Mapping.
To create category mapping, navigate to Catalog > Advanced Product Feeds > Category Mapping. Add your categories by selecting the corresponding Google categories in the right column that match your store's categories on the left.
The result should look something like this:
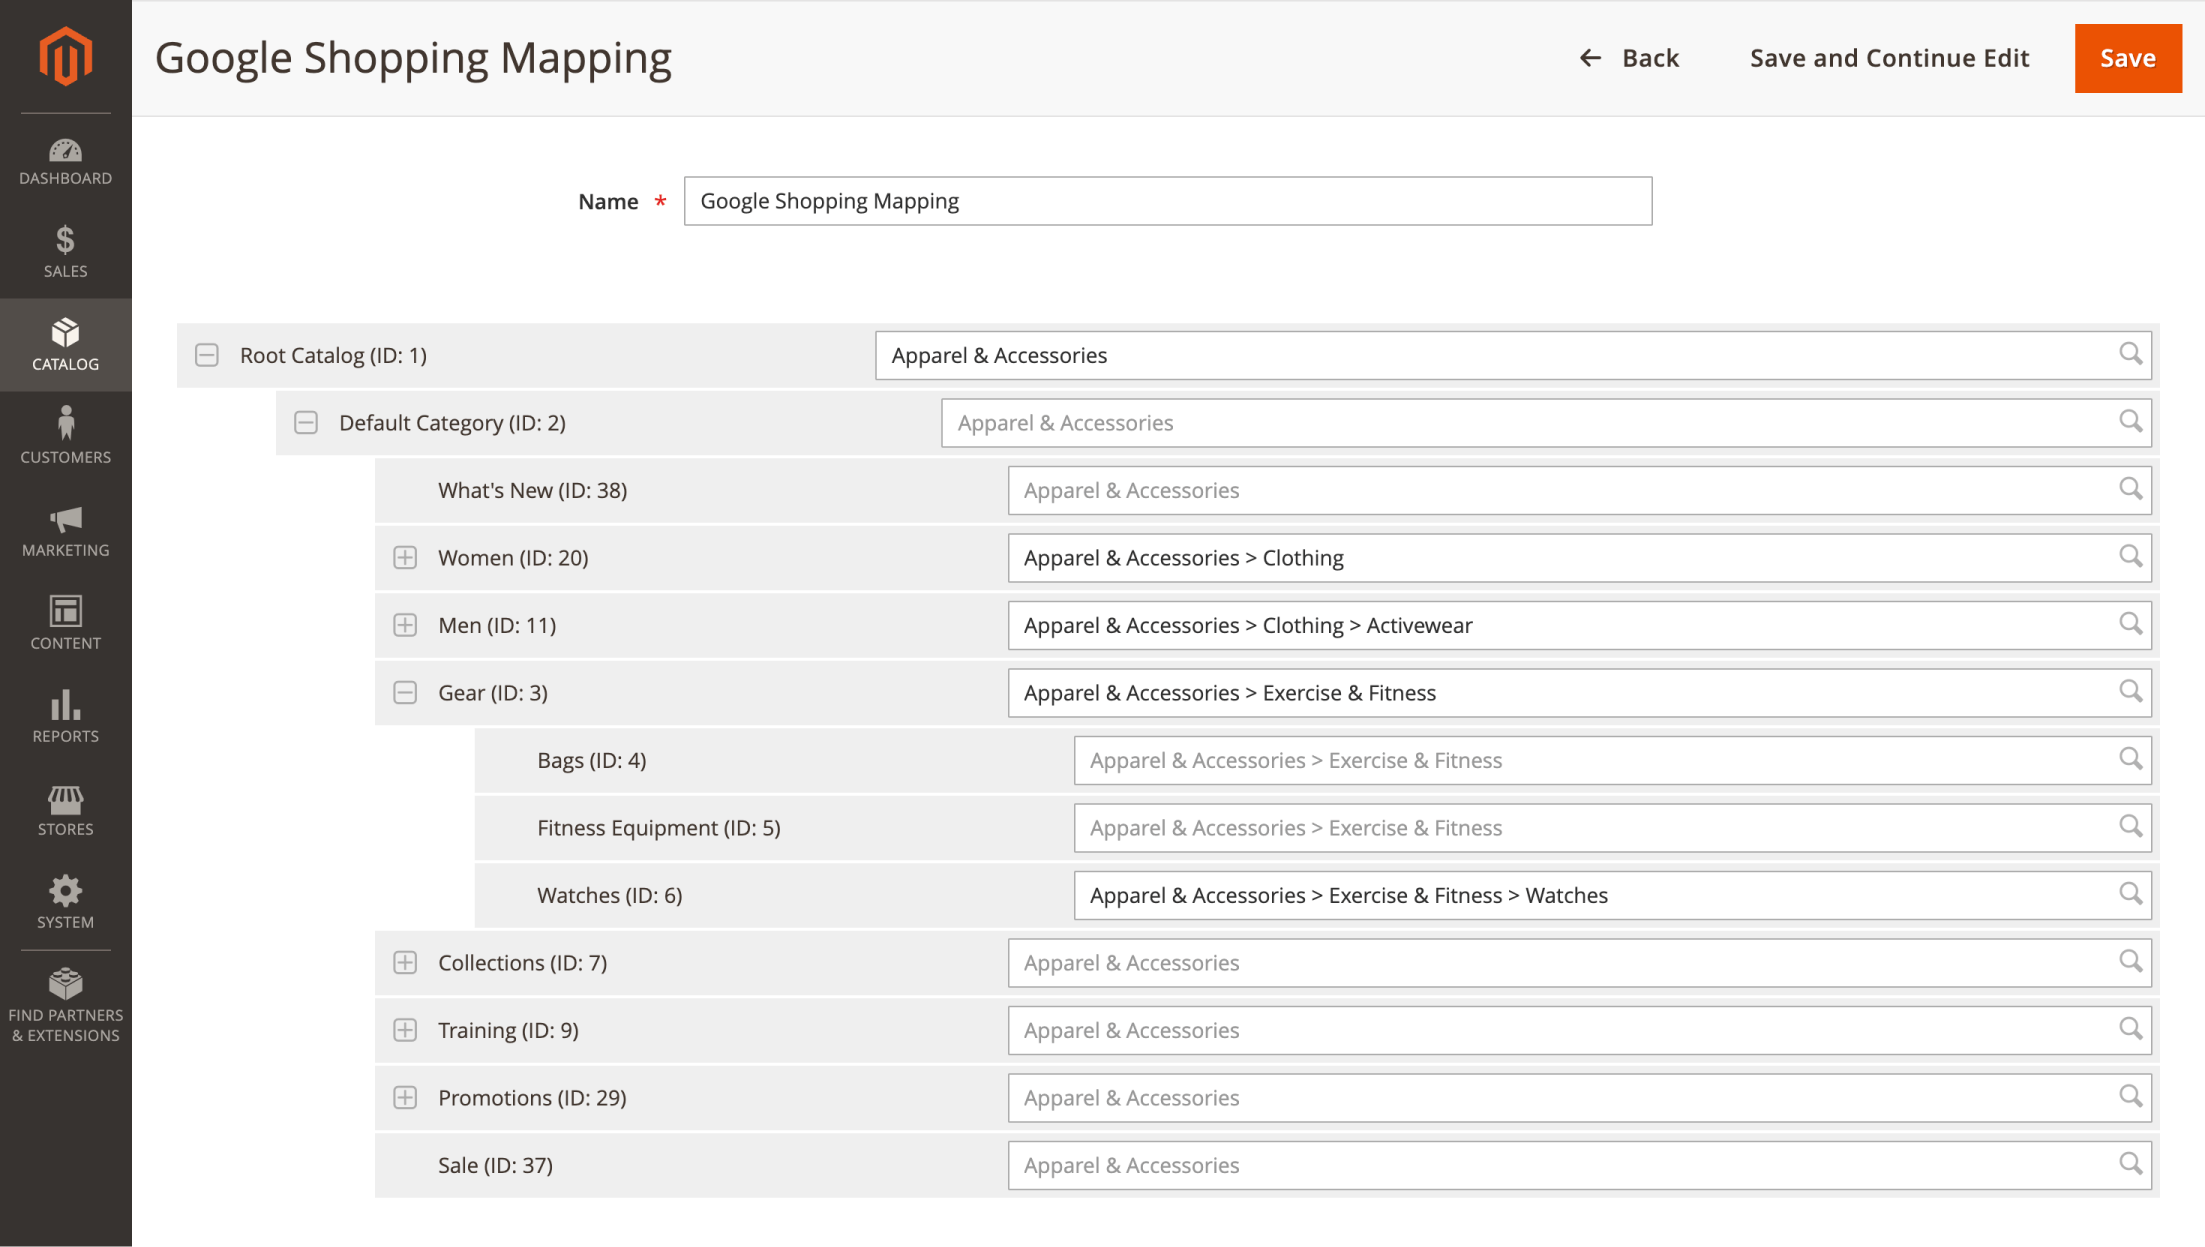
Once the mapping is complete, save it and return to the Content Settings tab. Next, add a variable to reference the mapping in your feed file:
Place your cursor within the section and insert the Category Mapping attribute.
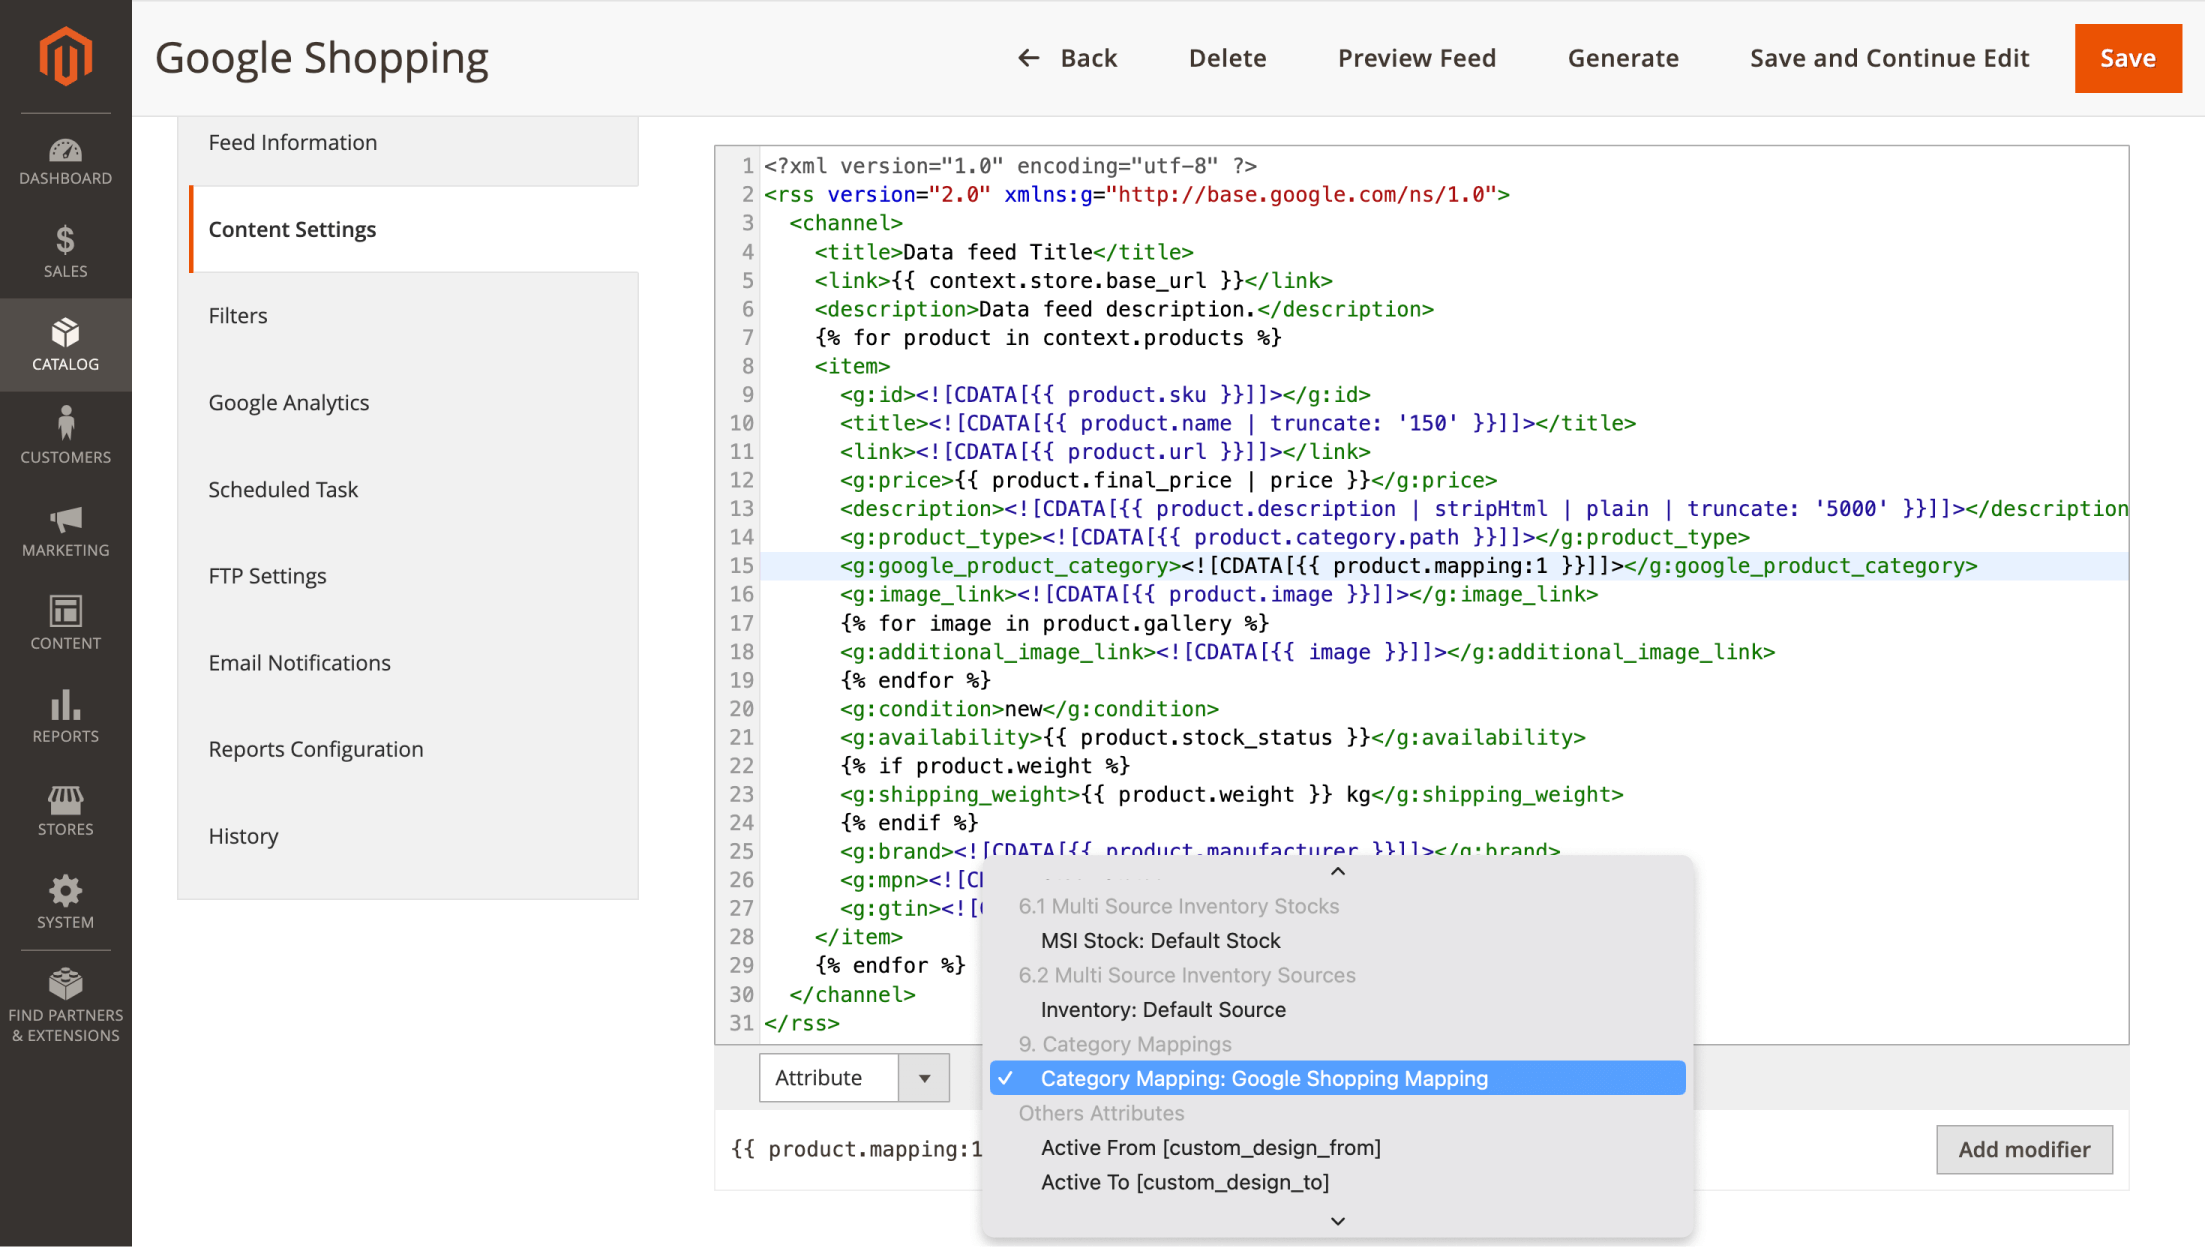
You'll get a line that looks like this:
Save your changes.
Now, when the feed is generated, the extension will automatically check the product category assigned in your store and replace it with the corresponding category from the Google Shopping taxonomy.
Step 4: Apply Filters
Using filters, you can select only the items you want to include in the marketplace feed. Ensure the selected items:
- Have a quantity greater than zero.
- Are in stock.
- Are visible in your catalog or search.
To create a filter, navigate to Catalog > Advanced Product Feeds > Manage Filters and create a new filter:
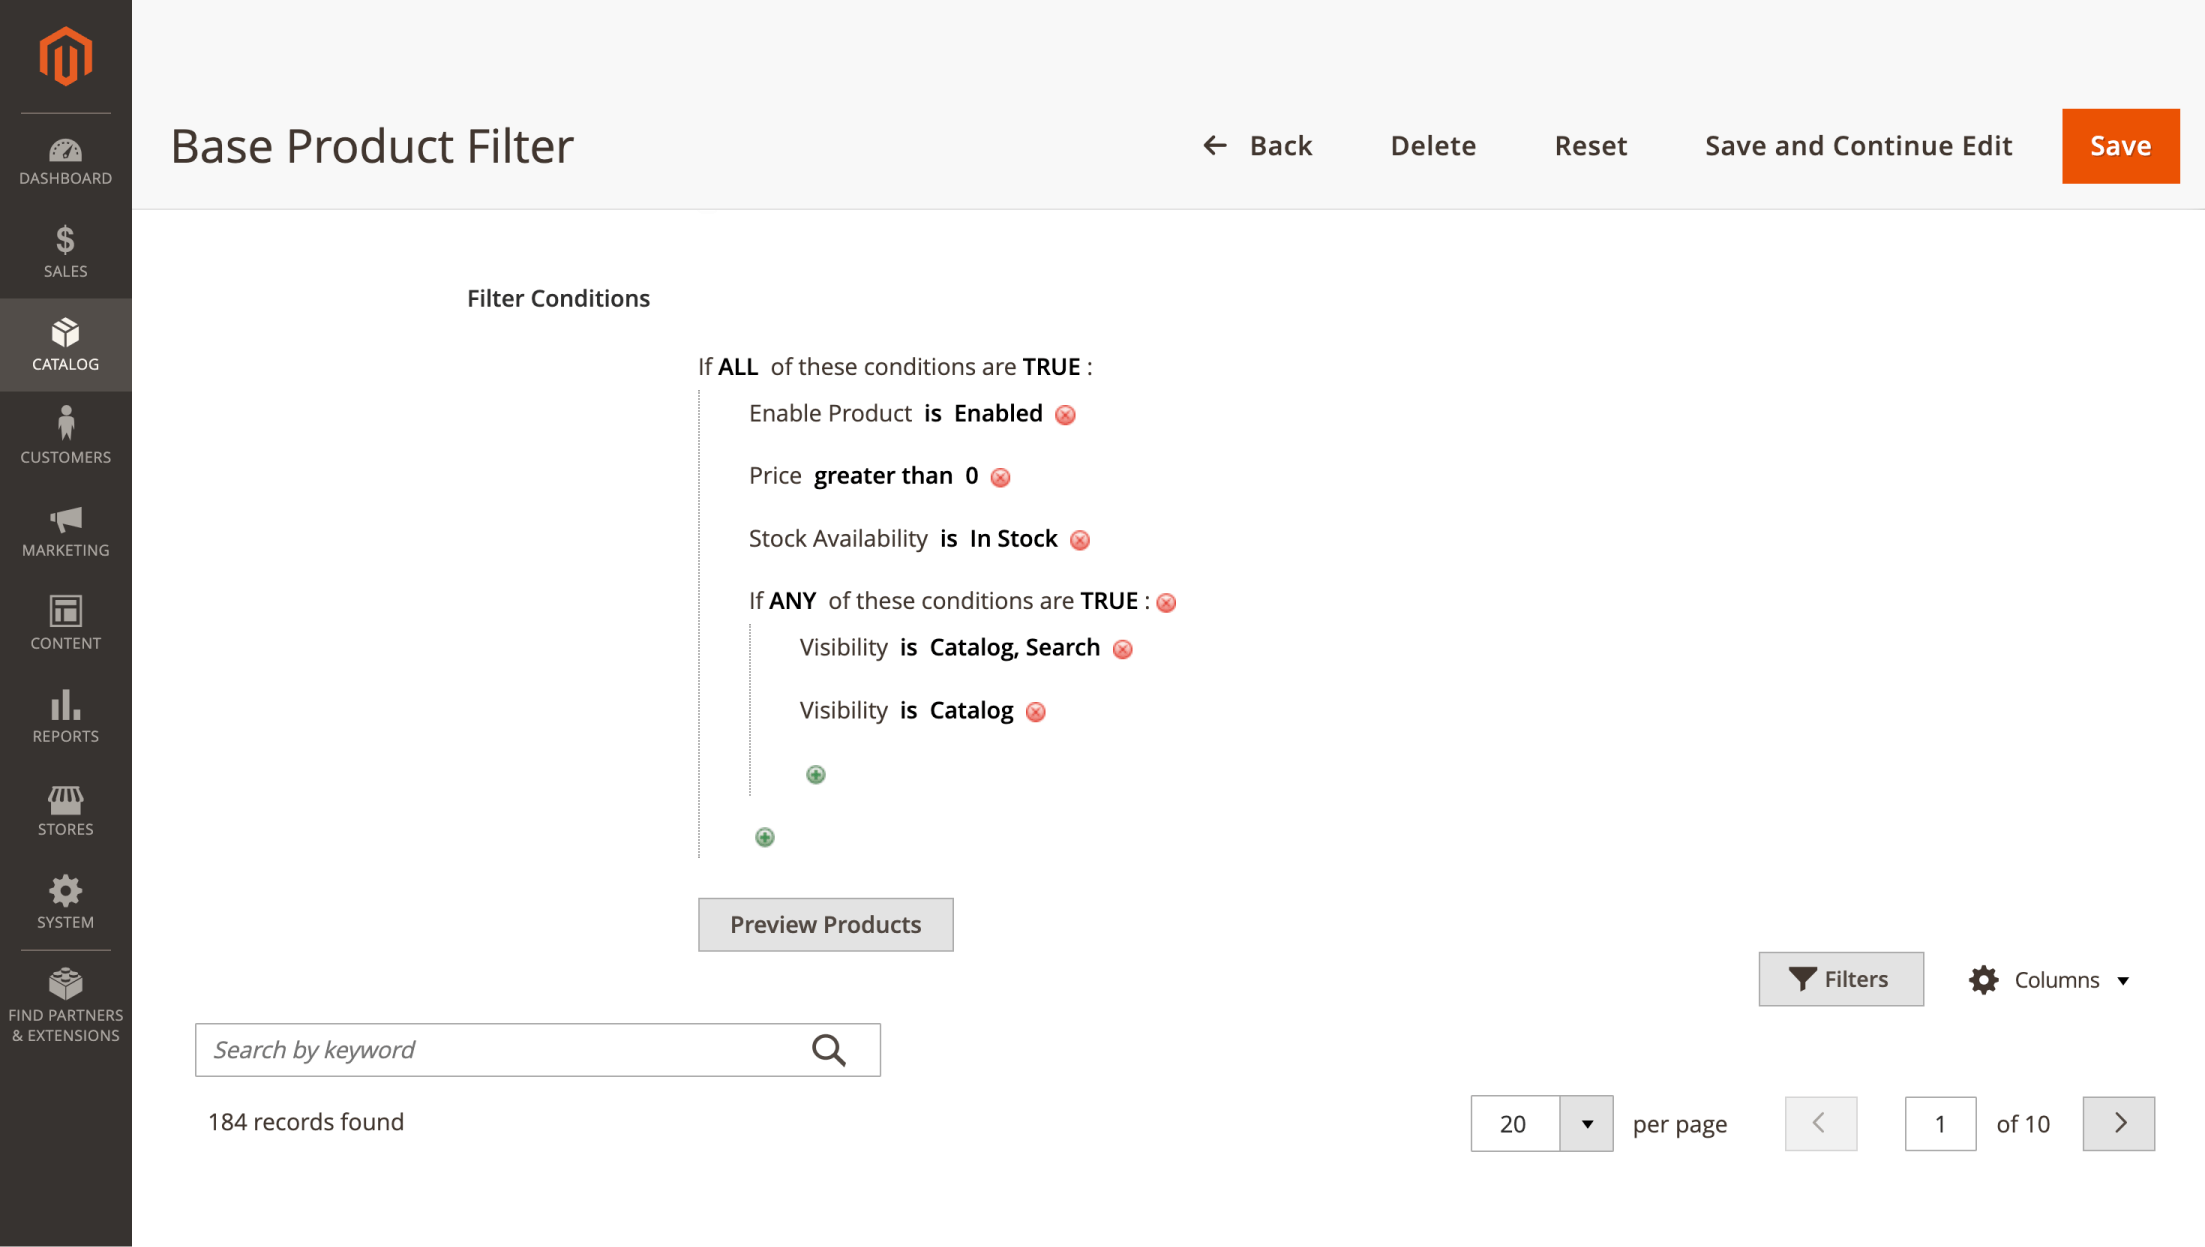
Save the filter and return to your feed configuration to apply it. Save your changes again:
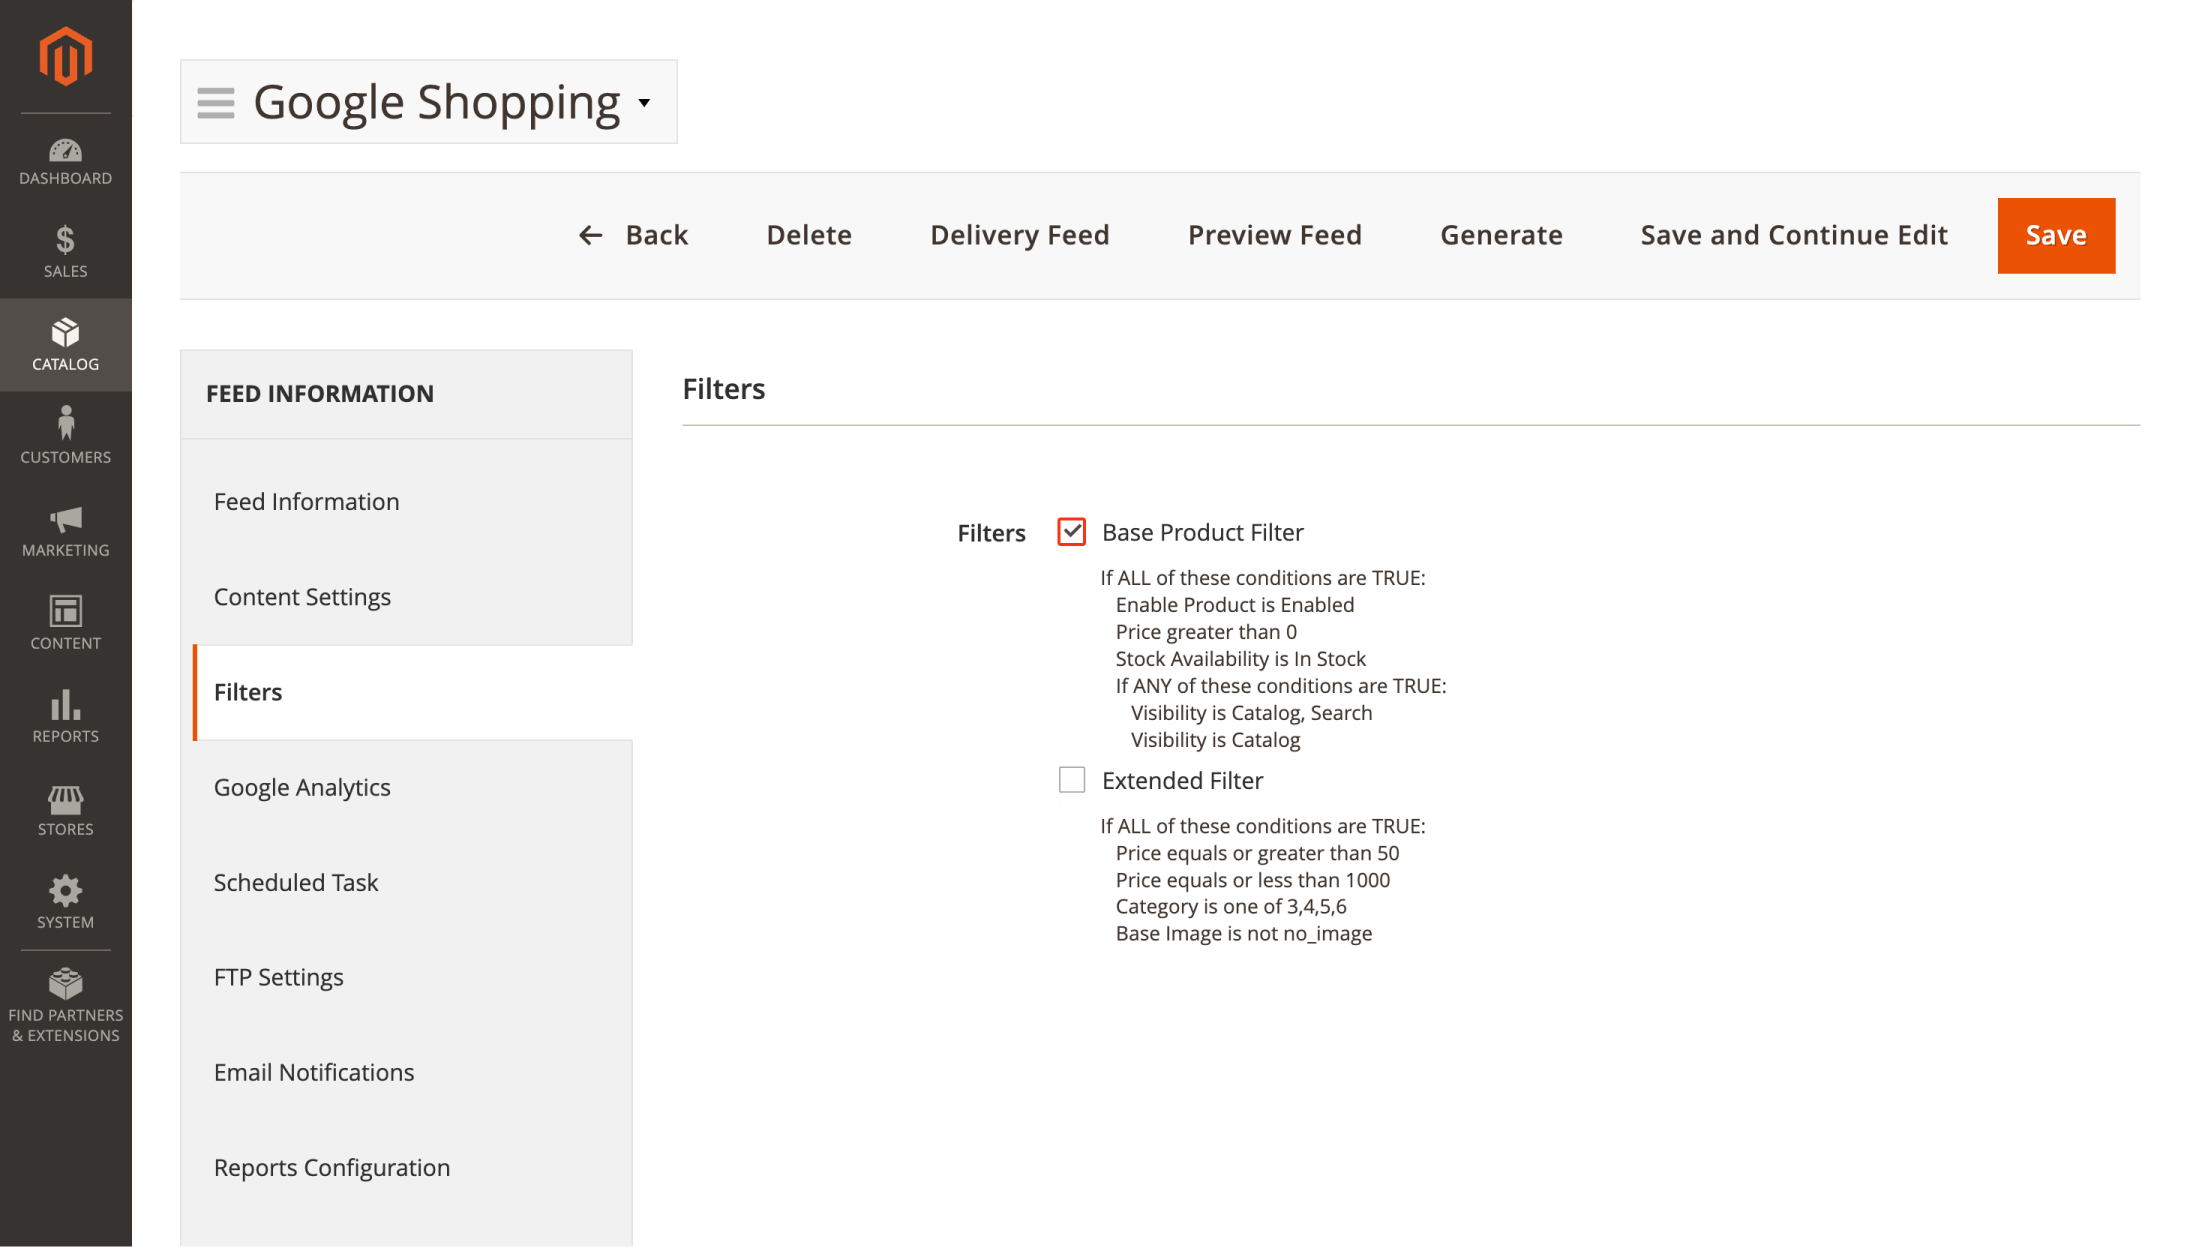
By completing these four steps, you've finalized the basic feed settings. At this point, you can stop if desired.
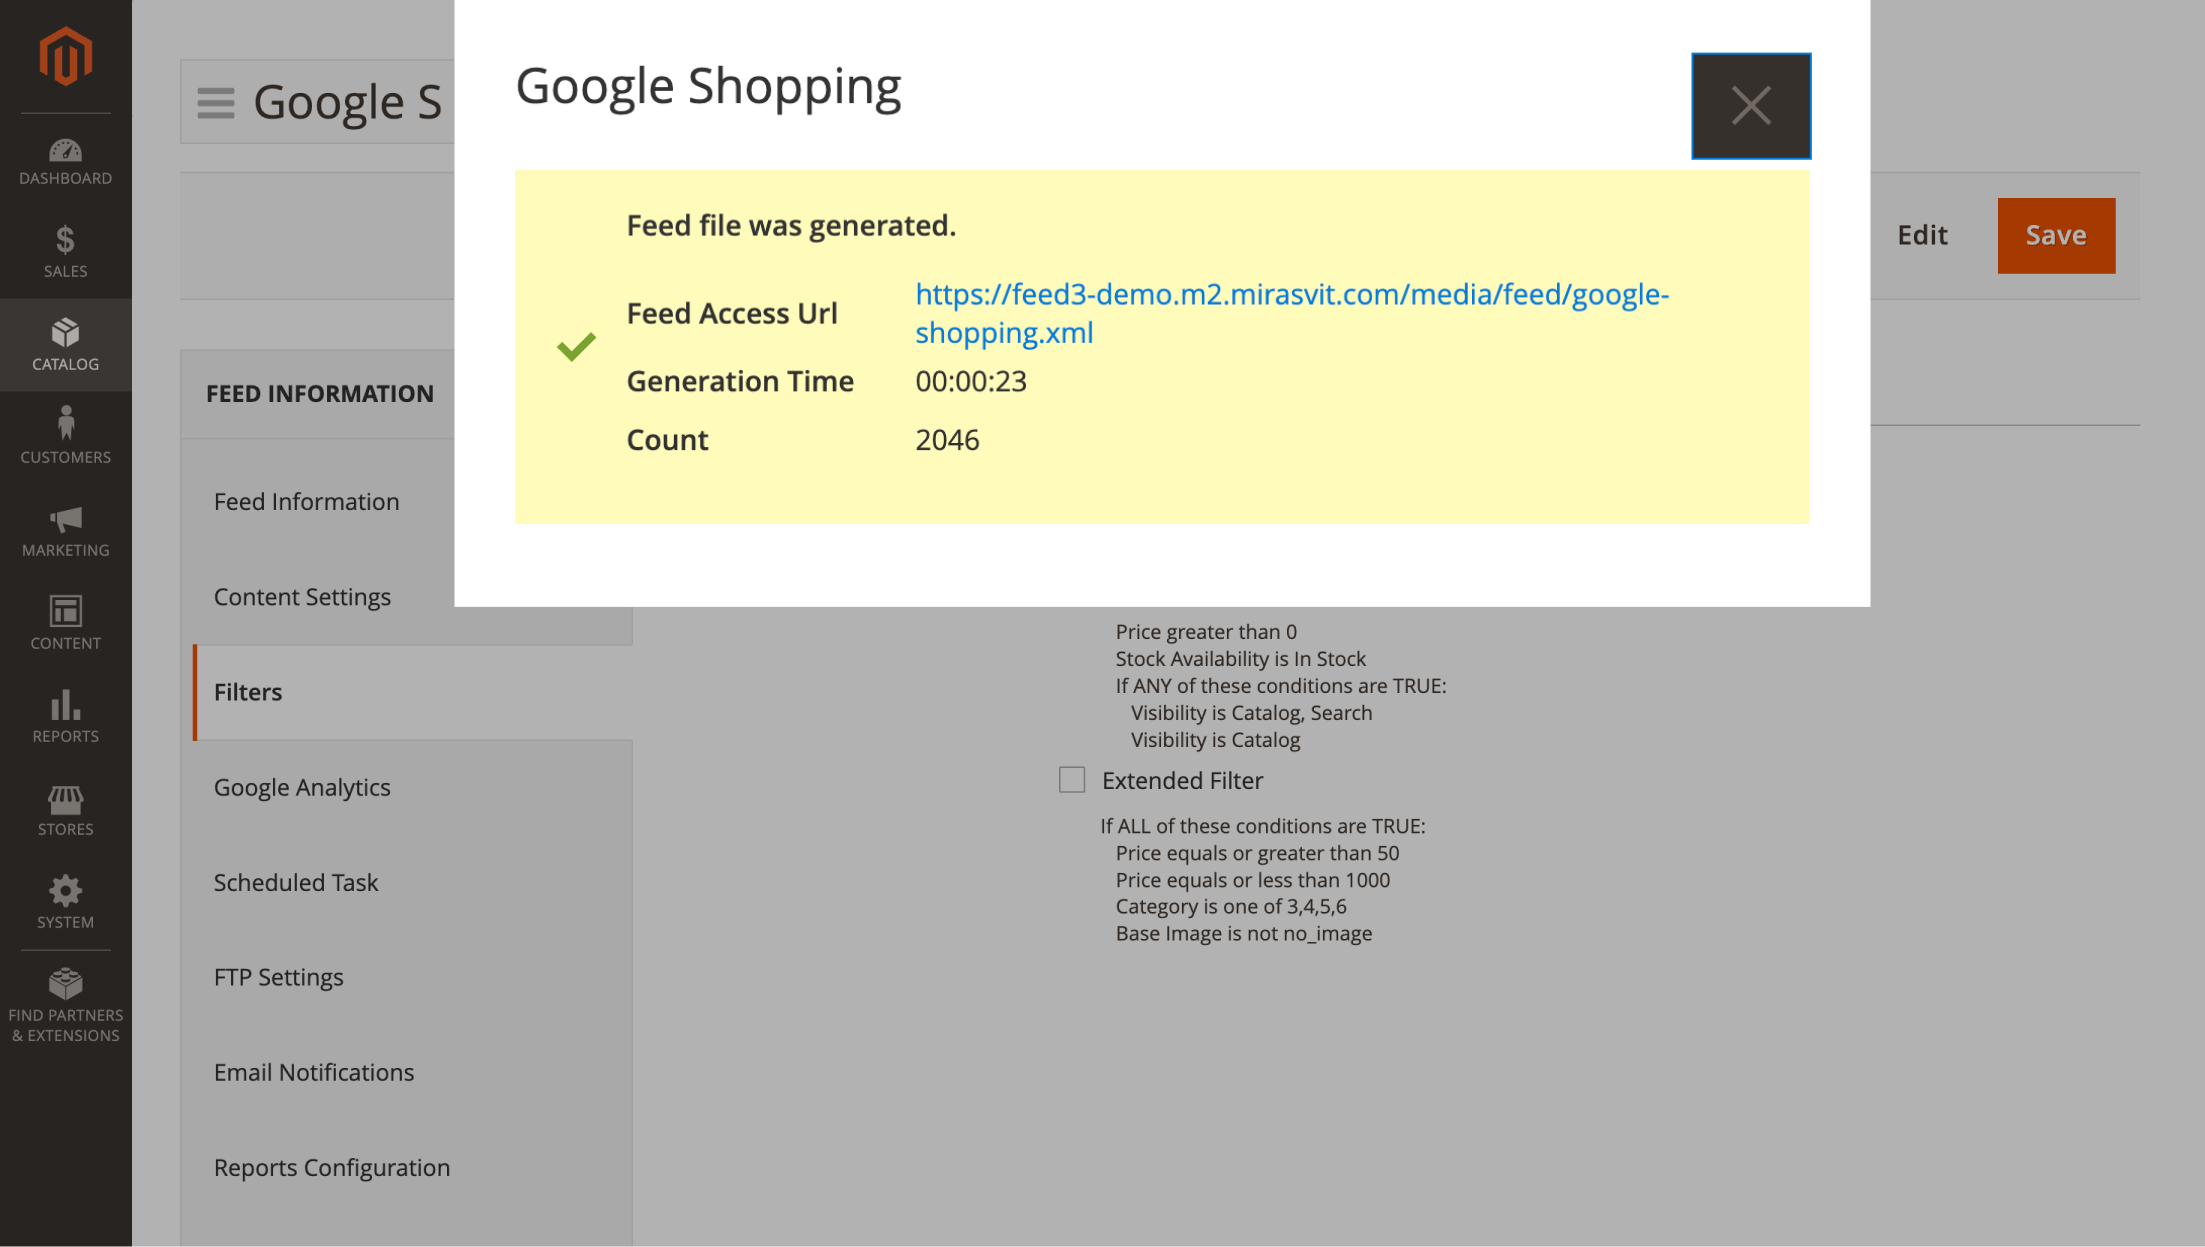
Click the Generate button, and a pop-up window will display the generation process. Once it's finished, you'll receive a link to your XML feed file, which is also accessible from the Feed Information tab.
To confirm the feed contains the correct data and doesn't have empty attributes, open the link in your browser:
After uploading the feed, Google Merchant Center will validate it using its tools to ensure all required fields are included. You can also use GMC reports to verify the accuracy of your product data and make any necessary adjustments.
With the basic feed setup complete, here are a few more features worth setting up.
Additional Options to Improve Your Feed
Integrate Google Analytics
To enable Google Analytics, go to the GA tab in the extension settings and fill in the required fields:
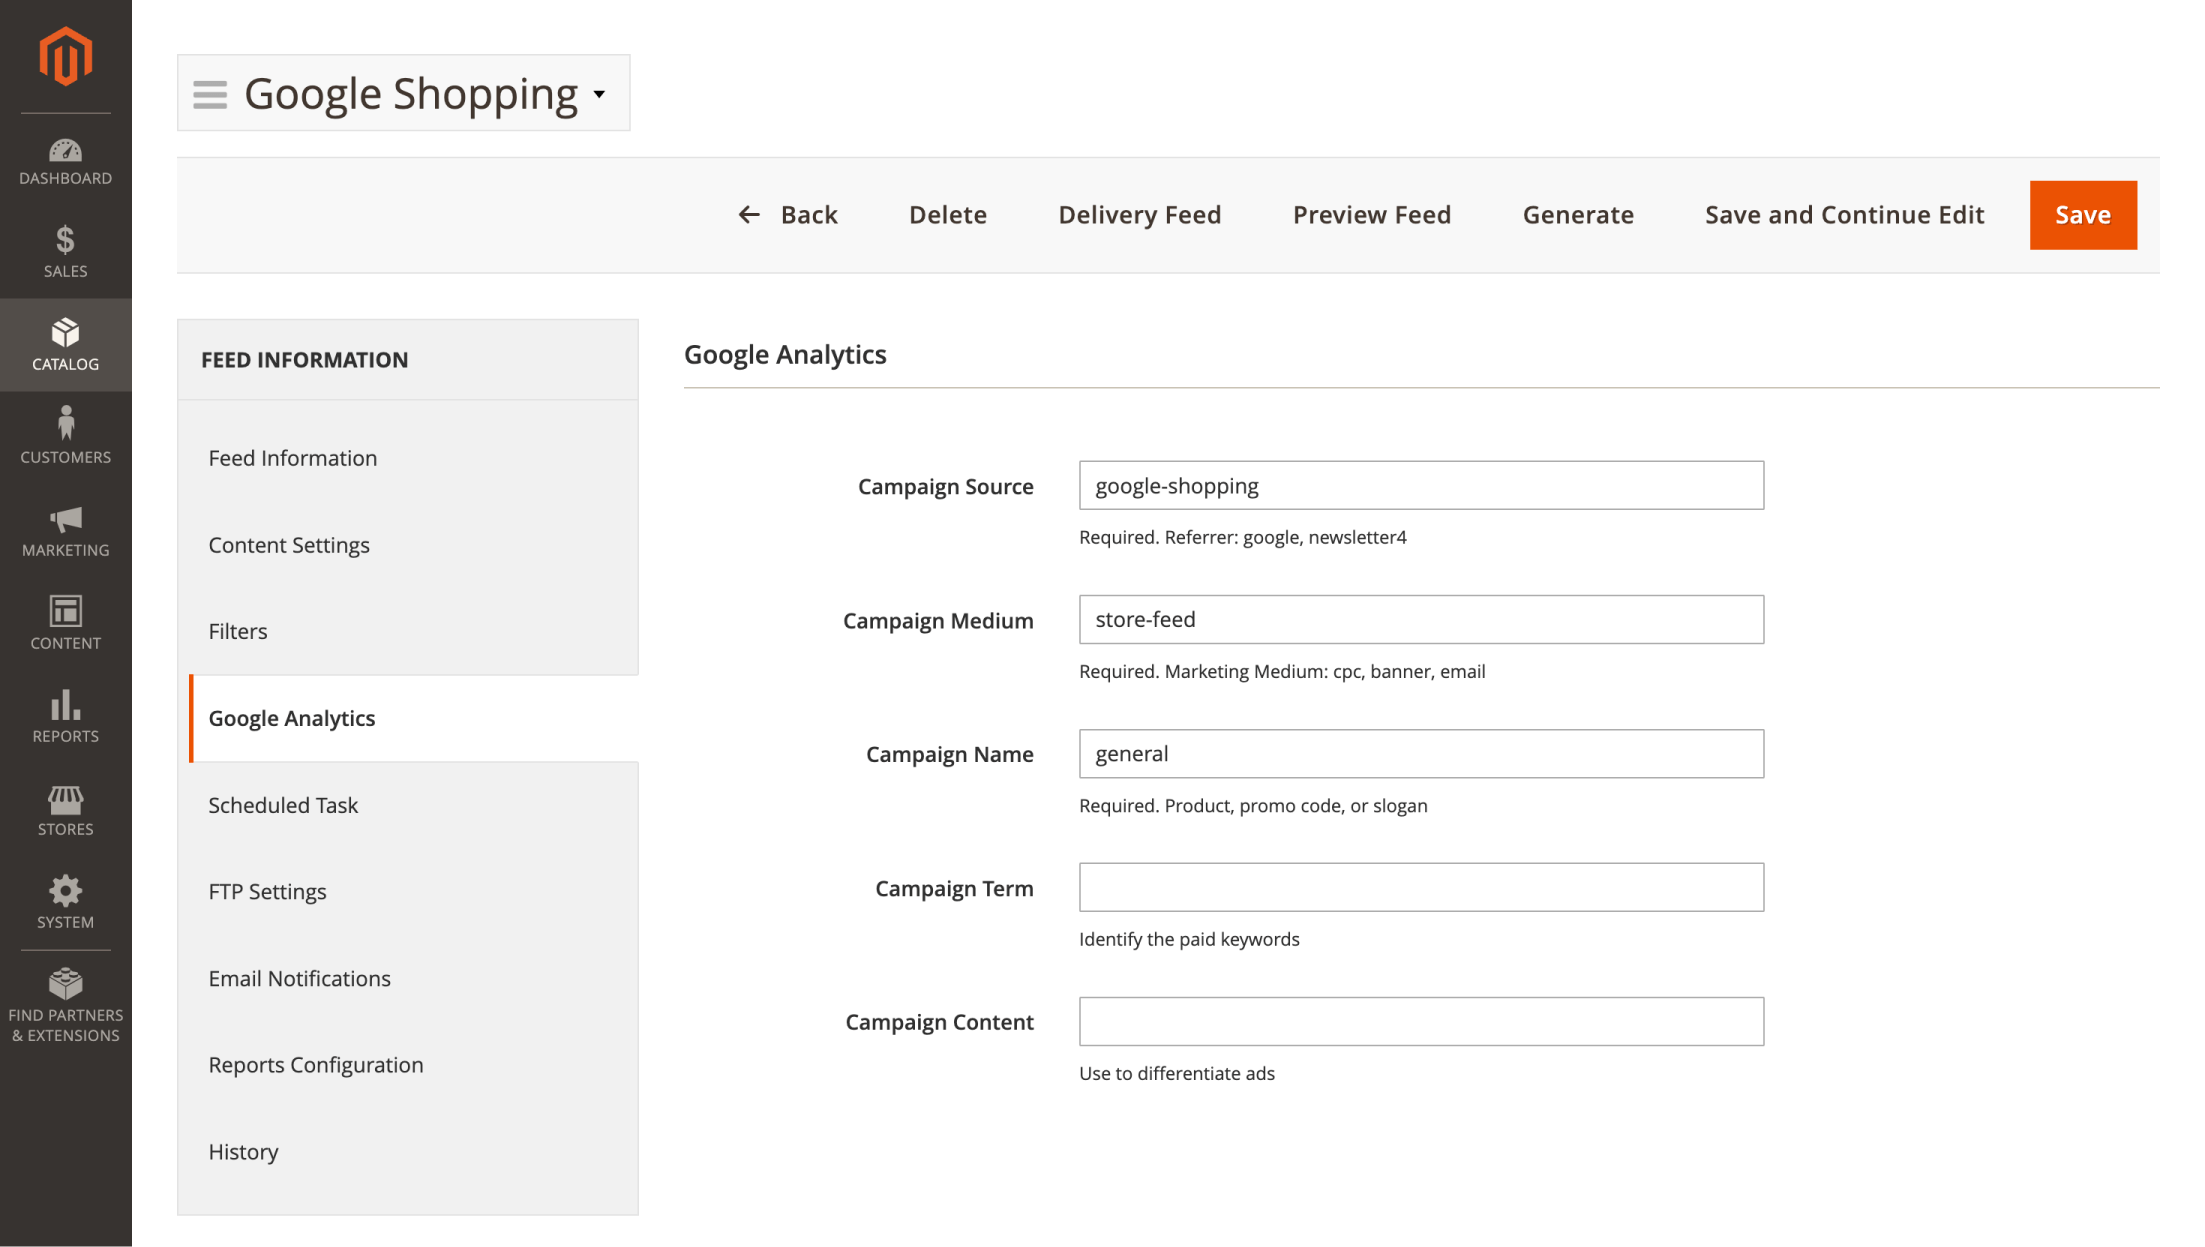
Once configured, the extension automatically adds UTM tags to each product URL. These tags allow Google Analytics to track when a customer finds your item on a marketplace and clicks through to your site.
Set Up Feed Upload via FTP/SFTP
Google Merchant Center allows you to upload the file in several ways: via SFTP to GMC servers or by providing a file URL. The second method is simpler, as mentioned earlier. However, if you prefer direct file uploads, complete the following fields with the credentials from your GMC account:
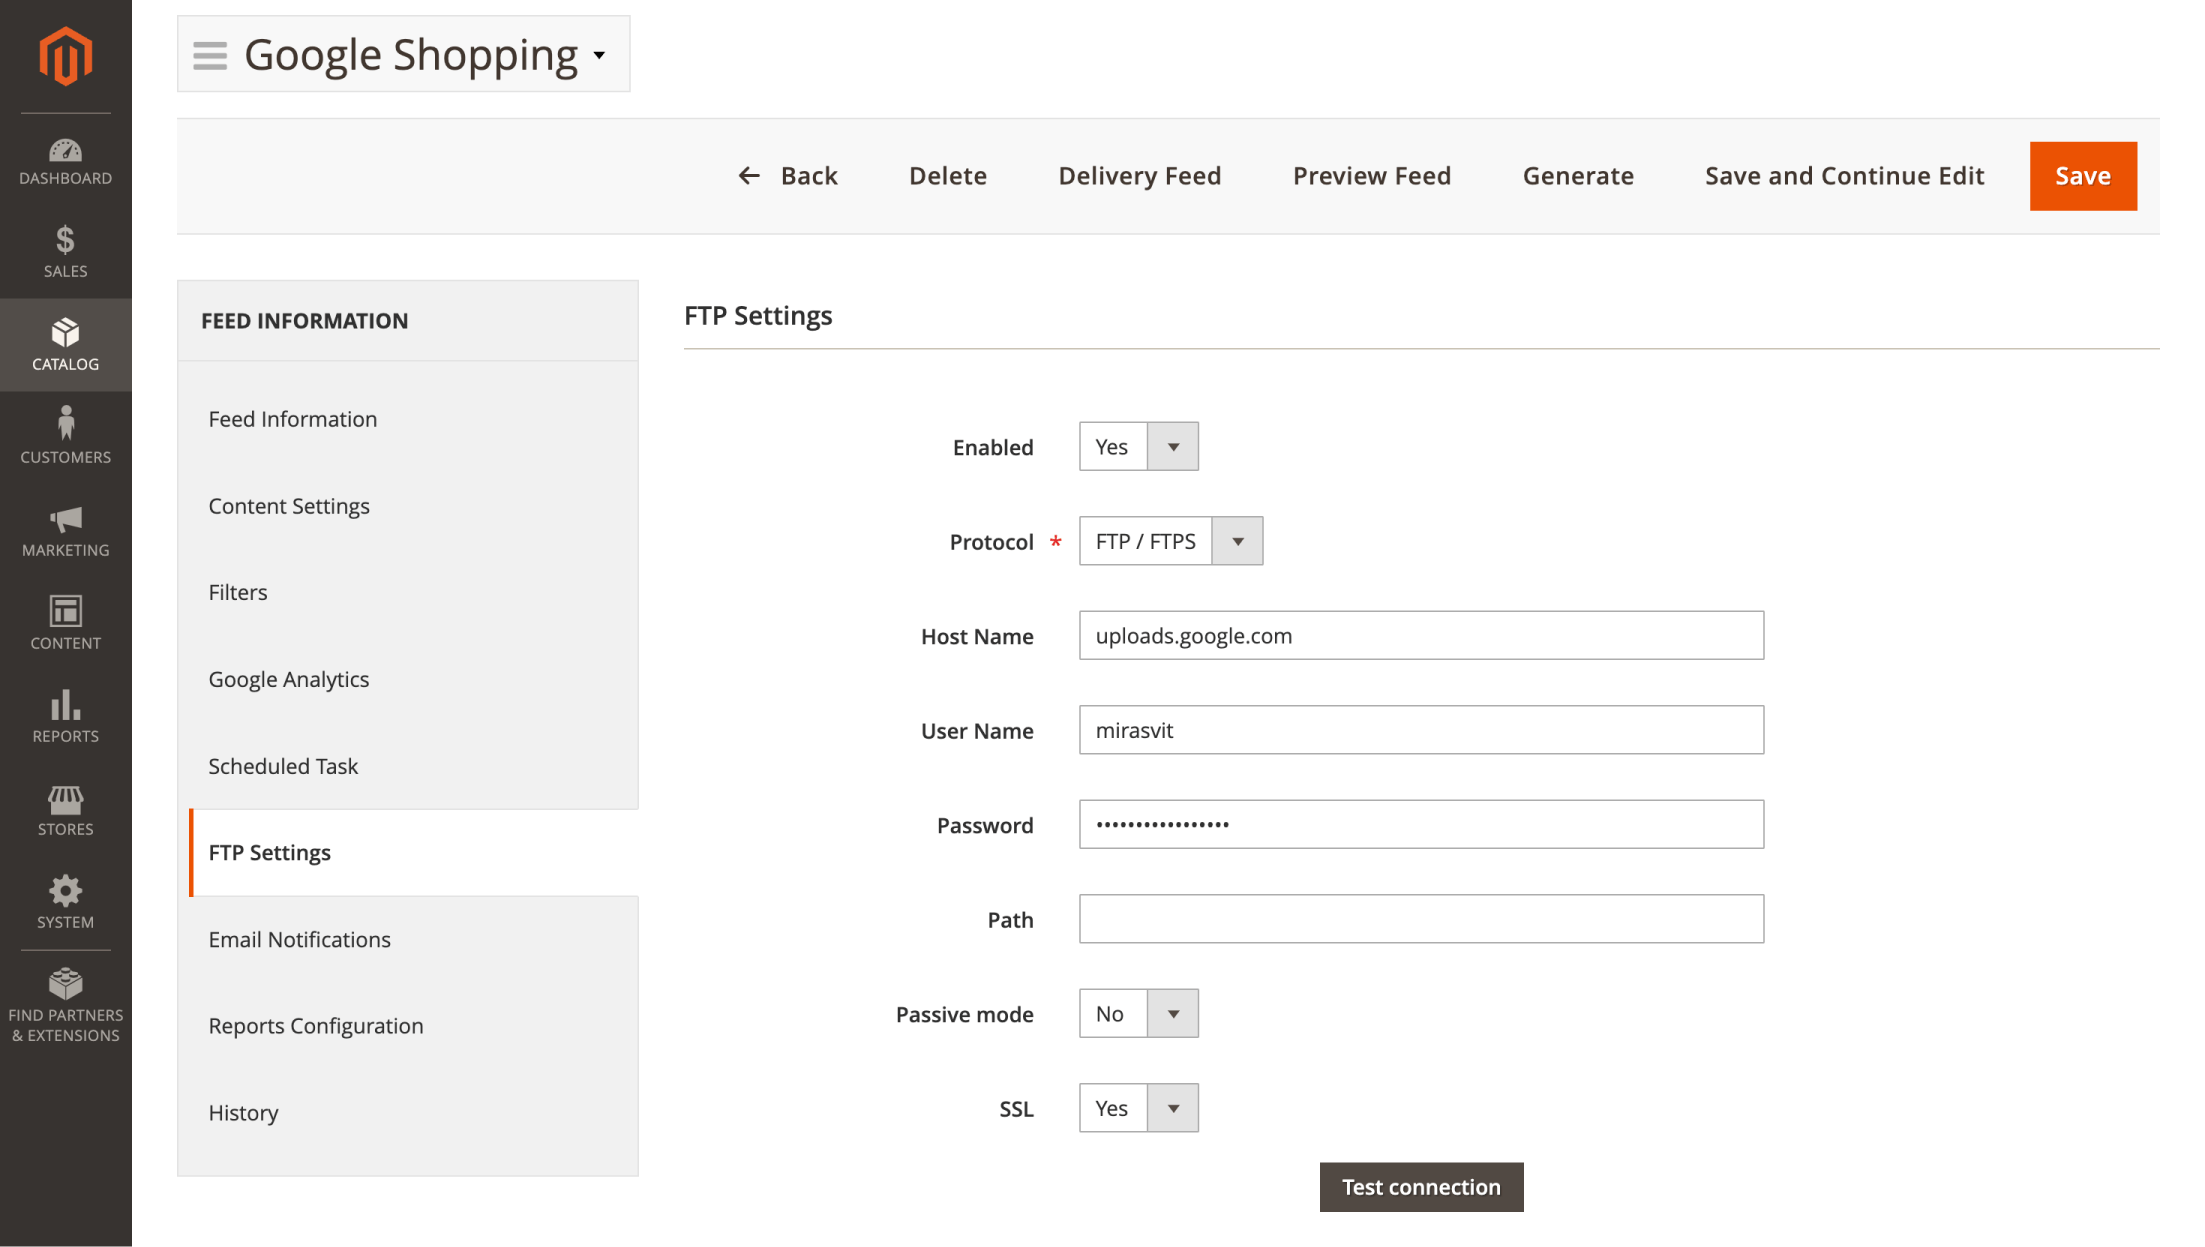
Make sure to test the connection to ensure everything is working properly.
Create Email Notifications
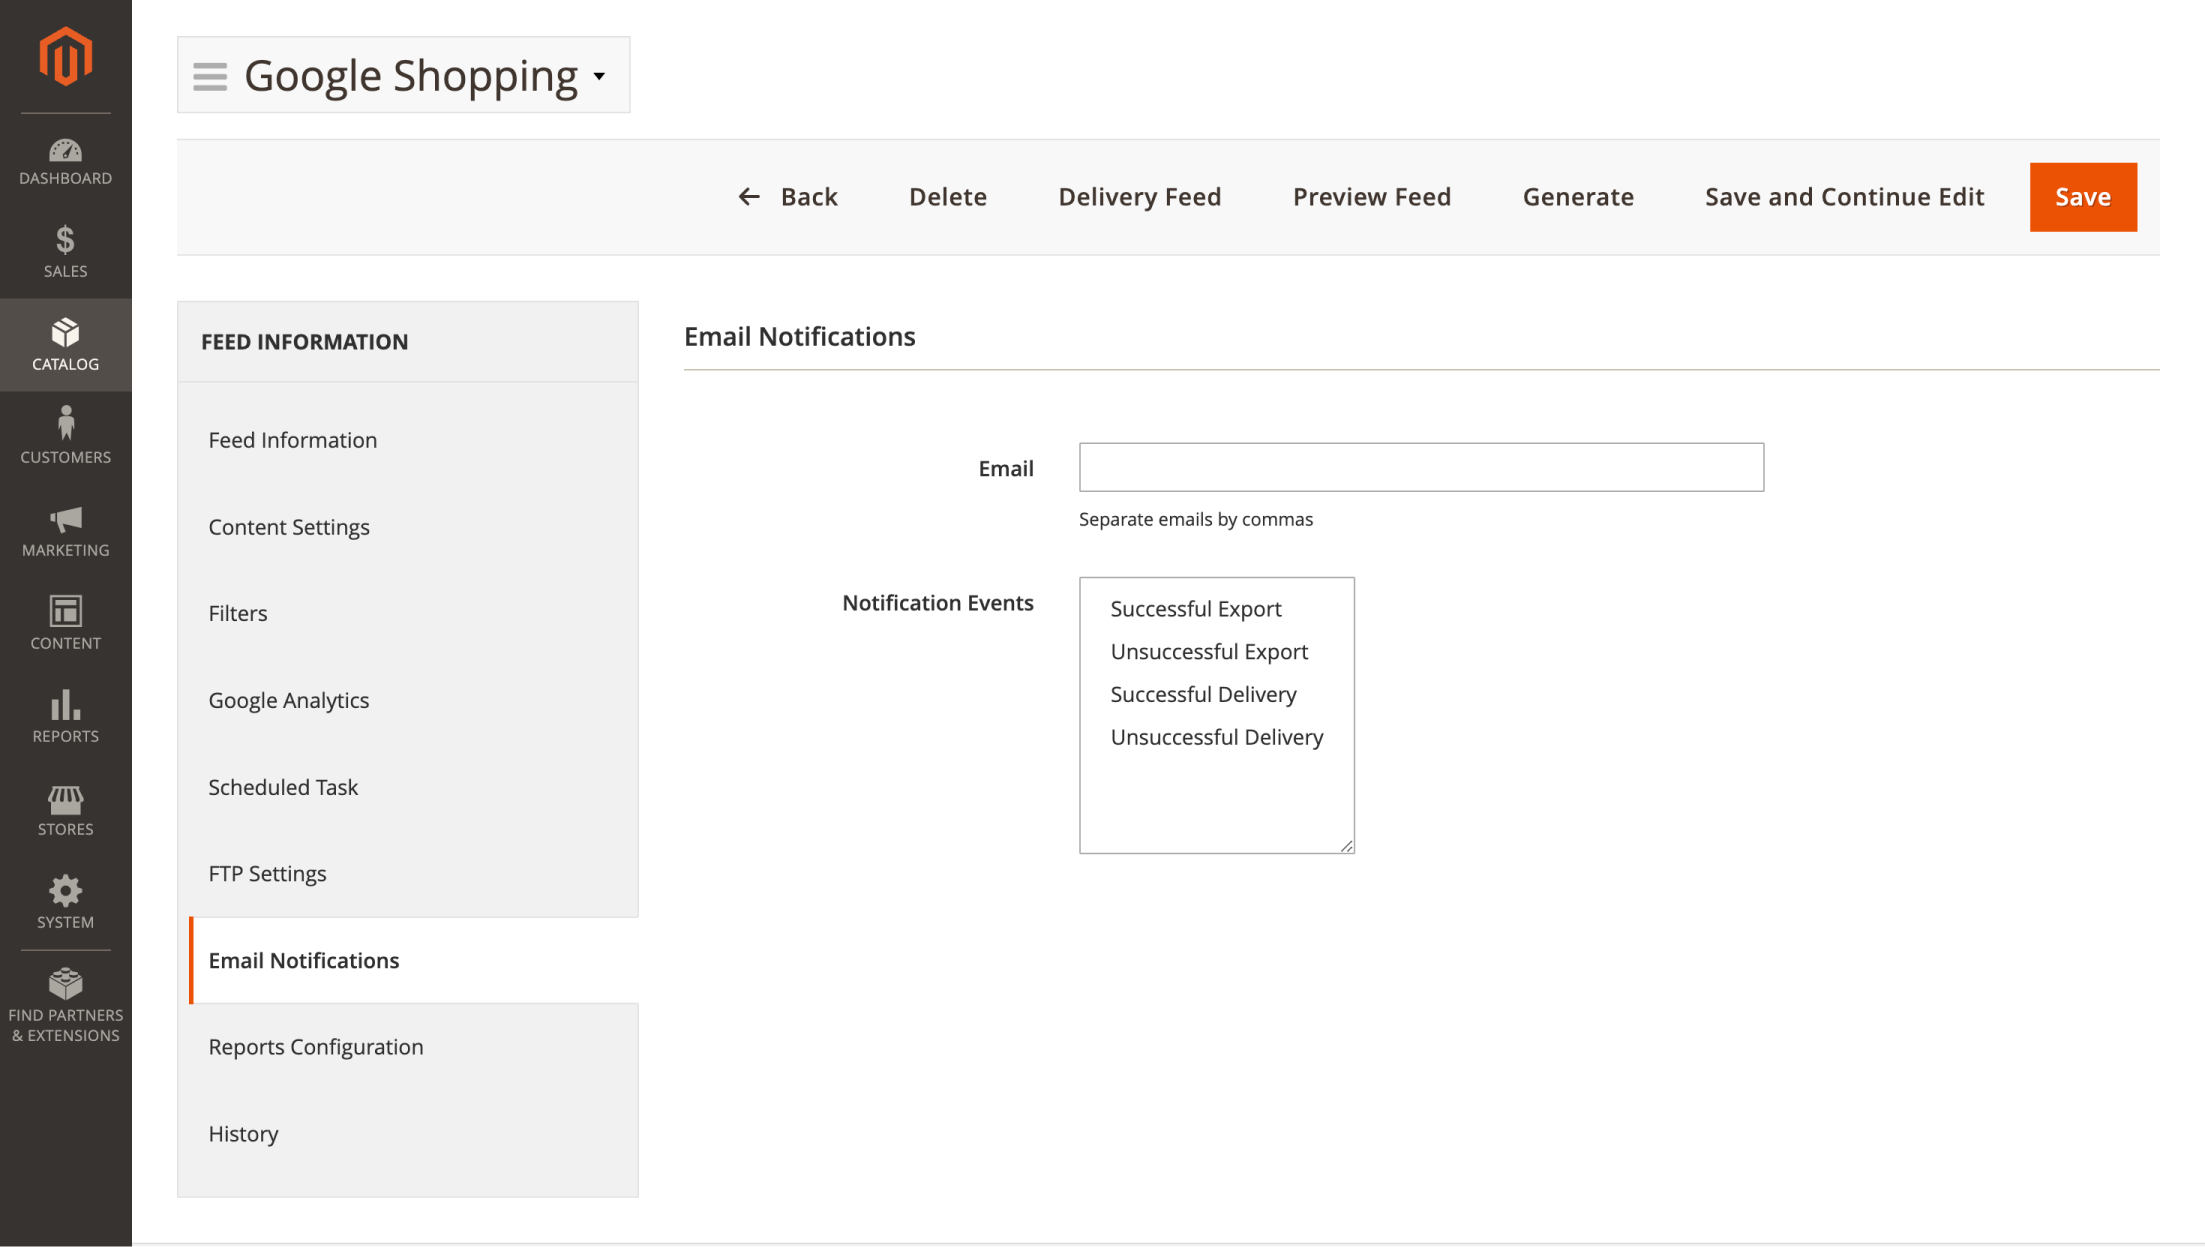
You can also configure notifications for successful feed generation and uploads, as well as alerts for errors, so you can respond promptly if issues arise.
Schedule Feed Generation
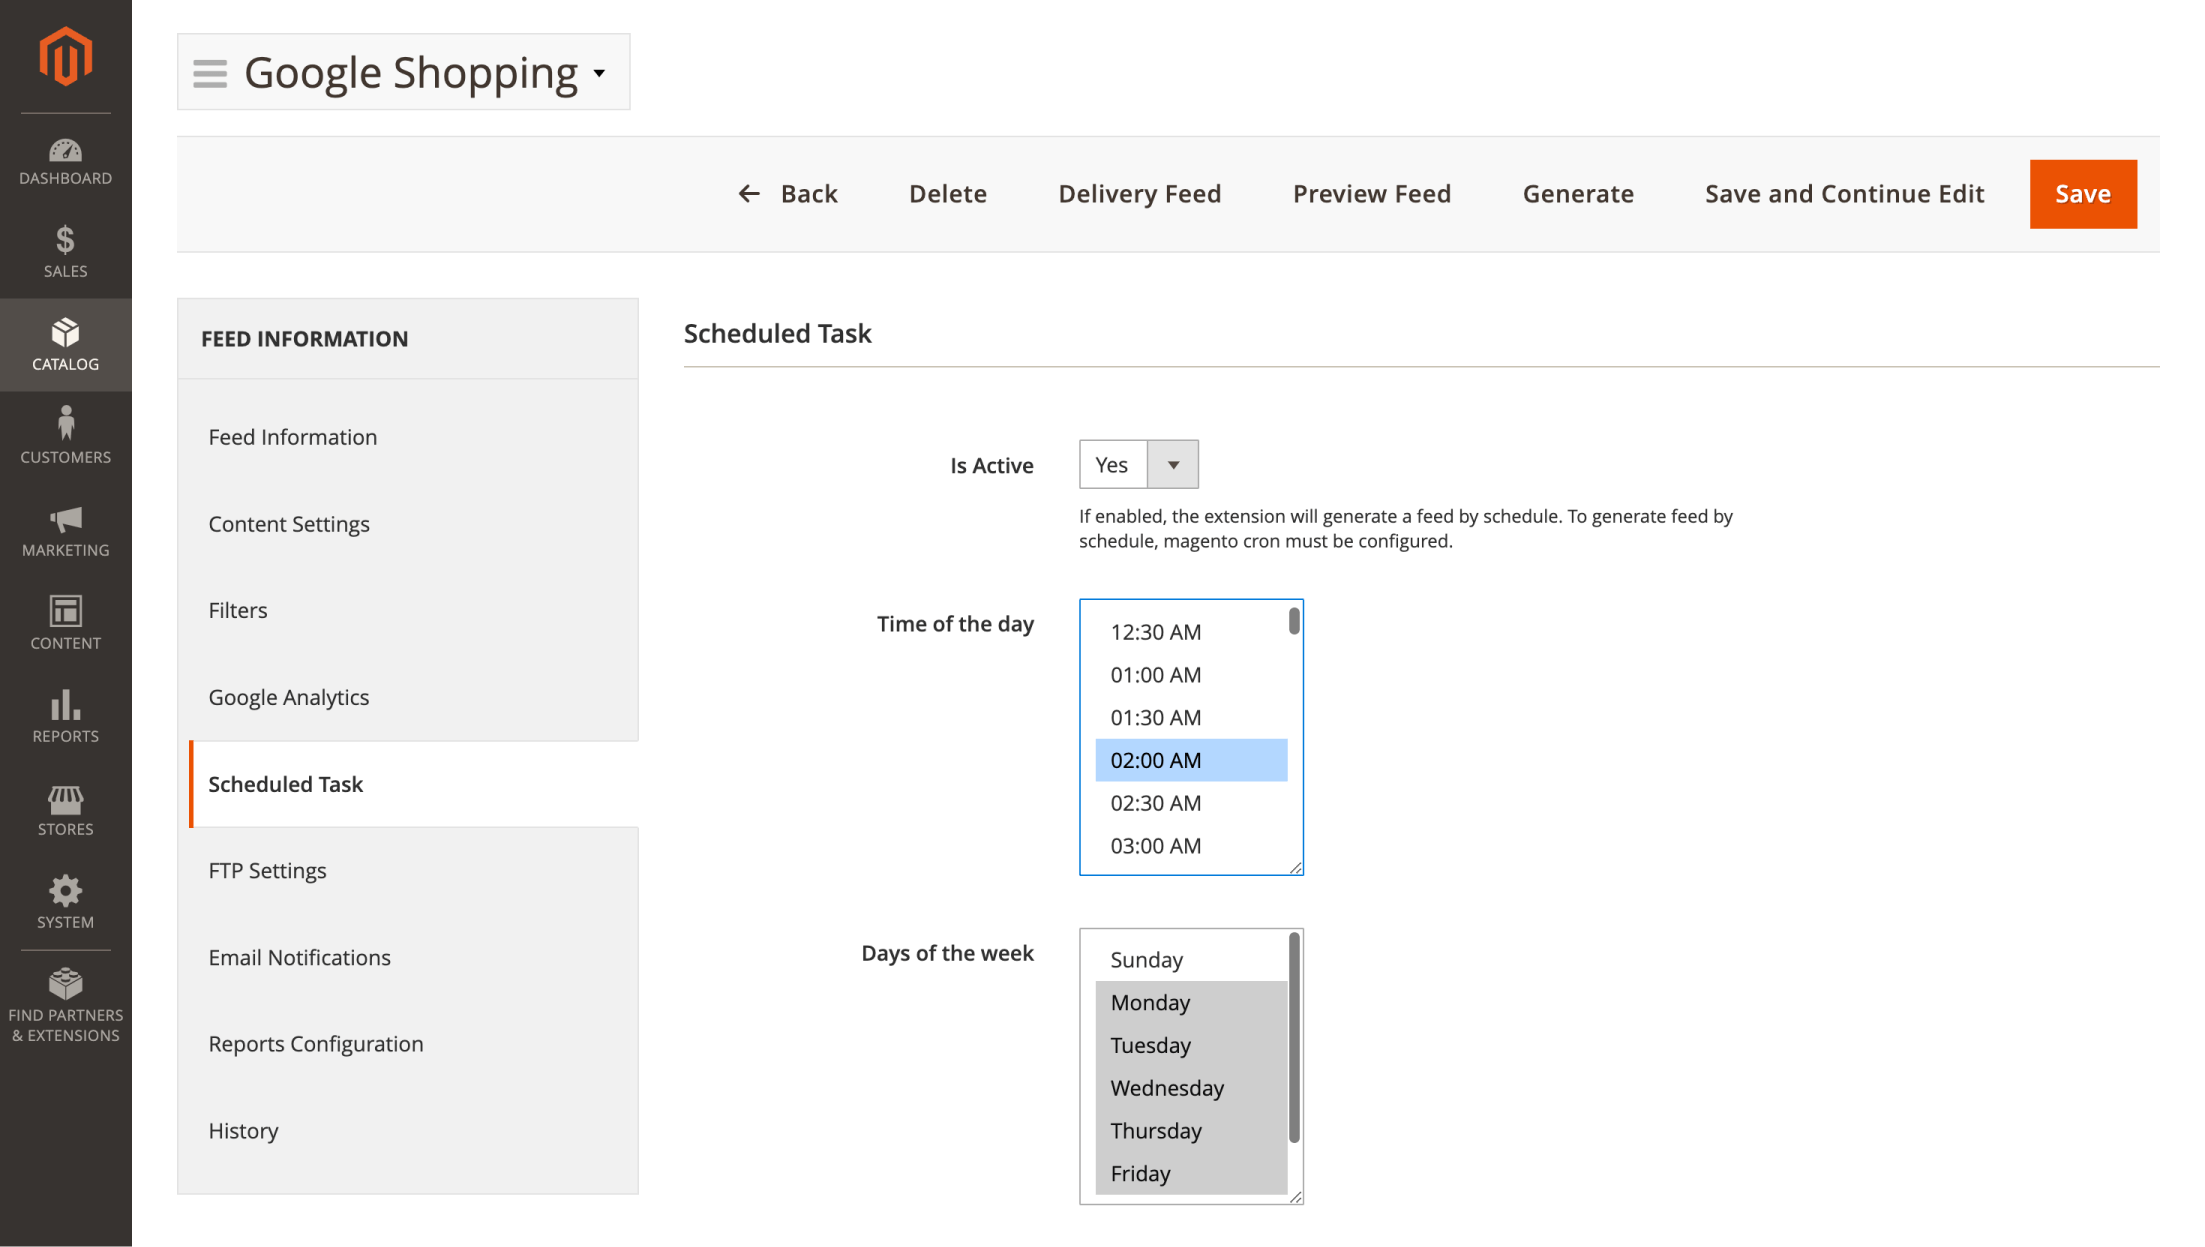
Because your store's data (e.g., prices, quantities, new items) constantly changes, it's important to keep the feed up-to-date. To do this, schedule regular feed generation. Google's own 2026 guidance treats daily updates as the minimum for most stores, so a single nightly run is no longer generous - it's the baseline.
Set the time and days of the week for the feed to generate. You can select multiple time frames per day, so if your catalog changes often, schedule a few runs throughout the day instead of just one during off-peak hours:
Enable Sales Analytics Reports
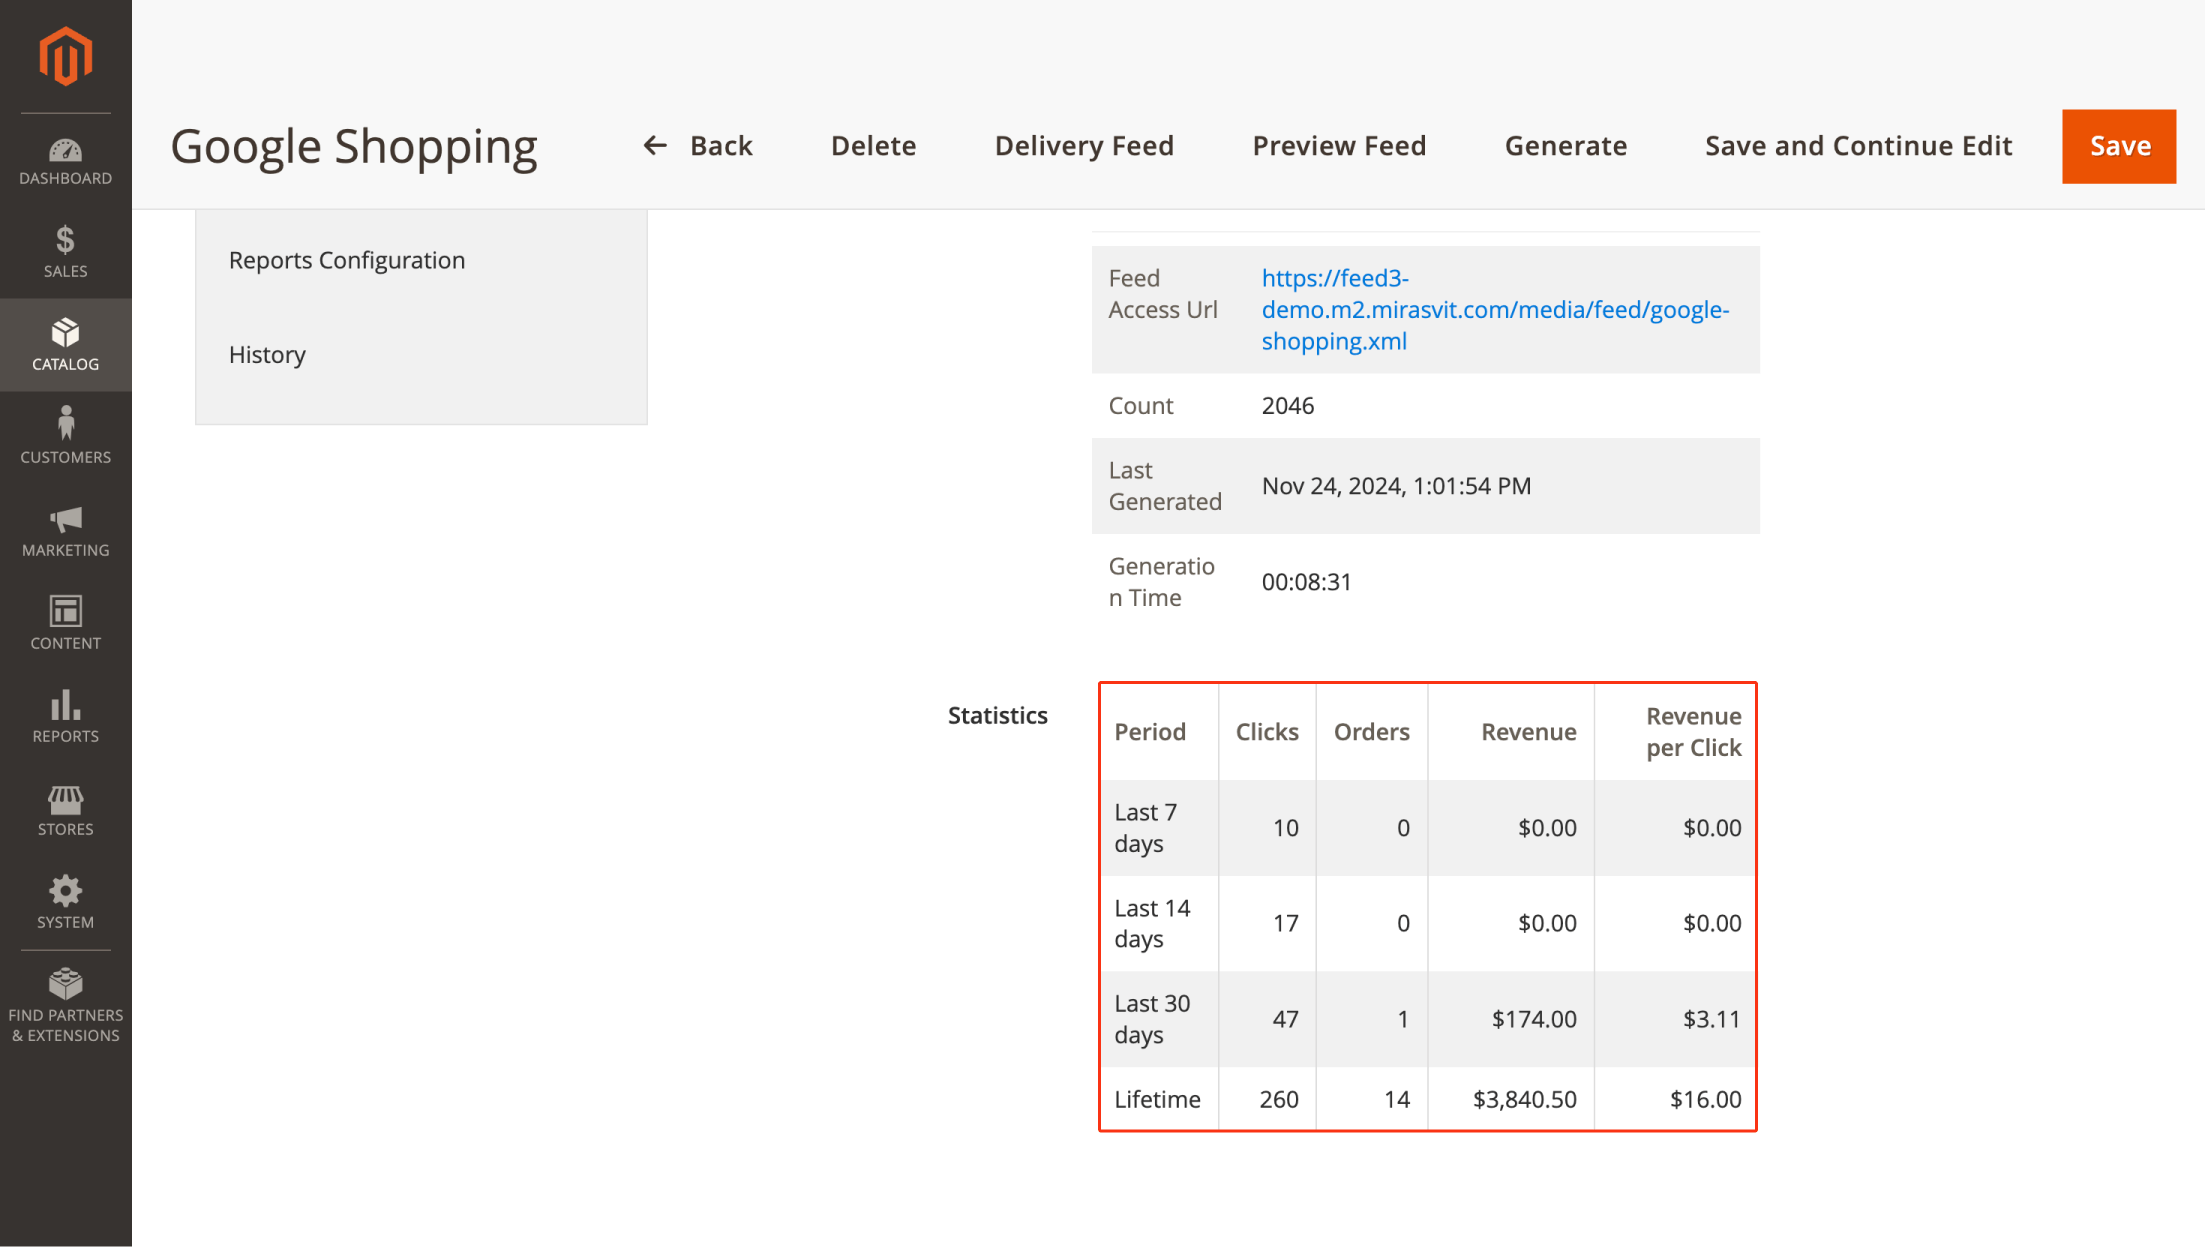
With the reporting features provided by the Advanced Product Feeds extension, you can analyze how well your marketplace listings are performing.
The extension adds two additional GET parameters to product URLs, allowing it to collect statistics on clicks and orders originating from Google Shopping.
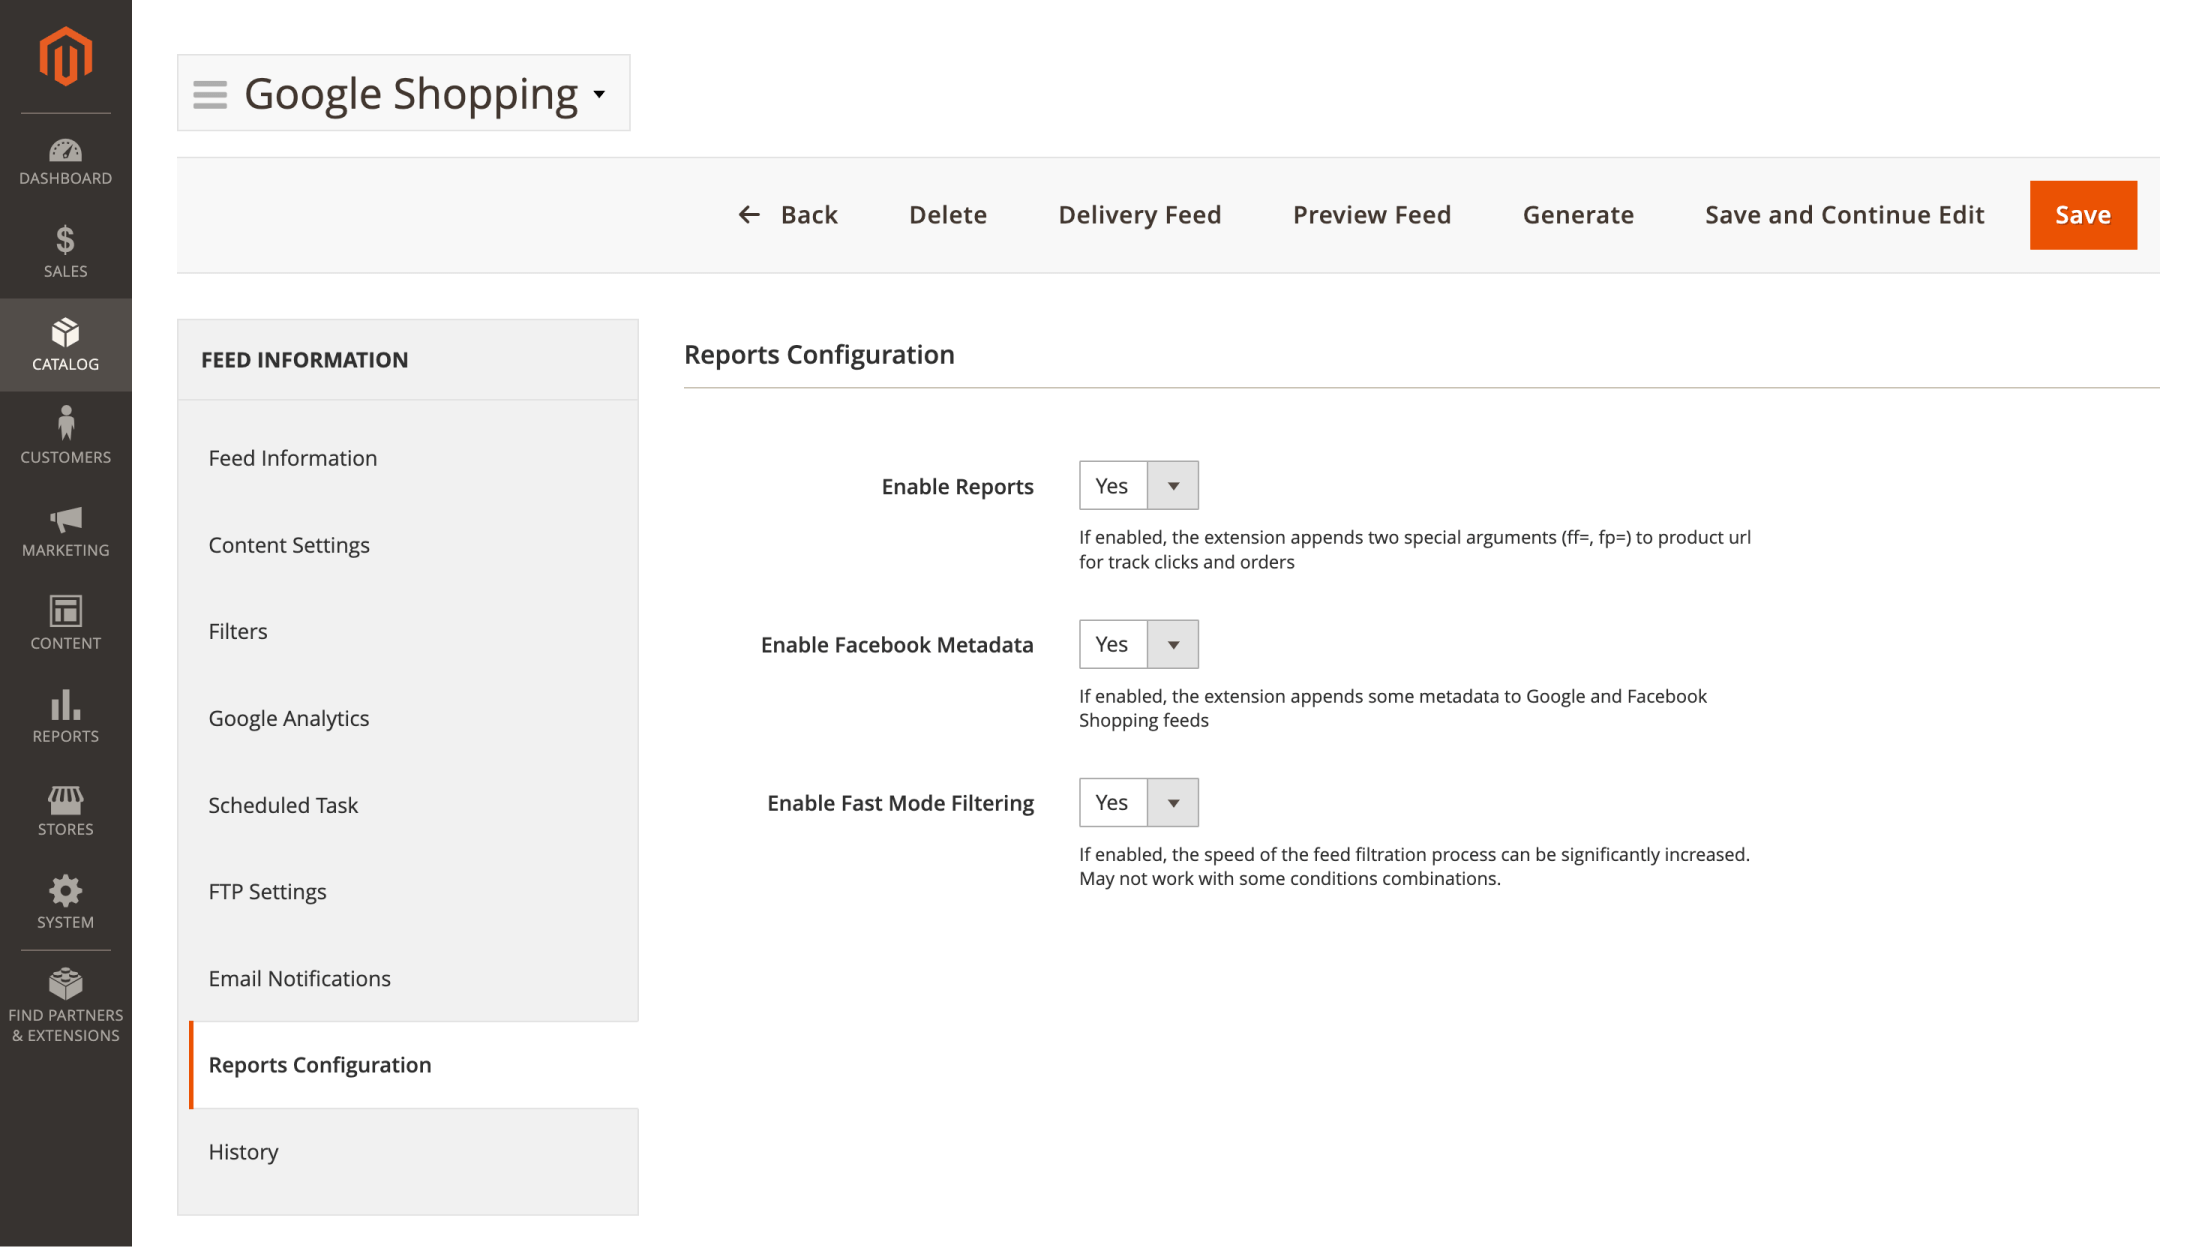
Based on the data, the tool calculates key metrics like Revenue and Revenue Per Click, displayed on the feed's Feed Info tab.
We've covered the features that let you generate a product feed and manage your marketplace listings efficiently. If some data is still missing, you can use Dynamic Variables and Dynamic Attributes to customize your feed further.
Handling Configurable Products
If your catalog uses configurable products - a parent product with simple variants for size, color, and so on - the feed needs to handle them differently than simple products. Advanced Product Feeds exports each simple variant as its own item, and links the variants together using Google's item_group_id attribute, so Google Shopping groups them as one product with several options.
That's what the "Google Shopping (configurable products)" template from Step 1 is for: pick it instead of the plain "Google Shopping" template if your store sells configurable products, and the variant linking is handled for you.
Common Feed Rejection Reasons (and How to Fix Them)
Google Merchant Center validates every feed before your products go live, and it's common for at least a few items to get flagged the first time. Based on what we see in support, the most frequent rejection reasons are:
- Missing or incorrect price: the price in your feed has to match the price shown on your product page exactly.
- Missing identifiers: Google requires at least two of three - GTIN, Brand, and MPN.
- Availability or attributes in the wrong language: values need to match the language of the target country, not just be present.
All three are fixable inside Advanced Product Feeds without touching a line of code: use Filters to exclude products that don't have the required data yet, and Dynamic Attributes or Dynamic Variables to fill in or localize the missing fields. In our experience, most rejections are minor - once you know what Google Merchant Center is flagging, they're quick to fix.
Preparing Your Feed for AI-Driven Shopping Search
Google's Merchant Center guidance for 2026 increasingly favors product titles that front-load the brand, product type, and key attributes (size, color, material) within the first ~70 characters, so its AI-driven Shopping search can parse them correctly.
Advanced Product Feeds has an optional AI optimization capability built for exactly this: you set up a reusable profile that tells an LLM how to rewrite or enrich specific fields - titles, descriptions, category mappings, attributes - tuned per channel and per store view, with Google Shopping supported first. Optimization runs ahead of time as its own background process and stores the results, so feed generation itself stays fast and doesn't call the LLM on every export. Each profile can either publish results automatically or hold them for your approval, and it reports token usage and cost as it runs - worth checking before you edit a profile, since that re-optimizes the whole catalog it covers. It reuses whichever AI provider (OpenAI, Claude, Gemini, or Grok) you've already configured for other Mirasvit AI features, so there's no separate API key to set up.
If you're also exploring AI shopping channels beyond Google, Advanced Product Feeds added a built-in ChatGPT feed template for OpenAI's Commerce platform in version 1.12.3 (May 2026), pre-configured with the required fields and seller/policy data. See our guide to selling through ChatGPT if you want to go deeper on that channel.
Final Thoughts
Google Shopping is just one of the hundreds of marketplaces your Magento products could be listed on - and once you've set up one feed, adding the next one is mostly a matter of picking a new template.
The Advanced Product Feeds extension, used as an example in this guide, handles the parts that make manual feed management painful: configurable products, feed validation, and keeping everything in sync as your catalog changes. It's simple, flexible, and works out-of-the-box in most cases, so you don't need to hire a developer to configure your store's data exports - you can do it yourself by following the steps above. If Google Shopping is your main channel, our dedicated Google Shopping Feed extension for Magento 2 is built specifically around this use case.
Got questions about your specific setup? Reach out to our support team - between the tickets we see, we can usually tell you exactly which setting to change.
FAQ
How do I create a Google Shopping feed for Magento?
Install a feed-generation extension such as Advanced Product Feeds, pick a pre-built Google Shopping template, fill in the feed information and content settings, apply a filter to select which products to export, and generate the feed. See the step-by-step guide above for details.
How do I integrate Magento with Google Shopping?
Register your store with Google Merchant Center, generate an XML product feed from Magento using a feed extension, and submit the feed URL to Merchant Center. Once approved, your products can appear in Google Shopping search results and ads.
How are configurable products handled in a Google Shopping feed?
Each simple product variant (a specific size, color, and so on) exports as its own feed item, linked to its siblings through Google's item_group_id attribute so Google Shopping groups them as one product with several options. Advanced Product Feeds includes a dedicated "Google Shopping (configurable products)" template for this.
What should I do if Google Merchant Center rejects my feed?
Check the rejection reason in Merchant Center first - the most common ones are a price mismatch with your product page, a missing identifier (Google requires at least two of GTIN, Brand, and MPN), or attributes not localized to the target country's language. All three can be fixed with filters or dynamic attributes without editing the feed by hand.
Mirasvit Support Engineer
Promote your products and achieve higher sales by using the power of marketplaces and comparison shopping engines with magento data feed extension. You can automatically generate and deliver feeds of your product catalog to those services with Magento Product Feeds extension.
This tool is unbelievably quick to use and is also outstandingly flexible. It's compatible with all major shopping and advertising services, including Google Shopping.
Feeds go straight to Google Merchant Center through Google's API, and AI profiles can rewrite titles, map Google categories and fill in missing attributes before your catalog ever reaches a marketplace.
Simply install the module, generate your very own product feed, present your catalog to a wider audience, and boost your sales right now!