Magento 2 Theme Development: How to Create a Custom Theme
-
 Anton Gurtovoi
- How to & Tutorials
- Updated: Oct 29, 2025
- 16 min read
Want a storefront that looks on-brand and loads fast, not just a demo skin? Magento 2 theme development gives you full control over layout, templates, and assets so you can shape design and performance instead of working around defaults.
In this guide, we outline what a theme is, show how to create a custom one with the right folder structure, and explain how to work with theme inheritance in Magento 2 so changes stay maintainable.
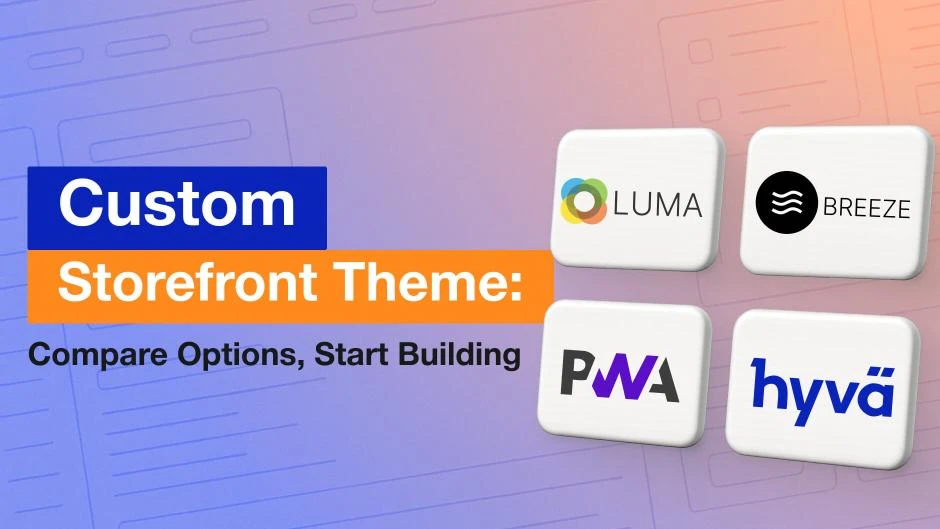
You will also see how the main storefront options, including Luma, Blank, Hyvä, Breeze, and PWA Studio, align with different store sizes and goals so you can choose with confidence.
We finish with practical steps for rolling out changes safely and a brief checklist to double-check quality before launch.
Table of Contents
- What Is a Magento 2 Theme
- Prerequisites and Theme Structure for Magento 2 Theme Development
- Create a Custom Theme in Magento 2: Step by Step
- Luma and Blank: Pros, Cons, and Practical Guidelines
- Hyvä: When to Choose and How to Start
- PWA and Breeze: Use Cases and Limitations
- Theme Options at a Glance
- Static Deploy, Enabling the Theme, and Cache Management
- Performance, SEO, and Accessibility Checklist
- Conclusion
What Is a Magento 2 Theme
In Magento 2, a theme is the presentation layer of the storefront. It contains layout XML, PHTML templates, and static assets such as CSS, JavaScript, images, and fonts. The theme defines how pages are arranged and styled, while business logic lives in modules.
The platform ships with two defaults:
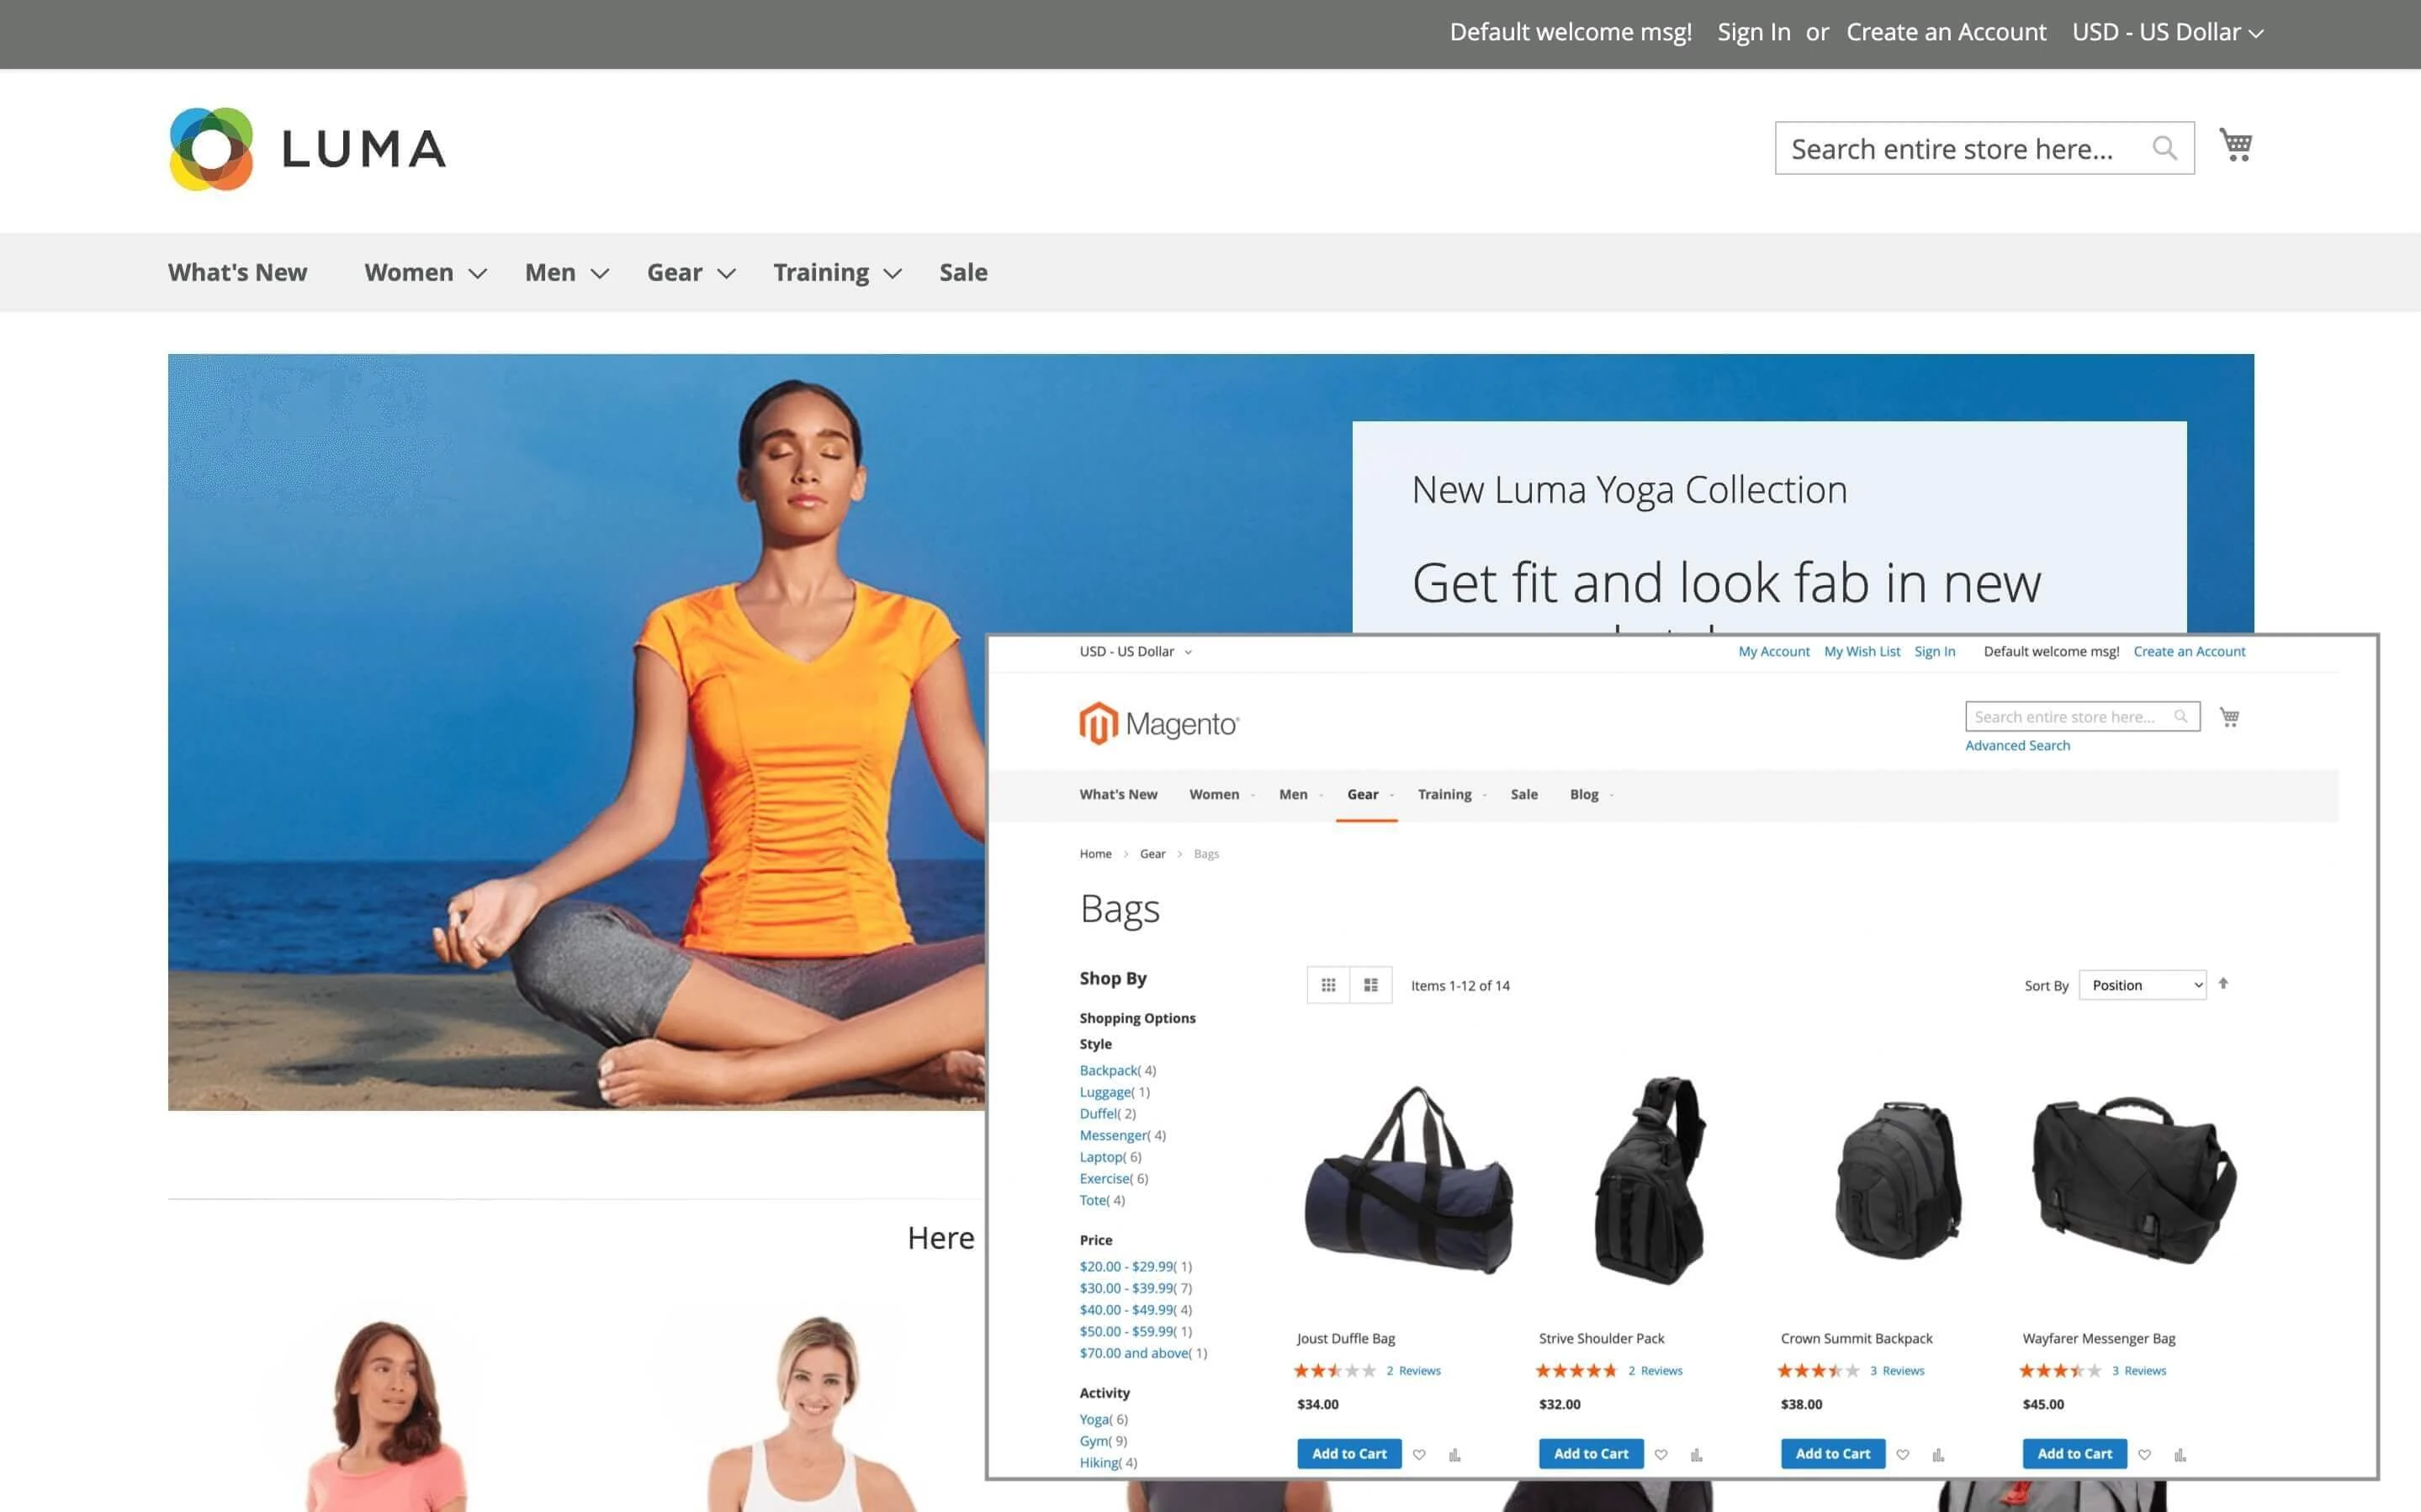
- Luma. A complete demo storefront you can enable after installation. It’s useful for exploration and quick prototyping, and it tends to offer broad extension compatibility—though its CSS/JS payload may require extra tuning for speed.
- Blank. A minimal developer base, not a finished storefront. It’s a clean starting point for a child theme with minimal styling and a predictable structure.
In real projects, you usually create a child theme that inherits from one of these bases and overrides only what you need. The platform relies on a fallback mechanism: if a file is missing in the child, it’s taken from the parent; if not found there, from the originating module.
A custom theme matters for three reasons: it expresses your brand, lets you tailor page structure and templates to business needs, and can improve performance by keeping assets lean. The system identifies a theme by a small set of key files in a predictable folder structure, so getting that structure right is the first practical step.
Prerequisites and Theme Structure for Magento 2 Theme Development
Before you install or switch to a new storefront theme, do a bit of prep and align your plan with the theme structure in Magento 2 so assets and overrides land in the right folders.
Use a staging copy rather than production. Make sure you can reach the server’s file system to create folders and add files, and that you can use the command line to register the theme and refresh caches. If your parent theme comes from a package, have Composer available.
Developer mode is convenient during build because changes become visible faster. Themes live in app/design/frontend/. Each theme sits in its own folder with a short, predictable name. Parent themes that are installed from packages are usually placed under vendor/magento/theme-frontend-*.
Key files: theme.xml, registration.php, view.xml
theme.xml declares the theme. It includes the title and, if you inherit, a parent such as Magento/blank or Magento/luma. You can also add a preview image so the theme is easy to recognize in the Admin.
After editing theme.xml, you should clear caches and, in production, redeploy static assets.
registration.php registers the theme with the system through the ComponentRegistrar so it appears in Content > Design > Configuration. Without this file, the theme will not be discoverable.
etc/view.xml is optional. Use it to set media presets such as product image sizes and gallery behavior. If present, it can override the parent’s values for the same settings.
Static assets and templates
Place styles, scripts, images, and fonts inside the web folder of your theme. If you use the Luma stack, requirejs-config.js also lives here. Overrides for modules go into folders named after the module you are changing.
For example, base storefront tweaks belong in Magento_Theme with layout and templates subfolders, and catalog page changes belong in Magento_Catalog with the same subfolders. This layout keeps customizations small and predictable.
Anything you do not include is resolved by inheritance from the parent theme and, if needed, from the originating module
Create a Custom Theme in Magento 2: Step by Step
This Magento 2 theme tutorial takes the shortest path from an empty folder to a working theme. You set up the skeleton, activate it, then make a small change to confirm everything works.
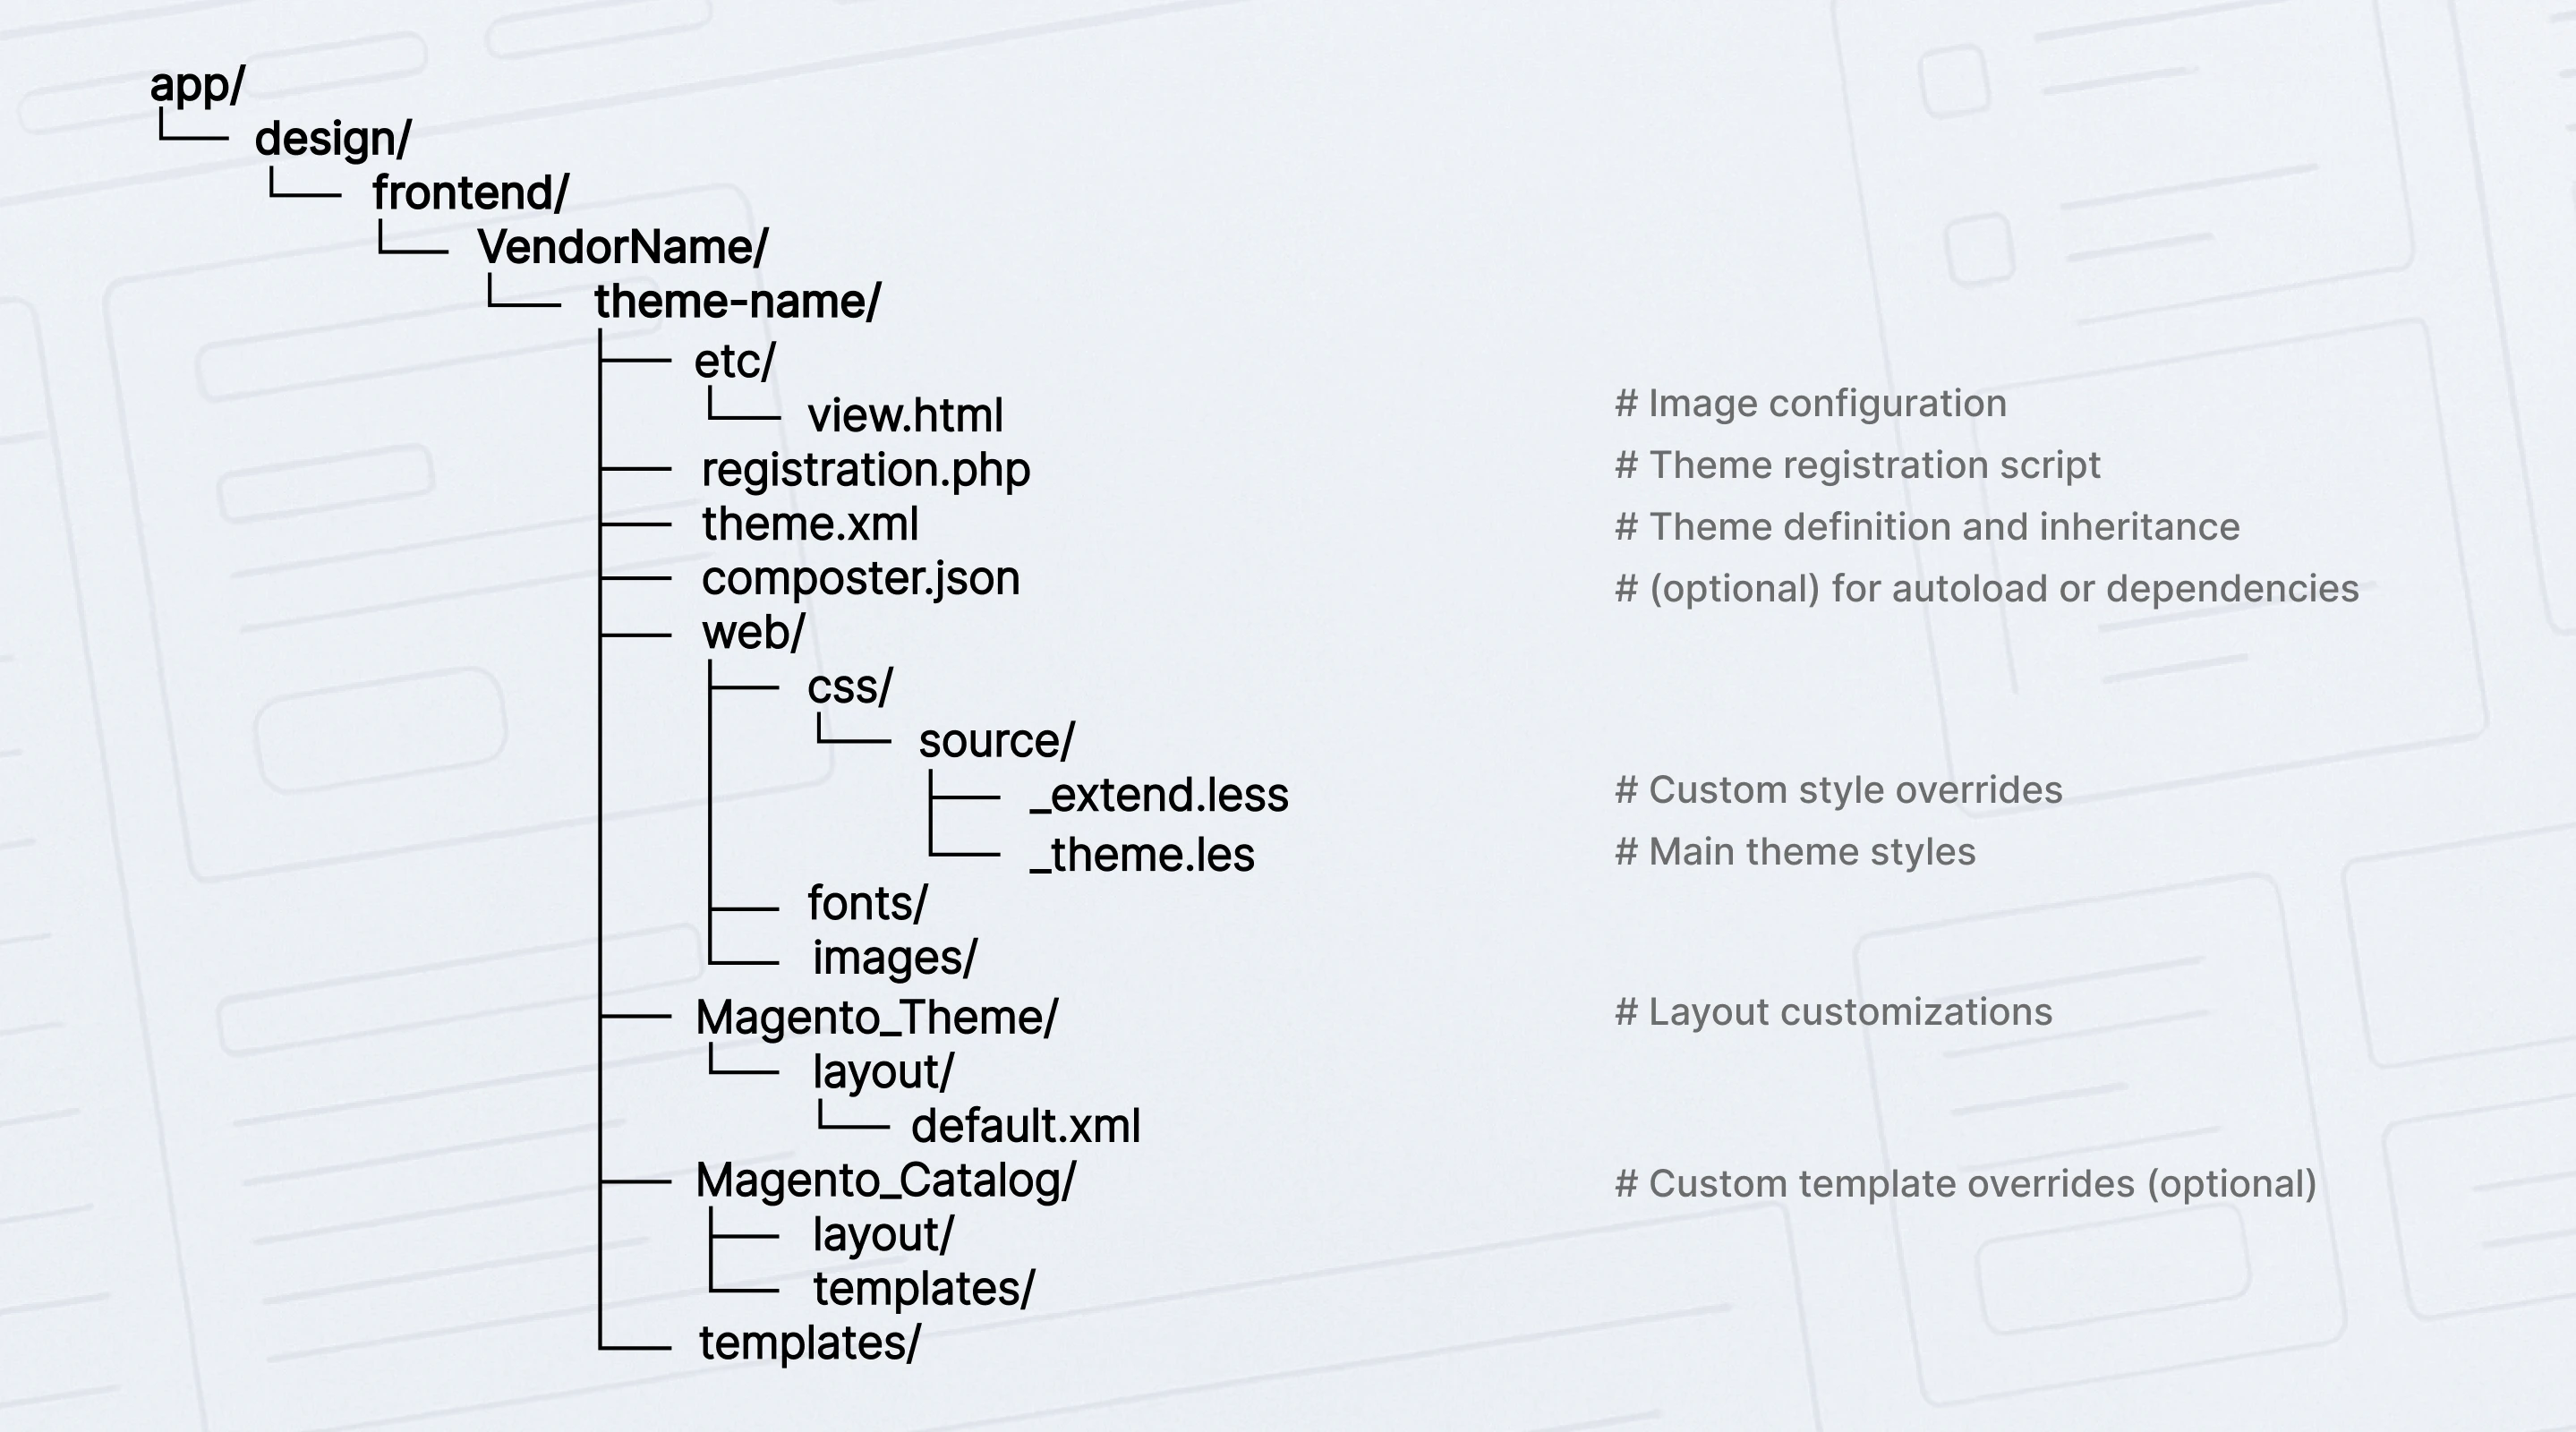
- Create the theme folder at
app/design/frontend/Vendor/theme. Use short names without spaces or special symbols. - Add theme.xml. Give the theme a title and, if you inherit, set a parent such as
Magento/blankorMagento/luma. You can also add a preview image to make the theme easy to spot in the Admin. - Register the theme with
registration.phpso the system can discover it underfrontend/Vendor/theme. Without this file, the theme will not appear in Design Configuration. - (Optional) Add composer.json if you plan to install the theme via Composer or want reproducible deployments.
- (Optional) Add etc/view.xml to fix media presets, for example, product image sizes and gallery settings. This helps keep images consistent across the store.
- Create asset folders:
web/css,web/js,web/images,web/fonts. If you use the Luma stack,requirejs-config.jsalso lives inweb/js. Many teams keep partial styles inweb/css/source. - Add a simple change to verify the theme is active. The fastest option is a small template tweak in
Magento_Theme/templates/html/header.phtmlor a layout update inMagento_Catalog/layout/catalog_product_view.xml. If you see your change on the storefront, the theme is wired correctly. - Enable the theme in the Admin: Content > Design > Configuration > choose the Store View > Applied Theme > Save.
- Refresh caches. In production, also redeploy static content for the required locales. Prefer
cache:cleanfor routine updates and usecache:flushonly when storage must be cleared. Developer mode is helpful during build because changes appear faster. - Sanity check the storefront. Confirm the header or layout update is visible, click a few key pages, and check responsive breakpoints.
Inheritance and fallback: safe overrides
Child themes stay small because the platform looks for files in a specific order. It starts with the current theme, then the parent, then the original module, so most changes boil down to a Magento 2 template or layout override. You only add the pieces you actually change.
Templates.
To replace a module template in your theme, place a file under the same relative path inside the module’s area within the theme, for example, app/design/frontend/Vendor/theme/Magento_Catalog/templates/product/view/addtocart.phtml.
Your version takes precedence over the parent and the module.
Layout XML.
When you need to adjust the structure, prefer extending an existing layout handle instead of replacing a whole file. Create a file with the same name under /layout in your theme and add only the instructions you need. If a full replacement is unavoidable, use the override folders that target a module file or a parent theme file, and document why a full override was required.
Static assets.
Files placed under the web in your theme override assets with the same path from the parent or the module. Keep only what you change to avoid drift.
Media settings.
If your child needs different image presets, add etc/view.xml. Values in the child override the parent’s settings. Good practice is to extend first and override whole files only when smaller changes cannot achieve the result. This reduces duplication, makes updates safer, and keeps the theme maintainable.
For the underlying rules and fallback order, consult Adobe’s official theme inheritance guide.
Luma and Blank: Pros, Cons, and Practical Guidelines
Luma and Blank are the baseline storefront themes. Luma is a complete demo you can enable to explore layouts and UI patterns and to check broad extension compatibility. Blank is a minimal developer base that gives you a clean foundation for a child theme when you plan a bespoke design.
The strongest advantage is compatibility and predictability. Most third-party extensions and community guides assume this stack, so integrations are smoother, documentation is richer, and upgrades are easier to plan. You also get the UI Library on LESS with variables and mixins, which helps keep styling consistent while you build on top through inheritance.
The trade-off is performance overhead compared with newer stacks. LESS together with RequireJS and Knockout often produces larger CSS and JavaScript bundles. Core Web Vitals usually need extra care: compile and minify styles for production, remove scripts you do not use, and avoid heavy template rewrites that add markup and blocking resources.
Implementation tips
A few habits keep projects on this stack maintainable without sacrificing speed:
- Keep inheritance shallow. One child on top of one parent is easier to reason about and upgrade.
- Adjust the structure with the layout XML first. Replace entire templates only when smaller edits cannot achieve the result, and record why a full override was needed.
- Use UI Library variables and mixins for typography, spacing, and color, then compile and minify LESS for production builds.
- Scope custom JavaScript at the theme or module level through RequireJS. Use Knockout only where reactive behavior is essential, for example, checkout or minicart.
- Watch bundle size after adding widgets or third-party scripts, and validate key pages against Core Web Vitals.
If you follow these guidelines, Luma and Blank remain a safe default that balances compatibility with a codebase you can upgrade confidently.
Hyvä: When to Choose and How to Start
The Hyvä theme for Magento 2 replaces the legacy frontend stack with Tailwind CSS and Alpine.js, which keeps assets light and development straightforward.
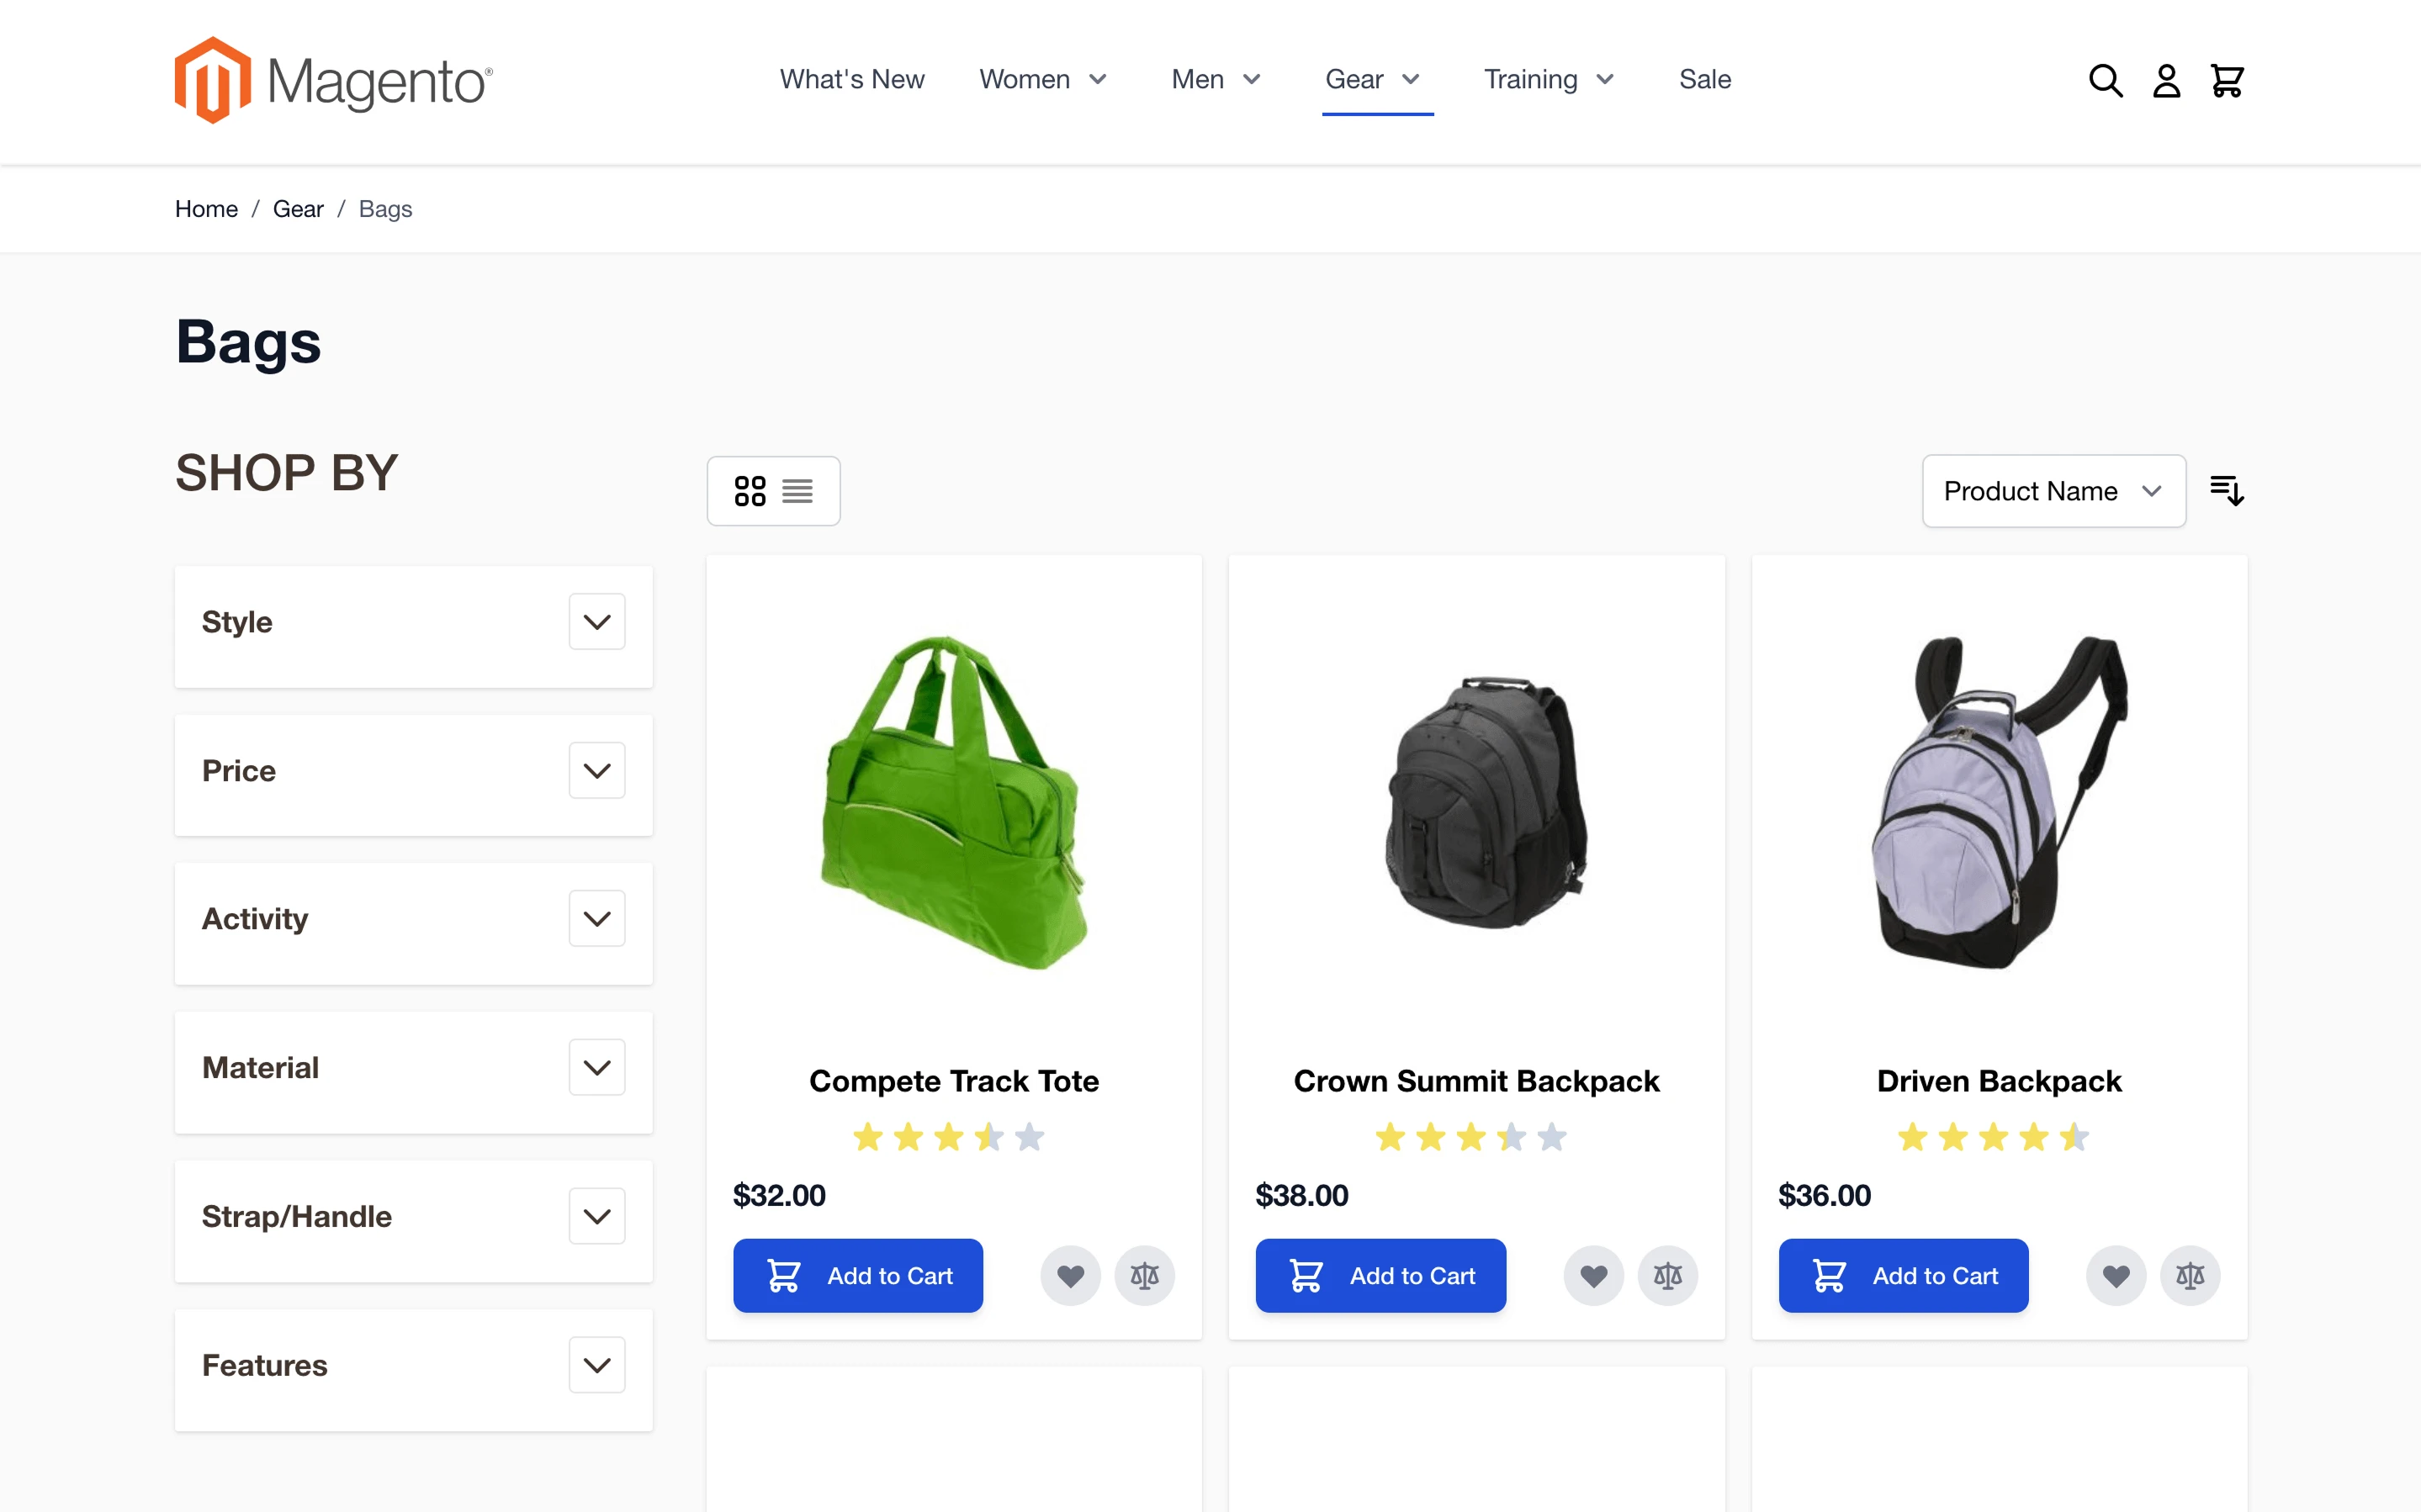
Teams that adopt it typically ship faster and see better Core Web Vitals. For a real-world take, see our experience switching to Hyvä and how it affected website performance.
When it makes sense
Hyvä is a good fit in these situations:
- You prioritize performance and want a minimal JavaScript footprint.
- The team is comfortable working without RequireJS and Knockout, and is ready to use Tailwind’s utility-first approach.
- You can validate third-party extensions through Hyvä compatibility modules or acceptable fallbacks.
What to check first
Make a quick inventory of the extensions that matter most, and verify their Hyvä support or available compatibility modules. Decide how you will handle checkout: Hyvä Checkout is a separate solution, while some projects keep a Luma-based checkout via a compatibility layer.
Confirm system requirements for your environment, including supported PHP versions and a Node runtime for the Tailwind build. Budget for the Hyvä license and plan how you will keep it updated.
Getting started
- Install the theme according to the Hyvä documentation and activate it like any storefront theme.
- Set up the Tailwind pipeline so CSS is compiled during development and as part of your production build.
- Add required compatibility modules for critical extensions, then migrate templates and blocks gradually, avoiding a mix of legacy patterns on Hyvä pages.
- Review Core Web Vitals as you go, especially on product, category, and checkout pages, and trim unused utilities or scripts if numbers slip.
PWA and Breeze: Use Cases and Limitations
1. PWA Studio
The PWA Studio theme is a headless storefront built on React and GraphQL. It suits teams that want an app-like UX with features such as offline support and push notifications, and are ready to run a separate frontend project.
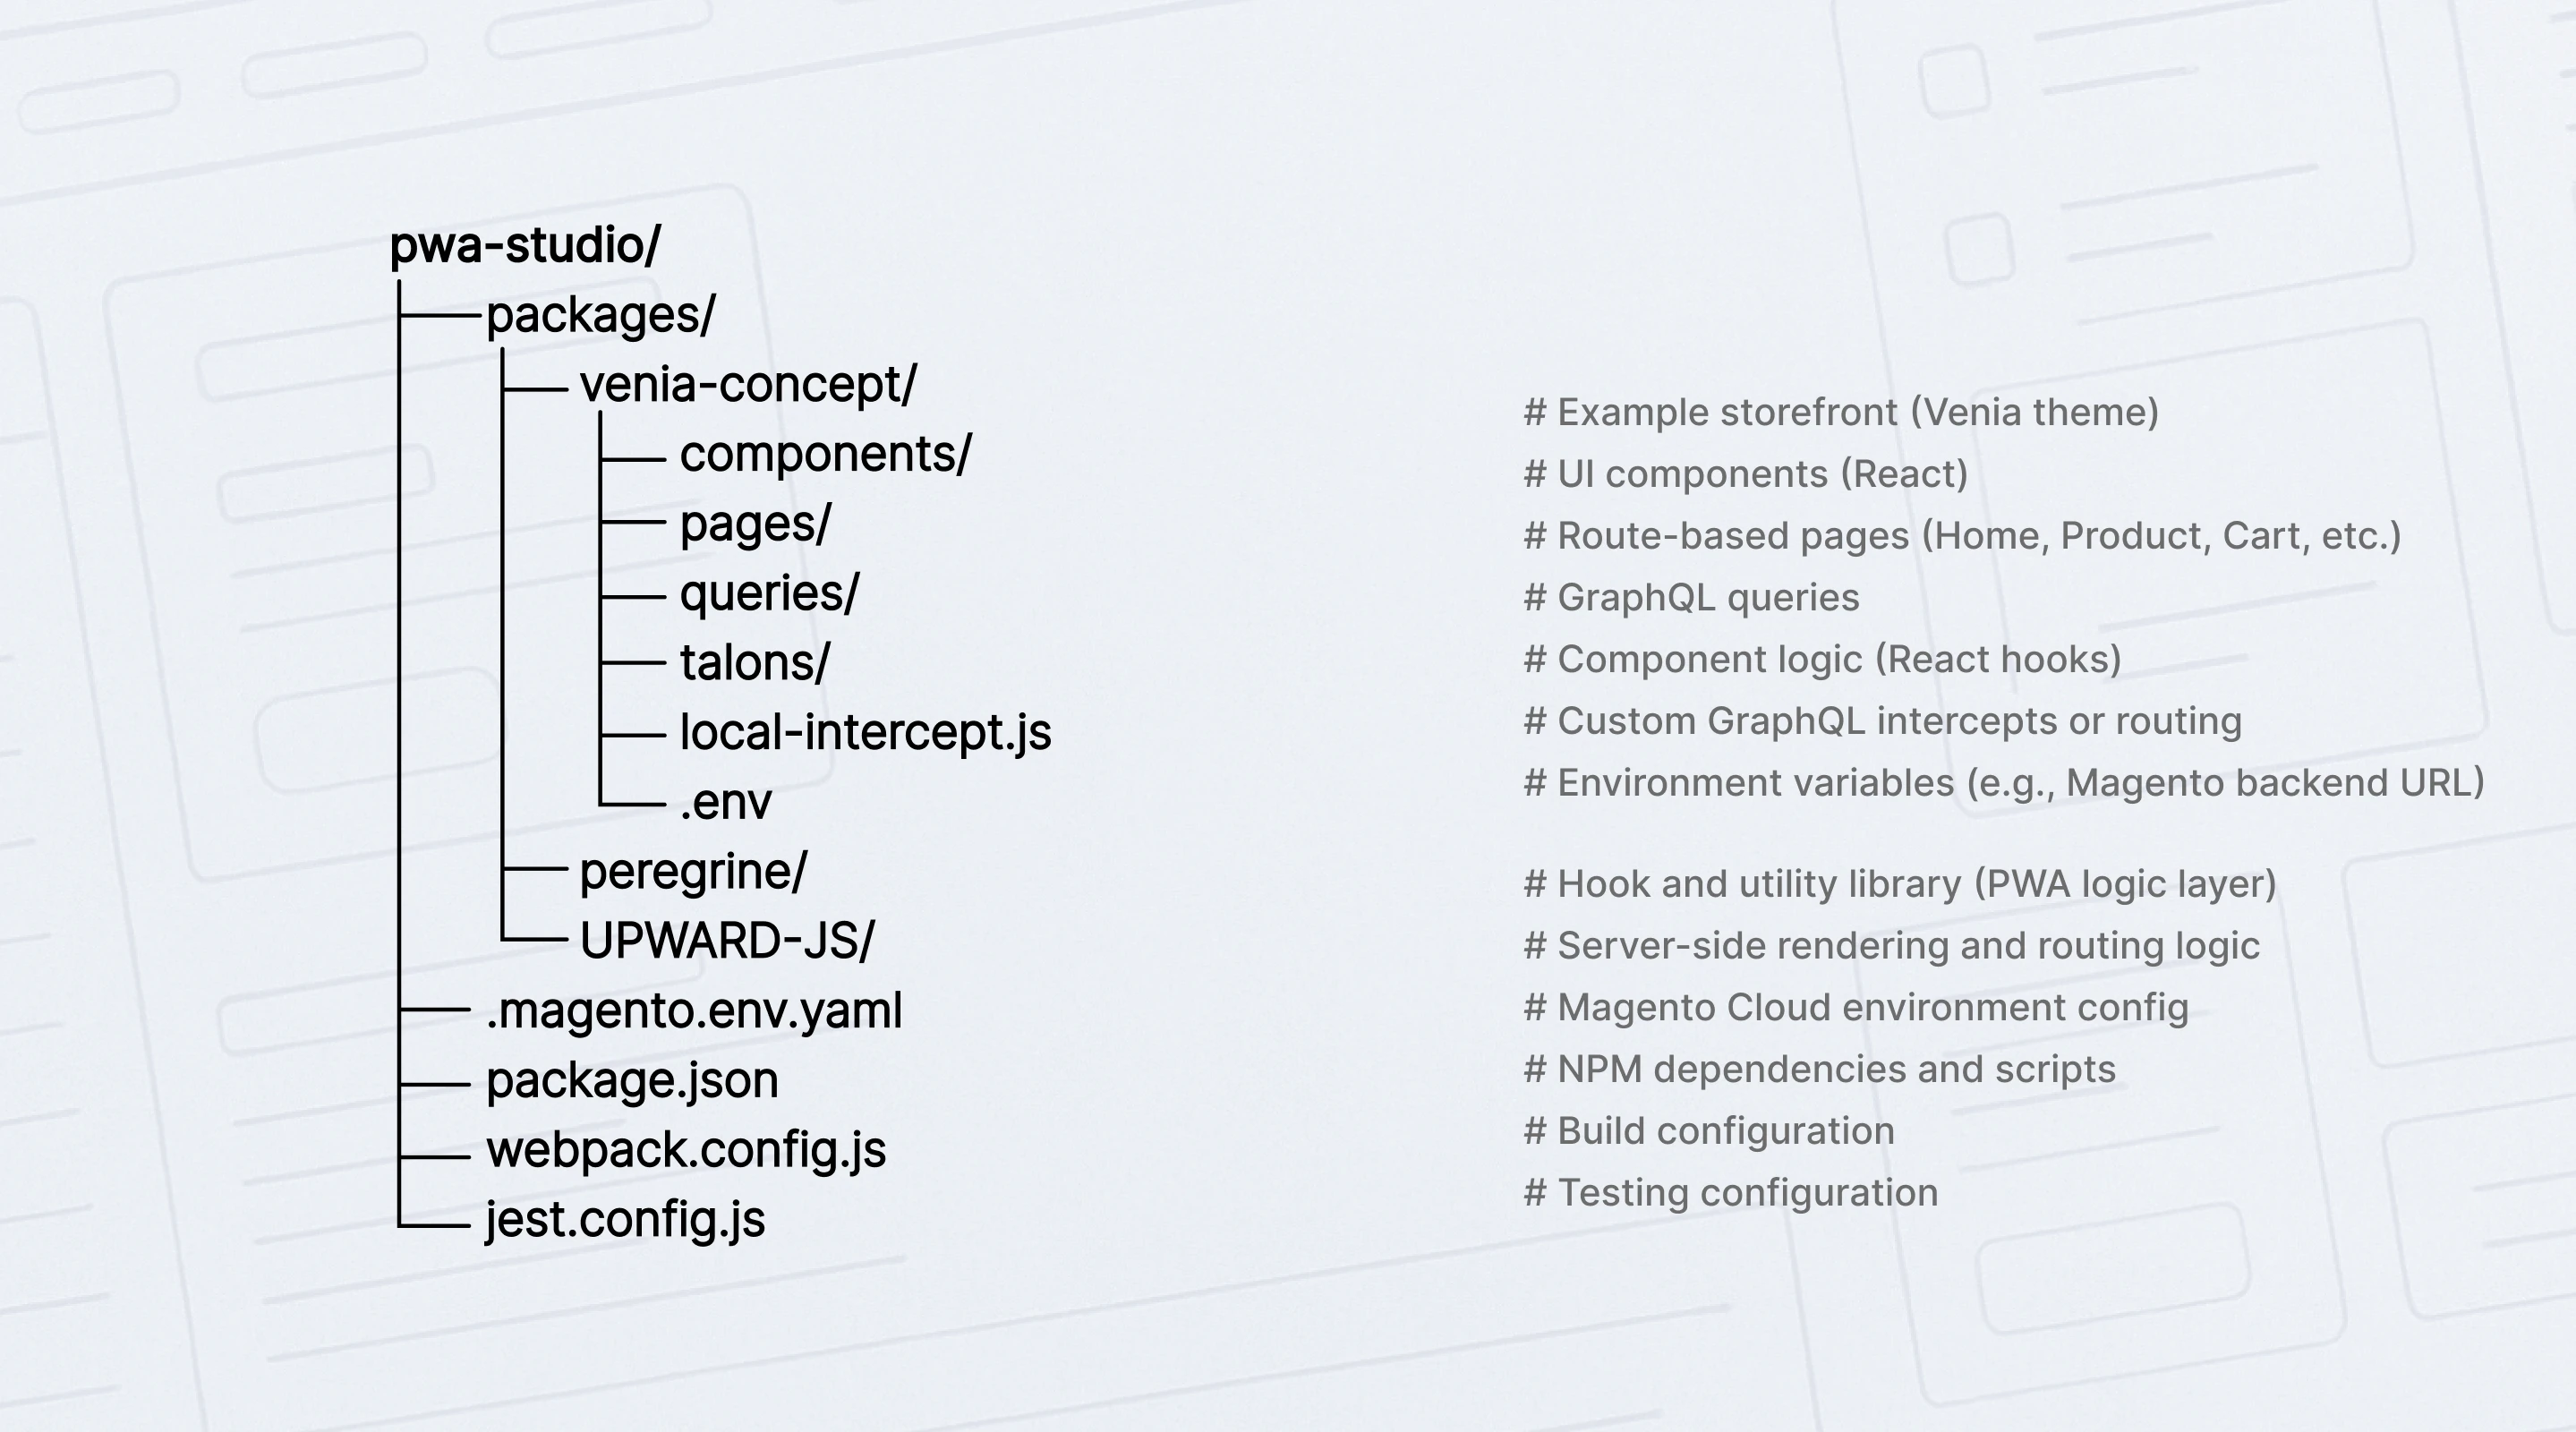
Getting started means setting up a dedicated storefront (Venia is the reference), preparing a Node and Yarn environment, and planning custom UI work because Luma components do not transfer automatically.
The trade-offs are a higher budget, a longer timeline, and the need to map extension features to a headless flow.
2. Breeze (Swissup)
The Breeze theme for Magento 2 is a lightweight alternative that replaces the heavy parts of the classic Luma stack. It aims to speed up an existing storefront without changing the overall architecture.

Installation follows the product docs, and you enable it like a regular theme. Compatibility with Luma extensions is generally good, but scripts that rely on RequireJS or custom Knockout bindings may need small adaptations.
Breeze works well when you want faster pages and a cleaner JavaScript footprint without committing to a new paradigm.
Theme Options at a Glance
We have already covered the baseline (Luma/Blank), Hyvä, and the alternatives Breeze and PWA Studio. The table below summarizes the key differences so you can weigh the pros and cons and choose the approach that fits your store.
| Option | Stack (CSS/JS) | Performance profile | Extension compatibility | Best fit |
|---|---|---|---|---|
| Luma | LESS, RequireJS, Knockout | Heavier by default, needs tuning | Broad, works out of the box | Maximum compatibility and a familiar baseline |
| Hyvä | Tailwind CSS, Alpine.js | Lean assets and strong Core Web Vitals | Via compatibility modules or fallbacks | Performance-first builds with license budget |
| Breeze | Simplified Luma-compatible JS | Faster than classic Luma | Generally high; minor JS tweaks may be needed | Speed boost without changing architecture |
| PWA Studio | React, GraphQL (headless) | App-like UX; depends on your build | Not a theme; features mapped headless | Larger scope projects aiming for headless UX |
Note: Hyvä Checkout is a separate solution; some stores keep a Luma-based checkout via a compatibility layer.
Thus, choose Luma for maximum compatibility, Hyvä when performance and a modern stack matter most, Breeze for a quick speed boost on the classic stack, and PWA Studio for headless, app-like builds when you have the time and budget.
Static Deploy, Enabling the Theme, and Cache Management
You have compared the options and picked a frontend. The final step is to put it live safely: enable the theme on the right scope, deploy static assets for production, and manage cache correctly.
Enabling a theme safely
Apply the theme on a staging copy first. In the Admin, go to Content > Design > Configuration, open the target Store View, choose the theme in Applied Theme, and save. Verify key pages, then repeat on production during a planned window. After switching, run cache:clean so layout and configuration changes take effect. Use cache:flush only if storage is corrupted or you intentionally need to clear all cached data.
Static content deploy
In developer mode, the system serves assets on the fly, which is fine for local and staging work. In production mode, you should use the standard Magento 2 deploy static content step so assets are built ahead of time. Run setup:static-content:deploy for each locale you use, then confirm that CSS and JavaScript load correctly.
If you changed only templates or layout XML, a cache:clean is often enough; if you added or removed assets, include a static deploy in the release steps. Warming the full page cache after deployment helps the first visitors avoid cold starts.
Cache management essentials
If you are weighing Magento 2 cache clean vs flush, prefer cache:clean for routine updates because it clears invalidated entries without dropping everything. Reserve cache:flush for rare cases when the cache storage itself must be emptied. Do not disable caches to “see changes”; that slows the site and hides real issues.
Developer mode is helpful during build, but production should remain in production mode for predictable asset handling and performance.
For practical examples and troubleshooting tips, see our Magento 2 cache management guide.
Uninstalling a theme
First, make sure no Store View uses the theme. If the theme was installed manually, run theme:uninstall with backup-code and clear-static-content flags so the system removes references and static files safely. If it was installed through Composer, remove it from the require section, run composer update, then use theme:uninstall. Finish with cache:clean and a quick check of storefront pages.
Performance, SEO, and Accessibility Checklist
You are close to going live. Take a short quality pass so the new theme loads quickly, is easy to find in search, and works well for all users.
Performance (Core Web Vitals)
Aim for Largest Contentful Paint around 2.5 seconds or faster, Cumulative Layout Shift below 0.1, and Interaction to Next Paint under 200 ms on real templates such as product, category, and checkout.
Serve images in the right sizes, prefer modern formats like WebP or AVIF, and lazy load non-critical media. Keep CSS lean, inline only what is critical for the first screen, and defer the rest.
Limit JavaScript to what the page actually needs and review third-party tags regularly. Preload key fonts and avoid blocking imports. After a release, warm the full page cache and recheck metrics on high-traffic pages. Validate results with PageSpeed Insights/Lighthouse on real templates after deployment.
SEO essentials
Each page should have one clear H1, a meaningful title and meta description, and a logical heading order. Use canonical URLs on category, product, and pagination views to prevent duplication.
Primary content must be available in HTML, not only after scripts run. Provide descriptive alt text for images. Add structured data where it matters, for example, Product and Breadcrumb. Confirm that language settings, sitemaps, and robots directives were not affected by theme changes.
Accessibility basics
Everything interactive must be reachable by keyboard with a visible focus state. Use semantic controls: links for navigation and buttons for actions. Inputs need associated labels, and dynamic updates should be announced with appropriate ARIA attributes.
Maintain sufficient color contrast and never rely on color alone to convey meaning. Modals and menus should close with Esc, keep focus inside while open, and not block the page for assistive technologies.
Give informative images alt text and hide purely decorative ones from screen readers.
Common pitfalls and how to avoid them
Teams often trip over folder layout and place overrides inside a module instead of the theme. Avoid editing core files; use theme overrides and layout XML to make changes. Do not mix patterns from different stacks on the same page.
Watch bundle size so CSS and JavaScript do not grow unchecked, and keep media optimized. Ensure custom blocks remain cacheable or are hole-punched correctly, and do not disable caches in production.
Quick pre-flight
Use this short list to sanity check your release:
- Key pages meet Core Web Vitals targets.
- Navigation, search, minicart, and checkout work by keyboard.
- Titles, H1s, canonicals, and structured data validate without errors.
- No broken links in the header or footer.
- Static assets are deployed and caches are warm.
- Third-party extensions render correctly on the new theme.
If these boxes are ticked, your theme is ready to go live.
Conclusion
There is no universal winner. The “best” frontend is the one that fits your goals, your team’s skills, and the extensions you depend on. Treat the theme as a product that evolves: keep overrides small, lean on inheritance, and write down why each change exists so future updates stay easy.
Make decisions with data, not guesses. Baseline your Core Web Vitals, ship on staging first, and refine what users actually touch most. Approached this way, Magento 2 theme development becomes a reliable practice rather than a one-off rebuild, and your storefront stays fast, consistent, and simple to maintain release after release.
FAQ
What is a Magento 2 theme?
A theme in Magento 2 is the presentation layer of the storefront: it contains layouts, templates, and static assets that control how pages look and feel, while business logic remains in modules.
How do I create a custom theme in Magento 2?
To create a custom theme, you add a theme folder under app/design/frontend/Vendor/theme, declare it in theme.xml, register it with registration.php, optionally define media presets in etc/view.xml, place your assets and overrides in the correct subfolders, activate the theme in the Admin, then clear cache and, in production, deploy static content.
Luma or Hyvä: which should I choose?
If you are deciding between Luma and Hyvä, pick Luma when maximum extension compatibility and low risk are the priority. Choose Hyvä when performance and a modern, lightweight stack matter more, and when you are ready to validate extensions via compatibility modules and budget for a license.
How does theme inheritance and fallback work?
Inheritance means your child theme contains only the files you change; everything else is resolved in order from the child to the parent and then to the original module. This keeps the codebase small and makes upgrades safer.
What is the safe way to switch a storefront theme?
The safe way to switch a theme is to test on staging first, enable it per Store View in the Admin, verify key pages, run cache clean, and in production, deploy static assets for the locales you use. Do not disable caches; keep production in production mode.
How do I uninstall or roll back a theme?
To remove a theme safely, make sure no Store View uses it, then run the official uninstall flow (CLI) so references and static files are cleaned up; if the theme was installed via Composer, remove the package and update dependencies before uninstalling. Keep a rollback plan so you can restore the previous theme without downtime.
Writer
Keep Learning