Tweaked-SEO Setup: Step-by-Step Onboarding Guide (Part 3)
-
 Yulia Goncharova
- SEO
- Jan 12, 2017
- 4 min read
Part 3. Check Advanced SEO Suite General settings.
3.1. Go to System -> Configuration -> Mirasvit Extensions -> SEO. Look at the first block of settings – General settings.
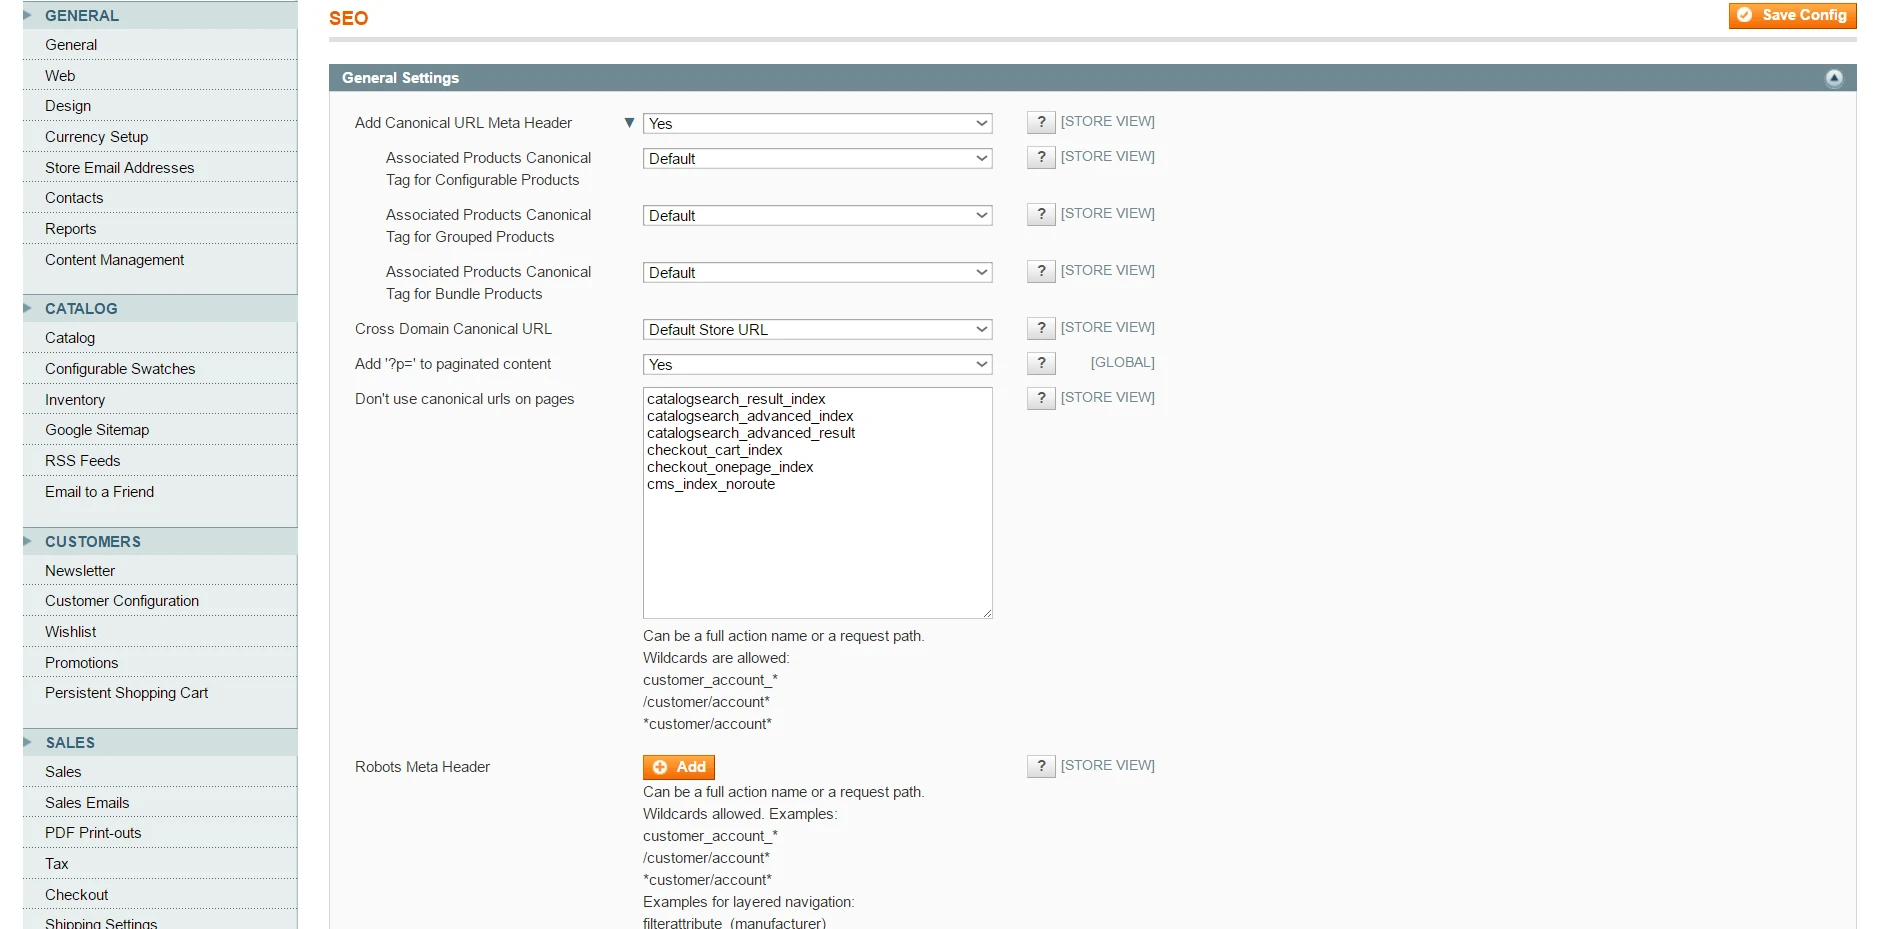 Image 1. General Settings of Advanced SEO Suite.
3.2. Check if canonical URLs are ON: choose YES in the field ‘Add canonical URL meta header’. In this case the tag will be added to your pages header automatically. If your store has a few views, the canonical URL will get the default one’s URL.
3.3. Check canonical tag for configurable products: see ‘Associated Products canonical tag for configurable products’ field. There are 2 options: Default and Parent Product. And if your Configurable product has a Parent product (a jacket, for instance) and a few Associated simple products (different sizes: S, M, L, for example), then it’s better choosing ‘Parent Product’ option. In this case the canonical tag will be parent product’s one for each associated simple products.
3.4. Check canonical tag for grouped products: see ‘Associated Products canonical tag for grouped products’ field. There are 2 options: Default and Parent Product as well.
3.5. Check canonical tag for configurable products: see ‘Associated Products canonical tag for configurable products’ field. There are 2 options: Default and Parent Product.
3.6. Check the ‘Cross domain canonical URL’ setting. Among the options are all your store views and you can choose any of them OR leave it Default. If you choose on of your store views, all other store views will have it as canonical. Otherwise (Default option), each store view / store will have their own canonical URL.
3.7. Check if store paginated content URLs contain ?p= parameter in the field ‘Add ?p= to paginated content’. It’s ‘Yes’ by default, and we recommend you leave it as is. Thus, if all pages URLs will look like https://store.com/?p=2, if you are on the page 2. Otherwise, URL will point to the category one.
3.8. Check if all pages are on the list of ‘Don’t use canonical URLs on pages’. It’s allowed to use wildcards either. On all these pages canonical Meta tags won’t be added.
3.9. If your store is running on HTTPS, you should check ‘Robots meta header for HTTPS’ settings. You may choose ‘NOINDEX, NOFOLLOW’, ‘INDEX,NOFOLLOW’, ‘NOINDEX, FOLLOW’, or ‘INDEX, FOLLOW’ option. Your choice will affect store robots.txt file, so you need 777 permissions for it.
3.10. If your store is multilingual, check ‘Enable link rel=”alternate” and hreflang’ settings. It’s ‘NO’ by default, but change it for ‘YES’ if your shop has a few versions in different languages. In this case, link rel=’alternate’ and hreflang tags will be added to page header in order to help search engines show it to the right audience.
3.10.1. Check if the second “hreflang” parameter is configured (“language” from country/language pair) for those store views which need this. To set the appropriate language for the store view, go to System -> Configuration -> General and select the store view to configure. At the tab Locale Options select the appropriate Locale for this store view and save it. This selected Locale Code will be the first code of the ‘hreflang’ parameter.
3.10.2. To set ‘alternate’ and ‘hreflang’ tags, go to SEO -> Settings and select the appropriate Store View in which you use other language. Untick the ‘Use Website’ at the field ‘Enable Link Rel=”alternate” and hreflang’ and select ‘Yes’ from the drop-down list. After this action, it will appear a new field: ‘Hreflang locale code (not necessary)’, where you can additionally set the language code which will be added to the alternate URL as the second parameter.
3.11. Check if next/prev pagination is enabled in the field ‘Enable link rel=”next/prev”’. Google highly recommends to indicate paginated content. In case you choose ‘Yes’, will be added to the header of your product list.
3.12. Check the option ‘Use meta tags from categories if they are not empty’ – if it’s enabled, Meta Title, Meta Description and Meta Keywords tags from the General Information tab will be applied to the child categories (only if they are not empty). To apply H1 to the current category, add H1 text to Page Header in General Information tab. If meta tags from parent category are empty, child categories and products will use only their own meta tags.
3.13. Check the option ‘Use meta tags from products if they are not empty’ – if it’s enabled, Meta Title, Meta Description and Meta Keywords tags from the product Meta Information tab will be applied to the products (only if they are not empty).
Checked!
Now your Advanced SEO Suite settings are ready!
Later I’ll give you some tips on checking SEO extension extended settings.
Also you may read the previous part of checklist using the following link:
Part 1. What to check right after installation?
Part 2. How To Tweak Your Frontend Sitemap?
OR
wait a bit for the next one:
Part 4. Check Advanced SEO Suite Extended settings.
Part 5. Check if your rich snippets are ready.
Part 6. Check your store SEO-friendly URL settings.
Part 7. Check Product Images settings.
Part 8. Check Info section settings.
Part 9. Check / Create SEO templates.
Part 10. Check Rewrites section settings.
Part 11. Check Redirects management section.