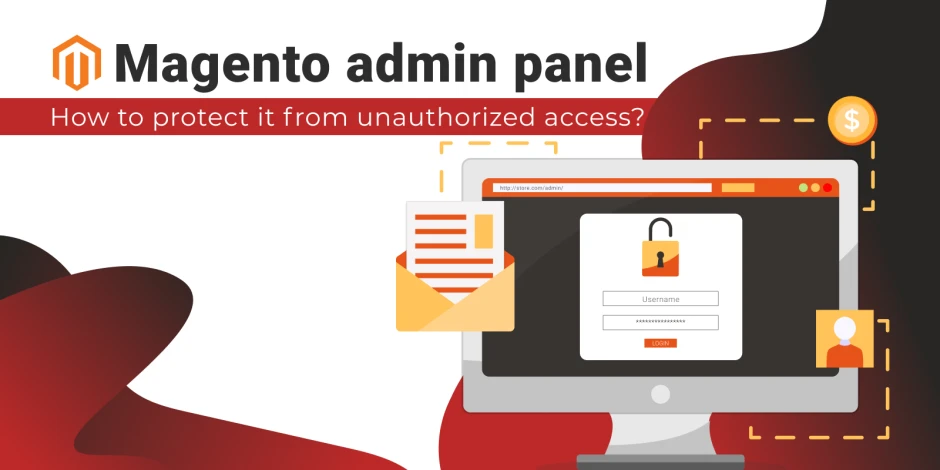
How to make your Magento admin panel more protected
-
 Eugen Barilyuk
- Magento 2
- Jan 26, 2022
- 11 min read
A software vulnerability is not always a reason why a Magento store can be significantly damaged. Often the website is breached due to the weak protection of its admin panel.
Any person who gets unauthorized admin access can do a lot of harm in the Magento store without triggering security alarms. Such a person can change store configuration, product catalog, data on orders, etc. Information on credit cards, billing and shipping addresses can be stolen.
So a Magento store owner should devote efforts that reduce the likelihood of the admin panel access compromise. Use the simple admin protecting practices described in this article.
- Change admin panel default URL
- Set two-factor authorization
- CAPTCHA for admin
- Magento Security tab
- IP whitelisting
- Set User Roles
- Log admin actions
- Summary
Change admin panel default URL
One of the first steps a store owner should do for protecting the admin panel is to change the default URL for accessing it. The default Magento admin URL is typically a store_domain/magento/admin. Since the store's domain name is publicly available, it is not hard for cybercriminals to guess the store admin URL.
The default Magento admin URL consists of two parts: admin URL and admin Path. The admin Path is a part of the admin URL and represents a text after the last slash of the Default Base URL. The latter is a store domain name with an additional address after the slash, for example https://magento_store/magento.
Changing the default admin URL enhances the Magento store protection by forcing the malicious actors to first find out the correct URL before starting any hacking activity, for example, employing a brute force cyber-attack.
Caution: Be very cautious when changing the Magento admin URL. Any error while configuring it can block the normal access to the store backend through the web browser. The access can be restored only by correcting the misconfigured fields on the server.
Note: Before making any changes to the admin URL of the store, consult with your hosting provider. Some hosters require default URLs for their firewall rules to work.
How to change the admin URL from the Magento admin panel
Log in to a Magento admin panel using the admin account and navigate to Stores. Find the Settings section and locate the link to Configuration. On the page, open the Advanced settings and click on Admin.
In the Admin Base URL section, set both the Use Custom Admin URL and Use Custom Admin Path to yes.

The Custom Admin Path will be placed behind the Custom Admin URL after the last slash.
When the configuration is complete , click Save Config and sign out from the admin panel. Then, log in using a new admin URL address.
Edit the admin path directly in env.php on server**
In case you need to change only the admin path for the Magento backend, it may be easier for you to modify the data on the server directly. The configuring of the custom admin path is stored in the env.php file. This file is located at app/etc/ of the Magento installation.
Open the env.php in a text editor and locate the part at the very beginning of the file:
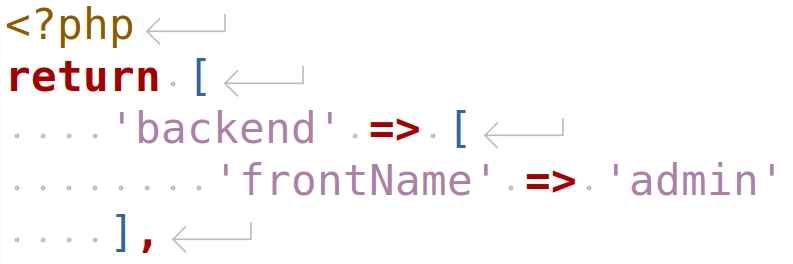
Change the default admin to any admin path you want, for example, storename_admin.
Flush the Magento cache to activate changes. Execute php bin/magento cache:flush command on the server. Alternatively, the cache can be flushed via the admin interface: System>Tools>Cache Management>Flush Magento Cache.
How to find the current Magento admin URL
After changing the default Magento admin URL to a custom one, it may be hard to instantly remember a new address. If you forget the current admin URL, the Magento provides several options to regain this information. Both require access to the server.
The first method to get the current admin URL is to run the command php bin/magento info:adminuri on the server. You will get the output in the form Admin URI: /magento_custom_admin.

Another way to check the current admin Path is to view the file /app/etc/env.php in the Magento installation folder. Open it with any text editor and find the back-end frontName option's value.
Simply append the obtained result to the store main URL address.
How to revert back to default Magento Admin URL and Path
When the admin URL or Path is set incorrectly, the store admin panel will not be available through the web browser as normal. In order to return the lost backend access, it is required to use the command line on the server.
The admin URL can be reverted to default value with the command php bin/magento config:set admin/url/use_custom 0. Revert the admin path with php bin/magento config:set admin/url/use_custom_path 0.
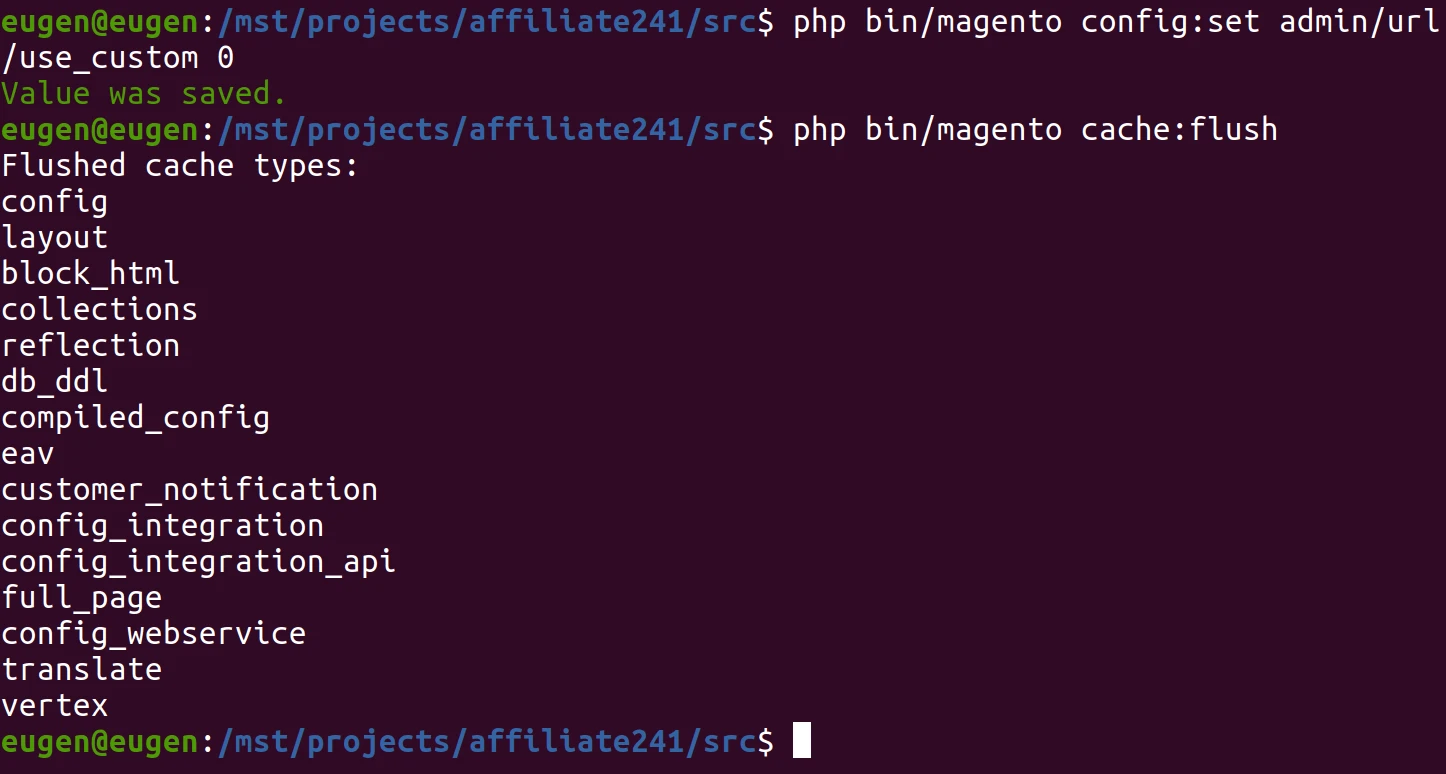
Clear the Magento cache with the command php bin/magento cache:flush.
Set two-factor authorization
Two-factor authorization (2FA) is a key protection method against unauthorized access. This method brings another security key to be used in addition to the password.
Having a second factor allows blocking unauthorized access even if a malicious actor knows the password. Typically, this key is a number or string obtained through an SMS or a dedicated app like Google Authenticator, Authy or Duo Security on an Android or iOS smartphone.
If a store admin has a smartphone that is incompatible with 2FA apps, he can use browser extensions of these 2FA apps. Alternatively, a store can configure a 2FA USB device (U2F device), namely YubiKey is supported by Magento.
Adobe has integrated the 2FA into Magento version 2.3.0, and starting from version 2.4.0 the 2FA is automatically enabled during Magento installation.
Configure the 2FA in a store by navigating to Stores>Settings>Configuration>Security>2FA. Locate the General section of 2FA settings and specify which 2FA provider is intended to be used.
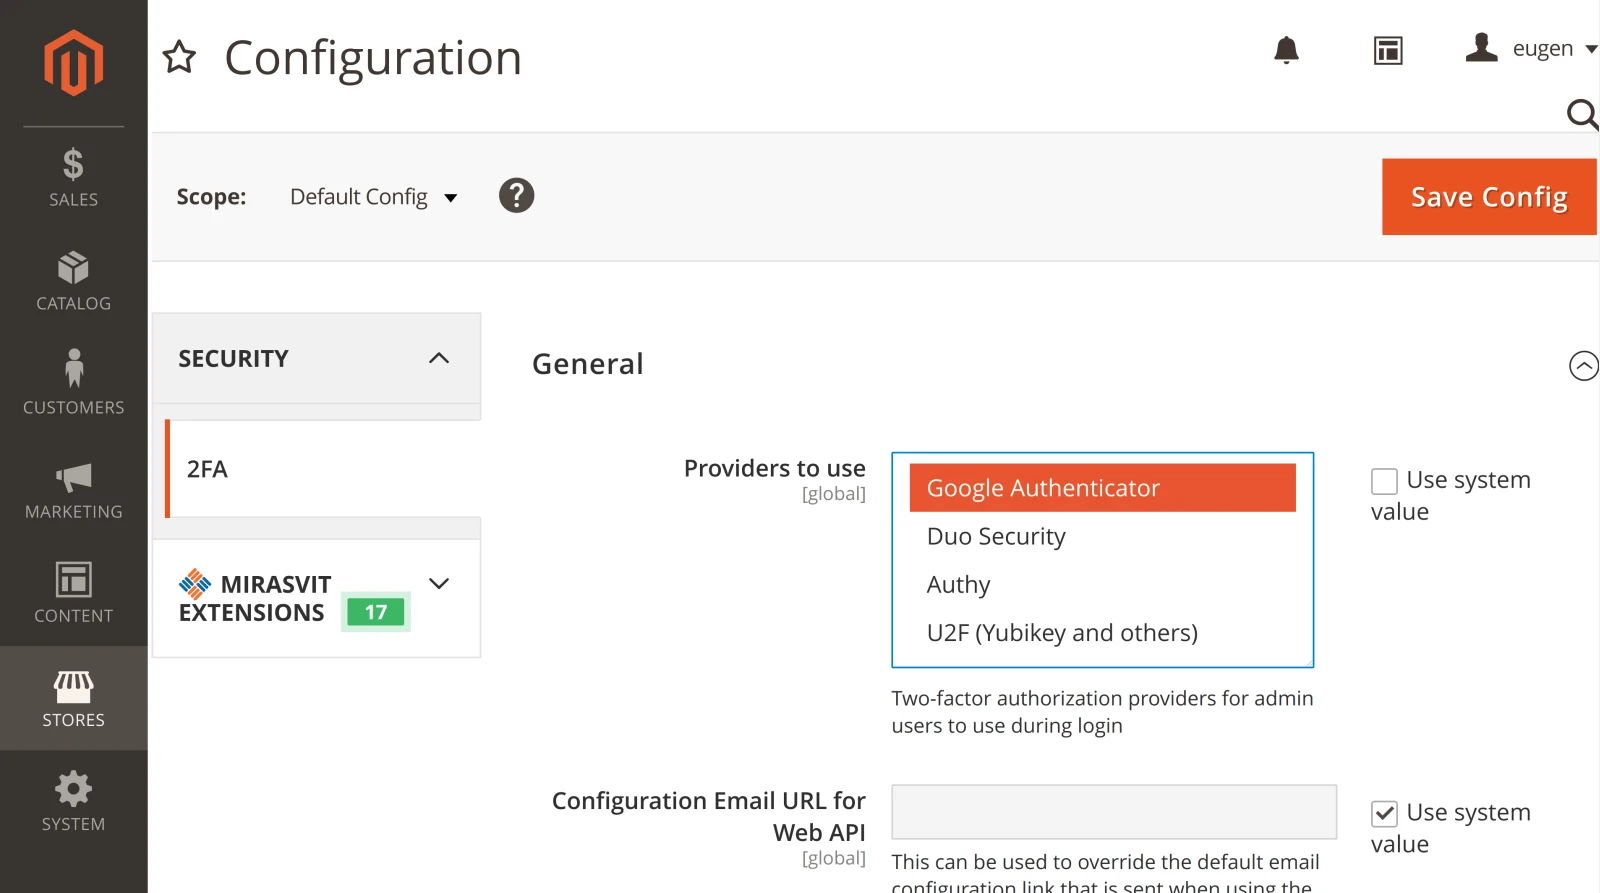
Magento supports using multiple 2FA providers simultaneously. However, each one needs to be configured individually.
Google Authenticator provides a single option of how long the window with a one-time password (OTP) should be displayed. Duo Security requires an Integration key, Secret key, API hostname. Authy also needs an API key. U2F devices require a WebAPi Challenge Domain.
Stick with Google Authenticator if you don’t want to make any configurations for setting up the 2FA. To connect, you simply have to scan a QR code that Magento displays with your smartphone.
CAPTCHA for admin
Brute-force is still a popular method for getting access to the admin panel. A store can protect itself from password guessing by enabling CAPTCHA for the admin login page.
Starting Magento 2.3 and later versions have the embedded support for the latest reCAPTCHA by Google.
To enable reCAPTCHA ensure its module is enabled. Launch the terminal in the Magento installation directory and execute the command to see the list of active modules:
php bin/magento module:status
In case the module is disabled, activate it with php bin/magento module:enable Magento_TwoFactorAuth
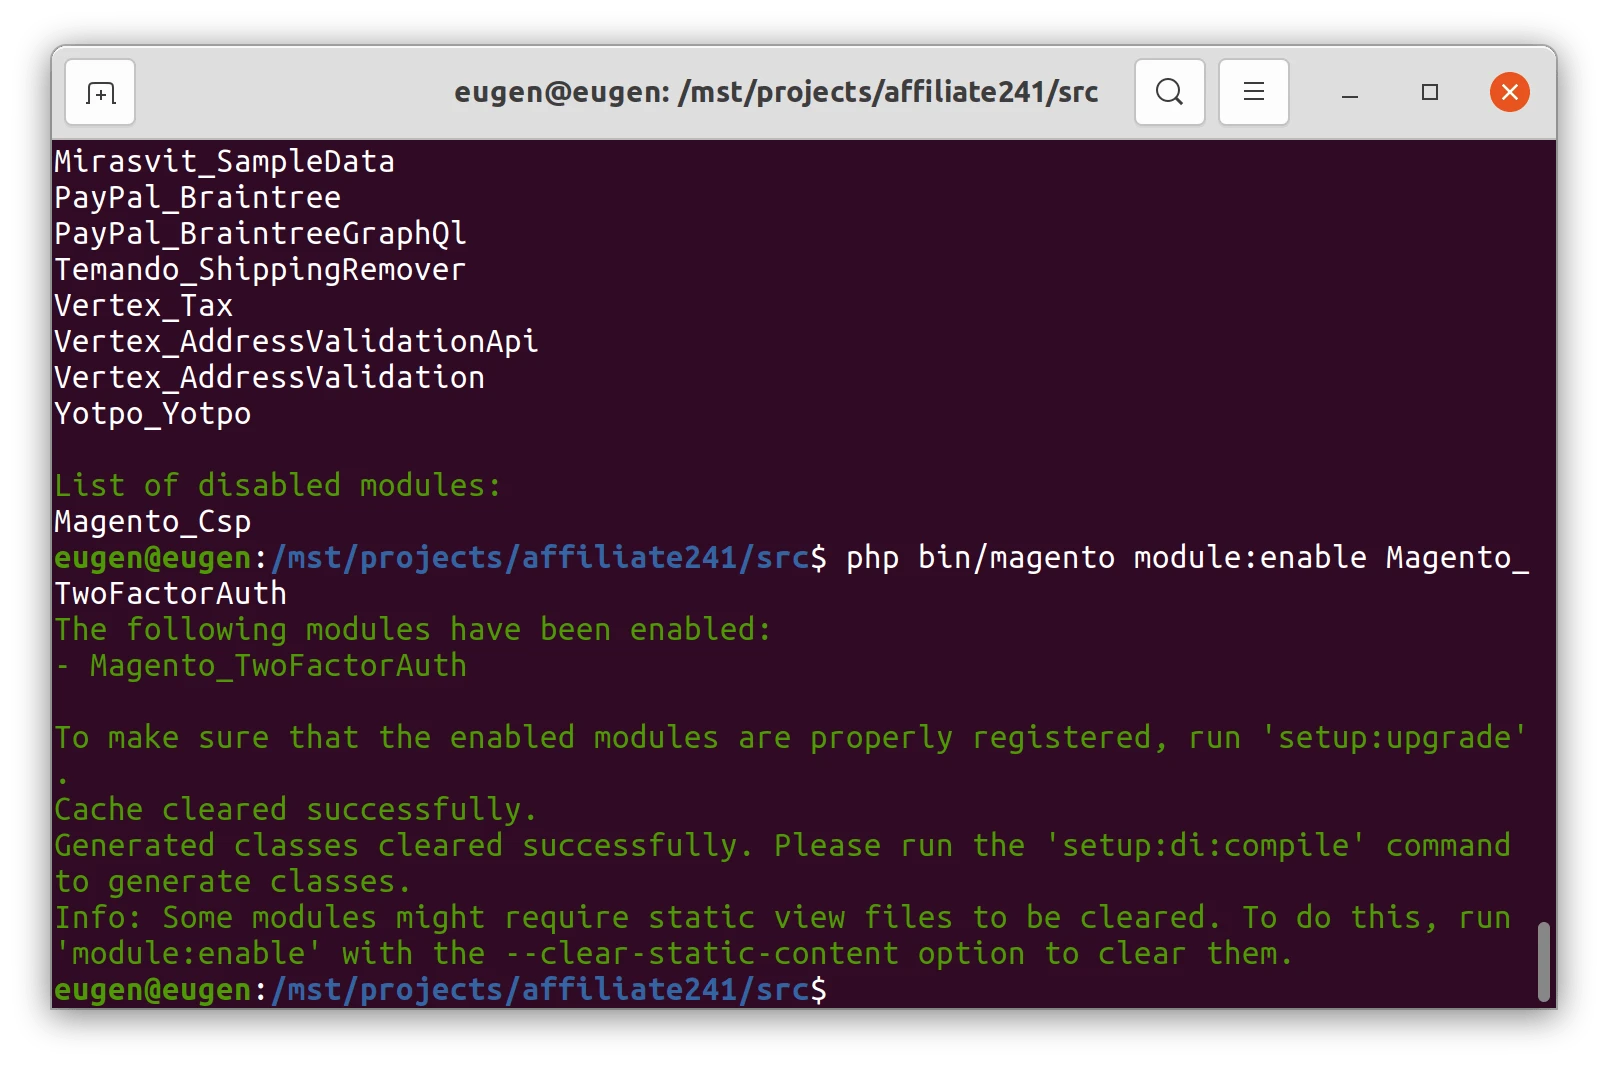
Note: Right after the 2FA module is activated, you will not be able to login into the store admin panel. Magento will ask to set up the two-factor authorization to be able to login. If you need time to prepare your smartphone for 2FA setup, you can temporarily disable the 2FA module with php bin/magento module:disable Magento_TwoFactorAuth
Magento Security tab
Use the Security tab of the Magento admin panel to further enhance its protection. The platform offers multiple options on configuring the admin security like limiting the admin session duration, blocking access from multiple devices, a way to reset the account password, and more.
To open the Security tab, go to the sidebar on the left of the admin panel and click Stores. Find the Settings section and locate the link to Configuration. Choose the Advanced section and open the Admin sub-menu, where the Security tab is located.
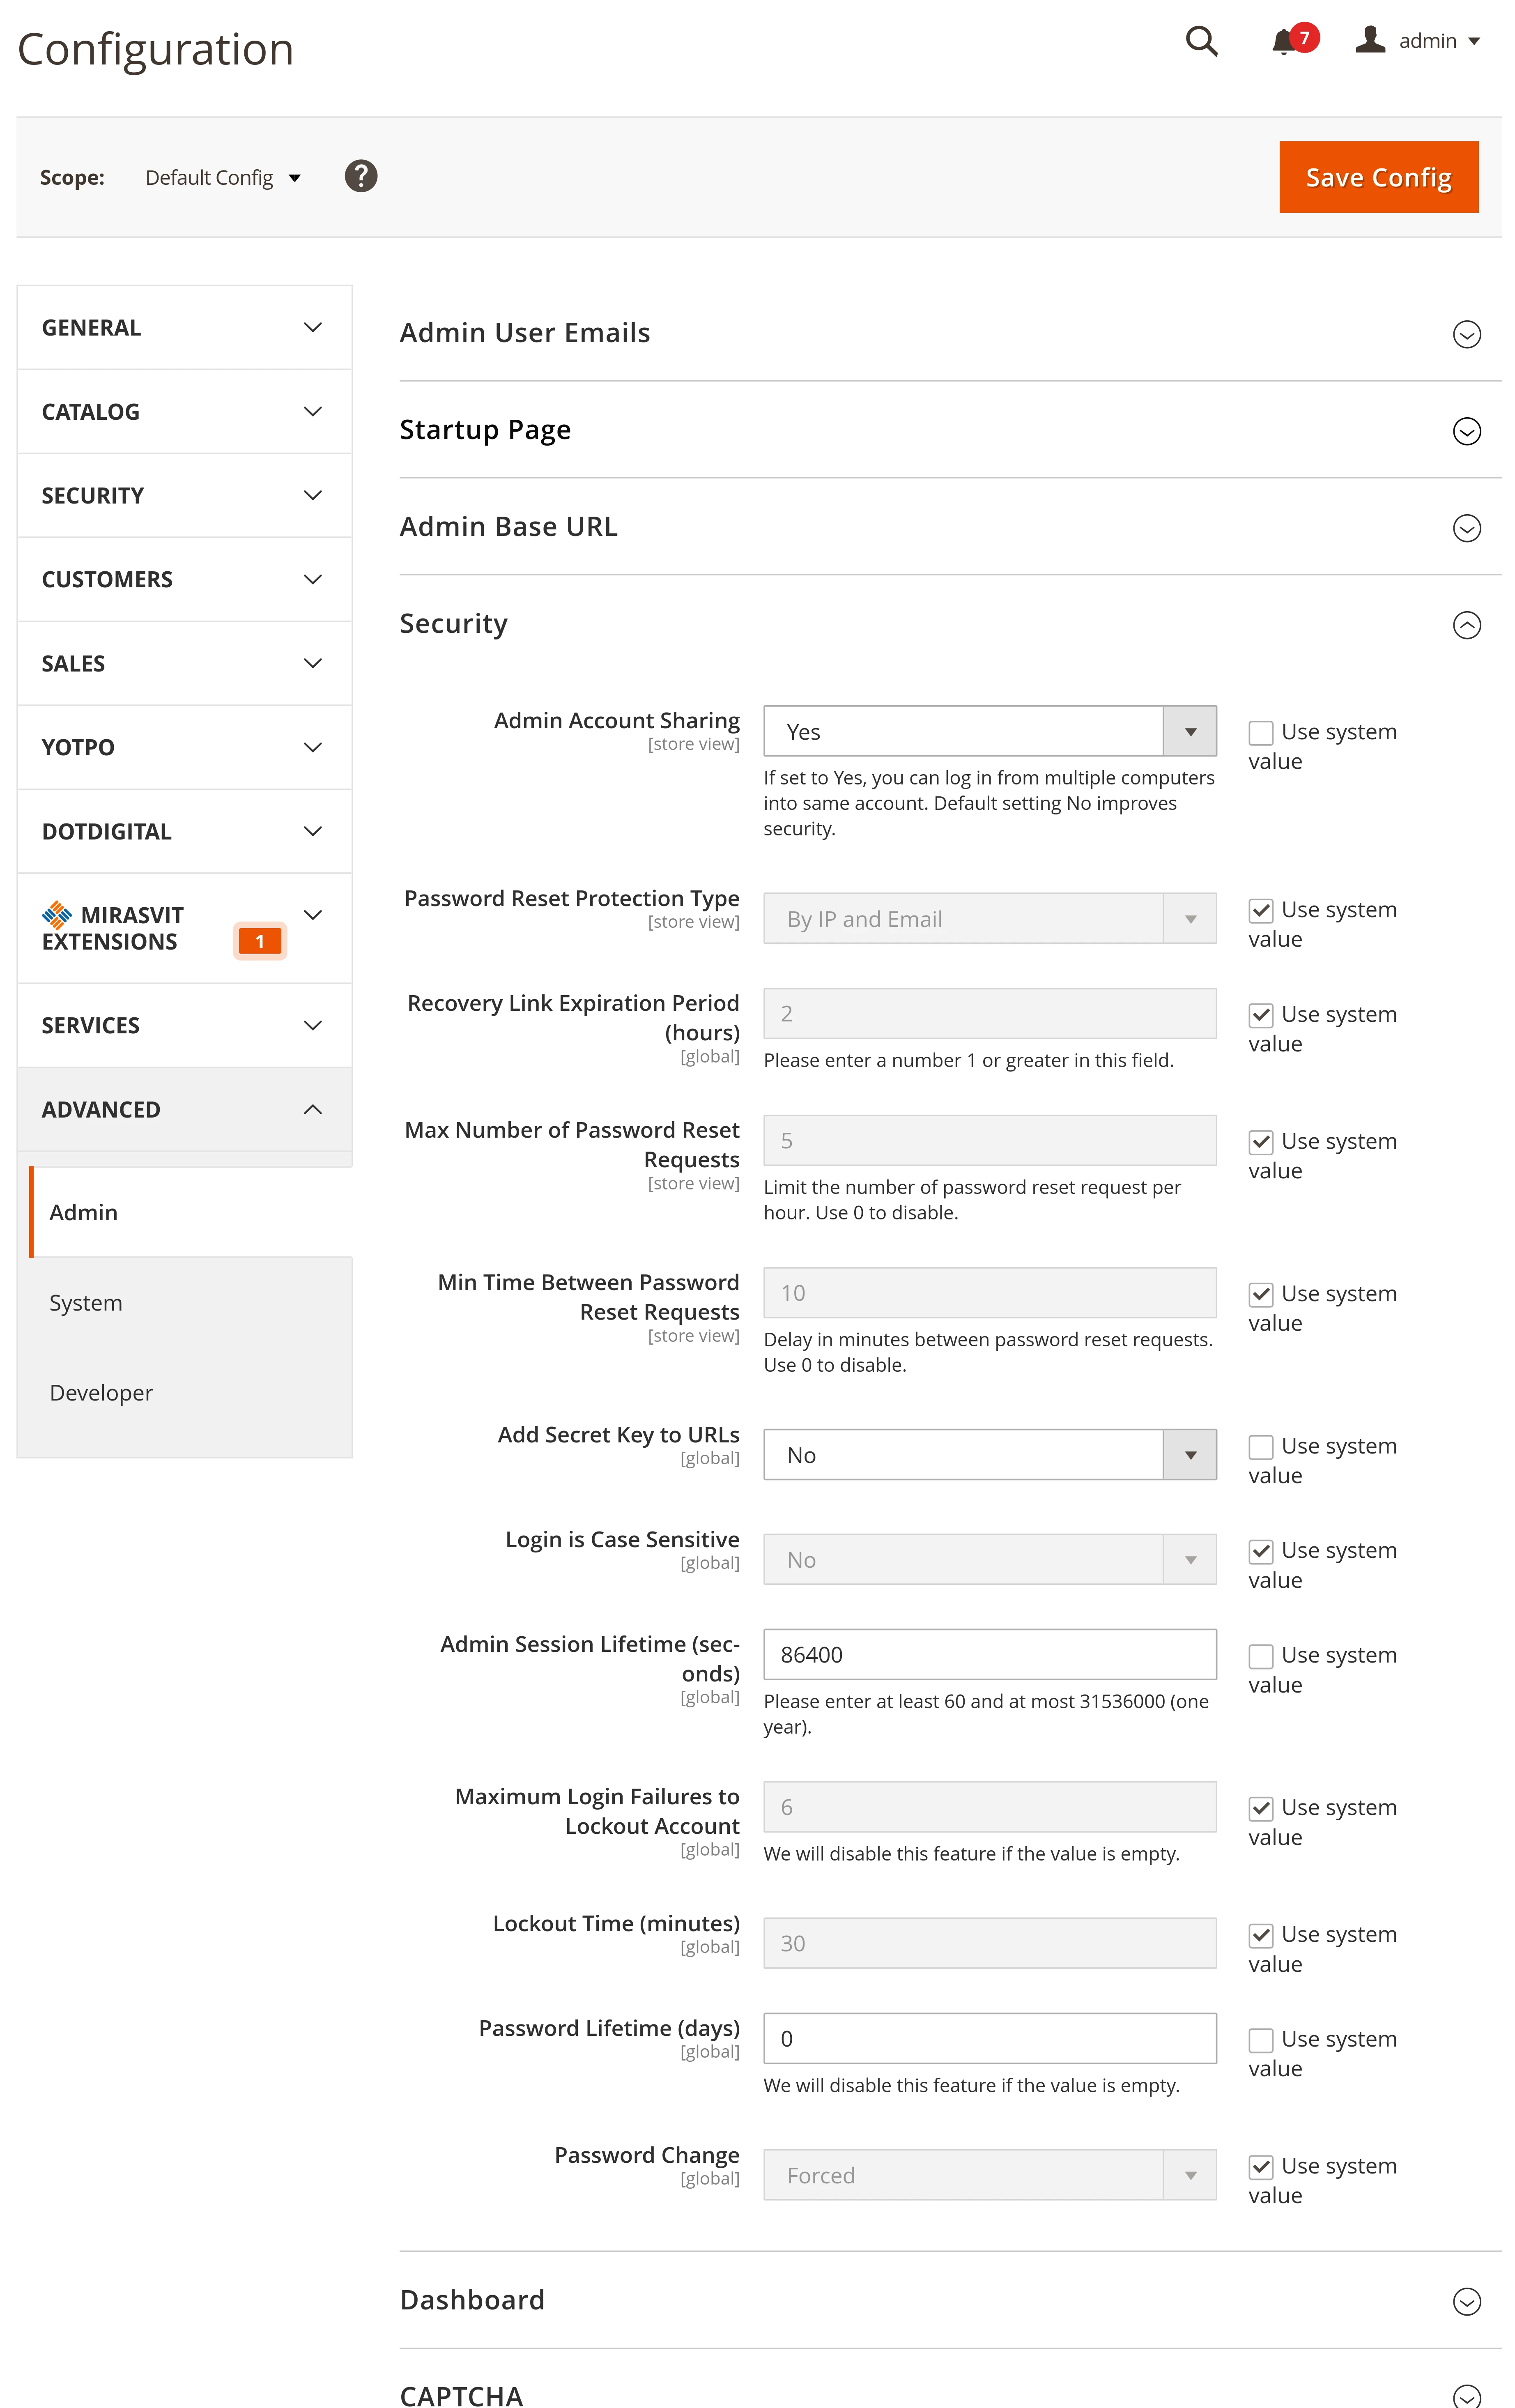
The Security offers the following options:
- Add Secret Key to URLs. This option enables appending a secret key to the existing Admin URL, if set to Yes. It is recommended to activate this option to protect the store from Cross-site request forgery attacks.
- Login is Case Sensitive. Make it harder to guess a password to your admin panel by configuring Magento to recognize the case of the characters. With this option enabled, upper and lowercase symbols will be considered different entities.
- Admin Session Lifetime. This field determines how long in seconds a current admin session will last if the store manager makes no actions. It helps prevent unauthorized access in several ways, one of them being cookies theft, when the hacker doesn’t know the password, but he has obtained a cookie file that allows the current admin session.
- Maximum Login Failures to Lockout Account. It is another way to protect a store admin from password guessing.
- Lockout Time. Specifies in minutes how a new retry to log into the admin account can be executed after failing. This option helps to protect the admin against brute force and password guessing.
- Password Lifetime. Make the passwords to admin accounts to be changed regularly with this option. It helps to block unauthorized access if a person has current login credentials. The longevity of passwords is stated in days with this option.
- Password Change. Use this option to stimulate store managers to change their passwords before they expire.
IP whitelisting
A powerful method of shielding the admin panel from unauthorized access is to limit the number of locations from which it can be accessed. Magento 2 offers tools to limit access by IP addresses. Simply add the allowed IP addresses to an IP whitelist.
The IP whitelisting method works best, assuming store admins generally access the store backend from specific areas and computers.
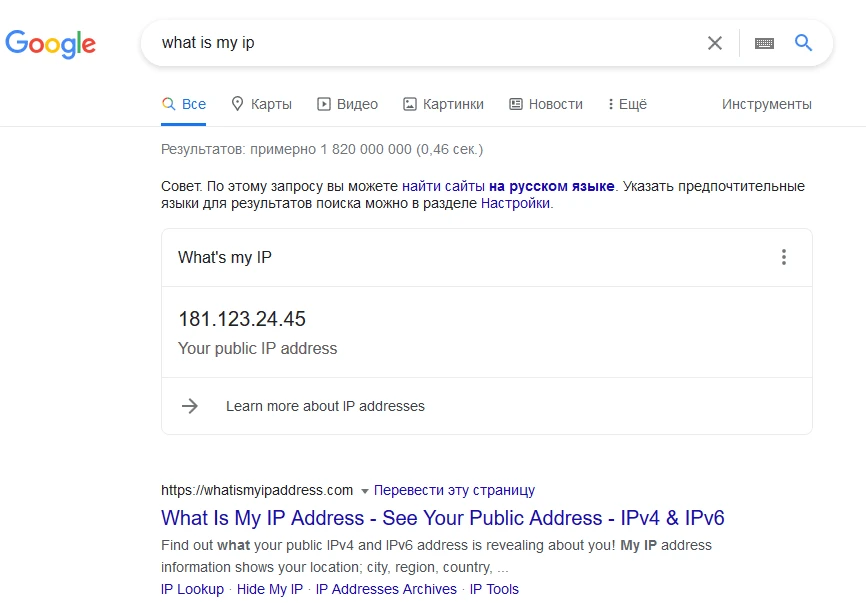
First, find out the IP address of every computer that is allowed to connect to a Magento 2 backend. Utilize Google’s functionality to unveil the public IP address by making a what is my ip search request.
Note: Keep in mind that a lot of internet providers use dynamic IP addresses. It is especially true when accessing from smartphones. If using a static IP address is not suitable, you will need to add to the whitelist every possible dynamic IP for store admins to have access to the backend.
Alternatively, a VPN tunnel may be configured for accessing the store admin from multiple IP addresses. Typically this requires consulting with a hosting provider of the store.
Apache Server
For stores using Apache Server, the IP whitelisting is done by means of the .htaccess file, which is located in the root folder of Magento installation. Open this file in a text editor and add the whitelisting rule inside the <IfModule mod_rewrite.c>:
RewriteCond %{REMOTE_ADDR} !^xx.xx.xx.xx
RewriteRule ^(index.php/)?admin/ - [L,R=403]
Replace xx.xx.xx.xx with the actual IP address from the whitelist. The address should be specified in IPv4 format.
Nginx Server
If the Magento store uses the Nginx Server application, it typically should consult with the hosting provider on the question of IP whitelisting since the files required for configuration may not be accessible.
If a store has full access to the server, the Nginx can be configured according to the official admin access restriction guide.
To set an IP address in a whitelist the nginx.conf file should be added with the following rule:
location ~ ^/admin/ {
    allow xx.xx.xx.xx;
    deny all;
    try_files $uri $uri/ /index.php;
}
location ~ ^/index.php/?admin/ {
    allow xx.xx.xx.xx;
    deny all;
    try_files $uri $uri/ /index.php;
}
Replace xx.xx.xx.xx with the actual IP address from the whitelist. The address should be specified in IPv4 format.
Set User Roles
Magento also allows minimizing the possible damage in case an unauthorized person gets access to the admin panel. This is done by creating user roles, representing permissions for actions a specific account can make in a store.
Navigate to System>Permissions>User Roles>Add New Role, and assign a name to the role.
Magento assigns any admin account a full list of granted permissions by default. However, this can be reduced by selecting each in-store resource or activity a user should have permission to.
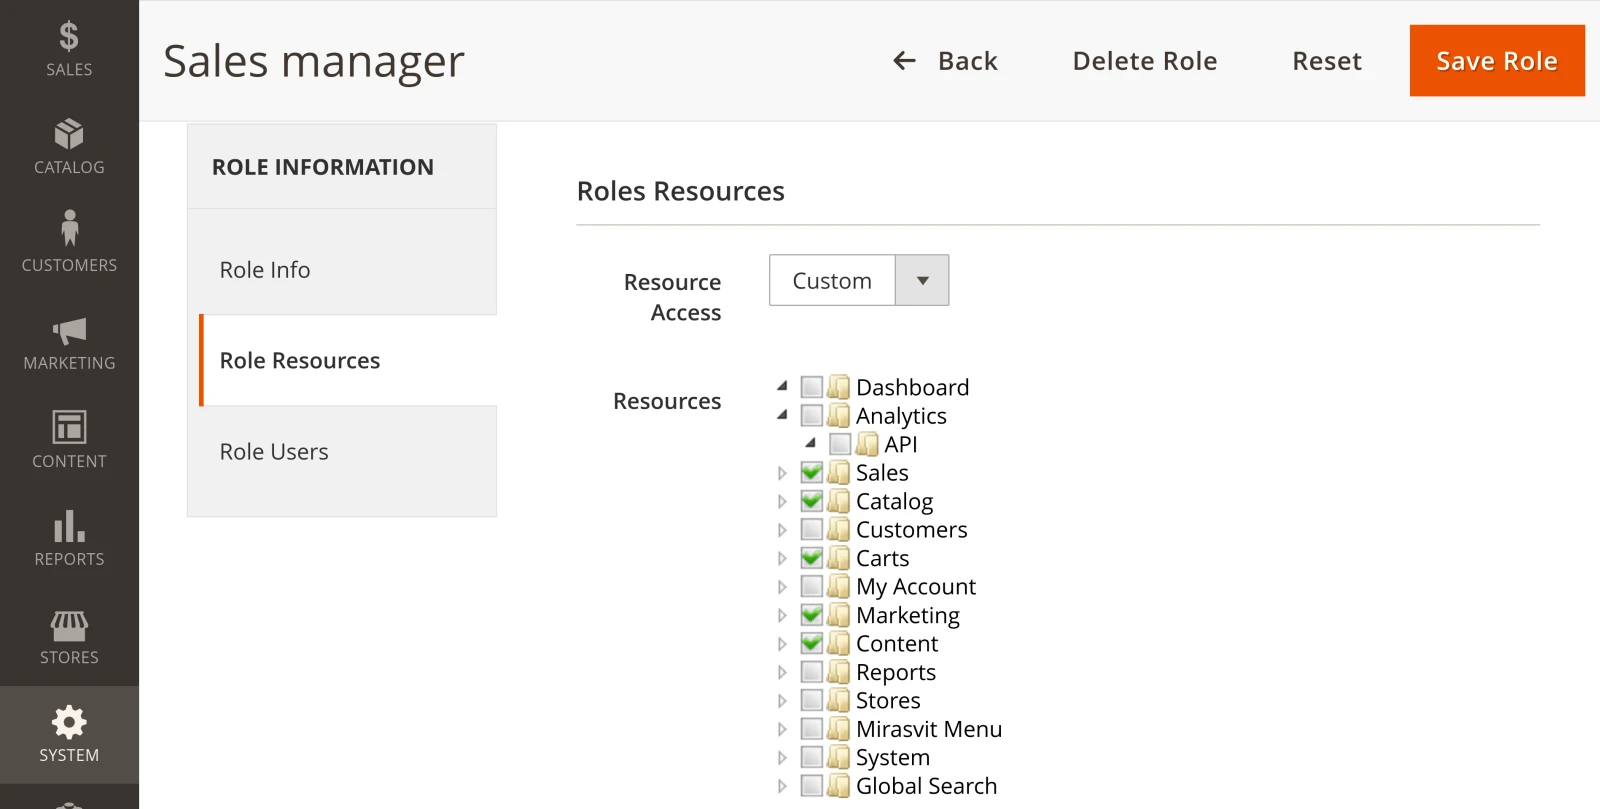
The permissions can limit the access to: - Sales - Catalog - Customers - Cart - Marketing - Content - Stores - System - Action log
Log admin actions
Stores based on the Adobe Commerce edition can utilize the embedded activity logging functionality. This helps to rebuild the actions made by the admin account with the help of the activity log.
The Action logs can be turned on in Stores>Settings>Configuration>Advanced >Admin>Admin Actions Logging. The function by default tracks every action, however it can be configured to log only specific actions.
Summary
Getting the admin panel in Magento 2 protected is a fundamental stage to shield the web store from multiple online dangers. With the simple steps described above, a store owner can make important changes to guarantee the store backend is protected without much of a stretch.
Writer