Common issues and a few hacks with Magento 2 Full Page Cache
-
 Oleksandr Drok
- Administration
- Updated: Sep 17, 2026
- 17 min read
Updated: added a step-by-step guide to enabling Full Page Cache, a new FAQ block, and refreshed the meta description.

From time to time, we receive complaints from our customers about the slow speed of their Magento 2 stores.
They ask us to help them solve the performance problem and speed up Magento 2 store.
In this article, we've compiled a list of our experiences and shared a few hacks for fixing the Magento store cache system.
Posts by theme
In our experience supporting Magento 2 merchants, a weak server is rarely the main culprit. It accounts for roughly a quarter to a third of slow-store cases. Third-party extensions cause more, typically 35-45%, since a complex stack means more places for things to go wrong. Custom code accounts for another 15-20%, and basic Magento misconfiguration, like Full Page Cache being disabled or Elasticsearch never tuned, for the rest. That's why, to solve the problem, you first need to spot the root cause.
Let's start with the basics of how the cache works, since the rest of the article builds on them.
Table of Contents
- How does Magento 2 Page Cache work
- Why is Page Cache so important
- Cacheable or Uncacheable
- How to Enable Full Page Cache in Magento 2
- Why is Magento 2 so slow
- I know it's the cache problem. How do I fix it
- Home solution: Built-in Magento Cache System
- External help: Warming modules
- Popular warming systems for Magento
How does Magento 2 Page Cache work
According to Wikipedia, the cache is a component that stores data, so future requests for that data can be served faster.
In Magento 2, a full-page cache module stores the entire HTML code of a generated page in the cache storage. For storage, Magento uses File cache or Varnish cache by default.
Varnish cache is ultra-fast and recommended for production stores, but it requires additional steps to install and configure.
When your store visitor opens any page in the browser, his or her request goes to the Magento 2 cache system:
- If the requested page is inside cache storage, it is quickly returned to the visitor. The speed of such an operation is very high.
- If the requested page is not present in the cache storage yet, Magento will generate this page, add it to the cache storage, and return it to a customer. The speed of such an operation is much lower.
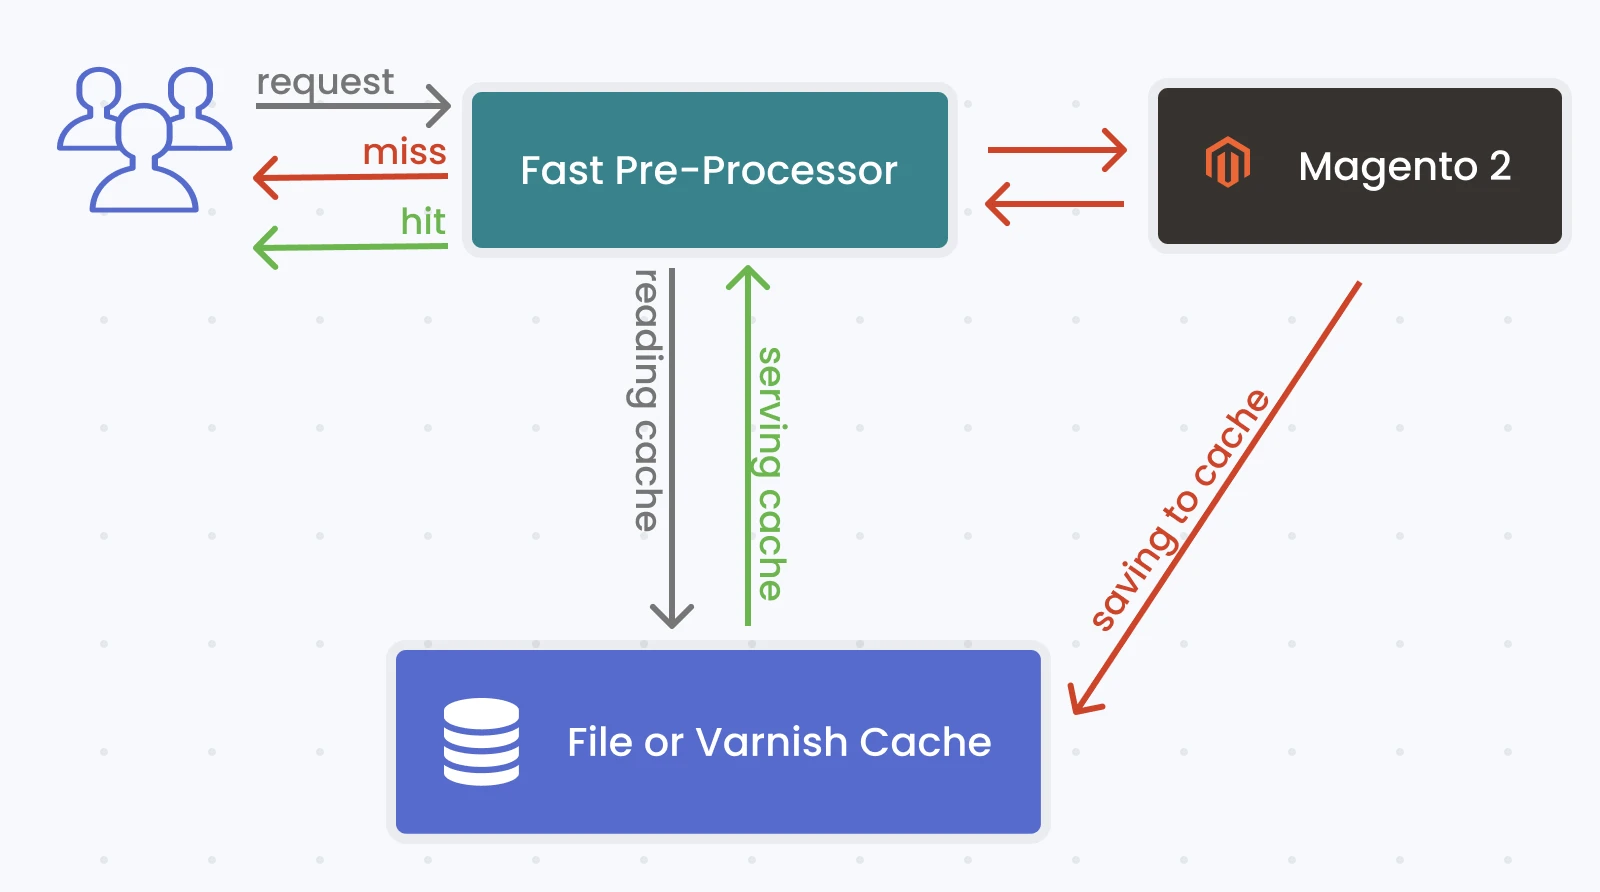
We can see that if a page is served from the cache, Magento sends a response very fast. If it isn't, the response is slow.
Why is Page Cache so important
Cache directly affects store speed, and speed affects both your Google ranking and your conversion rate.
Cacheable or Uncacheable
At first glance, we can see that the more pages there are inside the cache, the faster the store is.
Unfortunately, in many cases, this scenario is not possible: a store's products, categories, and prices change constantly, and Magento needs to clear outdated pages from the cache to display these changes correctly in the store frontend.
Not all pages can be added to the cache, either. Some pages are defined as ‘uncacheable’, meaning that Magento must generate these pages with every single request.
Some blocks may also be defined as ‘uncacheable’. This means Magento needs to generate every page with such a block from scratch for each visitor request.
There is a list of default pages which are cacheable:
- Home page
- Category page
- Products list page
- Product page
- CMS page
And there is a list of pages defined as uncacheable:
- Cart page
- Checkout page
- All pages of customer account
How to Enable Full Page Cache in Magento 2
Full Page Cache is enabled by default on a fresh Magento 2 install, but it's often turned off during development or after a migration. To check and enable it:
- In the admin panel, go to Stores > Configuration > Advanced > System > Full Page Cache.
- Under Caching Application, choose Built-in Application (the default) or Varnish Caching if you have Varnish set up.
- Save the configuration, then go to System > Cache Management and make sure Page Cache is enabled and refreshed.
You can also do this from the command line:
bin/magento cache:enable full_page
bin/magento cache:flush
If the cache still doesn't seem to work after enabling it, that's usually a sign of uncacheable blocks. The sections below show how to find and fix them.
Why is Magento 2 so slow
When any customer tells us that he or she has a slow store, the first thing we do is look for slow pages.
When they are located, it helps us find the root cause of the problem.
We will ask you to find such pages in your store and examine them individually using the following steps:
1. Check that Full page cache is enabled
First of all, please open your Magento admin panel, go to System > Cache Management and check to see if Page Cache is enabled.
It may sound funny, but many times we've been called when a developer did some work on a store, disabled the cache, and forgot to turn it back on. As a result, the store was running without any cache at all, so it was quite slow.
2. Check to see if a page is served from the cache
This matters most right after a server migration or a module update. We regularly see reports like "we moved to a new server and the site feels slower" or "product pages got slow again after your extension update". Confirming whether the page is even being served from cache is the fastest way to either rule that out or confirm it, before digging any further.
There are a few simple ways to check if a page is served from cache or not. You can use whichever option you find simpler.
a) Check by the response time
For instance, you have a page https://store.com/page1.html. Open it in your browser. Then, open browser development tools: it will show you the page generation time.
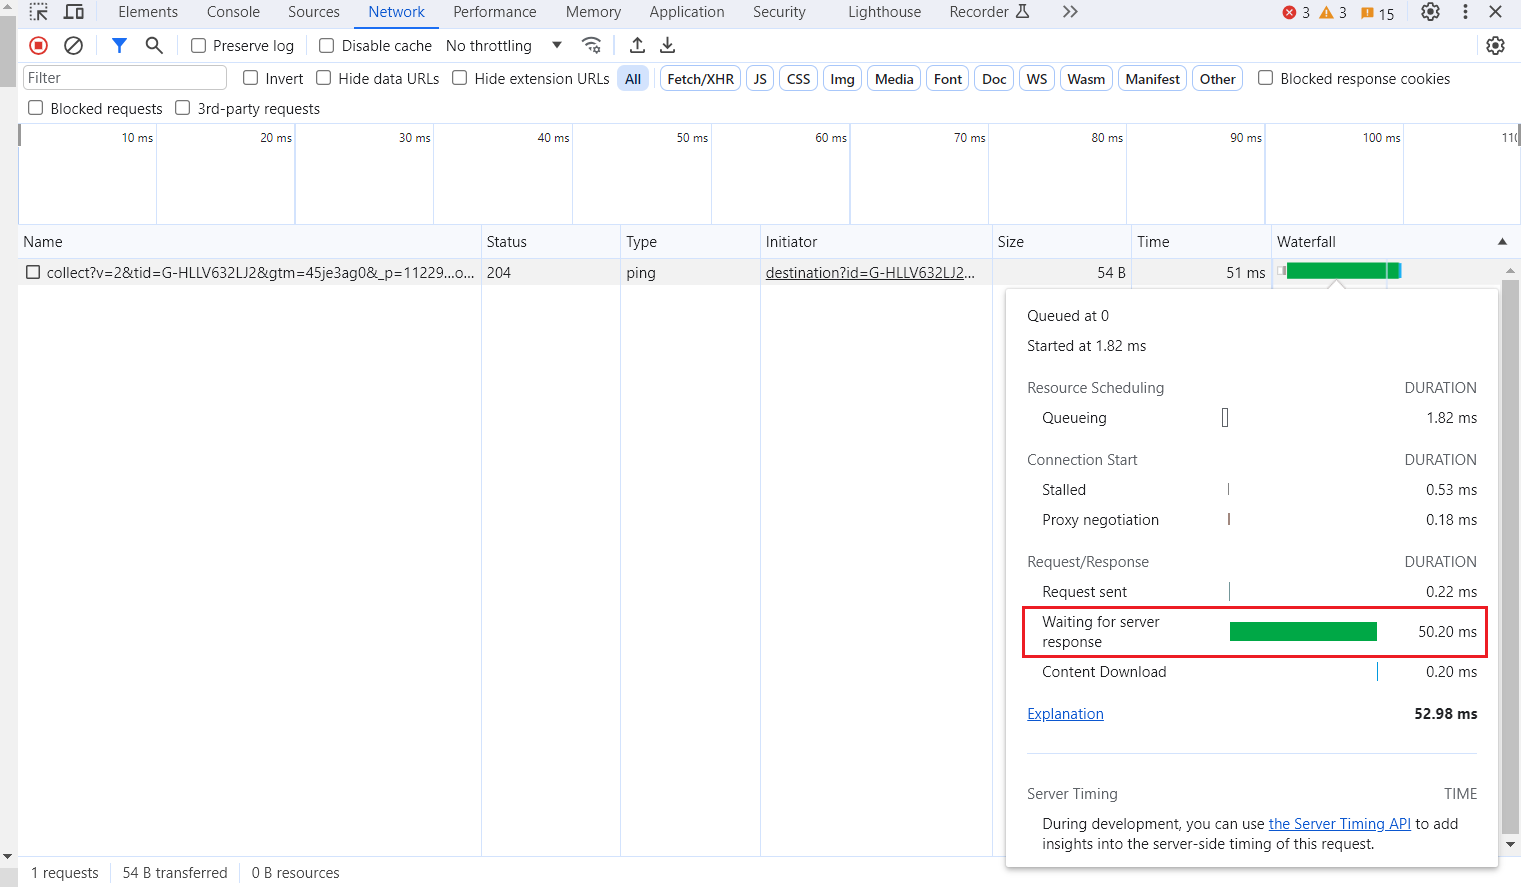
Add any GET parameter to the end of the URL and open the new URL (e.g. https://store.com/page1.html?random). Write down the page loading time from the developer toolbar, as you will need the time for the following comparison. In this case, the page is generated from scratch, so its loading time is high.
Then, open the initial page https://store.com/page1.html and, again, write down the loading time from the developer toolbar. Now the page should be served from the cache, i.e. its loading time should be much shorter than in the previous case. If this is not the case, the page is not served from cache and that's a problem.
One common false negative: make sure you're looking at the document request (the first row, type document) and not an XHR call like /customer/section/load/ or /checkout/cart/. Those always hit PHP, since they carry private, per-visitor content like the mini-cart or a customer greeting, so they'll look slow even on a fully cached page. Reading the wrong row is one of the most common reasons people conclude the cache isn't working when it actually is.
As a rough reference, a cache miss typically takes 800ms-3s depending on your server and page complexity, a hit from the built-in cache lands around 50-150ms, and a Varnish hit is usually faster still, 10-30ms. If your numbers land anywhere near that gap, the cache is doing its job.
b) Check by Magento headers
To use this approach, you need to switch your Magento store to dev mode. This may not be possible if your store is in production mode and has heavy traffic. But if you do tests on your dev host, this approach should be fine for you.
To switch your store to dev mode, just run the following command via SSH:
bin/magento deploy:mode:set developer
Then open any page and in developer tools of your browser, check the headers of that page (for Chrome, you need to open View / Developer / Developer Tools and the Network tab).
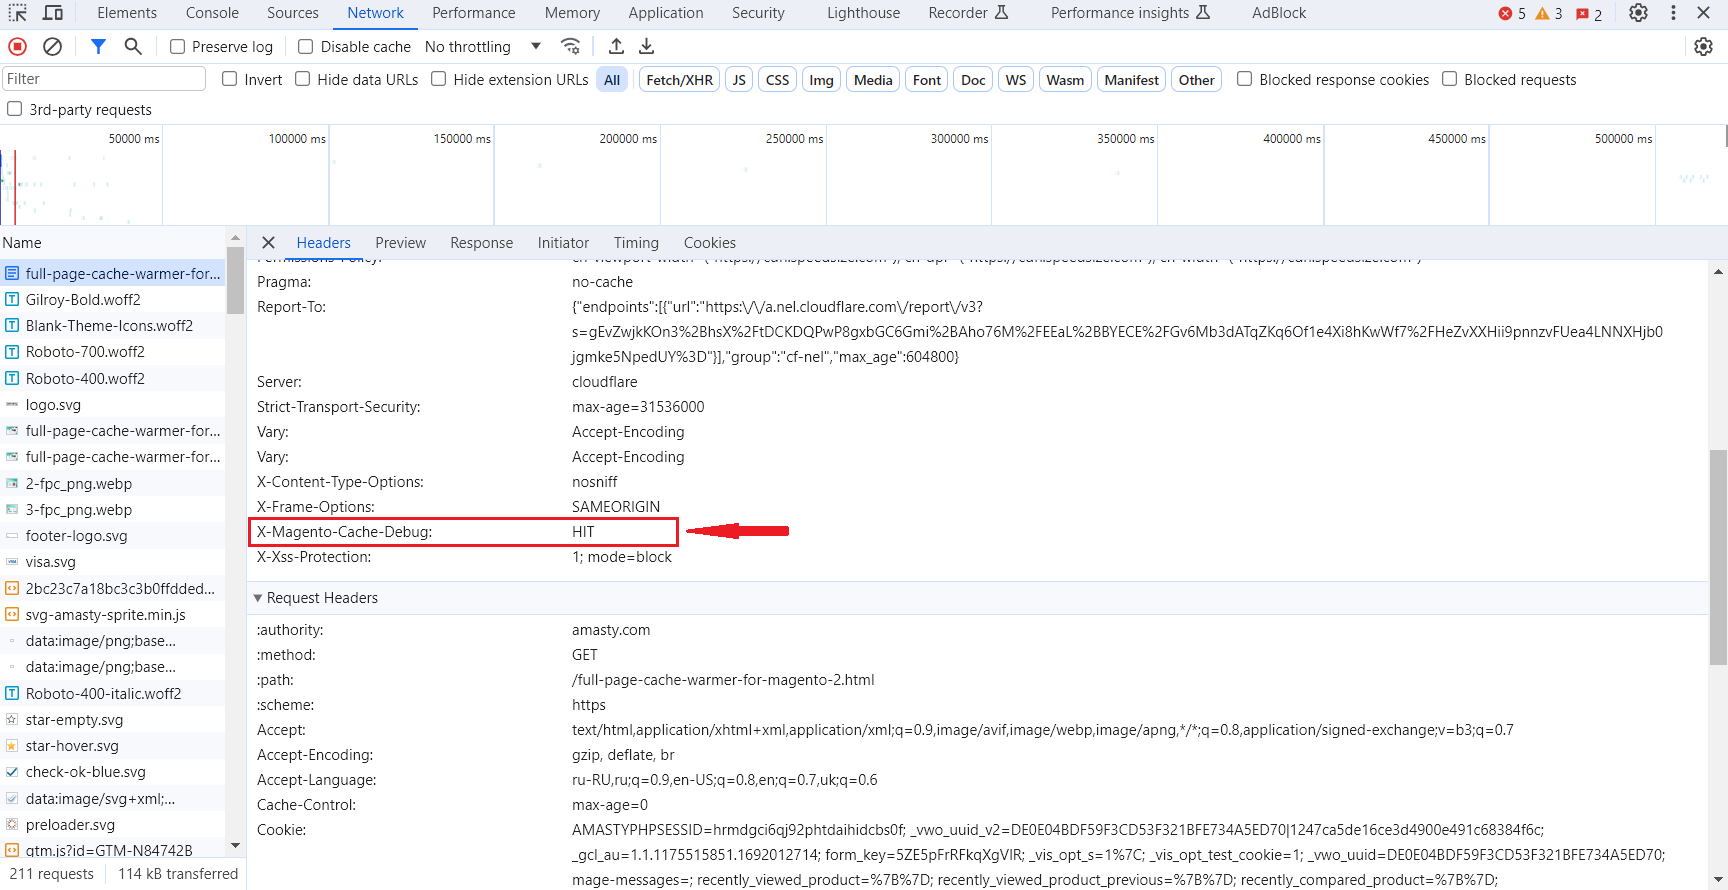
Find the header X-Magento-Cache-Debug. If its value is MISS, then the page is not served from the cache. If its value is HIT, then the page is from the cache and should be loaded fast.
This dev-mode restriction is specific to Magento's own header. It's intentionally hidden in production so it doesn't reveal infrastructure details. If you're running Varnish instead, its headers (Age, Via, X-Varnish) are visible in production too, since they're standard HTTP proxy headers, not something Magento controls.
If you're behind a CDN like Cloudflare or Fastly, this header can disappear even when the cache is working correctly, because CDNs in proxy mode commonly strip non-standard headers coming from the origin. If X-Magento-Cache-Debug is missing entirely, check the origin server directly before assuming the cache is broken (see the curl example below for how to do that while bypassing the CDN).
c) Check using the toolbar of the Mirasvit Full Page Cache Warmer extension
Probably, it's the easiest way to check the current issue and spot similar issues in the future.
Just enable the toolbar in the Store / Configuration / Page Cache Warmer. Open any page and you will see the cache status. Also, you will see information about uncacheable blocks.

d) Check using curl (command line)
If you'd rather skip the browser, the same headers are visible from the command line. Switch to dev mode first (see above), then run:
curl -s -D - -o /dev/null https://store.com/page1.html
This sends a normal GET request and prints just the response headers. This is closer to an actual page load than curl -I, which sends a HEAD request that some Varnish/nginx setups handle differently.
Look for X-Magento-Cache-Debug in the output: HIT means the page came from the cache, MISS means it didn't, same as in the browser. On Varnish, also check the Age header: it shows how many seconds the response has been sitting in Varnish's cache (Age: 0 alongside a hit means it was just cached; a large number means it's been sitting there a while), and it's only present when the page is actually served from Varnish. The built-in file/Redis cache doesn't set it. Some Varnish setups strip cache-related headers for security, so their absence on a hardened server doesn't automatically mean "not cached". X-Magento-Cache-Debug stays the more reliable signal for the built-in cache either way.
If a CDN in front of your store is stripping the header (see the note above), check the origin directly, bypassing the CDN, by pointing curl at the server's IP and setting the Host header manually:
curl -s -D - -o /dev/null -H "Host: store.com" http://<origin-ip>/page1.html
One gotcha: curl sends no cookies by default, so it always requests the guest version of a page. If you're troubleshooting what a specific logged-in customer or pricing tier sees, pass their session cookie with -b "your_cookie_here". Otherwise, you're checking a different cached variant than the one they get.
After doing the above checks, you will definitely be able to tell whether the cache works properly for the target page. If you've found that the cache is not working, then it's time to fix it.
3. See if the cache is cleared too often
Unintuitive as it may be, clearing the cache can also slow down your website. It should be cleared and updated occasionally, but not too often. Otherwise, pages will be frequently loaded "cold", building the cache anew, which takes longer.
There are four main reasons for cache clearing:
- Admin's wish. Administrators may flush the cache manually. If this is your main way to clear the cache, try to do it less often.
- Page edits. Editing a page's content clears its cache automatically, so changes take hold right away. This is why insignificant edits should be bundled together instead of doing them one by one.
- Expired TTL. All cached content has a certain Time To Live (TTL). It is set to 24 hours for public content by default. Lowering this attribute in settings may be the reason for excessive cache flushing.
- Third-party extension requests. Some third-party software can call for cache cleaning and do it far too often. In rare cases, modules from different developers may overlap in their schedules and cause excessive flushing.
Eliminating one of the listed processes can quicken your Magento website. But don't try to turn off all cache clearing entirely. That can cause other problems.
I know it's the cache problem. How do I fix it
There are different types of cache problems that may happen. Some problems are pretty easy, while others need a careful approach and developer debugging.
A few things are worth ruling out first, since they're quick to check:
- Full Page Cache is simply disabled in System > Cache Management. It's easy to overlook after debugging (see step 1 above) or after a deploy that ran
bin/magento maintenance:enableand never flipped it back. - The Caching Application setting doesn't match your actual infrastructure - admin says Varnish but Varnish isn't running, or vice versa.
- Private content or session cookies force a MISS beyond the expected customer sections - depending on the VCL, a logged-in session can push the whole page out of cache on some Varnish setups.
- A CDN in front of Magento overrides caching behavior - stripping
Cache-Control, rewritingVary, or forcingno-cacheregardless of what Magento sends. This is the least obvious one: Cache Management shows "enabled" and everything looks fine on the Magento side, because the actual block is happening one layer further out, in the CDN.
However, from our experience, in 90% of cases, a page is not added to the cache (and cache is not working for that page), because of the presence of uncacheable blocks somewhere inside the page. If none of your pages are added to the cache, then you have uncacheable blocks defined globally, which will then disable your full page cache system entirely.
To fix this cache problem, you need to find the incorrect uncacheable blocks and remove or fix them.
All blocks are defined in the layout files, which are placed in the following folders:
app/design/frontend/[Package]/[Theme]/[Module]/layout/*app/code/[Company]/[Module]/view/frontend/layout/*vendor/[company]/[module]/view/frontend/layout/*
There are a lot of files inside those folders. It's very time-consuming to check each file manually to discover the issue, so we created a set of commands that will greatly speed up the process.
You can search uncacheable blocks using the following SSH commands:
cd app/design/frontend/ && grep --recursive -l 'cacheable="false"' * && cd ../../..;
cd app/code && grep --recursive -l 'cacheable="false"' * && cd ../..;
cd vendor && grep --recursive -l 'cacheable="false"' * && cd ..;
You can also get the list of uncacheable blocks from the toolbar of our Full page cache warmer extension:

At this point, we've got a list of uncacheable blocks. Let's spot the incorrect ones. We need to check only blocks which are inside the following files:
- default.xml is responsible for all pages of your store
- catalog_product_view.xml is responsible for product pages of your store
- catalog_category_view.xml is responsible for the list of product pages of your store
- cms_page_index.xml is responsible for CMS pages of your store
If you see any uncacheable blocks inside these files, then you have found the source of the issue. Now it's time to fix it. You have two options:
a) Make the block cacheable by changing cacheable="false" to cacheable="true". It may or may not work for your case, depending on the block purpose. After making such changes, don't forget to flush the cache.
b) Contact the developers of the extension that created that block and ask them to fix the problem. As a temporary solution, you may disable the extension if it negatively affects your store's speed.
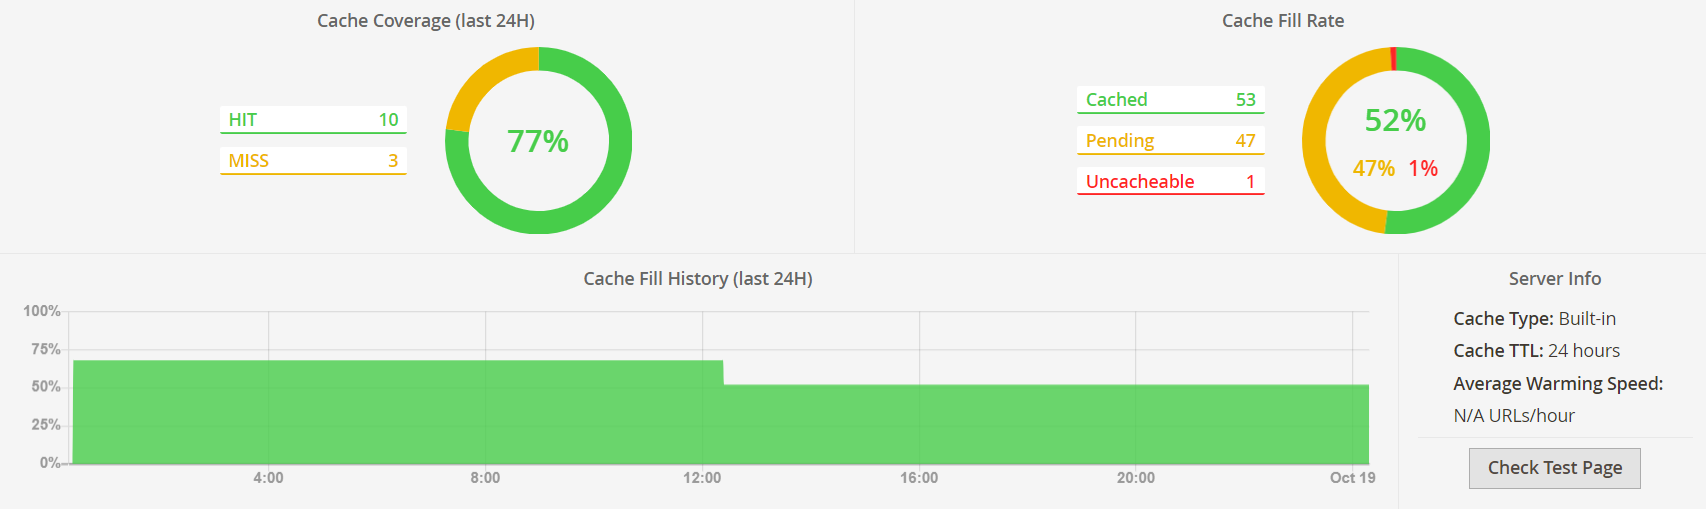
After fixing issues with uncached blocks, your cache should start working much better. On the FPC toolbar, you should see a high cache hit rate, which means that most of your pages are served from the cache.
Home solution: Built-in Magento Cache System
Standard Magento 2 has its own system to deal with the cache. It offers basic functionality, like full-page and block caching, together with a few settings. As the name suggests, full-page caching stores entire pages when they're first visited, to speed up subsequent loads. Block caching saves only parts of the page.
Start in the admin panel to find these settings. Choose Stores in the menu on the left and then Configuration. Click on the Advanced category on the left in the opened tab. Then pick System in the dropdown menu and finally, find the Full Page Cache category in the central list.
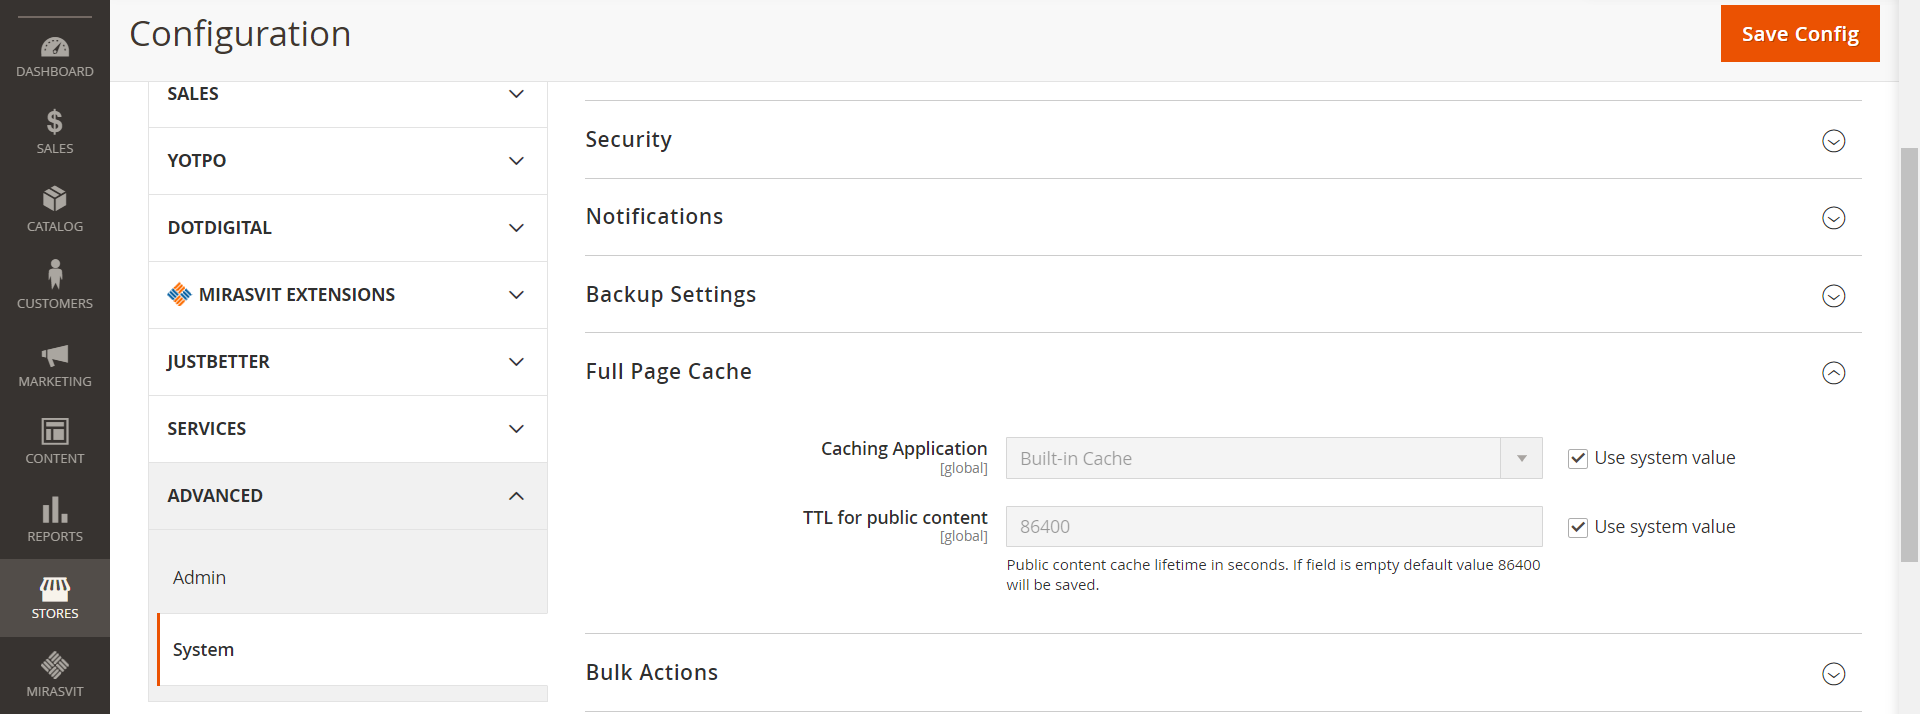
The base Magento full page cache settings allow you to adjust the TTL of all public content and change the caching application. The Varnish settings tab also appears in the System menu if you choose Varnish as the caching application. You can set the backend host and port and export configuration files with Varnish.
External help: Warming modules
The basic Magento full page cache tools have bare-bones functionality to work with the cache. However, you should consider third-party modules for warming, more functionality, and better control. These extensions offer all the necessary tools, like warming, scheduled flushing, hole punching, and a list of ignored pages. Here are four FPC module developers for your consideration:
- Mirasvit. Our extension provides warming functionality along with detailed statistics and debugging tools.
- Amasty. The module from this company warms mobile pages separately from desktop pages, using several algorithms to prioritize what gets cached first.
- Scommerce. Alongside basic features, an extension from these developers adds a warmer grid for manual control, creates log files, and automatically warms recently updated pages.
- MageBees. Key features of the module from this company are performance reports and a cache status widget for the store's front end.
Popular warming systems for Magento
The built-in Magento 2 full page cache system is not the only one out there, as you probably already figured out. There are several of them, but two in particular are the most commonly used in e-commerce. Here are their main differences.
Varnish
What sets this Magento 2 full page cache system apart is the VCL, a code language in which its configuration is written. Using it, you may fine-tune the way for processing incoming requests. Varnish also supports third-party modules, VMODs.
Magento generates a working VCL for you, so writing it by hand isn't the real barrier to adoption: getting a standard setup running is a matter of minutes. The actual cost shows up during rollout: Varnish can't terminate HTTPS itself, and the visitor's real IP address has to be threaded correctly through the whole chain, or things like IP-based bot blocking and geo-detection quietly break. We cover this trade-off, along with our own benchmark numbers, in Magento 2 Full Page Cache vs. Varnish.
LiteMage
LiteMage goes the opposite way from Varnish and offers easy installation, with little technical knowledge required. This system also supports HTTPS, HTTP/2, and HTTP/3 formats without using a proxy. It is generally faster and easier to set up because of that.
The biggest downside of LiteMage compared to Varnish is the lack of control. You don't have as much say over the configuration. The streamlined experience also limits how deeply you can customize it.
To sum it up, Magento 2 Page Cache greatly improves store speed, but only if your store is well-built and uses cache-friendly extensions.
From our experience, in most cases, page cache isn't working because of globally defined uncached blocks. Find them, fix them, and your Full Page Cache will finally do its job.
FAQ
How do I clear the Magento 2 cache?
Run bin/magento cache:flush to purge everything, or the more targeted bin/magento cache:clean full_page to remove only expired or invalidated entries. In the admin, the same choice is available under System > Cache Management.
Is Varnish the same as Full Page Cache?
No. Full Page Cache is the Magento feature that decides what gets cached and for how long. Varnish is just one of the places that cache can live, alongside the built-in File cache and Redis.
How do I disable cache for development?
In the admin, go to System > Cache Management and disable Page Cache (and any other types you don't want while developing). From the CLI, use bin/magento cache:disable full_page, and bin/magento cache:enable full_page to turn it back on when you're done.
What's a healthy cache hit ratio?
Most guides treat anything below 80% as a sign of a problem: frequent flushing, uncacheable blocks, or a misconfigured TTL. You can track your own ratio with the Full Page Cache Warmer's Efficiency Report or Magento's own cache coverage stats.
Are there any Full Page Cache security updates I should know about?
Yes. Magento Open Source and Adobe Commerce 2.4.7 added a setting that mitigates risks around the {BASE-URL}/page_cache/block/esi endpoint, which previously allowed loading arbitrary dynamic content fragments. If you're on an older version, check the 2.4.7 release notes and update.
Head of Product at Mirasvit
Magento 2 store loads quickly only if its pages are in the cache. Our extension automatically adds pages to the cache and thus, speeds up your store!
Whenever your customer or Google visits a page, its most recent variant will be loaded in a fraction of a second from the cache.
This extension runs an automated crawler that monitors cache status. Once the cached page is cleared, the crawler visits this page and warms up the cache for it!
Keep Learning

![7 essential ways to improve your Magento 2 site speed [Updated]](https://mirasvit.com/media/blog/resized/989/magento-performance-.png)