How to Increase Repeat Sales with Email Campaigns. Part 2
-
 Andriy Kovalenko
- How to & Tutorials
- Feb 11, 2025
- 10 min read
This is the second part of our article on how to boost repeat sales using email campaigns. In the first one, we discussed the advantages of this approach, the nuances of analytics and timing, and we also explained how to avoid mistakes in setting up campaigns.
Now, we will show you, step by step, how to create, customize, and launch effective email campaigns using Magento extensions.
You'll learn how to select and customize triggers, segment customers, create message templates, set them to send automatically, and track results.
This article is a practical guide that will help you make the most of email campaigns for your store.
Table of Contents
- Analyzing product range and customer base with Magento reporting tools
- Finding top repeat sales products and customer segments using custom reports
- Defining key audiences with customer segmentation
- Setting up and launching campaigns with Follow Up Email by Magento
- Step 1: Create a template
- Step 2: Plan a campaign
- Step 3: Choose a trigger
- Step 4: Customize events
- Step 5: Customize the audience
- Step 6: Select an email and customize the delay
- Testing the effectiveness of email campaigns with analytics tools
- Conclusions
Analyzing product range and customer base with Magento reporting tools
In the first part, we explain why it's important to analyze store assortment and customer behavior before launching a newsletter. Now let's learn how to do it effectively using Advanced Reports for Magento 2 and Customer Segmentation Suite extensions.
Finding top repeat sales products and customer segments using custom reports
For example, let's consider a small online store that specializes in selling tea. These are the types of products that need to be regularly restocked, which means they have a high potential for repeat sales.
To fully capitalize on this potential, you need to determine which specific positions are in the greatest demand. You can't find this out logically or by eye: you must work with data.
This is where the Advanced Reports extension comes in handy. It integrates with the store's database and enables you to generate various reports.
In the first part of this article, we examined reports that are most useful for email campaigns. Now we are going to study their functionality.
Let's start with the Product Performance report. It shows how many items were sold and how many orders were placed for a certain period. This information will help you determine which products are often bought and in what quantity.
Navigate to Mirasvit > Advanced Reports > Product Performance. Select the time interval you are interested in, for example, one quarter. Use the filter system to analyze different product categories. Use the filter system to analyze different product categories and identify those in the highest demand.
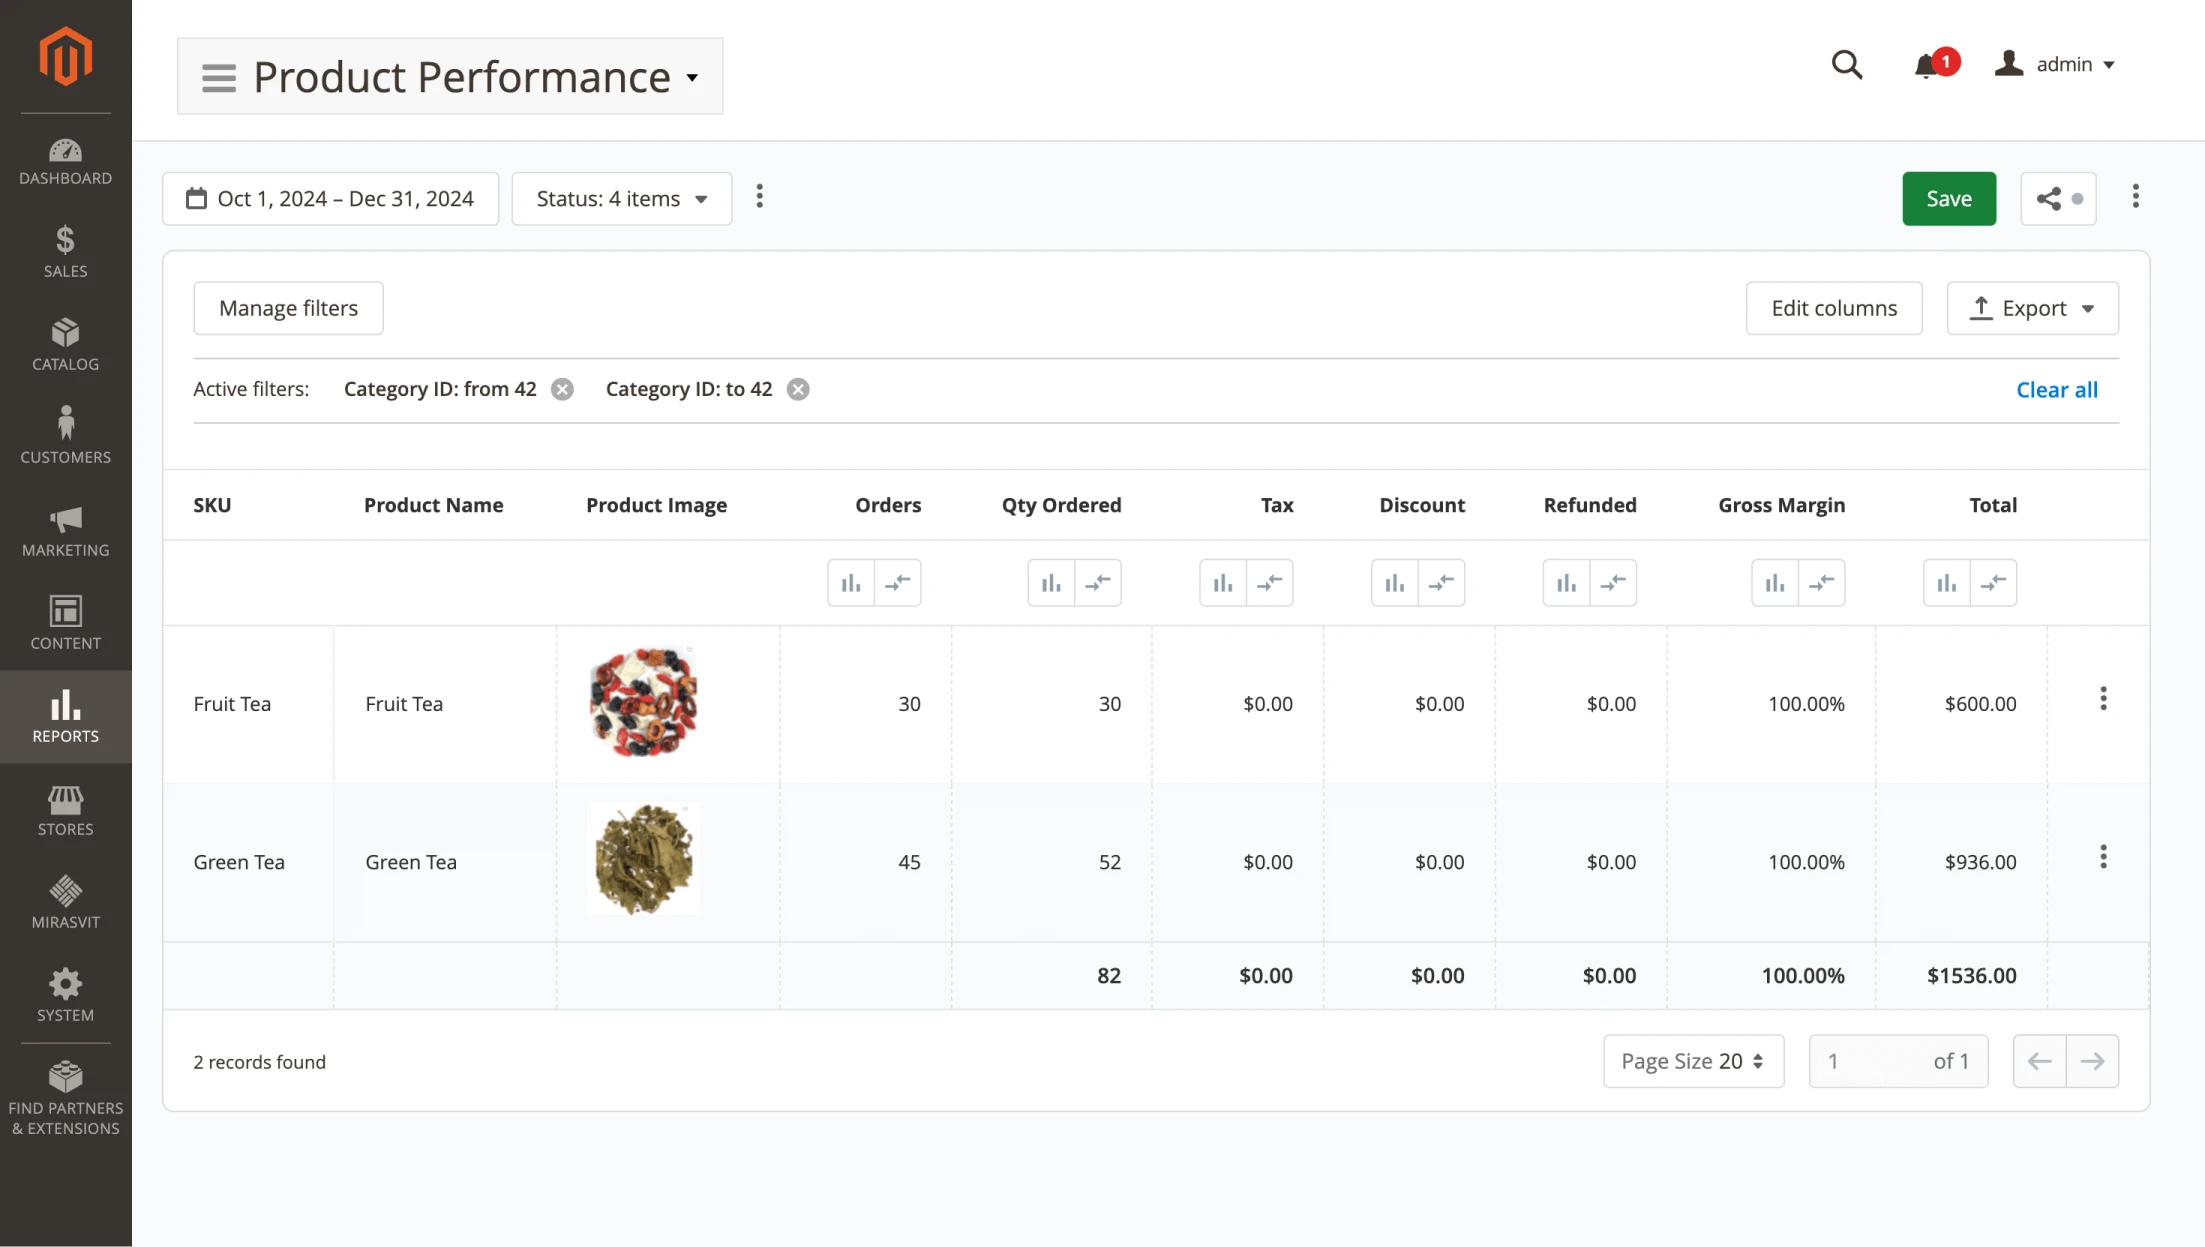
First, we should analyze the frequency with which people purchase these products. Choose the additional menu ... > View Sales, and review the data. Now we know the approximate life cycle of the products we are interested in.
The next step is to determine which customer groups purchase green and fruit teas most frequently.
Here, we can use another report: Mirasvit > Advanced Reports > Sales by Customer Group. In the window that opens, filter orders by the "Tea" category.
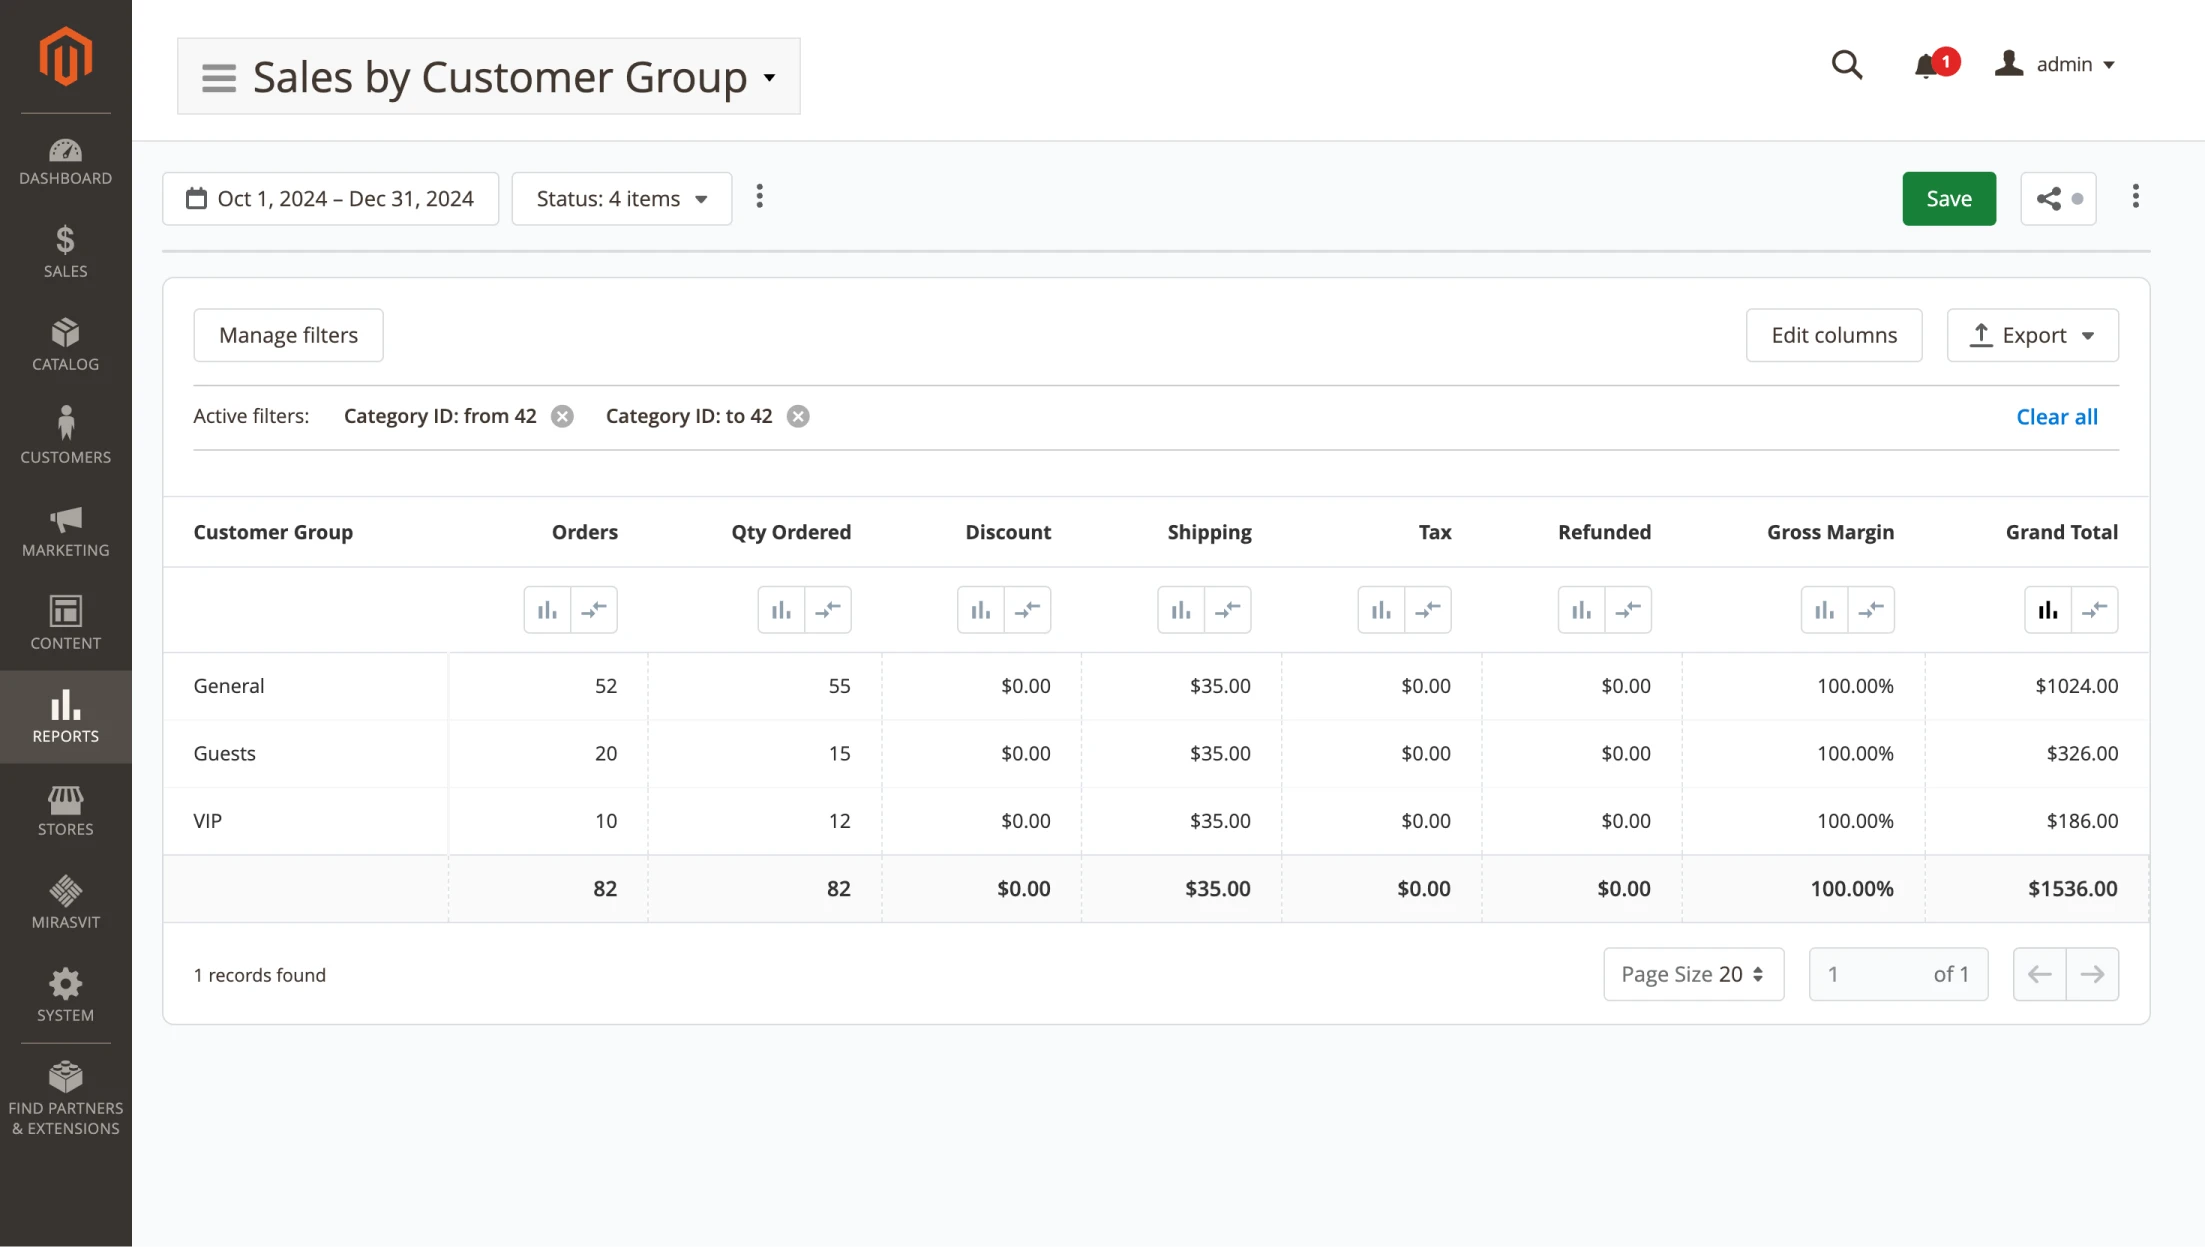
Two-thirds of the purchases were made by registered users who had previously placed orders on the website. This category of customers is the most likely to place another order in the store. Therefore, the email campaign should be tailored to this group.
To maximize the campaign’s effectiveness, we need to closely analyze these customers’ behavior.
Navigate to Mirasvit > Advanced Reports > Sales by Customer. Filter the data by the category of interest (Tea) and time period (one quarter).
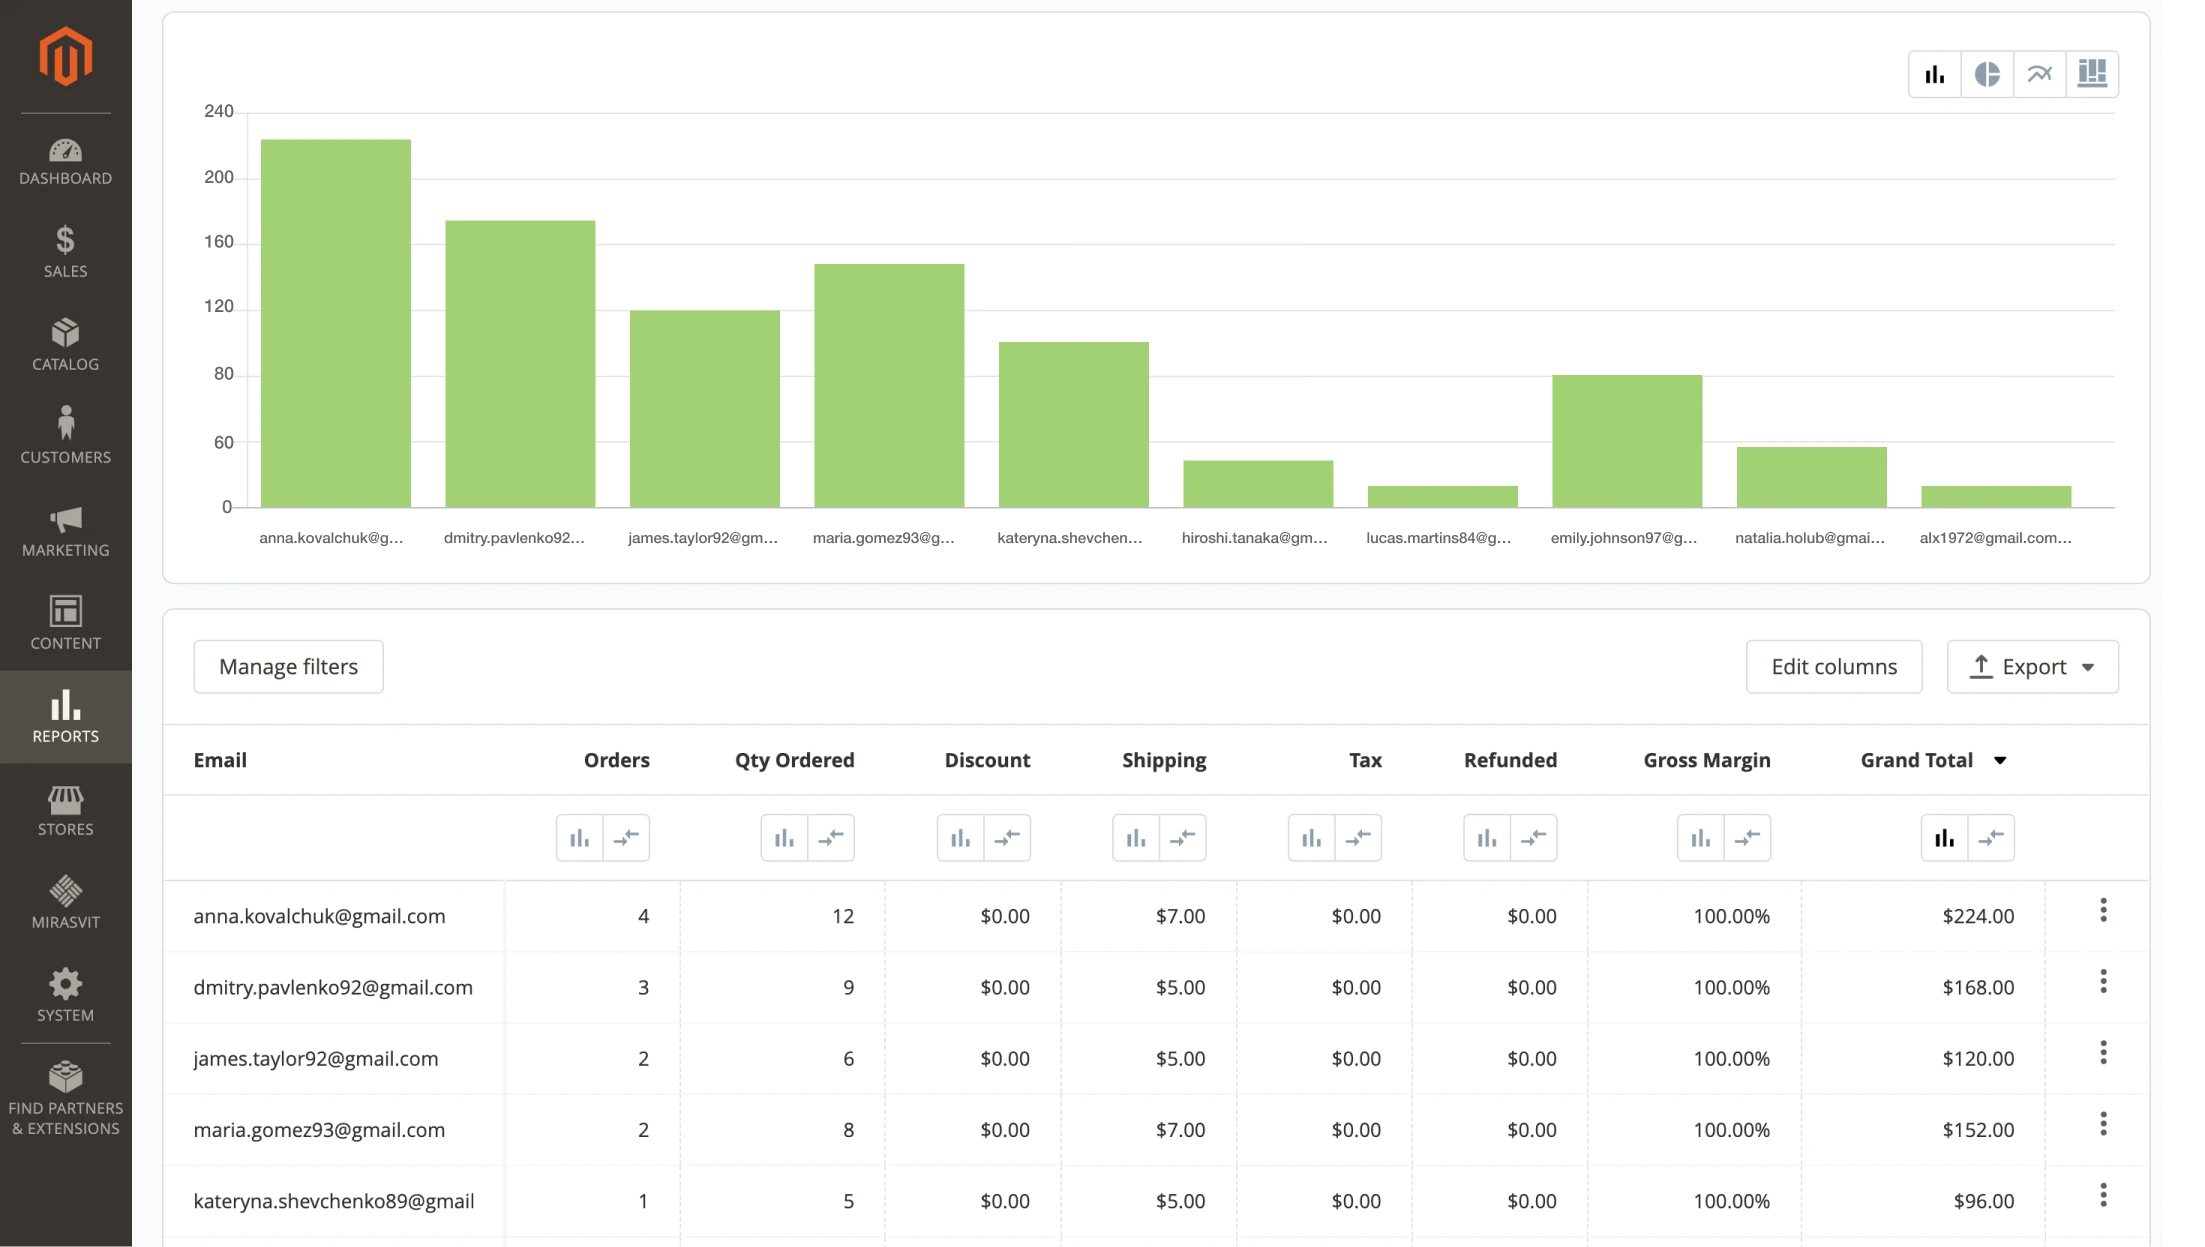
The report reveals that two-thirds of tea buyers have placed only one order in the last three months. This is a signal that it's worth working with your audience to increase repeat purchases. As we explained in the first part of this article, the best option is to create email campaigns.
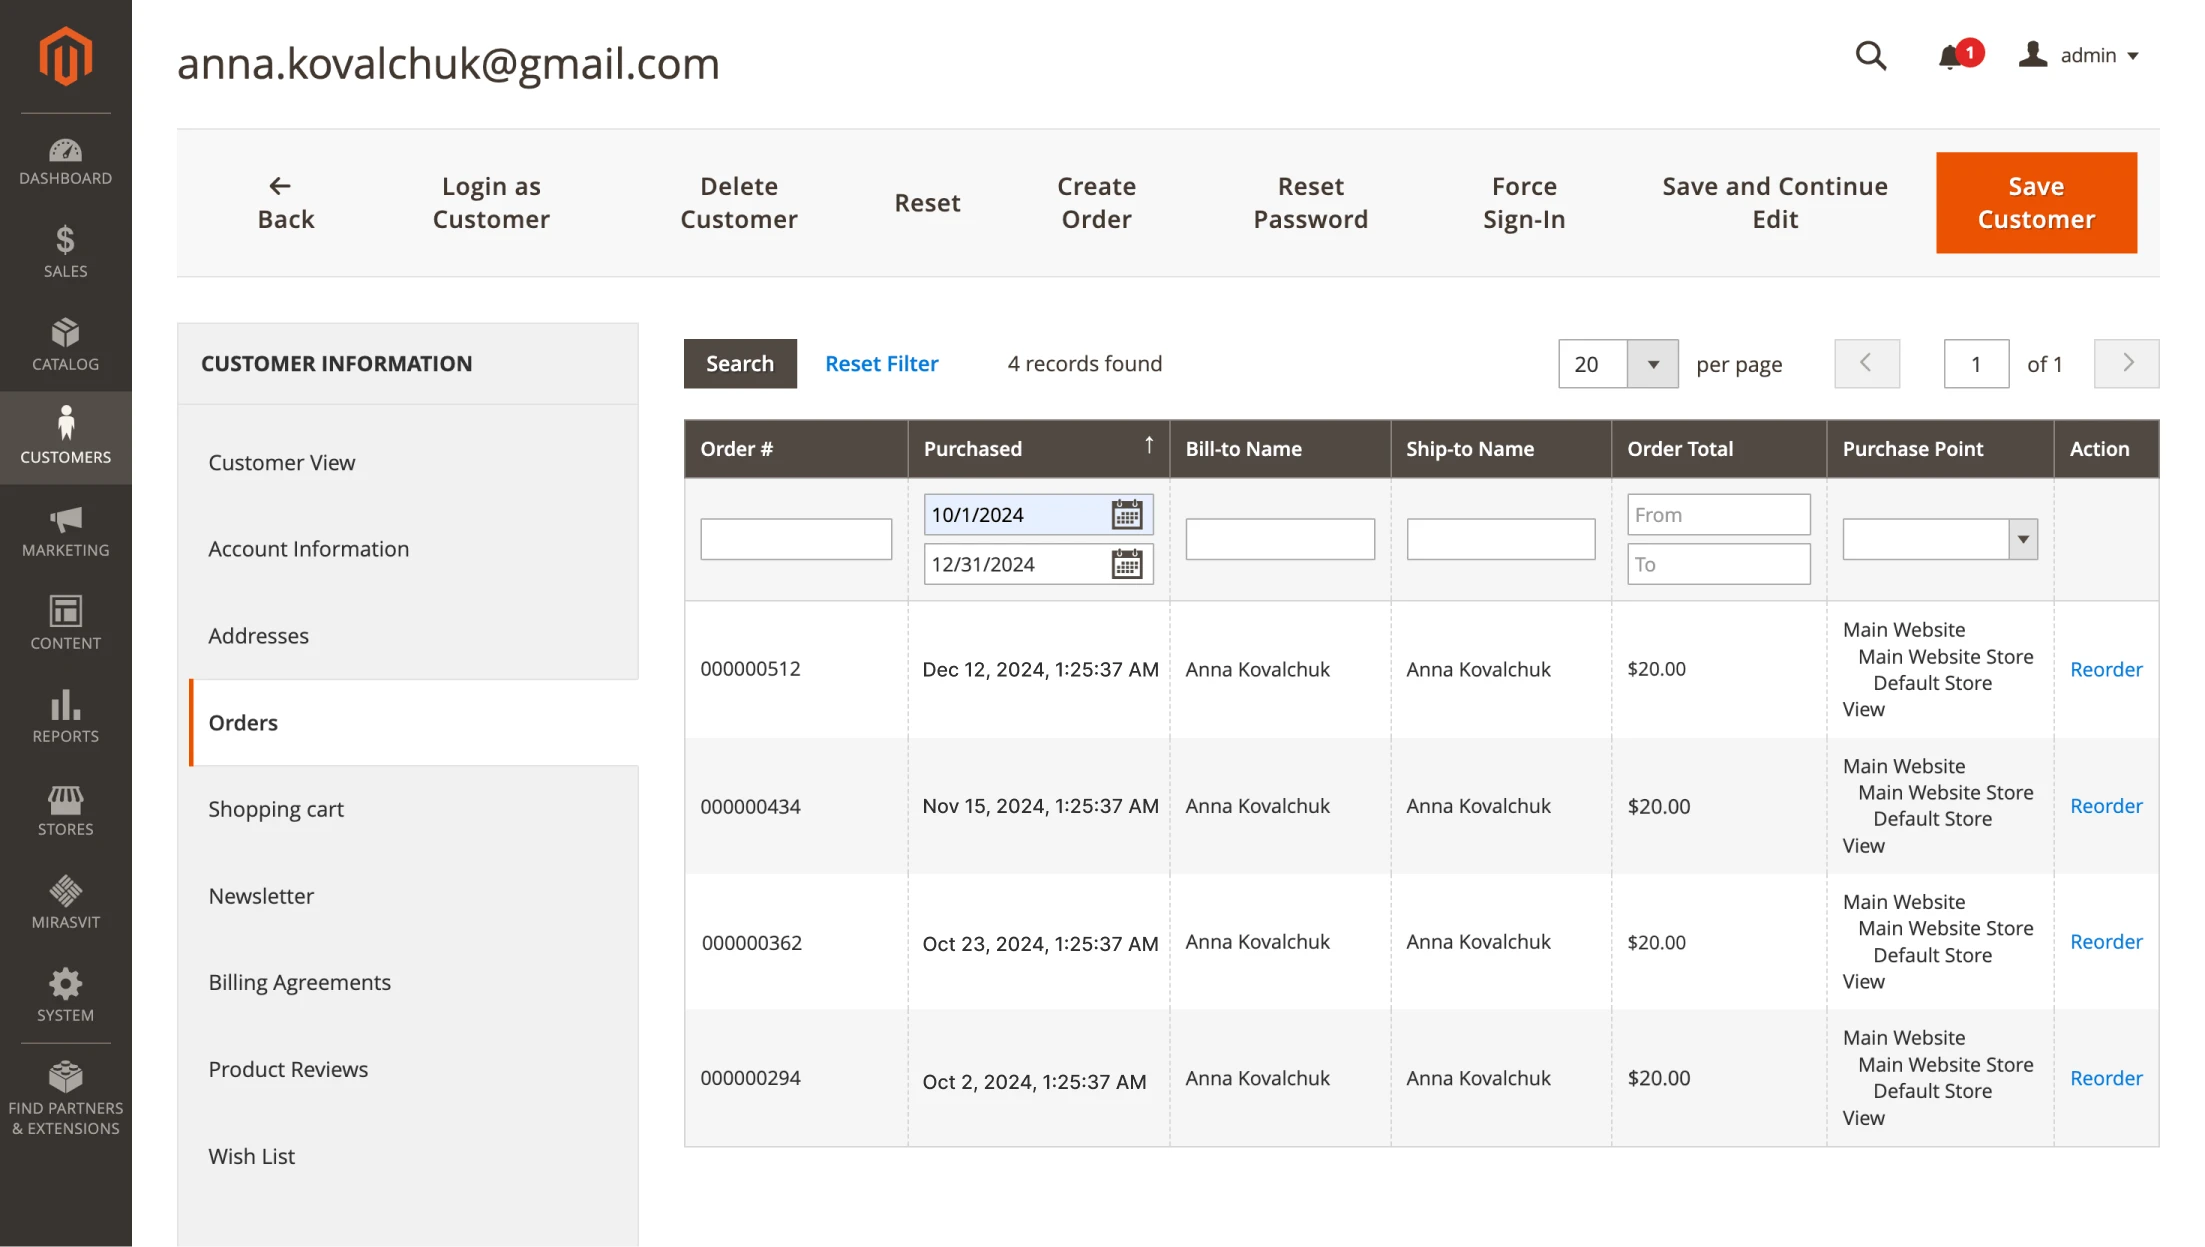
Using the additional menu ... > View Customer, you can analyze the behavior of individual users and personalize your mailings. Look at the frequency with which each individual places orders. In our case, it turns out that it happens about once every three weeks on average.
Keep this information in mind. It will be useful for customizing the email campaign.
In summary, we have identified a popular product with a short period of use and, consequently, a good potential for repeat sales. However, the analysis also showed that this potential is realized rather poorly: most customers do not order the product again. So, it is worth working with them. First, we should segment this audience.
Defining key audiences with customer segmentation
As we have already found out, the most promising audience for increasing repeat sales are registered users who have placed at least one order. That's the category we're going to focus on.
Let's use a module that allows us to create user groups based on specific criteria—the Customer Segmentation Suite. Within the module, select Segments and create a new one by clicking Add New Segments.
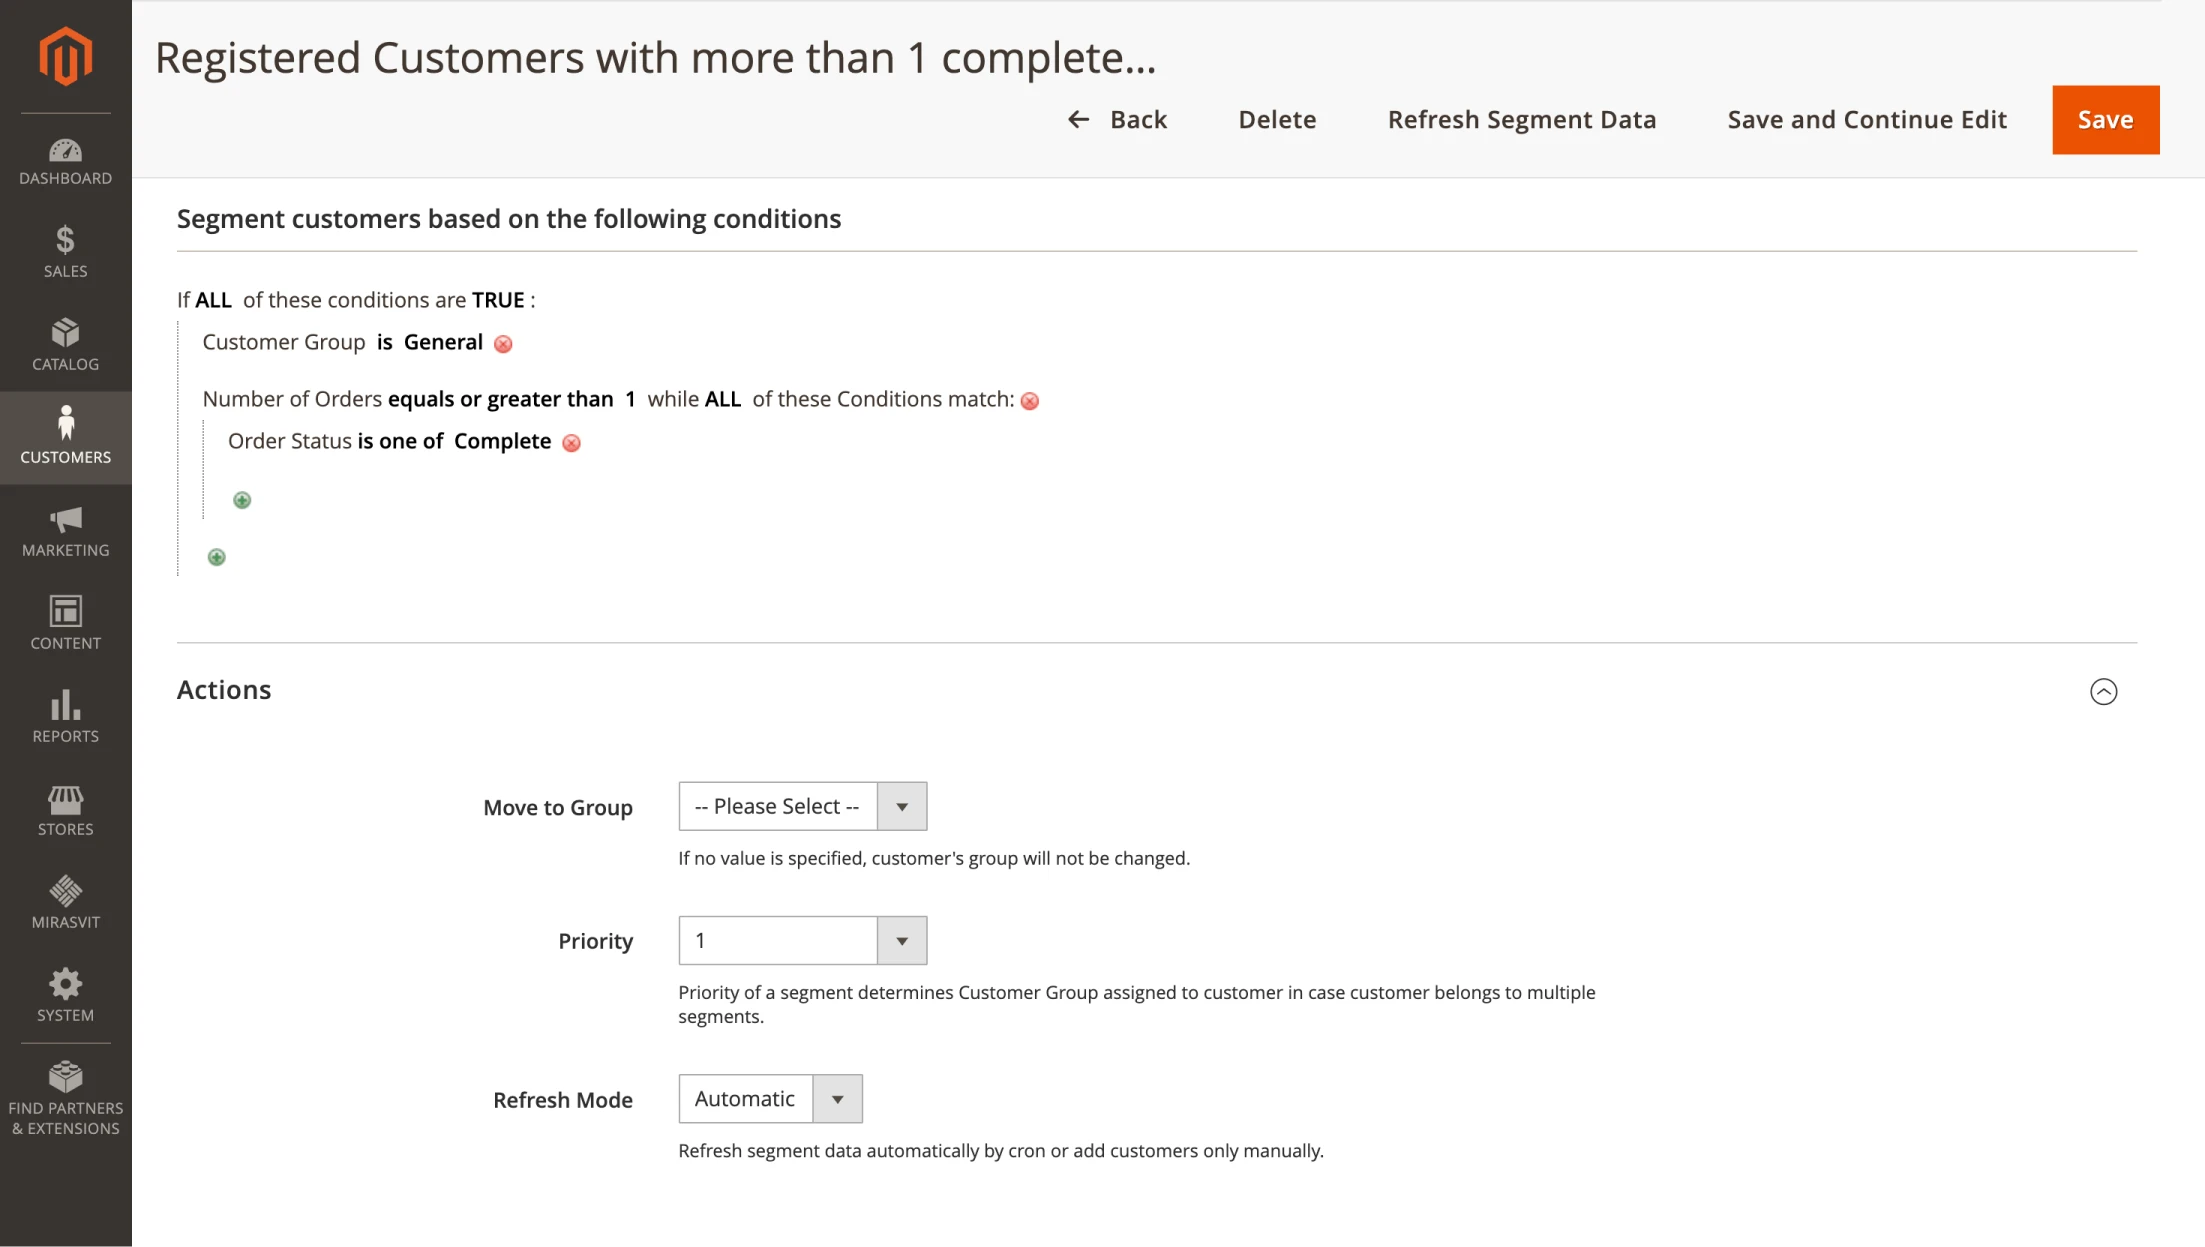
In the Refresh mode tab, set the Automatic mode so that any new users who purchase tea in our store are added to this segment. Give it a clear name: "Registered Customers with more than 1 completed order," and save. Next, it is important to click on the Refresh Segment Data button to update the segment immediately. Otherwise, you can wait for the scheduled task to run automatically.
Once the products for repeat sales are defined and customers are segmented, it’s time to set up email campaigns.
Setting up and launching campaigns with Follow Up Email by Magento
To automate campaigns, we use the Follow Up Email extension. We talked about its functionality in the first part of this article. Now we are going to explain how to work with it.
Step 1: Create a template
Open Mirasvit > Follow Up Email > Templates. This tab already contains pre-designed templates that can be used for various email campaigns. You can also create your own, which is what we are going to do.
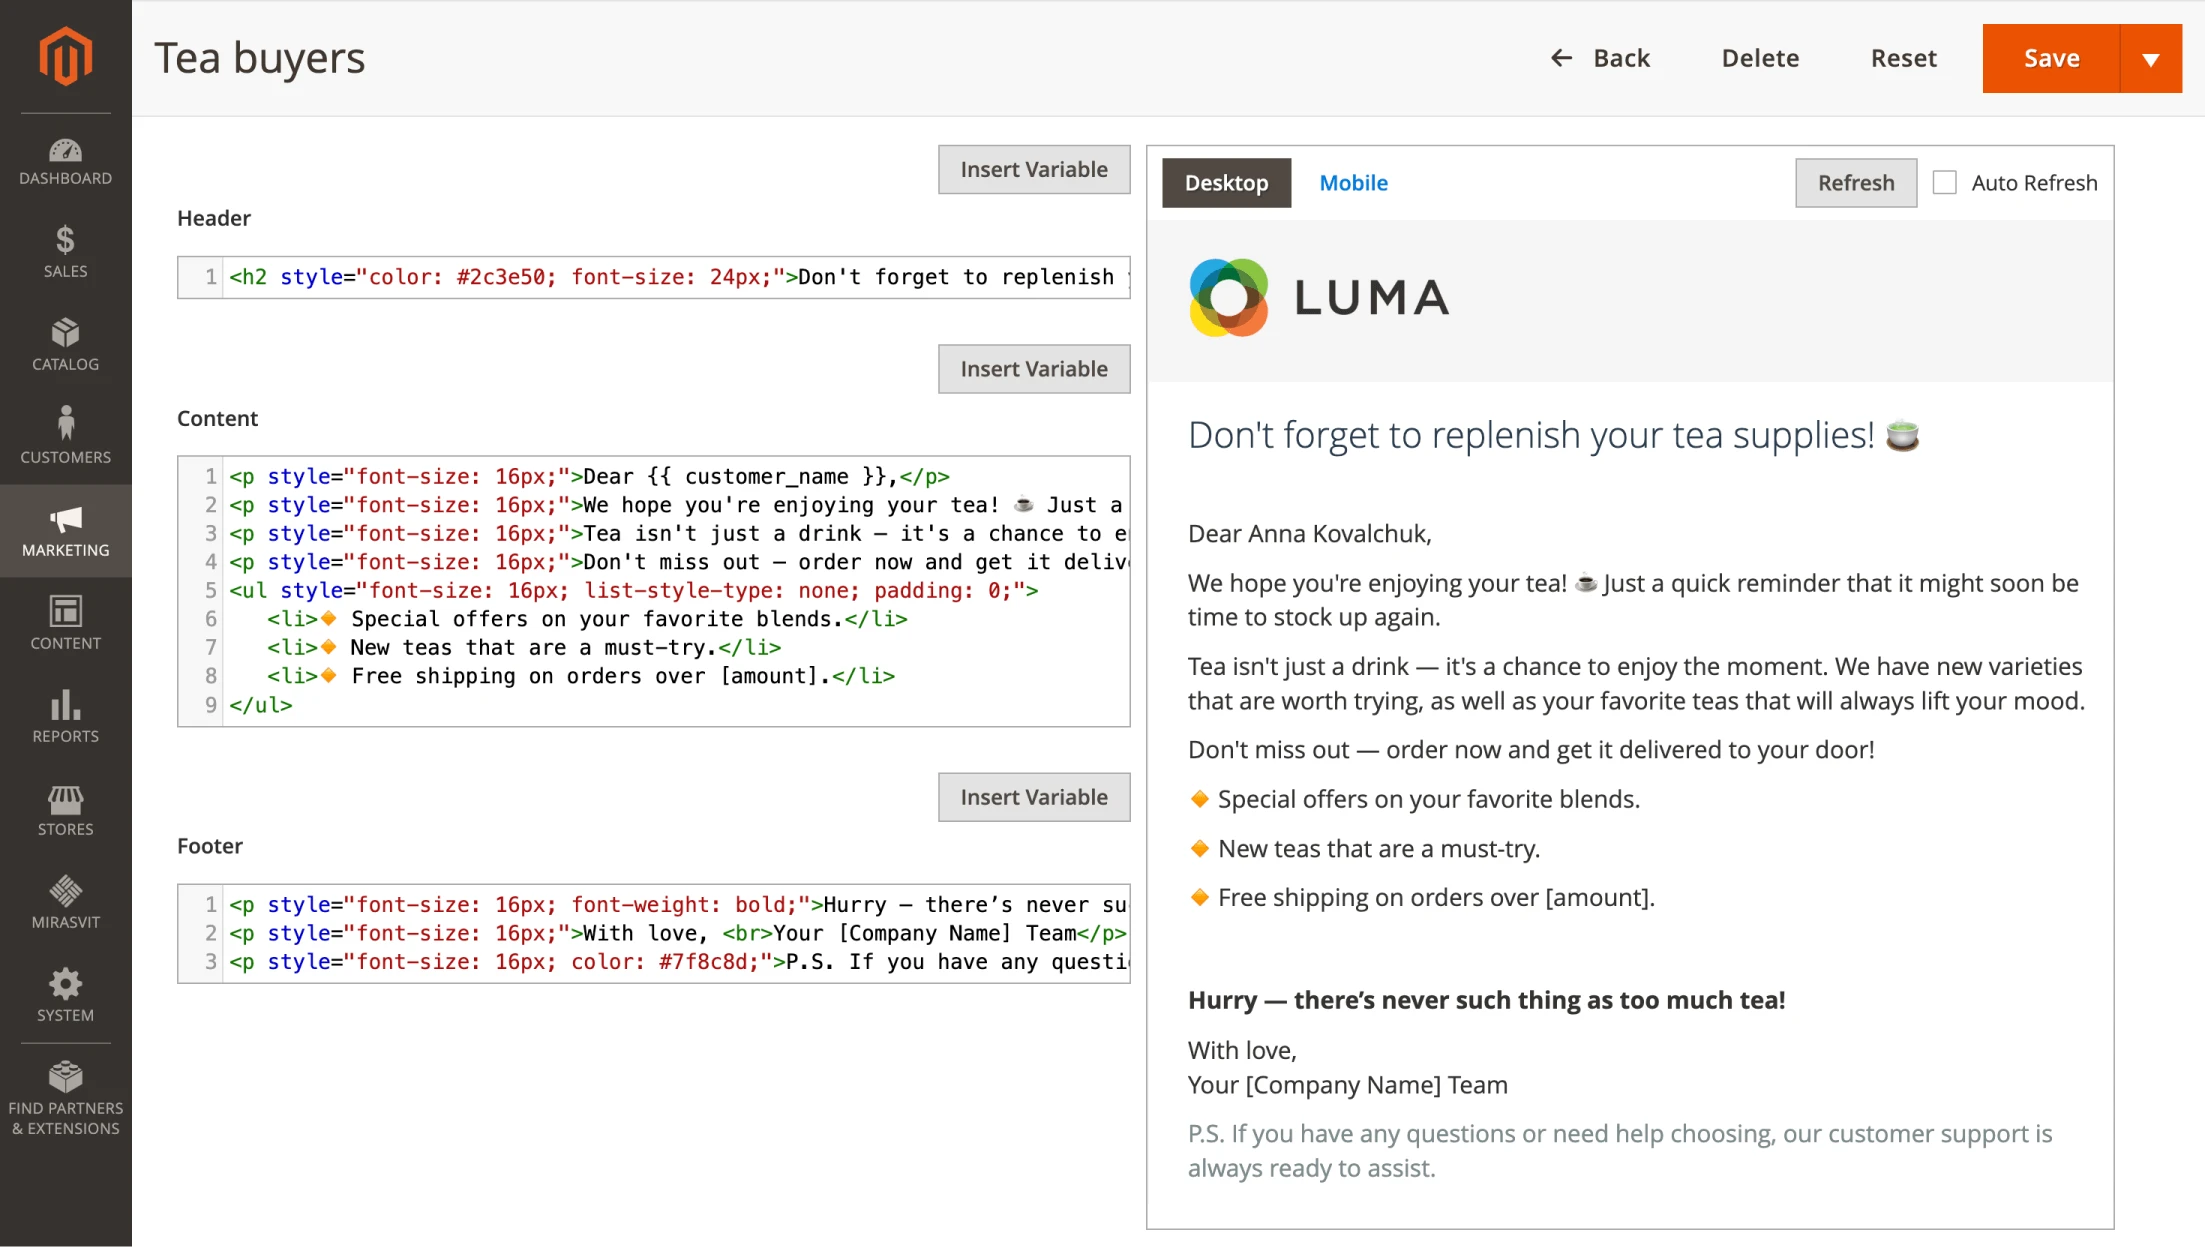
Click the Add Template button. Enter the name of the template—"Tea buyers." Choose the "Base theme," which is available to everyone by default. In the Email Subject column, specify the title of the email that your store's customers will receive: "Don't forget to replenish your tea supplies! 🍵."
Next, compose the text of the letter itself (you can find useful tips on how to simplify copywriting for your store on our blog).
To make messages more personalized, use the variables that Follow Up Email provides. For example, {{ customer_name }}. It will be automatically replaced with the name of a specific user in the letter.
We covered variables in more detail in the first part of this article.
Step 2: Plan a campaign
Once you have a template, you can start creating your newsletter. Open Mirasvit > Follow Up Email > Manage Campaigns. Create a new one by clicking the Create Campaign button. Enter the name: "Tea Buyers Campaign."
To automate the sending of emails, you should set up a trigger that will react to clients interactions with the store.
Step 3: Choose a trigger
In the created campaign, go to the Triggers section and click Add Trigger. Enter its name—"Tea Reminders."
Leave the Active From and Active To fields empty so that the trigger runs continuously. Select the appropriate Store View for the campaign. This is especially important if you have multiple versions of the store in different languages or if you sell in different currencies.
Don’t forget to fill in the fields on the Google Analytics Campaign tab so that you can track campaign performance in the future. We'll tell you how to do this a little later.
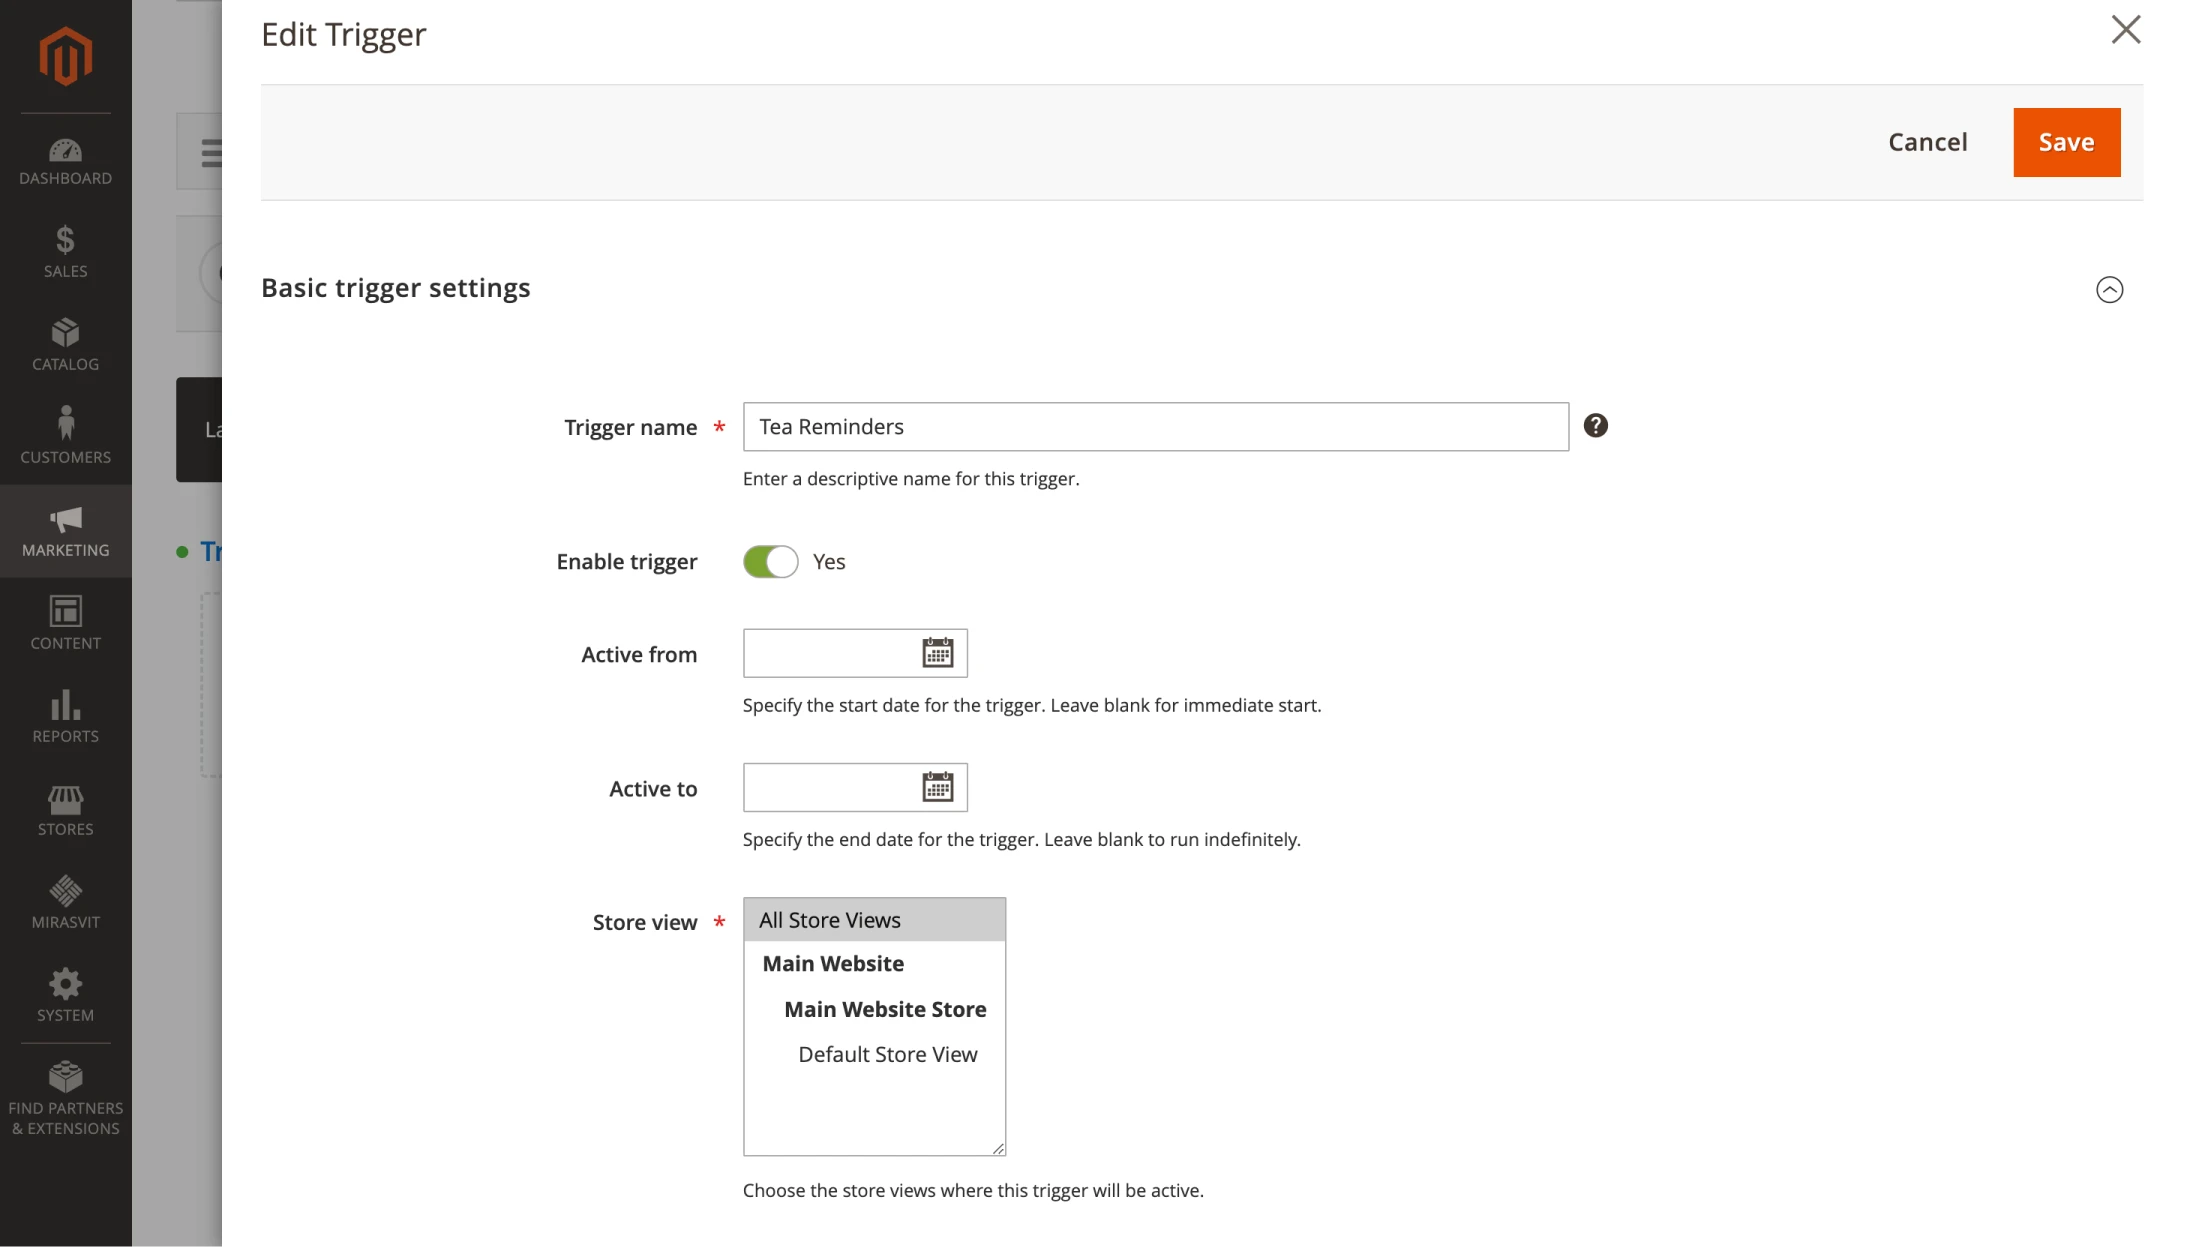
Finally, activate the trigger and save.
Step 4: Customize events
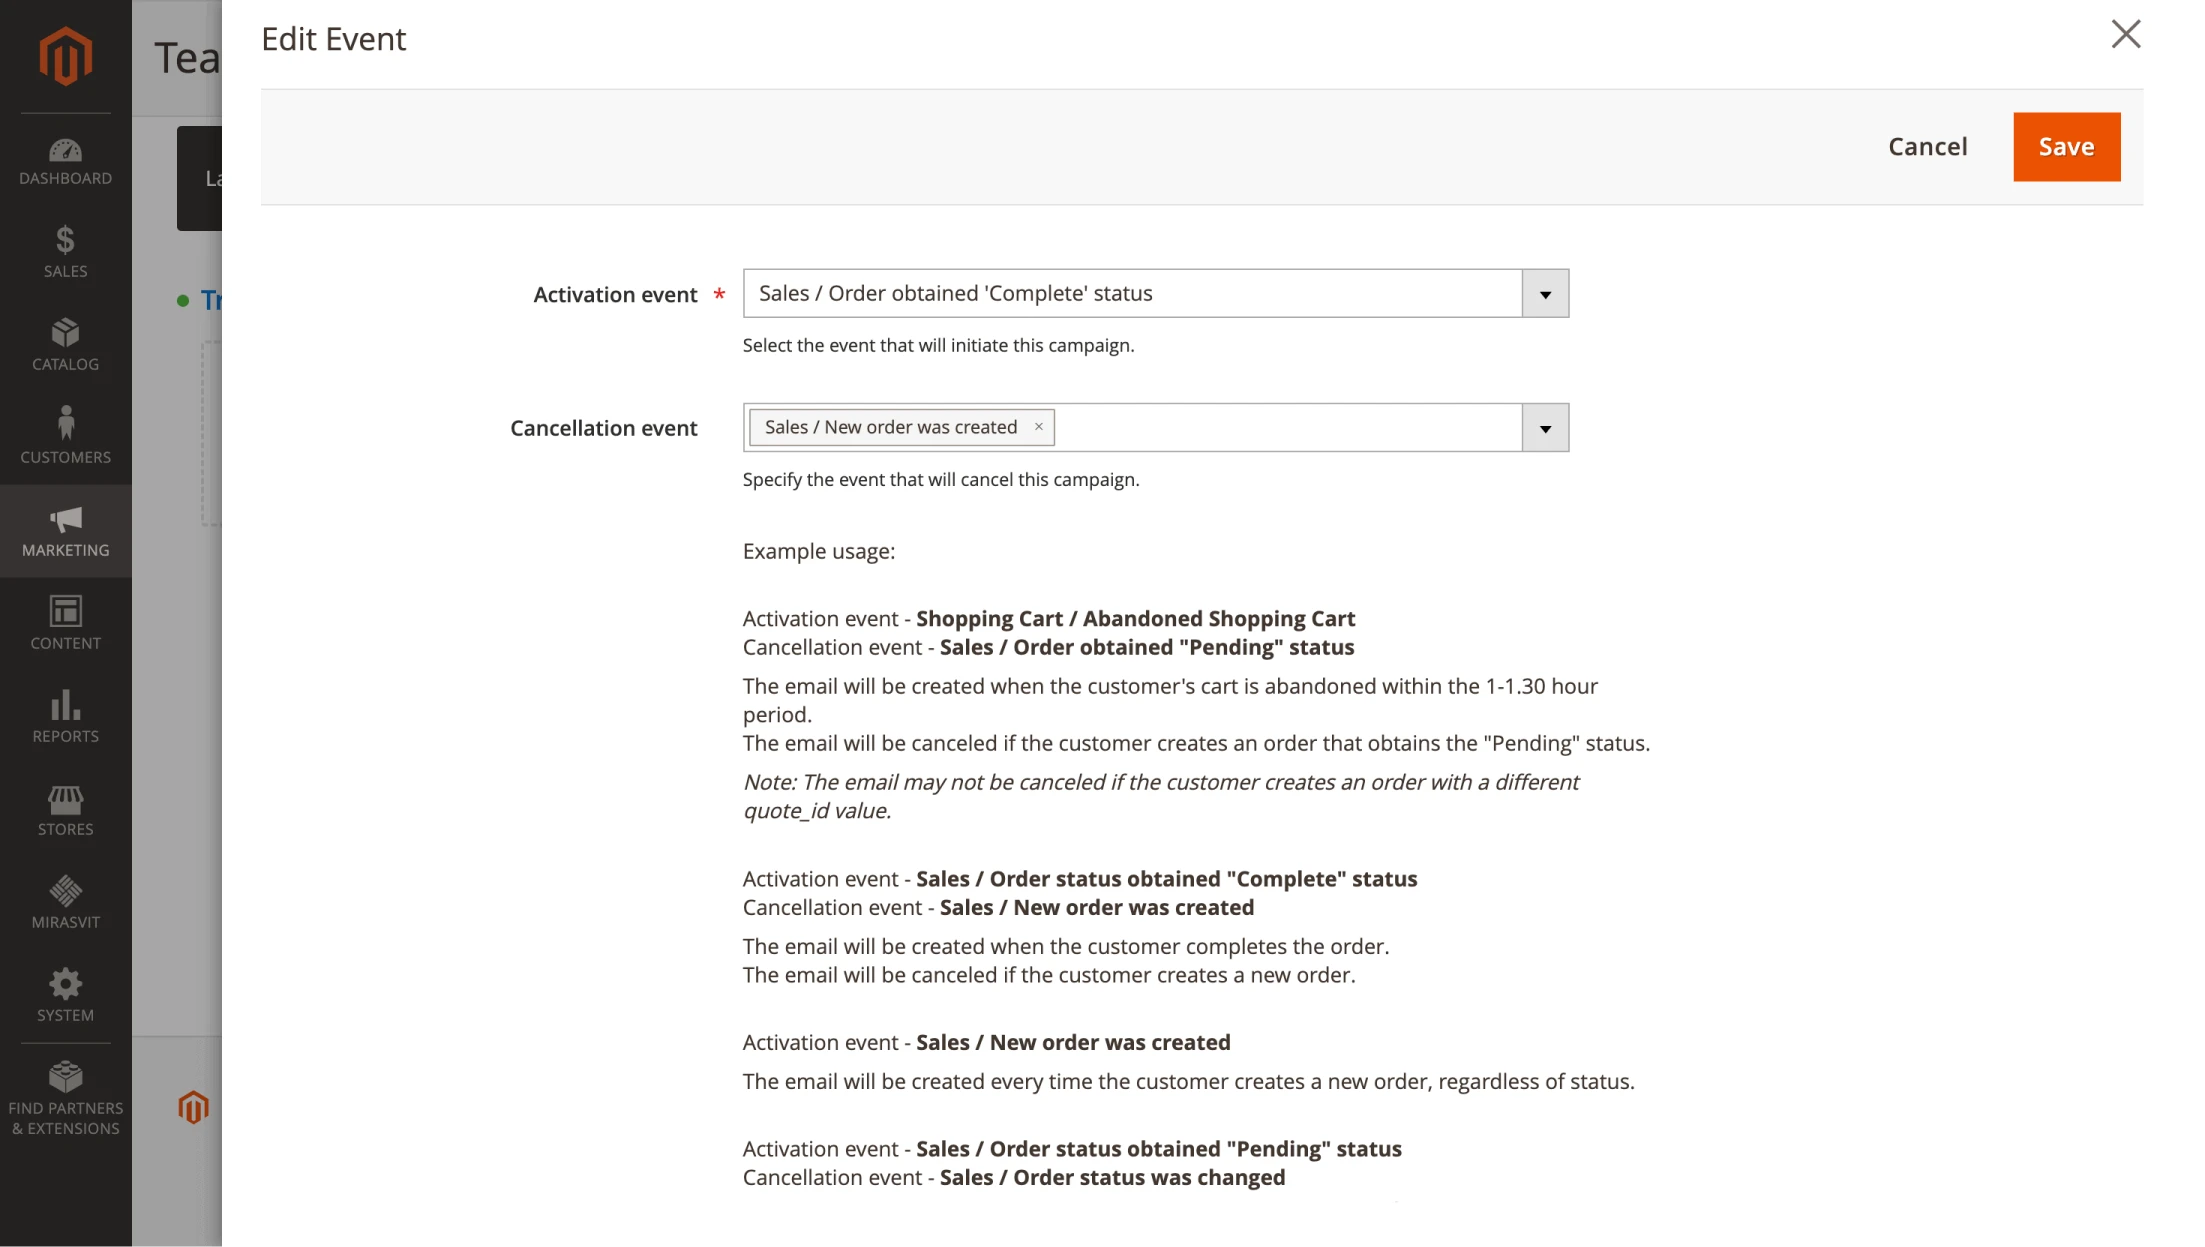
Now, we need to define the conditions that will activate the trigger. To do this, go to the Event section and click on Edit. In the Activation Event field, set the required value.
In the example with the tea store we are considering, we need the reminder to be sent after the customer has made a purchase. So, the process is as follows: Sales > Order obtained "Complete" status.
It’s also important to determine when the campaign should end. A logical approach would be to deactivate the trigger once the customer places a new order after receiving the reminder. This can be set in the Cancellation Event field. Select Sales > New order was created.
Step 5: Customize the audience
One of the key factors for the success of any email campaign is proper targeting. Customers should receive information that is relevant to them. Otherwise, there is a risk of losing their attention or, even worse, causing irritation.
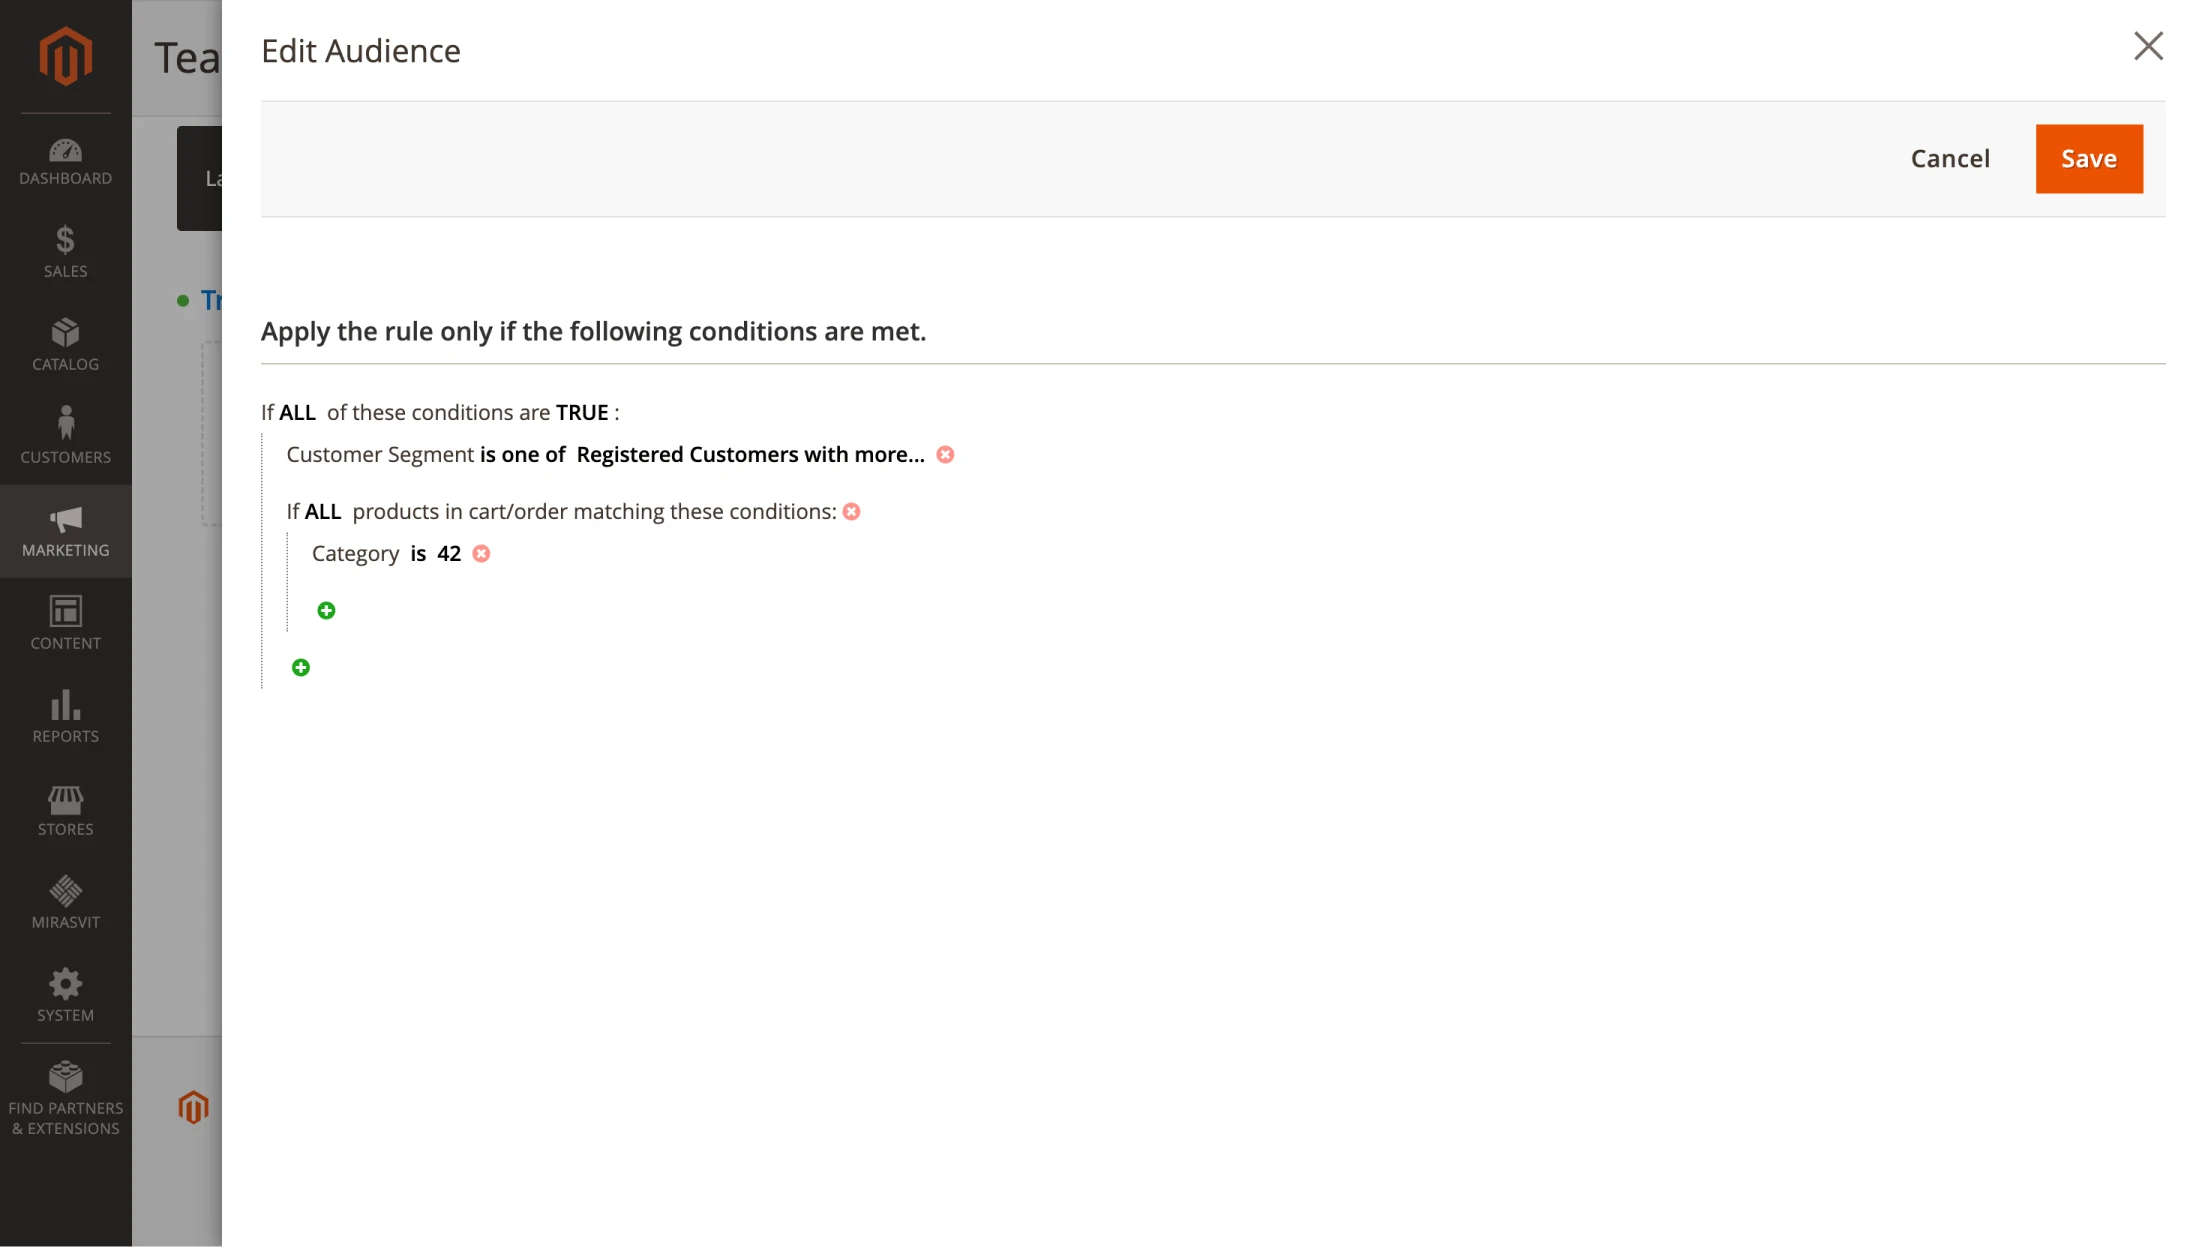
Therefore, it is important to define the campaign’s audience during setup. You can do this in the trigger settings. Select the Audience section and click Edit. In the field that opens, choose for which clients the trigger should work. In our example, these are:
- Registered in the store
- Bought tea
- Match the set customer segment group
Remember, we determined these parameters by analyzing Advanced Reports.
This approach helps narrow the audience of the campaign, making it more personalized. As a result, there is a higher possibility that a person will open the email, look at the offer, and make a purchase.
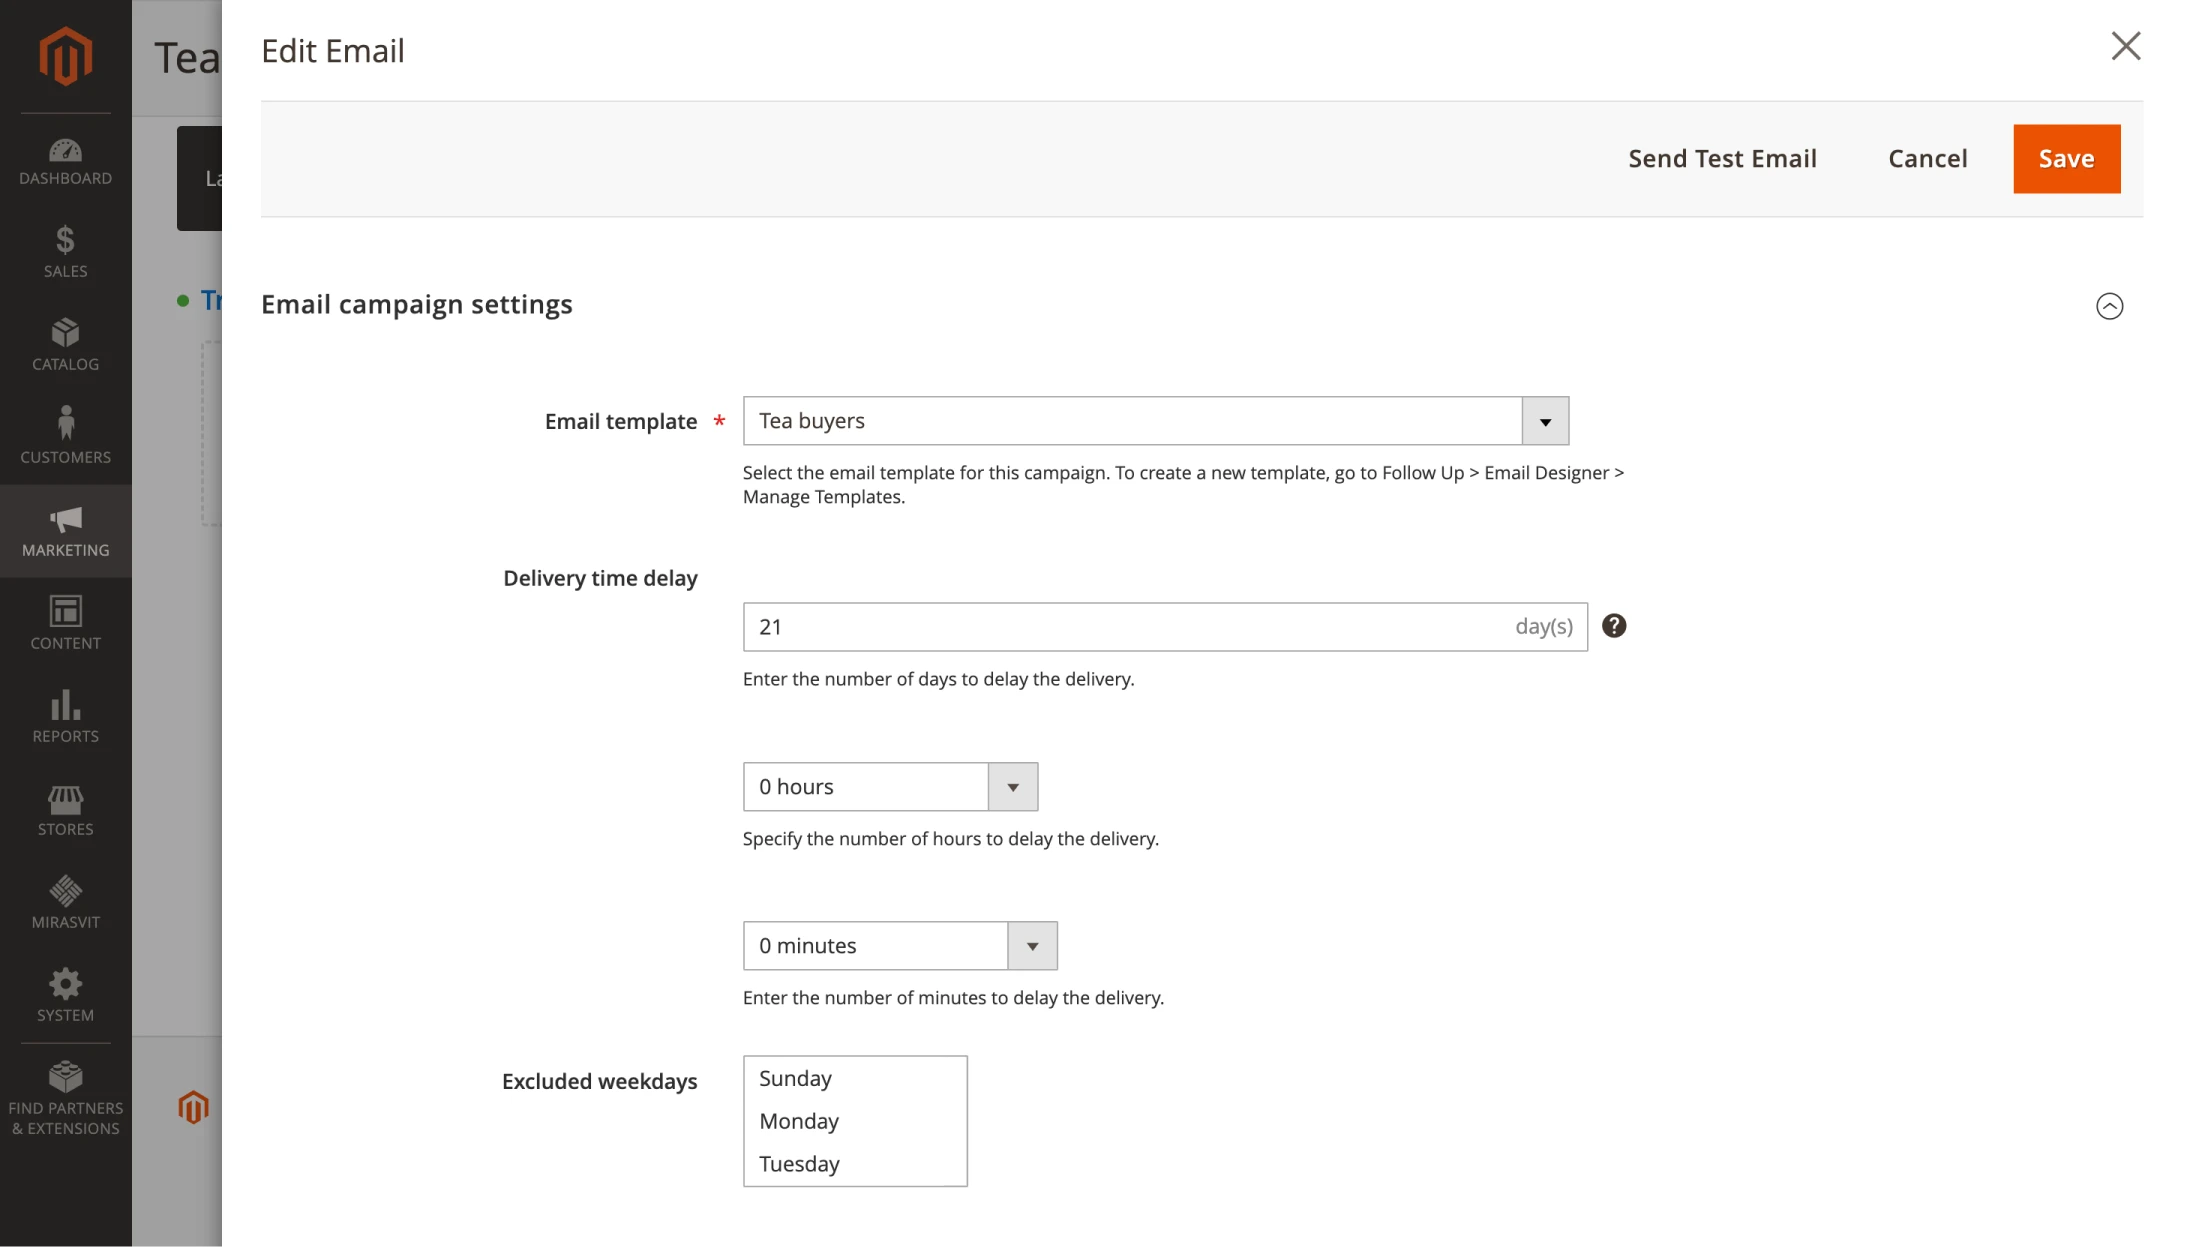
Step 6: Select an email and customize the delay
Now that the trigger is set up, we need to specify which email the clients will receive and define the timing of its delivery. To do this, click the Add Email button in the trigger section and select a previously prepared template in the Email Template field (see Step 1).
Next, we need to determine how long after the order is placed, the customer will receive a letter with an offer to repeat the purchase. In our example, Advanced Reports analysis showed that people purchased tea again, on average, three weeks after the first transaction. So, we customize the delay of the letter for this time.
In the Delivery Time Delay section, find the Days field and set it to 21. The Hours and Minutes sections can be left empty, if the exact time of sending is not critical. If you don't want your e-mails to be sent on weekends, select the Exclude Weekends checkbox.
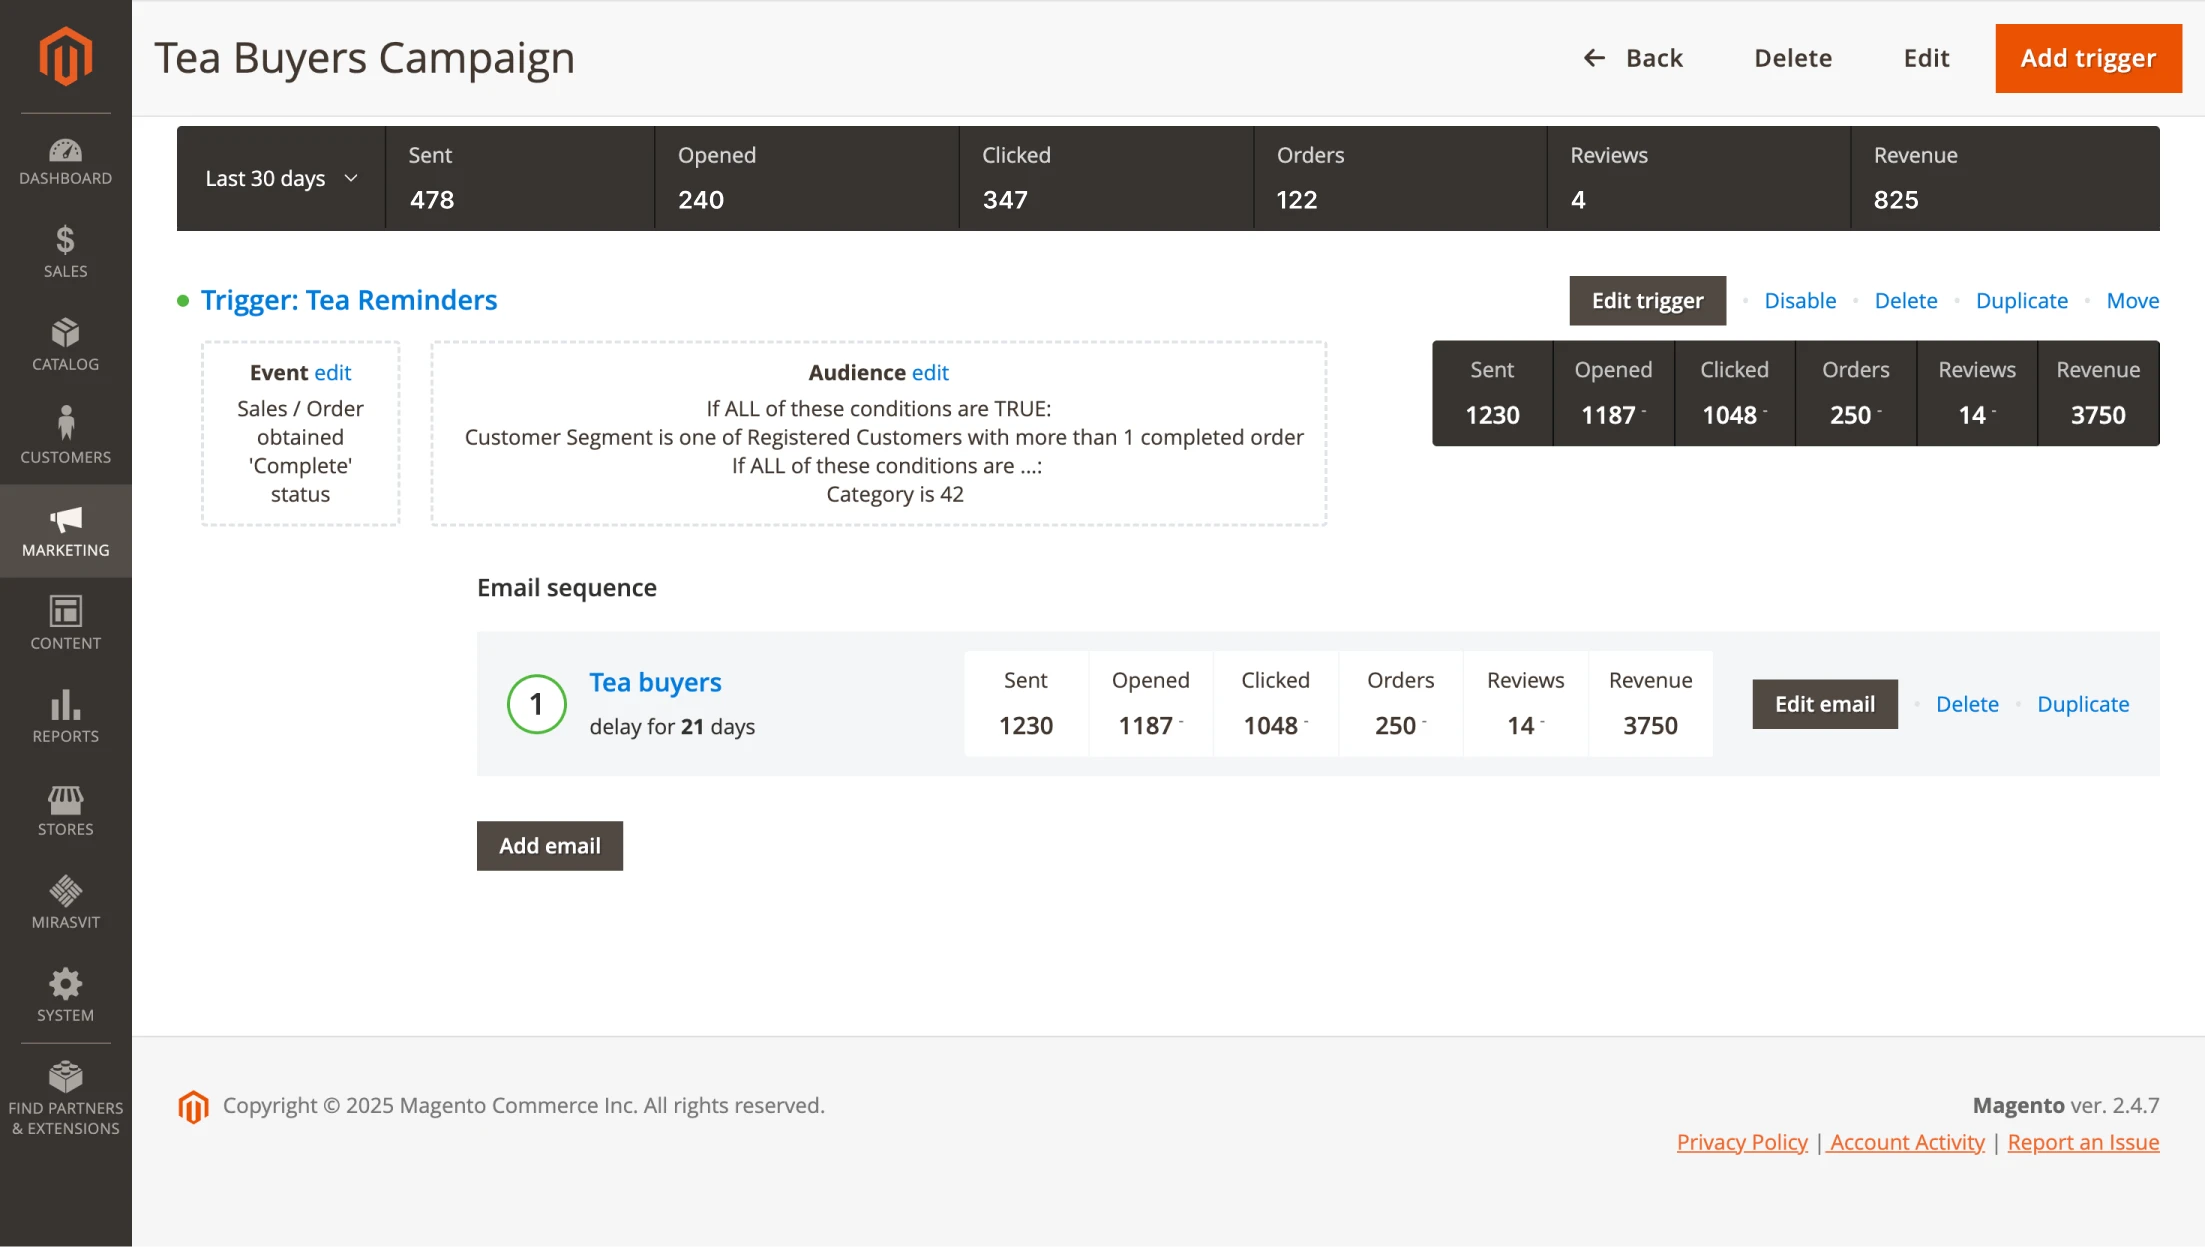
Now all the steps are completed—the campaign is set up. Every time a registered user buys tea, the Follow Up Email extension will capture this event. After 21 days, it will automatically send the customer an email reminding them to replenish their stock.
You can add additional templates with different designs, texts, or offers to the campaign if needed. For example, with a discount coupon if your email marketing strategy calls for it.
Testing the effectiveness of email campaigns with analytics tools
The Follow Up Email extension allows you not only to create and automate campaigns, but also to track their performance.
In the module dashboard, open the Manage Campaigns section. It contains all the created campaigns for your store. Select the one you are interested in to get its detailed statistics.
The extension will show the number of letters sent, the open and click rates, as well as conversions. This data will help you see how well your campaign is performing and figure out aspects that need improvement.
We talked more about it in the first part of the article.
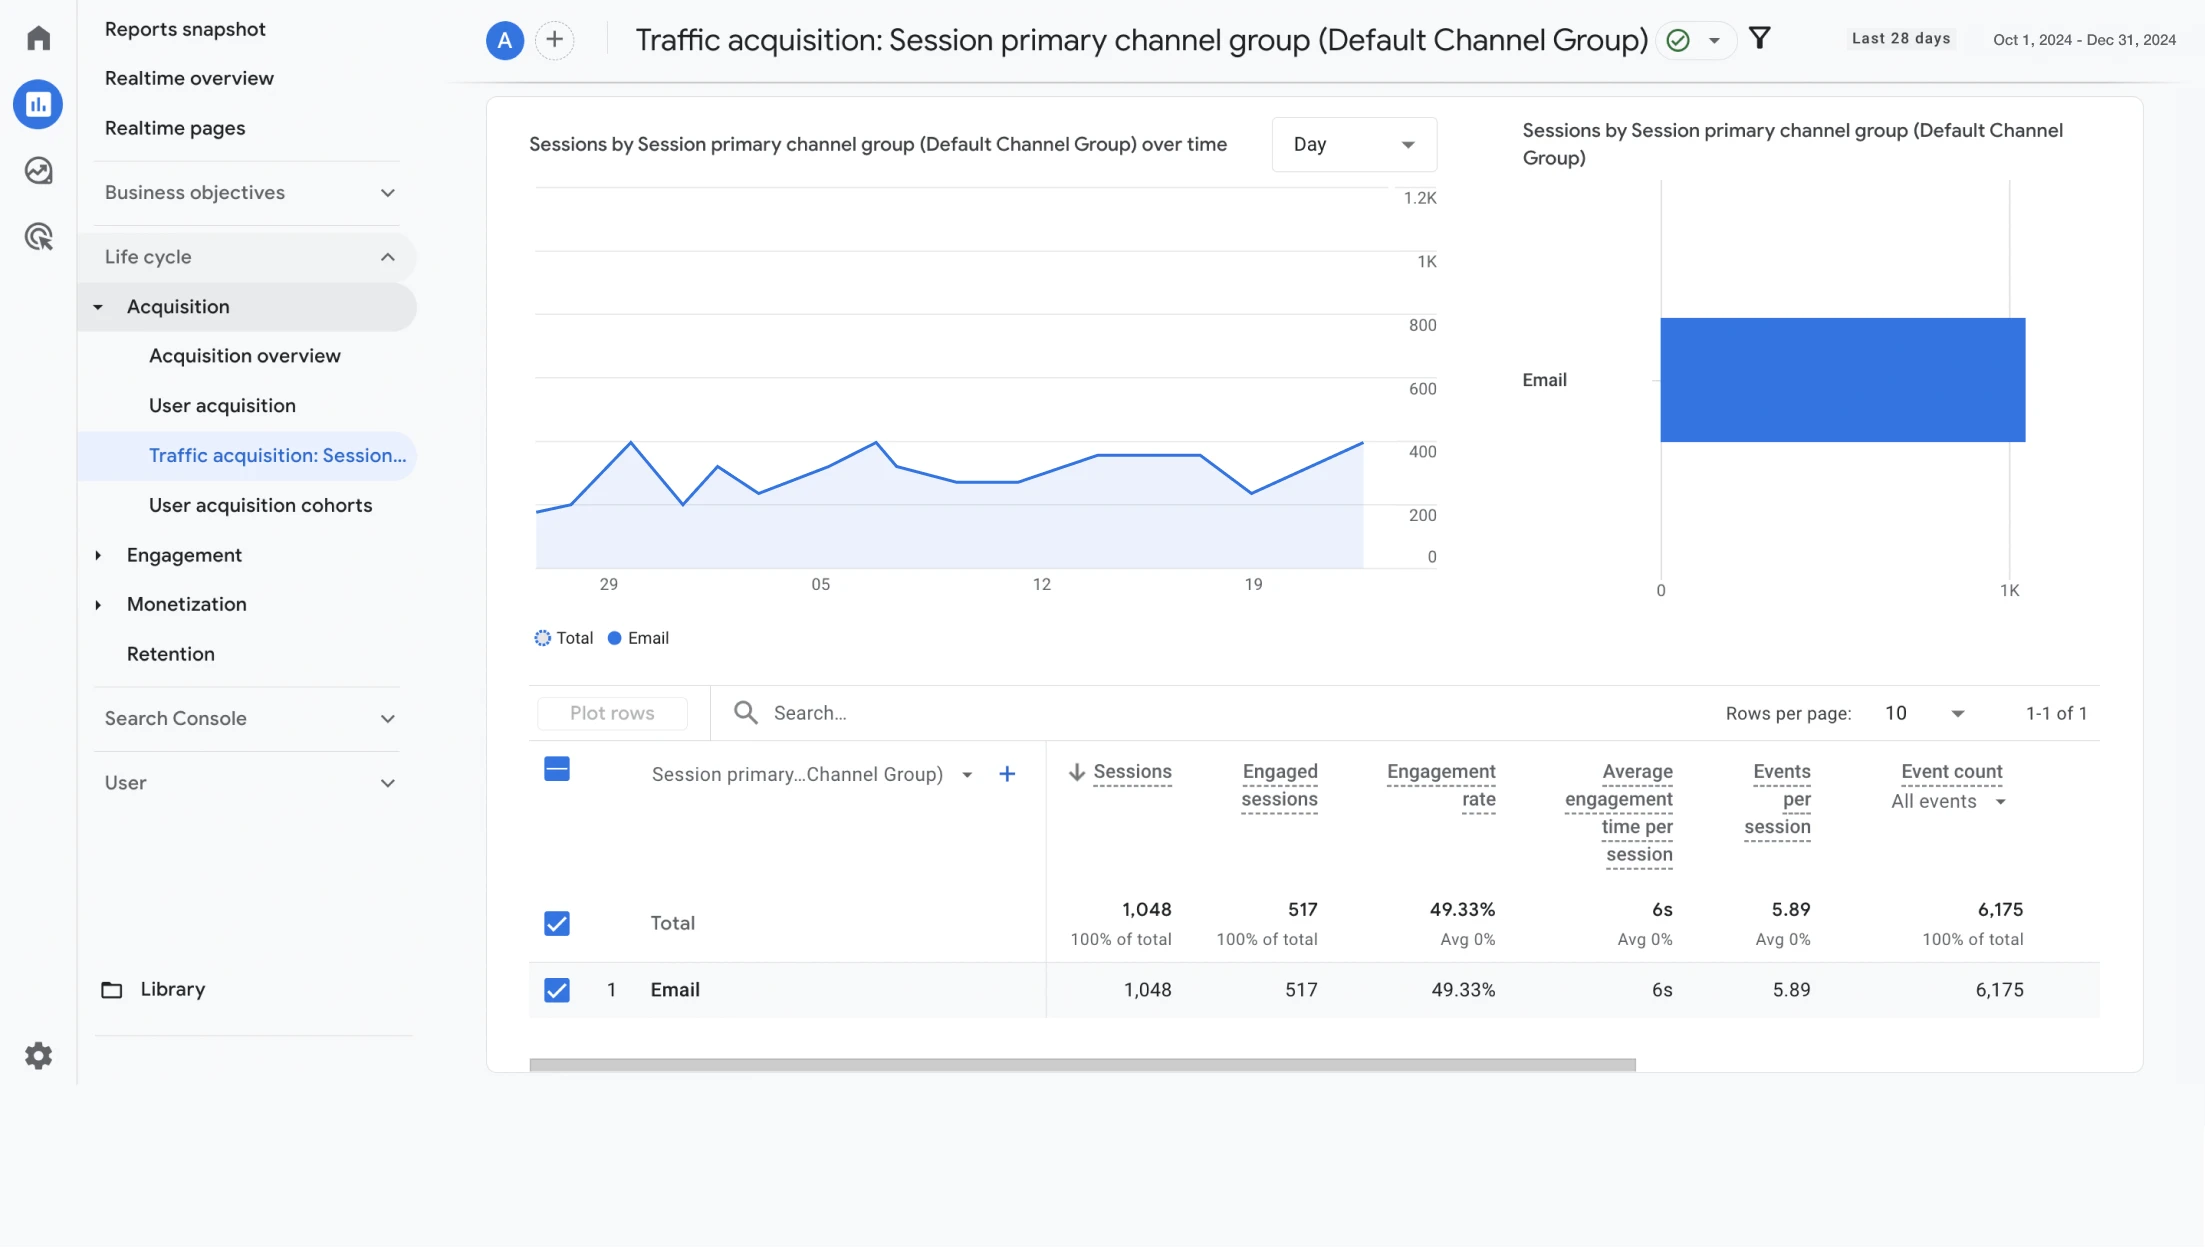
You can also use Google Analytics to track user behavior after they click on links in your letters. It will provide insight into the contribution of email campaigns to your website's overall conversion rate.
Go to the Google Analytics account to which your store is linked. Open Reports > Acquisition > Traffic Acquisition. Use the Source / Medium filters to find campaigns. Here you can see how many users came to the site via links from your campaign and how they interacted with your store.
Conclusions
Email campaigns are a powerful tool for increasing repeat sales, especially if you customize them with your customers' interests in mind.
In this article, we explained how extensions like Advanced Reports, Customer Segmentation Suite, and Follow Up Email can help you with this. Use them to find in-demand products and interested audiences in your store, and then create automated newsletters based on that data. Our step-by-step instructions will help you do it correctly and as efficiently as possible.
In this guide, we provided a realistic example to show how to create templates for emails, select and customize triggers for mailings, plan campaigns, and determine the best time to start and end them.
We also recommend that you study the modules described in this article in more detail, so that you can create campaigns that are perfect for your business.
You can find articles about Advanced Reports, Customer Segmentation Suite, and Follow Up Email on our blog.
Mirasvit Support Engineer
Magento 2 Reports Extension gives you 20 ready-to-use reports, a custom report builder, and multiple dashboards - everything Magento's default reports leave out.
Install Magento 2 Advanced Reports and take your online store's analytics to the next level!
Turn store events into email: abandoned cart reminders, review requests, win-backs, birthday greetings and order follow-ups, each triggered automatically and each reported with the revenue it brought in.
Customer segmentation is one of the central principles of marketing.
The Magento 2 Customer Segment extension allows you to split customers into segments according to the rules and then use them in other extensions.
It allows merchants to use communication channels with customers in the most effective way. Also, it will decrease the financial resources needed for marketing.