Product Label v2: new features to skyrocket your sales
-
 Eugen Barilyuk
- Extensions
- Apr 21, 2023
- 30 min read

Adding labels to your products could be a key component in improving the effectiveness of your product marketing strategy. Since the product label alongside the product image is often the first thing customers see when they browse through your store. Therefore, having well-designed and visually appealing labels can significantly influence their decision to choose your product over a competitor's.
The Product Labels extension has recently got a ton of improvements for creating astonishing labels to skyrocket sales in your Magento store. Upgrade to latest version v2 to get full features for your labels.
- Why product labels help increase sales
- Types of product labels in online store
- Product label placeholders, templates and variables
- Magento theme compatibility and product labels index
- Examples of product labels
- Summary
Why product labels help increase sales
Product labels, also known as badges, are an effective way to visually showcase a product's features and benefits, assisting customers in making informed purchasing decisions.
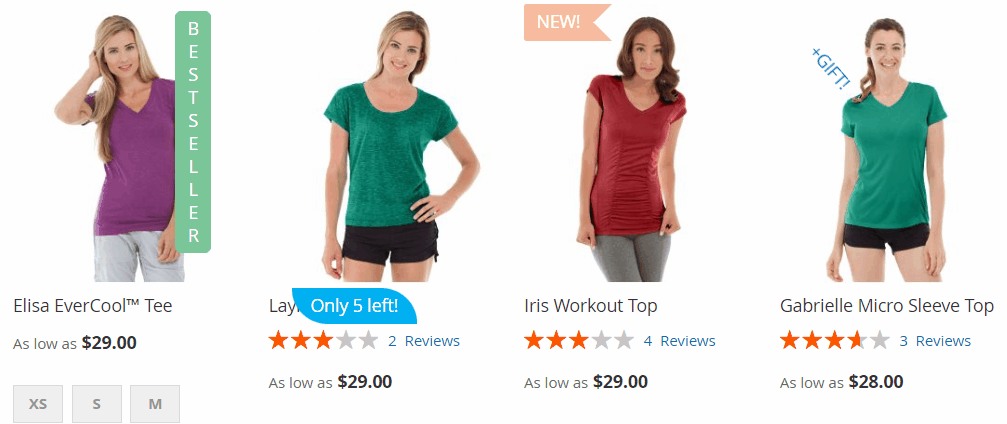
These labels can be utilized to draw attention to important information like promotions, discounts, and product ratings. For example, labels can show a customer if a product is new, on sale, or only has a few left in stock. Alternatively, labels may display information customers value most, like brand, material, packaging weight or volume, etc.
There are lots of different situations when you might need a product label in your store. For example, if there's a new product, there might be a label that says "New!" to catch the customer's attention. If there's a sale going on, there might be a label that says "Sale!" to let a shopper know about the best deals. Labels can also be used to show unique attributes of a product or special delivery options, like a downloadable product or free shipping.
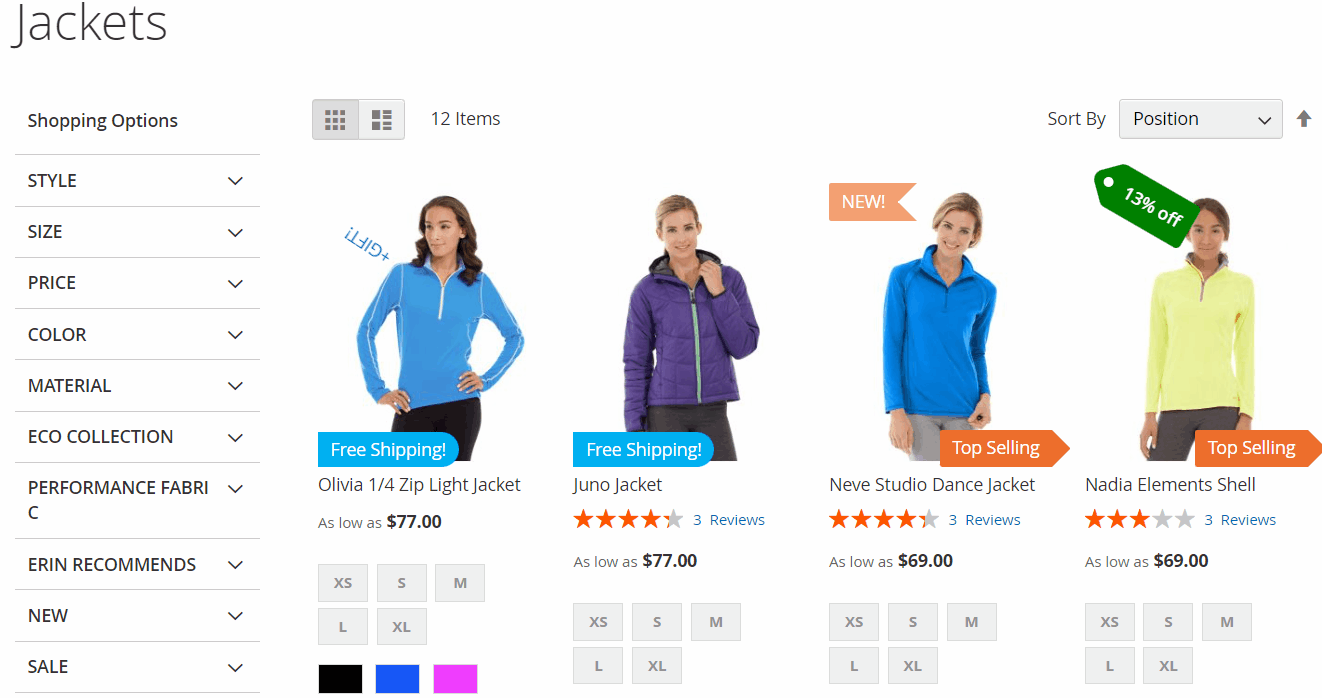
There are many types of product labels. Some have text, while others have pictures. Some labels have both text and image. They can be designed using different fonts, colors, and sizes to be bright, attention-grabbing, and easy to read.
Overall, labels are an important tool for organizing and navigating an online store, as well as improving the customer shopping experience and your marketing efforts.
Types of product labels in online store
The Product Labels v2 extension can implement almost any design of your creativity. Combine text, CSS, and images to get a perfect label for mobile and desktop views.
Simple text-based labels are easy to read. Text-based labels are more accessible. Screen readers can read them, making them more accessible to customers with visual impairments. This ensures that all customers can access the information they need when shopping online, regardless of their abilities.
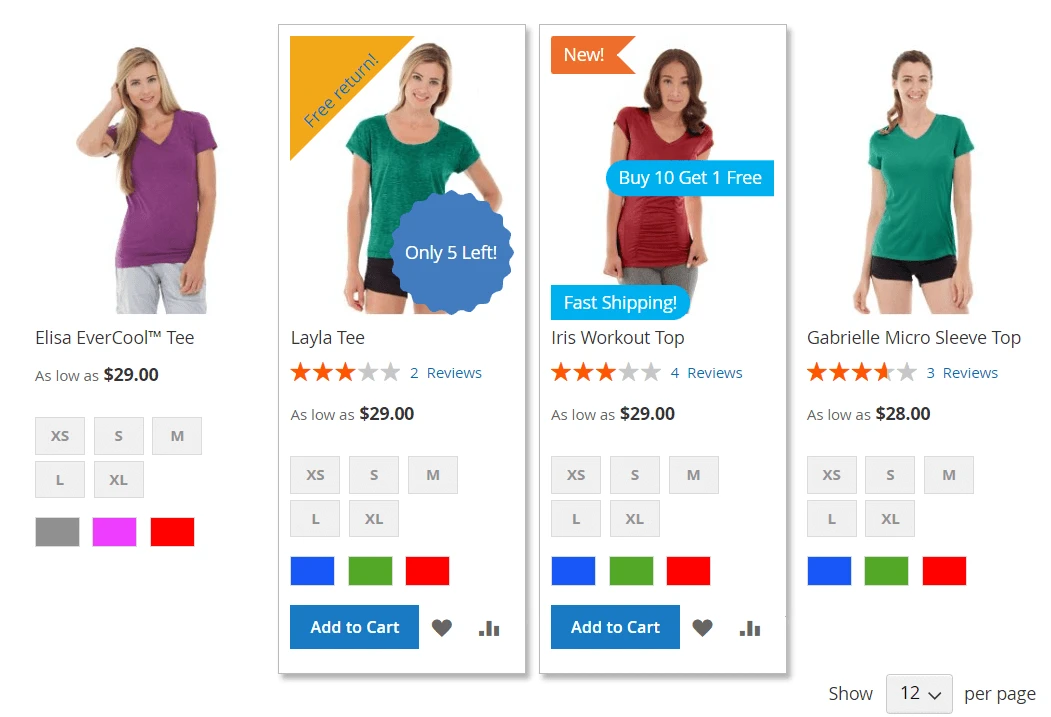
Image labels are eye-catching and can convey complex information visually. Images are a universal language that everyone can understand. An image-only label can communicate important information about a product without relying on language, which can be particularly helpful for customers who may not speak the same language as the seller. This means that image-only labels can be used to target a wider audience of potential customers, regardless of their language or cultural background.
By consistently using the same design elements, such as color schemes, typography, or graphics, across all products in an online store, image-only labels can be used to promote brand recognition. Customers will quickly begin to associate these elements with the brand. This can help to establish a strong brand identity and increase customer loyalty over time.
Using text + CSS to labels offer more customization and flexibility. Text + CSS labels are also responsive, allowing them to adapt to different screen sizes and resolutions. This means that they can be used on desktop computers, tablets, and mobile devices, without losing their visual impact. Additionally, CSS allows for visual effects, which can add an extra layer of engagement for customers.
With the right combination of typography, color, and layout, text + CSS labels can quickly catch the attention of customers.
Ultimately, the choice of label type will depend on the specific needs of the online store or website and the preferences of the target audience.
Product label placeholders, templates and variables
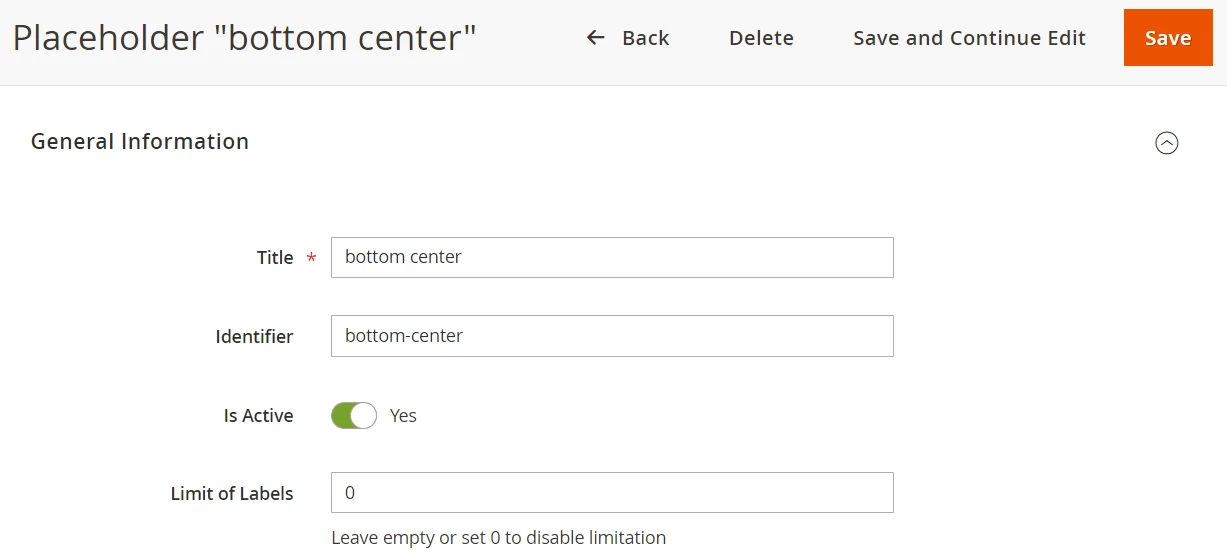
Product label placeholders
Starting from March 2023 the Product Labels extension has become more flexible in regards to where you can place your labels. Update to the version 2.X of the extension to be able to place the label anywhere on the product page of your store.
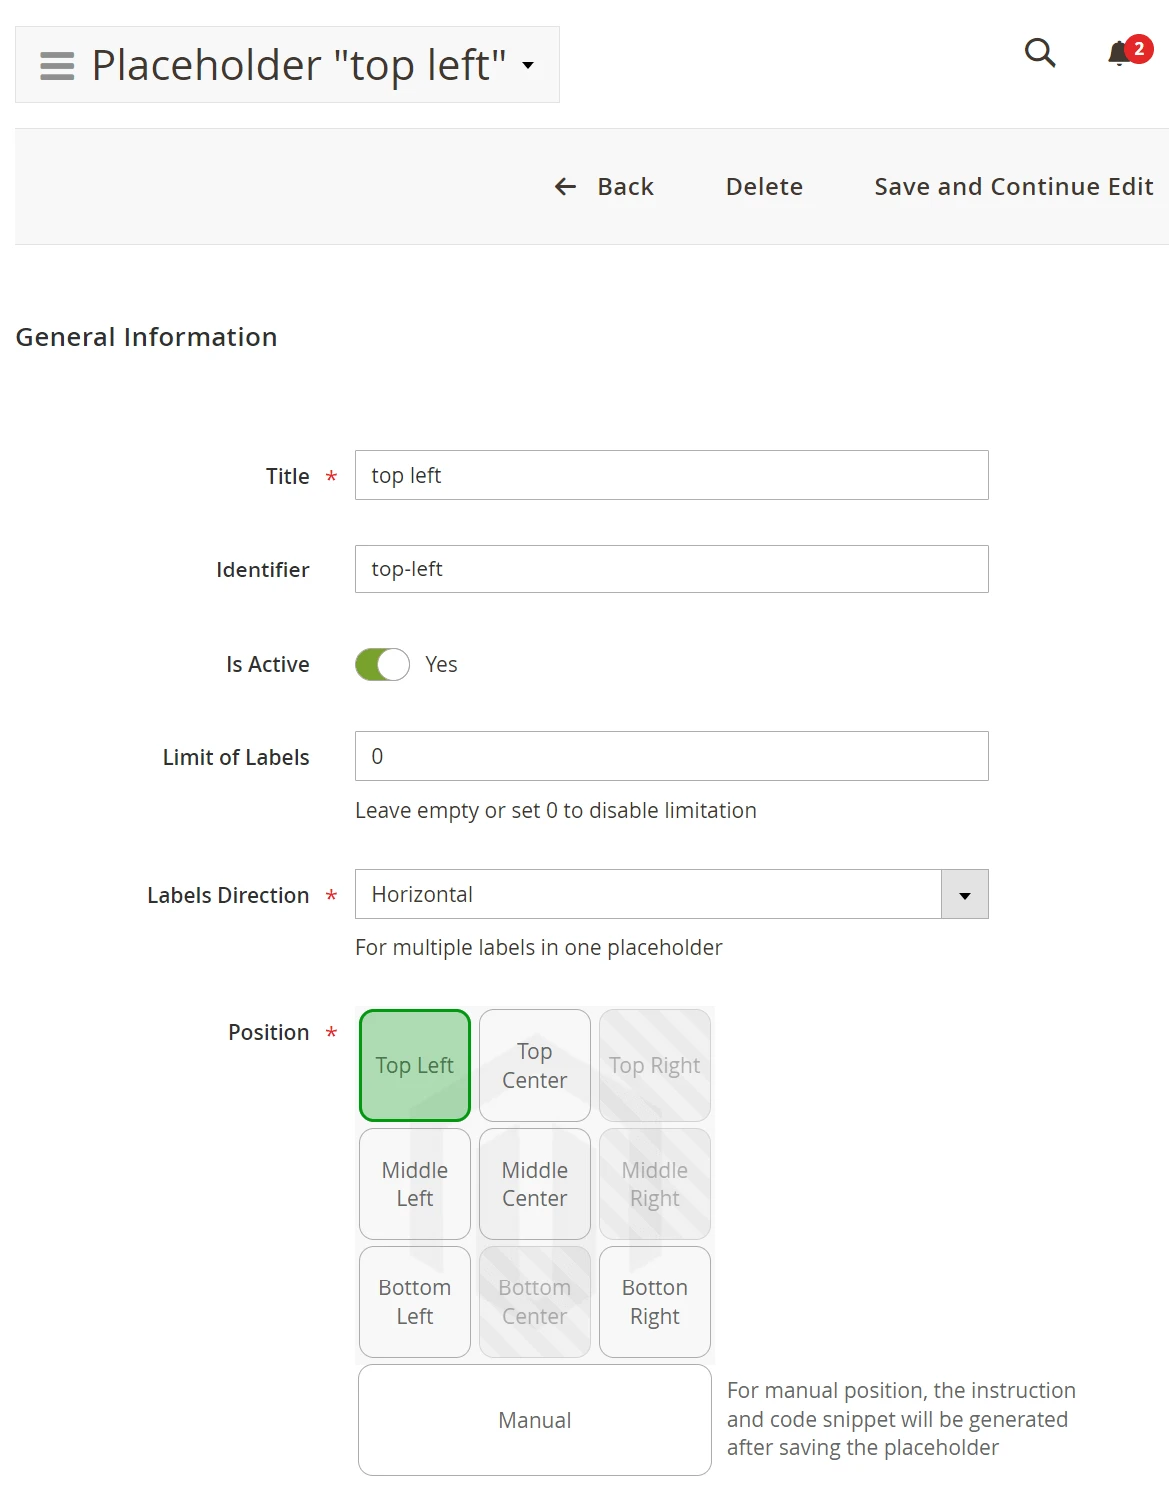
The Product Labels v2 offers a set of predefined positions which allow to quickly place a label on the product image.
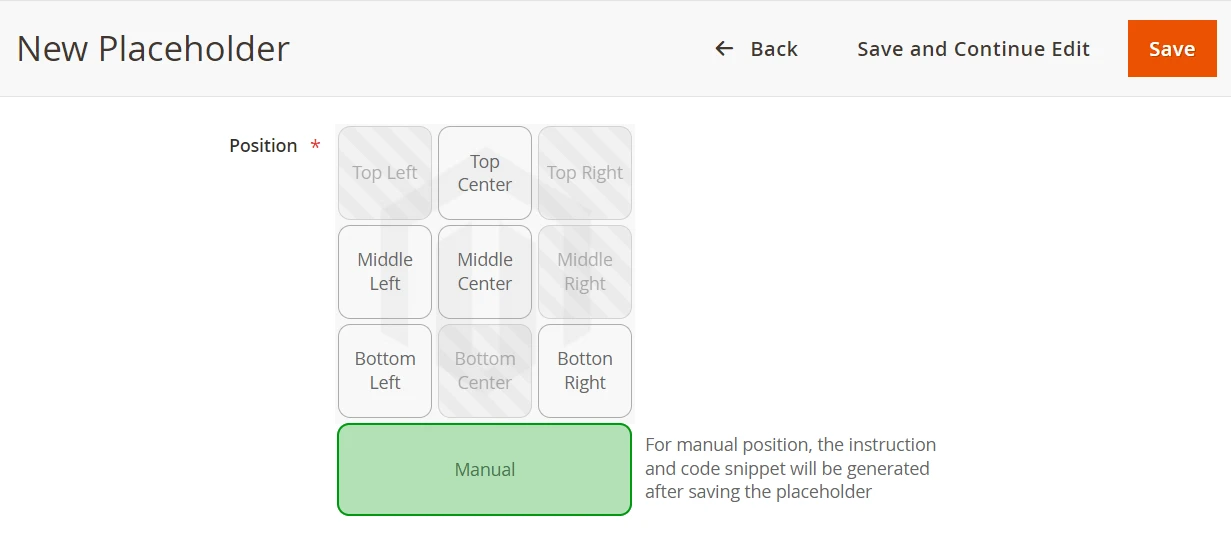
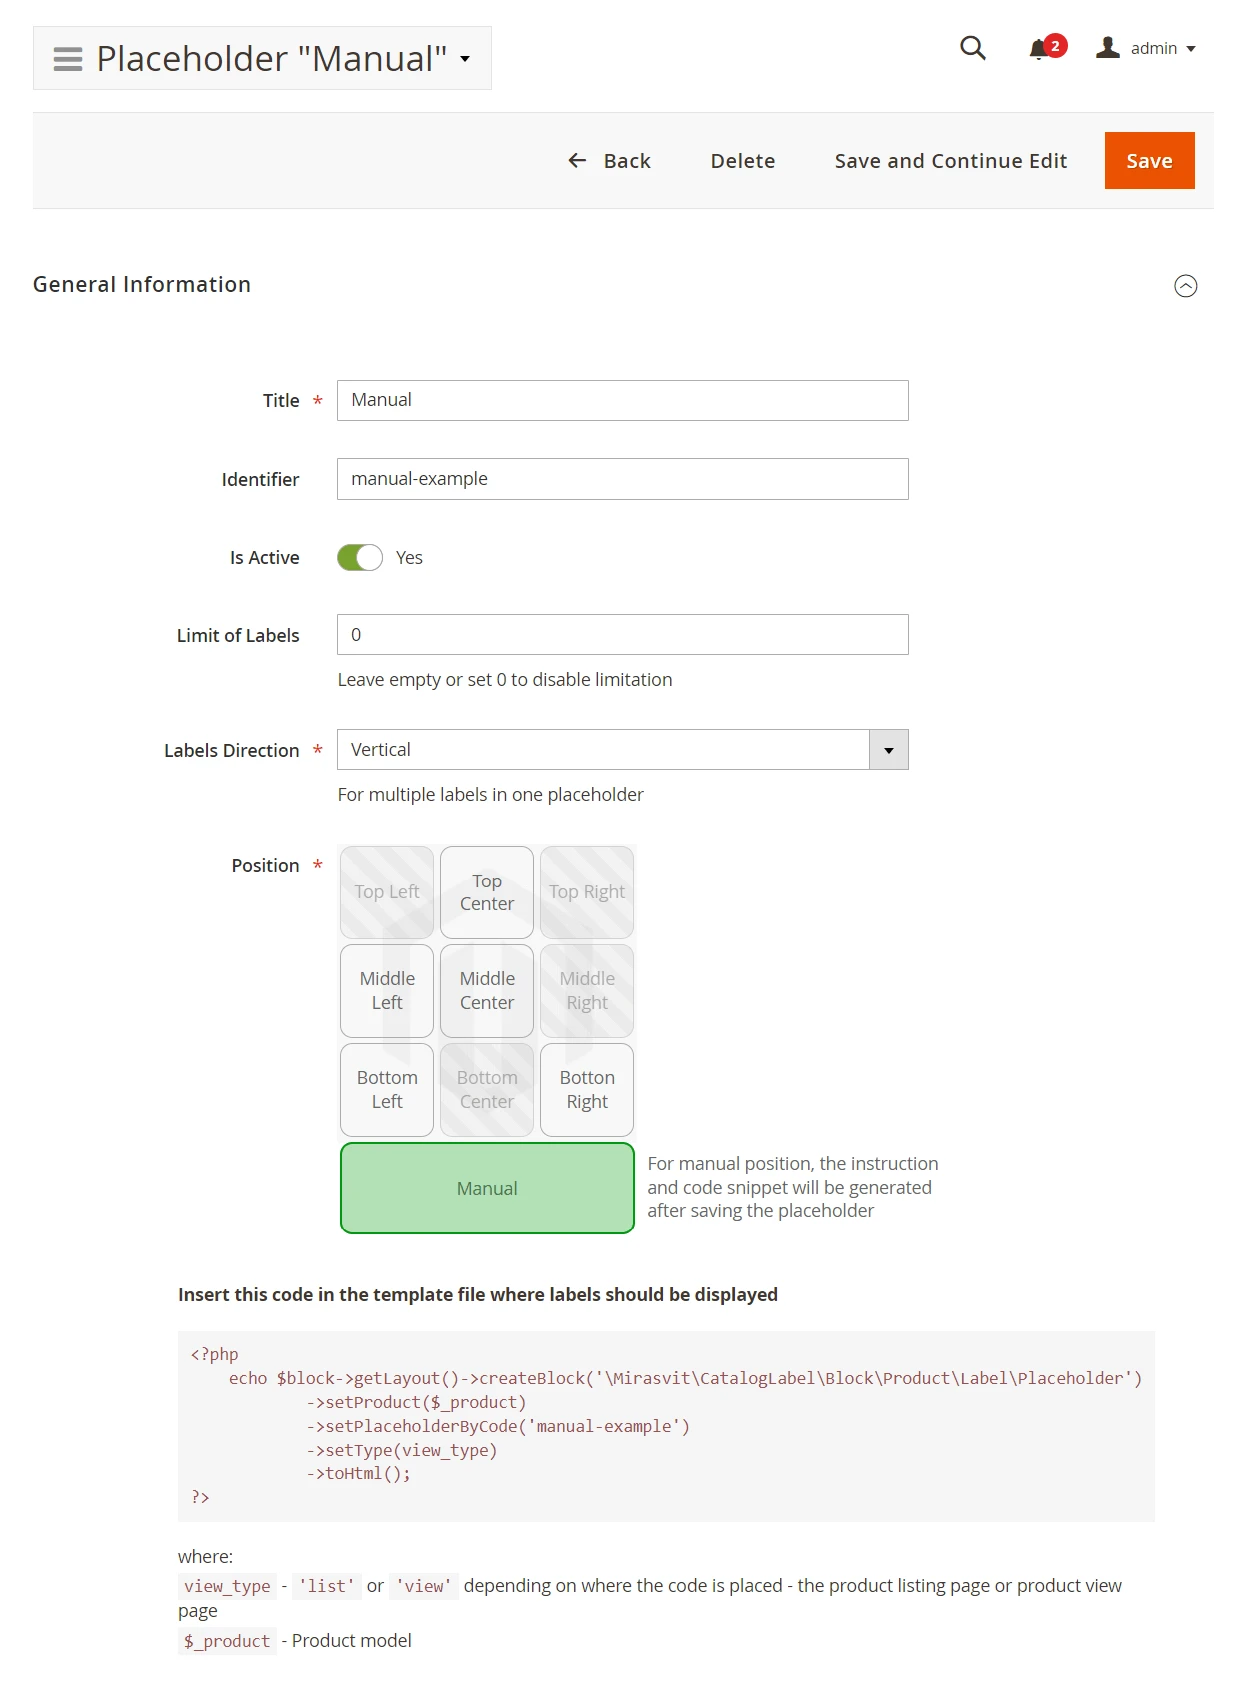
Choose Manual position to place the label anywhere you want. Simply paste the label code that the Product Labels will generate to the desired position in the frontend page template.
Quickly put labels with predefined placeholders
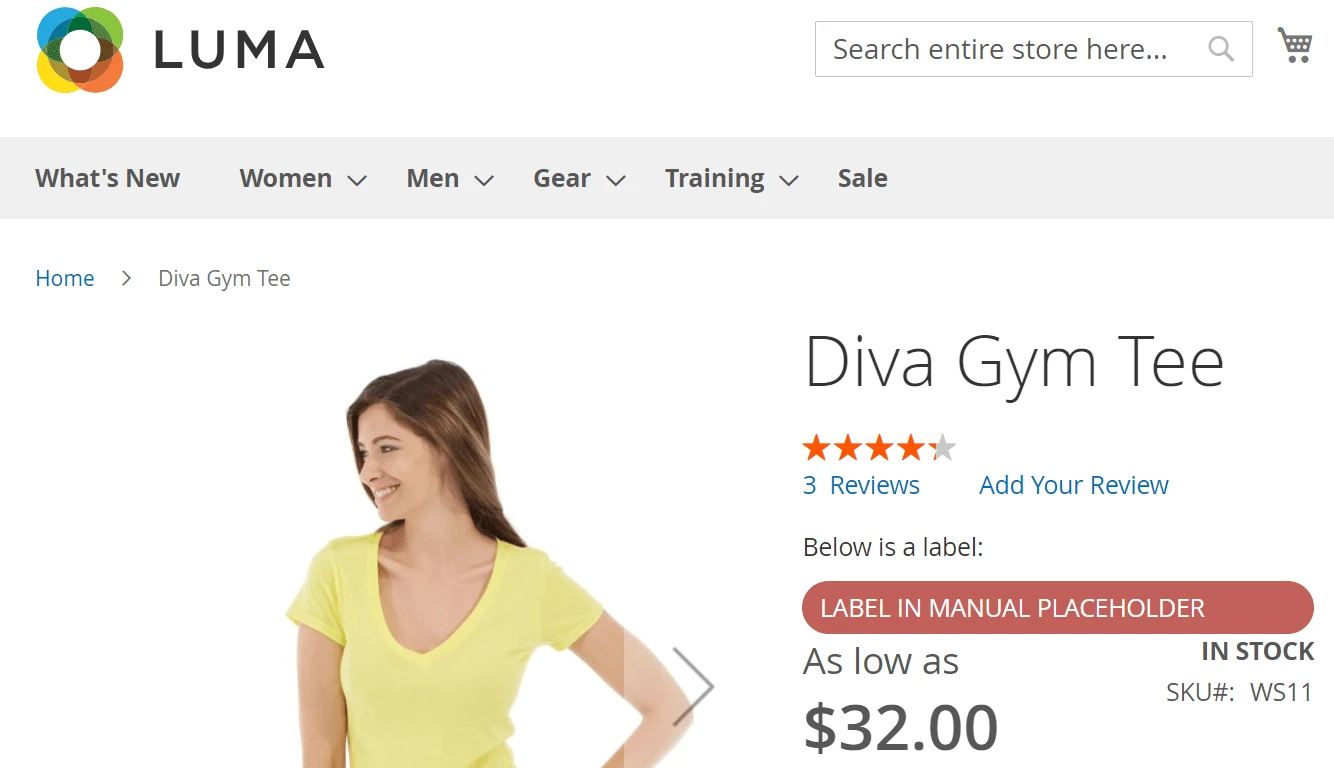
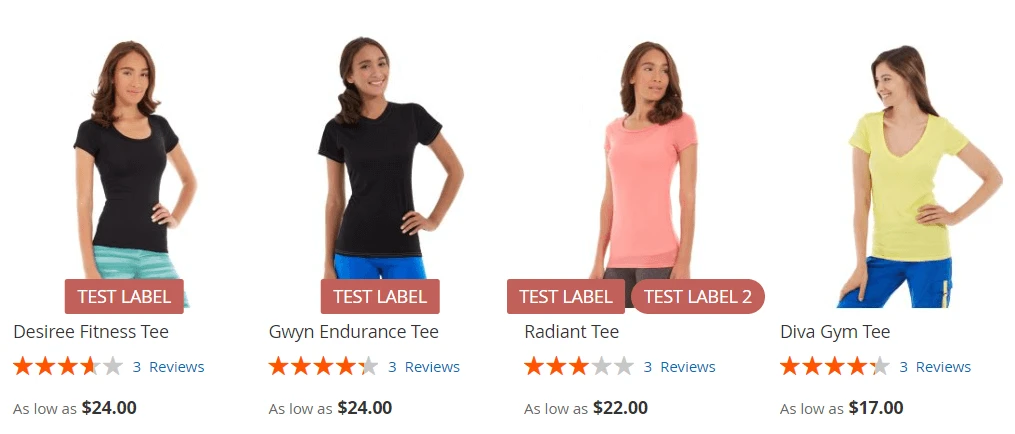
With a set of predefined placeholders you can quickly put a label on any part of the product image. The Product Labels extension splits the product image into 9 sectors: top-right, top-center, top-left, middle-left, middle-center, middle-right, bottom-left, bottom-center, bottom-right.
Simply choose where you want to place your label when configuring the label in the Design tab of the label configuration page. Here is an example of the label placed in the bottom middle of the product image:

Place product label anywhere with manual placeholder
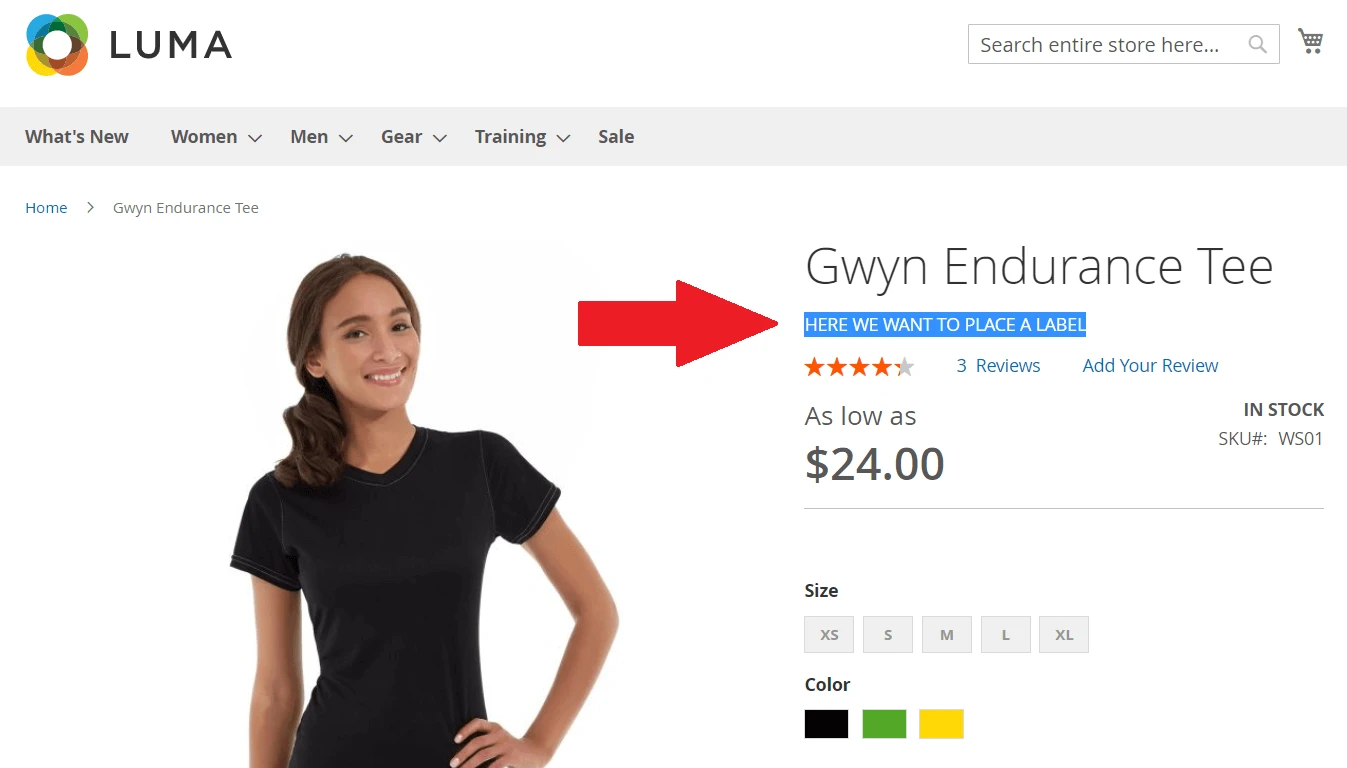
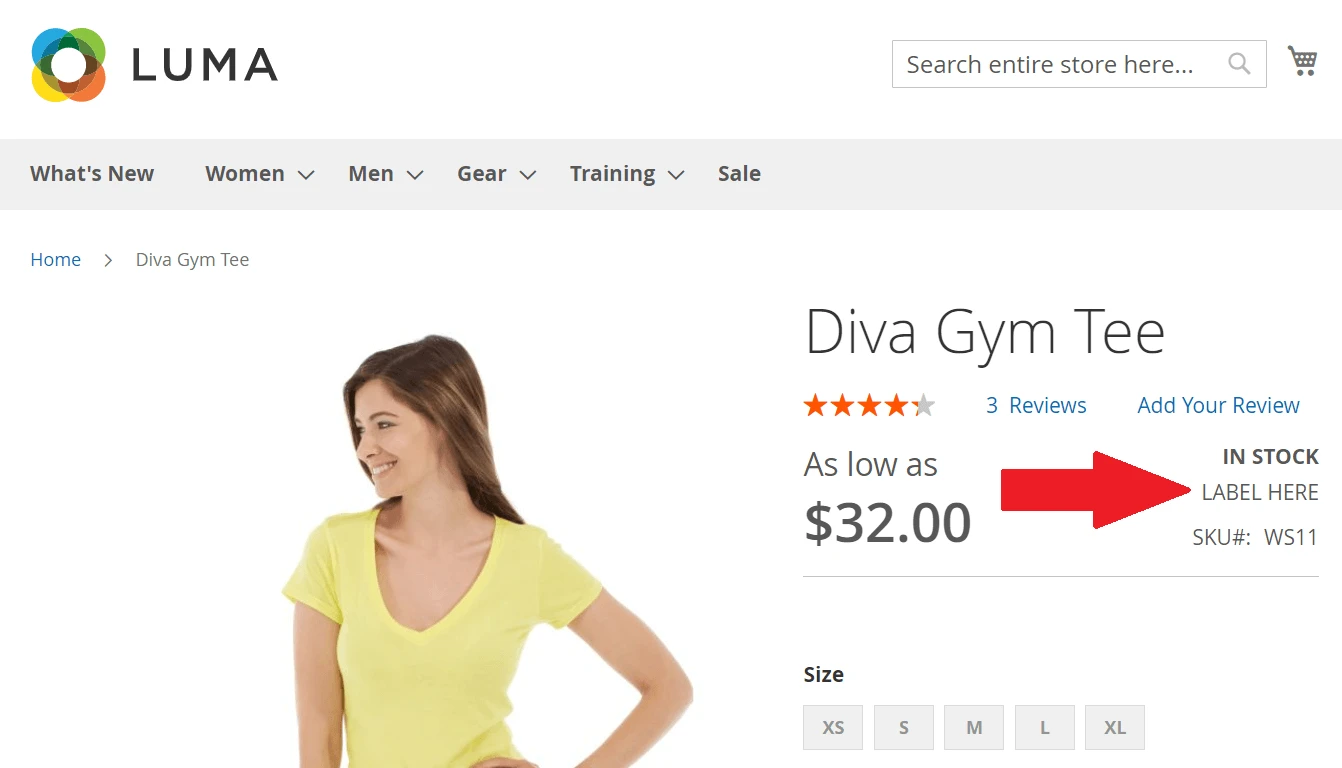
With a manual placeholder you are not restricted to placing labels on the product image. Choose this placeholder to place label anywhere on the product page or other pages of your Magento 2 store.
For example, you may want to place a label under the product title on the product page. Like the following:
All you need to do to place you label in a specific place on a page is to copy the PHP code the Product Labels extension provides when a manual placeholder is created:
<?php
    echo $block->getLayout()->createBlock('\Mirasvit\CatalogLabel\Block\Product\Label\Placeholder')
            ->setProduct($_product)
            ->setPlaceholderByCode('manual-example')
            ->setType(view_type)
            ->toHtml();
?>
In this PHP code piece you need to replace:
view_typewith'view'or'list'depending on where the placeholder is used: product view or product list.
For some frontend theme templates you will also need to replace:
$_productvariable if this variable is not present in the template you are editing. Replace the$_productwith a correct code to get the product object, otherwise Magento will throw an error Warning: Undefined variable $_product, making your store inactive.
Some Magento frontend theme templates do not have access to the product object. Therefore, it is not possible to use manual placeholder in such template. If the placeholder code is added, Magento will throw a TypeError, stating that the setProduct() function argument must be of correct type.
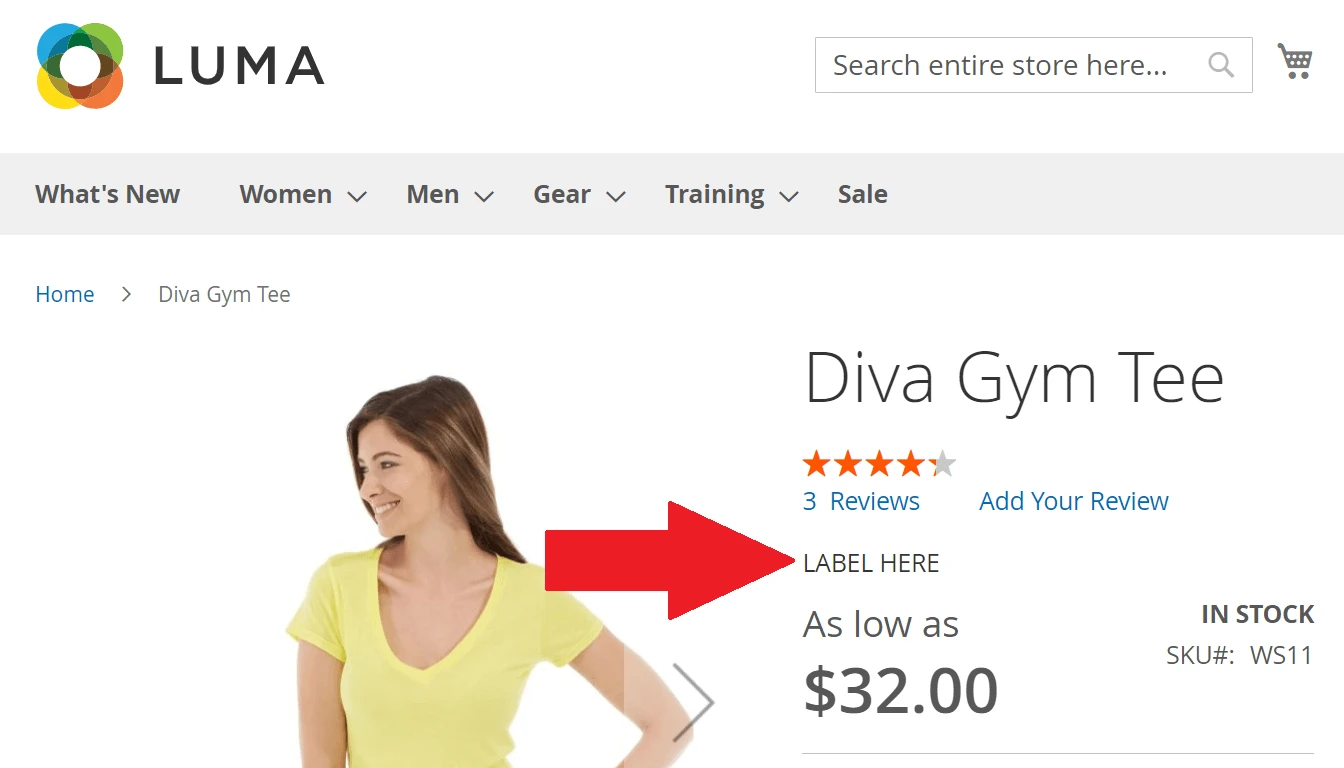
Example of placing a label in a manual placeholder
Let’s say you want to place a label under the review stars. Like the following:
Step 1. Locate a corresponding Magento frontend theme template
First you need to find a Magento frontend theme template that is used for displaying the block with review stars. In this case you need to edit a /src/vendor/magento/module-catalog/view/frontend/templates/product/view/review.phtml template.
Note
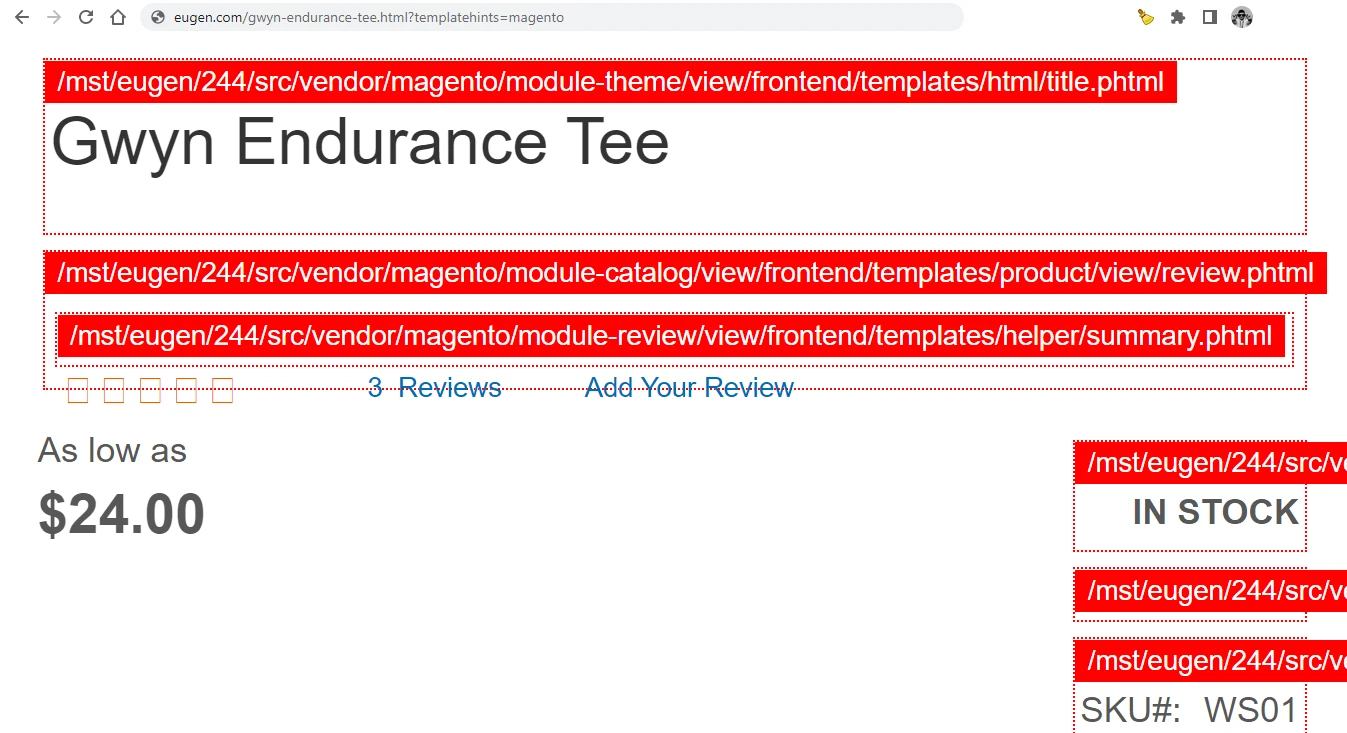
To use the manual placeholder you need to paste its PHP code in the specific frontend template of your Magento. Get the template file location by using the Template Path Hints option.
Navigate to Stores > Settings > Configuration > ADVANCED > Developer.
Set the Enable Template Path Hints for Storefront option to Yes. Set the Enable Hints for Storefront with URL Parameter to Yes. Leave the Parameter Value as system value. Clean the Magento cache.
Reload your store frontend page with the GET-parameter
?templatehints=magento. For example, your store URL should be like thishttps://www.mymagentostore.com/gwyn-endurance-tee.html?templatehints=magento.
Step 2. Paste the PHP code of manual placeholder
Paste in the template the PHP code you have copied when created a manual placeholder for the label.
Since the review.phtml template does not have a $_product variable defined, you need to correct the code. Replace the $_product with $block->getProduct(). Instead of setProduct($_product) a correct code for this template will be setProduct($block->getProduct()).
Step 3. Check the label on the store frontend
Flush the Magento cache and refresh the page with a label. The added label will look like this:
One more example of placing a label in a manual placeholder
Alternatively, you may want to place a label above the product SKU on the product page. Like the following:
Such placeholder for the label should be placed in the template /src/vendor/magento/module-catalog/view/frontend/templates/product/view/type/default.phtml. This template has the $_product variable defined, so you do not need to replace the variable like in the previous example.
Limit of labels in the placeholder
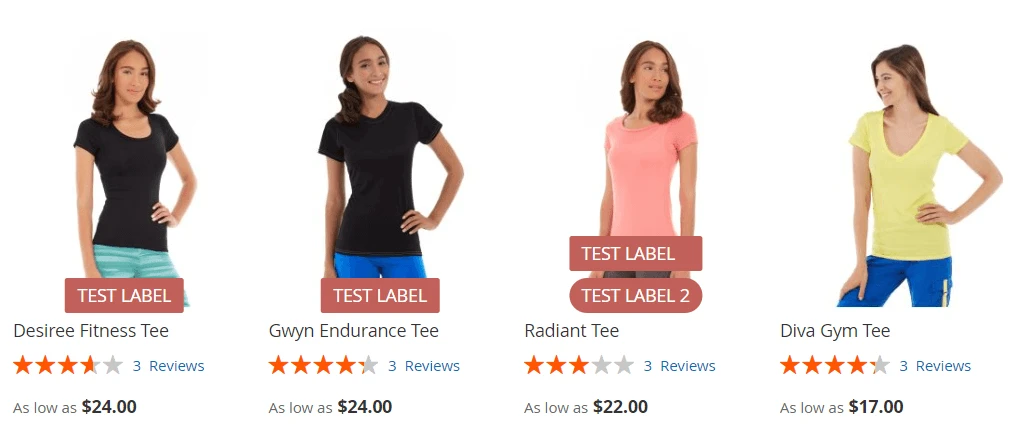
In some cases one product may have several labels in one placeholder. To keep your store frontend clean you can limit the number of labels allowed to display in one placeholder.
The default value for this option is zero, which corresponds to unlimited number of labels in the placeholder.
Direction of labels in the placeholder
When multiple labels are located in one placeholder they can be stacked vertically or horizontally. Simply select the direction.
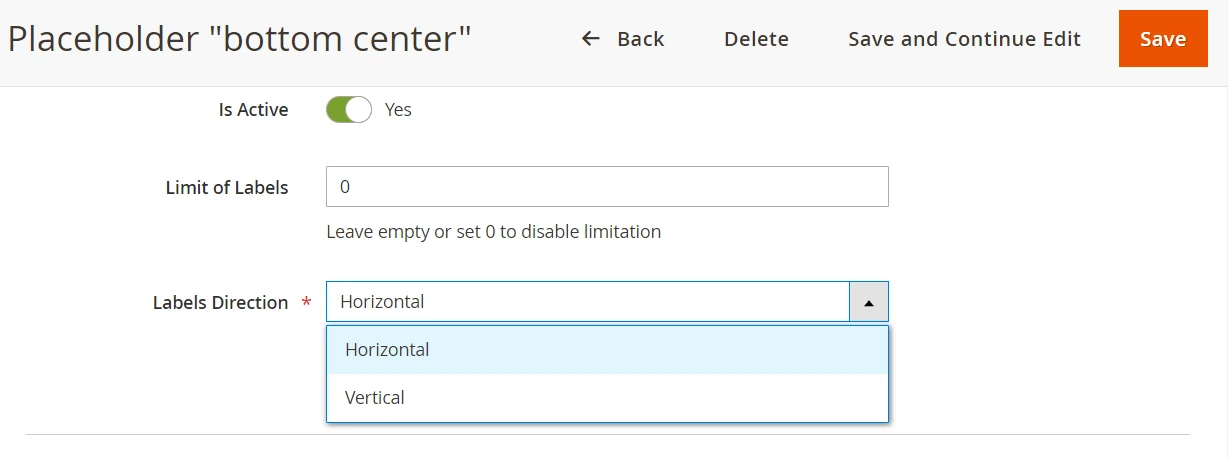
Here is how horizontal stacking looks like:
The vertical direction looks like:
Product labels templates
The Product Label extension allows you to create any type of the product label as a template, and then reuse it multiple times with different label text and usage rules.
The label template editor offers a visual preview of your future label. Any change is HTML or CSS is immediately displayed on the screen. This drastically simplifies the label design process.
When designing a label template you may use variables to make the label design flexible. For example, you may want to display a text on the label that is tailored to the exact product. In such case use the {var label.title} variable in the template design.
The following variables can be used:
{var label.title}- label text{var label.description}- label description, can be used as value for title attribute{var label.image_url}- label's image URL{var label.image}- label's image element with label image as background and with label text
Example: use one template for several different labels
For example, you can create a label template for the price discounts. This template then can be used for multiple products with individual value of the discount.
After creating a label template and the discount label the Product Label extension automates the label placing. The label will be placed according to the specified rule. The discount value will be taken from a corresponding variable.
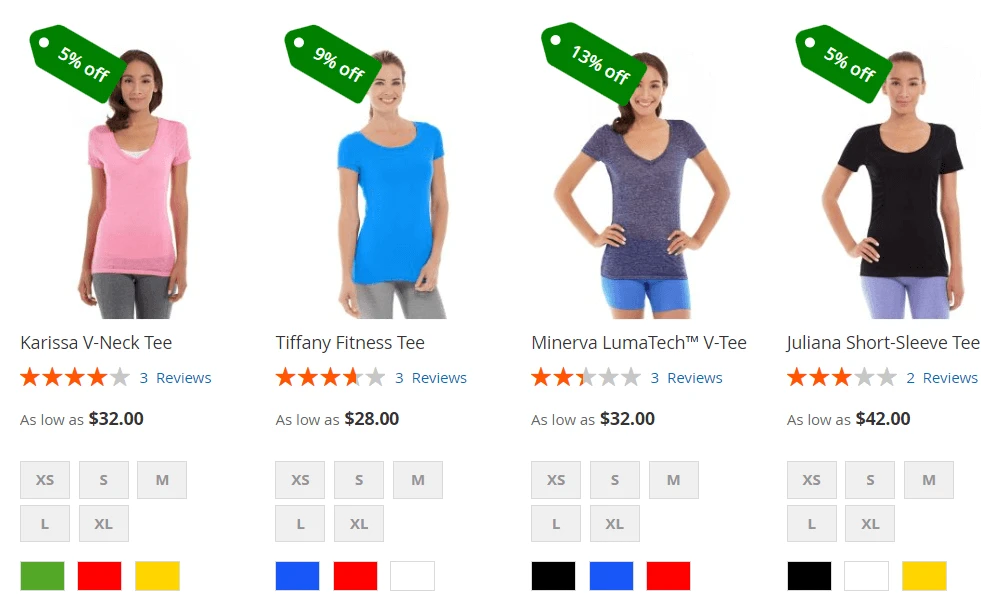
Variables in product labels
Taylor your labels to products by using variables. This allows to display product-related data on a universal product label.
Simply put a variable in the label text field to make the label to fetch the product data.
For example, you may want to highlight your new products. Show the number of days for a new product with the corresponding variable. Alternatively, for your bestselling products, you may want to highlight the number of items left in stock. You can create a label with a respectful variable to show how many of each bestselling product is left in stock.
For any label the following variables are allowed:
- [price] - product price
- [final_price] - product final price
- [special_price] - product special price
- [sku] - product SKU
- [stock_qty] - stock quantity
- [discount_amount] - discount amount
- [discount_percent] - discount percent
- [special_price_dl] - days left for special price
- [new_days] - product new days
- [attr|attributeCode] - product attribute value. Use the code attributeCode
- [br] - new line
Magento theme compatibility and product labels index
Magento themes compatibility
There are themes available to suit just about any kind of business. Whether you're looking for a sleek and modern design or something more traditional and classic, you can use the Product Labels extension in your store.
This module supports Magento Luma and Hyva themes out of the box:
It can be made compatible with other frontend themes with a manual theme template adjustment. For custom Magento themes it is required to insert the product label overlay code in the theme template
Product labels index
With the Product Labels v2 you have no need to worry about your Magento store loading speed. This module uses the Magento Index functionality to keep the index of all products marked with labels. When a frontend page of your store is rendered, the products with labels are simply taken from this index, keeping the high frontend loading speed.
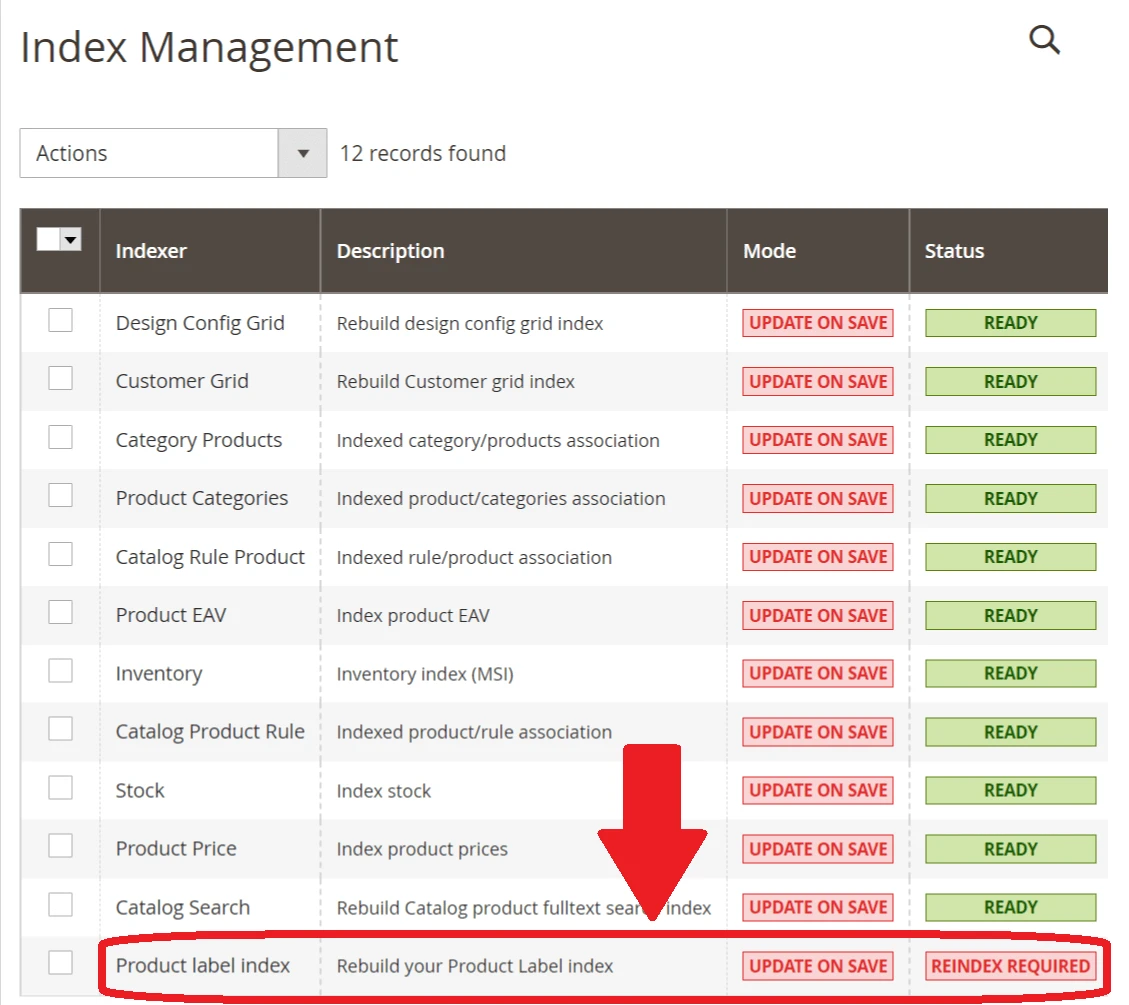
When creating a new label template or product label it is required to update the Product label index in order for the label to be displayed on the frontend.
The Product label index can be updated by CLI commands on your Magento server:
mirasvit:label:indexer --status. Displays information about Product Label indexmirasvit:label:indexer --reindex-all. Run full reindex of Product Label indexmirasvit:label:indexer --reindex-new. Run reindex of Product Label index for recently created/updated products
The index can also be updated from your Magento admin with the Improved Asynchronous Reindexing extension.
After reindexing flush the Magento cache for your labels to become visible on the frontend.
Examples of product labels
Here are the examples of product labels you may use in your store:
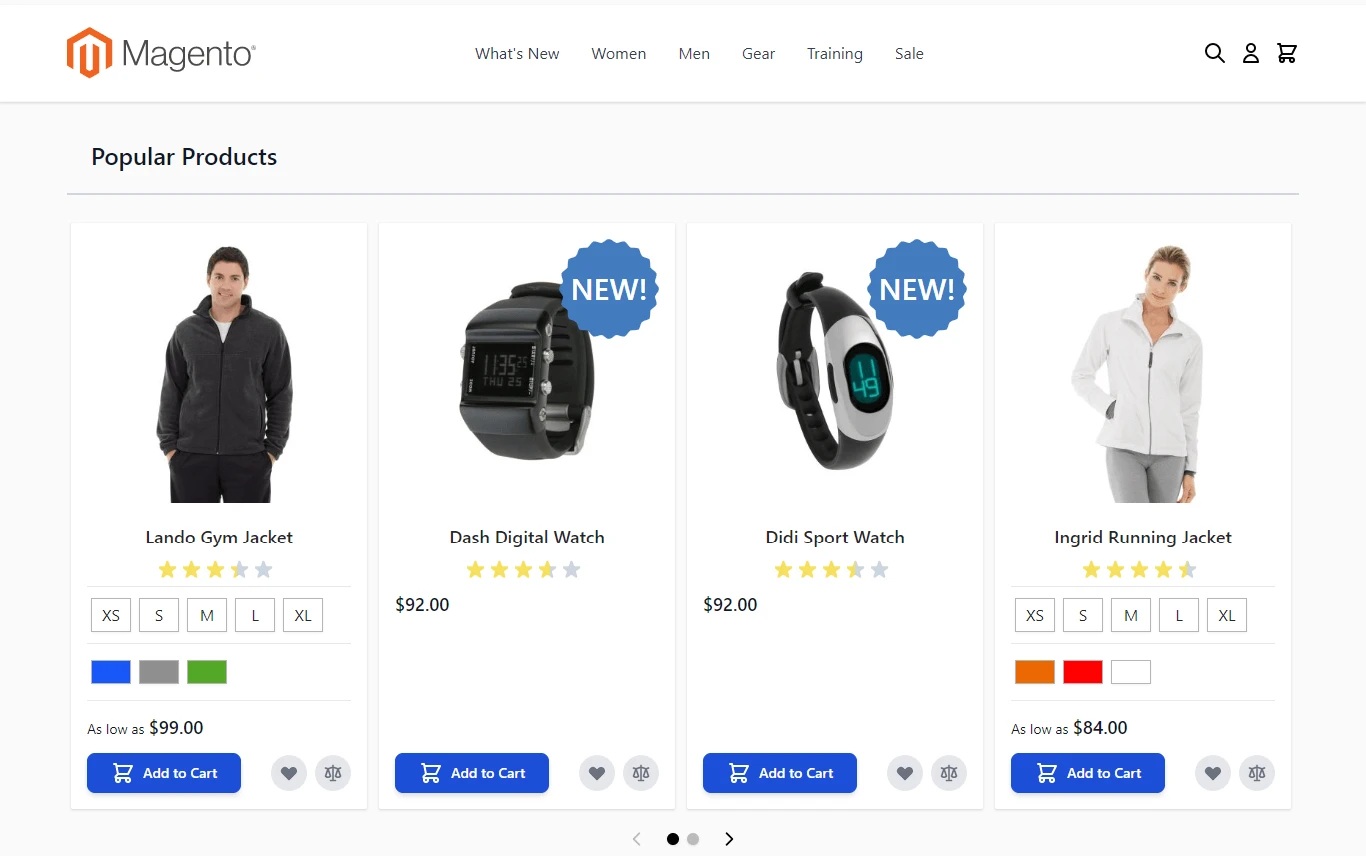
- Label for new product with a number of days
- Discount and stock quantity in a predefined placeholder
- Discount and stock quantity in a manual placeholder
- Label with a number of days left for Special Price on the product list page in manual placeholder next to the price
- Label with a product attribute
- Animated product label
Label for new product with a number of days
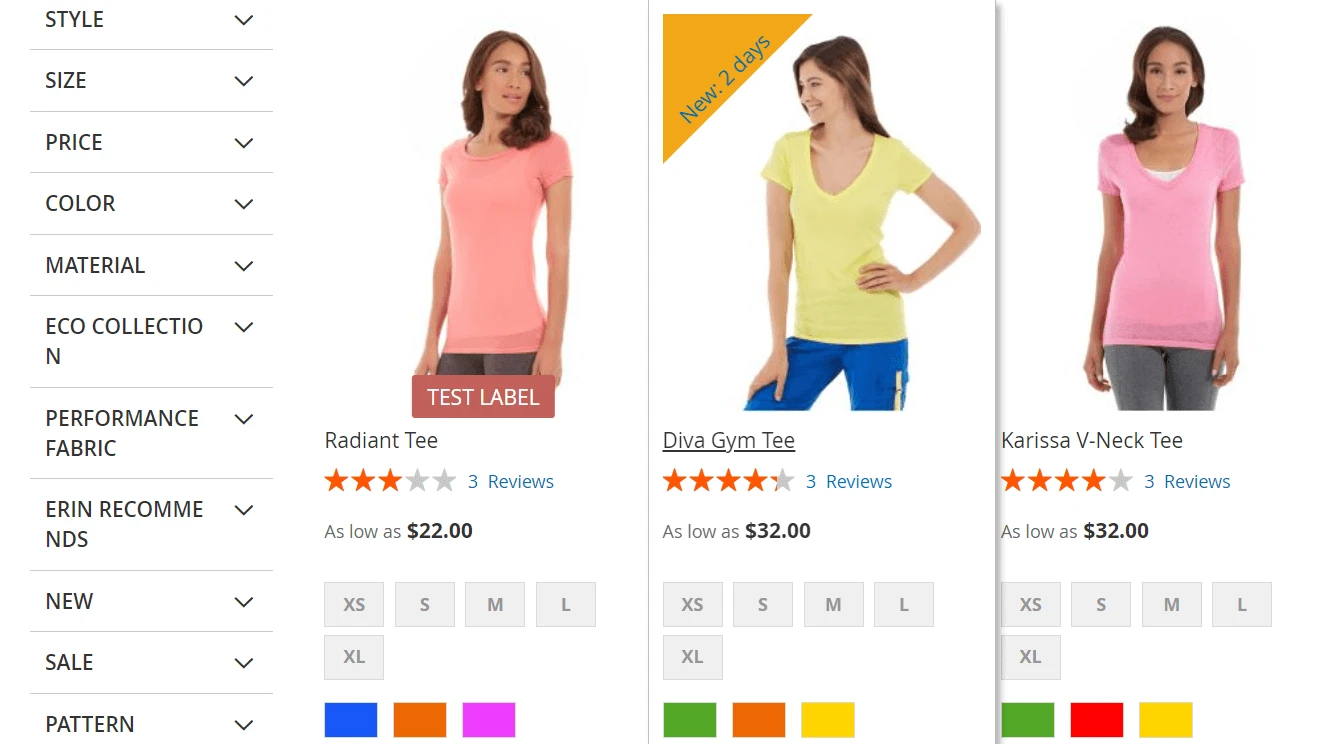
A simple way to draw attention to your products and make them stand out in your catalog is to mark them with a New label. This can help attract customers who may be looking for the latest or most recent products. Additionally, by labeling a product as "new," the store can create a sense of exclusivity and make customers feel like they are among the first to try out a new product.
Overall, labeling products as "new" can be a useful marketing strategy for stores. Products labeled as "new" may generate more interest and excitement from customers, which can lead to increased sales.
Step 1. Create a placeholder for the label
On the first step you need to specify a placeholder for the "new product" label. You can place the label into the existing placeholder. If you want to display the "new product" in a previously not used place, you will need to create a new placeholder.
Navigate to Marketing > Promotions > Product labels > Manage Placeholders
Assuming the label should be placed in top left corner of the product image, select a corresponding placeholder. Set the number of labels allowed in this placeholder or leave the default value to allow unlimited number of labels in this placeholder. Additionally, in Labels Direction set how multiple labels will be stacked in this placeholder: vertically or horizontally.
Step 2. Create a template for the "new product" label
Create a template for the "new product" label. Navigate to Marketing > Promotions > Product labels > Manage Templates.
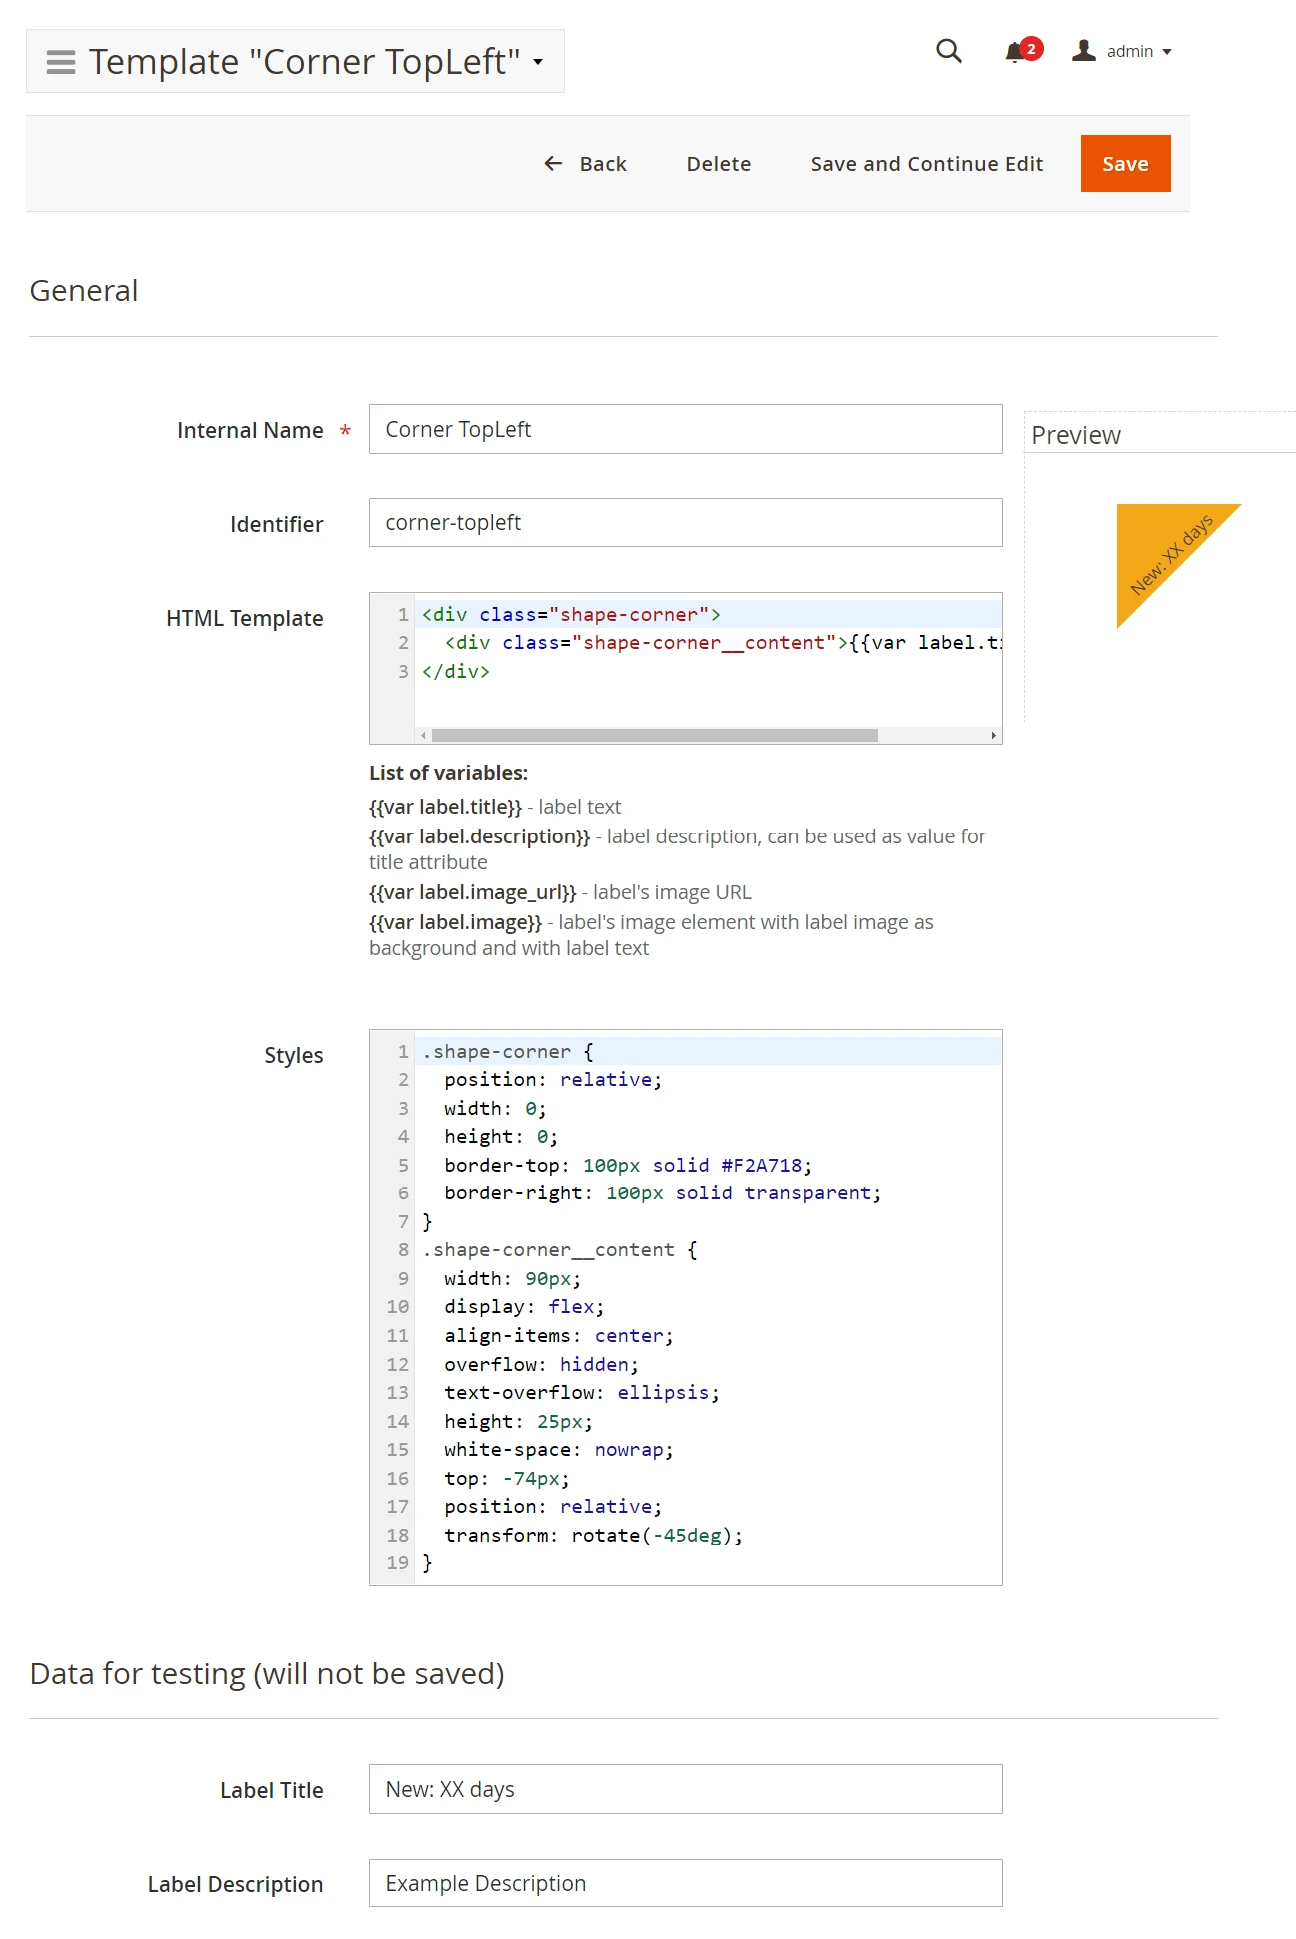
Set the HTML code for the label template. Use the {var label.title} for the template to automatically fetch the label text.
<div class="shape-corner">
  <div class="shape-corner__content">{var label.title}</div>
</div>
Define a label design using CSS styles. For example, make the label a cut-corner triangle with such CSS code:
.shape-corner {
  position: relative;
  width: 0;
  height: 0;
  border-top: 100px solid #F2A718;
  border-right: 100px solid transparent;
}
.shape-corner__content {
  width: 90px;
  display: flex;
  align-items: center;
  overflow: hidden;
  text-overflow: ellipsis;
  height: 25px;
  white-space: nowrap;
  top: -74px;
  position: relative;
  transform: rotate(-45deg);
}
Step 3. Create a "new product" label
Navigate to Marketing > Promotions > Product labels > Manage Labels to create a "new product" label.
General
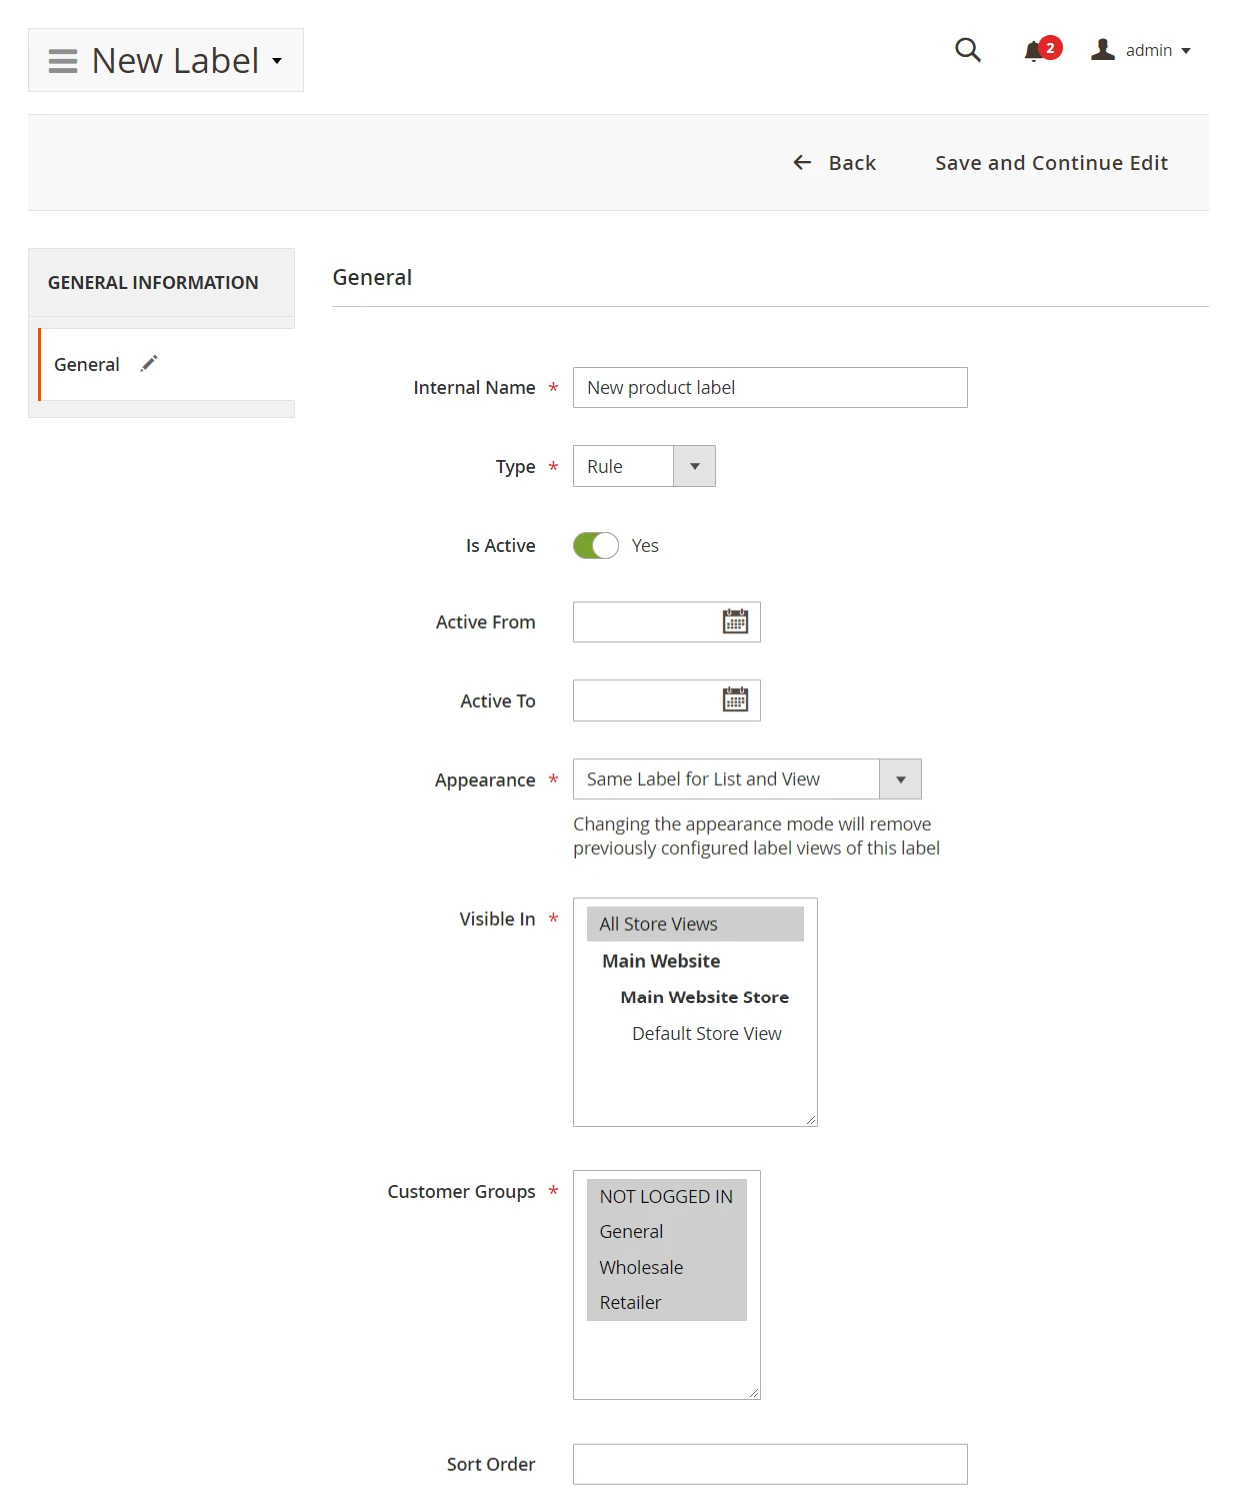
For the label set:
- Internal Name. This name is used for you to distinguish the label among other labels.
- Type. Specify how the label will be activated for display: by rule or by product attribute. This value cannot be changed later.
- Is Active. Set if the label should be active for display.
- Active From, Active To. Set the timerange when the label will be active.
- Appearance. Set whether the label should be displayed for a product view, product list or both.
- Visible In. Select the viewstore for the label visibility.
- Customer Groups. Choose the customer types the label should be displayed to.
- Sort Order. Set the label rank for the display when multiple labels are displayed. Label with the Sort Order=0 is displayed first.
Click Save and continue edit to proceed configuring the label. Two new tabs will appear: Rule and Design. If the label is configured to the Type=Attribute, the Rule tab will not appear.
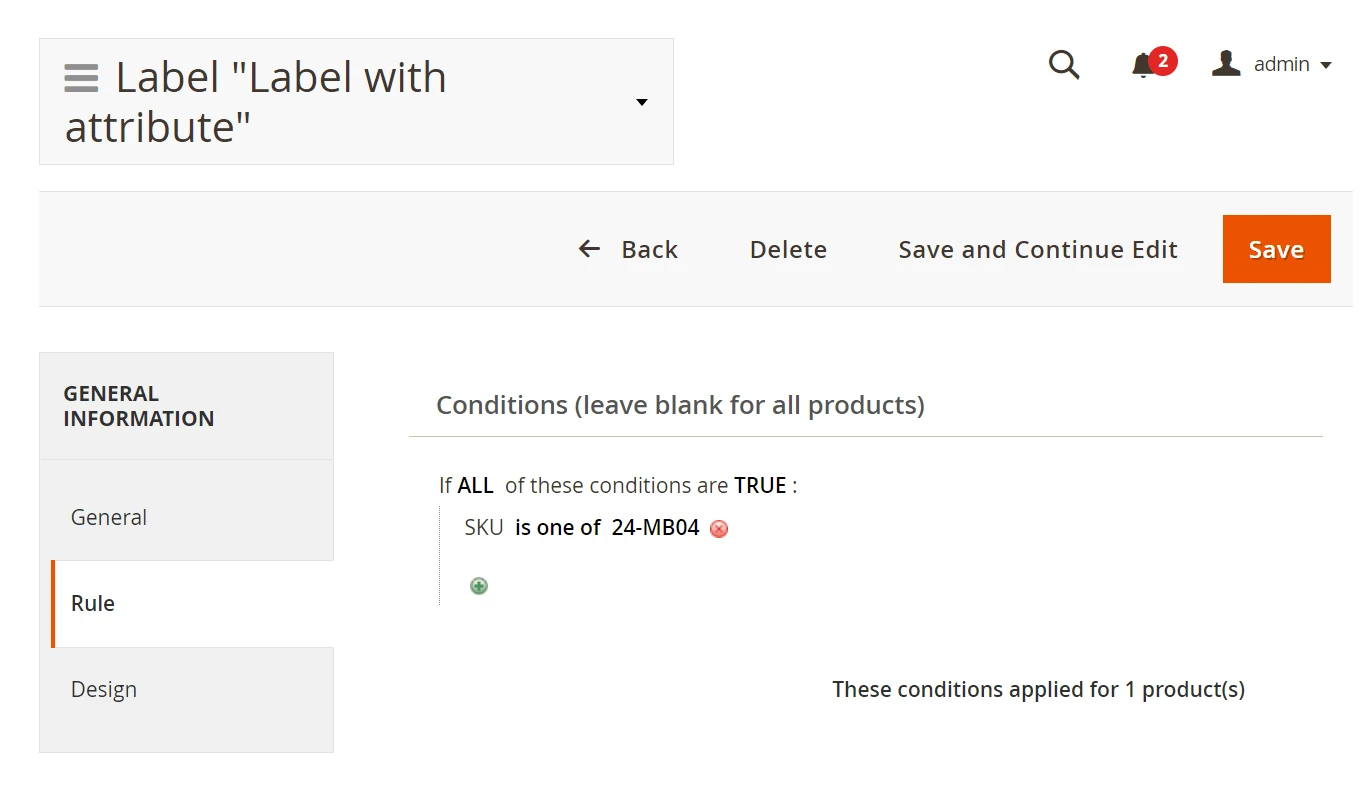
Rule
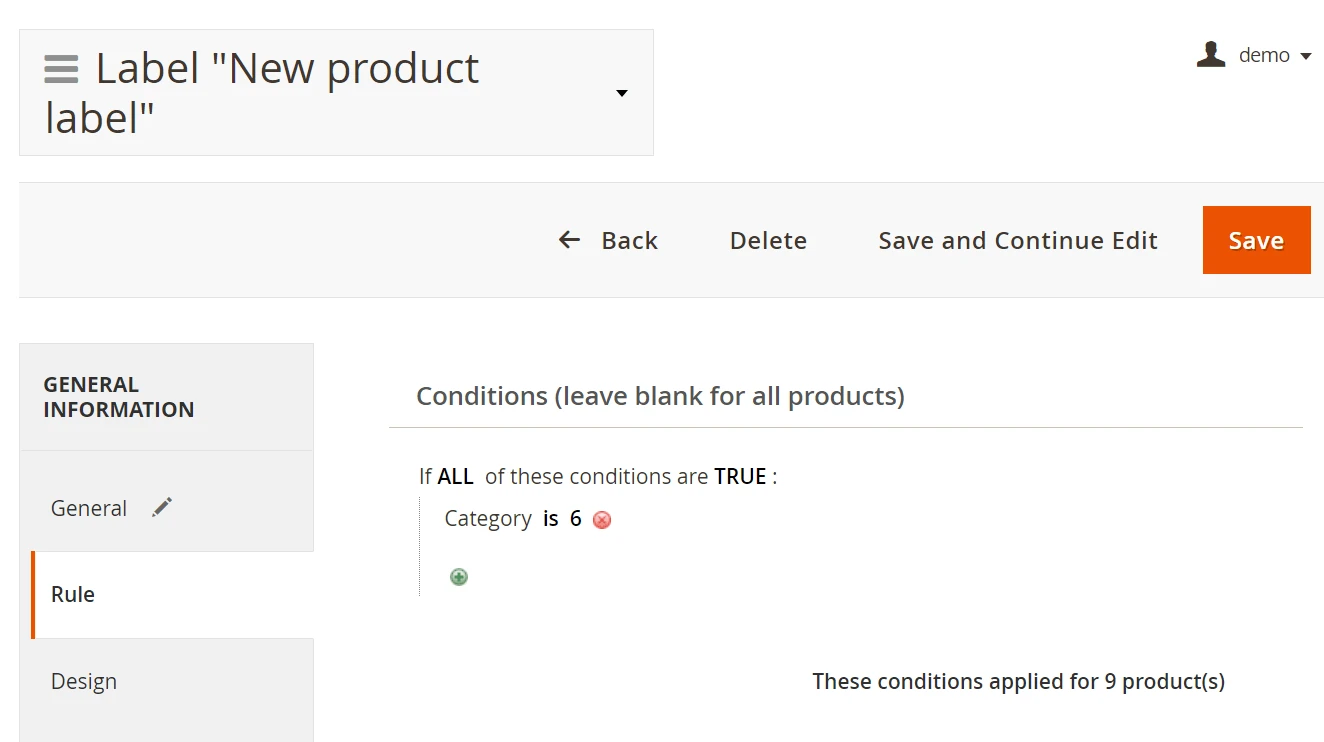
Configure the rule that will be used to determine the products that should be marked with the "new product" label.
Here you will see how many products will be marked with the label according to the specified set of conditions.
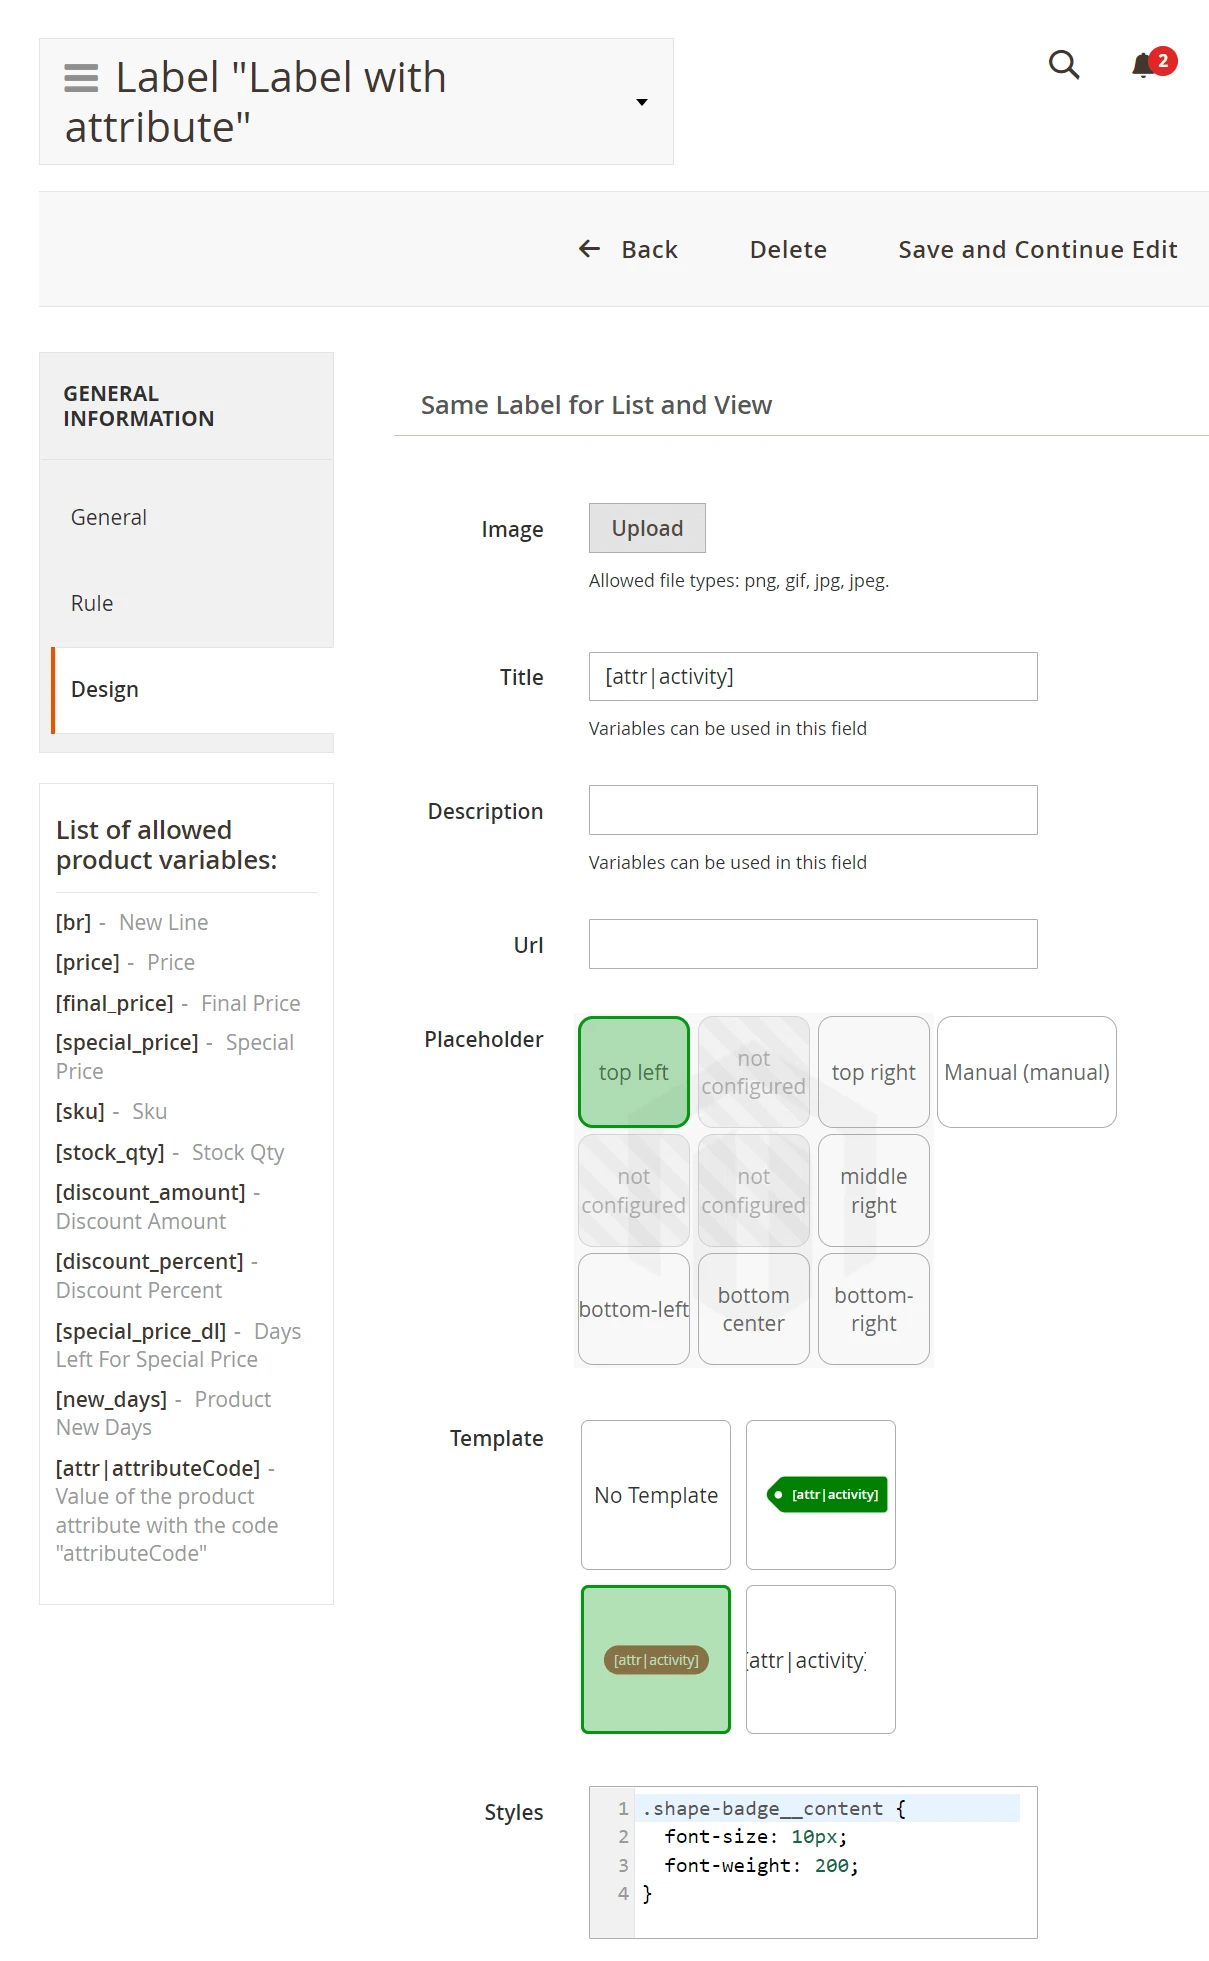
Design
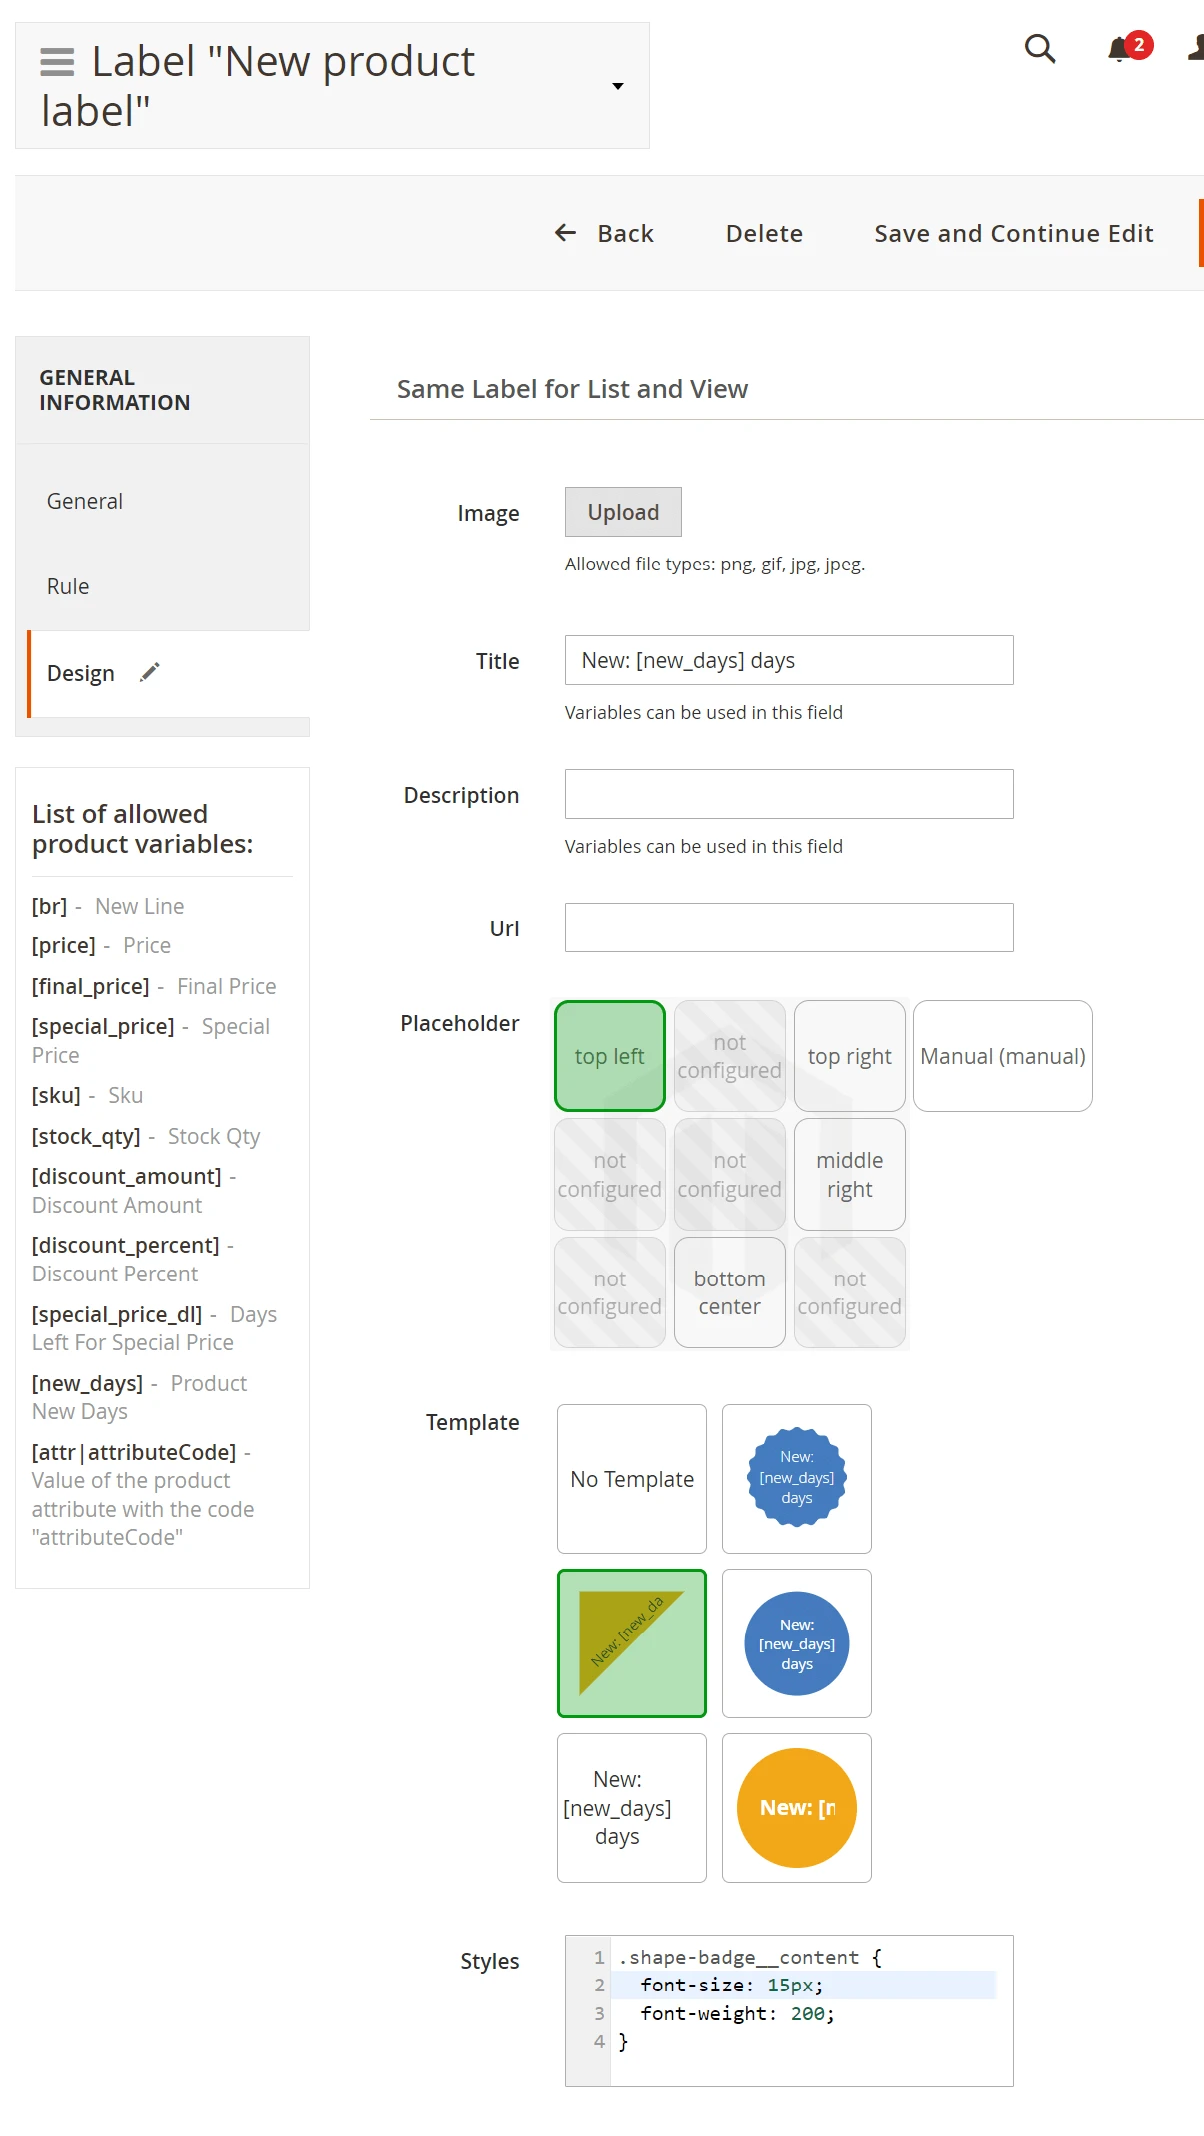
Set the:
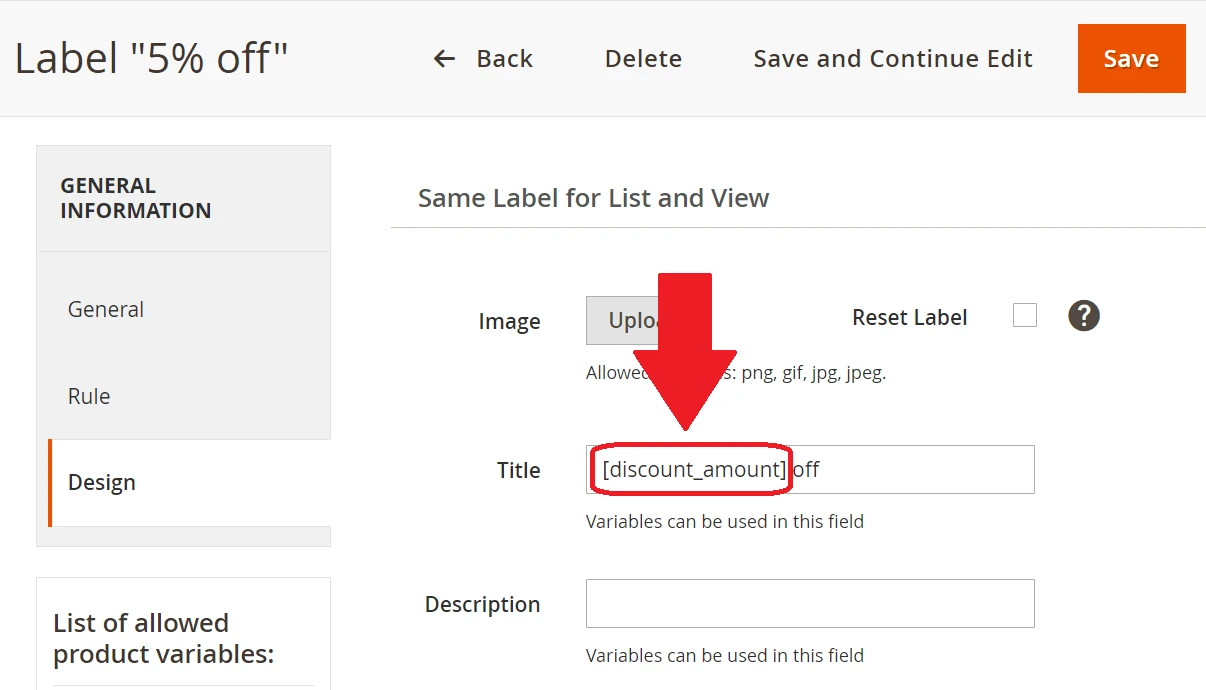
- Title as
New: [new_days] days. The[new_days]is the variable which will fetch the value New of the product. - Placeholder accordingly to your configured placeholder. Its top left for the "new product" label.
- Template. Use the template you have created for the "new product" label.
- Styles. Apply CSS styles to the label text. For example, font size and font weight.
Step 4. Check the label on store frontend
In your Magento admin navigate to System > Tools > Index Management and reindex the Product label index if you use the Improved Asynchronous Reindexing extenstion. Next, navigate to System > Tools > Index Management and flush Magento cache.
Alternatively, use CLI commands to launch the Product label index reindex and flush Magento cache.
Refresh the page with a product that should be marked with the "new product" label.
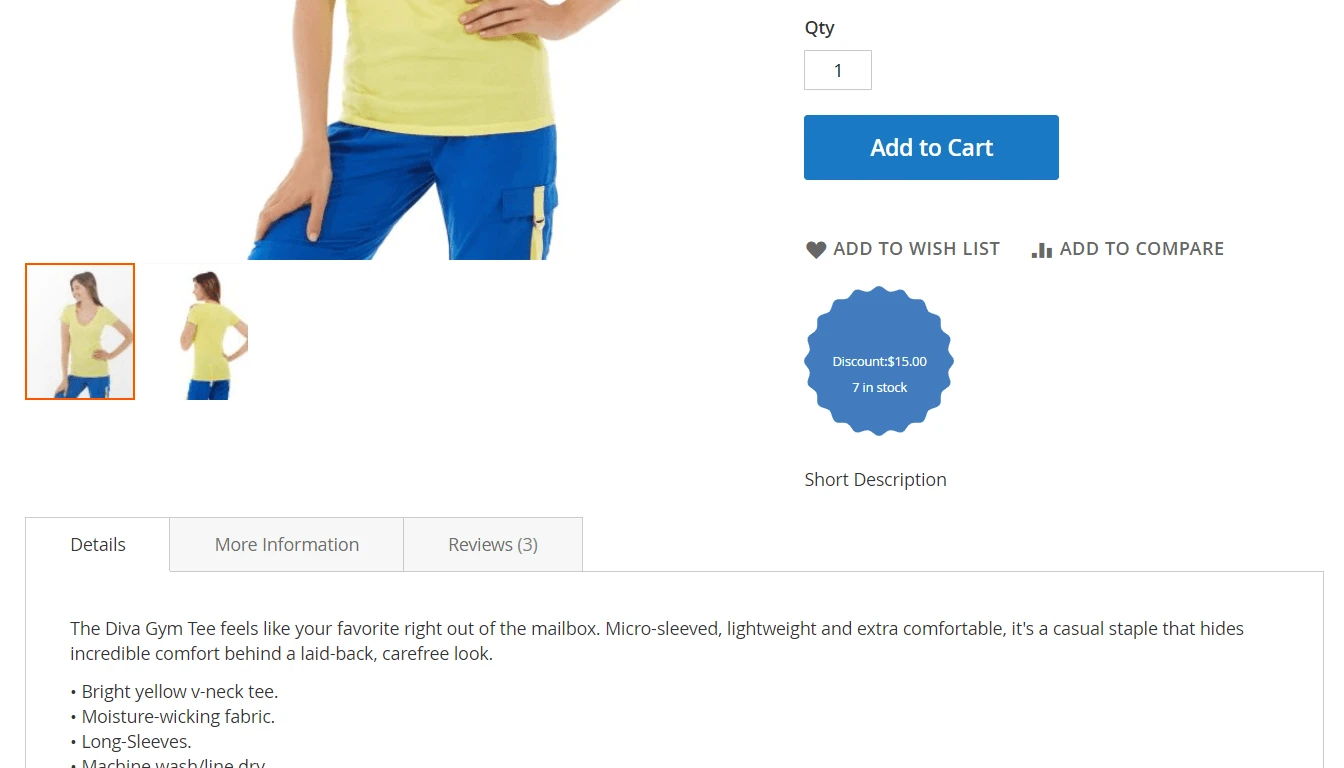
Text + CSS label with a discount and stock quantity
The discount value should be displayed as a label title, the stock quantity should be placed in the label description. This label should be displayed in different placeholders: predefined for the product list and manual for the product view. The manual placeholder should be located next to the Short Description block.
Discount and stock quantity in a predefined placeholder
Step 1. Create a placeholder for the label
On the first step you need to specify a placeholder for the label. You can place the label into the existing placeholder. If you want to display the label in a place that was not a previously used place, you will need to create a new placeholder.
Navigate to Marketing > Promotions > Product labels > Manage Placeholders
Assuming the label should be placed in top left corner of the product image, select a corresponding placeholder. Set the number of labels allowed in this placeholder or leave the default value to allow unlimited number of labels in this placeholder. Additionally, in Labels Direction set how multiple labels will be stacked in this placeholder: vertically or horizontally.
Step 2. Create a template for the label
Create a template for the label. Navigate to Marketing > Promotions > Product labels > Manage Templates.
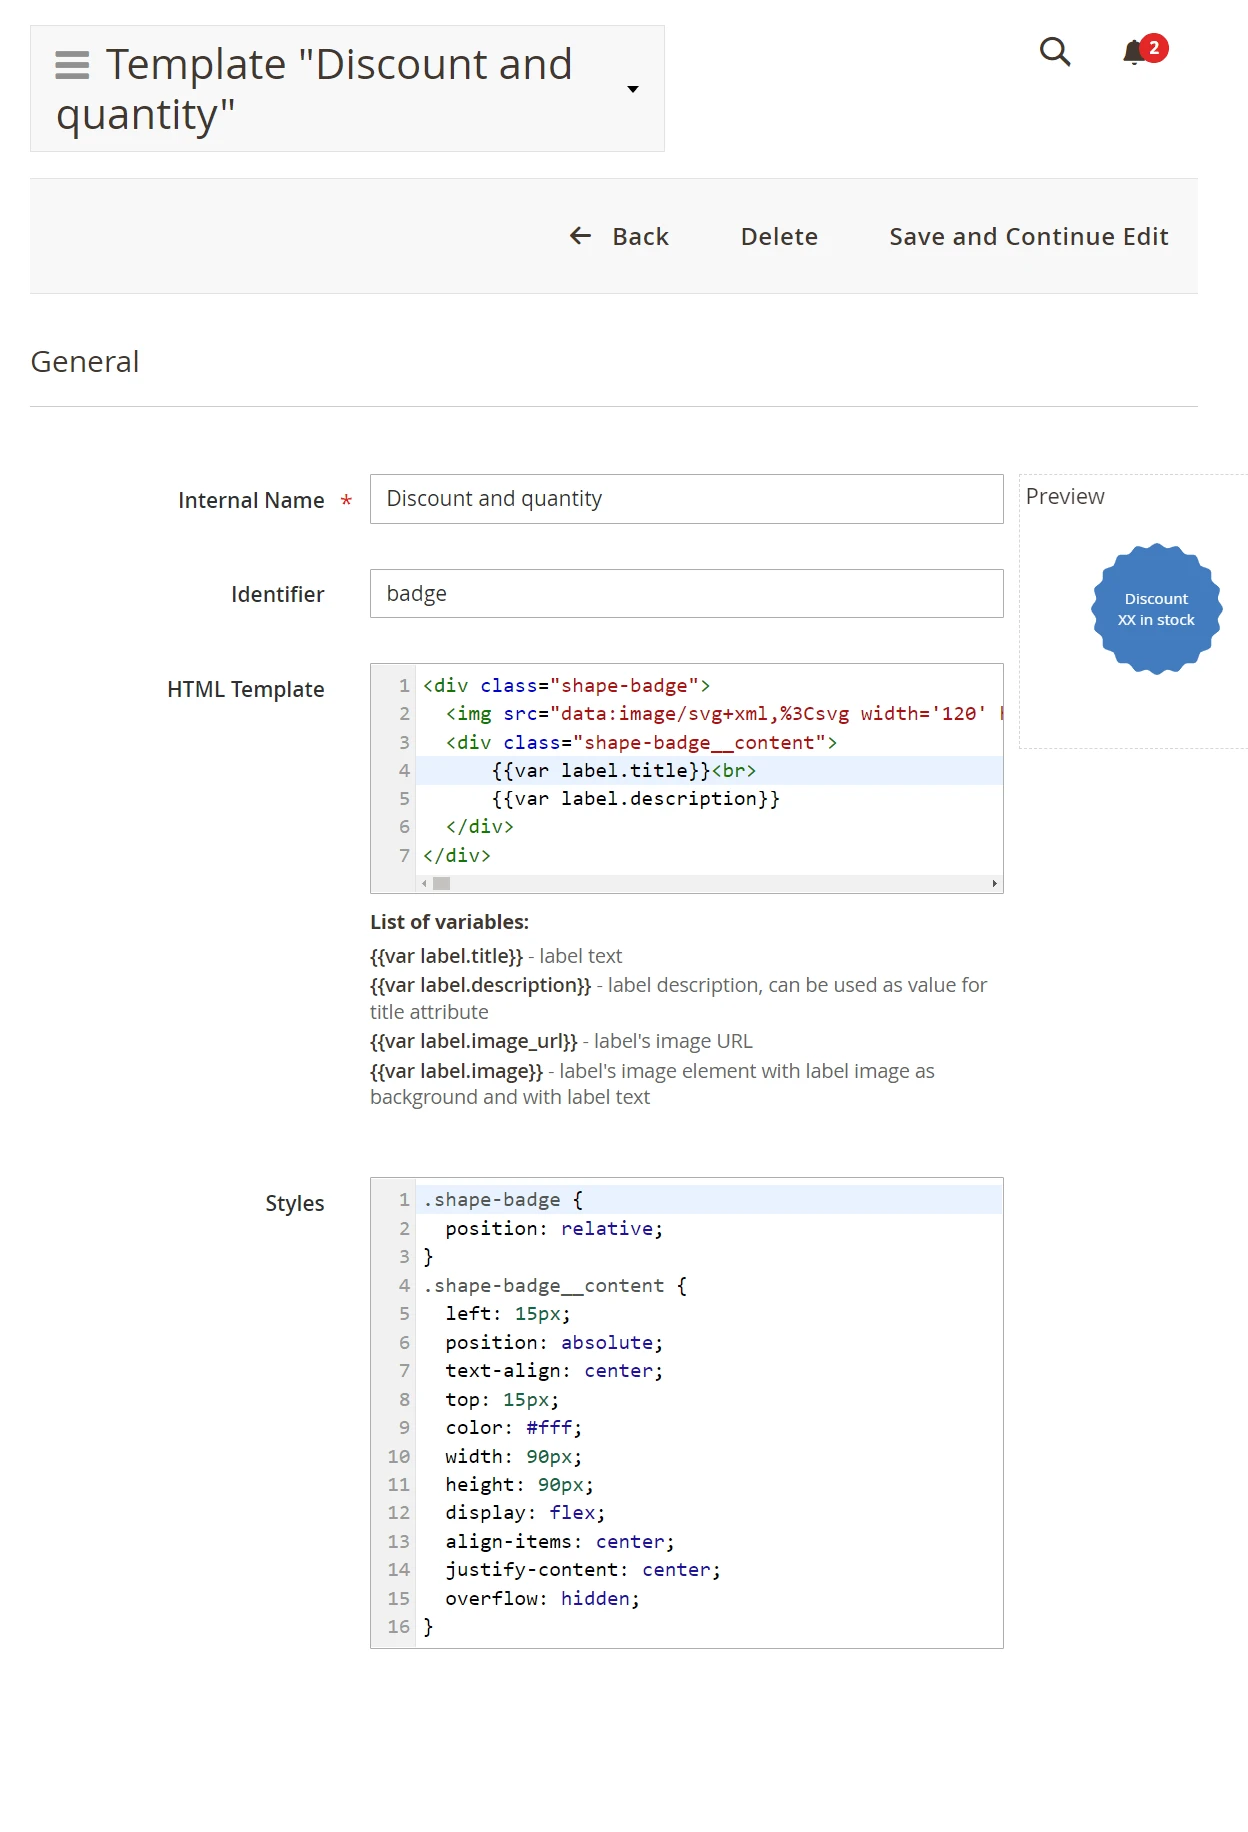
Set the HTML code for the label template. Use the {var label.title} and {var label.description} for the template to automatically fetch the label text.
The SVG image will be used as a label background.
<div class="shape-badge">
  <img src="data:image/svg+xml,%3Csvg width='120' height='120' viewBox='0 0 200 200' fill='none' xmlns='https://www.w3.org/2000/svg'%3E%3Cpath d='M200 99.9834C200 105.123 193.003 109.665 192.224 114.589C191.428 119.645 196.668 126.111 195.126 130.885C193.551 135.743 185.493 137.881 183.205 142.374C180.9 146.9 183.868 154.675 180.9 158.77C177.916 162.865 169.593 162.434 166.012 166.015C162.431 169.595 162.878 177.918 158.766 180.902C154.688 183.869 146.912 180.902 142.386 183.206C137.909 185.494 135.754 193.551 130.896 195.126C126.121 196.668 119.655 191.429 114.598 192.225C109.674 193.004 105.131 200 99.9917 200C94.852 200 90.3092 193.004 85.3851 192.225C80.3283 191.429 73.8622 196.668 69.0873 195.126C64.2295 193.551 62.0907 185.494 57.5976 183.206C53.0714 180.902 45.2955 183.869 41.2004 180.902C37.1052 177.918 37.5363 169.595 33.9551 166.015C30.3739 162.434 22.0509 162.881 19.0666 158.77C16.0988 154.692 19.0666 146.916 16.762 142.391C14.474 137.914 6.41631 135.759 4.84125 130.902C3.31592 126.127 8.57167 119.662 7.77584 114.605C6.9966 109.665 0 105.139 0 99.9834C0 94.8442 6.9966 90.3017 7.77584 85.378C8.57167 80.3216 3.3325 73.8561 4.87441 69.0816C6.44947 64.2241 14.5072 62.0855 16.7952 57.5928C19.0997 53.067 16.132 45.2918 19.0997 41.197C22.0841 37.1021 30.407 37.5332 33.9882 33.9523C37.5694 30.3714 37.1218 22.0491 41.2335 19.065C45.3121 16.0975 53.088 19.065 57.6142 16.7606C62.0907 14.4728 64.246 6.41578 69.1039 4.84085C73.8622 3.31565 80.3283 8.55438 85.3851 7.7752C90.3092 6.99602 94.852 0 99.9917 0C105.131 0 109.674 6.99602 114.598 7.7752C119.655 8.57096 126.121 3.33223 130.896 4.87401C135.754 6.44894 137.893 14.506 142.386 16.7938C146.912 19.0981 154.688 16.1306 158.783 19.0981C162.878 22.0822 162.447 30.4045 166.028 33.9854C169.61 37.5663 177.933 37.1187 180.917 41.2301C183.885 45.3084 180.917 53.0836 183.221 57.6094C185.509 62.0855 193.567 64.2407 195.142 69.0981C196.684 73.8727 191.445 80.3382 192.241 85.3946C193.003 90.3017 200 94.8442 200 99.9834Z' fill='%23427BBF'/%3E%3C/svg%3E%0A">
  <div class="shape-badge__content">
      {var label.title}
      {var label.description}
  </div>
</div>
Define a label design using CSS styles.
.shape-badge {
  position: relative;
}
.shape-badge__content {
  left: 15px;
  position: absolute;
  text-align: center;
  top: 15px;
  color: #fff;
  width: 90px;
  height: 90px;
  display: flex;
  align-items: center;
  justify-content: center;
  overflow: hidden;
}
Step 3. Create a label
Navigate to Marketing > Promotions > Product labels > Manage Labels to create a label.
General
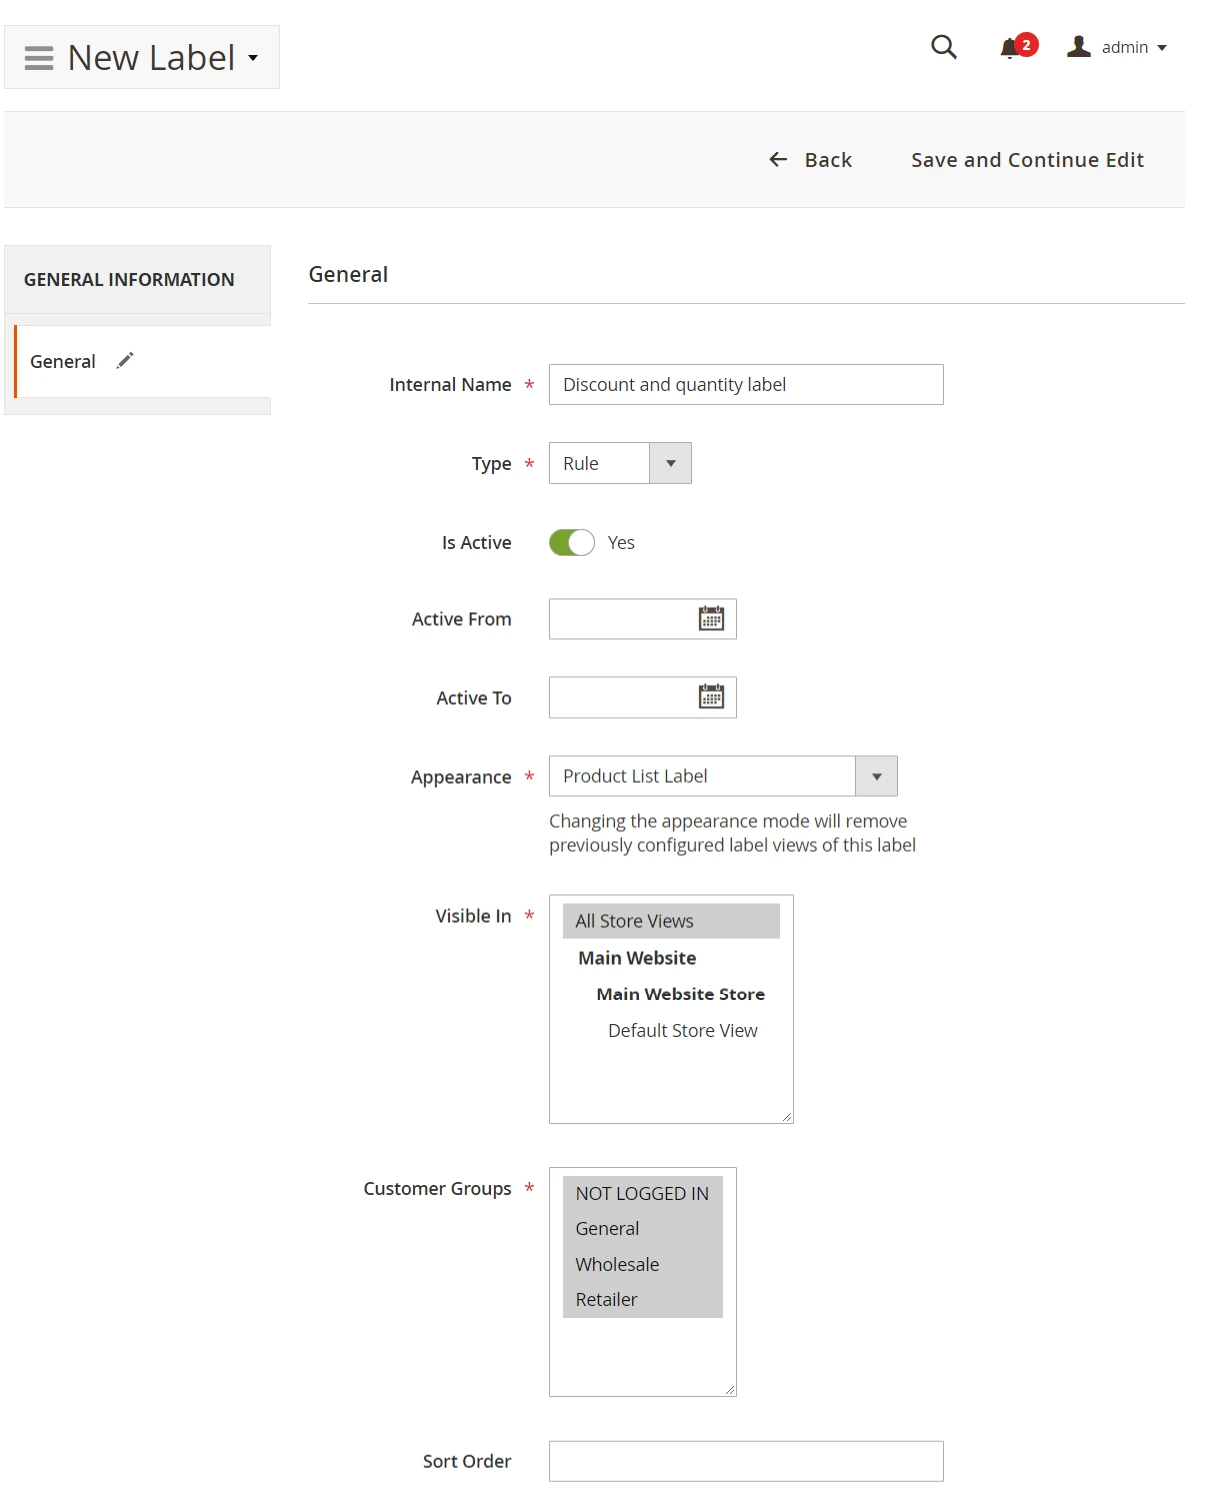
For the label set:
- Internal Name. This name is used for you to distinguish the label among other labels.
- Type. Specify how the label will be activated for display: by rule or by product attribute. This value cannot be changed later.
- Is Active. Set if the label should be active for display.
- Active From, Active To. Set the timerange when the label will be active.
- Appearance. Set to product list.
- Visible In. Select the viewstore for the label visibility.
- Customer Groups. Choose the customer types the label should be displayed to.
- Sort Order. Set the label rank for the display when multiple labels are displayed. Label with the Sort Order=0 is displayed first.
Click Save and continue edit to proceed configuring the label. Two new tabs will appear: Rule and Design. If the label is configured to the Type=Attribute, the Rule tab will not appear.
Rule
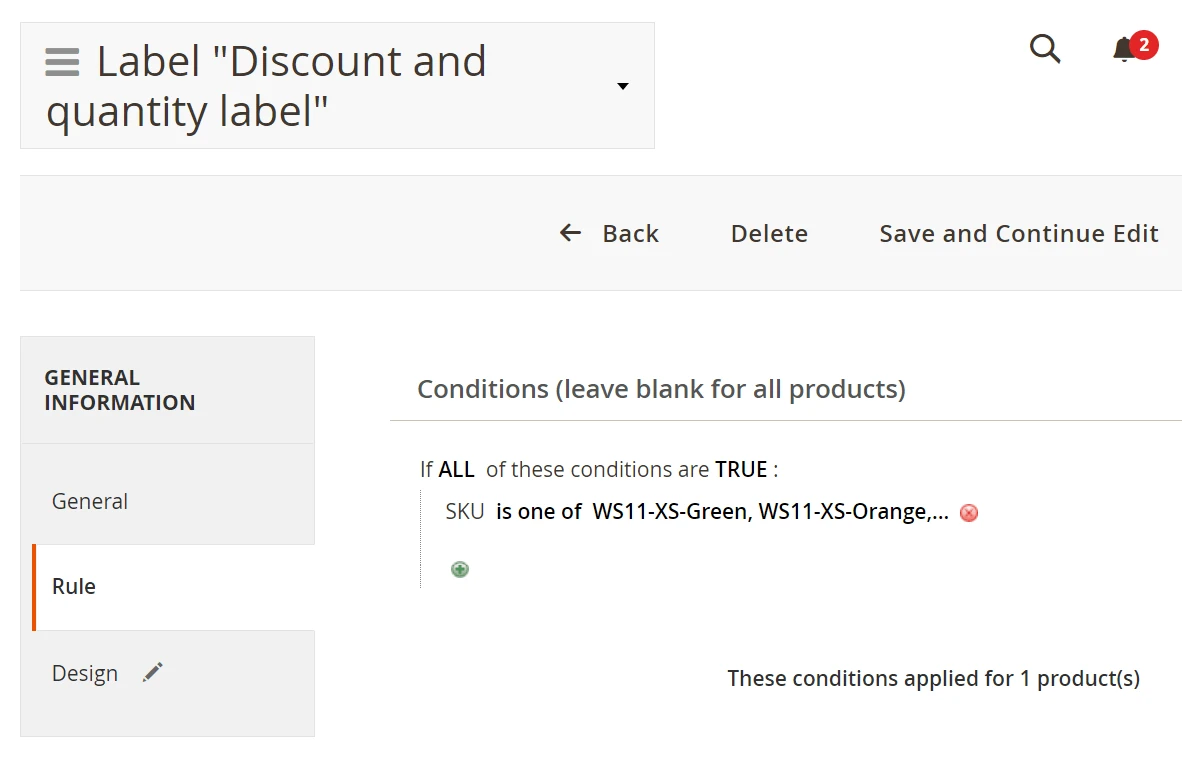
Configure the rule that will be used to determine the products that should be marked with the label.
Here you will see how many products will be marked with the label according to the specified set of conditions.
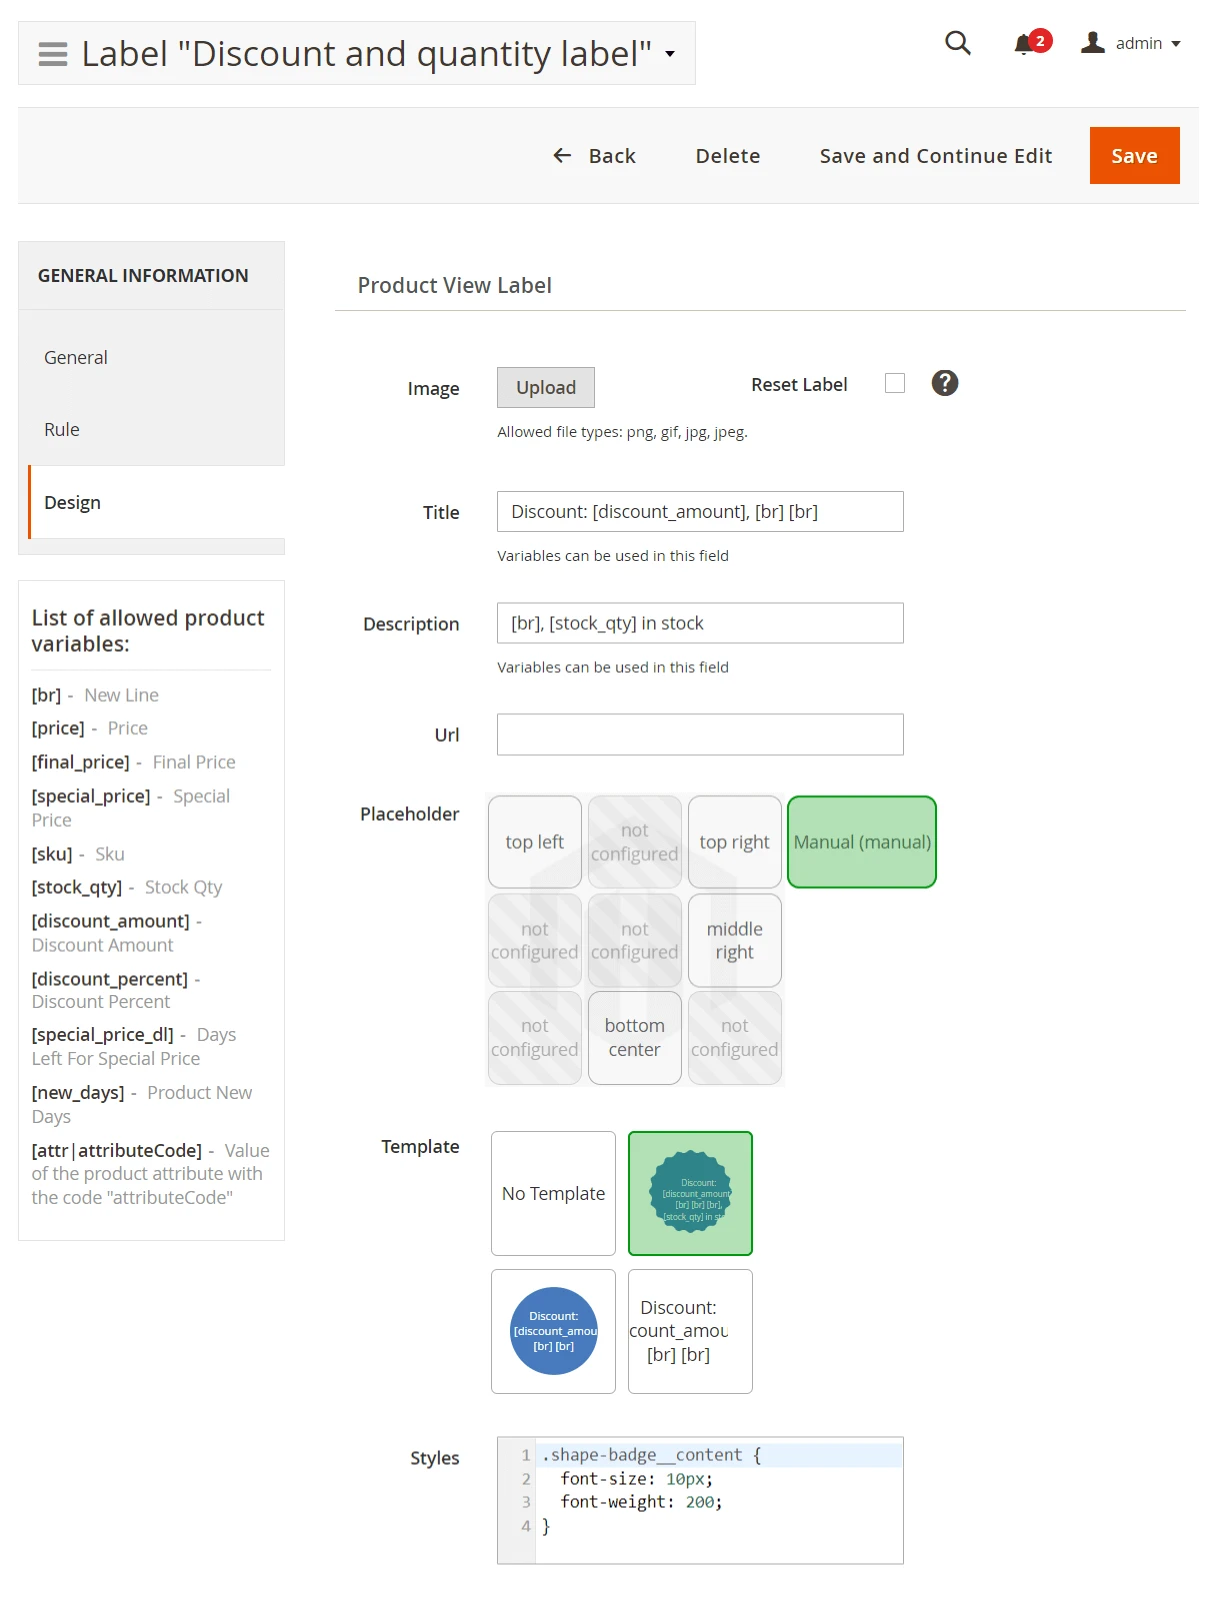
Design
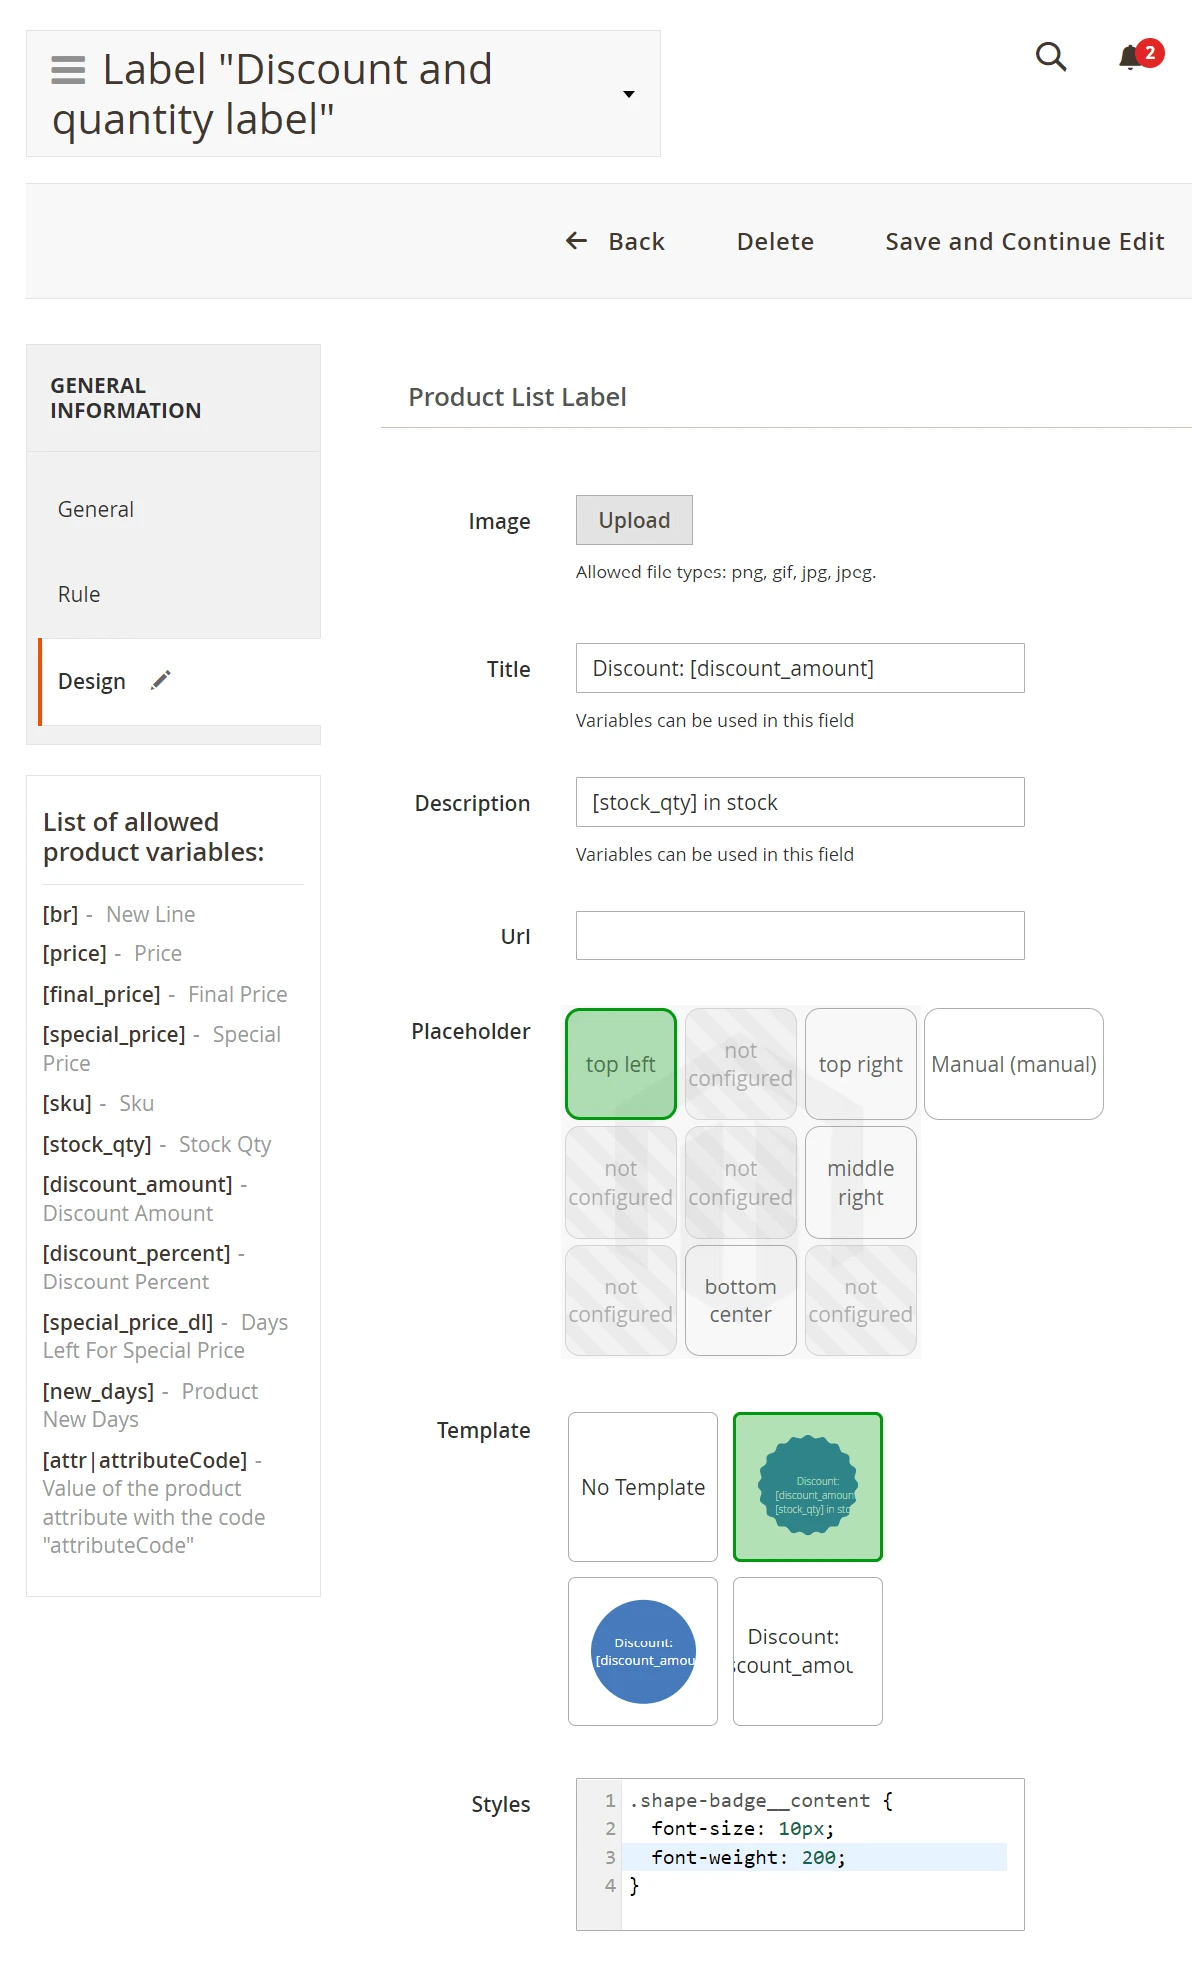
Set the:
- Title as
Discount: [discount_amount]. - Description as
[stock_qty] in stock. - Placeholder - top left.
- Template. Select the created badge template.
- Styles. Apply CSS styles to the label text. For example, font size and font weight.
Step 4. Check the label on store frontend
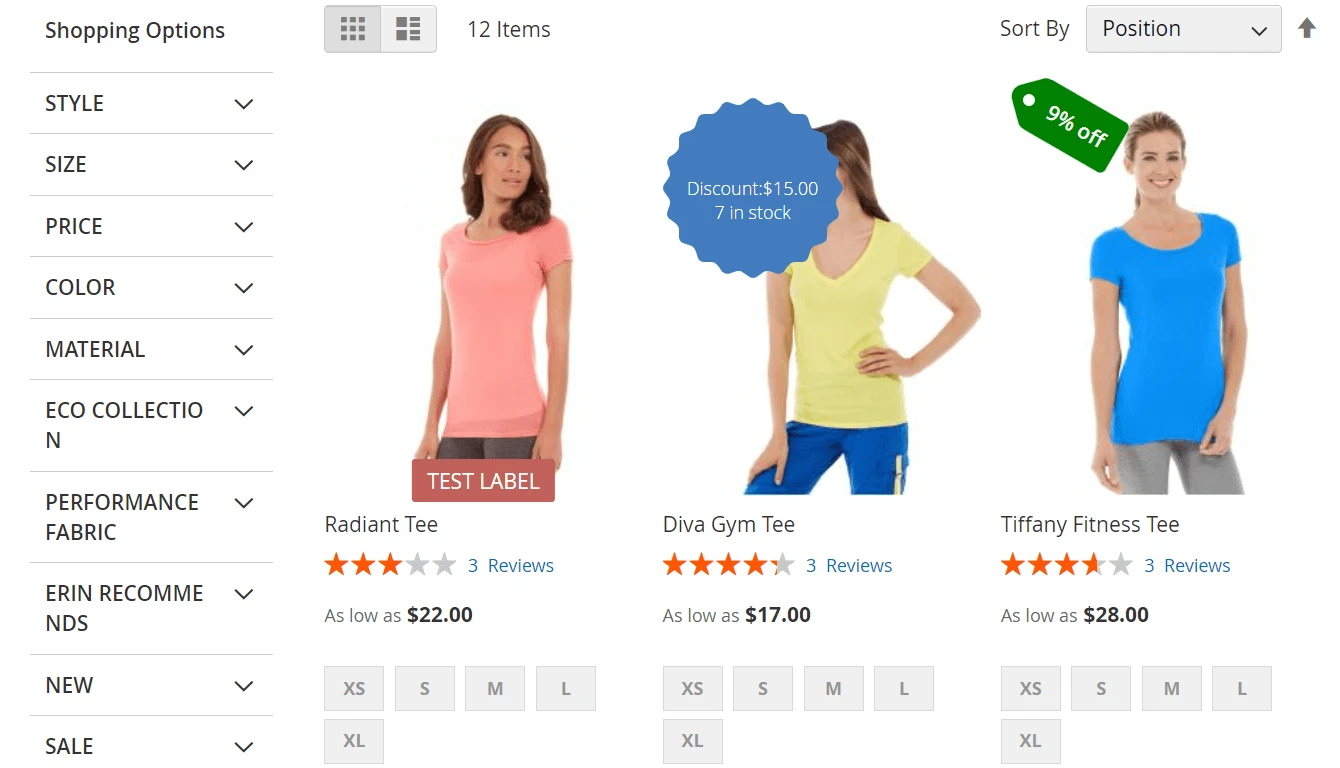
In your Magento admin navigate to System > Tools > Index Management and reindex the Product label index if you use the Improved Asynchronous Reindexing extenstion. Next, navigate to System > Tools > Index Management and flush Magento cache.
Alternatively, use CLI commands to launch the Product label index reindex and flush Magento cache.
Refresh the page with a product that should be marked with the "new product" label.
Discount and stock quantity in a manual placeholder
Step 1. Create a placeholder for the label
On the first step you need to specify a placeholder for the label. You can place the label into the existing placeholder. If you want to display the label in a place that was not a previously used place, you will need to create a new placeholder.
Navigate to Marketing > Promotions > Product labels > Manage Placeholders
Set the number of labels allowed in this placeholder or leave the default value to allow unlimited number of labels in this placeholder. Additionally, in Labels Direction set how multiple labels will be stacked in this placeholder: vertically or horizontally.
Select the manual placeholder. Copy the PHP code for this placeholder:
<?php
    echo $block->getLayout()->createBlock('\Mirasvit\CatalogLabel\Block\Product\Label\Placeholder')
            ->setProduct($_product)
            ->setPlaceholderByCode('manual-example')
            ->setType(view_type)
            ->toHtml();
?>
In this code replace:
setType(view_type)tosetType('view')setProduct($_product)tosetProduct($block->getProduct())
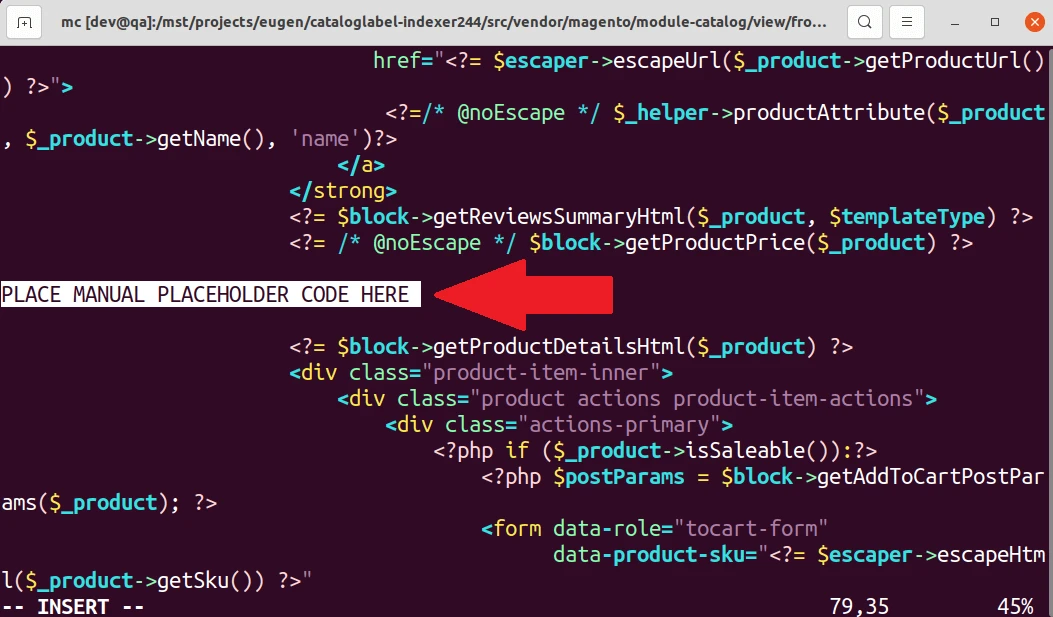
Step 2. Edit Magento frontend theme template
Since the task is to place the discount and stock quantity label next to the Short Description block, it is reasonable to use the Magento theme template /src/vendor/magento/module-catalog-inventory/view/frontend/templates/qtyincrements.phtml. This template has the following content:
<?php
/**
 * Copyright В© Magento, Inc. All rights reserved.
 * See COPYING.txt for license details.
 */

/**
 * @var $block \Magento\CatalogInventory\Block\Qtyincrements
 */
?>
<?php if ($block->getProductQtyIncrements()) : ?>
    <div class="product pricing">
        <?= $block->escapeHtml(__('%1 is available to buy in increments of %2', $block->getProductName(), $block->getProductQtyIncrements())) ?>
    </div>
<?php endif ?>
In the end of the qtyincrements.phtml file paste the PHP code for the manual placeholder:
<?php
/**
 * Copyright В© Magento, Inc. All rights reserved.
 * See COPYING.txt for license details.
 */

/**
 * @var $block \Magento\CatalogInventory\Block\Qtyincrements
 */
?>
<?php if ($block->getProductQtyIncrements()) : ?>
    <div class="product pricing">
        <?= $block->escapeHtml(__('%1 is available to buy in increments of %2', $block->getProductName(), $block->getProductQtyIncrements())) ?>
    </div>
<?php endif ?>

<?php
    echo $block->getLayout()->createBlock('\Mirasvit\CatalogLabel\Block\Product\Label\Placeholder')
            ->setProduct($block->getProduct())
            ->setPlaceholderByCode('manual-example')
            ->setType('view')
            ->toHtml();
?>
Step 2. Create a template for the label
We will reuse the template created for this label previously.
Step 3. Create a label
Navigate to Marketing > Promotions > Product labels > Manage Labels to create a label.
General
For the most part the label setting are similar to the label created previously. Check that:
- Appearance is set to product view.
Click Save and continue edit to proceed configuring the label. Two new tabs will appear: Rule and Design. If the label is configured to the Type=Attribute, the Rule tab will not appear.
Rule
Configure the rule that will be used to determine the products that should be marked with the label.
Here you will see how many products will be marked with the label according to the specified set of conditions.
Design
Set the:
- Title as
Discount: [discount_amount]. - Description as
[stock_qty] in stock. - Placeholder - manual.
- Template. Select the created badge template.
- Styles. Apply CSS styles to the label text. For example, font size and font weight.
Step 4. Check the label on store frontend
In your Magento admin navigate to System > Tools > Index Management and reindex the Product label index if you use the Improved Asynchronous Reindexing extenstion. Next, navigate to System > Tools > Index Management and flush Magento cache.
Alternatively, use CLI commands to launch the Product label index reindex and flush Magento cache.
Refresh the page with a product that should be marked with the "new product" label.
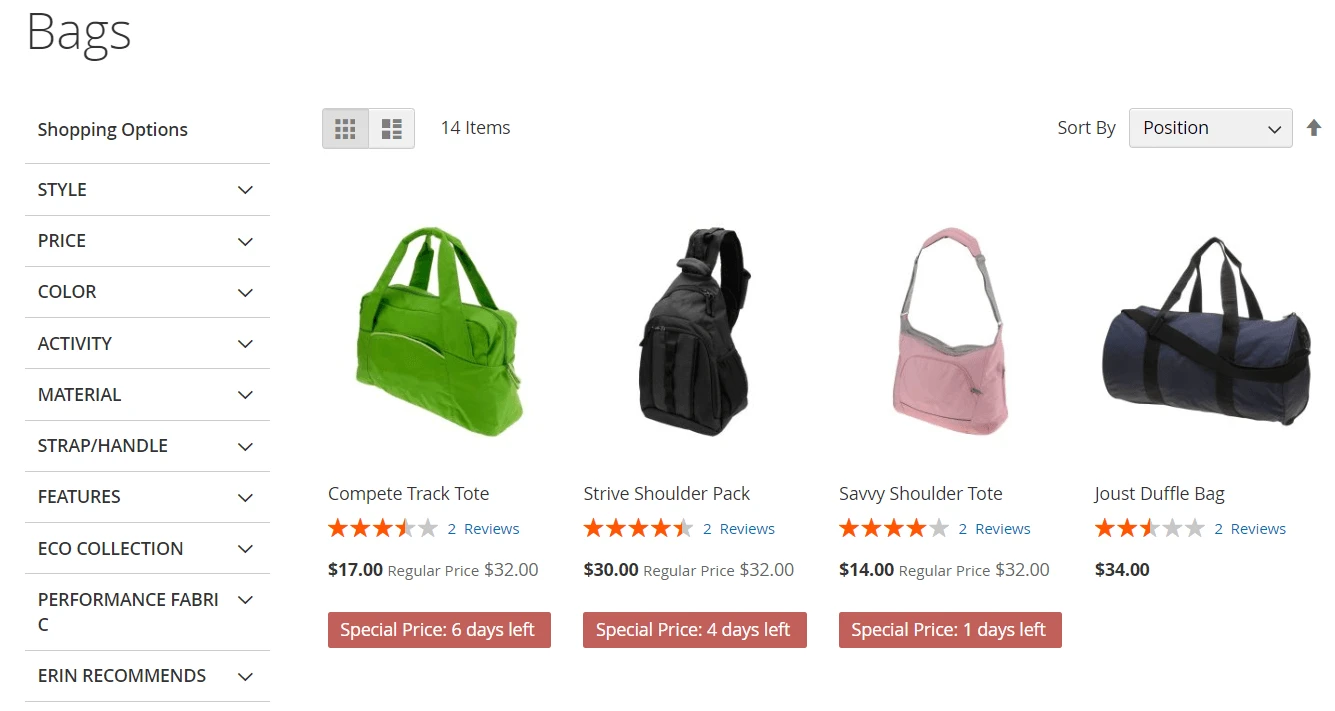
Label with a number of days left for Special Price on the product list page in manual placeholder next to the price
The task is to create a label on the product list page. It should be placed next to the product price. The label should display the number of days left for Special Price.
Step 1. Create a placeholder for the label
On the first step you need to specify a placeholder for the label. You can place the label into the existing placeholder. If you want to display the label in a place that was not a previously used place, you will need to create a new placeholder.
Navigate to Marketing > Promotions > Product labels > Manage Placeholders
Set the number of labels allowed in this placeholder or leave the default value to allow unlimited number of labels in this placeholder. Additionally, in Labels Direction set how multiple labels will be stacked in this placeholder: vertically or horizontally.
Select the manual placeholder. Copy the PHP code for this placeholder:
<?php
    echo $block->getLayout()->createBlock('\Mirasvit\CatalogLabel\Block\Product\Label\Placeholder')
            ->setProduct($_product)
            ->setPlaceholderByCode('manual-example')
            ->setType(view_type)
            ->toHtml();
?>
In this code replace:
setType(view_type)tosetType('list')
We need to place a label next to price, which is displayed with the /src/vendor/magento/module-catalog/view/base/templates/product/price/amount/default.phtml Magento frontend template. However, this template has no access to the product object.
Therefore, we will paste the copied PHP code in the Magento frontend template that is used to draw a product card in the product list. This template is located in file /src/vendor/magento/module-catalog/view/frontend/templates/product/list.phtml
Paste the code below the block that displays product price.
Step 2. Create a template for the label
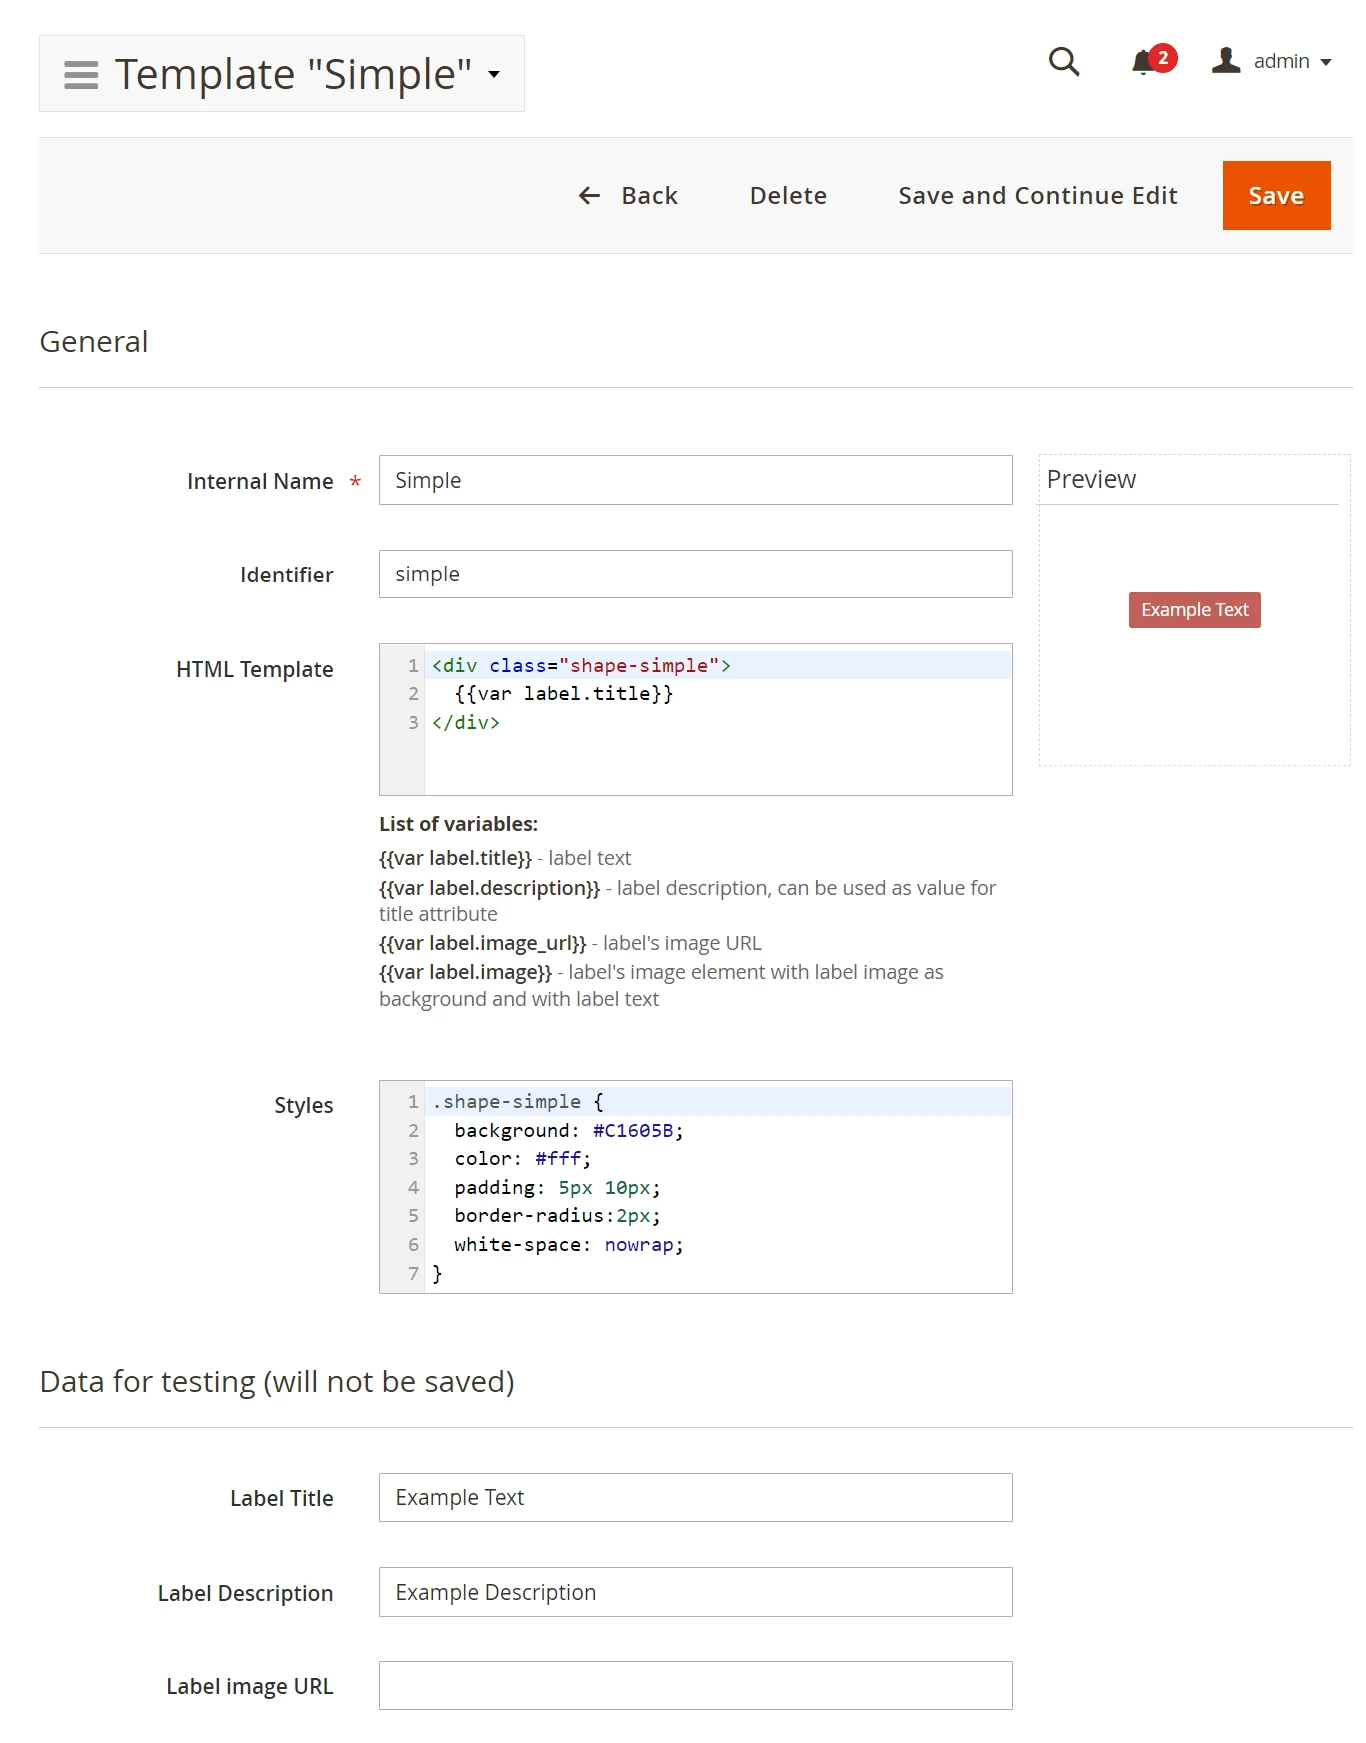
Create a template for the label with the number of days left for the Special Price. Navigate to Marketing > Promotions > Product labels > Manage Templates.
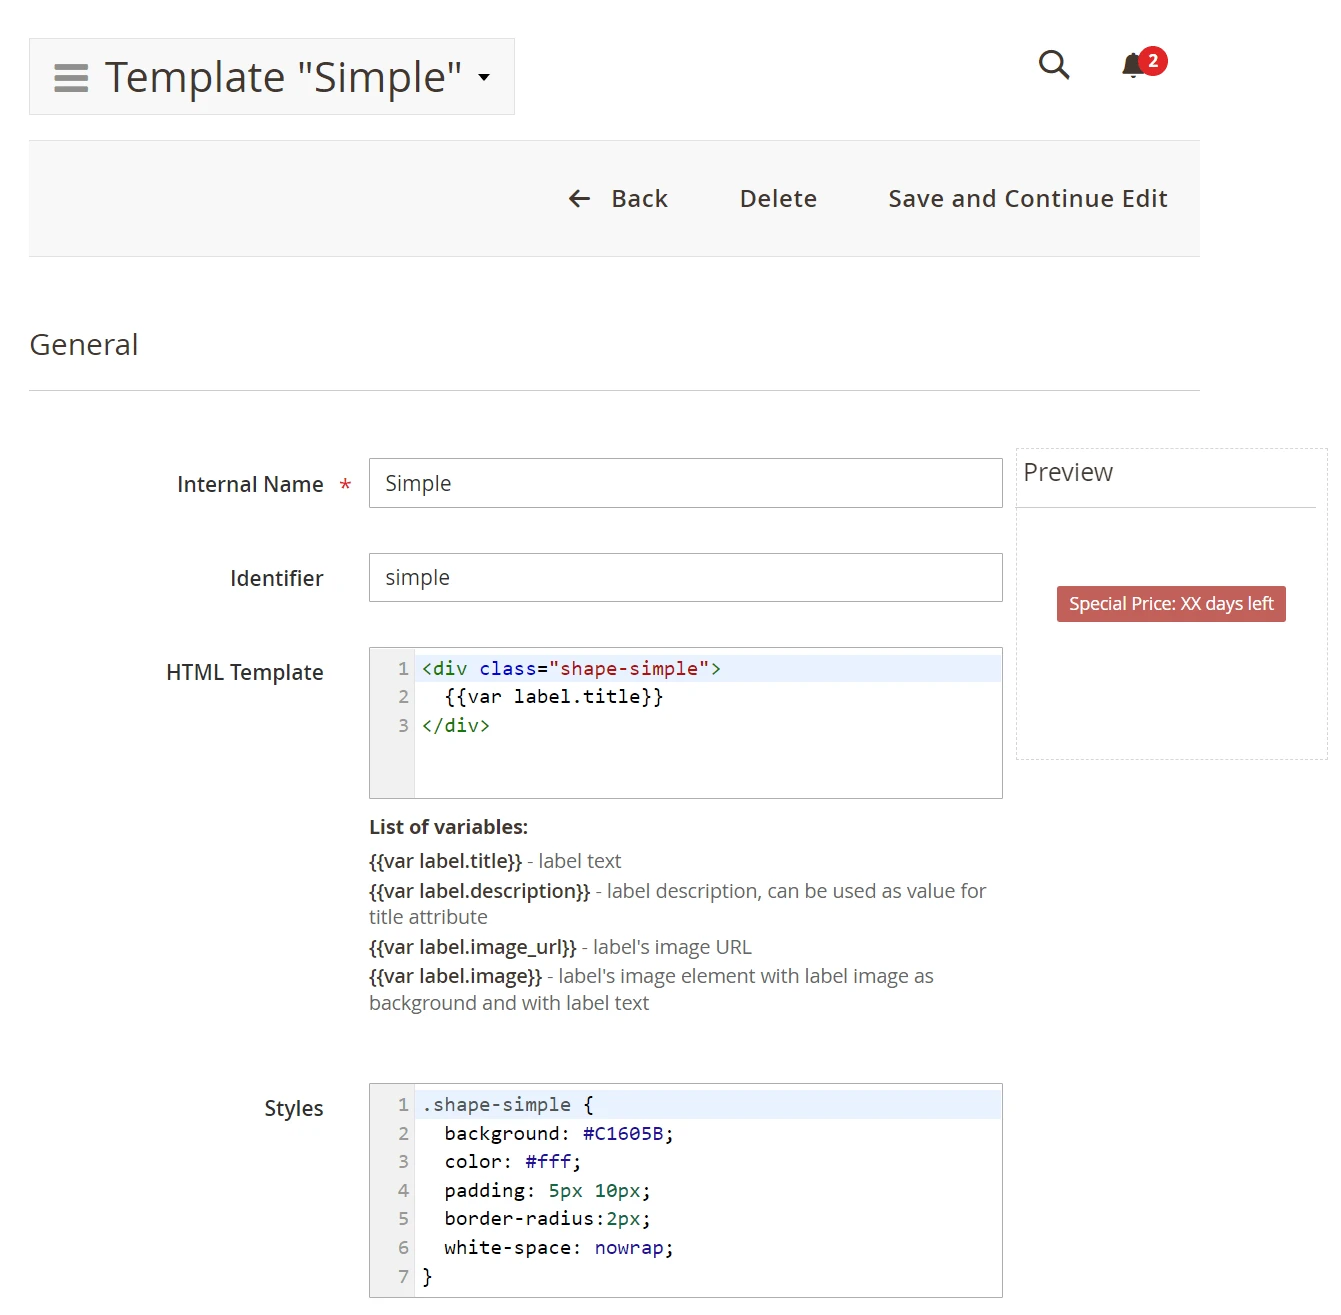
Set the HTML code for the label template. Use the {var label.title} for the template to automatically fetch the label text.
<div class="shape-simple">
  {var label.title}
</div>
Define a label design using CSS styles. For example, make the label a cut-corner triangle with such CSS code:
.shape-simple {
  background: #C1605B;
  color: #fff;
  padding: 5px 10px;
  border-radius:2px;
  white-space: nowrap;
}
Step 3. Create a label with the number of days left for the Special Price
Navigate to Marketing > Promotions > Product labels > Manage Labels to create a label with the number of days left for the Special Price.
General

For the label set:
- Internal Name. This name is used for you to distinguish the label among other labels.
- Type. Specify how the label will be activated for display: by rule or by product attribute. This value cannot be changed later.
- Is Active. Set if the label should be active for display.
- Active From, Active To. Set the timerange when the label will be active.
- Appearance. Set the label to be displayed for a product list.
- Visible In. Select the viewstore for the label visibility.
- Customer Groups. Choose the customer types the label should be displayed to.
- Sort Order. Set the label rank for the display when multiple labels are displayed. Label with the Sort Order=0 is displayed first.
Click Save and continue edit to proceed configuring the label. Two new tabs will appear: Rule and Design. If the label is configured to the Type=Attribute, the Rule tab will not appear.
Rule
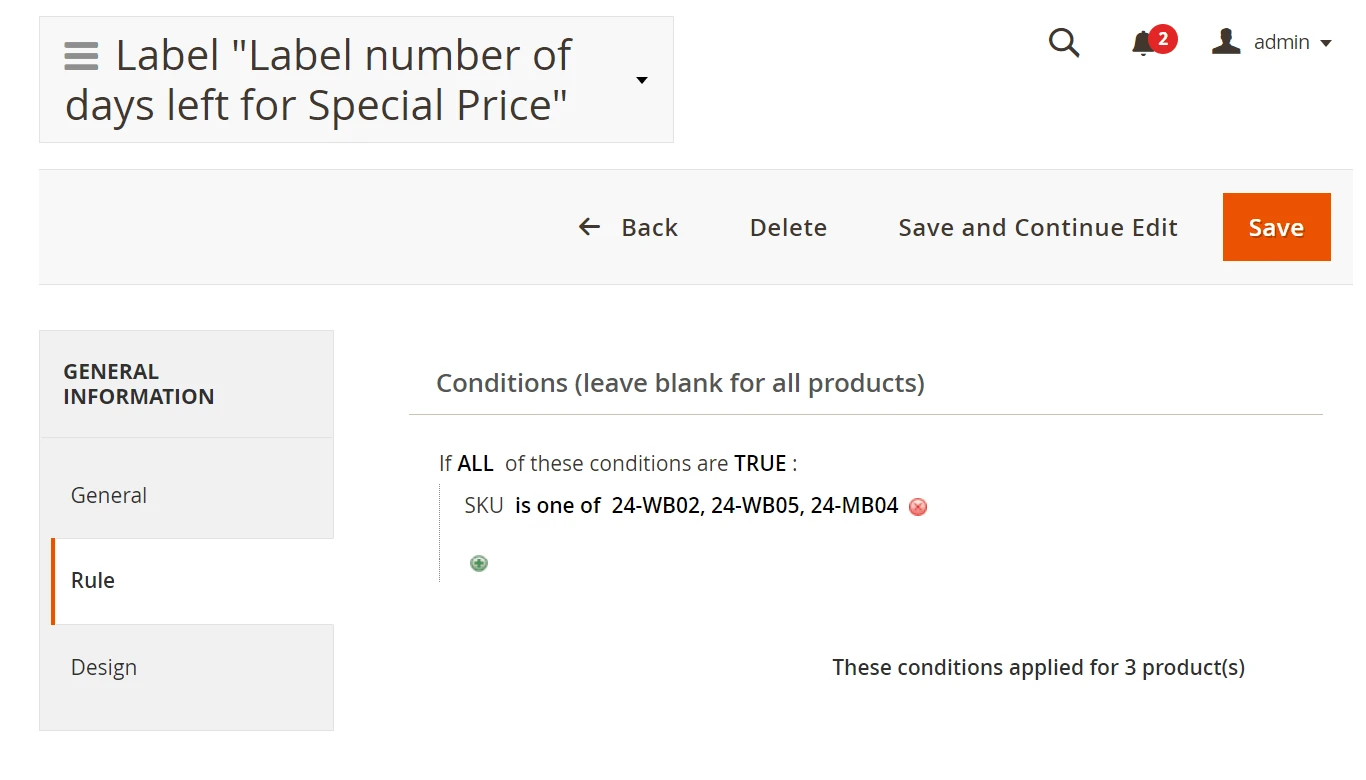
Configure the rule that will be used to determine the products that should be marked with the "new product" label.
Here you will see how many products will be marked with the label according to the specified set of conditions.
Design

Set the:
- Title as
Special Price: [special_price_dl] days left. The[special_price_dl]is the variable which will fetch the value of the product special price timerange. - Placeholder as manual.
- Template. Use the template you have created for the label.
- Styles. Apply CSS styles to the label text. For example, font size and font weight.
Step 4. Check the label on store frontend
In your Magento admin navigate to System > Tools > Index Management and reindex the Product label index if you use the Improved Asynchronous Reindexing extenstion. Next, navigate to System > Tools > Index Management and flush Magento cache.
Alternatively, use CLI commands to launch the Product label index reindex and flush Magento cache.
Refresh the page with a product that should be marked with the "new product" label.
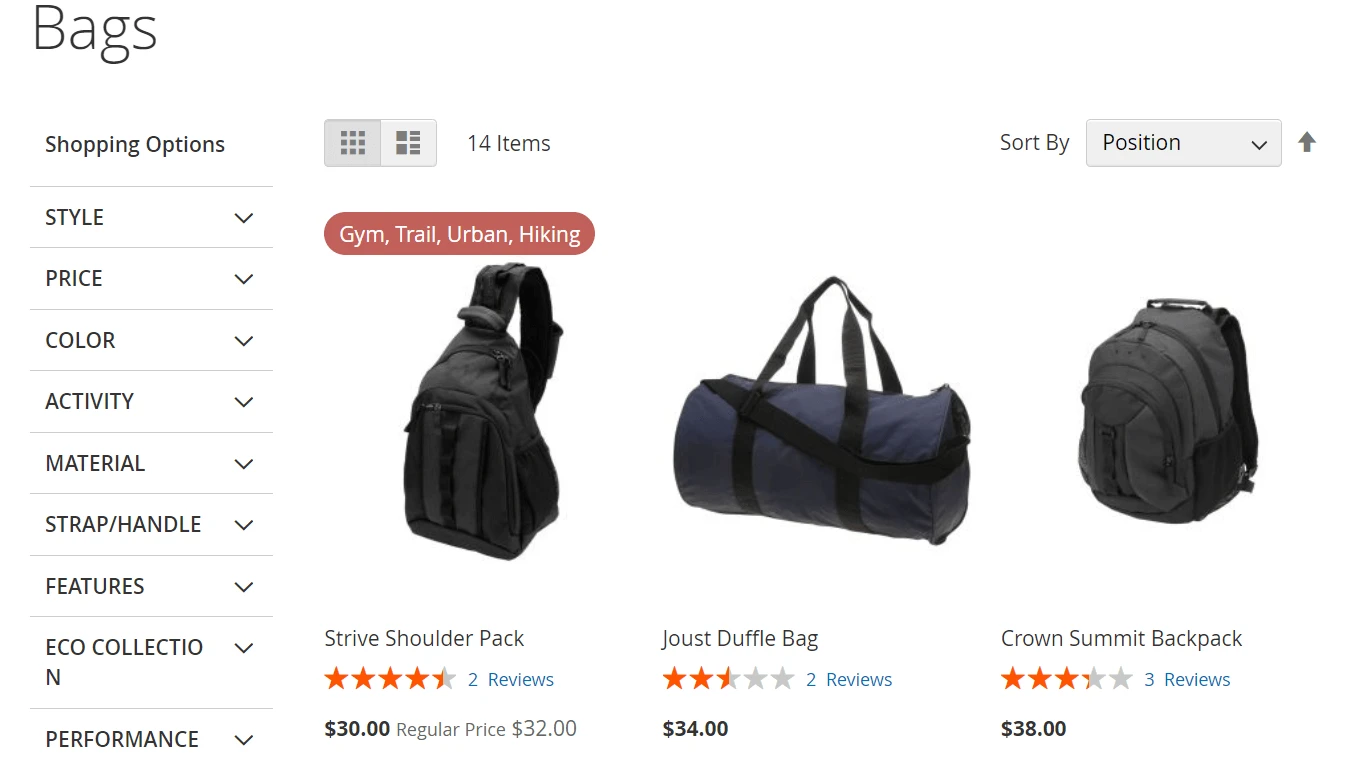
Label with a product attribute
Customers often may want a product of specific brand, style, material, etc. Put a label with such attribute to catch shopper’s attention.
Step 1. Create a placeholder for the label
On the first step you need to specify a placeholder for the label. You can place the label into the existing placeholder. If you want to display the label in a place that was not a previously used place, you will need to create a new placeholder.
Navigate to Marketing > Promotions > Product labels > Manage Placeholders
Set the number of labels allowed in this placeholder or leave the default value to allow unlimited number of labels in this placeholder. Additionally, in Labels Direction set how multiple labels will be stacked in this placeholder: vertically or horizontally.
Step 2. Create a template for the label
Create a template for the label with the number of days left for the Special Price. Navigate to Marketing > Promotions > Product labels > Manage Templates.
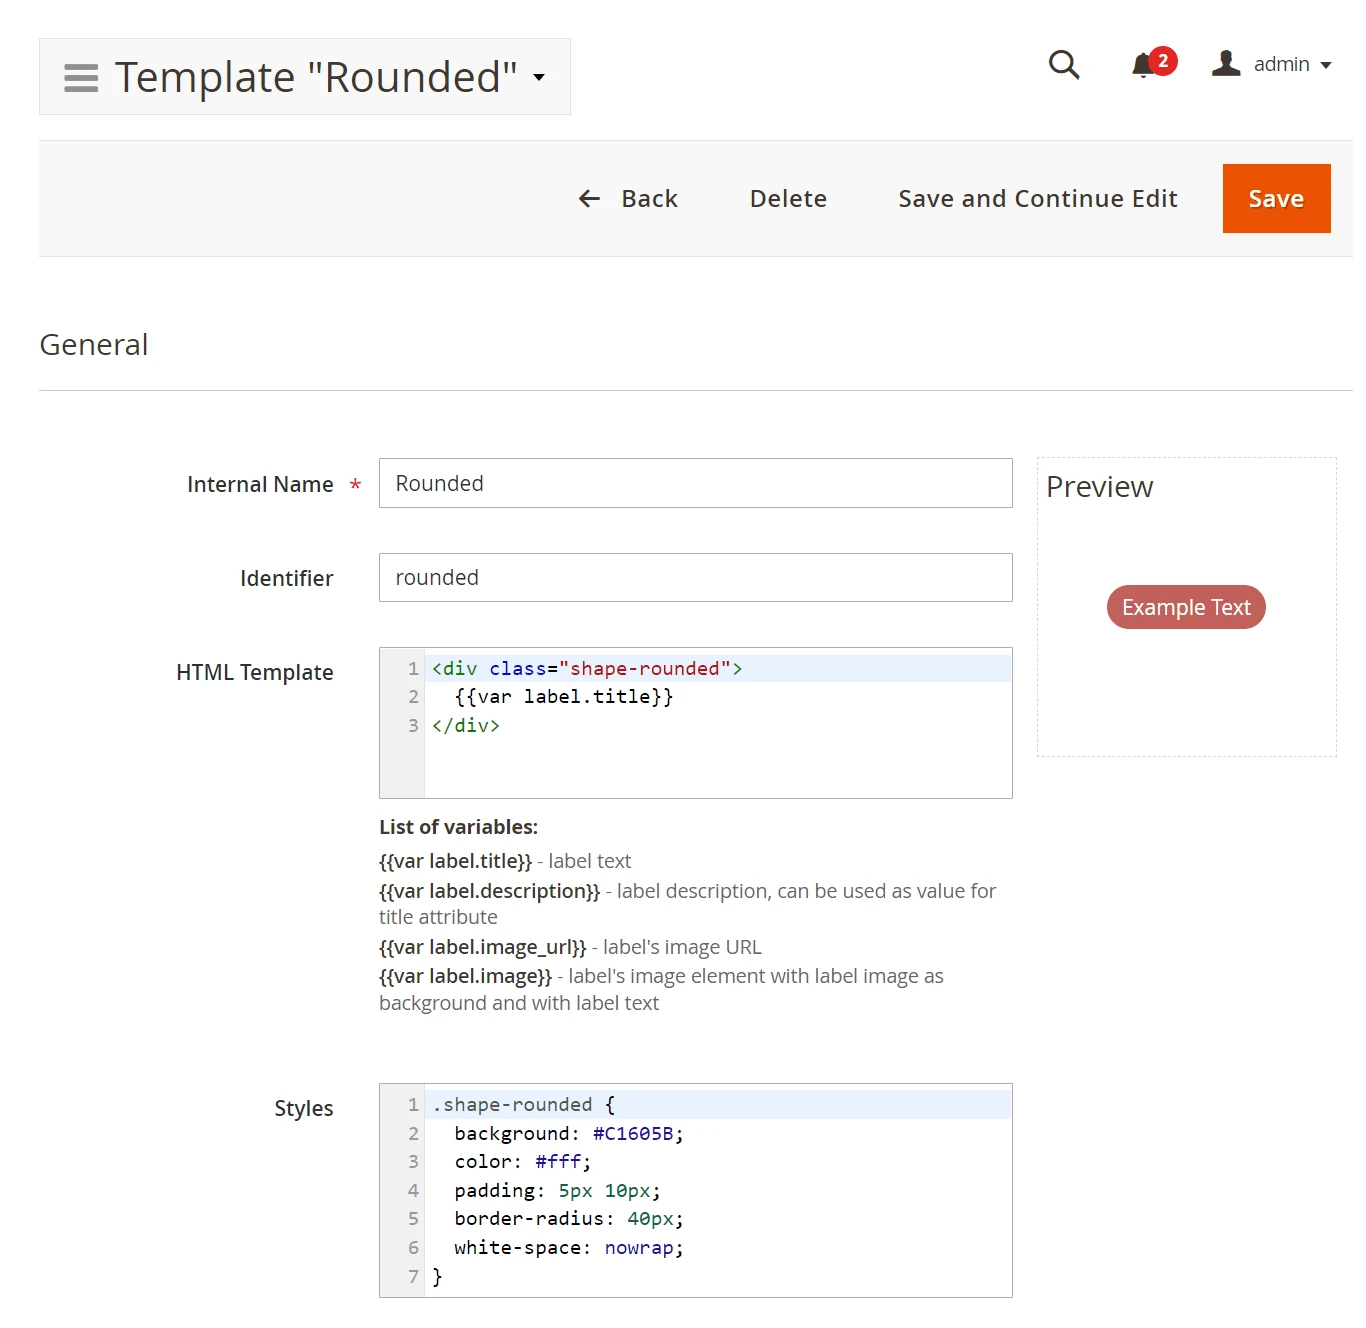
Set the HTML code for the label template. Use the {var label.title} for the template to automatically fetch the label text.
<div class="shape-rounded">
  {var label.title}
</div>
Define a label design using CSS styles. For example, make the label a cut-corner triangle with such CSS code:
.shape-rounded {
  background: #C1605B;
  color: #fff;
  padding: 5px 10px;
  border-radius: 40px;
  white-space: nowrap;
}
Step 3. Create a label that shows a product attribute
Navigate to Marketing > Promotions > Product labels > Manage Labels to create a label that shows a product attribute.
General
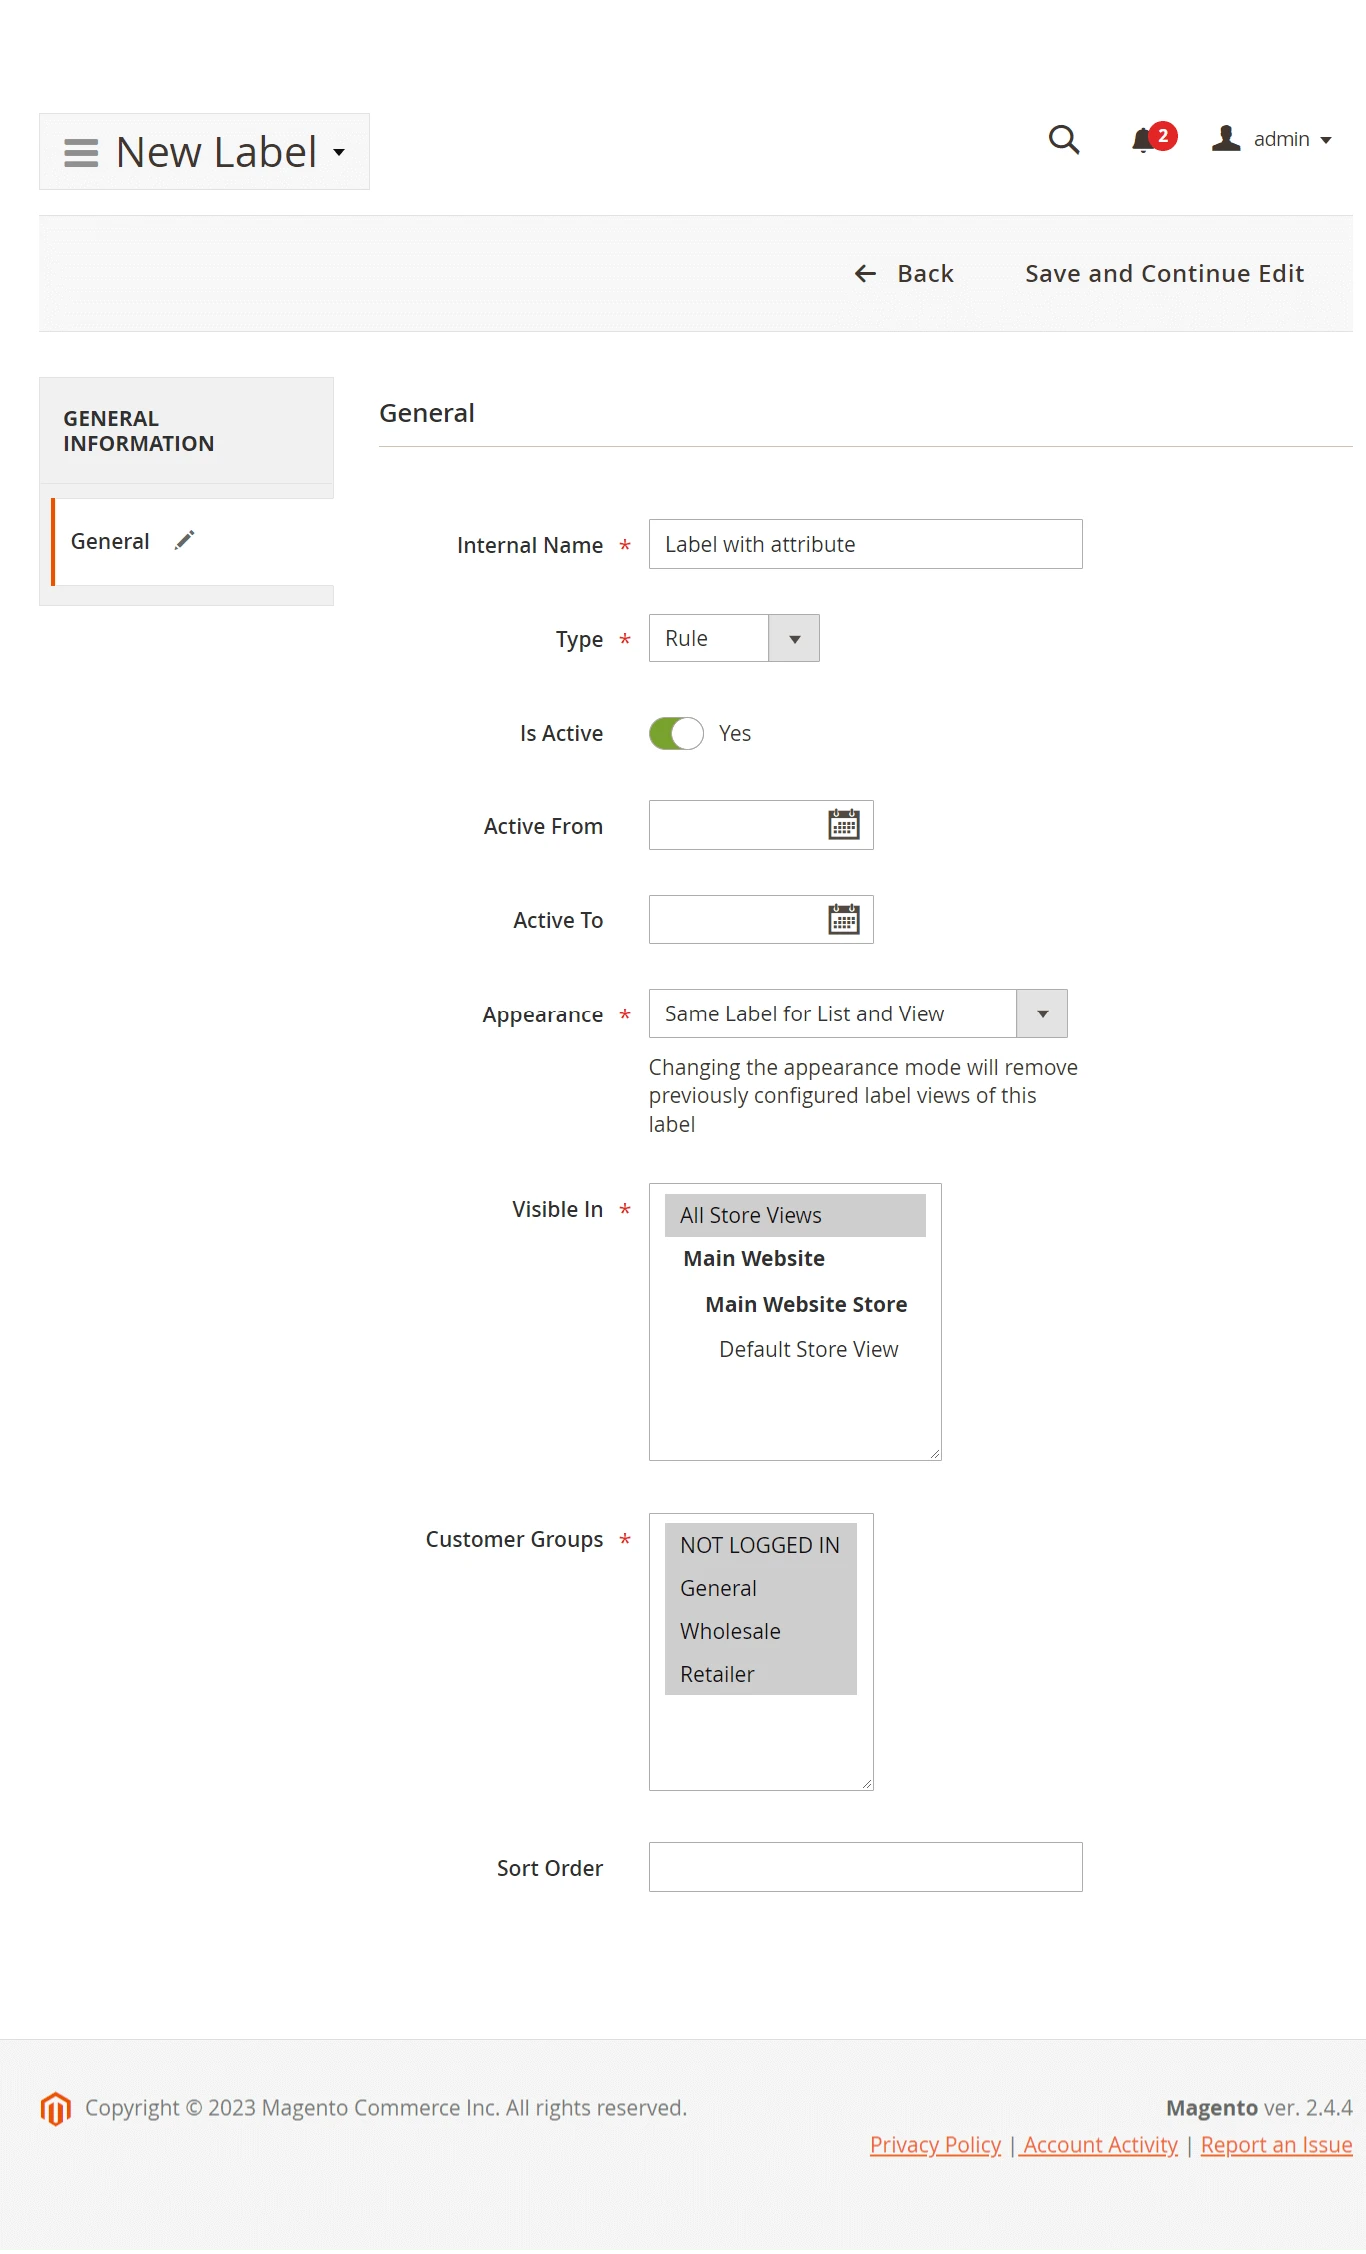
For the label set:
- Internal Name. This name is used for you to distinguish the label among other labels.
- Type. Specify how the label will be activated for display: by rule or by product attribute. This value cannot be changed later.
- Is Active. Set if the label should be active for display.
- Active From, Active To. Set the timerange when the label will be active.
- Appearance. Set the label to be displayed for a product list.
- Visible In. Select the viewstore for the label visibility.
- Customer Groups. Choose the customer types the label should be displayed to.
- Sort Order. Set the label rank for the display when multiple labels are displayed. Label with the Sort Order=0 is displayed first.
Click Save and continue edit to proceed configuring the label. Two new tabs will appear: Rule and Design. If the label is configured to the Type=Attribute, the Rule tab will not appear.
Rule
Configure the rule that will be used to determine the products that should display attribute in a label.
Here you will see how many products will be marked with the label according to the specified set of conditions.
Design
Set the:
- Title as
[attr|attributeCode]. Navigate to Stores > Attributes > Product to get the codes for attributes. - Placeholder as top left.
- Template. Use the template you have created for the label.
- Styles. Apply CSS styles to the label text. For example, font size and font weight.
Step 4. Check the label on store frontend
In your Magento admin navigate to System > Tools > Index Management and reindex the Product label index if you use the Improved Asynchronous Reindexing extenstion. Next, navigate to System > Tools > Index Management and flush Magento cache.
Alternatively, use CLI commands to launch the Product label index reindex and flush Magento cache.
Refresh the page with a product that should be marked with the "new product" label.
Animated product label
A flashing label, a label that changes its color, or a moving label can draw more attention than a static one.
When configuring a label template use CSS properties to create an animated product label. To modify the animation duration change the 5s value for animation-duration: 5s in the Styles section.
Label with changing color and vertically oriented text
![]()
Set HTML Template as:
<div class="button">
  {var label.title}
 </div>
Set Styles as:
.shape-flag-right2 {
  animation: blinker 1s linear infinite;
  --bg: #ED6E2C;
  background: var(--bg);
  color: #fff;
  padding: 5px 10px;
  position: relative;
  height: 30px;
  border-radius: 2px 0 0 2px;
  box-sizing: border-box;
  white-space: nowrap;
    -webkit-animation-name: shape-flag-right2-anim;
    animation-name: shape-flag-right2-anim;
    -webkit-animation-duration: 5s;
    animation-duration: 5s;
    -webkit-animation-direction: alternate;
    animation-direction: alternate;
    -webkit-animation-iteration-count: infinite;
    animation-iteration-count: infinite;
    -webkit-animation-timing-function: linear;
    animation-timing-function: linear;
}

.shape-flag-right2:after {
  content: "";
  position: absolute;
  right: -15px;
  top: 0;
  width: 0;
  height: 0;
  border-top: 15px solid var(--bg);
  border-right: 15px solid transparent;
}
.shape-flag-right2:before {
  content: "";
  position: absolute;
  right: -15px;
  bottom: 0;
  width: 0;
  height: 0;
  border-bottom: 15px solid var(--bg);
  border-right: 15px solid transparent;
}

@keyframes shape-flag-right2-anim {
  50% {
    opacity: 0;
  }
}
Label that flashes
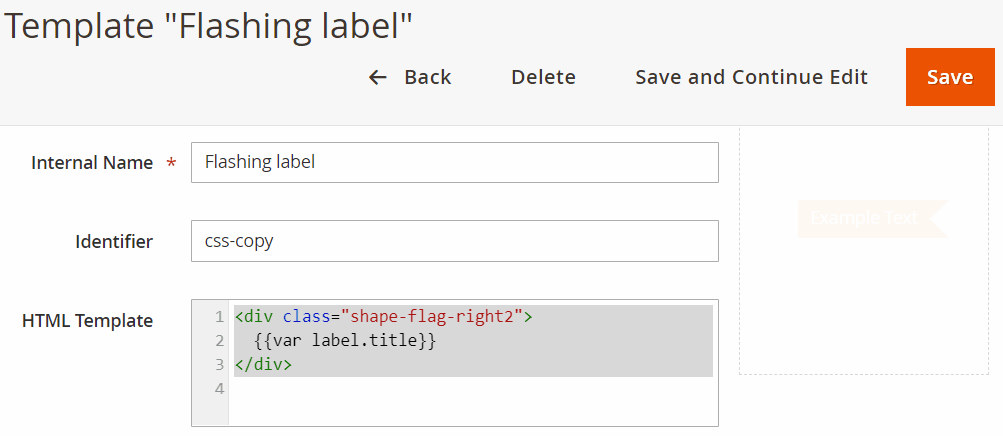
Here is an example of custom shaped label that moves from left to right.
Set HTML Template as:
<div class="shape-flag-right2">
  {var label.title}
</div>
Set styles as:
.shape-flag-right2 {
  animation: blinker 1s linear infinite;
  --bg: #ED6E2C;
  background: var(--bg);
  color: #fff;
  padding: 5px 10px;
  position: relative;
  height: 30px;
  border-radius: 2px 0 0 2px;
  box-sizing: border-box;
  white-space: nowrap;
    -webkit-animation-name: shape-flag-right2-anim;
    animation-name: shape-flag-right2-anim;
    -webkit-animation-duration: 5s;
    animation-duration: 5s;
    -webkit-animation-direction: alternate;
    animation-direction: alternate;
    -webkit-animation-iteration-count: infinite;
    animation-iteration-count: infinite;
    -webkit-animation-timing-function: linear;
    animation-timing-function: linear;
}

.shape-flag-right2:after {
  content: "";
  position: absolute;
  right: -15px;
  top: 0;
  width: 0;
  height: 0;
  border-top: 15px solid var(--bg);
  border-right: 15px solid transparent;
}
.shape-flag-right2:before {
  content: "";
  position: absolute;
  right: -15px;
  bottom: 0;
  width: 0;
  height: 0;
  border-bottom: 15px solid var(--bg);
  border-right: 15px solid transparent;
}

@keyframes shape-flag-right2-anim {
  50% {
    opacity: 0;
  }
}
Label that moves from left to right
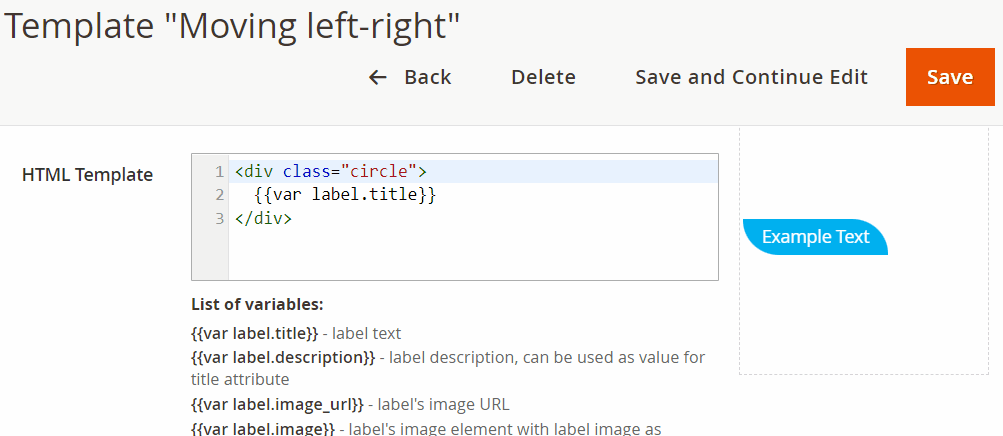
Here is an example of custom shaped label that moves from left to right.
Set HTML Template as:
<div class="circle">
  {var label.title}
</div>
Set styles as:
.circle {
    background: #00B0F0;
  color: #fff;
  padding: 5px 15px;
  border-radius: 0 40px;
  white-space: nowrap;
  -webkit-animation: s-pin 1000ms linear infinite, moveLeftToRight 5s linear infinite;
  -moz-animation: s-pin 1000ms linear infinite, moveLeftToRight 5s linear infinite;
  -ms-animation: s-pin 1000ms linear infinite, moveLeftToRight 5s linear infinite;
  animation: s-pin 1000ms linear infinite, moveLeftToRight 5s linear infinite;
  -webkit-transition: all 1s ease;
  transition: all 1s ease;
  position: absolute;
  left: 0;
}

@-moz-keyframes moveLeftToRight {
  0%   { left: -100px; }
  100% { left: 100%; }
}
@-ms-keyframes moveLeftToRight {
  0%   { left: -100px; }
  100% { left: 100%; }
}
@keyframes moveLeftToRight {
  0%   { left: -100px; }
  100% { left: 100%; }
}
@-webkit-keyframes moveLeftToRight {
  0%   { left: -100px; }
  100% { left: 100%; }
}
Label that rotates
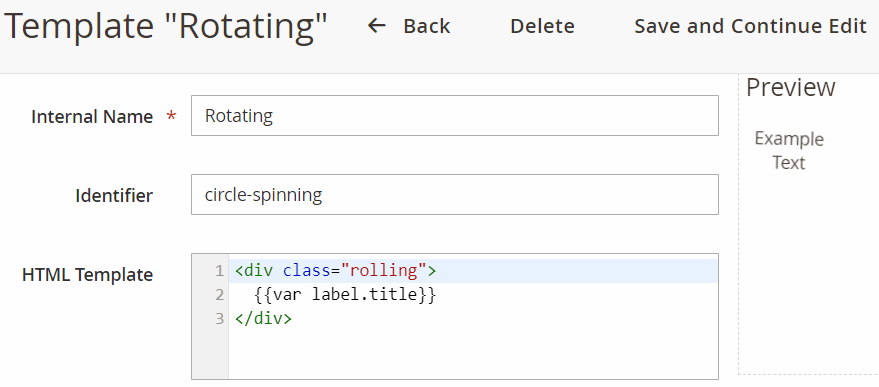
Here is an example of label that rotates.
Set HTML Template as:
<div class="rolling">
  {var label.title}
</div>
Set styles as:
.rolling {
    left: 10px;
  position: absolute;
  text-align: center;
  top: 10px;
  width: 80px;
  height: 80px;
  display: flex;
  align-items: center;
  justify-content: center;
  overflow: hidden;
  -webkit-animation: spin 10s linear infinite;
  -moz-animation: spin 10s linear infinite;
  -ms-animation: spin 10s linear infinite;
  animation: spin 10s linear infinite;
  -webkit-transition: all 1s ease;
  transition: all 1s ease;
  position: absolute;
  left: 0;
}

@-ms-keyframes spin {
  from { -ms-transform: rotate(0deg); }
  to { -ms-transform: rotate(360deg); }
}
@-moz-keyframes spin {
  from { -moz-transform: rotate(0deg); }
  to { -moz-transform: rotate(360deg); }
}
@keyframes spin {
  from { transform: rotate(0deg); }
  to { transform: rotate(360deg); }
}
@-webkit-keyframes spin {
  from { -webkit-transform: rotate(0deg); }
  to { -webkit-transform: rotate(360deg); }
}
Summary
Product labels, also known as badges, are an effective way to visually showcase a product's features and benefits, helping customers make informed purchasing decisions. In addition, they are used to highlight important information, such as promotions, discounts, and product ratings.
Text-only labels, text+CSS labels, and image labels are some of the most familiar product label types. Text-only labels are simple and easy to read; text+css labels offer more customization and flexibility, while image labels are eye-catching and can convey complex information visually.
Labels are an essential tool for organizing and navigating an online store and improving the customer shopping experience and marketing efforts. The updated Product Labels v2 extension offers everything you might need to create visually appealing and eye-catching labels to increase sales in your Magento store.
Writer