Advanced SEO Suite Onboarding Checklist (Part 5): Check If Rich Snippets Are Ready
-
 Yulia Goncharova
- SEO
- Jan 16, 2017
- 4 min read

Part 5. Check if your rich snippets are ready
5.1. Go to System -> Configuration -> Mirasvit Extensions -> SEO. Look for the block of settings – Rich Snippets and Opengraph.
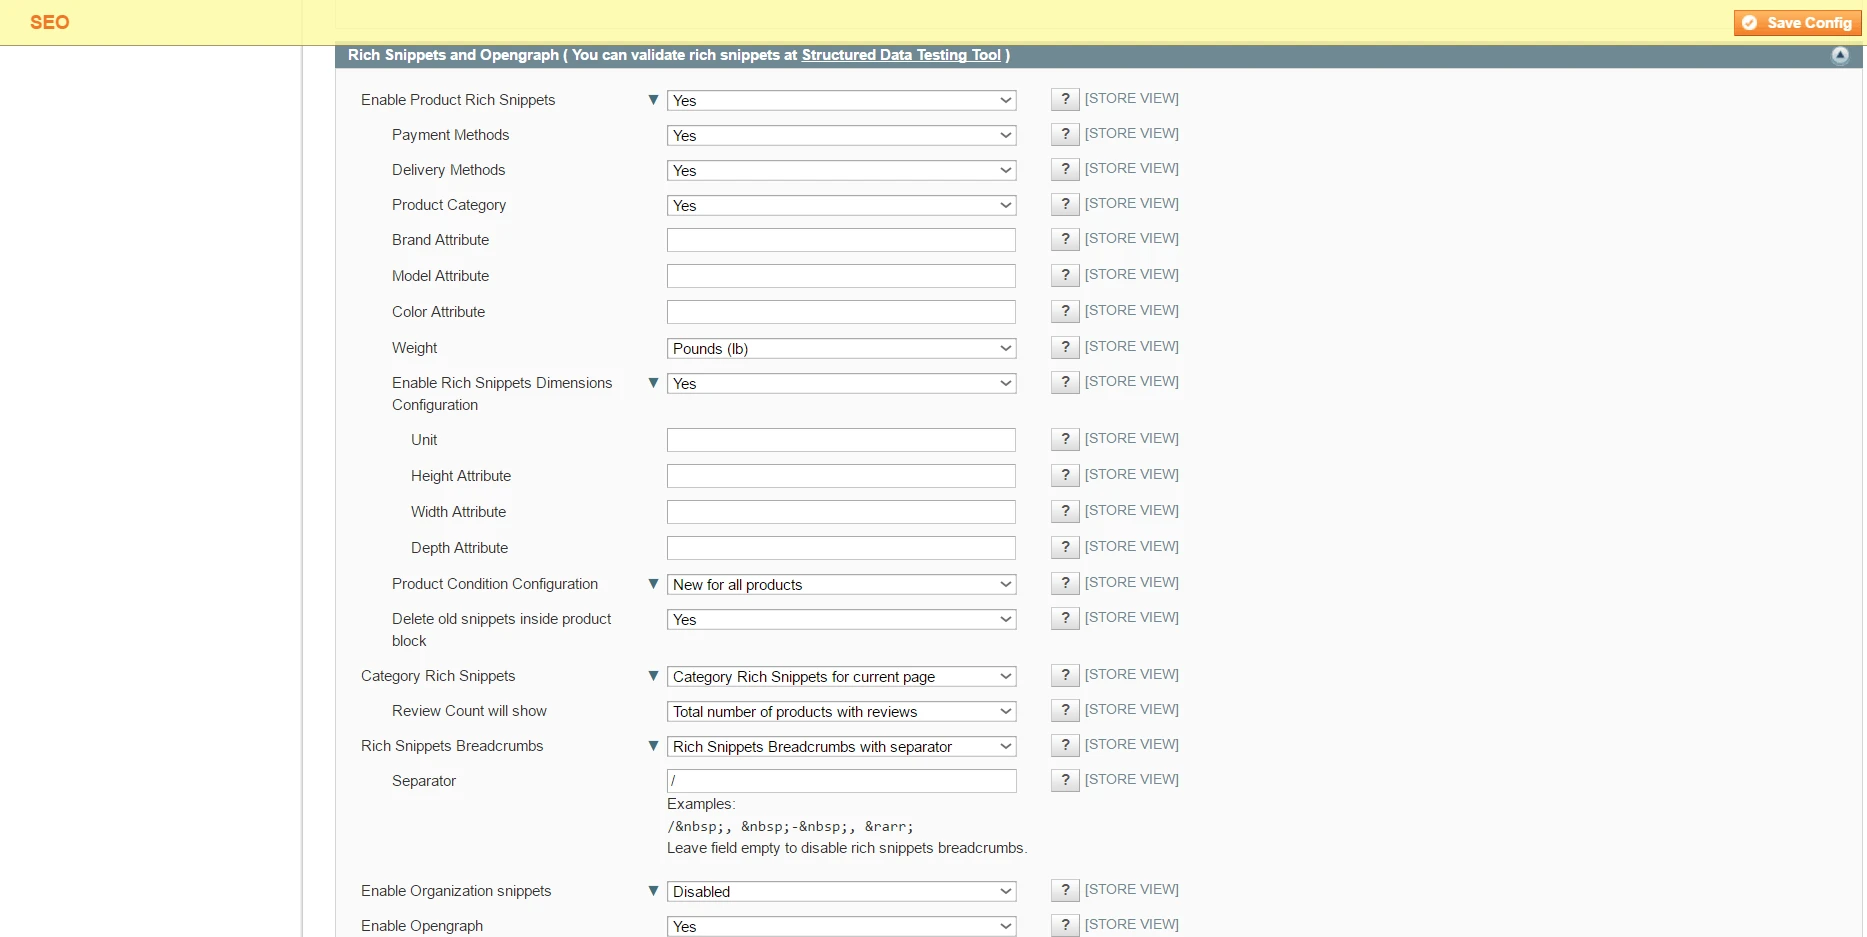 Image 1. Rich snippets settings.
5.2. Check if product page rich snippets option is enabled in the field ‘Enable Product Rich Snippets’. You should enable it to increase the chances of presence your store products in Google Shopping results. Rich snippets will be created using schema.org markup schema and microdata formats for products. If you enable product rich snippets, you’ll be able to manage a bunch of options configuring its view:
5.2.1. ‘Payment methods’: if you enable it, the information of accepted payment methods for this product will be included into current page rich snippet.
5.2.2. ‘Delivery methods’: if you enable it, the information of available delivery options for this product will be included into current page rich snippet.
5.2.3. ‘Product Category’: if you enable it, the information of the category containing this product will be included into current page rich snippet.
5.2.4. ‘Brand Attribute’: in this field you may add attribute code(s) of the brand, like country_of_manufacturer, manufacturer, etc.
5.2.5. ‘Model Attribute’: in this field you may add model attribute code(s), like model, car_model, etc.
5.2.6. ‘Color Attribute’: in this field you may add model attribute code(s), like color, car_color, etc.
5.2.7. ‘Weight’: if you enable it, weight information will be included into the product snippet. And you may choose one of the most suitable measurement units (kilograms, pounds or grams).
5.2.8. ‘Enable Rich Snippets Dimensions configuration’: after enabling you may configure Units (cm, mm or inches), Height, Weight and Depth attributes.
5.2.9. ‘Product Condition Configuration’: after enabling it you may choose one of the options – ‘New for all products’ or ‘Configured manually’ (in this case you’ll be able to include Condition, New Attribute, Used Attribute, Refurbished Attribute, Damaged Attribute values).
5.2.10. ‘Delete old snippets inside product block’: check if this option is enabled in case you have any manually added snippets, which could cause some conflicts with newly created snippets. This option helps to turn off the old / wrong snippets to avoid any conflicts.
5.3. Check if category rich snippets option is enabled in the field ‘Category Rich Snippets’. You may choose of 2 options (except ‘Disabled’):
5.3.1. ‘Category Rich Snippets for current page’ – in this case, a category rich snippet will show an average products rating and a minimal price of products placed only within the current page.
5.3.2. ‘Category Rich Snippets for current category’ – in this case, a category rich snippet will display the overall category products rating and minimal price.
Regardless of which option you enable, there will appear another one field ‘Review count will show’, where you’ve got another 2 ways to display your store category rich snippet:
5.3.3. ‘Total number of products with reviews’.
5.3.4. ‘Total number of reviews’.
5.4. ‘Rich Snippets Breadcrumbs’: you may disable this option, if you don’t use any product separator. Also, if you use some breadcrumbs different from Magento native, you should choose ‘Rich Snippets Breadcrumbs (variant 2). In case you want to add especial separator, choose ‘Rich Snippets Breadcrumbs with separator’ and enter the desired separator in the appeared field ‘Separator’.
5.5. ‘Enable Organization Snippet’: if you enable it, you’ll be able to configure the following store settings:
5.5.1. ‘Name of Organization’ – you can add it manually by choosing ‘Add name manually’ or use the automatic name by choosing ‘Add Name from Store information’ (the name will be copied from System -> General -> Store Information -> Store Name).
5.5.2. ‘Country Address’ – you can add it manually by choosing ‘Add country address manually’ or use the automatic address by choosing ‘Add country address from Store information’ (the name will be copied from System -> General -> Store Information -> Country Address).
5.5.3. ‘Locality Address’ – add locality manually, for instance, Mountain View.
5.5.4. ‘Postal Code’ – add ZIP/Postal code manually.
5.5.5. ‘Street Address’ – you can add it manually by choosing ‘Add street address manually’ or use the automatic street address by choosing ‘Add street address from Store information’ (the name will be copied from System -> General -> Store Information -> Store Contact Address).
5.5.6. ‘Telephone number’ – you can add it manually by choosing ‘Add telephone manually’ or use the automatic number by choosing ‘Add telephone from Store information’ (the name will be copied from System -> General -> Store Information -> Store Contact Telephone).
5.5.7. ‘Fax number’ – enter fax number manually, if you wish, or leave empty.
5.5.8. ‘Email’ – you can add it manually by choosing ‘Add email manually’ or use the automatic email by choosing ‘Add telephone from Store information’ (the name will be copied from System -> General -> Store Email Addresses -> General Contact -> Sender email).
5.6. ‘Enable opengraph’ – if this option is enabled, Facebook open graph tags will be added to header section of each product page.
5.7. Check ‘Add Twitter Summary Card’ field – if the option enabled, Twitter Card tags will be added to thesection of each store product page. Those tags allow Twitter to display information about your pages in more attractive way, when users share links to your shop pages.
Checked!
Now your store rich snippets are ready! You may read more about their importance in our previous article ‘Why Rich Snippets & Breadcrumbs Are So Necessary For Your Magento Store And What Are They Eventually?’
Next time I’ll tell you about SEO-friendly URL settings.
Now you may read previous parts of our onboarding checklist using the following links:
Part 1. What to check right after installation?
Part 2. How To Tweak Your Frontend Sitemap?
Part 3. How To Tweak SEO Suite Extension settings?
Part 4. Check Extended settings.
OR
wait a bit for the next one:
Part 6. Check your store SEO-friendly URL settings.
Part 7. Check Product Images settings.
Part 8. Check Info section settings.
Part 9. Check / Create SEO templates.
Part 10. Check Rewrites section settings.
Part 11. Check Redirects management section.