Advanced SEO Suite Onboarding Checklist (Part 10): Check Rewrites Section
-
 Yulia Goncharova
- SEO
- Jan 26, 2017
- 1 min read
Part 10. Check Rewrites section settings.
10.1. Go to SEO -> Rewrites Management.
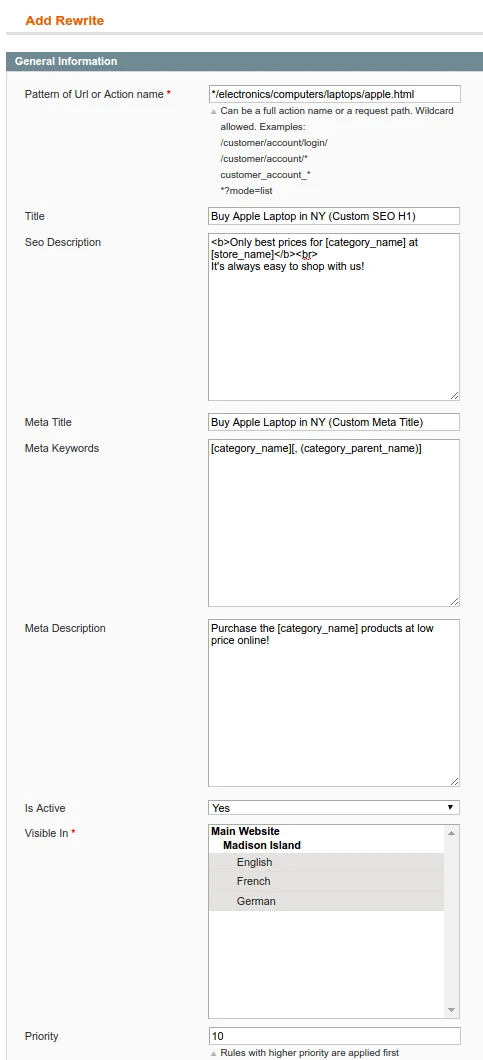 Image 1. Sample rewrite settings in Advanced SEO Suite.
10.2. Rewrites are designed to create Meta tags for defined URLs or actions. Rewrites generally prevail over SEO templates, so remember this while creating and managing them both. To create new rewrite click ‘Add Rewrite’ at the upper right corner.
10.3. Here we’ve got only one tab ‘General information’, so start filling out current tab fields: ‘Pattern of URL or Action name’. This is actually the most important rewrite part, because right here you define the pages or actions for current rewrite rule. You are free to use wildcards. Also you may specify the full action name or a request path.
See a few examples below:
- /customer/account/login/
- /customer/account/*
- customer_account_*
- *?mode=list
- */electronics/cell-phones/
- *cell-phones/nokia-2610-phone.html
Now your Rewrite will prevail in all your pattern URLs or Actions over any SEO template!
10.4. Add ‘Title’: this field contains the H1 title of the rewrited page. You are free to use variables, like in SEO templates!
10.5. Add ‘SEO description’. This test will be displayed in your store footer. It’s not necessary to add SEO description, but good for SEO purposes – this way your store page might be more visible for search engines.
10.6. Add ‘Meta title’, ‘Meta keywords’ and ‘Meta description’ in the next 3 fields. Use variables if you need. The full list of available variables is at our Advanced SEO Suite manual.
10.7. Check if your rewrite is active in the next field.
10.8. Set the store view to apply the rewrite in the ‘Visible in’ field.
10.9. Set the priority of the current rewrite, and remember, rewrites with higher priority will be applied first!
That’s it! Checked!
Now you’ve created your first store SEO rewrite rule.
Next time we’ll handle your store SEO redirects.
Also you may read previous parts of our onboarding checklist using the following links:
- Part 1. What to check right after installation?
- Part 2. How To Tweak Your Frontend Sitemap?
- Part 3. How To Tweak SEO Suite Extension settings?
- Part 4. Check Extended settings.
- Part 5. Check if your rich snippets are ready.
- Part 6. Check SEO-friendly URL Settings.
- Part 7. Check Product Images settings.
- Part 8. Check Info Section Settings.
- Part 9. Check SEO Templates.